


| 注解 | 作用域 | 说明 |
|---|---|---|
| @Controller | 类 | Controller标识 |
| @RequestMapping | 类/方法 | URL映射 |
| @ResponseBody | 类/方法 | 以JSON格式返回数据 |
| @RequestParam | 参数 | 按名字接受参数 |
| @RequestBody | 参数 | 接收JSON格式的参数 |
| @PathVariable | 参数 | 接受URL中的值 |
准备工作
User类
在我们正式测试这些注解时,需要创建一个User类,用来接收JSON参数及返回JSON数据。
import lombok.Data;

@Data
public class User {
    private String name;
    private int age;
}
Lombok插件
在使用@Data注解时,我们需要在Intellij IDEA中安装Lombok插件,并在pom文件中添加以下依赖:
<dependency>
    <groupId>org.projectlombok</groupId>
    <artifactId>lombok</artifactId>
</dependency>
ParamController类
这个类来装下我们的测试代码
import org.springframework.web.bind.annotation.*;

@RestController
public class ParamController {

}
无注解方式
无注解方式最简单:
@GetMapping("/noannotation")
public User noAnnotation(User user){
return user;
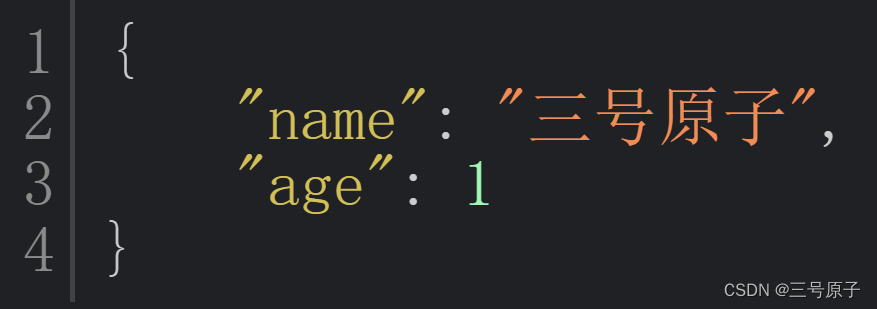
}在浏览器中访问:http://localhost:8080/noannotation?name=三号原子&age=1,会在浏览器中打印如下内容:
注解方式
@RequestParam方式
| 属性 | 类型 | 说明 |
|---|---|---|
| name | String | 参数名称 |
| value | String | name属性的别名 |
| required | boolea | 指定是否为必传参数(true/时,不传会报错) |
| defaultvalue | String | 参数默认值 |
@GetMapping("/requestparam")
    public User requestParam(@RequestParam String name,@RequestParam int age){
        User user= new User();
        user.setName(name);
        user.setAge(age);
        return user;
    }
在浏览器中访问http://localhost:8080/requestparam?name=@RequestParam方式&age=2,会在浏览器中打印如下内容:

@PathVariable方式
| 属性 | 类型 | 说明 |
|---|---|---|
| name | String | 参数名称 |
| value | String | name属性的别名 |
| required | boolean | 指定是否为必传参数(true/时,不传会报错) |
@GetMapping("/pathvariable/{name}/{age}")
public User pathVariable(@PathVariable String name,@PathVariable int age){
User user=new User();
user.setName(name);
user.setAge(age);
return user;
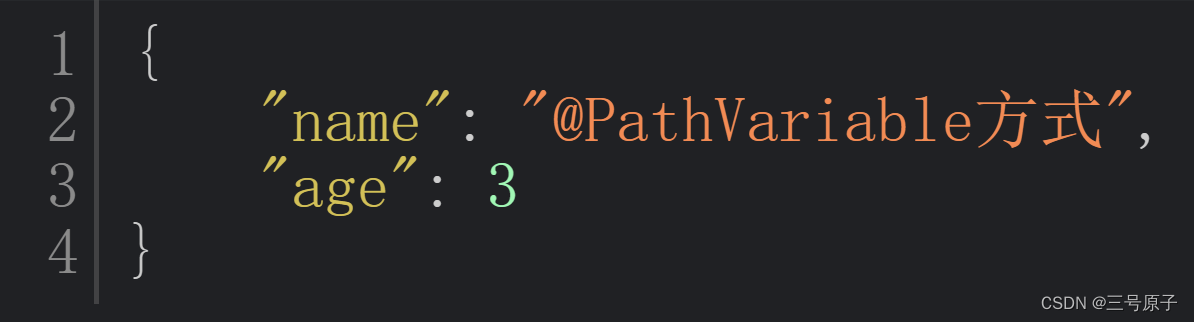
}在浏览器中访问http://localhost:8080/pathvariable/@PathVariable方式/3,会在浏览器中打印如下内容:
@RequestBody方式
| 属性 | 类型 | 说明 |
|---|---|---|
| required | boolean | 指定是否为必传参数(true/时,不传会报错) |
@GetMapping("/requestbody")
public User requestBody(@RequestBody User user){
return user;
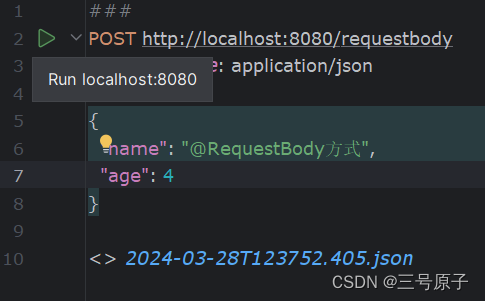
}请注意,这次需要POST方式请求接口,而浏览器的地址栏是不能直接发送POST请求的。所以我们需要借助其他的工具,这里以Intellij IDEA自带的HTTP Client为例,在requestBody方法左侧有一个绿色图标。

单击这个图标,按照我这个方式填写
POST http://localhost:8080/requestbody
Content-Type: application/json

{
  "name": "@RequestBody方式",
  "age": 4
}
以POST方式请求http://localhost:8080/requestbody
单击这个按钮后,会在IDEA界面下面出现

后言
Spring MVC 接收参数的几种方式就介绍完了。也许你也感受到了,这样测试接口既要输入请求地址,又要设置请求类型,非常麻烦,但是在之后的学习中会有更好的方法解决这个问题。


 9272
9272


 被折叠的 条评论
为什么被折叠?
被折叠的 条评论
为什么被折叠?
 到【灌水乐园】发言


