


生成式AI和大语言模型(LLM)不仅大大提升了个人的信息获取和工作效率,也正在重塑企业应用。很多企业正在探索基于LLM、RAG和Agent的生成式AI应用,通过与私域数据和现有的应用结合,来打造更创新、更具价值和更个性化的用户体验。
Dify架构及核心组件
Dify是一款开源LLM应用开发平台,提供了三种使用模式:商业化版本Dify Cloud(SaaS模式),自建Dify社区版(免费),自建企业版。本文主要介绍如何基于Amazon EKS自建高可用Dify社区版。
下图为基于Amazon EKS部署Dify的架构。
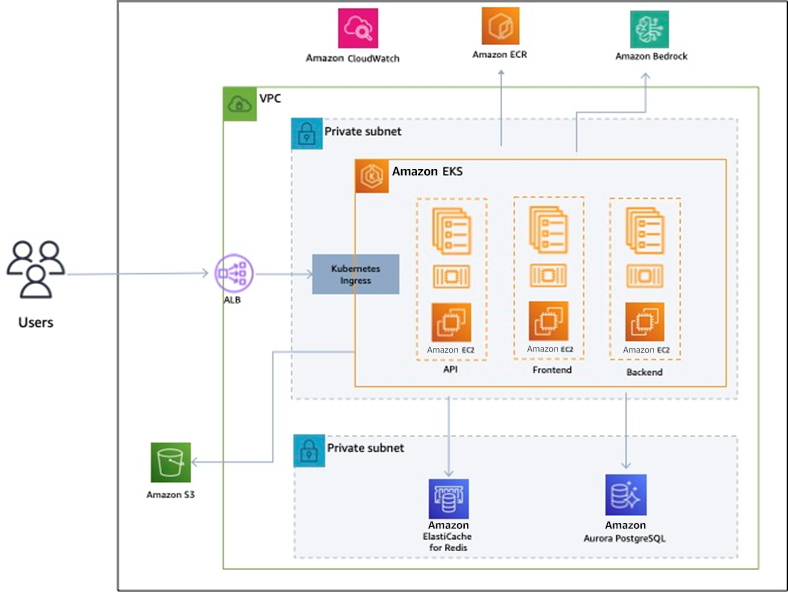
Dify基于Amazon EKS的架构图
Dify包括3个业务服务组件api/worker/web(Frontend),除此之外,还有6个基础组件vector db/db/redis/nginx/ssrf_proxy/sandbox。为了实现生产级高可用性,我们使用多个亚马逊云科技托管服务用作基础组件,包括Amazon S3、Amazon ElastiCache for Redis、Amazon Aurora PostgreSQL、ALB等。Dify支持多种向量数据库产品,包括OpenSearch、Zilliz/Milvus、Qrdrant、Weaviate等,本文使用部署在Amazon EKS中的Milvus。
一、前置条件
Dify有几个关键组件需要提前部署,包括:
Amazon EKS和Milvus,可参考链接1。
Amazon Aurora PostgreSQL,可以使用Serverless版,具体请参考链接2。
Amazon ElastiCache for Redis,可以使用Serverless版,具体请参考链接3。
本方案中的所有组件都支持使用Amazon Graviton3芯片的Amazon EC2实例,在部署时选择Amazon Graviton3实例可以获得更高的性价比。在基于Amazon Graviton3的Milvus博客中,测试结果显示Amazon Graviton3可以实现高达31%的性价比提升。
链接1
https://aws.amazon.com/cn/blogs/china/build-open-source-vector-database-milvus-based-on-amazon-eks/
链接2
https://docs.aws.amazon.com/AmazonRDS/latest/AuroraUserGuide/Aurora.AuroraPostgreSQL.html
链接3
https://docs.aws.amazon.com/AmazonElastiCache/latest/red-ug/GettingStarted.html
基于Amazon Graviton3的Milvus
https://aws.amazon.com/cn/blogs/china/milvus-achieves-up-to-31-price-performance-improvement-using-amazon-graviton3-instances/
二、Dify基于Amazon EKS部署步骤
Dify官方支持Docker Composer,以及源码部署的方式,具体参考下方链接。但是这两种方式未能照顾到高可用环境,更多是用于开发和测试环境的快速部署。
https://docs.dify.ai/v/zh-hans/getting-started/install-self-hosted
作为生产高可用环境,推荐以Helm Charts的方式部署在Amazon EKS上。本文使用该Chart进行部署,具体参考下方链接。
https://github.com/douban/charts/tree/master/charts/dify
在部署的时候需要做一些调整,比如使用Amazon S3替代minio用作对象存储,使用Amazon Application Load Balancer用作Amazon EKS Ingress,使用Amazon Aurora PostgreSQL替代内置PostgreSQL等,使用Amazon ElastiCache for Redis代替内置Redis。
部署中要使用到Amazon AK/SK、数据库的账号密码等敏感信息,我们使用K8s Secret进行存储,并推荐使用Amazon KMS进行加密,具体参考以下链接。
https://docs.aws.amazon.com/eks/latest/userguide/enable-kms.html
请注意,进行以下步骤前,请确保已经完成前置条件。
1.安装Helm,具体参考下方链接;
https://helm.sh/docs/intro/install/
2.添加Helm repo。
helm repo add douban https://douban.github.io/charts/
helm update
左右滑动查看完整示意
3.确保kubectl可以连接到您的Amazon EKS集群。使用如下命令创建Secret对象,用于存储Amazon AK/SK及PostgreSQL、Milvus和Redis的密码。这些密码需要转换为base64编码,可以使用echo -n "<password>" | base64命令快速获取base64编码。SECRET_KEY是Dify用来安全地签名会话cookie并加密数据库中的敏感信息的密钥,可以使用openssl rand -base64 42命令生成强密钥。MILVUS_PASSWORD可以在Milvus向量数据库中进行设置,默认为Milvus。Amazon ElastiCache for Redis除了用作缓存,也被用作Celery的消息队列,CELERY_BROKER_URL就是用来配置Celery的Broker,格式为redis://<redis_username>:<redis_password>@<redis_host>:<redis_port>/<redis_database>因为这个URL中涉及到Redis的密码,所以我们将其放在Secret中。
cat <<EOF | kubectl apply -f -
apiVersion: v1
kind: Secret
metadata:
  name: dify
type: Opaque
data:
  SECRET_KEY: <Replace your SECRET KEY here>
  S3_ACCESS_KEY: <Replace your S3 ACCESS KEY here>
  S3_SECRET_KEY: <Replace your S3 SECRET KEY here>
  DB_PASSWORD: <Replace your PostgreSQL PASSWORD here>
  MILVUS_PASSWORD: <Replace your MILVUS PASSWORD here>
  REDIS_PASSWORD: <Replace your REDIS PASSWORD here>
  CELERY_BROKER_URL: <Replace your CELERY BROKER URL here>
EOF
左右滑动查看完整示意
4.创建values.yaml。需要替换<>中的内容,包括host、image tag、vector store、MILVUS_HOST、S3_ENDPOINT、S3_REGION、S3_BUCKET_NAME、DB_USERNAME、DB_HOST、REDIS_HOST和ingress等。我们禁用了Dify自带的对象存储minio、Redis和PostgreSQL,使用Amazon S3、Amazon ElastiCache for Redis和Amazon Aurora替代。
host:ALB对应的自定义域名,建议开启TLS,host需要保持和DNS提供商注册的自定义域名一致。
image tag:具体查看下方链接,建议选择新版本的Dify。
https://github.com/langgenius/dify/releases
vector store和MILVUS_HOST:向量数据库配置。可选的配置有如下选项,本次案例使用的是Milvus。
①weaviate;
②qdrant;
③milvus;
④zilliz,与 milvus 一致;
⑤OpenSearch;
⑥tidb_vector。
S3_ENDPOINT、S3_REGION和S3_BUCKET_NAME:修改为您自己的Amazon S3 Endpoint、Region、Bucket name。
DB_HOST、DB_USERNAME和DB_DATABASE:修改为您自己的PostgreSQL数据库的信息,本例子中使用的是Aurora PostgreSQL。
REDIS_HOST和REDIS_USERNAME:修改为您自己的Amazon ElastiCache for Redis的信息,建议开启密码认证,同时设置REDIS_USE_SSL为true。
ingress:您的Amazon EKS的Ingress配置,使用Amazon Load Balancer Controller来创建Ingress。强烈建议开启HTTPS,并进行对应的设置,详见下方链接。开启HTTPS同时需要设置enableTLS为true,并将alb.ingress.kubernetes.io/certificate-arn替换为域名的ACM证书ARN。请确保您的Amazon EKS Ingress是正常工作的。
global:
  host: "<your domain name>"
  enableTLS: true


  image:
    # Set to the latest version of dify
    # Check the version here: https://github.com/langgenius/dify/releases
    # If not set, Using the default value in Chart.yaml
    tag: "0.7.2"
  extraBackendEnvs:
  # The log output level. Default is INFO. For production environments, it's recommended to set this to ERROR
  - name: LOG_LEVEL
    value: "ERROR"
  - name: SECRET_KEY
    valueFrom:
      secretKeyRef:
        name: dify
        key: SECRET_KEY
  # milvus
  - name: VECTOR_STORE
    value: "milvus"
  - name: MILVUS_HOST
    value: "<your Milvus endpoint>"
  - name: MILVUS_PORT
    value: "19530"
  - name: MILVUS_USER
    value: "root"
  - name: MILVUS_PASSWORD
    valueFrom:
      secretKeyRef:
        name: dify
        key: MILVUS_PASSWORD
  - name: MILVUS_SECURE
    value: "false"
  # External S3 bucket
  - name: S3_ENDPOINT
    value: "https://s3.<your region code>.amazonaws.com"
  - name: S3_REGION
    value: "<your region code>"
  - name: S3_BUCKET_NAME
    value: "<your bucket name>"
  - name: S3_ACCESS_KEY
    valueFrom:
      secretKeyRef:
        name: dify
        key: S3_ACCESS_KEY
  - name: S3_SECRET_KEY
    valueFrom:
      secretKeyRef:
        name: dify
        key: S3_SECRET_KEY
  # External postgresql
  - name: DB_USERNAME
    value: "<your postgres username>"
  - name: DB_PASSWORD
    valueFrom:
      secretKeyRef:
        name: dify
        key: DB_PASSWORD
  - name: DB_HOST
    value: "<your postgres endpoint>"
  - name: DB_PORT
    value: "5432"
  - name: DB_DATABASE
    value: "<your postgres database>"
  # External Redis
  - name: REDIS_HOST
    value: "<your redis endpoint>"
  - name: REDIS_PORT
    value: "6379"
  - name: REDIS_DB
    value: "0"
  - name: REDIS_USE_SSL
    value: "true"
  - name: REDIS_USERNAME
    value: "<your redis username>"
  # it is adviced to use secret to manage you sensitive info including password
  - name: REDIS_PASSWORD
    valueFrom:
     secretKeyRef:
       name: dify
       key: REDIS_PASSWORD
  # CELERY_BROKER_URL, format: "redis://<redis_username>:<redis_password>@<redis_host>:<redis_port>/<redis_database>"
  - name: CELERY_BROKER_URL
    valueFrom:
      secretKeyRef:
        name: dify
        key: CELERY_BROKER_URL
  - name: BROKER_USE_SSL
    value: "true"


ingress:
  enabled: true
  className: "alb"
  annotations:
    kubernetes.io/ingress.class: "alb" # Annotation: set ALB ingress type
    alb.ingress.kubernetes.io/scheme: "internet-facing" #Places the load balancer on public subnets
    alb.ingress.kubernetes.io/target-type: "ip" #The Pod IPs should be used as the target IPs (rather than the node IPs)
    alb.ingress.kubernetes.io/certificate-arn: "<your domain URL certificate ARN>"
    alb.ingress.kubernetes.io/listen-ports: '[{"HTTP": 80}, {"HTTPS": 443}]'
    alb.ingress.kubernetes.io/ssl-redirect: '443'


minio:
  embedded: false


postgresql:
  embedded: false


redis:
  embedded: false
左右滑动查看完整示意
https://docs.aws.amazon.com/eks/latest/userguide/aws-load-balancer-controller.html
1.执行如下命令进行安装。
helm install dify douban/dify -f values.yaml左右滑动查看完整示意
2.Dify的核心服务如api、worker、frontend、sandbox默认配置为一个副本,为了提高高可性,需要增加副本数量。使用以下配置创建new_values.yaml,并运行helm upgrade dify douban/dify -- reuse-values -f new_values.yaml命令进行更新。
frontend:
  replicaCount: 2


api:
  replicaCount: 2


worker:
  replicaCount: 2


sandbox:
  replicaCount: 2
左右滑动查看完整示意
3.验证安装。使用kubectl get ingress命令获取Endpoint,如果能正确获取,浏览器打开HOSTS即可访问。
NAME   CLASS   HOSTS                  ADDRESS                                 PORTS   AGE
dify   alb     dify.yourcompany.com   dify-xxxx.us-west-2.elb.amazonaws.com   80, 443 10d
左右滑动查看完整示意
总结
本文基于Amazon EKS,自建部署了Dify社区版,使用Amazon S3、Amazon Aurora Postgre SQL、Amazon ElastiCache for Redis等替代了Dify内置对象存储、PostgreSQL和Redis,并且增加了Dify核心服务的副本数量,实现了生产级别高可用。
关于Dify的使用,请参考亚马逊云科技博客。感兴趣的读者快亲自动手尝试吧!
亚马逊云科技博客
https://aws.amazon.com/cn/blogs/china/get-started-with-generative-ai-by-integrating-bedrock-claude3-with-dify/
参考资料
1.Dify:
https://docs.dify.ai/
2.基于Amazon EKS的Milvus
https://aws.amazon.com/cn/blogs/china/build-open-source-vector-database-milvus-based-on-amazon-eks/
3.Amazon Aurora PostgreSQL:
https://docs.aws.amazon.com/AmazonRDS/latest/AuroraUserGuide/Aurora.AuroraPostgreSQL.html
4.Dify与Amazon Bedrock中的大语言模型集成:
https://aws.amazon.com/cn/blogs/china/get-started-with-generative-ai-by-integrating-bedrock-claude3-with-dify/
本篇作者

吴万涛
亚马逊云科技解决方案架构师,负责亚马逊云科技云上解决方案架构设计和咨询,十几年IT行业从业经历,在网络、应用架构、容器等领域有丰富的经验。

白雪尧
亚马逊云科技解决方案架构师,对现代化应用架构、数据分析有丰富经验,对半导体设计行业等行业有相关经验。


星标不迷路,开发更极速!
关注后记得星标「亚马逊云开发者」
听说,点完下面4个按钮
就不会碰到bug了!

点击阅读原文查看博客!获得更详细内容!


 9436
9436

 被折叠的 条评论
为什么被折叠?
被折叠的 条评论
为什么被折叠?
 到【灌水乐园】发言


