In this tutorial we will implement an HTML5 websocket resorting to the Java EE websocket implementation (ServerEndpoint).
1. Introduction
The HTML5 specification brought the capability for web browsers to establish full-duplex TCP connections with websocket compliant servers.
In other words, browsers are now able to establish a connection with a server and keep sending or receiving data through that same established communication channel without the need of the overhead introduced by the HTTP protocol itself.
In this tutorial we will implement a simple websocket server endpoint in a Java EE environment and also the respective client-side infrastructure for sending and receiving data.
This tutorial considers the following environment:
Ubuntu 12.04
JDK 1.7.0.21
Glassfish 4.0
Note: WebSockets support was introduced in Java EE 7
package com.byteslounge.websockets;

import java.io.IOException;

import javax.websocket.OnClose;
import javax.websocket.OnMessage;
import javax.websocket.OnOpen;
import javax.websocket.Session;
import javax.websocket.server.ServerEndpoint;

@ServerEndpoint("/websocket")
public class WebSocketTest {

  @OnMessage
  public void onMessage(String message, Session session)
    throws IOException, InterruptedException {

    // Print the client message for testing purposes
    System.out.println("Received: " + message);

    // Send the first message to the client
    session.getBasicRemote().sendText("This is the first server message");

    // Send 3 messages to the client every 5 seconds
    int sentMessages = 0;
    while(sentMessages < 3){
      Thread.sleep(5000);
      session.getBasicRemote().
        sendText("This is an intermediate server message. Count: "
          + sentMessages);
      sentMessages++;
    }

    // Send a final message to the client
    session.getBasicRemote().sendText("This is the last server message");
  }

  @OnOpen
  public void onOpen() {
    System.out.println("Client connected");
  }

  @OnClose
  public void onClose() {
    System.out.println("Connection closed");
  }
}
As you may have already noticed we are importing several classes from
javax.websocket package.
@ServerEndpoint annotation is used at type level and defines the current class as a websocket server endpoint. The value used in this annotation represents the URL where the endpoint will be listening for client connections.
onOpen and onClose methods are annotated with @OnOpen and @OnClose respectively. These annotations are almost self-explanatory: They define which methods will be called upon a new client connection and disconnection.
Method onMessage is annotated with @OnMessage. This annotation defines which method will be called when a new message is received from the client. Note that this method may be defined with an optional parameter of type javax.websocket.Session (in our case the session parameter). If this parameter is defined the container will inject the session that is associated with the current client that sent the message being handled.
In our case we are just writing the client message content to the standard output. Then we proceed to send a message to the client followed by 3 test messages with a 5 second interval. Finally we send a final message to the client.
译者信息
2. WebSocket服务器端
让我们定义一个 Java EE websocket服务器端:
WebSocketTest.java
package com.byteslounge.websockets;

import java.io.IOException;

import javax.websocket.OnClose;
import javax.websocket.OnMessage;
import javax.websocket.OnOpen;
import javax.websocket.Session;
import javax.websocket.server.ServerEndpoint;

@ServerEndpoint("/websocket")
public class WebSocketTest {

  @OnMessage
  public void onMessage(String message, Session session)
    throws IOException, InterruptedException {

    // Print the client message for testing purposes
    System.out.println("Received: " + message);

    // Send the first message to the client
    session.getBasicRemote().sendText("This is the first server message");

    // Send 3 messages to the client every 5 seconds
    int sentMessages = 0;
    while(sentMessages < 3){
      Thread.sleep(5000);
      session.getBasicRemote().
        sendText("This is an intermediate server message. Count: "
          + sentMessages);
      sentMessages++;
    }

    // Send a final message to the client
    session.getBasicRemote().sendText("This is the last server message");
  }

  @OnOpen
  public void onOpen() {
    System.out.println("Client connected");
  }

  @OnClose
  public void onClose() {
    System.out.println("Connection closed");
  }
}
This is a simple test page that contains the JavaScript that will create a websocket connection to out websocket server endpoint.
onOpen method will be called when we establish a connection with the server endpoint.
onError method is called when an error occurs during client-server communication.
onMessage method will be called when a message is received from the server. In our case we are just appending the messages received from the server to the DOM.
We connect to the websocket server endpoint by using the construct new WebSocket() and passing the endpoint URL:
我们连接到websocket 服务器端,使用构造函数 new WebSocket() 而且传之以端点URL:
ws://localhost:8080/byteslounge/websocket
4. Testing
We may now test our application by accessing the testing page:
http://localhost:8080/byteslounge/page.html
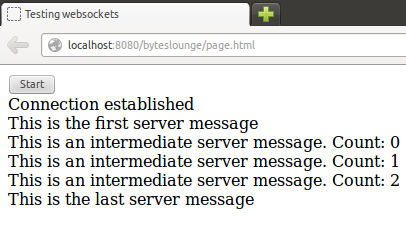
We will see the Connection established message as expected:
http://localhost:8080/byteslounge/page.html
Now as soon as we press the button we will send the initial message to the server through the websocket and receive the subsequent test messages sent by the server:
Messages sent by the server and received by the client
The TCP connection between the client and the server is established after the occurrence of a handshake over the HTTP protocol. It's easy to observe the handshake by using some HTTP traffic debugger. As soon as we create the WebSocket instance in the client the following request and respective server response will occur:
Note: we will only include HTTP headers that are relevant to the websockets handshake
Request:
GET /byteslounge/websocket HTTP/1.1
Connection: Upgrade
Upgrade: websocket
Sec-WebSocket-Key: wVlUJ/tu9g6EBZEh51iDvQ==
Response:
HTTP/1.1 101 Web Socket Protocol Handshake
Upgrade: websocket
Sec-WebSocket-Accept: 2TNh+0h5gTX019lci6mnvS66PSY=
Note that the client is requesting the protocol to be upgraded to the WebSocket protocol by usingConnection: Upgrade and Upgrade: websocket HTTP headers. The server response states that the client request was accepted and it will change protocol to WebSocket (using HTTP status code 101):
HTTP/1.1 101 Web Socket Protocol Handshake
6. Downloadable sample
The example source code is available for download at the end of this page. The test was executed in Glassfish 4 (you will need a Java EE 7 compliant application server).


 563
563

 被折叠的 条评论
为什么被折叠?
被折叠的 条评论
为什么被折叠?
 到【灌水乐园】发言


