


环境搭建篇
集群
- 集群 ,分布式,结点
集群是个物理形态只要是一堆机器就可以叫集群,他们是不是一起协作着干活,谁也不知道.
集群指的是将几台服务器集中在一起,实现统一业务.
分布式是若干独立计算机的集合,这些计算机对于用户来说就像单个相关系统.
分布式是指将不同的业务分布在不同的地方
节点 : 集群中的一个服务器
分布式中的每一个节点,都可以做集群.而集群并不一定就是分布式的.
Docker
-
docker安装(Linux,CentOs)
官网(https://docs.docker.com/engine/install/centos/)
跟着官网来即可(安装时遇到的BUG) -
docker开机自启
设置 docker 中的容器开机自启 docker update 容器名/ID --restart=always 设置docker开机自启 systemctl enable docker -
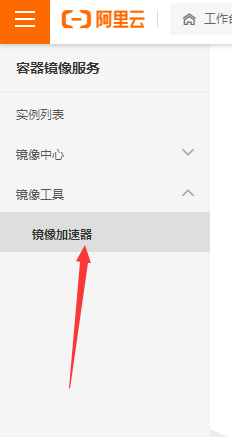
docker配置阿里云镜像
在阿里云的控制台中找到该项,随后将右侧的命令一一粘贴即可
-
docker 创建mysql实例并挂载
docker run -p 3306:3306 --name mysql \ #端口号对应为3306,实例名字为mysql,第一个3306位主机端口,第二个为docker中mysql的端口
-v /mydata/mysql/log:/var/log/mysql \  #挂载 mysql日志
-v /mydata/mysql/data:/var/lib/mysql \ #挂载 mysql数据
-v /mydata/mysql/conf:/etc/mysql \ #挂载 配置文件
-e MYSQL_ROOT_PASSWORD=root \ #设置密码
-d mysql:5.7 #运行该image
查看指定端口是否被占用 : lsof -i : 端口号
docker删除容器实例 : docker rm -f ID或服务名 -
添加mysql挂载到本机的配置文件 /mydata/mysql/conf/my.cnf, 内容如下
[client] default-character-set=utf8 [mysql] default-character-set=utf8 [mysqld] init_connect='SET collation_connection = utf8_unicode_ci' init_connect='SET NAMES utf8' character-set-server=utf8 collation-server=utf8_unicode_ci skip-character-set-client-handshake skip-name-resolve -
创建redis实例并挂载
提前创建 redis.conf 文件
mkdir -p /mydata/redis/conf
touch /mydata/redis/conf/redis.conf
创建并挂载
docker run -p 6379:6379 --name redis \
-v /mydata/redis/data:/data \
-v /mydata/redis/conf/redis.conf:/etc/redis/redis.conf \
-d redis redis-server /etc/redis/redis.conf  #这里设置每次开启运行自己redis.conf,所以需要提前创建
设置数据持久化
在/mydata/redis/conf/redis.conf中添加该内容
appendonly yes
Maven
-
maven配置
找到maven的conf下的settings.xml文件,根据对应位置添加以下信息设置对应jdk版本为1.8 <profile> <id>jdk-1.8</id> <activation> <activeByDefault>true</activeByDefault> <jdk>1.8</jdk> </activation> <properties> <maven.compiler.source>1.8</maven.compiler.source> <maven.compiler.target>1.8</maven.compiler.target> <maven.compiler.compilerVersion>1.8</maven.compiler.compilerVersion> </properties> </profile>设置阿里云镜像 <mirror> <id>nexus-aliyun</id> <mirrorOf>central</mirrorOf> <name>Nexus aliyun</name> <url>http://maven.aliyun.com/nexus/content/groups/public</url> </mirror>
Git
- 配置git
进入git bash 设置用户名和邮箱
git config --global user.name “XXX用户名”
git config --global user.email “XXXXX邮箱”
配置git-ssh
ssh-keygen -t rsa -C “XXX邮箱” // 然后三次回车
cat ~/.ssh/id_rsa.pub //查看生成的密钥
进去github 或 gitee(这里使用了 gitee),在个人设置中找到SSH公钥配置并将密钥粘贴进去

在 git bash 中
ssh -T git@gitee.com ,绑定gitee - 创建码云的仓库,模板如下

IDEA搭建项目
-
IDEA项目环境构建
当新的仓库创建完成后,会生成一个链接(如下)

打开IDEA并粘贴该链接

最后点击clone即可(如果仓库是私有的,需要输入账号密码来确认)
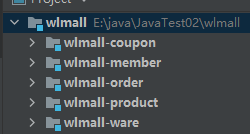
在该项目下,新建SpringBoot模块,先添加以下两个配置
分别依次添加仓库,优惠券等模块,如下
在主项目中(gitee上clone的那个)添加pom.xml,来聚合所有服务,配置如下
<?xml version="1.0" encoding="UTF-8"?>
<project xmlns="http://maven.apache.org/POM/4.0.0" xmlns:xsi="http://www.w3.org/2001/XMLSchema-instance"
         xsi:schemaLocation="http://maven.apache.org/POM/4.0.0 https://maven.apache.org/xsd/maven-4.0.0.xsd">
    <modelVersion>4.0.0</modelVersion>

    <groupId>com.sky.wlmall</groupId>
    <artifactId>wlmall</artifactId>
    <version>0.0.1-SNAPSHOT</version>
    <name>wlmall</name>
    <description>聚合服务</description>
    <packaging>pom</packaging>
    <modules>
        <module>wlmall-order</module>
        <module>wlmall-coupon</module>
        <module>wlmall-member</module>
        <module>wlmall-product</module>
        <module>wlmall-ware</module>
    </modules>

</project>
删除各个子模块中没有用的代码,或者在主模块的.gitignore下,添加配置,如下
**/target/
.idea
**/.mvn
**/mvnw
**/mvnw.cmd
**/.gitignore
添加 VCS

在 IDEA 中 安装 gitee插件
然后点击上一个图中的 第一个选项 commit,后点击提交并推送(上传到gitee中)

12. 创建数据库,并将数据库导入到docker中的mysql里…
逆向工程
- 逆向工程搭建
使用gitee上的人人开源的后台管理系统,前端Vue,和代码生成器快速创建
renren-fast (1)找到mysql文件,创建数据库并导入mysql.(2)修改数据库连接文件(3)运行
renren-fast-vue(1)配置vue环境(2)npm install (3)npm run dev(4)运行
renren-generator (1)修改数据库配置文件,修改生成代码的配置文件(2)运行,(3)在80端口生成代码
(4)将生成的代码粘贴到对应的微服务中.(5)创建一个公共的模块,用来存放依赖,工具类等,供微服务使用
(6) 将报错的地方调为不报错(向公共模块添加依赖和工具类等)
对微服务整合mybatisPlus (7)运行
(8)依次配置各个微服务的逆向工程
分布式
商品服务
category
category查询所有种类且以树形结构组装起来
代码如下:
 方法一
 public  List<CategoryEntity> listWithTree(){
        //查询所有的分类, 这里的 baseMapper 是 ServiceImpl 里的泛型 其在哪个service里就相当于操作哪张表的
        //这里的baseMapper 相当于 加了@Autowired注解的 private CategoryDao categoryDao
        List<CategoryEntity> categoryEntities = baseMapper.selectList(null);//查询所有的分类,因为没有查询的条件,所有为null
     //查找所有的一级分类 流式写法stream 加 lambda表达式
         List<CategoryEntity>  leve1Menus = categoryEntities.stream().filter(categoryEntity ->
         categoryEntity.getParentCid() == 0
         ).map((menu)->{
         menu.setChildren(getChildren(menu,categoryEntities));
         return menu;
         }).sorted((menu1,menu2)->{
         return (menu1.getSort()==null?0:menu1.getSort()) - (menu2.getSort() == null?0:menu2.getSort());
         }).collect(Collectors.toList());
                return leve1Menus;

    }
       private List<CategoryEntity> getChildren(CategoryEntity root, List<CategoryEntity> all){
        List<CategoryEntity> children = all.stream().filter(categoryEntity -> {
            return categoryEntity.getParentCid() == root.getCatId();
        }).map(categoryEntity -> {
            //找到子菜单
            categoryEntity.setChildren(getChildren(categoryEntity,all));
            return categoryEntity;
        }).sorted((menu1,menu2)->{
            //菜单排序
            return (menu1.getSort()==null?0:menu1.getSort()) - (menu2.getSort() == null?0:menu2.getSort());
        }).collect(Collectors.toList());
        return  children;
方法二
 public List<CategoryEntity> listWithTree() {
        //查询所有的分类, 这里的 baseMapper 是 ServiceImpl 里的泛型 其在哪个service里就相当于操作哪张表的
        //这里的baseMapper 相当于 加了@Autowired注解的 private CategoryDao categoryDao
        List<CategoryEntity> categoryEntities = baseMapper.selectList(null);//查询所有的分类,因为没有查询的条件,所有为null

       //查找所有的一级分类 forEach写法
        List<CategoryEntity> leve1Menus = new ArrayList<>();
        for (CategoryEntity category: categoryEntities) {
            if(category.getParentCid() == 0){ //找到一级分类
                category.setChildren(getChildren(category,categoryEntities));//找到他的子类
                leve1Menus.add(category);//将一级分类加入到集合中
                //对一级分类进行排序
                Comparator<CategoryEntity> comparator = new Comparator<CategoryEntity>() {
                    @Override
                    public int compare(CategoryEntity o1, CategoryEntity o2) {
                        return (o1.getSort()==null?0:o1.getSort()) - (o2.getSort() == null?0:o2.getSort());
                    }
                };
                leve1Menus.sort(comparator);
            }
        }
        return leve1Menus;
    }
    private List<CategoryEntity> getChildren(CategoryEntity root, List<CategoryEntity> all){
        List<CategoryEntity> children = new ArrayList<>();
        for(CategoryEntity categoryEntity : all){ //找到子类并通过递归找到 子类的子类
            if(categoryEntity.getParentCid() == root.getCatId()){
                children.add(categoryEntity);
                Comparator<CategoryEntity> comparator = new Comparator<CategoryEntity>() {
                    @Override
                    public int compare(CategoryEntity o1, CategoryEntity o2) {
                        return (o1.getSort()==null?0:o1.getSort()) - (o2.getSort() == null?0:o2.getSort());
                    }
                };
                children.sort(comparator);
                categoryEntity.setChildren(getChildren(categoryEntity,all));
            }
        }
        return children;
    }
网关配置
在renren-fast中配置网关,为其添加服务名和Nacos注册地址,并开启服务发现.
修改renren的vue前端的地址,让他默认去访问网关的端口
http://localhost:88/api
在gateway微服务中,配置网关路由,让前端发送的请求跳转到renren-fast
    routes:
        - id: renren-fast
          uri: http://127.0.0.1:8080
          predicates:
            - Path=/api/**
          filters:
            - RewritePath=/api(?<segment>/?.*), /renren-fast$\{segment}
跨域问题解决:
修gateway网关中的配置文件
spring:
  cloud:
    gateway:
      globalcors:
        add-to-simple-url-handler-mapping: true
        cors-configurations:
          '[/**]':
            allowedOrigins:
              - "http://localhost:8001"
            allowedMethods:
              - "GET"
              - "POST"
              - "DELETE"
              - "PUT"
              - "OPTIONS"
            allowedHeaders: "*"
            allowCredentials: true
            maxAge: 360000
加上配置全局的跨域配置类
package com.sky.wlmall.gateway.config;
import org.springframework.boot.SpringBootConfiguration;
import org.springframework.web.reactive.config.CorsRegistry;
import org.springframework.web.servlet.config.annotation.WebMvcConfigurer;


@SpringBootConfiguration
public class CorsConfig implements WebMvcConfigurer  {

    public void addCorsMappings(CorsRegistry corsRegistry){
        /**
         * 所有请求都允许跨域,使用这种配置就不需要
         * 在interceptor中配置header了
         */
        corsRegistry.addMapping("/**")
                .allowCredentials(true)
                .allowedOrigins("http://localhost:8001")
                .allowedMethods("POST", "GET", "PUT", "OPTIONS", "DELETE")
                .allowedHeaders("*")
                .maxAge(3600);
    }

}
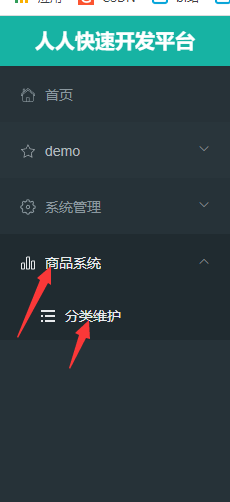
商品分类的显示
①在renren-fast-vue中,添加一个商品管理分类,如下:
②在其对应的前端目录下建立新的组件,组件代码可参考下方的删除处
③配置物品相关的微服务的网关,让其可以通过vue的路径直接访问
 routes:
        - id: wlmall-product
          uri: http://127.0.0.1:10000
          predicates:
            - Path=/api/product/**
          filters:
            - RewritePath=/api(?<segment>/?.*),/$\{segment}
菜单删除、添加、修改的管理
主要就是Vue代码、前后交互,后端的接口已用逆向工程生成(逆向工程也生成了Vue代码,后面都不在自己写了,只简单的修改)
在开发进行删除测试的时候,可在指定的字段属性上加上@TableLogic,表示逻辑删除,具体可参考Mybatis-plus文档。
后端的添加代码已用开发工具生成
修改后的前端代码如下:
<template>
<div>
  <el-switch v-model="draggable" active-text="开启拖拽" inactive-text="关闭拖拽"></el-switch>
  <el-button v-if="draggable" @click="batchSave">批量保存</el-button>
  <el-button type="danger" @click="batchDelete">批量删除</el-button>
  <!--  饿了么UI的树形结构,用来显示分类 通过 data 来绑定 要显示的数据-->
  <el-tree :data="menus" :props="defaultProps"  :expand-on-click-node="false" show-checkbox
           node-key="catId" :default-expanded-keys="expandedKey"
           :draggable= "draggable" :allow-drop="allowDrop" @node-drop="handleDrop" ref="tree">
     <span class="custom-tree-node" slot-scope="{ node, data }">
        <span>{{ node.label }}</span>
        <span>
          <el-button
            v-if="node.level<=2"
            type="text"
            size="mini"
            @click="() => append(data)">
            Append
          </el-button>
          <el-button
              type="text"
              size="mini"
              @click="() => edit(data)">
            Edit
          </el-button>
          <el-button
            v-if="node.childNodes.length==0"
            type="text"
            size="mini"
            @click="() => remove(node, data)">
            Delete
          </el-button>
        </span>
      </span>
  </el-tree>

  <el-dialog
    :title="title"
    :visible.sync="dialogVisible"
    width="30%">
    <el-form :model="category">
      <el-form-item label="分类名称" >
        <el-input v-model="category.name" autocomplete="off"></el-input>
      </el-form-item>
      <el-form-item label="图标" >
        <el-input v-model="category.icon" autocomplete="off"></el-input>
      </el-form-item>
      <el-form-item label="计量单位" >
        <el-input v-model="category.productUnit" autocomplete="off"></el-input>
      </el-form-item>
    </el-form>
    <span slot="footer" class="dialog-footer">
    <el-button @click="dialogVisible = false">取 消</el-button>
    <el-button type="primary" @click="submitData">确 定</el-button>
  </span>
  </el-dialog>
</div>
</template>
<script>
export default {
  data () {
    return {
      pCid: [],
      updateNodes: [],
      maxLevel: 0,
      draggable: true,
      title: "",
      dialogType: "",
      dialogVisible: false, /*dialogVisible值为true弹框出现为false消失*/
      menus: [],  /*获取的所有菜单信息*/
      category: {name: '', parentCid: 0, catLevel: 0, showStatus: 1, sort: 0 , catId: null, icon: null,productUnit: null }, /*添加的菜单的默认信息*/
      expandedKey: [], /*默认展开的菜单,可为多个*/
      defaultProps: {
        children: 'children',  /*子菜单的属性名*/
        label: 'name'          /*显示的名字*/
      }
    }
  },
  methods: {
    /*发送GET请求,获取后端数据的所有菜单并赋给menus*/
    getMenus () {
      this.$http({
        url: this.$http.adornUrl('/product/category/list/tree'),
        method: 'get'
      }).then(({data})=> {
        console.log('获取到了数据....', data.data)
        this.menus = data.data
      })
    },
    batchDelete() {
      let catIds = [];
      let checkedNodes = this.$refs.tree.getCheckedNodes();
      console.log("被选中的元素", checkedNodes);
      for (let i = 0; i < checkedNodes.length; i++) {
        catIds.push(checkedNodes[i].catId);
      }
      this.$confirm(`是否批量删除【${catIds}】菜单?`, "提示", {
        confirmButtonText: "确定",
        cancelButtonText: "取消",
        type: "warning"
      })
        .then(() => {
          this.$http({
            url: this.$http.adornUrl("/product/category/delete"),
            method: "post",
            data: this.$http.adornData(catIds, false)
          }).then(({ data }) => {
            this.$message({
              message: "批量删除成功",
              type: "success"
            });
            this.getMenus();
          });
        })
        .catch(() => {});
    },
    batchSave(){
      this.$http({
        url: this.$http.adornUrl("/product/category/update/order"),
        method: "post",
        data: this.$http.adornData(this.updateNodes,false)
      }).then(({data}) =>{
        this.$message({
          message: "修改成功",
          type: "success"
        })
        this.getMenus();
        this.expandedKey=this.pCid;
        this.updateNodes = [];
        this.maxLevel = 0;
      })
    },
    allowDrop(draggingNode, dropNode, type) {
      /*被拖动的当前节点以及所在的父节点总层数不能大于3*/

   /*  被拖动的当前节点总层数*/
      console.log("allowDrop:", draggingNode, dropNode, type);
      this.countNodeLevel(draggingNode.data);
      // 当前正在拖动的节点+父节点所在的深度不大于3即可
      let deep = this.maxLevel - draggingNode.data.catLevel + 1
      console.log("深度:", deep);
      if (type == "inner") {
        return deep + dropNode.level <= 3;
      } else {
        return deep + dropNode.parent.level <= 3;
      }
    },
    countNodeLevel(node) {
      //找到所有子节点,求出最大深度
      if (node.children != null && node.children.length > 0) {
        for (let i = 0; i < node.children.length; i++) {
          if (node.children[i].catLevel > this.maxLevel) {
            this.maxLevel = node.children[i].catLevel;
          }
          this.countNodeLevel(node.children[i]);
        }
      }
    },
    handleDrop(draggingNode, dropNode, dropType, ev) {
      console.log("handleDrop: ", draggingNode, dropNode, dropType);
   /* 当前节点最新的父节点id*/
      let pCid = 0;
      let siblings = null;
      if (dropType == "before" || dropType == "after") {
        pCid = dropNode.parent.data.catId == undefined ? 0 : dropNode.parent.data.catId;
        siblings = dropNode.parent.childNodes;
      } else {
        pCid = dropNode.data.catId;
        siblings = dropNode.childNodes;
      }
      this.pCid.push(pCid);

      /*当前拖拽节点的最新顺序,*/
      for (let i = 0; i < siblings.length; i++) {
        if (siblings[i].data.catId == draggingNode.data.catId) {
          /*如果遍历的是当前正在拖拽的节点*/
          let catLevel = draggingNode.level;
          if (siblings[i].level != draggingNode.level) {
            /*当前节点的层级发生变化*/
            catLevel = siblings[i].level;
            //修改他子节点的层级
            this.updateChildNodeLevel(siblings[i]);
          }
          this.updateNodes.push({catId: siblings[i].data.catId, sort: i, parentCid: pCid, catLevel: catLevel
          });
        } else {
          this.updateNodes.push({ catId: siblings[i].data.catId, sort: i });
        }
      }
      //3、当前拖拽节点的最新层级
      console.log("updateNodes", this.updateNodes);
      this.batchSave()
    },
    updateChildNodeLevel(node) {
      if (node.childNodes.length > 0) {
        for (let i = 0; i < node.childNodes.length; i++) {
          var cNode = node.childNodes[i].data;
          this.updateNodes.push({
            catId: cNode.catId,
            catLevel: node.childNodes[i].level
          });
          this.updateChildNodeLevel(node.childNodes[i]);
        }
      }
    },
    append(data) {
      this.category =  {name: '', parentCid: 0, catLevel: 0, showStatus: 1, sort: 0 , catId: null, icon: null,productUnit: null },
      this.title = "添加分类"
      this.dialogVisible = true
      this.dialogType = "add"
      console.log("添加数据",data)
      this.category.parentCid = data.catId;
      this.category.catLevel = data.catLevel*1 +1; /*先转化为整型*/
       console.log("append",data)
    },
    edit(data){

      this.title = "修改分类"
      this.dialogType = "edit"
      this.dialogVisible = true
      console.log(data.catId)
      this.$http({
        url: this.$http.adornUrl(`/product/category/info/${data.catId}`),
        method: 'get'
      }).then(({data})=> {
        console.log('获取到了数据....', data)
        this.category.catId = data.category.catId
        this.category.name = data.category.name
        this.category.icon = data.category.icon
        this.category.parentCid =data.category.parentCid
        this.category.productUnit = data.category.productUnit
      })

    },
    submitData(){
      if(this.dialogType === "add"){
        this.addCategory()
      }
      if(this.dialogType === "edit"){
        this.editCategory()
      }
    },
    editCategory(){
      console.log("xxxxxxx",this.category.parentCid)
      var {catId, name , icon, productUnit} = this.category;
      console.log("ssssss",this.category.parentCid)
      this.$http({
        url: this.$http.adornUrl("/product/category/update"),
        method: "post",
        data: this.$http.adornData({catId, name , icon, productUnit},false)
      }).then(({data}) =>{
          this.$message({
            message: "修改成功",
            type: "success"
          })
        this.dialogVisible = false
        this.getMenus();

        this.expandedKey=[this.category.parentCid];
      })
    },
  /*  通过POST发送添加请求,成功后返回菜单页并显示默认扩展菜单*/
    addCategory(){
      this.$http({
        url: this.$http.adornUrl("/product/category/save"),
        method: "post",
        data: this.$http.adornData(this.category,false)
      }).then(({data}) =>{
          this.$message({
            message: "添加成功",
            type: "success"
          })
        this.dialogVisible = false
        this.getMenus();
        this.expandedKey=[this.category.parentCid];
      })

    },
    remove(node, data) {
      let ids = [data.catId];
      //字符串用飘号,在里面引用可以使用${}来取值
      this.$confirm(`删除【${data.name}】菜单, 是否继续?`, '提示', {
        confirmButtonText: '确定',
        cancelButtonText: '取消',
        type: 'warning'
      }).then(() => {
        /*删除请求*/
        this.$http({
          url:this.$http.adornUrl('/product/category/delete'),
          method: 'post',
          data: this.$http.adornData(ids,false)
        }).then(({data})=>{
          console.log('删除成功')
          this.getMenus()
          this.expandedKey = [node.parent.data.catId]
        })
        this.$message({

          type: 'success',
          message: '删除成功!'
        });
      }).catch(() => {
        this.$message({
          type: 'info',
          message: '已取消删除'
        });
      });

    }
  },
  created () {
    this.getMenus()
  }
}
</script>

<style scoped>

</style>
Brand
OSS的使用
通过获取OSS服务端签名进行单文件上传
编写前端Vue代码(这里的一些前端代码可以通过renren中的逆向工具生成)…(将前端文件的请求地址改为Bucket的域名)

先通过前端来请求后端,后端向OSS获取服务端签名再返回给前端,前端通过该签名上传文件.
后端的代码在Controller层编写,详细可参考阿里云的帮助文档
注:所有的第三方接口可单独放到一个微服务中.
JSR303验证
①导入相关依赖
   <dependency>
            <groupId>jakarta.validation</groupId>
            <artifactId>jakarta.validation-api</artifactId>
            <version>2.0.2</version>
            <scope>compile</scope>
        </dependency>
        <dependency>
            <groupId>org.hibernate.validator</groupId>
            <artifactId>hibernate-validator</artifactId>
            <version>6.0.18.Final</version>
            <scope>compile</scope>
        </dependency>
    </dependencies>
② 加上相应注解
在 想要验证的实体上加入想要判断的注解 如@NotNull,@NotEmpty,等…
在控制层加上开启验证的注解@Valid 这样即可验证
自定义验证信息 ,在Controller的方法中加一个参数BindingResult,简单的使用如下:
实体类:
Controller:
    @RequestMapping("/save")
    public R save(@Valid @RequestBody BrandEntity brand, BindingResult result) {
        if(result.hasErrors()){//如果有错误
            Map<String,String> map = new HashMap<>();//使用MAP来存储错误信息
            result.getFieldErrors().forEach((item)->{//使用循环遍历所有错误并存储
                String message = item.getDefaultMessage();
                String field = item.getField();
                map.put(field,message);
            });
            return R.error(400,"属性信息错误").put("data",map);//将错误信息返回
        }
        brandService.save(brand);
        return R.ok();
    }
JSR303统一验证
和配置单个的Controller类似,只不过现在是全局的
添加配置类,如下即可
//扫描异常的包位置,扫描对应包下加了@Vaild注解的方法
@RestControllerAdvice(basePackages = "com.sky.wlmall.product.controller")
public class UnifiedException {
	//捕获的异常类型
    @ExceptionHandler(value = MethodArgumentNotValidException.class)
    public R handVaildException(MethodArgumentNotValidException exception){

        BindingResult result = exception.getBindingResult();
        Map<String,String> map = new HashMap<>();
        result.getFieldErrors().forEach((item)->{
            map.put(item.getField(),item.getDefaultMessage());
        });
        return       R.error(BizCodeEnum.VAILD_EXCEPTION.getCode(),BizCodeEnum.VAILD_EXCEPTION.getMsg()).put("data",map);//VAILD_EXCEPTION,VAILD_EXCEPTION自定义枚举类,方便使用
    }
    //捕获的异常类型
    @ExceptionHandler(value = Exception.class)
    public R handException(Exception exception){
        return R.error(BizCodeEnum.UNKNOW_EXCEPTION.getCode(), BizCodeEnum.UNKNOW_EXCEPTION.getMsg()) ;
    }
}
JSR303分组
①先命名想要的分组(即写一个接口)
public interface AddGroup {
}
将上述的Controller注解的@Valid换为@Validated({接口名.class})
    @RequestMapping("/save")
    public R save(@Validated({AddGroup.class}) @RequestBody BrandEntity brand) {
        System.out.println("**************************************");
        brandService.save(brand);
        return R.ok();
    }
在想要的实体类中添加组名的限制
  @URL(message = "logo地址不正确",groups = {AddGroup.class})
    private String logo;
这样@URL的限制只能对加了{AddGroup.class}的方法起作用,别的就不再起作用(group中可加多个设置)
AttrGroup
获取属性分组
前端代码通过逆向工程获取。。。
前端向后端发送请求,该请求可以根据catelog_id(只能是第三级的id)进行查找、或者根据属性分组名或属性Id进行模糊查询
Controller层
   @RequestMapping("/list/{catelogId}")//通过三级分类的Id来查找

    public R list(@RequestParam Map<String, Object> params, @PathVariable("catelogId") Long cateId) {
        PageUtils page = attrGroupService.queryPage(params,cateId);//根据该方法编写Service层以及其实现类

        return R.ok().put("page", page);
    }
Service实现类(前端的全部查询也是走的这里,如果想要对全部查询添加模糊查询的功能,在这里稍微修改一下即可)
public PageUtils queryPage(Map<String, Object> params, Long catelogId) {
        //当catelogId为零的时候表示查找所有的信息
       if(catelogId == 0){
           //分页工具,将前端的页面参数和查询语句封装进Ipage里,泛型中的类型是操作的实体类
           IPage<AttrGroupEntity> page = this.page(new Query<AttrGroupEntity>().getPage(params), new QueryWrapper<AttrGroupEntity>());
           return  new PageUtils(page);
       }else{
           //key 为前端的查询条件,可以为分组名或分组Id
           String key = (String) params.get("key");
           //当catelogId不为零的时候,根据Id进行查找
           QueryWrapper<AttrGroupEntity> wrapper = new QueryWrapper<AttrGroupEntity>().eq("catelog_Id",catelogId);
           //如果还有别的查询条件则再加上
           if(!StringUtils.isNullOrEmpty(key)){
               //这一块使用了and的函数类型,即要满足and前面条件的同时,还要满足and函数里的条件,即函数里的所有为一个大的整体条件
               //相当于给后面加了个括号,改变了运算的优先级
               //SQL语句如下:SELECT attr_group_id,attr_group_name,sort,descript,icon,catelog_id
               // FROM pms_attr_group WHERE (catelog_Id = ?
               // AND (attr_group_id = ? OR attr_group_name LIKE ?))
              wrapper.and((obj)->{
                  obj.eq("attr_group_id",key).or().like("attr_group_name",key);
              });
           }
           IPage<AttrGroupEntity> page = this.page(new Query<AttrGroupEntity>().getPage(params),wrapper);
           return new PageUtils(page);
       }

    }
属性分组修改优化
将所属分类以这种形式显示出来

前端代码略。。。
后端代码如下:
在分组实体类中加上总路径的属性

Controller

    @RequestMapping("/info/{attrGroupId}") // 根据GroupId来获取其相关的所有信息
    // @RequiresPermissions("product:attrgroup:info")
    public R info(@PathVariable("attrGroupId") Long attrGroupId) {
    //根据分组Id获取相关信息
        AttrGroupEntity attrGroup = attrGroupService.getById(attrGroupId);
        Long catelogId = attrGroup.getCatelogId();
        //根据catelogId来查看是否有父菜单
        Long[] catelogPath = categoryService.getCatelogPath(catelogId);
        //将得到的父菜单存入新加的属性中
        attrGroup.setCatelogPath(catelogPath);
        return R.ok().put("attrGroup", attrGroup);
    }
Service层 该Service加到Category里
   //通过While循环来获得总路径的Id编号返回一个数组, 也可以使用递归
    @Override
    public Long[] getCatelogPath(Long catelogId) {
       List<Long> paths = new ArrayList<>();
       //当为真的时候表示当前菜单有父菜单,可以接着向上查找,直到查找到的父菜单的Id为0的时候,表示他不再有父菜单了
       while (true){
           paths.add(catelogId);
           Long parentId = baseMapper.selectById(catelogId).getParentCid();
           if( parentId != 0){
               catelogId = parentId;
           }else {
               break;
           }
       }
        Collections.reverse(paths); //将获取到的路径翻转过来
  /*      System.out.println("*******************");
        for (Long item:
             paths) {
            System.out.println(item);
        }*/
       return (Long[]) paths.toArray(new Long[paths.size()]);
    }
品牌、分类与分组等之间的关联和级联更新
即修改一处品牌(分类),相关的别处的品牌(分类)也会修改
逆向生成前端页面
编写品牌的Controller层
    @RequestMapping("/update")
    public R update(@Validated({UpdateGroup.class}) @RequestBody BrandEntity brand) {
        /*brandService.updateById(brand);*/
        brandService.cascadingUpdate(brand); //级联更新
        return R.ok();
    }
编写品牌的Service层
      public void cascadingUpdate(BrandEntity brand) {
        //先根据Id进行更新
        this.updateById(brand);
        //如果名字不为空,则更新级联的标签
        if(!StringUtils.isNullOrEmpty(brand.getName())){
            //将品牌名和品牌Id传入
            categoryBrandRelationService.updateBrand(brand.getBrandId(),brand.getName());
        }
    }
编写 品牌和分类关联的Service层
    public void updateBrand(Long brandId, String name) {
        //创建二者的级联对象
        CategoryBrandRelationEntity relationEntity = new CategoryBrandRelationEntity();
        //根据品牌Id来修改品牌名
        relationEntity.setBrandId(brandId);
        relationEntity.setBrandName(name);
        this.update(relationEntity,new UpdateWrapper<CategoryBrandRelationEntity>().eq("brand_id",brandId));
    }
Attr
规格参数的添加
有的时候,一些实体类中,会出现一些数据库中没有的属性,所以为了规范,可创建一些类来存储这些没有的属性,如 Vo、Bo 、Do等。。
创建Vo 实体类 AttrVo,其属性和AttrEntity相同,但多出一个AttrGroupId的属性,目的是为了接受前端的数据并关联查询
Controller层
   @RequestMapping("/save")
    public R save(@RequestBody AttrVo attr) {
        attrService.saveAttr(attr);
        return R.ok();
    }
Service层
    @Transactional
    @Override
    public void saveAttr(AttrVo attr) {
    //创建对应数据库的实体类,这里的AttrVo 属于 Vo的
        AttrEntity attrEntity = new AttrEntity();
        //将前端传来的Vo attr,通过Spring给的工具类赋值给  attrEntity,即封装了get,set方法
        BeanUtils.copyProperties(attr,attrEntity);
        //保存到数据库
        this.save(attrEntity);
        //保存属性和属性分组直接的关联数据库
        if(attr.getAttrType() == ProductConstant.AttrEnum.ATTR_TYPE_BASE.getCode() && attr.getAttrGroupId() != null){
            AttrAttrgroupRelationEntity relationEntity = new AttrAttrgroupRelationEntity();
            relationEntity.setAttrId(attrEntity.getAttrId());
            relationEntity.setAttrGroupId(attr.getAttrGroupId());
            relationDao.insert(relationEntity);
        }
规格参数列表的显示
再创建一个Vo类型的实体类AttrRespVo,再上面的基础上,再添加两个属性,分组名groupName和分类名catelogName。
Controller层
   @GetMapping("/base/list/{catelogId}")
    public R baseAttrList(@RequestParam Map<String,Object> params, @PathVariable("catelogId") Long catrlogId){
       PageUtils page = attrService.queryBaseAttrPage(params,catrlogId);
       return R.ok().put("page",page);
    }
Service层
   public PageUtils queryBaseAttrPage(Map<String, Object> params, Long catelogId) {
         QueryWrapper<AttrEntity> queryWrapper = new QueryWrapper<>();
            //Id等于零的情况下查询所有的,不等于零就根据Id来查找
         if(catelogId!=0){
             queryWrapper.eq("catlog_id",catelogId);
         }
         String key = (String) params.get("key");
         //判断有没有查找的条件
         if (!StringUtils.isNullOrEmpty(key)){
             queryWrapper.and((obj)->{
                obj.eq("attr_id",key).or().like("attr_name",key);
             });
         }
         //将分页信息和查询条件装入分页工具
        IPage<AttrEntity> page = this.page(new Query<AttrEntity>().getPage(params), queryWrapper);
        PageUtils pageUtils = new PageUtils(page);
/* 后面的代码可以使用ForEach来便利,也可以使用这种stream流的方法来写
 List<AttrEntity> records = page.getRecords();
        List<AttrRespVo> attr_id = records.stream().map(attrEntity -> {
            AttrRespVo attrRespVo = new AttrRespVo();
            BeanUtils.copyProperties(attrEntity, attrRespVo);
            AttrAttrgroupRelationEntity attrId = relationDao.selectOne(new QueryWrapper<AttrAttrgroupRelationEntity>().eq("attr_id", attrEntity.getAttrId()));
            if (attrId != null) {
                AttrGroupEntity attrGroupEntity = attrGroupDao.selectById(attrId.getAttrGroupId());
                attrRespVo.setGroupName(attrGroupEntity.getAttrGroupName());
            }
            CategoryEntity categoryEntity = categoryDao.selectById(attrEntity.getCatelogId());
            if (categoryEntity != null) {
                attrRespVo.setCatelogName(categoryEntity.getName());
            }
            return attrRespVo;
        }).collect(Collectors.toList());*/
        //获取所有的分页工具类封装的AttrEntity对象,
        List<AttrEntity> attrEntities = page.getRecords();
        //将所有的AttrEntity经过加工后封装到AttrRespVo中
        List<AttrRespVo> attr_id  = new ArrayList<>();
        //通过循环来遍历所有的AttrEntity经过加工后封装到AttrRespVo中
        for (AttrEntity attrEntity:attrEntities) {
            //创建一个新的对象
            AttrRespVo attrRespVo = new AttrRespVo();
            //将attrEntity 的数据,复制给 attrRespVo
            BeanUtils.copyProperties(attrEntity,attrRespVo);
            //通过传过来的将attrEntity中的attr_id来获取 属性与属性分组之间的关联对象
            AttrAttrgroupRelationEntity relationEntity = relationDao.selectOne(new QueryWrapper<AttrAttrgroupRelationEntity>().eq("attr_id", attrEntity.getAttrId()));
            //如果获取到的对象不为空,则通过分组的Id来获取分组名并赋给attrRespVo
            if(relationEntity != null && relationEntity.getAttrGroupId() != null){
                AttrGroupEntity attrGroupEntity = attrGroupDao.selectById(relationEntity.getAttrGroupId());
                attrRespVo.setGroupName(attrGroupEntity.getAttrGroupName());
            }
            //通过attrEntity中的catelog_id来获取categoryEntity实体类对象
            CategoryEntity categoryEntity = categoryDao.selectById(attrEntity.getCatelogId());
            //如果获取到的对象不为空,则之间将分类名赋值给attrRespVo
            if (categoryEntity != null ){
                attrRespVo.setCatelogName(categoryEntity.getName());
            }
            //将封装好的一个对象加入List集合中
            attr_id.add(attrRespVo);
        }
        pageUtils.setList(attr_id);
        return pageUtils;
    }
规格参数的修改显示和更新
在AttrRespVo上再添加一个属性catelogPath,用来记录总的分类路径,在category中使用过
Controller
		//修改显示
    @RequestMapping("/info/{attrId}")
    // @RequiresPermissions("product:attr:info")
    public R info(@PathVariable("attrId") Long attrId) {
       /* AttrEntity attr = attrService.getById(attrId);*/
       AttrRespVo respVo = attrService.getAttrInfo(attrId);
        return R.ok().put("attr", respVo);
    }
    //更新
    @RequestMapping("/update")
    // @RequiresPermissions("product:attr:update")
    public R update(@RequestBody AttrVo attr) {
       /* attrService.updateById(attr);*/
        attrService.updateAttr(attr);
        return R.ok();
    }
Service
    @Override
    public AttrRespVo getAttrInfo(Long attrId) {
        //通过attrID 获取整个attrEntity对象,再复制给attrRespVo
        AttrRespVo attrRespVo = new AttrRespVo();
        AttrEntity attrEntity = this.getById(attrId);
        BeanUtils.copyProperties(attrEntity,attrRespVo);
       // 这时, attrRespVo还缺少     attrGroupId ,catelogName, groupName, catelogPath
        //通过  attrId 来获取整个 关系,关系分组 对象
        AttrAttrgroupRelationEntity attrAttrgroupRelationEntity = relationDao.selectOne(new QueryWrapper<AttrAttrgroupRelationEntity>().eq("attr_id",attrId));
        //如果能获取到该对象,表示其有相关联的分组
        if (attrAttrgroupRelationEntity != null){
            //将获取到的分组的ID,attrGroupId给attrRespVo  这时, attrRespVo还缺少catelogName, groupName, catelogPath
            attrRespVo.setAttrGroupId(attrAttrgroupRelationEntity.getAttrGroupId());
            //通过分组的ID获取分组的实体类
            AttrGroupEntity attrGroupEntity = attrGroupDao.selectById(attrAttrgroupRelationEntity.getAttrGroupId());
            //如果有该实体类
            if(attrGroupEntity != null){
                //将分组的Name赋值给attrRespVo, 这时, attrRespVo还缺少catelogName, catelogPath
                attrRespVo.setGroupName(attrGroupEntity.getAttrGroupName());
            }
        }
        //获取分类的ID
        Long catelogId = attrEntity.getCatelogId();
        //根据分类的ID来获取其整个分类路径 ,这个函数在分类时已经写好,可以直接用,这时, attrRespVo还缺少catelogName
        Long[] catelogPath = categoryService.getCatelogPath(catelogId);
        attrRespVo.setCatelogPath(catelogPath);
        //根据分类ID来获取整个分类的实体对象
        CategoryEntity categoryEntity = categoryDao.selectById(catelogId);
        //如果能获取到就将分类的名字赋值给attrRespVo,此时的attrRespVo已经封装完毕
        if(categoryEntity != null){
            attrRespVo.setCatelogName(categoryEntity.getName());
        }

        return  attrRespVo;
    }

    @Override
    public void updateAttr(AttrVo attr) {
        //将attr中的属性封装给attrEntity,并更新attrEntity
        AttrEntity attrEntity  = new AttrEntity();
        BeanUtils.copyProperties(attr,attrEntity);
        this.updateById(attrEntity);
        //创建属性和属性分组的关系对象,并将属性分组ID和属性Id赋值给该对象
        AttrAttrgroupRelationEntity relationEntity = new AttrAttrgroupRelationEntity();
        relationEntity.setAttrGroupId(attr.getAttrGroupId());
        relationEntity.setAttrId(attr.getAttrId());
        //级联更新
        //通过attrid来查找有没有相关的AttrAttrgroupRelationEntity对象
        Long count = relationDao.selectCount(new QueryWrapper<AttrAttrgroupRelationEntity>().eq("attr_id", attr.getAttrId()));
        if(count>0){
            //,如果有,同时也将AttrAttrgroupRelationEntity更新
            relationDao.update(relationEntity,new UpdateWrapper<AttrAttrgroupRelationEntity>().eq("attr_id",attr.getAttrId()));
        }else {
            //如果没有就插入该关系
            relationDao.insert(relationEntity);
        }
    }
分组属性和分组之间的关联查询与删除
查询:
Controller
  @GetMapping("/{attrgroupId}/attr/relation") //根据分组属性Id获取所有相关联的属性实体
    public R attrRelation(@PathVariable("attrgroupId") Long attrgroupId){
        List<AttrEntity> entities = attrGroupService.getRelationAttr(attrgroupId);
        return R.ok().put("data",entities);
    }
Service
   @Override
    public List<AttrEntity> getRelationAttr(Long attrgroupId) {
        //根据分组Id获取所有相关的分组与属性之间的关系对象
        List<AttrAttrgroupRelationEntity> attr_group_id = relationDao.selectList(new QueryWrapper<AttrAttrgroupRelationEntity>().eq("attr_group_id", attrgroupId));
        //根据查找到的分组Id获取所有的属性Id
        List<Long> attrIds = new ArrayList<>();
        for(AttrAttrgroupRelationEntity relationEntity : attr_group_id){
            attrIds.add(relationEntity.getAttrId());
        }
        //根据所有的属性Id来获取所有的相关的属性
        List<AttrEntity> entities = attrService.listByIds(attrIds);

        return  entities;
    }
删除
创建二者的关系实体类AttrGroupRelationVo
@Data
public class AttrGroupRelationVo {

    private Long attrId;
    private Long attrGroupId;
}
Controller
    @PostMapping("/attr/relation/delete")
    public R deleteRelation(@RequestBody AttrGroupRelationVo[] vos){
        attrGroupService.deleteRelation(vos);
        return R.ok();
    }
Service
    public void deleteRelation(AttrGroupRelationVo[] vos) {
        List<AttrAttrgroupRelationEntity> entities = new ArrayList<>();
      /*  System.out.println("-------------------------");*/
        for(AttrGroupRelationVo vo : vos){
//            System.out.println("....................");
//            System.out.println(vo);
            AttrAttrgroupRelationEntity relationEntity = new AttrAttrgroupRelationEntity();
            BeanUtils.copyProperties(vo,relationEntity);
            entities.add(relationEntity);
        }
        relationDao.deleteBatchRelation(entities);
    }
由与该Sql语句需要拼接,所以在XML文件里写了SQL语句
  <delete id="deleteBatchRelation">
            DELETE FROM `pms_attr_attrgroup_relation` WHERE
             <!--遍历传进来的entites中的所有对象,每个对象命名为item,查找其属性Id和属性分组Id,中间使用OR来连接-->
            <foreach collection="entities" item="item" separator=" OR ">
                (attr_id=#{item.attrId} AND attr_group_id=#{item.attrGroupId})
            </foreach>
   </delete>
属性分组与属性的关联(查询未被关联的属性以及新增)
查询未被关联的属性
Controller
 @GetMapping("/{attrgroupId}/noattr/relation") //展现出未分配关联的基本属性
    public R attrNoRelation(@PathVariable("attrgroupId") Long attrgroupId, @RequestParam Map<String,Object> params){
               PageUtils page =  attrGroupService.getNoRelationAttr(params,attrgroupId);
                return  R.ok().put("page",page);
    }
Service
    @Override
    public PageUtils getNoRelationAttr(Map<String, Object> params, Long attrgroupId) {
        //根据当前的分组Id获取到当前分组
        AttrGroupEntity attrGroupEntity = attrGroupDao.selectById(attrgroupId);
        //根据当前分组,获取其分组的分类Id
        Long catelogId = attrGroupEntity.getCatelogId();
        //再根据分类的Id获取所有与该Id关联的分组
        List<AttrGroupEntity> groups = attrGroupDao.selectList(new QueryWrapper<AttrGroupEntity>().eq("catelog_id", catelogId));
        //将获取的所有分组的Id放到集合中
        List<Long> collect = new ArrayList<>();
        for(AttrGroupEntity item : groups){
            collect.add(item.getAttrGroupId());
        }
        //根据该Id集合,查找所有的属性分组与属性之间的关系对象
        List<AttrAttrgroupRelationEntity> entities = relationDao.selectList(new QueryWrapper<AttrAttrgroupRelationEntity>().in("attr_group_id", collect));
        //将获取到的所有关系对象中的属性Id放到集合中
        List<Long> attrIds = new ArrayList<>();
        for(AttrAttrgroupRelationEntity entity : entities){
            attrIds.add(entity.getAttrId());
        }
        //根据分类Id来查找同一类下的属性,通过attr_type来筛选掉销售属性,即找出同一类下的基本属性
        QueryWrapper<AttrEntity> wrapper = new QueryWrapper<AttrEntity>().eq("catelog_id",catelogId).eq("attr_type", ProductConstant.AttrEnum.ATTR_TYPE_BASE.getCode());
        //如果上面集合所查到的属性Id不为空,就去除掉和集合中属性Id相同的属性
        if(attrIds != null){
            wrapper.notIn("attr_id",attrIds);
        }
        //如果有模糊查询,再进行模糊查询
        String key = (String) params.get("key");
        if(!StringUtils.isNullOrEmpty(key)){
            wrapper.and((w)->{
               w.eq("attr_id",key).or().like("attr_name",key);
            });
        }
        //因为寸的对象是属性,所以要调用属性的分页方法,并将其返回。
        IPage<AttrEntity> page = attrService.page(new Query<AttrEntity>().getPage(params), wrapper);
        PageUtils pageUtils = new PageUtils(page);

        return pageUtils;
    }
新增两者的关联
Cotroller
    @PostMapping("/attr/relation") //新增属性分组与属性的关联
    public R addRelation(@RequestBody List<AttrGroupRelationVo> vos){
        relationService.saveBatch(vos);
        return R.ok();
    }
Service
    @Override
    public void saveBatch(List<AttrGroupRelationVo> vos) { //新增属性分组与属性的关联
        List<AttrAttrgroupRelationEntity> collect = vos.stream().map(item->{
            //使用stream方法,遍历vos,并将获取到的值赋给关联对象,最后返回关联对象。
            AttrAttrgroupRelationEntity relationEntity = new AttrAttrgroupRelationEntity();
            BeanUtils.copyProperties(item,relationEntity);
            return relationEntity;
        }).collect(Collectors.toList());
        this.saveBatch(collect);
    }
Spu、Sku
由于添加商品需要使用到会员微服务,所以需要先配置会员微服务的Nacos和网关并启动微服务。
根据分类Id来获取其下的品牌
建立品牌的Vo
@Data
public class BrandVo {
    private Long brandId;//品牌Id
    private String brandName; //品牌名
}
Controller
   @GetMapping("/brands/list") //获取当前分类下的所有品牌
    public R relationBrandList(@RequestParam(value = "catId",required = true) Long catId){
        //根据分类Id来获取品牌的实体类
       List<BrandEntity> vos =  categoryBrandRelationService.getBrandsByCatId(catId);
       //因为前端只需要品牌Id和品牌名,所以在Controller层中,进行处理,返回数据只有品牌名和品牌ID即可
       List<BrandVo> collect = vos.stream().map(item->{
           //使用Stream遍历获取到的所有品牌对象,并将品牌名和Id赋值给自定义的vo对象
           BrandVo brandVo = new BrandVo();
           brandVo.setBrandId(item.getBrandId());
           brandVo.setBrandName(item.getName());
           return brandVo;
       }).collect(Collectors.toList());
       //将封装好的数据返回
       return R.ok().put("data",collect);
    }
Service
    public List<BrandEntity> getBrandsByCatId(Long catId) {
        //通过分类的Id 来获取所有关联过的 品牌分类关联对象
        List<CategoryBrandRelationEntity> relationEntities = relationDao.selectList(new QueryWrapper<CategoryBrandRelationEntity>().eq("catelog_id", catId));
        //通过遍历来 将获取到的品牌分类关联对象的品牌Id来查找到所需要的品牌对象
        List<BrandEntity> collect = relationEntities.stream().map(item->{
            Long brandId = item.getBrandId();
            BrandEntity brandEntity = brandDao.selectById(brandId);
            return brandEntity;
        }).collect(Collectors.toList());
        //将查到的所有品牌对象封装并返回
        return  collect;
    }
根据分类Id来获取其分组以及分组下的属性等
创建相关的Vo
@Data
public class AttrGroupWithAttrsVo {
    private Long attrGroupId;
    /**
     * 组名
     */
    private String attrGroupName;
    /**
     * 排序
     */
    private Integer sort;
    /**
     * 描述
     */
    private String descript;
    /**
     * 组图标
     */
    private String icon;
    /**
     * 所属分类id
     */
    private Long catelogId;

    private List<AttrEntity> attrs;
 }
Controller
  @GetMapping("/{catelogId}/withattr") //获取分类下的所有分组以及其属性和参数
    public R getAttrGroupWithAttrs(@PathVariable("catelogId") Long catelogId){
        //通过分类Id来查找所有相关的分组属性和属性
        List<AttrGroupWithAttrsVo> vos = attrGroupService.getAttrGroupWithAttrsByCatelogId(catelogId);
        return R.ok().put("data",vos);
    }
Service
    @Override
    public List<AttrGroupWithAttrsVo> getAttrGroupWithAttrsByCatelogId(Long catelogId) {
        //根据分类Id来查找有关的所有分组对象
        List<AttrGroupEntity> attrGroupEntities = this.list(new QueryWrapper<AttrGroupEntity>().eq("catelog_Id",catelogId));
        //通过stream方法,将查到的分组对象,一一赋值给新建的AttrGroupWithAttrsVo对象,并通过分组Id来查找所有有关的属性,存到一个集合中赋值给AttrGroupWithAttrsVo,最后返回。
        List<AttrGroupWithAttrsVo> collect = attrGroupEntities.stream().map(group->{
            AttrGroupWithAttrsVo attrsVo = new AttrGroupWithAttrsVo();
            BeanUtils.copyProperties(group,attrsVo);
            List<AttrEntity> relationAttr = this.getRelationAttr(attrsVo.getAttrGroupId());
            attrsVo.setAttrs(relationAttr);
            return attrsVo;
        }).collect(Collectors.toList());
            return collect;
    }
将封装好的Spu和Sku保存到数据库
该步骤有些繁琐,涉及到多个微服务,首先在公用的微服务中添加几个To实体类
public class MemberPrice {

    private Long id;
    private String name;
    private BigDecimal price;

}
public class SkuReductionTo {
    private Long skuId;
    private int fullCount;
    private BigDecimal discount;
    private int countStatus;
    private BigDecimal fullPrice;
    private BigDecimal reducePrice;
    private int priceStatus;
    private List<MemberPrice> memberPrice;
}
public class SpuBoundTo {
    private Long spuId;
    private BigDecimal buyBounds;
    private BigDecimal growBounds;
}
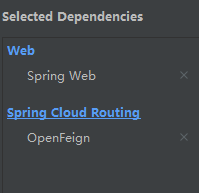
需要多个微服务远程调用,所以要配置OpenFeign
product微服务的配置
1.根据前端的请求JSON数据,使用工具生成多个Vo实体类,快捷链接
@FeignClient("wlmall-coupon") //远程调用的服务名
public interface SpuCouponFeignService {
//请求的服务路径
    @PostMapping("/coupon/spubounds/save")
    void saveSpuBounds(@RequestBody SpuBoundTo spuBoundTo);
    @PostMapping("/coupon/skufullreduction/saveinfo")
    R saveSkuReduction(@RequestBody SkuReductionTo skuReductionTo);
}
Controller
    @RequestMapping("/save")
    //@RequiresPermissions("product:spuinfo:save")
    public R save(@RequestBody SpuSaveVo vo) {
       /* spuInfoService.save(spuInfo);*/
      /*  System.out.println("Controller..............进来了*********");
        vo.getSkus().stream().forEach(item->{
            System.out.println(item.getMemberPrice());
        });
        System.out.println("Controller..............进来了*********");*/
        spuInfoService.saveSpuInfo(vo);
        return R.ok();
    }
Service
    @Transactional
    @Override
    public void saveSpuInfo(SpuSaveVo vo) {

        //将前端传来的SpuSaveVo对象,赋值给SpuInfoEntity,并添加创建时间和更新时间
        SpuInfoEntity infoEntity = new SpuInfoEntity();
        BeanUtils.copyProperties(vo,infoEntity);
        infoEntity.setCreateTime(new Date());
        infoEntity.setUpdateTime(new Date());
        //将封装好的SpuInfoEntity对象插入数据库
        this.saveBaseSpuInfo(infoEntity); //Id是自增的,所以不需要赋值


        //获取所有的描述信息
        List<String> decript = vo.getDecript();
        //创建一个商品描述的对象
        SpuInfoDescEntity descEntity = new SpuInfoDescEntity();
        //将商品对象的Id存入商品描述对象
        descEntity.setSpuId(infoEntity.getId());
        //将商品的所有描述存入商品对象,每个描述之间用逗号隔开
        descEntity.setDecript(String.join(",",decript));
        //将封装好的对象插入到数据库
        spuInfoDescService.saveSpuInfoDesc(descEntity);

        //获取前端传来的图片集
        List<String> images = vo.getImages();
        //通过SpuInfoEntity的Id和获取到的图片来保存到数据库
        imagesService.saveImages(infoEntity.getId(),images);

        //获取前端传来的基本的属性信息
        List<BaseAttrs> baseAttrs = vo.getBaseAttrs();
        //使用stream流来遍历所有的基本信息
        List<ProductAttrValueEntity> collect = baseAttrs.stream().map(attr -> {
            //创建产品的属性值对象
            ProductAttrValueEntity valueEntity = new ProductAttrValueEntity();
            //封装产品的属性值对象
            valueEntity.setAttrId(attr.getAttrId());
            AttrEntity id = attrService.getById(attr.getAttrId());
            valueEntity.setAttrName(id.getAttrName());
            valueEntity.setAttrValue(attr.getAttrValues());
            valueEntity.setQuickShow(attr.getShowDesc());
            valueEntity.setSpuId(infoEntity.getId());
            return valueEntity;
        }).collect(Collectors.toList());
            //将封装好的ProductAttrValueEntity集合保存到数据库
            attrValueService.saveProductAttr(collect);
        //获取前端传来的Sku对象集合
         List<Skus> skus = vo.getSkus();
         //如果有Sku的话
        System.out.println("Service..............进来了*********");
        skus.stream().forEach(item->{
            System.out.println(item.getMemberPrice());
        });
        System.out.println("Service..............进来了*********");
         if(skus!=null && skus.size()>0){
             //遍历Skus集合
             skus.forEach(item->{
                 System.out.println(item+"----------------------++++++++++");
                 //首先查看是否有默认图片,先设默认图片为空
                 String defaultImg = "";
                 //遍历当前skus对象中的所有图片,如果他的DefaultImg的值为1,表示他是该图片集的默认图片
                 for(Images image : item.getImages()){
                     if(image.getDefaultImg() ==1){
                         defaultImg = image.getImgUrl(); //如果有则找出该默认图片的链接
                     }
                 }
                 //创建一个Sku的实体对象
                 SkuInfoEntity skuInfoEntity = new SkuInfoEntity();
                 //将当前的skus对象的属性赋值给Sku实体对象
                 BeanUtils.copyProperties(item,skuInfoEntity);
                 //补全Sku实体对象剩余未赋的值
                 skuInfoEntity.setBrandId(infoEntity.getBrandId());
                 skuInfoEntity.setCatalogId(infoEntity.getCatalogId());
                 skuInfoEntity.setSaleCount(0L); //销量默认先为零
                 skuInfoEntity.setSpuId(infoEntity.getId());
                 skuInfoEntity.setSkuDefaultImg(defaultImg);
                 //调用方法来保存到数据库
                 skuInfoService.saveSkuInfo(skuInfoEntity);
                 //获取sku的Id
                 Long skuId = skuInfoEntity.getSkuId();
                  //遍历所有的图片
                 List<SkuImagesEntity> imagesEntities = item.getImages().stream().map(img->{
                        //获取Sku图片实体对象
                        SkuImagesEntity skuImagesEntity = new SkuImagesEntity();
                        //封装Sku图片实体对象
                        skuImagesEntity.setSkuId(skuId);
                        skuImagesEntity.setImgUrl(img.getImgUrl());
                        skuImagesEntity.setDefaultImg(img.getDefaultImg());

                        return skuImagesEntity;
                 }).filter(entity->{
                     return  !StringUtils.isEmpty(entity.getImgUrl());
                 }).collect(Collectors.toList());
                 //将sku图片相关信息保存到数据库
                 skuImagesService.saveBatch(imagesEntities);

                 //根据skus对象获取Attr对象集合
                 List<Attr> attr = item.getAttr();
                 //遍历获取的Attr集合
                 List<SkuSaleAttrValueEntity> collect1 = attr.stream().map(a -> {
                     //创建sku销售属性的实体类对象
                     SkuSaleAttrValueEntity attrValueEntity = new SkuSaleAttrValueEntity();
                     //封装该对象
                     BeanUtils.copyProperties(a, attrValueEntity);
                     attrValueEntity.setSkuId(skuId);
                     return attrValueEntity;
                 }).collect(Collectors.toList());
                 //将该集合对象保存到数据库
                 skuSaleAttrValueService.saveBatch(collect1);
                 // 获取积分对象
                 Bounds bounds = vo.getBounds();
                 //创建服务公用的SpuBoundTo对象,并赋值
                 SpuBoundTo spuBoundTo = new SpuBoundTo();
                 BeanUtils.copyProperties(bounds,spuBoundTo);
                 spuBoundTo.setSpuId(infoEntity.getId());
                 //通过OpenFeign来调用远程服务,实现该方法
                 couponFeignService.saveSpuBounds(spuBoundTo);
                 // TODO 写了一天的增删改查了要写吐了,这里有时间再研究下,。。。还有下面的代码再研究一下
                 SkuReductionTo skuReductionTo = new SkuReductionTo();
                 //这里赋值的时候,不知道为啥, skus中的MemberPrice不能直接赋给skuReductionTo的MemberPrice
                 // 且, 通过Set方法也不行,只能通过拆分再重装,
                 BeanUtils.copyProperties(item,skuReductionTo);
                 List<MemberPrice> memberPrices  = item.getMemberPrice().stream().map(memberPrice -> {
                     MemberPrice memberPrice1 = new MemberPrice();
                        memberPrice1.setPrice(memberPrice.getPrice());
                        memberPrice1.setId(memberPrice.getId());
                        memberPrice1.setName(memberPrice.getName());
                        return  memberPrice1;
                 }).collect(Collectors.toList());
                 skuReductionTo.setMemberPrice(memberPrices);
                 skuReductionTo.setSkuId(skuId);

                 if(skuReductionTo.getFullCount() >0 || skuReductionTo.getFullPrice().compareTo(new BigDecimal("0")) == 1){
                    couponFeignService.saveSkuReduction(skuReductionTo);
                 }
             });

         }
    }
      @Override
    public void saveBaseSpuInfo(SpuInfoEntity infoEntity) {
        this.baseMapper.insert(infoEntity);
    }
远程服务 coupon
Controller
	//两个路径下的Controller
    @Autowired
    private SkuFullReductionService skuFullReductionService;
    @PostMapping("/saveinfo")
     //@RequiresPermissions("coupon:skufullreduction:list")
    public R saveInfo(@RequestBody SkuReductionTo reductionTo){
        skuFullReductionService.saveSkuReduction(reductionTo);
        return  R.ok();
    }
       @RequestMapping("/save")
    //@RequiresPermissions("coupon:spubounds:save")
    public R save(@RequestBody SpuBoundsEntity spuBounds) {
        spuBoundsService.save(spuBounds);

        return R.ok();
    }
Service
public void saveSkuReduction(SkuReductionTo reductionTo) {
        SkuLadderEntity skuLadderEntity = new SkuLadderEntity();
        skuLadderEntity.setSkuId(reductionTo.getSkuId());
        skuLadderEntity.setFullCount(reductionTo.getFullCount());
        skuLadderEntity.setDiscount(reductionTo.getDiscount());
        skuLadderEntity.setAddOther(reductionTo.getCountStatus());
        if(reductionTo.getFullCount() > 0){
            skuLadderService.save(skuLadderEntity);
        }
        //2、sms_sku_full_reduction
        SkuFullReductionEntity reductionEntity = new SkuFullReductionEntity();
        BeanUtils.copyProperties(reductionTo,reductionEntity);
        if(reductionEntity.getFullPrice().compareTo(new BigDecimal("0"))==1){
            this.save(reductionEntity);
        }
        //3、sms_member_price
        List<MemberPrice> memberPrice = reductionTo.getMemberPrice();
        List<MemberPriceEntity> collect = memberPrice.stream().map(item -> {
            MemberPriceEntity priceEntity = new MemberPriceEntity();
            priceEntity.setSkuId(reductionTo.getSkuId());
            priceEntity.setMemberLevelId(item.getId());
            priceEntity.setMemberLevelName(item.getName());
            priceEntity.setMemberPrice(item.getPrice());
            priceEntity.setAddOther(1);
            return priceEntity;
        }).filter(item->{
            return item.getMemberPrice().compareTo(new BigDecimal("0")) == 1;
        }).collect(Collectors.toList());

        memberPriceService.saveBatch(collect);
    }
Spu、Sku列表检索,仓库,订单,的检索和显示
根据前端的数据,判断一下即可,相比上面的简单太多了,不写了,写吐了马上


 741
741


 被折叠的 条评论
为什么被折叠?
被折叠的 条评论
为什么被折叠?
 到【灌水乐园】发言


