


开放原子训练营(第二季)RT-Thread Nano学习营学习心得
学习目标:
- 掌握rt-thread开发环境搭建
- 掌握rt-thread开发部署流程
- 掌握rt-thread nano基本原理
学习内容:
- 搭建rt-thread开发环境
- 基于rt-thread的demo开发代码讲解
- 学习rt-thead的shell命令原理
- 学习rt-thread的时钟
- 学习rt-thread的message-queue
- 学习rt-thread nano内核入门
学习时间:
2023-04-22 10:00-15:00
学习产出:
- 学习心得
心得总结如下:
RT-Thread 的介绍见 百度百科,是一个很优秀的嵌入式系统,国内装机量已到十亿级,性能、稳定性等无疑已经是得到各行业的认证的。个人有幸收到csdn的学习训练营推送,本着学习的心态参加了入门到实践的线下学习。
1. 环境搭建部分
这部分学习内容分为RT-Thread Studio的安装、Sdk Manager的使用以及MDK项目结构说明。
本次实验开发板为 stm32f411-nucleo。
RT-Thread Studio的安装
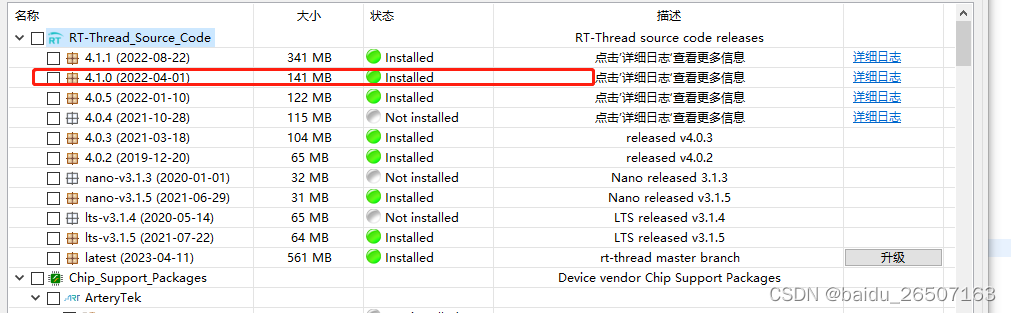
Sdk Manager的使用
SDK管理器中选择代码安装包。

安装RT-Thread源码
安装ST-LINK驱动
双击安装st-link驱动: dpinst_amd64.exe
具体见官方train-note
MDK项目结构说明
src(Kernel):RT-Thread内核源码,提供最基本的RTOS内容
components/drivers (DeviceDrivers):组件与服务层内容,实现外设驱动框架,对上层提供API来对硬件外设操作
components/finsh(Finsh): 组件与服务层内容,使用硬件外设的UART功能来模拟控制台的调试与打印等功能
bsp/Applications(Applications):应用层代码,使用BSP所适配的API来调用底层硬件外设和组件
bsp/drivers(Drivers): 使用开发板厂商所提供的硬件驱动库对DeviceDrivers中所提供的API进行具体实现
bsp/Libraries(Libraries): 开发板所对应的硬件驱动库,用于驱动硬件外设
2. 基于rt-thread的demo开发代码讲解
用户程序入口为 main() 函数,hello程序如下:
/*
 * Copyright (c) 2006-2021, RT-Thread Development Team
 *
 * SPDX-License-Identifier: Apache-2.0
 *
 * Change Logs:
 * Date           Author       Notes
 * 2023-04-22     eIOT       the first version
 */
#include <rtthread.h>

int export_app(void)
{
    rt_kprintf("export_app RT-Thread!\r\n");
    return 0;
}
INIT_APP_EXPORT(export_app);

void hello(void)
{
    rt_kprintf("hello RT-Thread!\n");
}

MSH_CMD_EXPORT(hello , say hello to RT-Thread);

#include <rtthread.h>

#define THREAD_PRIORITY         25
#define THREAD_STACK_SIZE       512
#define THREAD_TIMESLICE        5

static rt_thread_t tid1 = RT_NULL;

/* 线程 1 的入口函数 */
static void thread1_entry(void *parameter)
{
    rt_uint32_t count = 0;

    while (1)
    {
        /* 线程 1 采用低优先级运行,一直打印计数值 */
        rt_kprintf("thread1 count: %d\n", count ++);
        rt_thread_mdelay(500);
    }
}

ALIGN(RT_ALIGN_SIZE)
static char thread2_stack[1024];
static struct rt_thread thread2;
/* 线程 2 入口 */
static void thread2_entry(void *param)
{
    rt_uint32_t count = 0;

    /* 线程 2 拥有较高的优先级,以抢占线程 1 而获得执行 */
    for (count = 0; count < 10 ; count++)
    {
        /* 线程 2 打印计数值 */
        rt_kprintf("thread2 count: %d\n", count);
    }
    rt_kprintf("thread2 exit\n");
    /* 线程 2 运行结束后也将自动被系统脱离 */
}
3. RT-Thread的shell命令原理
shell主要原理是创建一个tshell线程,在空闲时获取字符,如果输入/n 字符,则调用msh_exec 来解析指令。代码部分在components/finsh/shell.c 中。创建自定义shell的demo如下:
/* 线程示例 */
int thread_sample(void)
{
    /* 创建线程 1,名称是 thread1,入口是 thread1_entry*/
    tid1 = rt_thread_create("thread1",
                            thread1_entry, RT_NULL,
                            THREAD_STACK_SIZE,
                            THREAD_PRIORITY, THREAD_TIMESLICE);

    /* 如果获得线程控制块,启动这个线程 */
    if (tid1 != RT_NULL)
    rt_thread_startup(tid1);

    /* 初始化线程 2,名称是 thread2,入口是 thread2_entry */
    rt_thread_init(&thread2,
                    "thread2",
                    thread2_entry,
                    RT_NULL,
                    &thread2_stack[0],
                    sizeof(thread2_stack),
                    THREAD_PRIORITY - 1, THREAD_TIMESLICE);
    rt_thread_startup(&thread2);

    return 0;
}

/* 导出到 msh 命令列表中 */
MSH_CMD_EXPORT(thread_sample, thread sample);
4. 学习rt-thread的时钟
时钟节拍由配置为中断触发模式的硬件定时器产生,当中断到来时,将调用一次:void rt_tick_increase(void),通知操作系统已经过去一个系统时钟,demo如下:
#include <rtthread.h>

/* 定时器的控制块 */
static rt_timer_t timer1;
static rt_timer_t timer2;
static int cnt = 0;

/* 定时器 1 超时函数 */
static void timeout1(void *parameter)
{
    rt_kprintf("periodic timer is timeout %d\n", cnt);

    /* 运行第 10 次,停止周期定时器 */
    if (cnt++ >= 9)
    {
        rt_timer_stop(timer1);
        rt_kprintf("periodic timer was stopped! \n");
    }
}

/* 定时器 2 超时函数 */
static void timeout2(void *parameter)
{
    rt_kprintf("one shot timer is timeout\n");
}

int timer_sample(void)
{
    /* 创建定时器 1  周期定时器 */
    timer1 = rt_timer_create("timer1", timeout1,
                             RT_NULL, 10,
                             RT_TIMER_FLAG_PERIODIC);

    /* 启动定时器 1 */
    if (timer1 != RT_NULL)
        rt_timer_start(timer1);

    /* 创建定时器 2 单次定时器 */
    timer2 = rt_timer_create("timer2", timeout2,
                             RT_NULL, 30,
                             RT_TIMER_FLAG_ONE_SHOT);

    /* 启动定时器 2 */
    if (timer2 != RT_NULL)
        rt_timer_start(timer2);
    return 0;
}

/* 导出到 msh 命令列表中 */
MSH_CMD_EXPORT(timer_sample, timer sample);
5. 学习rt-thread的message-queue
消息队列能够接收来自线程或中断服务例程中不固定长度的消息,并把消息缓存在自己的内存空间中。其他线程也能够从消息队列中读取相应的消息,而当消息队列是空的时候,可以挂起读取线程。当有新的消息到达时,挂起的线程将被唤醒以接收并处理消息,是一种异步的通信方式。demo代码如下:
#include <rtthread.h>

/* 消息队列控制块 */
static struct rt_messagequeue mq;
/* 消息队列中用到的放置消息的内存池 */
static rt_uint8_t msg_pool[2048];

ALIGN(RT_ALIGN_SIZE)
static char thread1_stack[1024];
static struct rt_thread thread1;
/* 线程 1 入口函数 */
static void thread1_entry(void *parameter)
{
    char buf = 0;
    rt_uint8_t cnt = 0;

    while (1)
    {
        /* 从消息队列中接收消息 */
        if (rt_mq_recv(&mq, &buf, sizeof(buf), RT_WAITING_FOREVER) == RT_EOK)
        {
            rt_kprintf("thread1: recv msg from msg queue, the content:%c\n", buf);
            if (cnt == 19)
            {
                break;
            }
        }
        /* 延时 50ms */
        cnt++;
        rt_thread_mdelay(50);
    }
    rt_kprintf("thread1: detach mq \n");
    rt_mq_detach(&mq);
}

ALIGN(RT_ALIGN_SIZE)
static char thread2_stack[1024];
static struct rt_thread thread2;
/* 线程 2 入口 */
static void thread2_entry(void *parameter)
{
    int result;
    char buf = 'A';
    rt_uint8_t cnt = 0;

    while (1)
    {
        if (cnt == 8)
        {
            /* 发送紧急消息到消息队列中 */
            result = rt_mq_urgent(&mq, &buf, 1);
            if (result != RT_EOK)
            {
                rt_kprintf("rt_mq_urgent ERR\n");
            }
            else
            {
                rt_kprintf("thread2: send urgent message - %c\n", buf);
            }
        }
        else if (cnt >= 20) /* 发送 20 次消息之后退出 */
        {
            rt_kprintf("message queue stop send, thread2 quit\n");
            break;
        }
        else
        {
            /* 发送消息到消息队列中 */
            result = rt_mq_send(&mq, &buf, 1);
            if (result != RT_EOK)
            {
                rt_kprintf("rt_mq_send ERR\n");
            }

            rt_kprintf("thread2: send message - %c\n", buf);
        }
        buf++;
        cnt++;
        /* 延时 5ms */
        rt_thread_mdelay(5);
    }
}

/* 消息队列示例的初始化 */
int msgq_sample(void)
{
    rt_err_t result;

    /* 初始化消息队列 */
    result = rt_mq_init(
        &mq,
        "mqt",
        &msg_pool[0],     /* 内存池指向 msg_pool */
        1,                /* 每个消息的大小是 1 字节 */
        sizeof(msg_pool), /* 内存池的大小是 msg_pool 的大小 */
        RT_IPC_FLAG_PRIO  /* 如果有多个线程等待,优先级大小的方法分配消息 */
    );

    if (result != RT_EOK)
    {
        rt_kprintf("init message queue failed.\n");
        return -1;
    }

    rt_thread_init(&thread1,
                   "thread1",
                   thread1_entry,
                   RT_NULL,
                   &thread1_stack[0],
                   sizeof(thread1_stack), 25, 5);
    rt_thread_startup(&thread1);

    rt_thread_init(&thread2,
                   "thread2",
                   thread2_entry,
                   RT_NULL,
                   &thread2_stack[0],
                   sizeof(thread2_stack), 25, 5);
    rt_thread_startup(&thread2);

    return 0;
}

/* 导出到 msh 命令列表中 */
MSH_CMD_EXPORT(msgq_sample, msgq sample);
6. RT-Thread nano内核入门
内核是一个操作系统的核心,是操作系统最基础也是最重要的部分。它负责管理系统的线程、线程间通信、系统时钟、中断及内存等。下图为 RT-Thread 内核架构图,可以看到内核处于硬件层之上,内核部分包括内核库、实时内核实现,如下图所示: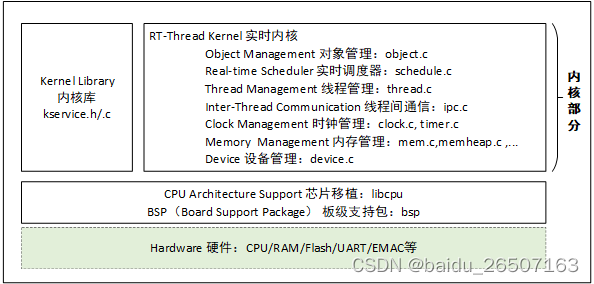
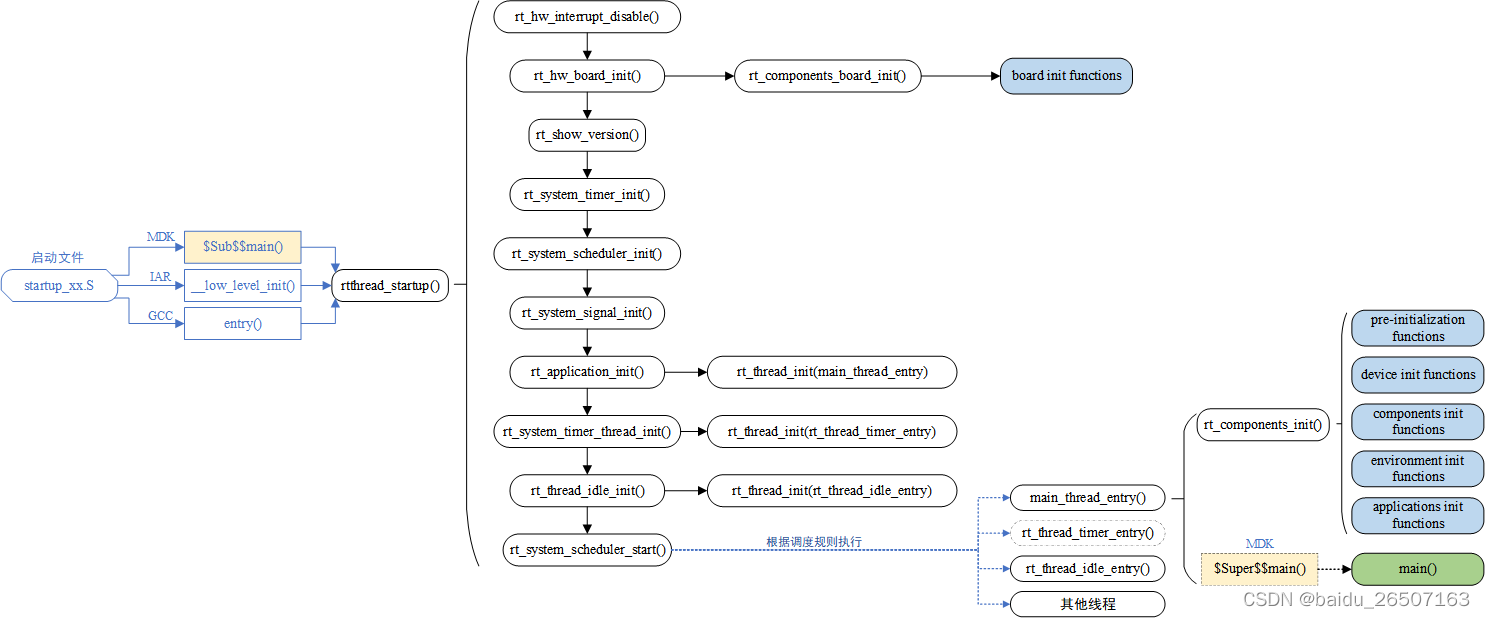
RT-Thread 支持多种平台和多种编译器,而 rtthread_startup() 函数是 RT-Thread 规定的统一启动入口。一般执行顺序是:系统先从启动文件开始运行,然后进入 RT-Thread 的启动函数 rtthread_startup() ,最后进入用户入口函数 main(),如下图所示:
具体可见官网关于内核基础的文档
写在最后
个人目前公司硬件产品使用的嵌入式系统是FreeRTOS,相比于RT-Thread各有优劣。FreeRTOS拥有功能丰富的生态,全球各大主板厂商都拥有基于FreeRTOS的模板,而RT-Thread结构设计更优秀,开发效率更高,对于国内的硬件大可应用RT-Thread。
最后,个人对csdn组织这次训练营表示十分的感谢,经过学习,我掌握了RT-Thread的开发入门基础,扩宽了技术视野,受益匪浅。同时也感谢耐心讲解RT-Thread相关知识的各位技术前辈。


 979
979


 被折叠的 条评论
为什么被折叠?
被折叠的 条评论
为什么被折叠?
 到【灌水乐园】发言


