


layout: post
title: C++进阶(一)C++新特性:智能指针、右值引用、lambda、多线程操作、function和bind、可变模板参数
description: C++进阶(一)C++新特性:智能指针、右值引用、lambda、多线程操作、function和bind、可变模板参数
tag: C++
文章目录
智能指针
-
为什么引入智能指针?
引入智能指针一方面可以自动释放内存,减少出错,另一方面可以共享所有权指针的传播和释放,节省资源。
C++中包含四种智能指针shared_ptr、unique_ptr、weak_ptr、auto_ptr。其中shared_ptr使用引用计数共享对象的所有权,而unique_ptr则独占对象的所有权,weak_ptr不影响引用计数,用于辅助shared_ptr,解决循环引用的问题,auto_ptr是旧版本的unique_ptr,相对于新版本的unique_ptr,不能在容器中保存auto_ptr,也不能从函数中返回auto_ptr。 -
原始使用new和delete管理内存可能存在着的问题:
- 忘记delete掉new出的空间,造成内存泄露,即内存无法再被归还给自由空间回收利用。
- 可能使用了已经delete了的对象,造成访问错误。
- 可能delete了已经delete了的对象,造成重复释放。
shared_ptr
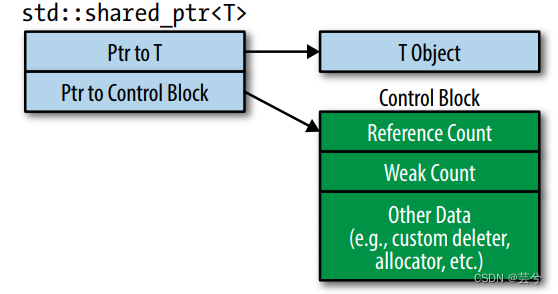
shared_ptr 内部包含两个指针,一个指向对象,另一个指向控制块(control block),控制块中包含一个引用计数(reference count), 一个弱计数(weak count)和其它一些数据。
shared_ptr共享被管理对象,同一时刻可以有多个shared_ptr拥有对象的所有权,当最后一个shared_ptr对象销毁时,被管理对象自动销毁。
简单来说,shared_ptr实现包含了两部分,
一个指向堆上创建的对象的裸指针,raw_ptr
一个指向内部隐藏的、共享的管理对象。share_count_object

make_shared
我们应该优先使用make_shared来构造智能指针,因为他更高效且安全。
auto sp1 = make_shared<int>(100);
或
shared_ptr<int> sp1 = make_shared<int>(100);
//相当于
shared_ptr<int> sp1(new int(100));
shared_ptr使用规范
- 不使用相同的内置指针初始化(或reset)多个智能指针。
- 不delete get()返回的指针
- 不使用get()初始化或reset()另一个智能指针
- 如果使用了get()返回的指针,记住当最后一个对应的智能指针销毁后,那么get()返回的指针就变为无效了。
- 如果使用智能指针管理的资源不是new分配的内存,需要给他传递删除器。
指定删除器
如果用shared_ptr管理非new对象或是没有析构函数的类时,应当为其传递合适的删除器(本质是可调用的函数)。
//1-3-1-delete
#include <iostream>
#include <memory>
using namespace std;
void DeleteIntPtr(int *p) {
cout << "call DeleteIntPtr" << endl;
delete p;
}
int main()
{
std::shared_ptr<int> p(new int(1), DeleteIntPtr);
return 0;
}
当p的引用计数为0时,自动调用删除器DeleteIntPtr来释放对象的内存。删除器可以是一个lambda表达式,上面的写法可以改为:
std::shared_ptr<int> p(new int(1), [](int *p) {cout << "call lambda delete p" << endl;delete p;});
shared_from_this()
不要将this指针作为shared_ptr返回出来,因为this指针本质上是一个裸指针,因此,这样可能会导致
重复析构,看下面的例子。
//1-3-2-shared_from_this
#include <iostream>
#include <memory>
using namespace std;
class A
{
public:
shared_ptr<A> GetSelf()
{
return shared_ptr<A>(this); // 不要这么做
}
~A()
{
cout << "Destructor A" << endl;
}
};
int main()
{
shared_ptr<A> sp1(new A);
shared_ptr<A> sp2 = sp1->GetSelf();
return 0;
}
运行后调用了两次析构函数。
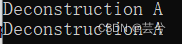
在这个例子中,由于用同一个指针(this)构造了两个智能指针sp1和sp2,而他们之间是没有任何关系的,在离开作用域之后this将会被构造的两个智能指针各自析构,导致重复析构的错误。
正确返回this的shared_ptr的做法是:让目标类通过std::enable_shared_from_this类,然后使用基类的成员函数shared_from_this()来返回this的shared_ptr,如下所示。
//1-3-2-shared_from_this2
#include <iostream>
#include <memory>
using namespace std;
class A: public std::enable_shared_from_this<A>
{
public:
shared_ptr<A>GetSelf()
{
return shared_from_this(); //
}
~A()
{
cout << "Destructor A" << endl;
}
};
int main()
{
shared_ptr<A> sp1(new A);
shared_ptr<A> sp2 = sp1->GetSelf(); // ok
return 0;
}
std::enable_shared_from_this类中有一个weak_ptr,这个weak_ptr用来观察this智能指针,调用shared_from_this()方法是,会调用内部这个weak_ptr的lock()方法,将所观察的shared_ptr返回。
在外面创建A对象的智能指针和通过对象返回this的智能指针都是安全的,因为shared_from_this()是内部的weak_ptr调用lock()方法之后返回的智能指针,在离开作用域之后,spy的引用计数减为0,A对象会被析构,不会出现A对象被析构两次的问题。
weak_ptr
share_ptr虽然已经很好用了,但是有一点share_ptr智能指针还是有内存泄露的情况,当两个对象相互使用一个shared_ptr成员变量指向对方,会造成循环引用,使引用计数失效,从而导致内存泄漏。
weak_ptr 是一种不控制对象生命周期的智能指针, 它指向一个 shared_ptr 管理的对象. 进行该对象的内存管理的是那个强引用的shared_ptr, weak_ptr只是提供了对管理对象的一个访问手段。
weak_ptr 设计的目的是为配合 shared_ptr 而引入的一种智能指针来协助 shared_ptr 工作, 它只可以从一个 shared_ptr 或另一个 weak_ptr 对象构造, 它的构造和析构不会引起引用记数的增加或减少。
weak_ptr的基本用法:
- 通过use_count()方法获取当前观察资源的引用计数,如下所示:
shared_ptr<int> sp(new int(10));
weak_ptr<int> wp(sp);
cout << wp.use_count() << endl; //结果讲输出1
- 通过expired()方法判断所观察资源是否已经释放,如下所示:
shared_ptr<int> sp(new int(10));
weak_ptr<int> wp(sp);
if(wp.expired())
cout << "weak_ptr无效,资源已释放";
else
cout << "weak_ptr有效";
- 通过lock方法获取监视的shared_ptr,如下所示:
std::weak_ptr<int> gw;
void f()
{
auto spt = gw.lock();
if(gw.expired()) {
cout << "gw无效,资源已释放";
}
else {
cout << "gw有效, *spt = " << *spt << endl;
}
}
int main()
{
	{
		auto sp = std::make_shared<int>(42);
		gw = sp;
		f();
	}
	f();
	return 0;
}
unique_ptr
unique_ptr是一个独占型的智能指针,它不允许其他的智能指针共享其内部的指针,不允许通过赋值将一个unique_ptr赋值给另一个unique_ptr。与shared_ptr不同,某个时刻只有一个unique_ptr指向给定对象,当unique_ptr被销毁,它所指向的对象也被销毁。
unique_ptr<T> my_ptr(new T);
unique_ptr<T> my_other_ptr = my_ptr; // 报错,不能复制
unique_ptr不允许复制,但可以通过函数返回给其他的unique_ptr,还可以通过std::move来转移到其他的unique_ptr,这样它本身就不再拥有原来指针的所有权了。例如
unique_ptr<T> my_ptr(new T); // 正确
unique_ptr<T> my_other_ptr = std::move(my_ptr); // 正确
unique_ptr<T> ptr = my_ptr; // 报错,不能复制
std::make_shared是c++11的一部分,但std::make_unique不是。它是在c++14里加入标准库的。
auto upw1(std::make_unique<Widget>()); // with make func
std::unique_ptr<Widget> upw2(new Widget); // without make func
使用new的版本重复了被创建对象的键入,但是make_unique函数则没有。重复类型违背了软件工程的一个重要原则:应该避免代码重复,代码中的重复会引起编译次数增加,导致目标代码膨胀。
std::shared_ptr<int> ptr3(new int(1), [](int *p){delete p;}); // 正确
std::unique_ptr<int> ptr4(new int(1), [](int *p){delete p;}); // 错误
unique_ptr需要确定删除器的类型,所以不能像shared_ptr那样直接指定删除器,可以这样写:
std::unique_ptr<int, void(*)(int*)> ptr5(new int(1), [](int *p){delete p;}); //正确
auto_ptr
早期的标准库包含名为auto_ptr的类,它具有unique_ptr的部分特性,但不是全部,特别是不能在容器中保存auto_ptr,也不能从函数中返回auto_ptr,虽热auto_ptr依旧是标准库的一部分,但编写程序应该使用unique_ptr.
右值引用
为支持移动操作,新标准引入了一种新的引用类型——右值引用。我们通过&&而非&获取右值引用。使用右值引用只能绑定到临时对象,所引用的对象将被销毁且没有其他用户,使用右值引用可以自由地接管所引用对象的资源。
标准库move函数
虽然不能将一个右值引用直接绑定到一个左值上,但我们可以显式地将一个左值转换为对应的右值引用类型,还可以通过调用一个名为move的新标准库函数(在头文件utility中)来获得绑定在左值上的右值引用。
int &&rr1 = 42;  // 正确,字面值是右值
int &&rr2 = rr1; // 错误,rr1是左值
int &&rr3 = std::move(rr1); // 正确,使用move获得了左值的右值引用,使用move的源值rr1将不能再使用
我们可以销毁一个移后源对象,也可以赋予它新值,但不能使用一个移后源对象的值
移动构造函数和移动赋值运算符
这两个成员类似对应的拷贝操作,但它们从给定对象“窃取”而不是拷贝资源。
StrVec::StrVec(StrVec &&s) noexcept : elements(s.elements), first_free(s.first_free), cap(s.cap) //移动操作不应抛出任何异常
{
	//令s进入这样的状态——对其运行析构函数是安全的
	s.elements = s.first_free = s.cap = nullptr;
}
noexcept通知标准库我们的构造函数不抛出任何异常,在确认操作不会抛出异常时应该通知编译器,否则它默认移动我们的类对象时可能抛出异常,并且为了处理这种可能性而作出一些额外的工作
Str &StrVec::operator=(StrVec &&rhs) noexcept
{
	// 直接检测自赋值
	if(this != &rhs)
	{
		free();
		elements = rhs.elements;
		first_free = rhs.first_free;
		cap = rhs.cap;
		rhs.elements = rhs.first_free = rhs.cap = nullptr;
	}
	return *this;
}
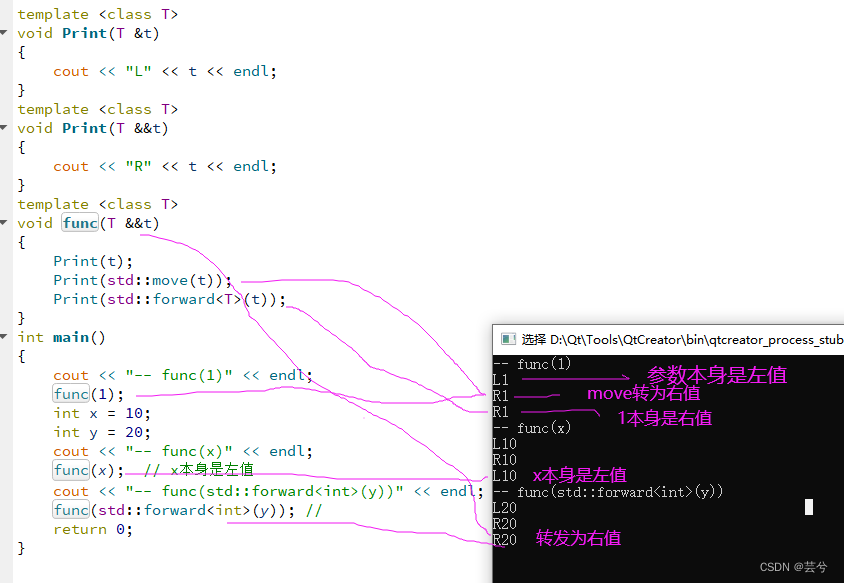
forward 完美转发
forward 完美转发实现了参数在传递过程中保持其值属性的功能,即若是左值,则传递之后仍然是左值,若是右值,则传递之后仍然是右值。
// 2-3-2-forward1
#include <iostream>
using namespace std;
template <class T>
void Print(T &t)
{
cout << "L" << t << endl;
}
template <class T>
void Print(T &&t)
{
cout << "R" << t << endl;
}
template <class T>
void func(T &&t)
{
Print(t);
Print(std::move(t));
Print(std::forward<T>(t));
}
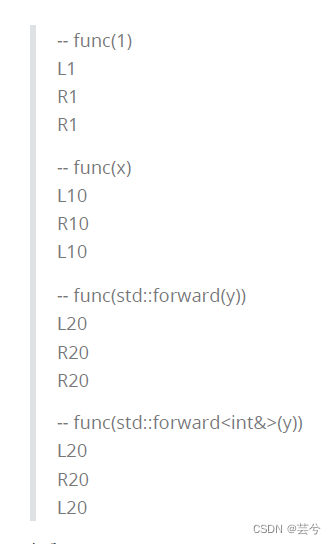
int main()
{
cout << "-- func(1)" << endl;
func(1);
int x = 10;
int y = 20;
cout << "\n-- func(x)" << endl;
func(x); // x本身是左值
cout << "\n-- func(std::forward<int>(y))" << endl;
func(std::forward<int>(y)); T为int,以右值方式转发y
cout << "\n-- func(std::forward<int&>(y))" << endl;
func(std::forward<int&>(y));
cout << "\n-- func(std::forward<int&&>(y))" << endl;
func(std::forward<int&&>(y));
return 0;
}
运行结果:
lambda匿名函数
[捕获列表](参数列表) mutable(可选) 异常属性 -> 返回类型 {
// 函数体
}
语法规则:lambda表达式可以看成是一般函数的函数名被略去,返回值使用了一个 -> 的形式表示。唯一与普通函数不同的是增加了“捕获列表”。
使用捕获列表
一个lambda可以使用一个函数中的局部变量,但必须明确地在捕获列表中指明:
[sz](const string &a, const string &b){return a.size() >= sz;}
完整的biggies
void biggies(vector<string>& words, vector<string>::size_type sz){
	elimDups(words); // 字典序排序,去重
	stable_sort(words.begin(), words.end(), [](const string &a, const string &b) {return a.size() < b.size();});  // 使用lambda按照长度排序
	// 获取一个迭代器,指向第一个满足size() >= sz的元素
	auto wc = find_if(words.begin(), words.end(), [sz](const string &a){return a.size() >= sz;})
// 计算满足size  >= sz的元素的数目
auto count = words.end() - wc;
cout << count << " " << make_plural(count, "word", "s");
		<< "of length" << sz << "or longer" << endl;
	// 打印长度大于等于给定值的单词,每个单词后边接一个空格
for_each(wc, words.end(), [](const string &s){cout << s << " ";});
cout << endl;
}
类似参数传递。变量的捕获方式可以是值或者引用,采用值捕获的前提是变量可以拷贝,与参数传递不同的是,被捕获的变量是在lambda创建时拷贝,而不是调用时拷贝。下边这个例子,创建的lambda拷贝了v1为42的值,后边v1虽然被修改了,但不会影响lambda内对应的值,因为它是在创建lambda时执行的拷贝。
void fcn1(){
	size_t v1 = 42;
	auto f = [v1] {return v1;};
	v1 = 0;
	auto j = f();
}
如果想要在创建lambda后还能修改捕获参数,那么就应该采用引用捕获的方式:
下边的fcn2则会输出0,因为传递的是引用。
void fcn2(){
	size_t v1 = 42;
	auto f2 = [&v1] {return v1;};
	v1 = 0;
	auto j = f2();
}
注意:
- 引用捕获与返回引用有着相同的问题和限制,需保证引用的对象在执行lambda时是存在的。lambda捕获的都是局部变量,这些变量在函数结束后就不复存在了,如果lambda可能在函数结束后执行,捕获的引用指向的局部变量已经消失。
- 一些不能拷贝的类型如ostream,捕获的唯一方式就是引用捕获或指向os的指针。
- 应尽量保存lambda的变量捕获简单化,避免捕获潜在的问题。
除了显式列出我们希望使用的来自所在函数的变量之外,还可以让编译器根据lambda体中的代码推断我们要使用的变量,称为隐式捕获,为了指示编译器推断,应该在捕获列表写一个=或&告诉编译器是采用值捕获还是引用捕获。例如我们可以重写传递给find_if的lambda:
// sz为隐式捕获
wc = find_if(words.begin(), words.end(), [=](const string &s){return s.size() >= sz});
如果希望对一部分变量采用值捕获,其他变量采用引用捕获,可以混合使用隐式捕获和显示捕获,当使用混合捕获时,捕获列表第一个参数必须是=或&,指定默认捕获方式是值或是引用。
// os隐式捕获,指明了是&引用捕获,c是显示捕获
for_each(words.begin(), words.end(), [&, c](const string &s){ os << s << c;});
// c隐式捕获,值捕获,os显式引用捕获
for_each(words.begin(), words.end(), [=, &os](const string &s){os << s << c;});
默认情况下,值拷贝的变量,lambda不会改变其值,如果希望改变,需在参数列表首加上mutable关键字。
size_t v1 = 42;
auto f = [v1]()mutable {return ++v1;};
v1 = 0;
auto j = f(); // j = 43
指定lambda返回类型必须是尾置的
下边这个例子使用标准库中的transform算法和一个lambda来将一个序列中的每个负数替换为它的绝对值:
transform(vi.begin(), vi.end(), vi.begin(), [](int i){return i < 0 ? -i : i});
函数transform接受3个迭代器和一个可调用对象,前两个迭代器表示输入序列,第三个迭代器表示目的位置,算法对输入序列中每个元素调用可调用对象,并将结果写在目的位置。如上边的例子所示,目的迭代器位置是可以与表示输入序列开始的位置相同的。
因为lambda可以根据条件运算符的类型推断返回值类型,所以lambda忽略了返回值类型的声明。如果使用看似等价的if代替上面的三目运算符,则会出错,因为编译器无法推断返回值类型。
transform(vi.begin(), vi.end(), vi.begin(), [](int i){if(i < 0 return -i; else return i;});
当需要为一个lambda定义返回值类型时,必须使用尾置返回值类型:
transform(vi.begin(), vi.end(), vi.begin(), [](int i) -> int{if(i < 0 return -i; else return i;});
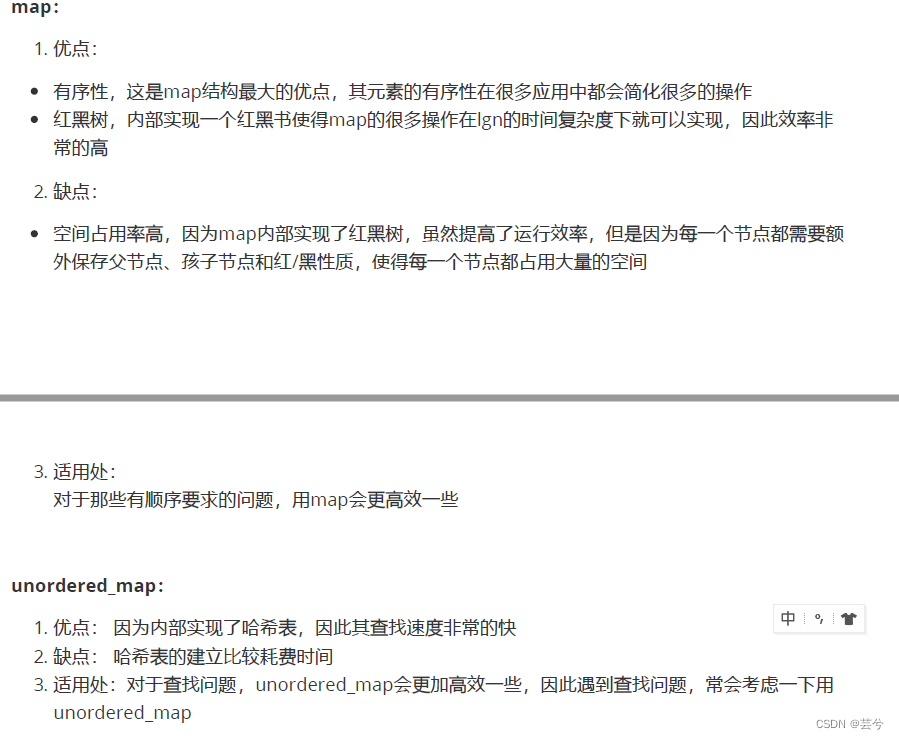
STL无序容器 unordered_map/unordered_set
C++11 增加了无序容器 unordered_map/unordered_multimap 和
unordered_set/unordered_multiset,由于这些容器中的元素是不排序的,因此,比有序容器map/multimap 和 set/multiset 效率更高。 map 和 set 内部是红黑树,在插入元素时会自动排序,而无序容器内部是散列表( Hash Table),通过哈希( Hash),而不是排序来快速操作元素,使得效率更高。由于无序容器内部是散列表,因此无序容器的 key 需要提供 hash_value 函数,其他用法和map/set 的用法是一样的。不过对于自定义的 key,需要提供 Hash 函数和比较函数。
多线程thread
语法
头文件中声明:
#include <thread>
成员函数
- get_id()
获取线程ID,返回类型std::thread::id对象。
http://www.cplusplus.com/reference/thread/thread/get_id/ - joinable()
判断线程是否可以加入等待。(缺省构造的thread对象、已经完成join的thread对象、已经detach的thread对象都不是joinable。)
http://www.cplusplus.com/reference/thread/thread/joinable/ - join()
等该线程执行完成后才返回。(调用该函数会阻塞当前线程(主调线程)。阻塞调用者(caller)所在的线程(主调线程)直至被join的std::thread对象标识的线程(被调线程)执行结束。)
http://www.cplusplus.com/reference/thread/thread/join/ - detach()
detach调用之后,目标线程就成为了守护线程,驻留后台运行,与之关联的std::thread对象失去对目标线程的关联,无法再通过std::thread对象取得该线程的控制权。当线程主函数执行完之后,线程就结束了,运行时库负责清理与该线程相关的资源。
调用 detach 函数之后:- *this 不再代表任何的线程执行实例。
- joinable() == false
- get_id() == std::thread::id()
http://www.cplusplus.com/reference/thread/thread/detach/
构造函数
默认构造函数:
//创建一个空的 thread 执行对象。
thread() _NOEXCEPT
{ // construct with no thread
_Thr_set_null(_Thr);
}
初始化构造函数:
//创建std::thread执行对象,该thread对象可被joinable,新产生的线程会调用threadFun函数,该函
数的参数由 args 给出
template<class Fn, class... Args>
explicit thread(Fn&& fn, Args&&... args);

拷贝构造函数:
// 拷贝构造函数(被禁用),意味着 thread 不可被拷贝构造。
thread(const thread&) = delete;
thread t1;
thread t2 =t1; // 错误
移动构造函数:
//move 构造函数,调用成功之后 x 不代表任何 thread 执行对象。
//注意:可被 joinable 的 thread 对象必须在他们销毁之前被主线程 join 或者将其设置为
detached。
thread(thread&& x)noexcept
thread t1;
thread t2 =move(t1); // 可以
#include<thread>
using namespace std;
void threadFun(int &a) // 引用传递
{
cout << "this is thread fun !" <<endl;
cout <<" a = "<<(a+=10)<<endl;
}
int main()
{
int x = 10;
thread t1(threadFun, std::ref(x));
thread t2(std::move(t1)); // t1 线程失去所有权
thread t3;
t3 = std::move(t2); // t2 线程失去所有权
//t1.join(); // ?
t3.join();
cout<<"Main End "<<"x = "<<x<<endl;
return 0;
}
线程创建
- 传入0个值
- 传入2个值
- 传入引用
- 传入类函数
- detach
- move
使用std::thread创建线程,提供线程函数或者函数对象,并可以同时指定线程函数的参数。
#include <iostream>
#include <thread> // 头文件
using namespace std;
// 1 传入0个值
void func1()
{
cout << "func1 into" << endl;
}
// 2 传入2个值
void func2(int a, int b)
{
cout << "func2 a + b = " << a+b << endl;
}
// 3 传入引用
void func3(int &c) // 引用传递
{
cout << "func3 c = " << &c << endl;
c += 10;
}
//
class A
{
public:
// 4. 传入类函数
void func4(int a)
{
// std::this_thread::sleep_for(std::chrono::seconds(1));
cout << "thread:" << name_<< ", fun4 a = " << a << endl;
}
void setName(string name) {
name_ = name;
}
void displayName() {
cout << "this:" << this << ", name:" << name_ << endl;
}
void play()
{
std::cout<<"play call!"<<std::endl;
}
private:
string name_;
};
//5. detach
void func5()
{
cout << "func5 into sleep " << endl;
std::this_thread::sleep_for(std::chrono::seconds(1));
cout << "func5 leave " << endl;
}
// 6. move
void func6()
{
cout << "this is func6 !" <<endl;
}
int main()
{
// 1. 传入0个值
cout << "\n\n main1--------------------------\n";
std::thread t1(&func1); // 只传递函数
t1.join(); // 阻塞等待线程函数执行结束
// 2. 传入2个值
cout << "\n\n main2--------------------------\n";
int a =10;
int b =20;
std::thread t2(func2, a, b); // 加上参数传递,可以任意参数
t2.join();
// 3. 传入引用
cout << "\n\n main3--------------------------\n";
int c =10;
std::thread t3(func3, std::ref(c)); // 加上参数传递,可以任意参数
t3.join();
cout << "main3 c = " << &c << ", "<<c << endl;
// 4. 传入类函数
1.1.3 线程封装
见范例1-thread2-pack
zero_thread.h
cout << "\n\n main4--------------------------\n";
A * a4_ptr = new A();
a4_ptr->setName("darren");
std::thread t4(A::func4, a4_ptr, 10);
t4.join();
delete a4_ptr;
// 5.detach
cout << "\n\n main5--------------------------\n";
std::thread t5(&func5); // 只传递函数
t5.detach(); // 脱离
// std::this_thread::sleep_for(std::chrono::seconds(2)); // 如果这里不休眠会怎么
样
cout << "\n main5 end\n";
// 6.move
cout << "\n\n main6--------------------------\n";
int x = 10;
thread t6_1(func6);
thread t6_2(std::move(t6_1)); // t6_1 线程失去所有权
t6_1.join(); // 抛出异常
t6_2.join();
return 0;
}
线程封装
zero_thread.h
#ifndef ZERO_THREAD_H
#define ZERO_THREAD_H
#include <thread>
class ZERO_Thread
{
public:
	ZERO_Thread();
	virtual ~ZERO_Thread();
	bool start();
	void stop();
	bool isAlive() const;
	std::thread::id id(){return th_->get_id();}
	std::thread* getThread(){return th_;}
	void join();
	void detach();
	static size_t CURRENT_THREADID();
protected:
	void threadEntry();
	virtual void run() = 0;
private:
	bool running_; // 是否在运行
	std::thread *th_;
};
#endif
zero_thread.cpp
#include "zero_thread.h"
#include <sstream>
#include <iostream>
#include <exception>

ZERO_Thread::ZERO_Thread():running_(false), th_(NULL){}
ZERO_Thread::~ZERO_Thread()
{
	if(th_ != nullptr)
	{
		if(th_->joinable())
		{
			std::cout << "~ZERO_Thread detach\n";
			th_->detach();
		}
		delete th_;
		th_ = nullptr;
	}
	std::cout << "~ZERO_Thread()" << std::endl;
}

bool ZERO_Thread::start()
{
	if (running_)
	{
		return false;
	}
	try
	{
		th_ = new std::thread(ZERO_Thread::threadEntry, this);
	}
	catch(...)
	{
		throw ""[ZERO_Thread::start] thread start error";
	}
	return true;
}

void ZERO_Thread::stop()
{
	running_ = false;
}

bool ZERO_Thread::isAlive() const
{
	return running_;
}

void ZERO_Thread::join()
{
	if(th_->joinable())
	{
		th_->join();
	}
}

void ZERO_Thread::detach()
{
	th_->detach();
}

size_t ZERO_Thread::CURRENT_THREADID()
{
	// 声明为thread_local的本地变量在线程中是持续存在的,不同于普通临时变量的生命周期,
// 它具有static变量一样的初始化特征和生命周期,即使它不被声明为static。
	static thread_local size_t threadId = 0;
	if(threadId == 0)
	{
		std::stringstream ss;
		ss << std::this_thread::get_id();
		threadId = strtol(ss.str().c_str(), nullptr, 0);
	}
	return threadId;
}

void ZERO_Thread::threadEntry()
{
	running_ = true;
	try
	{
		run(); // 函数运行所在
	}
	catch (std::exception &ex)
	{
		running_ = false;
		throw ex;
	}
	catch(...)
	{
		running_ = false;
		throw ;
	}
	running_ = false;
}
main.cpp
#include <iostream>
#include <chrono>
#include "zero_thread.h"
using namespace std;

class A : public ZERO_Thread
{
public:
	void run()
	{
		while(running_)
		{
			cout << "print A" << endl;
			std::this_thread::sleep_for(std::chrono::seconds(5));
		}
		cout << "------- leave A" << endl;
	}
};
class B : public ZERO_Thread
{
public:
	void run()
	{
		while(running_)
		{
			cout << "print B" << endl;
			std::this_thread::sleep_for(std::chrono::seconds(2))
		}
		cout << "------- leave B" << endl;
	}
};

int main()
{
	{
		A a;
		a.start();
		B b;
		b.start();
		std::this_thread::sleep_for(std::chrono::seconds(5));
		a.stop();
		a.join();
		b.stop();
		b.join(); // 需要我们自己join
	}
	cout << "Hello World!" << endl;
	return 0;
}
互斥量mutex
mutex又称互斥量,C++ 11中与 mutex相关的类(包括锁类型)和函数都声明在 头文件<mutex.h>中,所以如果你需要使用 std::mutex,就必须包含 头文件。
C++11提供如下4种语义的互斥量(mutex):
- std::mutex,独占的互斥量,不能递归使用。
- std::time_mutex,带超时的独占互斥量,不能递归使用。
- std::recursive_mutex,递归互斥量,不带超时功能。
- std::recursive_timed_mutex,带超时的递归互斥量。
mutex
std::mutex 是C++11 中最基本的互斥量,std::mutex 对象提供了独占所有权的特性——即不支持递归地对 std::mutex 对象上锁,而 std::recursive_lock 则可以递归地对互斥量对象上锁。
std::mutex 的成员函数:
- 构造函数,std::mutex不允许拷贝构造,也不允许 move 拷贝,最初产生的 mutex 对象是处于unlocked 状态的。
- lock(),调用线程将锁住该互斥量。线程调用该函数会发生下面 3 种情况:
- (1). 如果该互斥量当前没有被锁住,则调用线程将该互斥量锁住,直到调用 unlock之前,该线程一直拥有该锁。
- (2). 如果当前互斥量被其他线程锁住,则当前的调用线程被阻塞住。
- (3). 如果当前互斥量被当前调用线程锁住,则会产生死锁(deadlock)。
- unlock(), 解锁,释放对互斥量的所有权。
- try_lock(),尝试锁住互斥量,如果互斥量被其他线程占有,则当前线程也不会被阻塞。线程调用该函数也会出现下面 3 种情况:
- (1). 如果当前互斥量没有被其他线程占有,则该线程锁住互斥量,直
到该线程调用 unlock 释放互斥量。 - (2). 如果当前互斥量被其他线程锁住,则当前调用线程返回
false,而并不会被阻塞掉。 - (3). 如果当前互斥量被当前调用线程锁住,则会产生死锁(deadlock)。
- (1). 如果当前互斥量没有被其他线程占有,则该线程锁住互斥量,直
下面这个例子开辟了10个线程自增counter变量,如果使用try_lock()就不一定每次都能拿到锁去自增,如果使用lock()就会将counter自增到10 × 10K。
//1-2-mutex1
#include <iostream> // std::cout
#include <thread> // std::thread
#include <mutex> // std::mutex
volatile int counter(0); // non-atomic counter
std::mutex mtx; // locks access to counter
void increases_10k()
{
for (int i=0; i<10000; ++i) {
// 1. 使用try_lock的情况
// if (mtx.try_lock()) { // only increase if currently not locked:
// ++counter;
// mtx.unlock();
// }
// 2. 使用lock的情况
		{
			mtx.lock();
			++counter;
			mtx.unlock();
		}
	}
}
int main()
{
	std::thread threads[10];
	for (int i=0; i<10; ++i)
		threads[i] = std::thread(increases_10k);
	for (auto& th : threads) th.join();
		std::cout << " successful increases of the counter " << counter << std::endl;
return 0;
}
recursive_mutex
递归锁允许同一个线程多次获取该互斥锁,可以用来解决同一线程需要多次获取互斥量时死锁的问题。
//死锁范例1-2-mutex2-dead-lock
#include <iostream>
#include <thread>
#include <mutex>
struct Complex
{
	int i;
	Complex() : i(0){}
	void mul(int x)
	{
		std::lock_guard<std::mutex> lock(mutex);
		i *= x;
	}
	void div(int x)
	{
		std::lock_guard<std::mutex> lock(mutex);
		i /= x;
	}

	void both(int x, int y)
	{
		std::lock_guard<std::mutex> lock(mutex);
		mul(x);
		div(y);
	}
};
运行后出现死锁的情况。在调用both时获取了互斥量,在调用mul时又要获取互斥量,但both的并没有释放,从而产生死锁。
使用递归锁std::mutex mutex;
//递归锁1-2-recursive_mutex1
#include <iostream>
#include <thread>
#include <mutex>
struct Complex
{
	std::recursive_mutex mutex;
	int i;
	Complex() : i(0){}
	void mul(int x)
	{
		std::lock_guard<std::recursive_mutex> lock(mutex);
		i *= x;
	}
	void div(int x)
	{
		std::lock_guard<std::recursive_mutex> lock(mutex);
		i /= x;
	}
	void both(int x, int y)
	{
		std::lock_guard<std::recursive_mutex> lock(mutex);
		mul(x);
		div(y);
	}
};

int main(void)
{
	Complex complex;
	complex.both(32, 23); //因为同一线程可以多次获取同一互斥量,不会发生死锁
	std::cout << "main finish\n";
	return 0;
}
虽然递归锁能解决这种情况的死锁问题,但是尽量不要使用递归锁,主要原因如下:
- 需要用到递归锁的多线程互斥处理本身就是可以简化的,允许递归很容易放纵复杂逻辑的产生,并
且产生晦涩,当要使用递归锁的时候应该重新审视自己的代码是否一定要使用递归锁; - 递归锁比起非递归锁,效率会低;
- 递归锁虽然允许同一个线程多次获得同一个互斥量,但可重复获得的最大次数并未具体说明,一旦超过一定的次数,再对lock进行调用就会抛出std::system错误。
带超时的互斥量timed_mutex和recursive_timed_mutex
std::timed_mutex比std::mutex多了两个超时获取锁的接口:try_lock_for和try_lock_until
//1-2-timed_mutex
#include <iostream>
#include <thread>
#include <mutex>
#include <chrono>
std::timed_mutex mutex;
void work()
{
	std::chrono::milliseconds timeout(100);
	while (true)
		{
		if (mutex.try_lock_for(timeout))
		{
			std::cout << std::this_thread::get_id() << ": do work with the
			mutex" << std::endl;
			std::chrono::milliseconds sleepDuration(250);
			std::this_thread::sleep_for(sleepDuration);
			mutex.unlock();
			std::this_thread::sleep_for(sleepDuration);
		}
		else
		{
			std::cout << std::this_thread::get_id() << ": do work without the
			mutex" << std::endl;
			std::chrono::milliseconds sleepDuration(100);
			std::this_thread::sleep_for(sleepDuration);
		}
	}
}
int main(void)
{
	std::thread t1(work);
	std::thread t2(work);
	t1.join();
	t2.join();
	std::cout << "main finish\n";
	return 0;
}
lock_guard和unique_lock的使用和区别
相对于手动lock和unlock,我们可以使用RAII(通过类的构造析构)来实现更好的编码方式。
RAII:也称为“资源获取就是初始化”,是c++等编程语言常用的管理资源、避免内存泄露的方法。它保证在任何情况下,使用对象时先构造对象,最后析构对象。
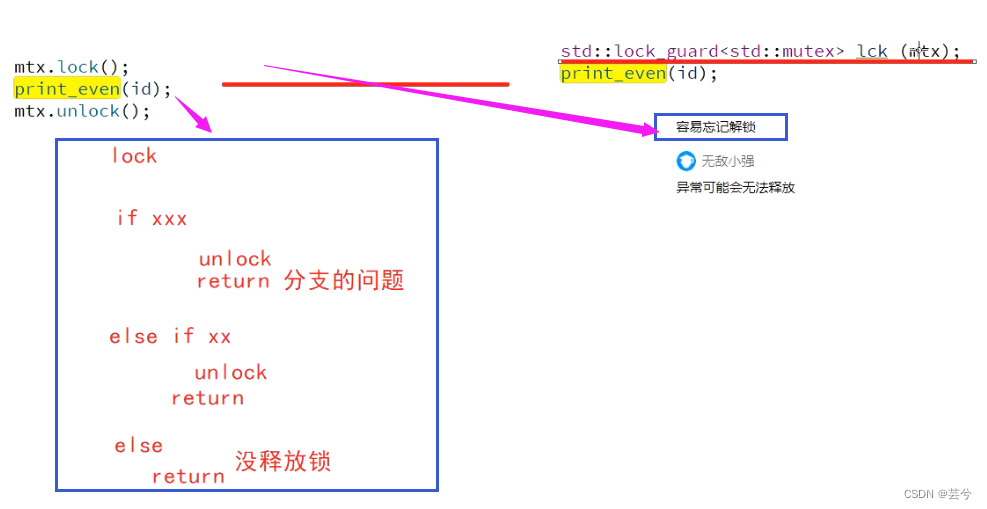
unique_lock,lock_guard的使用
unique_lock,lock_guard这两种锁都可以对std::mutex进行封装,在创建时自动加锁,在销毁时自动解锁。实现RAII的效果。
#include <iostream> // std::cout
#include <thread> // std::thread
#include <mutex> // std::mutex, std::lock_guard
#include <stdexcept> // std::logic_error
std::mutex mtx;
void print_even (int x) {
	if (x%2==0) std::cout << x << " is even\n";
	else throw (std::logic_error("not even"));
}
void print_thread_id (int id) {
	try {
	// using a local lock_guard to lock mtx guarantees unlocking on destruction / exception:
	std::lock_guard<std::mutex> lck (mtx);
	print_even(id);
	}
	catch (std::logic_error&) {
	std::cout << "[exception caught]\n";
	}
}
int main ()
{
	std::thread threads[10];
	// spawn 10 threads:
	for (int i=0; i<10; ++i)
	threads[i] = std::thread(print_thread_id,i+1);
	for (auto& th : threads) th.join();
	return 0;
}
unique_lock,lock_guard的区别
- 区域锁lock_guard使用起来比较简单,除了构造函数外没有其他member function,在整个区域都有效。
区域锁unique_lock除了lock_guard的功能外,提供了更多的member_function,主要是unique_lock可以进行临时解锁和再上锁,如在构造对象之后使用lck.unlock()就可以进行解锁,lck.lock()进行上锁,而不必等到析构时自动解锁。,相对来说更灵活一些;但是在unique_lock占用地内存更多,效率也有所下降。
#include <iostream>
#include <deque>
#include <thread>
#include <mutex>
#include <condition_variable>
#include <unistd.h>
std::deque<int> q;
std::mutex mu;
std::condition_variable cond;
int count = 0;
void fun1() {
while (true) {
	// {
	std::unique_lock<std::mutex> locker(mu);
	q.push_front(count++);
	locker.unlock(); // 这里是不是必须的?
	cond.notify_one();
	// }
	sleep(1);
	}
}
void fun2() {
	while (true) {
	std::unique_lock<std::mutex> locker(mu);
	cond.wait(locker, [](){return !q.empty();});
	auto data = q.back();
	q.pop_back();
	// locker.unlock(); // 这里是不是必须的?
	std::cout << "thread2 get value form thread1: " << data << std::endl;
	}
}
int main() {
	std::thread t1(fun1);
	std::thread t2(fun2);
	t1.join();
	t2.join();
	return 0;
}
条件变量的目的就是为了,在没有获得某种提醒时长时间休眠; 如果正常情况下, 我们需要一直循环
(+sleep), 这样的问题就是CPU消耗+时延问题,条件变量的意思是在cond.wait这里一直休眠直到
cond.notify_one唤醒才开始执行下一句; 还有cond.notify_all()接口用于唤醒所有等待的线程。
那么为什么必须使用unique_lock呢?
原因: 条件变量在wait时会进行unlock再进入休眠, lock_guard并无该操作接口
wait: 如果线程被唤醒或者超时那么会先进行lock获取锁, 再判断条件(传入的参数)是否成立, 如果成立则
wait函数返回否则释放锁继续休眠
notify: 进行notify动作并不需要获取锁
使用场景:需要结合notify+wait的场景使用unique_lock; 如果只是单纯的互斥使用lock_guard
条件变量condition_variable
互斥量是多线程间同时访问某一共享变量时,保证变量可被安全访问的手段。但单靠互斥量无法实现线程的同步。线程同步是指线程间需要按照预定的先后次序顺序进行的行为。C++11对这种行为也提供了有力的支持,这就是条件变量。条件变量位于头文件condition_variable下。
条件变量
条件变量使用过程:
- 拥有条件变量的线程获取互斥量;
- 循环检查某个条件,如果条件不满足则阻塞直到条件满足;如果条件满足则向下执行;
- 某个线程满足条件执行完之后调用notify_one或notify_all唤醒一个或者所有等待线程。
条件变量提供了两类操作:wait和notify。这两类操作构成了多线程同步的基础。
wait
函数原型:
void wait (unique_lock<mutex>& lck);
template <class Predicate>
void wait (unique_lock<mutex>& lck, Predicate pred);
包含两种重载,第一种只包含unique_lock对象,另外一个Predicate 对象(等待条件),这里必须使用unique_lock,因为wait函数的工作原理:
- 当前线程调用wait()后将被阻塞并且函数会解锁互斥量,直到另外某个线程调用notify_one或者
notify_all唤醒当前线程;一旦当前线程获得通知(notify),wait()函数也是自动调用lock(),同理不能使用lock_guard对象。 - 如果wait没有第二个参数,第一次调用默认条件不成立,直接解锁互斥量并阻塞到本行,直到某一个线程调用notify_one或notify_all为止,被唤醒后,wait重新尝试获取互斥量,如果得不到,线程会卡在这里,直到获取到互斥量,然后无条件地继续进行后面的操作。
- 如果wait包含第二个参数,如果第二个参数不满足,那么wait将解锁互斥量并堵塞到本行,直到某一个线程调用notify_one或notify_all为止,被唤醒后,wait重新尝试获取互斥量,如果得不到,线程会卡在这里,直到获取到互斥量,然后继续判断第二个参数,如果表达式为false,wait对互斥量解锁,然后休眠,如果为true,则进行后面的操作。
wait_for
函数原型:
template <class Rep, class Period>
cv_status wait_for (unique_lock<mutex>& lck,
const chrono::duration<Rep,Period>& rel_time);
template <class Rep, class Period, class Predicate>
bool wait_for (unique_lock<mutex>& lck,
const chrono::duration<Rep,Period>& rel_time, Predicate pred);
和wait不同的是,wait_for可以执行一个时间段,在线程收到唤醒通知或者时间超时之前,该线程都会处于阻塞状态,如果收到唤醒通知或者时间超时,wait_for返回,剩下操作和wait类似。
wait_until函数
函数原型:
template <class Clock, class Duration>
cv_status wait_until (unique_lock<mutex>& lck,
const chrono::time_point<Clock,Duration>& abs_time);
template <class Clock, class Duration, class Predicate>
bool wait_until (unique_lock<mutex>& lck,
const chrono::time_point<Clock,Duration>& abs_time,
Predicate pred);
与wait_for类似,只是wait_until可以指定一个时间点,在当前线程收到通知或者指定的时间点超时之前,该线程都会处于阻塞状态。如果超时或者收到唤醒通知,wait_until返回,剩下操作和wait类似
notify_one
函数原型:
void notify_one() noexcept;
解锁正在等待当前条件的线程中的一个,如果没有线程在等待,则函数不执行任何操作,如果正在等待的线程多余一个,则唤醒的线程是不确定的。
notify_all
函数原型:
void notify_all() noexcept;
解锁正在等待当前条件的所有线程,如果没有正在等待的线程,则函数不执行任何操作。
原子变量atomic
具体参考:http://www.cplusplus.com/reference/atomic/atomic/
// atomic::load/store example
#include <iostream> // std::cout
#include <atomic> // std::atomic, std::memory_order_relaxed
#include <thread> // std::thread
//std::atomic<int> count = 0;//错误初始化
std::atomic<int> count(0); // 准确初始化 atomic 是线程安全的
void set_count(int x)
{
	std::cout << "set_count:" << x << std::endl;
	count.store(x, std::memory_order_relaxed); // set value atomically
}
void print_count()
{
	int x;
	do
	{
		x = count.load(std::memory_order_relaxed); // get value atomically
	} while (x==0);
		std::cout << "count: " << x << '\n';
}

int main ()
{
	std::thread t1 (print_count);
	std::thread t2 (set_count, 10);
	t1.join();
	t2.join();
	std::cout << "main finish\n";
	return 0;
}
异步操作
- std::future : 异步指向某个任务,然后通过future特性去获取任务函数的返回结果。
- std::aysnc: 异步运行某个任务函数
- std::packaged_task :将任务和feature绑定在一起的模板,是一种封装对任务的封装。
- std::promise参考C++官方手册的范例。
std::aysnc和std::future
std::future期待一个返回,从一个异步调用的角度来说,future更像是执行函数的返回值,C++标准库使用std::future为一次性事件建模,如果一个事件需要等待特定的一次性事件,那么这线程可以获取一个future对象来代表这个事件。
异步调用往往不知道何时返回,但是如果异步调用的过程需要同步,或者说后一个异步调用需要使用前一个异步调用的结果。这个时候就要用到future。
线程可以周期性的在这个future上等待一小段时间,检查future是否已经ready,如果没有,该线程可以先去做另一个任务,一旦future就绪,该future就无法复位(无法再次使用这个future等待这个事件),所以future代表的是一次性事件。
future的类型
在库的头文件中声明了两种future,唯一future(std::future)和共享future(std::shared_future)这
两个是参照。std::unique_ptr和std::shared_ptr设立的,前者的实例是仅有的一个指向其关联事件的实例,而后者可以有多个实例指向同一个关联事件,当事件就绪时,所有指向同一事件的std::shared_future实例会变成就绪。
future的使用
std::future是一个模板,例如std::future< int >,模板参数就是期待返回的类型,虽然future被用于线程间通信,但其本身却并不提供同步访问,热门必须通过互斥元或其他同步机制来保护访问。
future使用的时机是当你不需要立刻得到一个结果的时候,你可以开启一个线程帮你去做一项任务,并期待这个任务的返回,但是std::thread并没有提供这样的机制,这就需要用到std::async和std::future(都在头文件中声明)std::async返回一个std::future对象,而不是给你一个确定的值(所以当你不需要立刻使用此值的时候才需要用到这个机制)。当你需要使用这个值的时候,对future使用get(),线程就会阻塞直到future就绪,然后返回该值。
#include <iostream>
#include <future>
#include <thread>
using namespace std;
int find_result_to_add()
{
	// std::this_thread::sleep_for(std::chrono::seconds(2)); // 用来测试异步延迟的影响
	std::cout << "find_result_to_add" << std::endl;
	return 1 + 1;
}
int find_result_to_add2(int a, int b)
{
	// std::this_thread::sleep_for(std::chrono::seconds(5)); // 用来测试异步延迟的影响
	return a + b;
}
void do_other_things()
{
	std::cout << "do_other_things" << std::endl;
	// std::this_thread::sleep_for(std::chrono::seconds(5));
}

int main()
{
	std::future<int> result = std::async(find_result_to_add);
	// std::future<decltype (find_result_to_add())> result =
	std::async(find_result_to_add);
	// auto result = std::async(find_result_to_add); // 推荐的写法
	do_other_things();
	std::cout << "result: " << result.get() << std::endl; // 延迟是否有影响?
	// std::future<decltype (find_result_to_add2(int, int))> result2 =
	std::async(find_result_to_add2, 10, 20); //错误
	std::future<decltype (find_result_to_add2(0, 0))> result2 =
	std::async(find_result_to_add2, 10, 20);
	std::cout << "result2: " << result2.get() << std::endl; // 延迟是否有影响?
	// std::cout << "main finish" << endl;
return 0;
}
跟thread类似,async允许你通过将额外的参数添加到调用中,来将附加参数传递给函数。如果传入的函数指针是某个类的成员函数,则还需要将类对象指针传入(直接传入,传入指针,或者是std::ref封装)。
默认情况下,std::async是否启动一个新线程,或者在等待future时,任务是否同步运行都取决于你给的参数。这个参数为std::launch类型
- std::launch::defered表明该函数会被延迟调用,直到在future上调用get()或者wait()为止
- std::launch::async,表明函数会在自己创建的线程上运行
- std::launch::any = std::launch::defered | std::launch::async
- std::launch::sync = std::launch::defered
enum class launch
{
	async,deferred,sync=deferred,any=async|deferred
};
PS:默认选项参数被设置为std::launch::any。如果函数被延迟运行可能永远都不会运行。
std::packaged_task
如果说std::async和std::feature还是分开看的关系的话,那么std::packaged_task就是将任务和feature绑定在一起的模板,是一种封装对任务的封装。
可以通过std::packaged_task对象获取任务相关联的feature,调用get_future()方法可以获得
std::packaged_task对象绑定的函数的返回值类型的future。std::packaged_task的模板参数是函数签名。
PS:例如int add(int a, intb)的函数签名就是int(int, int)
#include <iostream>
#include <future>
using namespace std;
int add(int a, int b, int c)
{
	std::cout << "call add\n";
	return a + b + c;
}
void do_other_things()
{
	std::cout << "do_other_things" << std::endl;
}
int main()
{
	std::packaged_task<int(int, int, int)> task(add); // 封装任务
	do_other_things();
	std::future<int> result = task.get_future();
	task(1, 1, 2); //必须要让任务执行,否则在get()获取future的值时会一直阻塞
	std::cout << "result:" << result.get() << std::endl;
	return 0;
}
std::promise
std::promise提供了一种设置值的方式,它可以在这之后通过相关联的std::future对象进行读取。换种说法,之前已经说过std::future可以读取一个异步函数的返回值了,那么这个std::promise就提供一种方式手动让future就绪。
//1-5-promise
#include <future>
#include <string>
#include <thread>
#include <iostream>
using namespace std;
void print(std::promise<std::string>& p)
{
	p.set_value("There is the result whitch you want.");
}
void do_some_other_things()
{
	std::cout << "Hello World" << std::endl;
}
int main()
{
	std::promise<std::string> promise;
	std::future<std::string> result = promise.get_future();
	std::thread t(print, std::ref(promise));
	do_some_other_things();
	std::cout << result.get() << std::endl;
	t.join();
	return 0;
}
由此可以看出在promise创建好的时候future也已经创建好了
线程在创建promise的同时会获得一个future,然后将promise传递给设置他的线程,当前线程则持有future,以便随时检查是否可以取值。
function和bind
头文件:#include<functional>
在设计回调函数的时候,无可避免地会接触到可回调对象。在C++11中,提供了std::function和
std::bind两个方法来对可回调对象进行统一和封装。
C++语言中有几种可调用对象:函数、函数指针、lambda表达式、bind创建的对象以及重载了函数调用运算符的类。
和其他对象一样,可调用对象也有类型。例如,每个lambda有它自己唯一的(未命名)类类型;函数及函数指针的类型则由其返回值类型和实参类型决定。
function
- 保存普通函数
//保存普通函数
void func1(int a)
{
cout << a << endl;
}
//1. 保存普通函数
std::function<void(int a)> func;
func = func1;
func(2); //2
- 保存lambda表达式
std::function<void()> func_1 = [](){cout << "hello world" << endl;};
func_1(); //hello world
- 保存成员函数
//保存成员函数
class A{
public:
	A(string name) : name_(name){}
	void func3(int i) const {cout <<name_ << ", " << i << endl;}
	private:
	string name_;
};
//3 保存成员函数
std::function<void(const A&,int)> func3_ = &A::func3;
A a("darren");
func3_(a, 1);
bind
可将bind函数看作是一个通用的函数适配器,它接受一个可调用对象,生成一个新的可调用对象来“适应”原对象的参数列表。
调用bind的一般形式:auto newCallable = bind(callable, arg_list);
其中,newCallable本身是一个可调用对象,arg_list是一个逗号分隔的参数列表,对应给定的callable的参数。即,当我们调用newCallable时,newCallable会调用callable,并传给它arg_list中的参数。
arg_list中的参数可能包含形如n的名字,其中n是一个整数,这些参数是“占位符”,表示newCallable的参数,它们占据了传递给newCallable的参数的“位置”。数值n表示生成的可调用对象中参数的位置:_1为newCallable的第一个参数,_2为第二个参数,以此类推。
使用_n绑定bind的参数或者重排参数顺序
名字_n都定义在一个名为placeholders的命名空间中,而这个命名空间本身定义在std命名空间。
_n指示了参数位置。
利用bind可以绑定给定可调用对象中的参数或者重新安排顺序.
假定f是一个可调用对象,接受5个参数。
g = bind(f ,a ,b ,_2, _c, _1)
bind绑定后的新可调用对象接受两个参数,第一个位置的参数会赋值给f的第5个位置,而新可调用对象的第二个位置参数会赋值给f的第3个位置。
即g(_1, _2)将被映射为:
f(a,b,_2,c,_1)
下面举一个使用bind重排参数顺序的例子:
bind(isShorter, _2, _1))使得传递给新的可调用对象的第一个位置参数,赋予给了isShort的第二个位置,因此重排参数顺序的结果是,下边第二条语句返回的是按单词长度由长到短排序。
// 按单词长度由短到长排序
sort(words.begin(), words.end(), isShorter);
// 按单词长度由长到短排序。
sort(words.begin(), words.end(), bind(isShorter, _2, _1));
绑定引用参数
与lambda一样,有时需要用引用的方式绑定参数。
而bind本身是对参数进行拷贝,这时需要用到与bind一样处于头文件functional中的ref函数或者cref函数。
函数ref返回一个对象,包含给定的引用,此对象是可以拷贝的,cref生成保存const引用的类。
for_each(words.begin(), words.end(), bind(print, ref(os), _1, ' '));
可变模板参数
C++11的新特性–可变模版参数(variadic templates)是C++11新增的最强大的特性之一,它对参数进行了高度泛化,它能表示0到任意个数、任意类型的参数。
可变参数模板语法:
template <class... T>
void f(T... args);
上面的可变模版参数的定义当中,省略号的作用有两个:
- 声明一个参数包T… args,这个参数包中可以包含0到任意个模板参数;
- 在模板定义的右边,可以将参数包展开成一个一个独立的参数。
上面的参数args前面有省略号,所以它就是一个可变模版参数,我们把带省略号的参数称为“参数包”,它里面包含了0到N(N>=0)个模版参数。我们无法直接获取参数包args中的每个参数的,只能通过展开参数包的方式来获取参数包中的每个参数,这是使用可变模版参数的一个主要特点,也是最大的难点,即如何展开可变模版参数。
可变模版参数和普通的模版参数语义是一致的,所以可以应用于函数和类,即可变模版参数函数和可变模版参数类,然而,模版函数不支持偏特化,所以可变模版参数函数和可变模版参数类展开可变模版参数的方法还不尽相同,下面我们来分别看看他们展开可变模版参数的方法。
可变模版参数的展开
//3-1-variable-parameter 一个简单的可变模版参数函数
#include <iostream>
using namespace std;
template <class... T>
void f(T... args)
{
	cout << sizeof...(args) << endl; //打印变参的个数
}
int main()
{
	f(); //0
	f(1, 2); //2
	f(1, 2.5, ""); //3
	return 0;
}
递归函数方式展开参数包
通过递归函数展开参数包,需要提供一个参数包展开的函数和一个递归终止函数,递归终止函数正是用来终止递归的。
#include <iostream>
using namespace std;
//递归终止函数
void print()
{
	cout << "empty" << endl;
}
//展开函数
template <class T, class ...Args>
void print(T head, Args... rest)
{
	cout << "parameter " << head << endl;
	print(rest...);
}
int main(void)
{
	print(1,2,3,4);
	return 0;
}
上例会输出每一个参数,直到为空时输出empty。展开参数包的函数有两个,一个是递归函数,另外一个是递归终止函数,参数包Args…在展开的过程中递归调用自己,每调用一次参数包中的参数就会少一个,直到所有的参数都展开为止,当没有参数时,则调用非模板函数print终止递归过程。
上面的递归终止函数还可以写成这样:
template <class T>
void print(T t)
{
	cout << t << endl;
}
逗号表达式展开参数包
递归函数展开参数包是一种标准做法,也比较好理解,但也有一个缺点,就是必须要一个重载的递归终止函数,即必须要有一个同名的终止函数来终止递归,这样可能会感觉稍有不便。有没有一种更简单的方式呢?其实还有一种方法可以不通过递归方式来展开参数包,这种方式需要借助逗号表达式和初始化列表。比如前面print的例子可以改成这样:
#include <iostream>
using namespace std;
template <class T>
void printarg(T t)
{
	cout << t << endl;
}
template <class ...Args>
void expand(Args... args)
{
	int arr[] = {(printarg(args), 0)...};
}
int main()
{
	expand(1,2,3,4);
	return 0;
}


 1511
1511


 被折叠的 条评论
为什么被折叠?
被折叠的 条评论
为什么被折叠?
 到【灌水乐园】发言


