Springboot整合MyBatis实现数据库查询(二)

友情提醒

先看文章目录,大致了解文章知识点结构,点击文章目录可直接跳转到文章指定位置。

第一章、准备

1.1)准备数据库表

①使用MySQL数据库,在navicat中导入sql,sql文件已经上传了,表结构如下
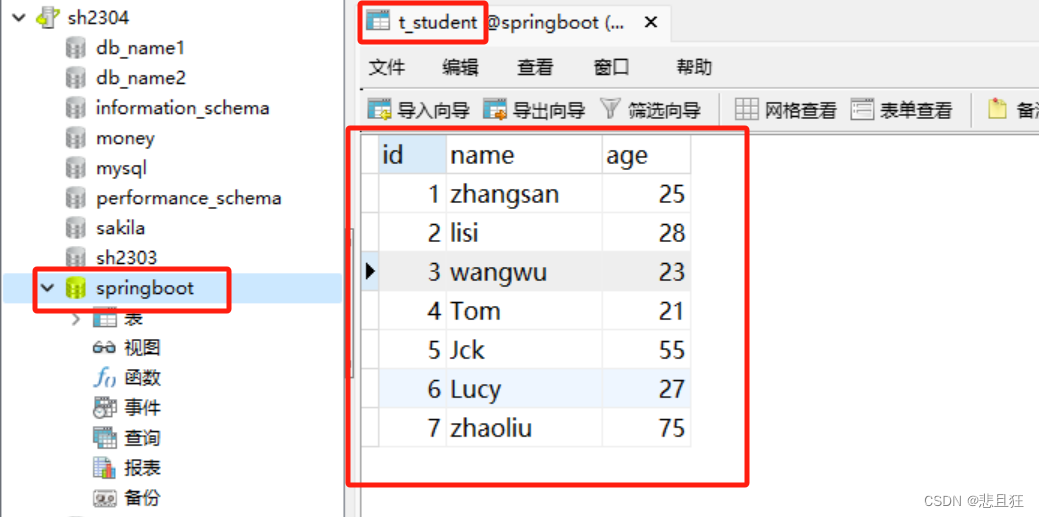
在这里插入图片描述

1.2)创建springboot项目,添加依赖

创建springboot项目参考这个博客链接:快速构建springboot项目
创建好后的目录结构如下
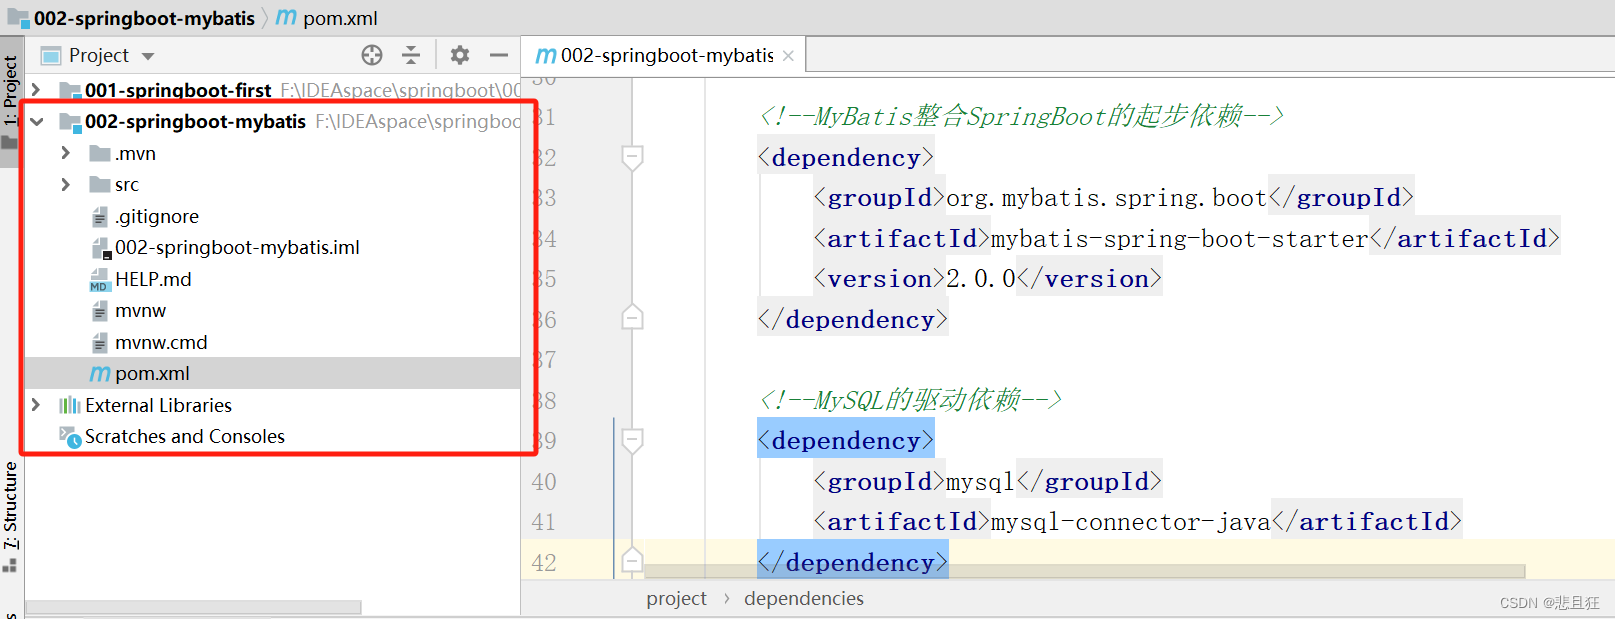
在这里插入图片描述

添加相关依赖

<!--MyBatis整合SpringBoot的起步依赖-->
<dependency>
    <groupId>org.mybatis.spring.boot</groupId>
    <artifactId>mybatis-spring-boot-starter</artifactId>
    <version>2.0.0</version>
</dependency>

<!--MySQL的驱动依赖-->
<dependency>
    <groupId>mysql</groupId>
    <artifactId>mysql-connector-java</artifactId>
    <version>8.0.28</version>
</dependency>

1.3)使用mybatis逆向工程

①添加Generator.xml配置文件到如图目录下,配置文件已经上传了,这里要注意驱动jar包和项目的路径为自己本机实际的路径
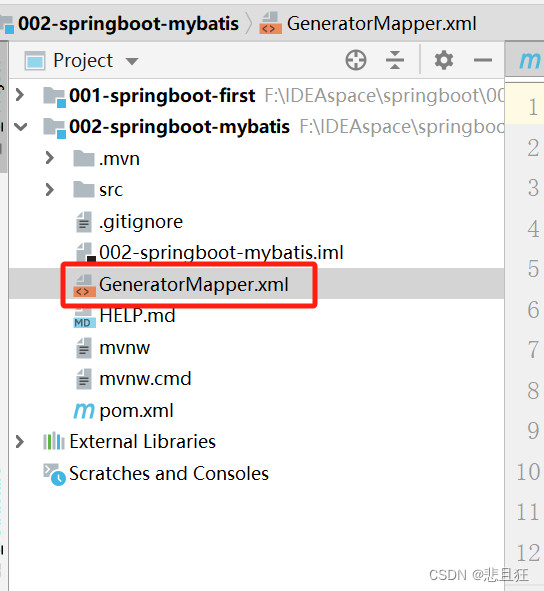
在这里插入图片描述
②pom文件中添加mybatis代码自动生成插件

<!--mybatis代码自动生成插件-->
            <plugin>
                <groupId>org.mybatis.generator</groupId>
                <artifactId>mybatis-generator-maven-plugin</artifactId>
                <version>1.3.6</version>
                <configuration>
                    <!--配置文件的位置-->
                    <configurationFile>GeneratorMapper.xml</configurationFile>
                    <verbose>true</verbose>
                    <overwrite>true</overwrite>
                </configuration>
            </plugin>

③双击红色选中命令,生成相关文件
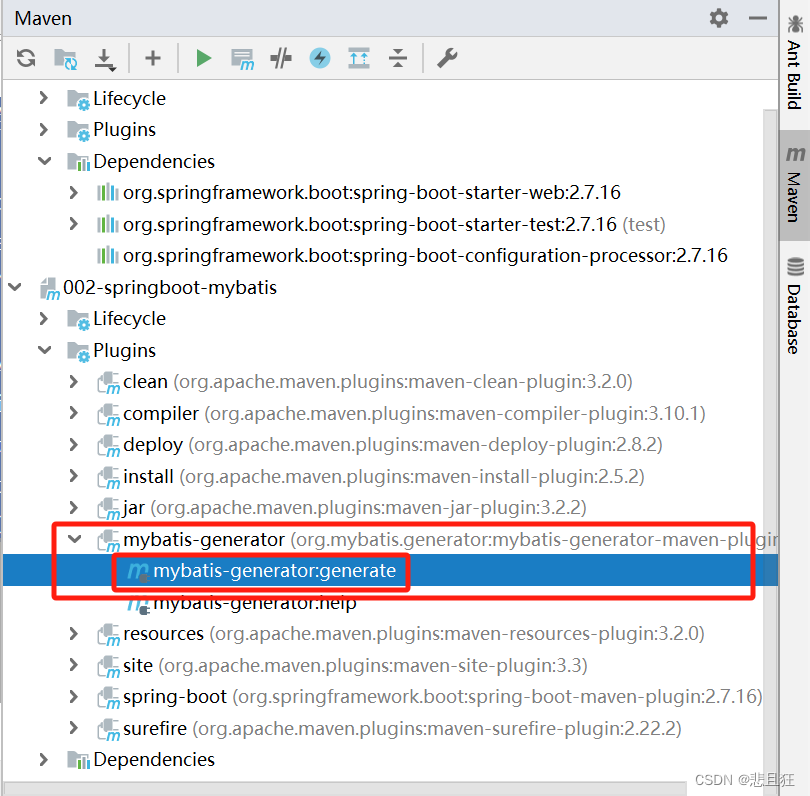
在这里插入图片描述

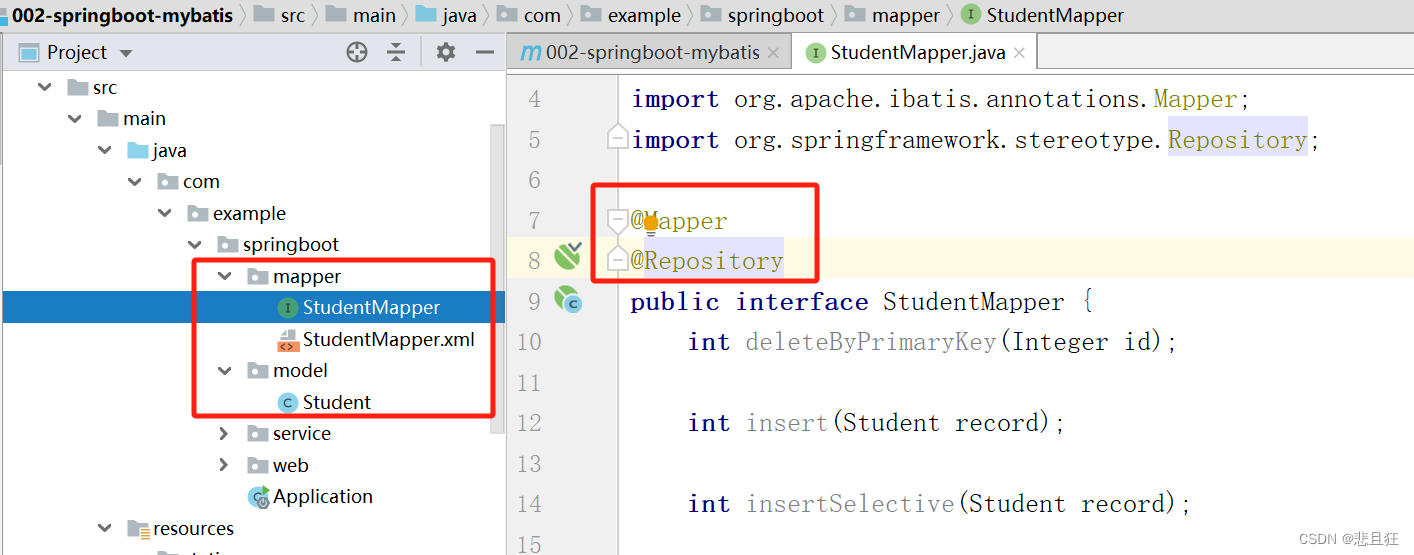
④成功生成mapper和model,并在生成的StudentMapper接口中手动加上@Mapper注解和@Repository注解
在这里插入图片描述
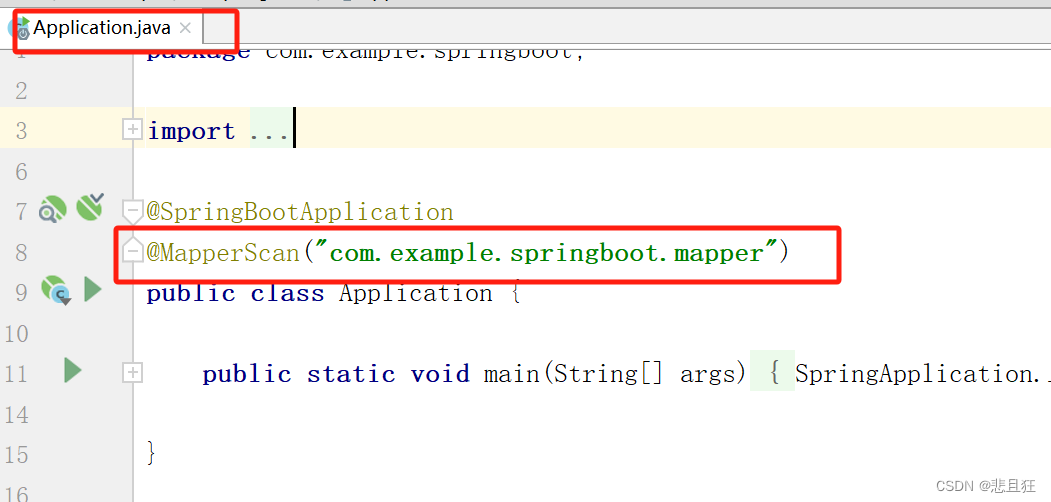
⑤每次都手动添加@Mapper注解很麻烦,我们可以再Application类中使用@MapperScan注解进行扫描包操作达到自动识别的效果
在这里插入图片描述

第二章、代码开发

2.1)建包并编写代码

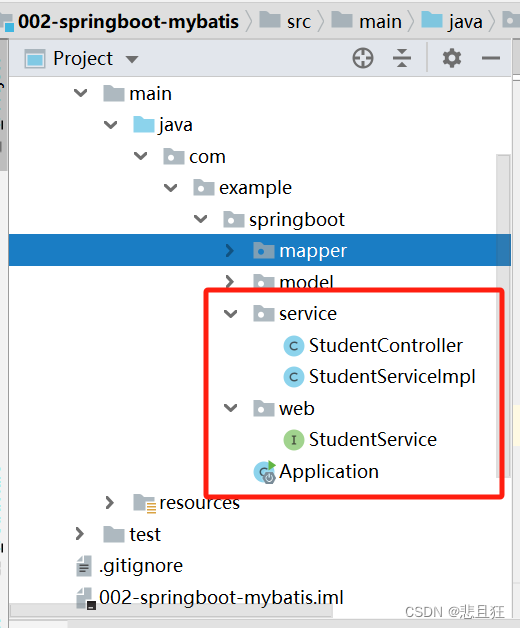
①在com.example.springboot目录下创建web包和service包。
在这里插入图片描述

②web包下创建StudentController并编写代码

package com.example.springboot.service;

import com.example.springboot.model.Student;
import com.example.springboot.web.StudentService;
import org.springframework.beans.factory.annotation.Autowired;
import org.springframework.stereotype.Controller;
import org.springframework.web.bind.annotation.RequestMapping;
import org.springframework.web.bind.annotation.ResponseBody;

@Controller
public class StudentController {

    @Autowired
    private StudentService studentService;

    @RequestMapping(value = "/springBoot/student")
    public @ResponseBody
    Object student() {

        Student student = studentService.queryStudentById(1);

        return student;
    }
}

③service包下创建StudentService 接口并编写代码

package com.example.springboot.web;

import com.example.springboot.model.Student;

public interface StudentService {

    /**
     * 根据学生标识获取学生详情
     * @param id
     * @return
     */
    Student queryStudentById(Integer id);
}

⑤service包下创建StudentServiceImpl并编写代码

package com.example.springboot.service;

import com.example.springboot.mapper.StudentMapper;
import com.example.springboot.model.Student;
import com.example.springboot.web.StudentService;
import org.springframework.beans.factory.annotation.Autowired;
import org.springframework.stereotype.Service;

@Service
public class StudentServiceImpl implements StudentService {

    @Autowired
    private StudentMapper studentMapper;

    @Override
    public Student queryStudentById(Integer id) {
        return studentMapper.selectByPrimaryKey(id);
    }
}

2.2)application配置文件


#配置内嵌Tomcat端口号
server.port=9003

#配置项目上下文根
server.servlet.context-path=/002-springboot-mybatis

#配置数据库的连接信息
#注意这里的驱动类有变化
spring.datasource.driver-class-name=com.mysql.cj.jdbc.Driver
spring.datasource.url=jdbc:mysql://localhost:3306/springboot?serverTimezone=UTC&characterEncoding=utf-8
spring.datasource.username=root
spring.datasource.password=root

2.3)设置编译位置

 <resources>
            <resource>
                <directory>src/main/java</directory>
                <includes>
                    <include>**/*.xml</include>
                </includes>
            </resource>
        </resources>

第三章、测试访问

3.1)访问浏览器

访问http://localhost:9003/002-springboot-mybatis/springBoot/student成功查询到数据

在这里插入图片描述

  • 19
    点赞
  • 8
    收藏
    觉得还不错? 一键收藏
  • 0
    评论
你可以按照以下步骤来实现Spring BootMyBatis整合,并实现省市区三级查询: 1. 首先,在你的Spring Boot项目中添加MyBatisMyBatis-Spring的依赖。你可以在项目的pom.xml文件中添加以下依赖: ```xml <dependencies> <!-- MyBatis --> <dependency> <groupId>org.mybatis.spring.boot</groupId> <artifactId>mybatis-spring-boot-starter</artifactId> <version>2.1.4</version> </dependency> <!-- MySQL 数据库驱动 --> <dependency> <groupId>mysql</groupId> <artifactId>mysql-connector-java</artifactId> <version>8.0.21</version> </dependency> <!-- 其他依赖... --> </dependencies> ``` 2. 在你的Spring Boot配置文件application.properties或application.yml中添加数据库连接配置,例如: ```properties # 数据库连接配置 spring.datasource.url=jdbc:mysql://localhost:3306/your_database_name spring.datasource.username=your_username spring.datasource.password=your_password spring.datasource.driver-class-name=com.mysql.cj.jdbc.Driver # MyBatis 配置 mybatis.mapper-locations=classpath:mapper/**/*.xml mybatis.type-aliases-package=com.example.yourproject.model ``` 3. 创建省市区的数据表,并定义对应的实体类。 4. 创建MyBatis的Mapper接口,用于定义省市区数据表的增删改查操作。例如,创建一个CityMapper接口: ```java public interface CityMapper { City getById(int id); List<City> getByProvinceId(int provinceId); // 其他查询方法... } ``` 5. 创建MyBatis的Mapper XML文件,对应CityMapper接口的方法。例如,创建一个cityMapper.xml文件: ```xml <?xml version="1.0" encoding="UTF-8"?> <!DOCTYPE mapper PUBLIC "-//mybatis.org//DTD Mapper 3.0//EN" "http://mybatis.org/dtd/mybatis-3-mapper.dtd"> <mapper namespace="com.example.yourproject.mapper.CityMapper"> <resultMap id="BaseResultMap" type="com.example.yourproject.model.City"> <id column="id" property="id" jdbcType="INTEGER"/> <result column="name" property="name" jdbcType="VARCHAR"/> <result column="province_id" property="provinceId" jdbcType="INTEGER"/> <!-- 其他字段映射... --> </resultMap> <select id="getById" resultMap="BaseResultMap"> SELECT * FROM city WHERE id = #{id} </select> <select id="getByProvinceId" resultMap="BaseResultMap"> SELECT * FROM city WHERE province_id = #{provinceId} </select> <!-- 其他查询语句... --> </mapper> ``` 6. 创建Service层和Controller层,用于调用MyBatis的Mapper接口进行查询操作。例如,创建一个CityService和CityController: ```java @Service public class CityService { @Autowired private CityMapper cityMapper; public City getById(int id) { return cityMapper.getById(id); } public List<City> getByProvinceId(int provinceId) { return cityMapper.getByProvinceId(provinceId); } // 其他查询方法... } @RestController public class CityController { @Autowired private CityService cityService; @GetMapping("/city/{id}") public City getCityById(@PathVariable int id) { return cityService.getById(id); } @GetMapping("/city/province/{provinceId}") public List<City> getCitiesByProvinceId(@PathVariable int provinceId) { return cityService.getByProvinceId(provinceId); } // 其他接口... } ``` 7. 启动Spring Boot应用程序,并测试接口的调用。例如,通过访问`http://localhost:8080/city/1`可以获取id为1的城市信息,通过访问`http://localhost:8080/city/province/1`可以获取省份id为1的所有城市信息。 以上是整合Spring BootMyBatis实现省市区三级查询的基本步骤,你可以根据自己的需求进行修改和扩展。希望对你有帮助!如果你有任何问题,请随时提问。
评论
添加红包

请填写红包祝福语或标题

红包个数最小为10个

红包金额最低5元

当前余额3.43前往充值 >
需支付:10.00
成就一亿技术人!
领取后你会自动成为博主和红包主的粉丝 规则
hope_wisdom
发出的红包
实付
使用余额支付
点击重新获取
扫码支付
钱包余额 0

抵扣说明:

1.余额是钱包充值的虚拟货币,按照1:1的比例进行支付金额的抵扣。
2.余额无法直接购买下载,可以购买VIP、付费专栏及课程。

余额充值