在学习强化学习时,顺便复习复习pytorch的基本内容,遇到了 torch.gather()函数,参考图解PyTorch中的torch.gather函数 - 知乎 (zhihu.com)进行解释。
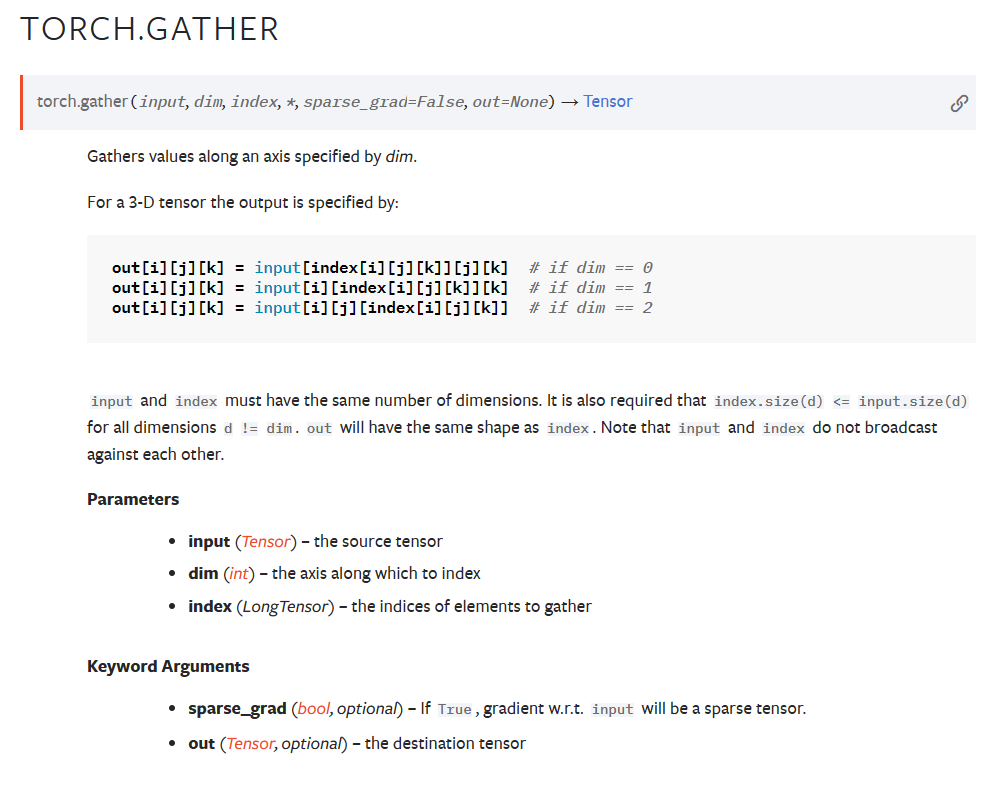
pytorch官网对函数给出的解释:

即input是一个矩阵,根据dim的值,将index的值替换到不同的维度的索引,当dim为0时,index替代i的值,成为第0维度的索引。
输入和输出的矩阵形式相同。
例子:首先我们生成3×3的矩阵,明确行索引的概念,第0行指的是[3,4,5],第0列指的是[[3] [6] [9]]
import torch
tensor_0 = torch.arange(3, 12).view(3, 3)
print(tensor_0)
tensor([[ 3,  4,  5],
        [ 6,  7,  8],
        [ 9, 10, 11]])
index为行向量且dim=0时
index = torch.tensor([[2, 1, 0]])
tensor_1 = tensor_0.gather(0, index)
print(tensor_1)
tensor([[9, 7, 5]])
当dim=0时,替换第0维度。由于input为二维列表,因此第0维度指的是选择第几行的维度,即行索引所在的维度,替换了i的索引,为input[index[i][j]] [j]
那么我们会输出tensor([[ input[2][j] input[1][j] input[0][j] ]]),那么j如何获得呢?从index of index中拿到,index每一个元素的索引为(0,0) (0,1) (0,2),取j,则为0,1,2,那么输出则为tensor([[ input[2][0] input[1][1] input[0][2] ]]),即
tensor([[9, 7, 5]])
输入行向量index,且dim=1
index = torch.tensor([[2, 1, 0]])
tensor_1 = tensor_0.gather(1, index)
print(tensor_1)
tensor([[5, 4, 3]])
维度为1,则替换列索引的值,那么输出为tensor([[ input[i][2] input[i][1] input[i][0] ]]),index每一个元素的索引为(0,0) (0,1) (0,2),i均为1,那么tensor([[ input[0][2] input[0][1] input[0][0] ]])
输入为行向量,dim=0
index = torch.tensor([[2, 1, 0]]).t()
tensor_1 = tensor_0.gather(0, index)
print(tensor_1)
tensor([[5],
        [7],
        [9]])
维度为0,则替换行索引,且输出与输入的格式相同,为
tensor([input[2][j],
        input[1][j],
        input[0][j]])
index每一个元素的索引为(0,0) (1,0) (2,0),j对应的值为0,0,0,则
tensor([input[2][0],
        input[1][0],
        input[0][0]])
输入为行向量,dim=1
index = torch.tensor([[2, 1, 0]]).t()
tensor_1 = tensor_0.gather(1, index)
print(tensor_1)
tensor([[5],
        [7],
        [9]])
维度为1,则替换列索引,且输出与输入的格式相同,为
tensor([input[i][2],
        input[i][1],
        input[i][0]])
index每一个元素的索引为(0,0) (1,0) (2,0),i对应的值为0,1,2,则
tensor([input[0][2],
        input[1][1],
        input[2][0]])
输入为二维矩阵,且dim=1
index = torch.tensor([[0, 2],
                      [1, 2]])
tensor_1 = tensor_0.gather(1, index)
print(tensor_1)
tensor([[3, 5],
        [7, 8]])
维度为1,则替换列索引,且输出与输入的格式相同,为
tensor([[input[i][0], input[i][2]],
        [input[i][1], input[i][2]]])
替换为行索引后,可得:
tensor([[input[0][0], input[0][2]],
        [input[1][1], input[1][2]]])
在强化学习中的应用
在PyTorch官网DQN页面的代码中,i是state,j是a
# Compute Q(s_t, a) - the model computes Q(s_t), then we select the
# columns of actions taken. These are the actions which would've been taken
# for each batch state according to policy_net
state_action_values = policy_net(state_batch).gather(1, action_batch)
我们使用dim=1,action_batch 将获得的动作列表替换为列索引,即可获得每个state下该动作的动作价值。


 9747
9747


 被折叠的 条评论
为什么被折叠?


