


Bootstrap学习
简介
Bootstrap,来自 Twitter,是目前最受欢迎的前端框架。Bootstrap 是基于 HTML、CSS、JAVASCRIPT 的,它简洁灵活,使得 Web 开发更加快捷。
优点
- 移动设备优先:自 Bootstrap 3 起,框架包含了贯穿于整个库的移动设备优先的样式。
- 浏览器支持:所有的主流浏览器都支持 Bootstrap。
- 容易上手:只要您具备 HTML 和 CSS 的基础知识,您就可以开始学习 Bootstrap
- 响应式设计:Bootstrap 的响应式 CSS 能够自适应于台式机、平板电脑和手机。更多有关响应式设计的内容详见 Bootstrap 响应式设计。
Bootstrap 包的内容
- 基本结构:Bootstrap 提供了一个带有网格系统、链接样式、背景的基本结构
- CSS:Bootstrap 自带以下特性:全局的 CSS 设置、定义基本的 HTML 元素样式、可扩展的 class,以及一个先进的网格系统
- 组件:Bootstrap 包含了十几个可重用的组件,用于创建图像、下拉菜单、导航、警告框、弹出框等等
- JavaScript 插件:Bootstrap 包含了十几个自定义的 jQuery 插件
- 定制:您可以定制 Bootstrap 的组件、LESS 变量和 jQuery 插件来得到您自己的版本
使用方法
http://getbootstrap.com/ 上下载 Bootstrap 的最新版本
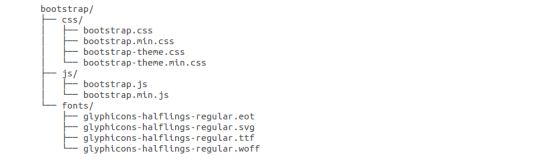
如上图所示,可以看到已编译的 CSS 和 JS(bootstrap.),以及已编译压缩的 CSS 和 JS(bootstrap.min.)。同时也包含了 Glyphicons 的字体,这是一个可选的 Bootstrap 主题。
HTML 模板
一个使用了 Bootstrap 的基本的 HTML 模板如下所示:
<!DOCTYPE html>
<html>
   <head>
      <title>Bootstrap 模板</title>
      <meta name="viewport" content="width=device-width, initial-scale=1.0">
      <!-- 引入 Bootstrap -->
      <link href="http://apps.bdimg.com/libs/bootstrap/3.3.0/css/bootstrap.min.css" rel="stylesheet">

      <!-- 可选的Bootstrap主题文件(一般不使用) -->
        <script src="http://apps.bdimg.com/libs/bootstrap/3.3.0/css/bootstrap-theme.min.css"></script>

        <!-- jQuery文件。务必在bootstrap.min.js 之前引入 -->
        <script src="http://apps.bdimg.com/libs/jquery/2.0.0/jquery.min.js"></script>

        <!-- 最新的 Bootstrap 核心 JavaScript 文件 -->
        <script src="http://apps.bdimg.com/libs/bootstrap/3.3.0/js/bootstrap.min.js"></script>
   </head>
   <body>
        <h1>Hello, world!</h1>

   </body>
</html>
Bootstrap CSS 概览
移动设备优先
需要在网页的 head 之中添加 viewport meta 标签,如下所示:
<meta name="viewport" content="width=device-width, initial-scale=1.0,maximum-scale=1.0,user-scalable=no">
- width 属性控制设备的宽度。假设您的网站将被带有不同屏幕分辨率的设备浏览,那么将它设置为 device-width 可以确保它能正确呈现在不同设备上。
- initial-scale=1.0 确保网页加载时,以 1:1 的比例呈现,不会有任何的缩放。
- 添加 user-scalable=no 可以禁用其缩放(zooming)功能
响应式图像
<img src="..." class="img-responsive" alt="响应式图像">
通过添加 img-responsive class 可以让 Bootstrap 3 中的图像对响应式布局的支持更友好。
.img-responsive {
  display: inline-block;
  height: auto;
  max-width: 100%;
}
全局显示、排版和链接
- 基本的全局显示
- 排版
- 链接样式
Bootstrap 网格系统
Bootstrap 提供了一套响应式、移动设备优先的流式网格系统,随着屏幕或视口(viewport)尺寸的增加,系统会自动分为最多12列。
Bootstrap 网格系统(Grid System)的工作原理
- 行必须放置在 .container class 内,以便获得适当的对齐(alignment)和内边距(padding)。
- 使用行来创建列的水平组。
- 内容应该放置在列内,且唯有列可以是行的直接子元素。
- 预定义的网格类,比如 .row 和 .col-xs-4,可用于快速创建网格布局。LESS 混合类可用于更多语义布局。
- 列通过内边距(padding)来创建列内容之间的间隙。该内边距是通过 .rows 上的外边距(margin)取负,表示第一列和最后一列的行偏移。
- 网格系统是通过指定您想要横跨的十二个可用的列来创建的。例如,要创建三个相等的列,则使用三个 .col-xs-4。
媒体查询
媒体查询是非常别致的”有条件的 CSS 规则”。它只适用于一些基于某些规定条件的 CSS。如果满足那些条件,则应用相应的样式。
Bootstrap 中的媒体查询允许您基于视口大小移动、显示并隐藏内容。下面的媒体查询在 LESS 文件中使用,用来创建 Bootstrap 网格系统中的关键的分界点阈值。
/* 超小设备(手机,小于 768px) */
/* Bootstrap 中默认情况下没有媒体查询 */

/* 小型设备(平板电脑,768px 起) */
@media (min-width: @screen-sm-min) and (max-width: @screen-sm-max) { ... }

/* 中型设备(台式电脑,992px 起) */
@media (min-width: @screen-md-min) and (max-width: @screen-md-max) { ... }

/* 大型设备(大台式电脑,1200px 起) */
@media (min-width: @screen-lg-min) { ... }
网格选项

偏移列
偏移是一个用于更专业的布局的有用功能。它们可用来给列腾出更多的空间。例如,.col-xs=* 类不支持偏移,但是它们可以简单地通过使用一个空的单元格来实现该效果。
为了在大屏幕显示器上使用偏移,请使用 col-md-offset-* 类。这些类会把一个列的左外边距(margin)增加 * 列,其中 * 范围是从 1 到 11。
<div class="container">
    <h1>Hello, world!</h1>
    <div class="row" >
        <div class="col-xs-6 col-md-offset-3"
        style="background-color: #dedef8;box-shadow:
        inset 1px -1px 1px #444, inset -1px 1px 1px #444;">
            <p>Lorem ipsum dolor sit amet, consectetur adipisicing
            elit.
            </p>
        </div>
    </div>
</div>
嵌套列
为了在内容中嵌套默认的网格,请添加一个新的 .row,并在一个已有的 .col-md-* 列内添加一组 .col-md-* 列。被嵌套的行应包含一组列,这组列个数不能超过12(其实,没有要求你必须占满12列)。
在下面的实例中,布局有两个列,第二列被分为两行四个盒子。
<div class="container">
    <h1>Hello, world!</h1>
    <div class="row">
        <div class="col-md-3" style="background-color: #dedef8;box-shadow: inset 1px -1px 1px #444, inset -1px 1px 1px #444;">
            <h4>第一列</h4>
            <p>
                Lorem ipsum dolor sit amet, consectetur adipisicing elit.
            </p>
        </div>
        <div class="col-md-9" style="background-color: #dedef8;box-shadow: inset 1px -1px 1px #444, inset -1px 1px 1px #444;">
            <h4>第二列 - 分为四个盒子</h4>
            <div class="row">
                <div class="col-md-6" style="background-color: #B18904; box-shadow: inset 1px -1px 1px #444, inset -1px 1px 1px #444;">
                    <p>
                        Consectetur art party Tonx culpa semiotics. Pinterest
        assumenda minim organic quis.
                    </p>
                </div>
                <div class="col-md-6" style="background-color: #B18904; box-shadow: inset 1px -1px 1px #444, inset -1px 1px 1px #444;">
                    <p>
                         sed do eiusmod tempor incididunt ut labore et dolore magna
        aliqua. Ut enim ad minim veniam, quis nostrud exercitation
        ullamco laboris nisi ut aliquip ex ea commodo consequat.
                    </p>
                </div>
            </div>
            <div class="row">
                <div class="col-md-6" style="background-color: #B18904; box-shadow: inset 1px -1px 1px #444, inset -1px 1px 1px #444;">
                    <p>
                        quis nostrud exercitation ullamco laboris nisi ut
        aliquip ex ea commodo consequat.
                    </p>
                </div>
                <div class="col-md-6" style="background-color: #B18904; box-shadow: inset 1px -1px 1px #444, inset -1px 1px 1px #444;">
                    <p>
                        Lorem ipsum dolor sit amet, consectetur adipisicing elit,
        sed do eiusmod tempor incididunt ut labore et dolore magna
        aliqua. Ut enim ad minim.
                    </p>
                </div>
            </div>
        </div>
    </div>
</div>
列排序
Bootstrap 网格系统另一个完美的特性,就是您可以很容易地以一种顺序编写列,然后以另一种顺序显示列。
您可以很轻易地改变带有 .col-md-push-* 和 .col-md-pull-* 类的内置网格列的顺序,其中 * 范围是从 1 到 11。
<div class="container">
    <h1>Hello, world!</h1>
    <div class="row">
        <p>
            排序前
        </p>
        <div class="col-md-4" style="background-color: #dedef8; box-shadow: inset 1px -1px 1px #444, inset -1px 1px 1px #444;">
我在左边
        </div>
        <div class="col-md-8" style="background-color: #dedef8; box-shadow: inset 1px -1px 1px #444, inset -1px 1px 1px #444;">
我在右边
        </div>
    </div>
    <br>
    <div class="row">
        <p>
            排序后
        </p>
        <div class="col-md-4 col-md-push-8" style="background-color: #dedef8; box-shadow: inset 1px -1px 1px #444, inset -1px 1px 1px #444;">
我在左边
        </div>
        <div class="col-md-8 col-md-pull-4" style="background-color: #dedef8; box-shadow: inset 1px -1px 1px #444, inset -1px 1px 1px #444;">
我在右边
        </div>
    </div>
</div>
Bootstrap 排版
Bootstrap 使用 Helvetica Neue、 Helvetica、 Arial 和 sans-serif 作为其默认的字体栈。
使用 Bootstrap 的排版特性,您可以创建标题、段落、列表及其他内联元素。
内联子标题
如果需要向任何标题添加一个内联子标题,只需要简单地在元素两旁添加 ,或者添加 .small class,这样子您就能得到一个字号更小的颜色更浅的文本,如下面实例所示:
<h1>我是标题1 h1. <small>我是副标题1 h1</small></h1>
<h2>我是标题2 h2. <small>我是副标题2 h2</small></h2>
<h3>我是标题3 h3. <small>我是副标题3 h3</small></h3>
<h4>我是标题4 h4. <small>我是副标题4 h4</small></h4>
<h5>我是标题5 h5. <small>我是副标题5 h5</small></h5>
<h6>我是标题6 h6. <small>我是副标题6 h6</small></h6>
引导主体副本
为了给段落添加强调文本,则可以添加 class=”lead”,这将得到更大更粗、行高更高的文本,如下面实例所示:
<p class="lead">这是一个演示引导主体副本用法的实例。</p>
强调
HTML 的默认强调标签 (设置文本为父文本大小的 85%)、(设置文本为更粗的文本)、(设置文本为斜体)。
<small>本行内容是在标签内</small><br>
<strong>本行内容是在标签内</strong><br>
<em>本行内容是在标签内,并呈现为斜体</em><br>
<p class="text-left">向左对齐文本</p>
<p class="text-center">居中对齐文本</p>
<p class="text-right">向右对齐文本</p>
<p class="text-muted">本行内容是减弱的</p>
<p class="text-primary">本行内容带有一个 primary class</p>
<p class="text-success">本行内容带有一个 success class</p>
<p class="text-info">本行内容带有一个 info class</p>
<p class="text-warning">本行内容带有一个 warning class</p>
<p class="text-danger">本行内容带有一个 danger class</p>
缩写
HTML 元素提供了用于缩写的标记,比如 WWW 或 HTTP。Bootstrap 定义 元素的样式为显示在文本底部的一条虚线边框,当鼠标悬停在上面时会显示完整的文本(只要您为 title 属性添加了文本)。为了得到一个更小字体的文本,请添加 .initialism 到 。
<abbr title="World Wide Web">WWW</abbr><br>
<abbr title="Real Simple Syndication" class="initialism">RSS</abbr>
地址(Address)
使用
标签,您可以在网页上显示联系信息。由于 默认为 display:block;,您需要使用标签来为封闭的地址文本添加换行。
<address>
  <strong>Some Company, Inc.</strong><br>
  007 street<br>
  Some City, State XXXXX<br>
  <abbr title="Phone">P:</abbr> (123) 456-7890
</address>

<address>
  <strong>Full Name</strong><br>
  <a href="mailto:#">mailto@somedomain.com</a>
</address>
引用(Blockquote)
您可以在任意的 HTML 文本旁使用默认的 blockquote 。其他选项包括,添加一个 标签来标识引用的来源,使用 class .pull-right 向右对齐引用。
<blockquote>这是一个带有源标题的引用。<small>Someone famous in <cite title="Source Title">Source Title</cite></small></blockquote>
列表
Bootstrap 支持有序列表、无序列表和定义列表。
- 有序列表:有序列表是指以数字或其他有序字符开头的列表。
- 无序列表:无序列表是指没有特定顺序的列表,是以传统风格的着重号开头的列表。如果您不想显示这些着重号,您可以使用 class .list-unstyled 来移除样式。您也可以通过使用 class .list-inline 把所有的列表项放在同一行中。
定义列表:在这种类型的列表中,每个列表项可以包含 dt 和 dd 元素。dt 代表 定义术语,就像字典,这是被定义的属于(或短语)。接着,dd 是 dt 的描述。您可以使用 class dl-horizontal 把 dl 行中的属于与描述并排显示。
<h4>有序列表</h4>
<ol>
  <li>Item 1</li>
  <li>Item 2</li>
  <li>Item 3</li>
  <li>Item 4</li>
</ol>
<h4>无序列表</h4>
<ul>
  <li>Item 1</li>
  <li>Item 2</li>
  <li>Item 3</li>
  <li>Item 4</li>
</ul>
<h4>未定义样式列表</h4>
<ul class="list-unstyled">
  <li>Item 1</li>
  <li>Item 2</li>
  <li>Item 3</li>
  <li>Item 4</li>
</ul>
<h4>内联列表</h4>
<ul class="list-inline">
  <li>Item 1</li>
  <li>Item 2</li>
  <li>Item 3</li>
  <li>Item 4</li>
</ul>
<h4>定义列表</h4>
<dl>
  <dt>Description 1</dt>
  <dd>Item 1</dd>
  <dt>Description 2</dt>
  <dd>Item 2</dd>
</dl>
<h4>水平的定义列表</h4>
<dl class="dl-horizontal">
  <dt>Description 1</dt>
  <dd>Item 1</dd>
  <dt>Description 2</dt>
  <dd>Item 2</dd>
</dl>
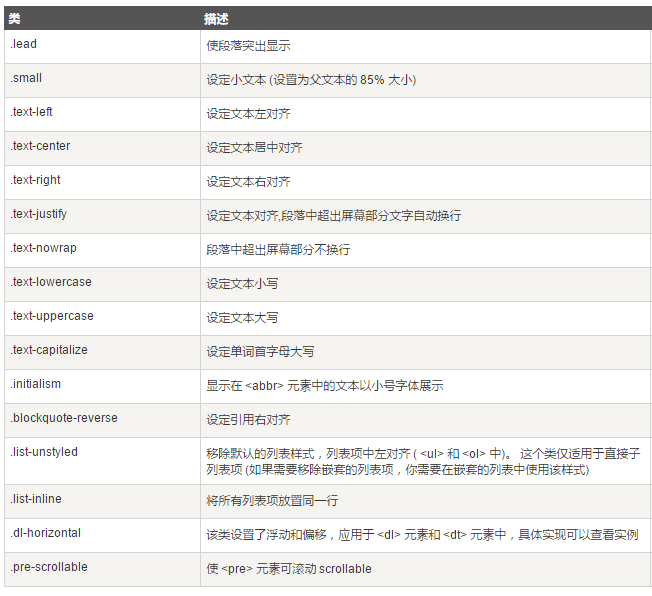
更多排版类
Bootstrap 代码
Bootstrap 允许您以两种方式显示代码:
- 第一种是 code 标签。如果您想要内联显示代码,那么您应该使用 code 标签。
- 第二种是 pre 标签。如果代码需要被显示为一个独立的块元素或者代码有多行,那么您应该使用 pre 标签。
请确保当您使用 pre 和 code 标签时,开始和结束标签使用了 unicode 变体: < ; 和 > ;。
<p><code><header></code> 作为内联元素被包围。</p>
<p>如果需要把代码显示为一个独立的块元素,请使用 <pre> 标签:</p>
<pre>
<article>
<h1>Article Heading</h1>
</article>
</pre>
Bootstrap 表格
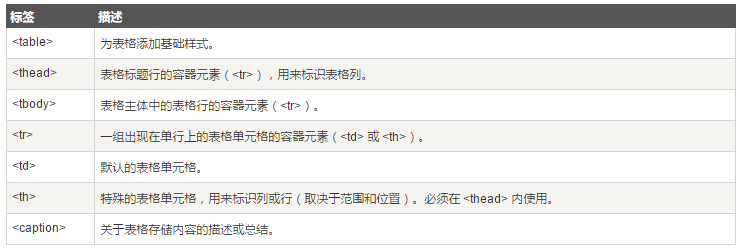
Bootstrap 提供了一个清晰的创建表格的布局。下表列出了 Bootstrap 支持的一些表格元素:
表格类
下表样式可用于表格中:
<div class="container">
  <h2>表格</h2>
  <p>联合使用所有表格类:</p>
  <table class="table table-striped table-bordered table-hover table-condensed">
    <thead>
      <tr>
        <th>#</th>
        <th>Firstname</th>
      </tr>
    </thead>
    <tbody>
      <tr>
        <td>1</td>
        <td>Anna</td>
      </tr>
      <tr>
        <td>2</td>
        <td>Debbie</td>
      </tr>
      <tr>
        <td>3</td>
        <td>John</td>
      </tr>
    </tbody>
  </table>
</div>
tr, th 和 td 类
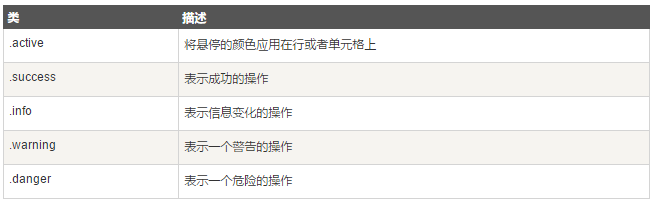
下表的类可用于表格的行或者单元格:
<table class="table">
   <caption>上下文表格布局</caption>
   <thead>
      <tr>
         <th>产品</th>
         <th>付款日期</th>
         <th>状态</th>
      </tr>
   </thead>
   <tbody>
      <tr class="active">
         <td>产品1</td>
         <td>23/11/2013</td>
         <td>待发货</td>
      </tr>
      <tr class="success">
         <td>产品2</td>
         <td>10/11/2013</td>
         <td>发货中</td>
      </tr>
      <tr  class="warning">
         <td>产品3</td>
         <td>20/10/2013</td>
         <td>待确认</td>
      </tr>
      <tr  class="danger">
         <td>产品4</td>
         <td>20/10/2013</td>
         <td>已退货</td>
      </tr>
   </tbody>
</table>
响应式表格
通过把任意的 .table 包在 .table-responsive class 内,您可以让表格水平滚动以适应小型设备(小于 768px)。当在大于 768px 宽的大型设备上查看时,您将看不到任何的差别。
<div class="table-responsive">
   <table class="table">
      ....
   </table>
</div>
Bootstrap 表单
表单布局
Bootstrap 提供了下列类型的表单布局:
- 垂直表单(默认)
- 内联表单
- 水平表单
垂直或基本表单
基本的表单结构是 Bootstrap 自带的,个别的表单控件自动接收一些全局样式。下面列出了创建基本表单的步骤:
- 向父 <form> 元素添加 role=”form”。
- 把标签和控件放在一个带有 class .form-group 的
中。这是获取最佳间距所必需的。
向所有的文本元素 <input>、<textarea> 和 <select> 添加 class .form-control。
<form role="form">
   <div class="form-group">
      <label for="name">名称</label>
      <input type="text" class="form-control" id="name"
         placeholder="请输入名称">
   </div>
   <div class="form-group">
      <label for="inputfile">文件输入</label>
      <input type="file" id="inputfile">
      <p class="help-block">这里是块级帮助文本的实例。</p>
   </div>
   <div class="checkbox">
      <label>
      <input type="checkbox"> 请打勾
      </label>
   </div>
   <button type="submit" class="btn btn-default">提交</button>
</form>
内联表单
如果需要创建一个表单,它的所有元素是内联的,向左对齐的,标签是并排的,请向 <form> 标签添加 class .form-inline。
<form class="form-inline" role="form">
   <div class="form-group">
      ...
   </div>
   <div class="form-group">
      ...
   </div>
</form>
默认情况下,Bootstrap 中的 input、select 和 textarea 有 100% 宽度。在使用内联表单时,您需要在表单控件上设置一个宽度。
使用 class .sr-only,您可以隐藏内联表单的标签。
水平表单
水平表单与其他表单不仅标记的数量上不同,而且表单的呈现形式也不同。如需创建一个水平布局的表单,请按下面的几个步骤进行:
- 向父 <form> 元素添加 class .form-horizontal。
- 把标签和控件放在一个带有 class .form-group 的 <div> 中。
向标签添加 class .control-label。
<form class="form-horizontal" role="form">
   <div class="form-group">
      <label for="firstname" class="col-sm-2 control-label">名字</label>
      <div class="col-sm-10">
         <input type="text" class="form-control" id="firstname"
            placeholder="请输入名字">
      </div>
   </div>
   <div class="form-group">
      <label for="lastname" class="col-sm-2 control-label">姓</label>
      <div class="col-sm-10">
         <input type="text" class="form-control" id="lastname"
            placeholder="请输入姓">
      </div>
   </div>
   <div class="form-group">
      <div class="col-sm-offset-2 col-sm-10">
         <div class="checkbox">
            <label>
               <input type="checkbox"> 请记住我
            </label>
         </div>
      </div>
   </div>
   <div class="form-group">
      <div class="col-sm-offset-2 col-sm-10">
         <button type="submit" class="btn btn-default">登录</button>
      </div>
   </div>
</form>
支持的表单控件
Bootstrap 支持最常见的表单控件,主要是 input、textarea、checkbox、radio 和 select。
输入框(Input)
最常见的表单文本字段是输入框 input。用户可以在其中输入大多数必要的表单数据。Bootstrap 提供了对所有原生的 HTML5 的 input 类型的支持,包括:text、password、datetime、datetime-local、date、month、time、week、number、email、url、search、tel 和 color。适当的 type 声明是必需的,这样才能让 input 获得完整的样式。
文本框(Textarea)
当您需要进行多行输入的时,则可以使用文本框 textarea。必要时可以改变 rows 属性(较少的行 = 较小的盒子,较多的行 = 较大的盒子)。
<form role="form">
  <div class="form-group">
    <label for="name">文本框</label>
    <textarea class="form-control" rows="3"></textarea>
  </div>
</form>
复选框((Checkbox)和单选框(Radio)
复选框和单选按钮用于让用户从一系列预设置的选项中进行选择。
- 当创建表单时,如果您想让用户从列表中选择若干个选项时,请使用 checkbox。如果您限制用户只能选择一个选项,请使用 radio。
对一系列复选框和单选框使用 .checkbox-inline 或 .radio-inline class,控制它们显示在同一行上。
<label for="name">默认的复选框和单选按钮的实例</label>
<div class="checkbox">
   <label><input type="checkbox" value="">选项 1</label>
</div>
<div class="checkbox">
   <label><input type="checkbox" value="">选项 2</label>
</div>

<div class="radio">
   <label>
      <input type="radio" name="optionsRadios" id="optionsRadios1"
         value="option1" checked> 选项 1
   </label>
</div>
<div class="radio">
   <label>
      <input type="radio" name="optionsRadios" id="optionsRadios2"
         value="option2">
         选项 2 - 选择它将会取消选择选项 1
   </label>
</div>
<label for="name">内联的复选框和单选按钮的实例</label>
<div>
   <label class="checkbox-inline">
      <input type="checkbox" id="inlineCheckbox1" value="option1"> 选项 1
   </label>
   <label class="checkbox-inline">
      <input type="checkbox" id="inlineCheckbox2" value="option2"> 选项 2
   </label>
   <label class="checkbox-inline">
      <input type="checkbox" id="inlineCheckbox3" value="option3"> 选项 3
   </label>
   <label class="checkbox-inline">
      <input type="radio" name="optionsRadiosinline" id="optionsRadios3"
         value="option1" checked> 选项 1
   </label>
   <label class="checkbox-inline">
      <input type="radio" name="optionsRadiosinline" id="optionsRadios4"
         value="option2"> 选项 2
   </label>
</div>
选择框(Select)
当您想让用户从多个选项中进行选择,但是默认情况下只能选择一个选项时,则使用选择框。
- 使用 <select> 展示列表选项,通常是那些用户很熟悉的选择列表,比如州或者数字。
使用 multiple=”multiple” 允许用户选择多个选项。
<form role="form">
   <div class="form-group">
      <label for="name">选择列表</label>
      <select class="form-control">
         <option>1</option>
         <option>2</option>
         <option>3</option>
         <option>4</option>
         <option>5</option>
      </select>

      <label for="name">可多选的选择列表</label>
      <select multiple class="form-control">
         <option>1</option>
         <option>2</option>
         <option>3</option>
         <option>4</option>
         <option>5</option>
      </select>
   </div>
</form>
静态控件
当您需要在一个水平表单内的表单标签后放置纯文本时,请在 <p> 上使用 class .form-control-static。
<form class="form-horizontal" role="form">
  <div class="form-group">
    <label class="col-sm-2 control-label">Email</label>
    <div class="col-sm-10">
      <p class="form-control-static">email@example.com</p>
    </div>
  </div>
  <div class="form-group">
    <label for="inputPassword" class="col-sm-2 control-label">密码</label>
    <div class="col-sm-10">
      <input type="password" class="form-control" id="inputPassword"
         placeholder="请输入密码">
    </div>
  </div>
</form>
表单控件状态
除了 :focus 状态(即,用户点击 input 或使用 tab 键聚焦到 input 上),Bootstrap 还为禁用的输入框定义了样式,并提供了表单验证的 class。
输入框焦点
当输入框 input 接收到 :focus 时,输入框的轮廓会被移除,同时应用 box-shadow。
禁用的输入框 input
如果您想要禁用一个输入框 input,只需要简单地添加 disabled 属性,这不仅会禁用输入框,还会改变输入框的样式以及当鼠标的指针悬停在元素上时鼠标指针的样式。
禁用的字段集 fieldset
对 <fieldset> 添加 disabled 属性来禁用 <fieldset> 内的所有控件。
验证状态
Bootstrap 包含了错误、警告和成功消息的验证样式。只需要对父元素简单地添加适当的 class(.has-warning、 .has-error 或 .has-success)即可使用验证状态。
<form class="form-horizontal" role="form">
   <div class="form-group">
      <label class="col-sm-2 control-label">聚焦</label>
      <div class="col-sm-10">
         <input class="form-control" id="focusedInput" type="text"
            value="该输入框获得焦点...">
      </div>
   </div>
   <div class="form-group">
      <label for="inputPassword" class="col-sm-2 control-label">
         禁用
      </label>
      <div class="col-sm-10">
         <input class="form-control" id="disabledInput" type="text"
            placeholder="该输入框禁止输入..." disabled>
      </div>
   </div>
   <fieldset disabled>
      <div class="form-group">
         <label for="disabledTextInput"  class="col-sm-2 control-label">
            禁用输入(Fieldset disabled)
         </label>
         <div class="col-sm-10">
            <input type="text" id="disabledTextInput" class="form-control"
               placeholder="禁止输入">
         </div>
      </div>
      <div class="form-group">
         <label for="disabledSelect"  class="col-sm-2 control-label">
            禁用选择菜单(Fieldset disabled)
         </label>
         <div class="col-sm-10">
            <select id="disabledSelect" class="form-control">
               <option>禁止选择</option>
            </select>
         </div>
      </div>
   </fieldset>
   <div class="form-group has-success">
      <label class="col-sm-2 control-label" for="inputSuccess">
         输入成功
      </label>
      <div class="col-sm-10">
         <input type="text" class="form-control" id="inputSuccess">
      </div>
   </div>
   <div class="form-group has-warning">
      <label class="col-sm-2 control-label" for="inputWarning">
         输入警告
      </label>
      <div class="col-sm-10">
         <input type="text" class="form-control" id="inputWarning">
      </div>
   </div>
   <div class="form-group has-error">
      <label class="col-sm-2 control-label" for="inputError">
         输入错误
      </label>
      <div class="col-sm-10">
         <input type="text" class="form-control" id="inputError">
      </div>
   </div>
</form>
表单控件大小
分别使用 class .input-lg 和 .col-lg-* 来设置表单的高度和宽度。
<form role="form">
   <div class="form-group">
      <input class="form-control input-lg" type="text"
         placeholder=".input-lg">
   </div>

   <div class="form-group">
      <select class="form-control input-sm">
         <option value="">.input-sm</option>
      </select>
   </div>

   <div class="row">
      <div class="col-lg-2">
         <input type="text" class="form-control" placeholder=".col-lg-2">
      </div>
      <div class="col-lg-3">
         <input type="text" class="form-control" placeholder=".col-lg-3">
      </div>
      <div class="col-lg-4">
         <input type="text" class="form-control" placeholder=".col-lg-4">
      </div>
   </div>
</form>
表单帮助文本
Bootstrap 表单控件可以在输入框 input 上有一个块级帮助文本。为了添加一个占用整个宽度的内容块,请在 <input> 后使用 .help-block。
<form role="form">
   <span>帮助文本实例</span>
   <input class="form-control" type="text" placeholder="">
   <span class="help-block">一个较长的帮助文本块,超过一行,
   需要扩展到下一行。本实例中的帮助文本总共有两行。</span>
</form>
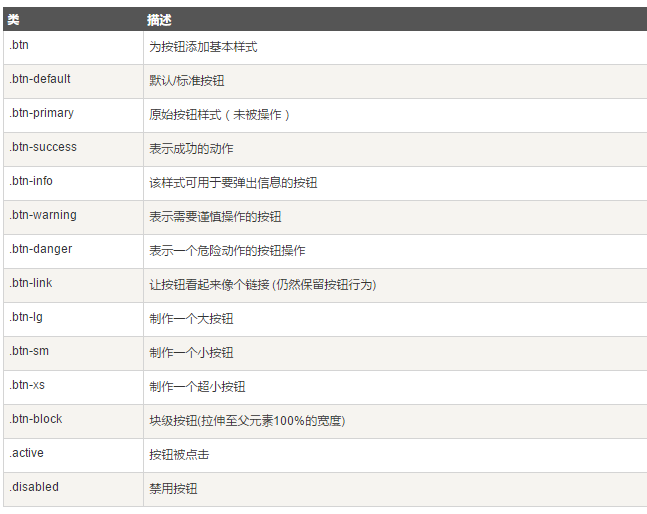
Bootstrap 按钮
本章将通过实例讲解如何使用 Bootstrap 按钮。任何带有 class .btn 的元素都会继承圆角灰色按钮的默认外观。但是 Bootstrap 提供了一些选项来定义按钮的样式,具体如下表所示:
以下样式可用于<a>, <button>, 或 <input> 元素上:
<!-- 标准的按钮 -->
<button type="button" class="btn btn-default">默认按钮</button>

<!-- 提供额外的视觉效果,标识一组按钮中的原始动作 -->
<button type="button" class="btn btn-primary">原始按钮</button>

<!-- 表示一个成功的或积极的动作 -->
<button type="button" class="btn btn-success">成功按钮</button>

<!-- 信息警告消息的上下文按钮 -->
<button type="button" class="btn btn-info">信息按钮</button>

<!-- 表示应谨慎采取的动作 -->
<button type="button" class="btn btn-warning">警告按钮</button>

<!-- 表示一个危险的或潜在的负面动作 -->
<button type="button" class="btn btn-danger">危险按钮</button>

<!-- 并不强调是一个按钮,看起来像一个链接,但同时保持按钮的行为 -->
<button type="button" class="btn btn-link">链接按钮</button>
按钮标签
您可以在 <a>、<button> 或 <input> 元素上使用按钮 class。但是建议您在 <button> 元素上使用按钮 class,避免跨浏览器的不一致性问题。
Bootstrap 图片
Bootstrap 提供了三个可对图片应用简单样式的 class:
- .img-rounded:添加 border-radius:6px 来获得图片圆角。
- .img-circle:添加 border-radius:50% 来让整个图片变成圆形。
.img-thumbnail:添加一些内边距(padding)和一个灰色的边框。
<img src="/wp-content/uploads/2014/06/download.png"
   class="img-rounded">
<img src="/wp-content/uploads/2014/06/download.png"
   class="img-circle">
<img src="/wp-content/uploads/2014/06/download.png"
   class="img-thumbnail">
响应式图片
通过在 <img> 标签添加 .img-responsive 类来让图片支持响应式设计。 图片将很好地扩展到父元素。
.img-responsive 类将 max-width: 100%; 和 height: auto; 样式应用在图片上:
<img src="cinqueterre.jpg" class="img-responsive" alt="Cinque Terre">
Bootstrap 辅助类
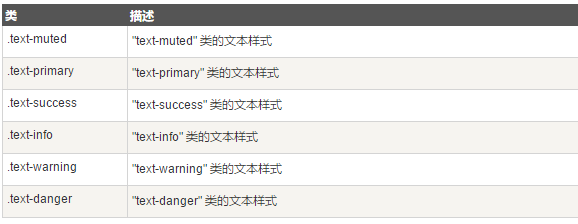
文本
以下不同的类展示了不同的文本颜色。如果文本是个链接鼠标移动到文本上会变暗:
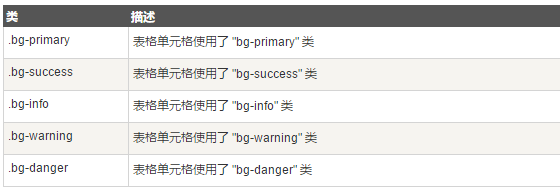
背景
以下不同的类展示了不同的背景颜色。 如果文本是个链接鼠标移动到文本上会变暗:
其他
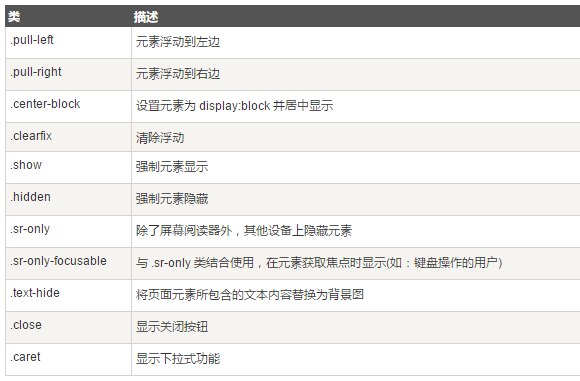
插入符
使用插入符表示下拉功能和方向。使用带有 class caret 的 元素得到该功能。
<p>插入符实例
   <span class="caret"></span>
</p>
Bootstrap 响应式实用工具
Bootstrap 提供了一些辅助类,以便更快地实现对移动设备友好的开发。这些可以通过媒体查询结合大型、小型和中型设备,实现内容对设备的显示和隐藏。
需要谨慎使用这些工具,避免在同一个站点创建完全不同的版本。响应式实用工具目前只适用于块和表切换。
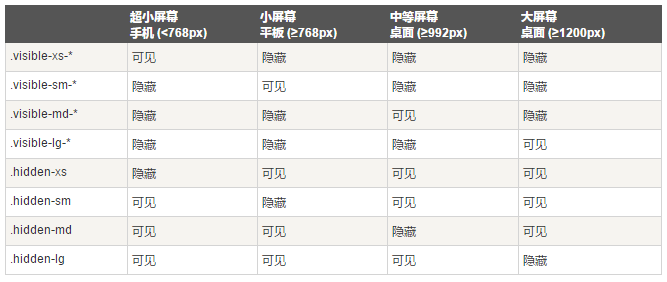
从 v3.2.0 版本起,形如 .visible-- 的类针对每种屏幕大小都有了三种变体,每个针对 CSS 中不同的 display 属性,列表如下:

因此,以超小屏幕(xs)为例,可用的 .visible-- 类是:.visible-xs-block、.visible-xs-inline 和 .visible-xs-inline-block。
.visible-xs、.visible-sm、.visible-md 和 .visible-lg 类也同时存在。但是从 v3.2.0 版本开始不再建议使用。除了
打印类
下表列出了打印类。使用这些切换打印内容。

参考:http://www.runoob.com/bootstrap/bootstrap-css-overview.html


 1109
1109

 被折叠的 条评论
为什么被折叠?
被折叠的 条评论
为什么被折叠?
 到【灌水乐园】发言


