


最近重装了操作系统,正好尝试搭建一套ubuntu的开发环境。ubuntu安装好了之后发现磁盘给的不够,这时就要通过扩文件系统将存储扩大。
首先看下当前的文件系统
df -Tm
root@ubuntu:~# df -Tm
Filesystem Type 1M-blocks Used Available Use% Mounted on
udev devtmpfs 1441 0 1441 0% /dev
tmpfs tmpfs 295 2 293 1% /run
/dev/sda5 ext4 19524 9262 9248 51% /
tmpfs tmpfs 1474 0 1474 0% /dev/shm
标红色的是我的根文件系统,可以看到这个文件系统已经使用了51%,共有19G的容量。
从操作系统的角度看完了之后,从物理层面看下硬盘分区情况,使用fdisk -l 查看
fdisk -l
Disk /dev/sda: 20 GiB, 21474836480 bytes, 41943040 sectors
Disk model: VMware Virtual S
Units: sectors of 1 * 512 = 512 bytes
Sector size (logical/physical): 512 bytes / 512 bytes
I/O size (minimum/optimal): 512 bytes / 512 bytes
Disklabel type: dos
Disk identifier: 0x89f0bd9b
Device Boot Start End Sectors Size Id Type
/dev/sda1 * 2048 1050623 1048576 512M b W95 FAT32
/dev/sda2 1052670 41940991 40888322 19.5G 5 Extended
/dev/sda5 1052672 41940991 40888320 19.5G 83 Linux
从这里可以看出来,硬盘就一个,然后硬盘分区使用扩展卷的分区,分区名是/dev/sda5
因为我的这台虚拟机没有安装lvm,这里选择安装lvm
root@ubuntu:~# apt install lvm2
Reading package lists... Done
Building dependency tree
Reading state information... Done
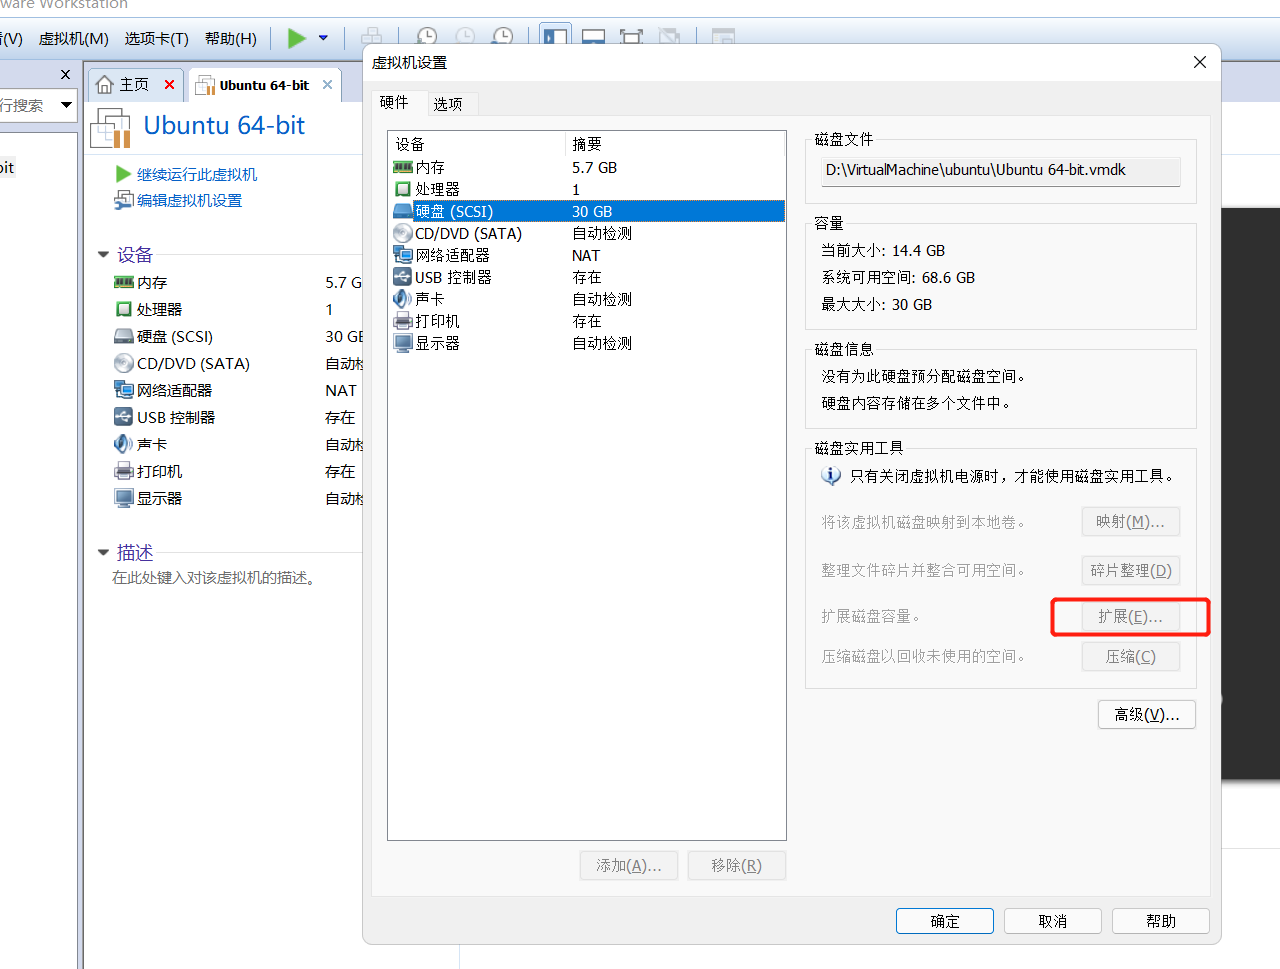
在虚拟机关机的状态时候扩本地磁盘的容量
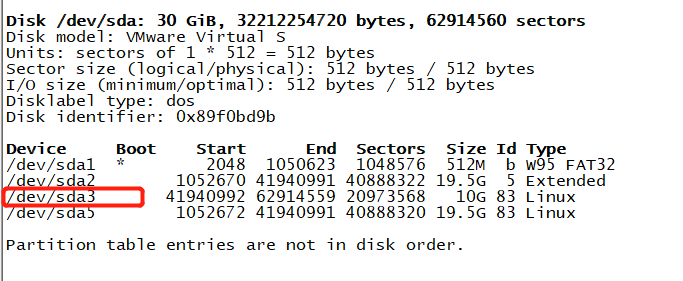
扩完磁盘之后,再fdisk 看下磁盘的容量
lion@ubuntu:~$ sudo fdisk -l
Disk /dev/sda: 30 GiB, 32212254720 bytes, 62914560 sectors
Disk model: VMware Virtual S
Units: sectors of 1 * 512 = 512 bytes
Sector size (logical/physical): 512 bytes / 512 bytes
I/O size (minimum/optimal): 512 bytes / 512 bytes
Disklabel type: dos
Disk identifier: 0x89f0bd9b
Device Boot Start End Sectors Size Id Type
/dev/sda1 * 2048 1050623 1048576 512M b W95 FAT32
/dev/sda2 1052670 41940991 40888322 19.5G 5 Extended
/dev/sda5 1052672 41940991 40888320 19.5G 83 Linux
能看到整个sda磁盘30G,已经分配的/dev/sda5 还是之后19.5G的容量,这时候我们就可以把10G的磁盘空间分配给/home的空间,这里我们用逻辑卷的模式来进行
首先格式化磁盘空间
fdisk /dev/sda
root@ubuntu:~# fdisk /dev/sda
Welcome to fdisk (util-linux 2.34).
Changes will remain in memory only, until you decide to write them.
Be careful before using the write command.
Command (m for help): m
Help:
DOS (MBR)
a toggle a bootable flag
b edit nested BSD disklabel
c toggle the dos compatibility flag
Generic
d delete a partition
F list free unpartitioned space
l list known partition types
n add a new partition
p print the partition table
t change a partition type
v verify the partition table
i print information about a partition
Misc
m print this menu
u change display/entry units
x extra functionality (experts only)
Script
I load disk layout from sfdisk script file
O dump disk layout to sfdisk script file
Save & Exit
w write table to disk and exit
q quit without saving changes
Create a new label
g create a new empty GPT partition table
G create a new empty SGI (IRIX) partition table
o create a new empty DOS partition table
s create a new empty Sun partition table
输入m 打开帮助,读这里的选项,我们就能够找到增加一个分区的,输入n,这里我们增加一个主分区,所有后面输入p,然后默认的从扇区编号41940992-62914559意思是将磁盘多余的扇区都分配出来
Command (m for help): n
Partition type
p primary (1 primary, 1 extended, 2 free)
l logical (numbered from 5)
Select (default p): p
Partition number (3,4, default 3):
First sector (41940992-62914559, default 41940992):
Last sector, +/-sectors or +/-size{K,M,G,T,P} (41940992-62914559, default 62914559):
Created a new partition 3 of type 'Linux' and of size 10 GiB.
上面已经显示了有10G的空间,然后输入w,保存这个磁盘分区表
Command (m for help): n
Partition type
p primary (1 primary, 1 extended, 2 free)
l logical (numbered from 5)
Select (default p): p
Partition number (3,4, default 3):
First sector (41940992-62914559, default 41940992):
Last sector, +/-sectors or +/-size{K,M,G,T,P} (41940992-62914559, default 62914559):
Created a new partition 3 of type 'Linux' and of size 10 GiB.
Command (m for help): w
The partition table has been altered.
Syncing disks.
再执行fdisk 我们就能看到我们刚才创建的sda3这个分区了
现在我们用这个sda3创建pv,使用pvcreate + 分区
root@ubuntu:~# pvcreate /dev/sda3
Physical volume "/dev/sda3" successfully created.
root@ubuntu:~#
root@ubuntu:~#
然后创建vg
root@ubuntu:~# vgcreate vghome /dev/sda3
Volume group "vghome" successfully created
然后创建lv
root@ubuntu:~# lvcreate -n lvhome -l 100%FREE vghome
Logical volume "lvhome" created.
这个就表示了用100%剩余的刚刚创建的vghome这个卷组创建逻辑卷
此时查看逻辑卷就能够查看到了
root@ubuntu:~# lvdisplay
--- Logical volume ---
LV Path /dev/vghome/lvhome
LV Name lvhome
VG Name vghome
LV UUID hCav9V-HfJL-b1yM-FBKK-7cjJ-167J-uRiKTA
LV Write Access read/write
LV Creation host, time ubuntu, 2022-06-26 05:22:37 -0700
LV Status available
# open 0
LV Size 10.00 GiB
Current LE 2560
Segments 1
Allocation inherit
Read ahead sectors auto
- currently set to 256
Block device 253:0
完成了之后给逻辑卷创建文件系统
root@ubuntu:~# mkfs.ext4 /dev/vghome/lvhome
mke2fs 1.45.5 (07-Jan-2020)
Creating filesystem with 2621440 4k blocks and 655360 inodes
Filesystem UUID: 19147237-cf28-40b8-84e2-3e9a96bcb5ce
Superblock backups stored on blocks:
32768, 98304, 163840, 229376, 294912, 819200, 884736, 1605632
Allocating group tables: done
Writing inode tables: done
Creating journal (16384 blocks): done
Writing superblocks and filesystem accounting information: done
这个时候就可以挂载了
mount /dev/vghome/lvhome /home
下面这一步不要忘了,否则每次重启的时候都要重复挂载
vim /etc/fstab
加入这一行即可
/dev/vghome/lvhome /home ext4 errors=remount-ro 0 0


 1万+
1万+


 被折叠的 条评论
为什么被折叠?
被折叠的 条评论
为什么被折叠?
 到【灌水乐园】发言


