


目录
2.1获取SpringApplicationRunListeners
4.3 设置environment属性MutablePropertySources
4.5 根据environment配置,设置SpringApplication实例的属性值
4.7 再一次设置environment属性MutablePropertySources
6.9 准备工作完成后,执行contextLoaded监听器
本文主要是结合上一篇准备好IOC容器的实例后,再继续准备一系列参数,例如监听器、环境变量、启动类参数配置等等。
基本上做到了逐行源码解释,以及其后续具体的实现原理及伪代码示例,并对网上一些错误的解析进行了修正。
由于内容较多,之间相互联系又比较紧密,所以直接放在了一章。
但是每一节的内容是可以单独浏览,有需要的可以收藏后阅读。
下面进入正题,本文的主要内容是执行如下方法:
this.prepareContext(context, environment, listeners, applicationArguments, printedBanner);
其在类SpringApplication中的完整代码为:
public ConfigurableApplicationContext run(String... args) {
        StopWatch stopWatch = new StopWatch();
        stopWatch.start();
        ConfigurableApplicationContext context = null;
        Collection<SpringBootExceptionReporter> exceptionReporters = new ArrayList();
        this.configureHeadlessProperty();
        //1准备监听器
        SpringApplicationRunListeners listeners = this.getRunListeners(args);
        listeners.starting();
        Collection exceptionReporters;
        try {
            //2准备环境参数
            ApplicationArguments applicationArguments = new DefaultApplicationArguments(args);
            //3准备环境变量
            ConfigurableEnvironment environment = this.prepareEnvironment(listeners, applicationArguments);
            this.configureIgnoreBeanInfo(environment);
            //4准备Banner
            Banner printedBanner = this.printBanner(environment);
            context = this.createApplicationContext();
            exceptionReporters = this.getSpringFactoriesInstances(SpringBootExceptionReporter.class, new Class[]{ConfigurableApplicationContext.class}, context);
            //5真正开始执行准备工作
            this.prepareContext(context, environment, listeners, applicationArguments, printedBanner);
            this.refreshContext(context);
可以看到,和前一步的IOC容器初始化仅仅是实例化一个类相比,这一步准备工作,更多的侧重于对外部条件的整合。
二者一个准备内部环境,一个整合外部条件,一起构成了IOC完整的准备工作。
由于这一步更多的是涉及到外部条件的整合,那么我们就得一步步来介绍,这些外部条件有哪些,分别有哪些作用,是如何被IOC整合的?
上文,我们的代码引用中执行了四步准备工作,才真正进入prepareContext方法,其实在这四步之前,还有一个默认的准备条件,那就是SpringApplication类的初始化。
public static ConfigurableApplicationContext run(Class<?> primarySource, String... args) {
        return run(new Class[]{primarySource}, args);
    }

    public static ConfigurableApplicationContext run(Class<?>[] primarySources, String[] args) {
        return (new SpringApplication(primarySources)).run(args);
    }
这里的第一个run方法,就是Springboot启动时,直接调用的run方法,可以看到这个run方法和我们真正进入IOC容器初始化的run方法是不同的。
它还调用了一次run方法,在实例化SpringApplication后,调用的初始化IOC的run方法。
1 实例化SpringApplication
public SpringApplication(Class<?>... primarySources) {
        this((ResourceLoader)null, primarySources);
    }

    public SpringApplication(ResourceLoader resourceLoader, Class<?>... primarySources) {
        this.sources = new LinkedHashSet();
        this.bannerMode = Mode.CONSOLE;
        this.logStartupInfo = true;
        this.addCommandLineProperties = true;
        this.addConversionService = true;
        this.headless = true;
        this.registerShutdownHook = true;
        this.additionalProfiles = new HashSet();
        this.isCustomEnvironment = false;
        this.lazyInitialization = false;
        this.resourceLoader = resourceLoader;
        Assert.notNull(primarySources, "PrimarySources must not be null");
        this.primarySources = new LinkedHashSet(Arrays.asList(primarySources));
        //1获取应用类型
        this.webApplicationType = WebApplicationType.deduceFromClasspath();
        //2设置初始化器
        this.setInitializers(this.getSpringFactoriesInstances(ApplicationContextInitializer.class));        //3设置监听器
        this.setListeners(this.getSpringFactoriesInstances(ApplicationListener.class));
        //4设置启动类属性
        this.mainApplicationClass = this.deduceMainApplicationClass();
    }
可以看到,SpringApplication的大部分内容都是简单初始化一些属性,给一些默认值。
但是在初始化的过程中,有四个参数比较复杂,我们一一分析。
1.1 webApplicationType初始化
static WebApplicationType deduceFromClasspath() {
        if (ClassUtils.isPresent("org.springframework.web.reactive.DispatcherHandler", (ClassLoader)null) && !ClassUtils.isPresent("org.springframework.web.servlet.DispatcherServlet", (ClassLoader)null) && !ClassUtils.isPresent("org.glassfish.jersey.servlet.ServletContainer", (ClassLoader)null)) {
            return REACTIVE;
        } else {
            String[] var0 = SERVLET_INDICATOR_CLASSES;
            int var1 = var0.length;
            for(int var2 = 0; var2 < var1; ++var2) {
                String className = var0[var2];
                if (!ClassUtils.isPresent(className, (ClassLoader)null)) {
                    return NONE;
                }
            }
            return SERVLET;
        }
    }
根据第一行代码:
ClassUtils.isPresent("org.springframework.web.reactive.DispatcherHandler")
其执行方式就是通过全类名,利用默认的类加载器来加载类,但是我们一般的Springboot项目基本都是采用基于servlet的分发器。所以呢,第一行代码结果便是false,直接进入else条件。
然后就是加载默认的全类名:
private static final String[] SERVLET_INDICATOR_CLASSES = new String[]{"javax.servlet.Servlet", "org.springframework.web.context.ConfigurableWebApplicationContext"};两个都加载成功了,所以最终返回了SERVLET。
这个应用类型,又为我们前面IOC容器的初始化提供了条件,因为选择IOC容器类型的时候,便是根据SERVLET来判断的:
switch(this.webApplicationType) {
                case SERVLET:
                    contextClass = Class.forName("org.springframework.boot.web.servlet.context.AnnotationConfigServletWebServerApplicationContext");
                    break;
1.2 initializers初始化(自动装配原理)
initializers就是ApplicationContextInitializer的数组化形式。
private List<ApplicationContextInitializer<?>> initializers;我们再看一下ApplicationContextInitializer是什么:
public interface ApplicationContextInitializer<C extends ConfigurableApplicationContext> {
    void initialize(C var1);
}
可以看到,其是一个定义了一个initialize方法的接口。还是不太清晰,它具体是干嘛,我们再看一下UML类图:

可以看到ApplicationContextInitializer继承了一部分IOC容器的接口。
我们再通过它的实现类,来看一下,到底initialize方法是干嘛的:
public class DelegatingApplicationContextInitializer implements ApplicationContextInitializer<ConfigurableApplicationContext>, Ordered {
......
    public void initialize(ConfigurableApplicationContext context) {
        ConfigurableEnvironment environment = context.getEnvironment();
        List<Class<?>> initializerClasses = this.getInitializerClasses(environment);
        if (!initializerClasses.isEmpty()) {
            this.applyInitializerClasses(context, initializerClasses);
        }
    }
通过DelegatingApplicationContextInitializer的实现类,我们又了解的深入了一些。
ApplicationContextInitializer接口的initialize方法,基本就是通过传入的IOC容器,获取一些容器中的条件,然后执行一些初始化方法。
还是有点模糊,没关系,我们在后面还会用到它,最起码对ApplicationContextInitializer有了一定程度的认识。
我们再回到SpringApplication中的构造器,继续初始化initializers:
this.setInitializers(this.getSpringFactoriesInstances(ApplicationContextInitializer.class));就是很平常的set方法,set什么呢?往下看:
private <T> Collection<T> getSpringFactoriesInstances(Class<T> type) {
return this.getSpringFactoriesInstances(type, new Class[0]);
}
private <T> Collection<T> getSpringFactoriesInstances(Class<T> type, Class<?>[] parameterTypes, Object... args) {
//获取类加载器
ClassLoader classLoader = this.getClassLoader();
//根据class属性,获取项目引入jar包下META-INF/spring.factories文件中的配置文件值
Set<String> names = new LinkedHashSet(SpringFactoriesLoader.loadFactoryNames(type, classLoader));
//根据获取的配置文件值,其实就是全限定类名,实例化类
List<T> instances = this.createSpringFactoriesInstances(type, parameterTypes, classLoader, args, names);
//排序
AnnotationAwareOrderComparator.sort(instances);
return instances;
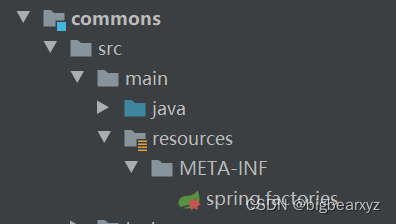
}getSpringFactoriesInstances这个方法的作用,就是利用系统默认的类加载器,去加载被引入当前工程的所有jar包下路径为META-INF/spring.factories的配置文件。
以springboot的内部打包好的jar包为例,其实就是这样:

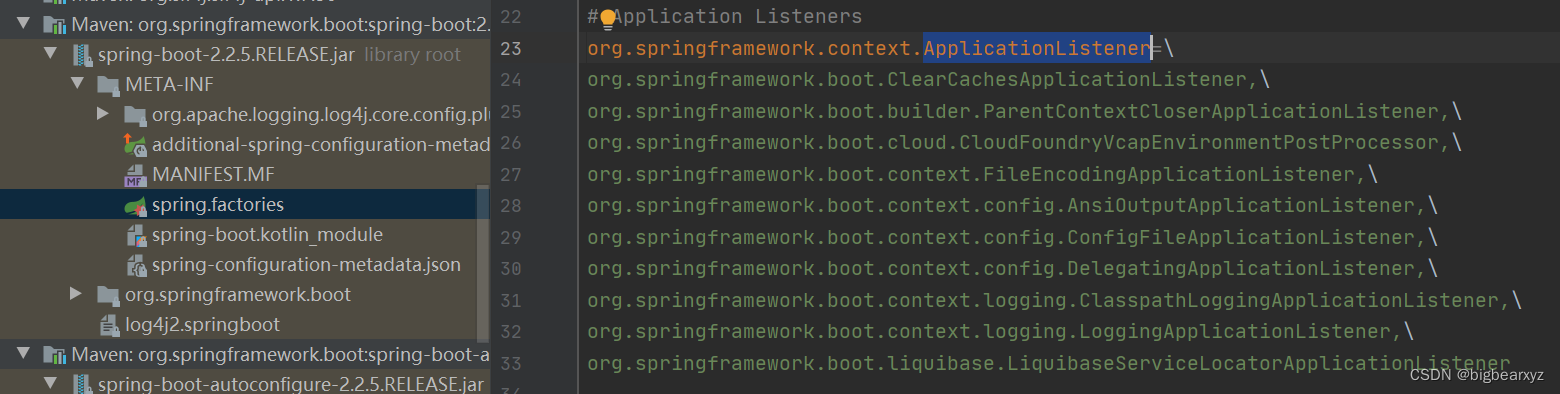
其具体信息如下:
# Application Context Initializers
org.springframework.context.ApplicationContextInitializer=\
org.springframework.boot.context.ConfigurationWarningsApplicationContextInitializer,\
org.springframework.boot.context.ContextIdApplicationContextInitializer,\
org.springframework.boot.context.config.DelegatingApplicationContextInitializer,\
org.springframework.boot.rsocket.context.RSocketPortInfoApplicationContextInitializer,\
org.springframework.boot.web.context.ServerPortInfoApplicationContextInitializer
ApplicationContextInitializer比较特殊,它分了2个jar包定义属性:

在实际的项目开发中,打包前的位置是位于这里:
在SpringFactoriesLoader.loadFactoryNames(type, classLoader)方法中,加载完所有的META-INF/spring.factories文件中的配置文件以后,再根据我们传入的ApplicationContextInitializer类的全类名,获取key为
org.springframework.context.ApplicationContextInitializer
的所有value值,而这些value的值,其实也是一系列的全类名。
loadFactoryNames具体加载过程如下:
public static List<String> loadFactoryNames(Class<?> factoryType, @Nullable ClassLoader classLoader) {
        String factoryTypeName = factoryType.getName();
        return (List)loadSpringFactories(classLoader).getOrDefault(factoryTypeName, Collections.emptyList());
    }
    private static Map<String, List<String>> loadSpringFactories(@Nullable ClassLoader classLoader) {
        MultiValueMap<String, String> result = (MultiValueMap)cache.get(classLoader);
        if (result != null) {
            return result;
        } else {
            try {
                Enumeration<URL> urls = classLoader != null ? classLoader.getResources("META-INF/spring.factories") : ClassLoader.getSystemResources("META-INF/spring.factories");
                LinkedMultiValueMap result = new LinkedMultiValueMap();
我们再获取所有value值后,再通过this.createSpringFactoriesInstances(type, parameterTypes, classLoader, args, names)方法,对获取的names(value的值集合)进行实例化,返回实例化的集合,也就是this.setInitializers方法的作用,最终完成给SpringApplication类中的initializers属性赋值。
获取initializers属性的过程,就是我们通常所说的Springboot的自动装配原理。
1.3 listeners初始化
通过代码
this.setListeners(this.getSpringFactoriesInstances(ApplicationListener.class));我们可以看出,listeners的初始化方法基本和initializers保持一致,就是初始化ApplicationListener
实现类对应的一系列实例,所以不用过多描述。
但是同样,我们需要对listeners进行介绍:
private List<ApplicationContextInitializer<?>> initializers;通过UML类图
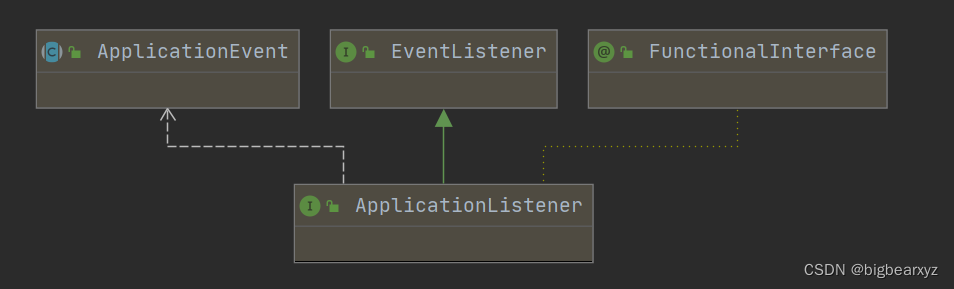
可以看出,ApplicationListener其实就是一个以ApplicationEvent为参数的监听器,其具体接口如下:
public interface ApplicationListener<E extends ApplicationEvent> extends EventListener {
    void onApplicationEvent(E var1);
}
说起监听器,最简单的理解,无论是publishEvent还是后面我们会介绍的多播器ApplicationEventMulticaster。
其核心功能都只是为了把ApplicationListener实现类的onApplicationEvent(E var1)方法执行一遍。
依旧是通过META-INF/spring.factories文件,我们可以找到ApplicationListener的实现类:

1.4 mainApplicationClass初始化
private Class<?> mainApplicationClass;至此,我们来到SpringApplication初始化的最后一步:
this.mainApplicationClass = this.deduceMainApplicationClass();具体代码为:
private Class<?> deduceMainApplicationClass() {
        try {
            StackTraceElement[] stackTrace = (new RuntimeException()).getStackTrace();
            StackTraceElement[] var2 = stackTrace;
            int var3 = stackTrace.length;
            for(int var4 = 0; var4 < var3; ++var4) {
                StackTraceElement stackTraceElement = var2[var4];
                if ("main".equals(stackTraceElement.getMethodName())) {
                    return Class.forName(stackTraceElement.getClassName());
                }
            }
        } catch (ClassNotFoundException var6) {
        }
        return null;
    }
可以看到,其实就是根据方法栈的调用信息,来获取方法名为main的类,也就是我们的启动类BookstoreApplication。
2 准备参数listeners
在完成SpringApplication的实例化以后,我们就可以真正进入run方法,来获取一系列的参数,为执行
this.prepareContext(context, environment, listeners, applicationArguments, printedBanner)
方法做准备了。
在上篇文章,我们提到了经过实例化AnnotationConfigServletWebServerApplicationContext类,我们完成了对IOC容器的初始化,也就是我们的context参数,又通过初始化SpringApplication,准备好了this参数。
下面我们准备下一个参数listeners,看代码:
public ConfigurableApplicationContext run(String... args) {
        StopWatch stopWatch = new StopWatch();
        stopWatch.start();
        ConfigurableApplicationContext context = null;
        Collection<SpringBootExceptionReporter> exceptionReporters = new ArrayList();
        this.configureHeadlessProperty();
        SpringApplicationRunListeners listeners = this.getRunListeners(args);
        listeners.starting();
主要就是通过执行this.getRunListeners(args)方法获取listeners以后,执行了其starting方法。
2.1获取SpringApplicationRunListeners
private SpringApplicationRunListeners getRunListeners(String[] args) {
        Class<?>[] types = new Class[]{SpringApplication.class, String[].class};
        return new SpringApplicationRunListeners(logger, this.getSpringFactoriesInstances(SpringApplicationRunListener.class, types, this, args));
    }
又遇到了我们熟悉的this.getSpringFactoriesInstances(SpringApplicationRunListener.class, types, this, args)方法,通过上面的分析,我们知道就是根据SpringApplicationRunListener这个key下面的vlaues,来实例化一些类,其具体配置如下:
# Run Listeners
org.springframework.boot.SpringApplicationRunListener=\
org.springframework.boot.context.event.EventPublishingRunListener
这里注意一点,这里的SpringApplicationRunListener和前面我们初始化的以ApplicationListener为接口的监听器是不一样的。
可以看到,这里主要就是实现了对接口SpringApplicationRunListener的实现类EventPublishingRunListener的实例化。
而我们知道,最终返回的其实是一个SpringApplicationRunListeners对象,EventPublishingRunListener的实例仅仅是构造SpringApplicationRunListeners的一个参数:
class SpringApplicationRunListeners {
    private final Log log;
    private final List<SpringApplicationRunListener> listeners;

    SpringApplicationRunListeners(Log log, Collection<? extends SpringApplicationRunListener> listeners) {
        this.log = log;
        this.listeners = new ArrayList(listeners);
    }
可以看到,在run方法中的listeners其实就是SpringApplicationRunListeners的实例。
而真正的listeners其实是隐藏在SpringApplicationRunListeners中的EventPublishingRunListener实例。那么EventPublishingRunListener实例化做了什么呢?
public EventPublishingRunListener(SpringApplication application, String[] args) {
        this.application = application;
        this.args = args;
        this.initialMulticaster = new SimpleApplicationEventMulticaster();
        Iterator var3 = application.getListeners().iterator();
        while(var3.hasNext()) {
            ApplicationListener<?> listener = (ApplicationListener)var3.next();
            this.initialMulticaster.addApplicationListener(listener);
        }

    }
可以看到,通过方法this.getSpringFactoriesInstances(SpringApplicationRunListener.class, types, this, args),在实例化EventPublishingRunListener的过程中,把ApplicationListener的实例作为参数传进来了。
通过上面的代码,我们可以很清晰的看出,其实就是获取SpringApplication实例的listeners参数,也就是上文提到的配置文件中ApplicationListener对应的一系列实现类。
所谓的RunListener,其实还是最开始在SpringApplication实例化时,构造的listeners参数。
在上面代码中,同时我们可以看到,还创建了一个新的实例SimpleApplicationEventMulticaster特意来添加listeners参数。
那么SimpleApplicationEventMulticaster又是做什么的呢?
依旧我们可以通过UML类图,来大致了解其作用:
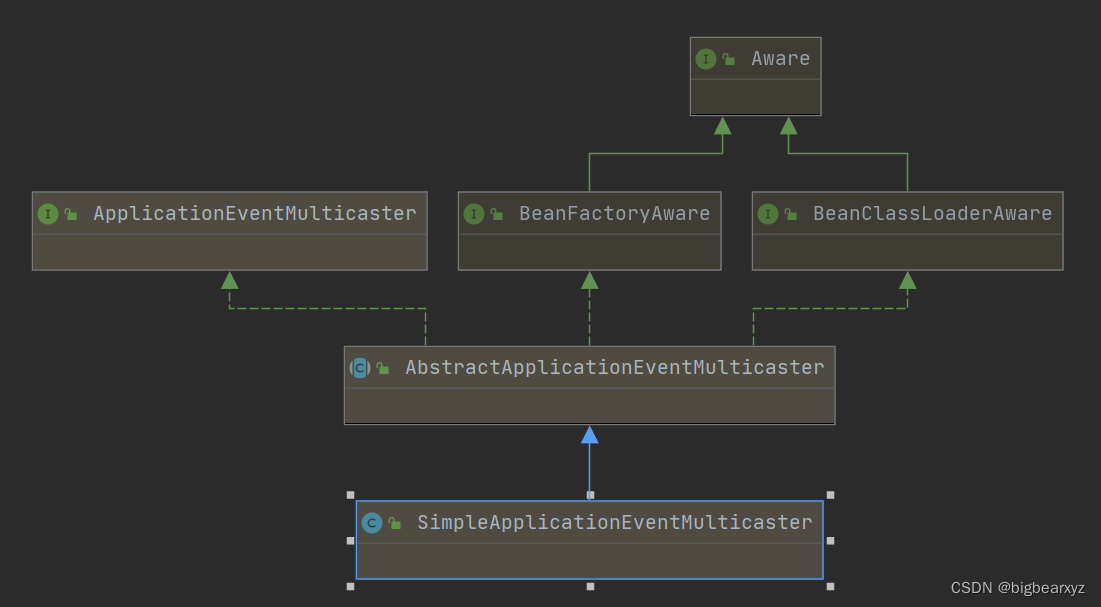
可以看到,其主要作用是实现了三个接口:
ApplicationEventMulticaster、BeanClassLoaderAware、BeanClassLoaderAware
后两个接口,通过名字我们可以看出,基本是关于bean工厂和类加载的一些增强接口。
比较不熟悉的是ApplicationEventMulticaster,我们看看它的接口定义:
public interface ApplicationEventMulticaster {
    void addApplicationListener(ApplicationListener<?> var1);
    void addApplicationListenerBean(String var1);
    void removeApplicationListener(ApplicationListener<?> var1);
    void removeApplicationListenerBean(String var1);
    void removeAllListeners();
    void multicastEvent(ApplicationEvent var1);
    void multicastEvent(ApplicationEvent var1, @Nullable ResolvableType var2);
}
可以看到,基本就是一些对于ApplicationListener类型的监听器进行管理的方法。而关键方法在于multicastEvent,通过其实现类的方法,我们可以看到,其主要作用就是利用线程池来调用ApplicationListener监听器中的onApplicationEvent方法。
也就是我们常说的多播器。
2.2执行listeners.starting()
SpringApplicationRunListeners中的starting方法,其实就是迭代执行其属性listeners中的SpringApplicationRunListener实例的starting方法。
也就是EventPublishingRunListener中的starting方法:
public void starting() {
        this.initialMulticaster.multicastEvent(new ApplicationStartingEvent(this.application, this.args));
    }
也就是调用了EventPublishingRunListener初始化时构建的多播器对象SimpleApplicationEventMulticaster的multicastEvent方法:
public void multicastEvent(ApplicationEvent event) {
        this.multicastEvent(event, this.resolveDefaultEventType(event));
    }
    public void multicastEvent(ApplicationEvent event, @Nullable ResolvableType eventType) {
        ResolvableType type = eventType != null ? eventType : this.resolveDefaultEventType(event);
        Executor executor = this.getTaskExecutor();
        Iterator var5 = this.getApplicationListeners(event, type).iterator();
        while(var5.hasNext()) {
            ApplicationListener<?> listener = (ApplicationListener)var5.next();
            if (executor != null) {
                executor.execute(() -> {
                    this.invokeListener(listener, event);
                });
            } else {
                this.invokeListener(listener, event);
            }
        }

    }
其实就是在初始化的监听器中,选择了一部分监听器类型为ApplicationStartingEvent的监听器,利用线程池来执行选中监听器的onApplicationEvent方法。
我们以LoggingApplicationListener为例,展示其具体的匹配方式,首先我们看调用栈:
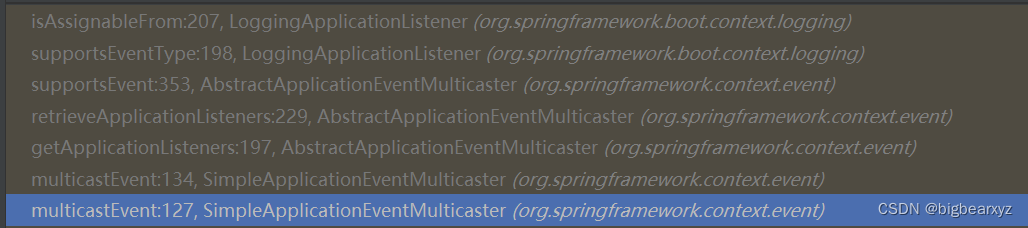
从下往上看,从SimpleApplicationEventMulticaster中的multicastEvent方法一直到LoggingApplicationListener类中的isAssignableFrom方法。
就是看传入的监听器类型,是否满足LoggingApplicationListener类中预先定义的类型。此处传入的监听器类型为ApplicationStartingEvent,而LoggingApplicationListener预先定义的类型EVENT_TYPES 为:
EVENT_TYPES = new Class[]{ApplicationStartingEvent.class, ApplicationEnvironmentPreparedEvent.class, ApplicationPreparedEvent.class, ContextClosedEvent.class, ApplicationFailedEvent.class};可见ApplicationStartingEvent是数组中的类型之一,所以满足条件。
其它的监听器过滤情况类似。
所以,run方法中的listeners.starting()方法,其实就是调用了一系列属于ApplicationStartingEvent类型的监听器。然后使用多播器SimpleApplicationEventMulticaster,利用线程池,执行了ApplicationStartingEvent类型监听器的onApplicationEvent方法。
同样以LoggingApplicationListener为例,即执行了:
public void onApplicationEvent(ApplicationEvent event) {
        if (event instanceof ApplicationStartingEvent) {
            this.onApplicationStartingEvent((ApplicationStartingEvent)event);
        } else if (event instanceof ApplicationEnvironmentPreparedEvent) {
         ......
    }
2.3 starting监听器的作用
由于监听器做的工作,与Springboot的启动过程密切相关,所以需要着重介绍下ApplicationStartingEvent类型的监听器,即其作用,首先我们看下所有starting的监听器:
[org.springframework.boot.context.logging.LoggingApplicationListener, org.springframework.boot.autoconfigure.BackgroundPreinitializer, org.springframework.boot.context.config.DelegatingApplicationListener, org.springframework.boot.liquibase.LiquibaseServiceLocatorApplicationListener]
一个个介绍:
LoggingApplicationListener作用:
private void onApplicationStartingEvent(ApplicationStartingEvent event) {
        //1加载log系统
        this.loggingSystem = LoggingSystem.get(event.getSpringApplication().getClassLoader());
        //2初始化加载好的log系统
        this.loggingSystem.beforeInitialize();
    }
主要有两步。第一步,根据配置文件加载合适的日志系统,通常我们用的最多的就是logback和log4j2,这里系统默认选中LogbackLoggingSystem类作为日志实现,且对其进行实例化,此时还会初始化日志级别,通过如下代码实现:
static {
        Map<String, String> systems = new LinkedHashMap();
        systems.put("ch.qos.logback.core.Appender", "org.springframework.boot.logging.logback.LogbackLoggingSystem");
        systems.put("org.apache.logging.log4j.core.impl.Log4jContextFactory", "org.springframework.boot.logging.log4j2.Log4J2LoggingSystem");
        systems.put("java.util.logging.LogManager", "org.springframework.boot.logging.java.JavaLoggingSystem");
        SYSTEMS = Collections.unmodifiableMap(systems);
    }
public static LoggingSystem get(ClassLoader classLoader) {
        String loggingSystem = System.getProperty(SYSTEM_PROPERTY);
        if (StringUtils.hasLength(loggingSystem)) {
            return (LoggingSystem)("none".equals(loggingSystem) ? new LoggingSystem.NoOpLoggingSystem() : get(classLoader, loggingSystem));
        } else {
            return (LoggingSystem)SYSTEMS.entrySet().stream().filter((entry) -> {
                return ClassUtils.isPresent((String)entry.getKey(), classLoader);
            }).map((entry) -> {
                return get(classLoader, (String)entry.getValue());
            }).findFirst().orElseThrow(() -> {
                return new IllegalStateException("No suitable logging system located");
            });
        }
    }
第二步, 执行LogbackLoggingSystem对象的beforeInitialize方法,主要作用就是在logback的上下文中设置其TurboFilterList属性。
BackgroundPreinitializer作用:
public void onApplicationEvent(SpringApplicationEvent event) {
        if (!Boolean.getBoolean("spring.backgroundpreinitializer.ignore") && event instanceof ApplicationStartingEvent && this.multipleProcessors() && preinitializationStarted.compareAndSet(false, true)) {
            this.performPreinitialization();
        }
......
执行this.performPreinitialization(),在没有配置系统属性spring.backgroundpreinitializer.ignore=true的情况下,以多线程的形式开启预初始化,配置一些IOC容器的属性。
 但是经过仔细的代码追踪,笔者发现一个很奇怪的现象,此处多线程的代码执行,基本都是直接new了一个对象,也不存在把值放在公共缓存里面。
这个performPreinitialization方法执行的后台线程,更多的像是一种预演,预先调用一下这个功能是否ok,如果有错,预先打印错误出来,于实际的IOC启动并没有多大用处。
笔者推测,这也是为什么它可以通过配置文件关闭的原因,毕竟这样还可以减少系统资源的消耗。
DelegatingApplicationListener作用:
它的onApplicationEvent方法,需要监听器类型为ApplicationEnvironmentPreparedEvent才会执行,略过。
LiquibaseServiceLocatorApplicationListener作用:
通过默认类加载器加载指定全限定类名的实例,由于未引入liquibase相关jar包,略过。
public void onApplicationEvent(ApplicationStartingEvent event) {
        if (ClassUtils.isPresent("liquibase.servicelocator.CustomResolverServiceLocator", event.getSpringApplication().getClassLoader())) {
            (new LiquibaseServiceLocatorApplicationListener.LiquibasePresent()).replaceServiceLocator();
        }
3 准备参数applicationArguments
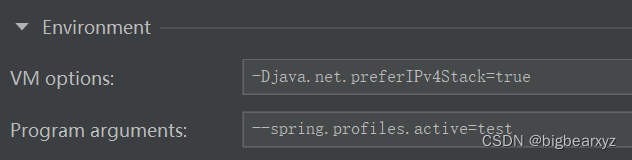
ApplicationArguments applicationArguments = new DefaultApplicationArguments(args);在main方法执行的过程中,会把启动过程的命令行参数直接通过args的形式传过来,如果是以cmd的形式是这样:
java -jar app.jar --server.port=8081 --spring.profiles.active=test
在idea中是这样:
![]()
利用命令行参数初始化了一个实例DefaultApplicationArguments:
public DefaultApplicationArguments(String... args) {
        Assert.notNull(args, "Args must not be null");
        this.source = new DefaultApplicationArguments.Source(args);
        this.args = args;
    }
目前来说还看不出来是干嘛,我们后面用到了再解释。
4 准备参数environment
ConfigurableEnvironment environment = this.prepareEnvironment(listeners, applicationArguments);private ConfigurableEnvironment prepareEnvironment(SpringApplicationRunListeners listeners, ApplicationArguments applicationArguments) {
ConfigurableEnvironment environment = this.getOrCreateEnvironment();
this.configureEnvironment((ConfigurableEnvironment)environment, applicationArguments.getSourceArgs());
ConfigurationPropertySources.attach((Environment)environment);
listeners.environmentPrepared((ConfigurableEnvironment)environment);
this.bindToSpringApplication((ConfigurableEnvironment)environment);
if (!this.isCustomEnvironment) {
environment = (new EnvironmentConverter(this.getClassLoader())).convertEnvironmentIfNecessary((ConfigurableEnvironment)environment, this.deduceEnvironmentClass());
}
ConfigurationPropertySources.attach((Environment)environment);
return (ConfigurableEnvironment)environment;
}我们一步步分析:
4.1创建environment
ConfigurableEnvironment environment = this.getOrCreateEnvironment();
具体代码为:
private ConfigurableEnvironment getOrCreateEnvironment() {
        if (this.environment != null) {
            return this.environment;
        } else {
            switch(this.webApplicationType) {
            case SERVLET:
                return new StandardServletEnvironment();
            .......
        }
    }
可以看到,根据当前webApplicationType的类型,也就是类SpringApplication实例化的时候被赋值SERVLET的属性,构造了一个StandardServletEnvironment的实例返回。
那么StandardServletEnvironment又是什么呢?依然通过UML来对其有个总体认识:
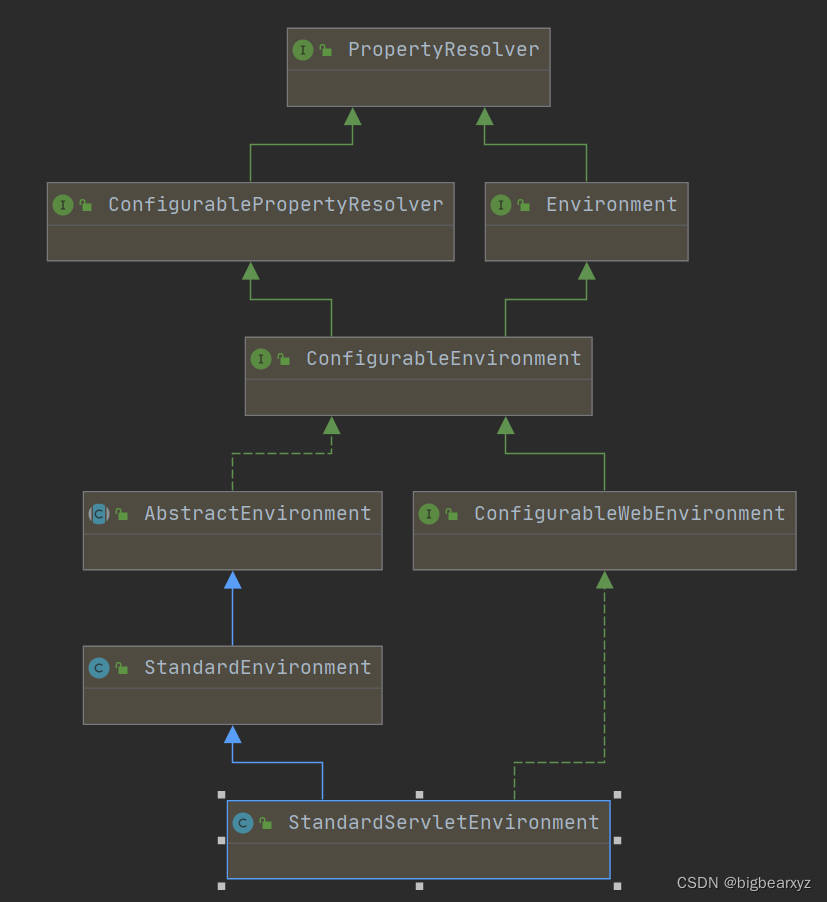
public interface PropertyResolver {
    boolean containsProperty(String var1);
    @Nullable
    String getProperty(String var1);
    String getProperty(String var1, String var2);
    @Nullable
    <T> T getProperty(String var1, Class<T> var2);
    <T> T getProperty(String var1, Class<T> var2, T var3);
    .......
}
可以看到,PropertyResolver主要就是负责解析获取配置文件属性,而其下属的继承接口ConfigurablePropertyResolver和Environment,以及其后的继承接口,都是在获取了配置文件信息的基础上进行扩展,比如获取可用配置,设置参数前后缀等。
从StandardServletEnvironment类一层层往上的实例化可以看出,environment在实例化阶段,就预先加载了许多配置,例如系统属性、命令行属性等等,例如通过实例化调用如下方法,这样就给environment的propertySources预先设置了一些默认属性:
protected void customizePropertySources(MutablePropertySources propertySources) {
        propertySources.addLast(new PropertiesPropertySource("systemProperties", this.getSystemProperties()));
        propertySources.addLast(new SystemEnvironmentPropertySource("systemEnvironment", this.getSystemEnvironment()));
    }
4.2配置environment
第一步,
this.configureEnvironment((ConfigurableEnvironment)environment, applicationArguments.getSourceArgs());
protected void configureEnvironment(ConfigurableEnvironment environment, String[] args) {
        if (this.addConversionService) {
            ConversionService conversionService = ApplicationConversionService.getSharedInstance();
         environment.setConversionService((ConfigurableConversionService)conversionService);
        }
        this.configurePropertySources(environment, args);
        this.configureProfiles(environment, args);
    }
由于SpringApplication对象在初始化的过程中,给addConversionService赋值为true,所以直接获取了ConversionServic的实例,并赋值给environment中的实例属性ConfigurablePropertyResolver中的实例属性ConfigurableConversionService的值。
由于涉及到继承和组合,这里用代码说明更清晰,就是调用了environment参数的抽象父类AbstractEnvironment的方法:
public void setConversionService(ConfigurableConversionService conversionService) {
        this.propertyResolver.setConversionService(conversionService);
    }
给其属性ConfigurablePropertyResolver赋值,之后再调用ConfigurablePropertyResolver的setConversionService方法给ConfigurablePropertyResolver的属性ConfigurableConversionService赋值。
ConversionServic又是什么呢?通过其接口定义,我们可以大致了解:
public interface ConversionService {
    boolean canConvert(@Nullable Class<?> var1, Class<?> var2);

    boolean canConvert(@Nullable TypeDescriptor var1, TypeDescriptor var2);

    @Nullable
    <T> T convert(@Nullable Object var1, Class<T> var2);

    @Nullable
    Object convert(@Nullable Object var1, @Nullable TypeDescriptor var2, TypeDescriptor var3);
}
可以看到,其实就是先判断是否可以转换,再把源类型的对象,转换成指定类型的对象。
第二步,
this.configurePropertySources(environment, args);
解析命令行参数args,就是我们前文提到的cmd命令或者idea参数配置,这这里需要放入environment,并归类到其commandLineArgs类型下,下面我们会介绍到environment还会有许多类型的参数。
第三步,
this.configureProfiles(environment, args);
protected void configureProfiles(ConfigurableEnvironment environment, String[] args) {
        Set<String> profiles = new LinkedHashSet(this.additionalProfiles);
        profiles.addAll(Arrays.asList(environment.getActiveProfiles()));
        environment.setActiveProfiles(StringUtils.toStringArray(profiles));
    }
这里的主要作用其实就是environment.getActiveProfiles(),通常来说就是获取启动参数中的配置值,例如在idea的启动参数中配置
--spring.profiles.active=test
4.3 设置environment属性MutablePropertySources
ConfigurationPropertySources.attach((Environment)environment);
public static void attach(Environment environment) {
        Assert.isInstanceOf(ConfigurableEnvironment.class, environment);
        MutablePropertySources sources = ((ConfigurableEnvironment)environment).getPropertySources();
        PropertySource<?> attached = sources.get("configurationProperties");
        if (attached != null && attached.getSource() != sources) {
            sources.remove("configurationProperties");
            attached = null;
        }
        if (attached == null) {
            sources.addFirst(new ConfigurationPropertySourcesPropertySource("configurationProperties", new SpringConfigurationPropertySources(sources)));
        }

    }
由于environment在初始化的过程中,仅仅是利用空参构造器实例化了一个MutablePropertySources对象,所以去获取configurationProperties属性的时候为空,那么就走到了最后一步,直接实例化了对象ConfigurationPropertySourcesPropertySource。
归根结底就是给configurationProperties属性设置了一个默认值。
其实就是给environment的一个属性设置了默认值,这个我们后面用到再细说。
4.4 在environment的准备阶段,发布监听事件
listeners.environmentPrepared((ConfigurableEnvironment)environment);
参考前面的listeners.starting,再结合现有代码,就能很清晰看出做了什么:
void environmentPrepared(ConfigurableEnvironment environment) {
        Iterator var2 = this.listeners.iterator();
        while(var2.hasNext()) {
            SpringApplicationRunListener listener = (SpringApplicationRunListener)var2.next();
            listener.environmentPrepared(environment);
        }

    }
首先,依然是加载所有监听器,执行environmentPrepared方法:
public void environmentPrepared(ConfigurableEnvironment environment) {
        this.initialMulticaster.multicastEvent(new ApplicationEnvironmentPreparedEvent(this.application, this.args, environment));
    }
根据我们前面的分析,此处multicastEvent的作用,其实就是从SpringApplication的所有监听器中,筛选出类型为ApplicationEnvironmentPreparedEvent的监听器,从而执行被筛选出监听器的onApplicationEven方法。
我们依旧以LoggingApplicationListener类为例,可以看到它也是ApplicationEnvironmentPreparedEvent类型的:
EVENT_TYPES = new Class[]{ApplicationStartingEvent.class, ApplicationEnvironmentPreparedEvent.class, ApplicationPreparedEvent.class, ContextClosedEvent.class, ApplicationFailedEvent.class};从这里我们也可以看出,其实系统监听器,会在Springboot项目运行的不同阶段,执行不同类型的监听器方法。
它们的执行方法基本都一样,唯一不同的是在不同的阶段,执行不同类型的监听器方法。
同样,我们也来看看这一步的监听器有哪些?
[org.springframework.boot.context.config.ConfigFileApplicationListener, org.springframework.boot.context.config.AnsiOutputApplicationListener, org.springframework.boot.context.logging.LoggingApplicationListener, org.springframework.boot.context.logging.ClasspathLoggingApplicationListener, org.springframework.boot.autoconfigure.BackgroundPreinitializer, org.springframework.boot.context.config.DelegatingApplicationListener, org.springframework.boot.context.FileEncodingApplicationListener]
ConfigFileApplicationListener作用:
利用自动装配机制,加载spring.factories文件中的配置参数:
# Environment Post Processors
org.springframework.boot.env.EnvironmentPostProcessor=\
org.springframework.boot.cloud.CloudFoundryVcapEnvironmentPostProcessor,\
org.springframework.boot.env.SpringApplicationJsonEnvironmentPostProcessor,\
org.springframework.boot.env.SystemEnvironmentPropertySourceEnvironmentPostProcessor,\
org.springframework.boot.reactor.DebugAgentEnvironmentPostProcessor
其都属于同一个接口的实现类:
@FunctionalInterface
public interface EnvironmentPostProcessor {
    void postProcessEnvironment(ConfigurableEnvironment environment, SpringApplication application);
}
可以看到,就是通过java的spi机制实例化这些配置类,对传入的environment参数进行配置。
例如SystemEnvironmentPropertySourceEnvironmentPostProcessor类的处理逻辑就是把原来environment中的systemEnvironment属性值,取出来后再通过包装后,重新放入environment中,总而言之,这些接口都是对environment的一系列后续处理了。
这个监听器类中有一个很重要的作用,就是通过其load方法,加载classpath路径下的yml文件,通过拼接的方式获取完整路径,加载配置:
if (processed.add(fileExtension)) {
                            this.loadForFileExtension(loaderx, location + name, "." + fileExtension, profile, filterFactory, consumer);
                        }
此方法支持三种方式的配置文件加载:
[xml, yml, properties]
AnsiOutputApplicationListener的作用:
根据配置文件参数spring.output.ansi.console-available的值,来设置AnsiOutput类的属性。
LoggingApplicationListener的作用:
根据环境environment来对日志系统进行初始化,类似于根据配置文件,来设置日志的生效级别。
ClasspathLoggingApplicationListener的作用:
如果开启了debugger的日志模式,在系统日志打印出本机包括jdk以及本地maven仓库下载的所有jar包路径。
BackgroundPreinitializer的作用:
无任何行为,略过。
DelegatingApplicationListener的作用:
加载配置文件中属性为context.listener.classes下的监听器,并运行监听器:

public class CustomListenApplication implements ApplicationListener<ApplicationEvent> {
    @Override
    public void onApplicationEvent(ApplicationEvent applicationEvent) {
        System.out.println("监听器加入系统。。。。。。。。。。。。。。。。。。。。。。。。。。。。。。。。。");
    }
}
这样无需使用注解或者注入bean的形式加入容器。
FileEncodingApplicationListener的作用:
检查配置文件中属性spring.mandatory-file-encoding如果配置了,是否与系统配置保持一致,如若不一致,会报错:
logger.error("System property 'file.encoding' is currently '" + encoding + "'. It should be '" + desired + "' (as defined in 'spring.mandatoryFileEncoding').")4.5 根据environment配置,设置SpringApplication实例的属性值
this.bindToSpringApplication((ConfigurableEnvironment)environment);
了解细节需要看详细方法:
protected void bindToSpringApplication(ConfigurableEnvironment environment) {
        try {
            Binder.get(environment).bind("spring.main", Bindable.ofInstance(this));
        } catch ...
    }
在底层实现,就是利用反射,根据其传入的对象,可以解析到对象的class类型,从而利用反射获取传入对象的属性值。
但是需要配置文件配置了以spring.main开头的属性,这个绑定才会生效,可以认为只有spring.main配置了值,才会开启反射去获取this的各个属性,并根据配置文件的值来赋值。
spring:
  main:
    allow-bean-definition-overriding: true
原本初始化时,SpringApplication的属性值allowBeanDefinitionOverriding为false,执行此方法后,会根据配置文件值来赋值,最终allowBeanDefinitionOverriding被设置为true。
其具体的执行链为:
Binder类中的bind(...)==>this.bindObject(...)==>this.bindDataObject,然后进入类DataObjectBinder中的方法bind(...)==>
JavaBeanBinder.Bean.get(...)==>new JavaBeanBinder.Bean(type, resolvedType)==>返回bean信息。
而内部类Bean在初始化的过程中,会根据class类型来获取属性:
Bean(ResolvableType type, Class<?> resolvedType) {
            ......
            this.addProperties(resolvedType);
        }

        private void addProperties(Class<?> type) {
            while(type != null && !Object.class.equals(type)) {
                Method[] declaredMethods = type.getDeclaredMethods();
                Field[] declaredFields = type.getDeclaredFields();
                this.addProperties(declaredMethods, declaredFields);
......
4.6 规范environment类型
if (!this.isCustomEnvironment) {
            environment = (new EnvironmentConverter(this.getClassLoader())).convertEnvironmentIfNecessary((ConfigurableEnvironment)environment, this.deduceEnvironmentClass());
        }
判断environment的类型是否为StandardEnvironment,如果是直接用当前environment,如果不是新建一个StandardEnvironment类型的对象,把environment属性值copy过去,然后返回StandardEnvironment对象。
这里的代码清晰又简单,就不详细展示了。
4.7 再一次设置environment属性MutablePropertySources
ConfigurationPropertySources.attach((Environment)environment);
为什么说是再一次,这里很奇怪的是,确实是又执行了一次一模一样的代码,其作用主要是为了把configurationProperties的配置文件,加载到environment的MutablePropertySources属性的第一行,这个configurationProperties它其实又是所有配置文件的汇总,它本身包含所有配置文件,但是它又和别的配置文件在同一个级别。这个后续肯定还会用到,到时候我们就知道这样做的原因了。
4.8 根据environment配置忽略bean信息
在prepareEnvironment方法执行完成以后,下面还有一步:
this.configureIgnoreBeanInfo(environment);
主要就是看系统是否有配置spring.beaninfo.ignore信息,如果没有配置,从environment取,如果environment也没配置,那就设置默认值为true。
4.9 environment准备阶段小结
在environment的准备阶段,主要是准备了一系列各种类型的参数,加入到了environment的MutablePropertySources属性中,有操作系统自带的类型,例如systemProperties、systemEnvironment,还有命令行参数类型commandLineArgs,更有我们不可或缺的application.yml。
还有一些现在看来还不太明了的类型configurationProperties,似乎是用来汇总所有环境类型。
5 准备参数printedBanner
Banner printedBanner = this.printBanner(environment);
Banner就是横幅的意思,这个参数的意义就是加载默认配置在classpath路径下的banner文件,并以logger或者System.out.print()的形式输出在控制台。
banner文件可以是txt,也可以是图片。
txt采用默认参数配置:
String location = environment.getProperty("spring.banner.location", "banner.txt")image需要在yml文件配置属性spring.banner.image.location的值,image支持的后缀有
{"gif", "jpg", "png"}
当然也可以不配置banner文件,这样程序会选择系统默认的Banner对象SpringBootBanner来打印Spring自己的banner。如果选择txt,则使用对象ResourceBanner,在后续执行打印方法,如果选择image,使用对象ImageBanner。
6 执行prepareContext方法
在前面的步骤中,我们分别介绍了执行prepareContext之前需要准备的参数。下面我们正式开始进入执行方法。
this.prepareContext(context, environment, listeners, applicationArguments, printedBanner)
其中,context参数就是上一章介绍的AnnotationConfigServletWebServerApplicationContext实例,也是我们说的IOC容器。
6.1 IOC容器设置环境变量
context.setEnvironment(environment);参数准备阶段准备好的environment参数,设置到IOC容器中。
6.2 IOC容器后置处理
this.postProcessApplicationContext(context);设置IOC容器中的ConversionService属性,通过单例方法来加载默认的转换映射属性:
if (this.addConversionService) {
            context.getBeanFactory().setConversionService(ApplicationConversionService.getSharedInstance());
        }
6.3 执行初始化方法
this.applyInitializers(context)在SpringApplication实例话的过程中,通过spring.factories文件加载了7个初始化器:
[org.springframework.boot.context.config.DelegatingApplicationContextInitializer, org.springframework.boot.autoconfigure.SharedMetadataReaderFactoryContextInitializer, org.springframework.boot.context.ContextIdApplicationContextInitializer, org.springframework.boot.context.ConfigurationWarningsApplicationContextInitializer, org.springframework.boot.rsocket.context.RSocketPortInfoApplicationContextInitializer, org.springframework.boot.web.context.ServerPortInfoApplicationContextInitializer, org.springframework.boot.autoconfigure.logging.ConditionEvaluationReportLoggingListener]
在此处,我们以IOC容器实例为参数,来分别执行他们的initialize方法。
依旧是一个个介绍它们的作用:
DelegatingApplicationContextInitializer
获取配置文件中参数context.initializer.classes的值,获取ApplicationContextInitializer接口的实现类的全类名,根据全类名反射生成对象后,执行initialize方法。
context:
  initializer:
    classes: com.CustomInitializer
和上文介绍的代理监听器类似,都是配置文件配置参数后,实例化配置对象。
在IOC容器中,添加bean工厂的后置处理器CachingMetadataReaderFactoryPostProcessor,为以后执行BeanFactoryPostProcessor接口中的postProcessBeanFactory方法做准备:
public void initialize(ConfigurableApplicationContext applicationContext) {
        applicationContext.addBeanFactoryPostProcessor(new SharedMetadataReaderFactoryContextInitializer.CachingMetadataReaderFactoryPostProcessor());
    }
ContextIdApplicationContextInitializer
生成容器id,并把ContextIdApplicationContextInitializer实例化后加入IOC容器中的存放单例对象的Map中,并构建id和实例对象的映射关系。
public void initialize(ConfigurableApplicationContext applicationContext) {
        ContextIdApplicationContextInitializer.ContextId contextId = this.getContextId(applicationContext);
        applicationContext.setId(contextId.getId());
        applicationContext.getBeanFactory().registerSingleton(ContextIdApplicationContextInitializer.ContextId.class.getName(), contextId);
    }
ConfigurationWarningsApplicationContextInitializer
在IOC容器中,添加bean工厂的后置处理器ConfigurationWarningsPostProcessor:
 public void initialize(ConfigurableApplicationContext context) {
        context.addBeanFactoryPostProcessor(new ConfigurationWarningsApplicationContextInitializer.ConfigurationWarningsPostProcessor(this.getChecks()));
    }
RSocketPortInfoApplicationContextInitializer
把指定的监听器加入IOC容器的监听器中,注意这个监听器不属于SpringApplication,是IOC自己的:
public void initialize(ConfigurableApplicationContext applicationContext) {
        applicationContext.addApplicationListener(new RSocketPortInfoApplicationContextInitializer.Listener(applicationContext));
    }
ServerPortInfoApplicationContextInitializer
把当前类作为监听器加入到IOC容器的监听器中,在容器启动后,根据Tomcat参数设置environment的MutablePropertySources属性:
public void initialize(ConfigurableApplicationContext applicationContext) {
        applicationContext.addApplicationListener(this);
    }
    public void onApplicationEvent(WebServerInitializedEvent event) {
        String propertyName = "local." + this.getName(event.getApplicationContext()) + ".port";
        this.setPortProperty((ApplicationContext)event.getApplicationContext(), propertyName, event.getWebServer().getPort());
    }
ConditionEvaluationReportLoggingListener
把当前类作为监听器加入到IOC容器的监听器中,在容器刷新阶段,打印日志,显示IOC容器状态:
public void initialize(ConfigurableApplicationContext applicationContext) {
        this.applicationContext = applicationContext;
        applicationContext.addApplicationListener(new ConditionEvaluationReportLoggingListener.ConditionEvaluationReportListener());
......
    }
6.4 执行contextPrepared阶段监听器
[org.springframework.boot.autoconfigure.BackgroundPreinitializer, org.springframework.boot.context.config.DelegatingApplicationListener]
BackgroundPreinitializer
未执行,略过。
DelegatingApplicationListener
代理监听器,在此阶段,再执行一次我们配置过自定义监听器。
6.5 初始化日志打印
if (this.logStartupInfo) {
            this.logStartupInfo(context.getParent() == null);
            this.logStartupProfileInfo(context);
        }
打印系统信息,Springboot版本信息,和当前生效配置文件信息。
6.6 注册bean信息
从IOC容器中,获取beanFactory对象,再给beanFactory注册一系列bean信息及其映射对象,这样以后直接可以从bean工厂通过bean信息来获取对象:
ConfigurableListableBeanFactory beanFactory = context.getBeanFactory();
        beanFactory.registerSingleton("springApplicationArguments", applicationArguments);
        if (printedBanner != null) {
            beanFactory.registerSingleton("springBootBanner", printedBanner);
        }

        if (beanFactory instanceof DefaultListableBeanFactory) {
            ((DefaultListableBeanFactory)beanFactory).setAllowBeanDefinitionOverriding(this.allowBeanDefinitionOverriding);
        }
6.7 设置懒加载的beanFactory后置处理器
if (this.lazyInitialization) {
            context.addBeanFactoryPostProcessor(new LazyInitializationBeanFactoryPostProcessor());
        }
6.8 加载启动类信息到IOC容器
//从main方法获取启动类参数
Set<Object> sources = this.getAllSources();
        Assert.notEmpty(sources, "Sources must not be empty");
        //加载启动类信息到IOC容器
        this.load(context, sources.toArray(new Object[0]));
这一步主要是先从启动类的main方法中获取传入的class参数,然后把获取的启动类全部加载进IOC容器,注意这里主要是以key,value的形式把bean的定义信息放到IOC容器,还没有进行bean的实例化。
其具体实现是先构建启动类的bean定义信息对象:
BeanDefinitionLoader loader = this.createBeanDefinitionLoader(this.getBeanDefinitionRegistry(context), sources);
......
loader.load();
然后循环加载启动类sources,这里会根据启动参数的类型选择使用注解或者xml的形式来解析bean定义信息:
private int load(Object source) {
        Assert.notNull(source, "Source must not be null");
        if (source instanceof Class) {
            //注解形式加载
            return this.load((Class)source);
        } else if (source instanceof Resource) {
            //xml形式加载
            return this.load((Resource)source);
        }......
    }
如果是以注解的形式加载会判断启动类是否有@Component注解,只有包含了指定注解才会把启动类的信息注册到IOC容器中:
private int load(Class<?> source) {
......
        if (this.isComponent(source)) {
            this.annotatedReader.register(new Class[]{source});
            return 1;
        }
这里我们可以看一下详细的判断isComponent的过程:
private boolean isComponent(Class<?> type) {
        if (MergedAnnotations.from(type, SearchStrategy.TYPE_HIERARCHY).isPresent(Component.class)) {
            return true;
重点在isPresent方法,根据条件,其会调用AnnotationsScanner中的scan方法:
static <C, R> R scan(C context, AnnotatedElement source, SearchStrategy searchStrategy, AnnotationsProcessor<C, R> processor, @Nullable BiPredicate<C, Class<?>> classFilter) {
        R result = process(context, source, searchStrategy, processor, classFilter);
        return processor.finish(result);
    }
然后根据其搜索类型进入指定的解析当前类注解的方法:
case TYPE_HIERARCHY:
            return processClassHierarchy(context, source, processor, classFilter, true, false);
通过processClassHierarchy进入真正的解析方法doWithAnnotations,然后调用:
AnnotationTypeMappings mappings = AnnotationTypeMappings.forAnnotationType(type)利用AnnotationTypeMappings类的forAnnotationType方法解析启动类注解@SpringBootApplication,也就是type参数。然后把这个复合注解中涉及到的注解以及底层的元注解全部解析出来,具体的解析方法AnnotationTypeMappings的内部类在Cache的get方法中,根据@SpringBootApplication注解来解析:
AnnotationTypeMappings get(Class<? extends Annotation> annotationType) {
            return (AnnotationTypeMappings)this.mappings.computeIfAbsent(annotationType, this::createMappings);
        }
重点在createMappings方法,会构造一个AnnotationTypeMappings对象来解析:
AnnotationTypeMappings createMappings(Class<? extends Annotation> annotationType) {
            return new AnnotationTypeMappings(this.repeatableContainers, this.filter, annotationType);
        }
private AnnotationTypeMappings(RepeatableContainers repeatableContainers, AnnotationFilter filter, Class<? extends Annotation> annotationType) {
......
this.mappings = new ArrayList();
this.addAllMappings(annotationType);
......
}这里的mappings就是我们返回的所有注解信息,而addAllMappings就是真正的执行方法:
private void addAllMappings(Class<? extends Annotation> annotationType) {
        Deque<AnnotationTypeMapping> queue = new ArrayDeque();
        this.addIfPossible(queue, (AnnotationTypeMapping)null, annotationType, (Annotation)null);
        while(!queue.isEmpty()) {
            AnnotationTypeMapping mapping = (AnnotationTypeMapping)queue.removeFirst();
            this.mappings.add(mapping);
            this.addMetaAnnotationsToQueue(queue, mapping);
        }
    }
可以看到主要就是构建了一个双端队列,利用反射循环解析。把复合注解@SpringBootApplication的所有注解信息全部解析出来:
private void addMetaAnnotationsToQueue(Deque<AnnotationTypeMapping> queue, AnnotationTypeMapping source) {
        Annotation[] metaAnnotations = AnnotationsScanner.getDeclaredAnnotations(source.getAnnotationType(), false);
而@Component注解就是包含在@SpringBootApplication==>@SpringBootConfiguration==>@Configuration的下一层。
addMetaAnnotationsToQueue就是一个不断循环解析的过程。
额外说一句,这个启动类是支持多个参数的:
public static void main(String[] args) {
        SpringApplication.run(new Class[]{BookstoreApplication.class, TestApp.class}, args);
    }
通过上文代码分析,只要加了Component注解都可以加载到IOC容器中。
6.9 准备工作完成后,执行contextLoaded监听器
listeners.contextLoaded(context);
流程和前面调用方法一直,此过程加载类型为ApplicationPreparedEvent的监听器:
[org.springframework.boot.cloud.CloudFoundryVcapEnvironmentPostProcessor, org.springframework.boot.context.config.ConfigFileApplicationListener, org.springframework.boot.context.logging.LoggingApplicationListener, org.springframework.boot.autoconfigure.BackgroundPreinitializer, org.springframework.boot.context.config.DelegatingApplicationListener]
CloudFoundryVcapEnvironmentPostProcessor作用:
public void onApplicationEvent(ApplicationPreparedEvent event) {
        logger.switchTo(CloudFoundryVcapEnvironmentPostProcessor.class);
    }
切换日志到当前类,但是并未具体打印日志,可能为后续日志打印做准备。
ConfigFileApplicationListener作用:
private void onApplicationPreparedEvent(ApplicationEvent event) {
        this.logger.switchTo(ConfigFileApplicationListener.class);
        this.addPostProcessors(((ApplicationPreparedEvent)event).getApplicationContext());
    }
切换日志到当前类,然后把指定的bean工厂后置处理器加入IOC容器的后置处理器集合中:
protected void addPostProcessors(ConfigurableApplicationContext context) {
        context.addBeanFactoryPostProcessor(new ConfigFileApplicationListener.PropertySourceOrderingPostProcessor(context));
    }
LoggingApplicationListener的作用:
根据条件,加载指定的bean信息和实例,到容器中,注意这里加载了bean实例:
private void onApplicationPreparedEvent(ApplicationPreparedEvent event) {
        ConfigurableListableBeanFactory beanFactory = event.getApplicationContext().getBeanFactory();
        if (!beanFactory.containsBean("springBootLoggingSystem")) {
            beanFactory.registerSingleton("springBootLoggingSystem", this.loggingSystem);
        }
     ......
        if (this.loggerGroups != null && !beanFactory.containsBean("springBootLoggerGroups")) {
            beanFactory.registerSingleton("springBootLoggerGroups", this.loggerGroups);
......
这里加载了springBootLoggingSystem和springBootLoggerGroups的对象到IOC容器。
BackgroundPreinitializer的作用:
此时后台任务已完成,略过。
DelegatingApplicationListener的作用:
运行配置好的自定义监听器:
context:
  listener:
    classes: com.CustomListenApplication
7 总结
总的说来其实很简单,就是在项目启动后,进行一系列的初始化。包括SpringApplication实例准备,listens监听器准备,environment环境准备。
还有我们上一篇提到的IOC容器创建,都是为执行prepareContext方法做准备。
但这所有的一切,都是为了进入IOC容器刷新步骤。


 738
738


 被折叠的 条评论
为什么被折叠?
被折叠的 条评论
为什么被折叠?
 到【灌水乐园】发言


