


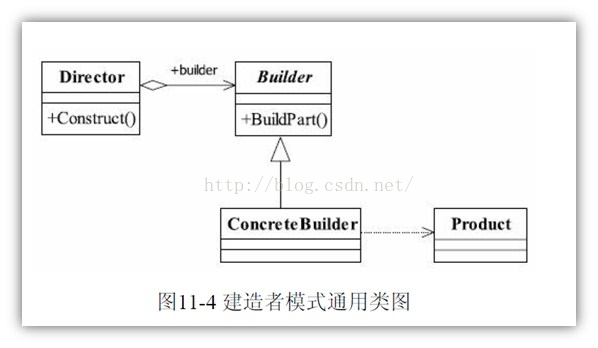
常用设计模式有23中,分为:
创建型模式(主要用于创建对象)
1、单例模式 2、工厂方法模式 3、抽象工厂模式 4、建造者模式 5、原型模式
行为型模式 (主要用于描述对象或类是怎样交互和怎样分配职责)
1、模板方法模式 2、中介者模式 3、命令模式 4、责任链模式 5、策略模式 6、迭代器模式
7、观察者模式 8、备忘录模式 9、访问者模式 10、状态模式 11、解释器模式
结构型模式(主要用于处理类或对象的组合)
1、代理模式 2、装饰模式 3、适配器模式 4、组合模式 5、外观模式(门面模式) 6、享元模式 7、桥梁模式
<span style="font-size:18px;">public class Product {
public void doSomething(){
//独立业务处理
}
}</span><span style="font-size:18px;">public abstract class Builder {
//设置产品的不同部分,以获得不同的产品
public abstract void setPart();
//建造产品
public abstract Product buildProduct();
}
</span><span style="font-size:18px;">public class ConcreteProduct extends Builder {
private Product product = new Product();
//设置产品零件
public void setPart(){
/*
* 产品类内的逻辑处理
*/
}
//组建一个产品
public Product buildProduct() {
return product;
}
}</span><span style="font-size:18px;">public class Director {
private Builder builder = new ConcreteProduct();
//构建不同的产品
public Product getAProduct(){
builder.setPart();
/*
* 设置不同的零件,产生不同的产品
*/
return builder.buildProduct();
}
} </span>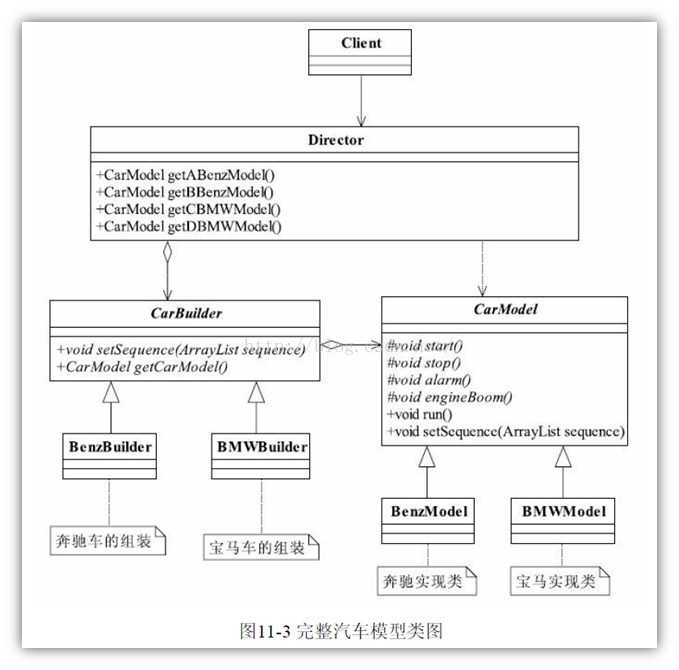
<span style="font-size:18px;">代码清单11-1 车辆模型的抽象类
public abstract class CarModel {
//这个参数是各个基本方法执行的顺序
private ArrayList sequence = new ArrayList();
//模型是启动开始跑了
protected abstract void start();
//能发动,还要能停下来,那才是真本事
protected abstract void stop();
//喇叭会出声音,是滴滴叫,还是哔哔叫
protected abstract void alarm();
//引擎会轰隆隆地响,不响那是假的
protected abstract void engineBoom();
//那模型应该会跑吧,别管是人推的,还是电力驱动,总之要会跑
final public void run() {
//循环一边,谁在前,就先执行谁
for(int i=0;i
String actionName = this.sequence.get(i);
if(actionName.equalsIgnoreCase("start")){
this.start(); //启动汽车
}else if(actionName.equalsIgnoreCase("stop")){
this.stop(); //停止汽车
}else if(actionName.equalsIgnoreCase("alarm")){
this.alarm(); //喇叭开始叫了
}else if(actionName.equalsIgnoreCase("engine boom")){
//如果是engine boom关键this.engineBoom(); //引擎开始轰鸣
}
}
}
//把传递过来的值传递到类内
final public void setSequence(ArrayList sequence){
this.sequence = sequence;
}
}</span><span style="font-size:18px;">代码清单11-2 奔驰模型代码
public class BenzModel extends CarModel {
protected void alarm() {
System.out.println("奔驰车的喇叭声音是这个样子的...");
}
protected void engineBoom() {
System.out.println("奔驰车的引擎是这个声音的...");
}
protected void start() {
System.out.println("奔驰车跑起来是这个样子的...");
}
protected void stop() {
System.out.println("奔驰车应该这样停车...");
}
}
</span><span style="font-size:18px;">代码清单11-3 宝马模型代码
public class BMWModel extends CarModel {
protected void alarm() {
System.out.println("宝马车的喇叭声音是这个样子的...");
}
protected void engineBoom() {
System.out.println("宝马车的引擎是这个声音的...");
}
protected void start() {
System.out.println("宝马车跑起来是这个样子的...");
}
protected void stop() {
System.out.println("宝马车应该这样停车...");
}
} </span><span style="font-size:18px;">代码清单11-5 抽象汽车组装者
public abstract class CarBuilder {
//建造一个模型,你要给我一个顺序要求,就是组装顺序
public abstract void setSequence(ArrayList<String> sequence);
//设置完毕顺序后,就可以直接拿到这个车辆模型
public abstract CarModel getCarModel();
}</span>实现类
<span style="font-size:18px;">代码清单11-6 奔驰车组装者
public class BenzBuilder extends CarBuilder {
private BenzModel benz = new BenzModel();
public CarModel getCarModel() {
return this.benz;
}
public void setSequence(ArrayList sequence) {
this.benz.setSequence(sequence);
}
}  </span>
<span style="font-size:18px;">代码清单11-7 宝马车组装者
public class BMWBuilder extends CarBuilder {
private BMWModel bmw = new BMWModel();
public CarModel getCarModel() {
return this.bmw;
}
public void setSequence(ArrayList<String> sequence) {
this.bmw.setSequence(sequence);
}
}</span><span style="font-size:18px;">代码清单11-10 导演类
public class Director {
private ArrayList sequence = new ArrayList();
private BenzBuilder benzBuilder = new BenzBuilder();
private BMWBuilder bmwBuilder = new BMWBuilder();
/*
* A类型的奔驰车模型,先start,然后stop,其他什么引擎、喇叭一概没有
*/
public BenzModel getABenzModel(){
//清理场景,这里是一些初级程序员不注意的地方
this.sequence.clear();
//ABenzModel的执行顺序
this.sequence.add("start");
this.sequence.add("stop");
//按照顺序返回一个奔驰车
this.benzBuilder.setSequence(this.sequence);
return (BenzModel)this.benzBuilder.getCarModel();
}
/*
* B型号的奔驰车模型,是先发动引擎,然后启动,然后停止,没有喇叭
*/
public BenzModel getBBenzModel(){
this.sequence.clear();
this.sequence.add("engine boom");
this.sequence.add("start");
this.sequence.add("stop");
this.benzBuilder.setSequence(this.sequence);
return (BenzModel)this.benzBuilder.getCarModel();
}
/*
* C型号的宝马车是先按下喇叭(炫耀嘛),然后启动,然后停止
*/
public BMWModel getCBMWModel(){
this.sequence.clear();
this.sequence.add("alarm");
this.sequence.add("start");
this.sequence.add("stop");
this.bmwBuilder.setSequence(this.sequence);
return (BMWModel)this.bmwBuilder.getCarModel();
}
/*
* D类型的宝马车只有一个功能,就是跑,启动起来就跑,永远不停止
*/
public BMWModel getDBMWModel(){
this.sequence.clear();
this.sequence.add("start");
this.bmwBuilder.setSequence(this.sequence);
return (BMWModel)this.benzBuilder.getCarModel();
}
/*
* 这里还可以有很多方法,你可以先停止,然后再启动,或者一直停着不动,静态的嘛
* 导演类嘛,按照什么顺序是导演说了算
*/
}</span>大家看一下程序中有很多this调用。这个我一般是这样要求项目组成员 的,如果你要调用类中的成员变量或方法,需要在前面加上 this关键字,不加也能正常地跑 起来,但是不清晰,加上this关键字,我就是要调用本类中的成员变量或方法,而不是本方 法中的一个变量。
<span style="font-size:18px;">代码清单11-11 导演类
public class Client {
public static void main(String[] args) {
Director director = new Director();
//1万辆A类型的奔驰车
for(int i=0;i<10000;i++){
director.getABenzModel().run();
}
//100万辆B类型的奔驰车
for(int i=0;i<1000000;i++){
director.getBBenzModel().run();
}
//1000万辆C类型的宝马车
for(int i=0;i<10000000;i++){
director.getCBMWModel().run();
}
}
}</span>8.Android中的源码分析
Android中的AlertDialog.Builder就是使用了Builder模式来构建AlertDialog的。
8.1 AlertDialog.Builder的简单用法
        AlertDialog.Builder builder = new AlertDialog.Builder(activity);//创建一个Builder对象
        builder.setIcon(R.drawable.icon);
        builder.setTitle("标题");
        builder.setMessage("信息");
        builder.setPositiveButton("确定",
                new DialogInterface.OnClickListener() {
                    @Override
                    public void onClick(DialogInterface dialog, int which) {

                    }
                });
        AlertDialog alertDialog = builder.create();//创建AlertDialog对象
        alertDialog.show();//展示AlertDialog
通过Builder对象来构建Icon、Title、Message等,将AlertDialog的构建过程和细节隐藏了起来。
8.2 AlertDialog相关源码分析
//AlertDialog源码
public class AlertDialog extends Dialog implements DialogInterface {
    private AlertController mAlert;//接受Builder成员变量P的参数

    AlertDialog(Context context, @StyleRes int themeResId, boolean createContextThemeWrapper) {
        super(context, createContextThemeWrapper ? resolveDialogTheme(context, themeResId) : 0, createContextThemeWrapper);
        mWindow.alwaysReadCloseOnTouchAttr();
        mAlert = AlertController.create(getContext(), this, getWindow());//创建AlertController对象
    }

    @Override
    public void setTitle(CharSequence title) {//设置Title
        super.setTitle(title);
        mAlert.setTitle(title);//保存在AlertController对象中
    }

    public void setMessage(CharSequence message) {//设置Message
        mAlert.setMessage(message);//保存在AlertController对象中
    }

    public void setIcon(@DrawableRes int resId) {//设置Icon
        mAlert.setIcon(resId);//保存在AlertController对象中
    }


    @Override
    protected void onCreate(Bundle savedInstanceState) {
        super.onCreate(savedInstanceState);
        mAlert.installContent();//安装AlertDialog的内容
    }

    //AlertDialog其他代码略

    public static class Builder {
        private final AlertController.AlertParams P;//构建AlertDialog对象所需要的参数都存放在P中

        public Builder(Context context) {
            this(context, resolveDialogTheme(context, 0));
        }

        public Builder(Context context, int themeResId) {
            P = new AlertController.AlertParams(new ContextThemeWrapper(
                    context, resolveDialogTheme(context, themeResId)));//初始化AlertParams对象
        }

        public Context getContext() {
            return P.mContext;
        }

        public android.app.AlertDialog.Builder setTitle(CharSequence title) {
            P.mTitle = title;//保存title到P中
            return this;
        }

        public android.app.AlertDialog.Builder setMessage(CharSequence message) {
            P.mMessage = message;//保存message
            return this;
        }


        public android.app.AlertDialog.Builder setIcon(@DrawableRes int iconId) {
            P.mIconId = iconId;//保存IconId
            return this;
        }

        //Builder其他代码略

        public android.app.AlertDialog create() {//构建AlertDialog
            final android.app.AlertDialog dialog = new android.app.AlertDialog(P.mContext, 0, false);//创建一个AlertDialog对象
            P.apply(dialog.mAlert);//将P中的参数设置到AlertController中
            //其他设置代码略
            return dialog;
        }
    }
}
//Dialog源码
 public class Dialog implements DialogInterface, Window.Callback, KeyEvent.Callback, View.OnCreateContextMenuListener, Window.OnWindowDismissedCallback {
        //其他代码略
        public void show() {
            //前面代码略
            if (!mCreated) {
                dispatchOnCreate(null);//分发onCreate
            } else {
                final Configuration config = mContext.getResources().getConfiguration();
                mWindow.getDecorView().dispatchConfigurationChanged(config);
            }

            onStart();//调用onStart()
            mDecor = mWindow.getDecorView();

            //设置参布局参数略

            mWindowManager.addView(mDecor, l);//添加到WindowManager
            mShowing = true;

            sendShowMessage();
        }

        void dispatchOnCreate(Bundle savedInstanceState) {//分发onCreate
            if (!mCreated) {
                onCreate(savedInstanceState);//调用AlertDialog的onCreate方法,创建AlertDialog视图
                mCreated = true;
            }
        }
    }
//AlertController源码
public class AlertController {
        //其他代码略

        public void installContent() {//安装内容
            int contentView = selectContentView();//选择合适的布局
            mWindow.setContentView(contentView);//布局添加到Window中
            setupView();//把dialog.mAlert对象中需要构建的元素逐个添加设置到Window上,即构建我们设置的布局发生在这一步中
        }
    }
8.3 简单流程说明:
-
通过
AlertDialog.Builder设置各种属性后(如:setTitle()),这些属性信息会保存在P变量中,P变量的类型为AlertController.AlertParams。 -
调用
builder.create()即可返回一个AlertDialog对象。
2.1builder.create()方法中首先会创建一个AlertDialog对象,AlertDialog对象构造时会初始化WindowManager和Window。
2.2builder.create()创建完AlertDialog对象后,会调用P.apply(dialog.mAlert);即把P变量中所存储的用来构建AlertDialog对象的元素设置到了dialog.mAlert中,dialog.mAlert的类型为AlertController。 -
调用
AlertDialog的show()方法,展示界面。
3.1show()方法中会调用dispatchOnCreate(null),dispatchOnCreate(null)调起onCreate(),onCreate()会调起mAlert.installContent();即安装AlertDialog的内容。
3.2installContent()中会调用mWindow.setContentView(mAlertDialogLayout);即把mAlertDialogLayout这个布局加到Window中去。
3.3 调完mWindow.setContentView(mAlertDialogLayout)后会调用setupView(),setupView()中会把dialog.mAlert对象中需要构建的元素逐个添加设置到mWindow上。
3.4 最后通过把view添加到mWindowManager上展示出来。
8.4 总结:
builder模式隐藏了这种复杂的构建过程,只需几行简单的代码就把AlertDialog给展示出来了。AlertDialog的builder中并没有抽象建造者(Builder)、Director(指挥者类)等角色。AlertDialog.Builder同时扮演了Builder、ConcreteBuilder、Director等角色,这是Android中的一种简化,也值得我们去学习使用。


 915
915


 被折叠的 条评论
为什么被折叠?
被折叠的 条评论
为什么被折叠?
 到【灌水乐园】发言


