


Android的技术讨论QQ群125317747.
1、Android SDK的安装
2、ADT的安装和配置
3、Android模拟器的下载
一、首先介绍1、Android SDK的安装。
(1)下载地址:http://developer.android.com/index.html 去download下载

提供了三个版本的sdk下载链接。根据你的操作系统下载相应的SDK。
(2)下载后的文件是个压缩包。大概有31MB左右。其实这个不是Android SDK而是SDK manager 。只是一个sdk安装工具而已。解压后的目录如下

(3)然后双击SDK Manager.exe 或者SDK Setup.exe.出现

然后它会自动去访问google的网站,去下载安装Android SDK.
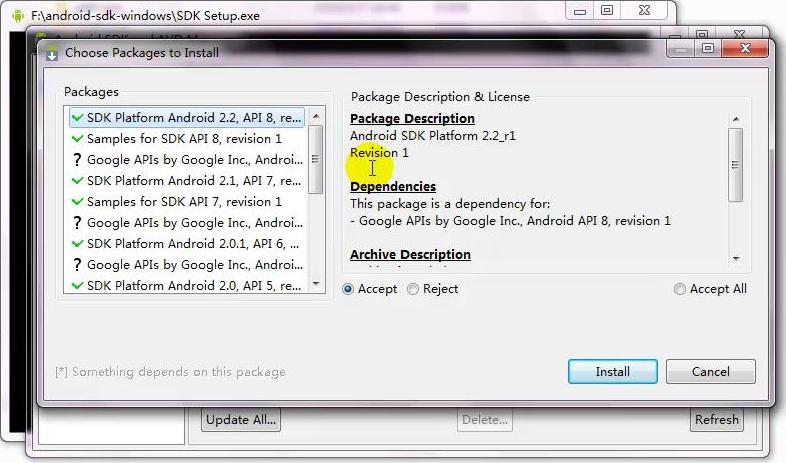
注意:那个package里的东西,有各种版本,也就是你开发的时候需要调用的各种API,如同java SDK一样。有2.0 、2.1、2.2、2.3版本。USBdriver主要是用来链接计算机和手机的。建议把1.5以上的API都安装了。因为你需要开发的时间的版本不一样。
然后选择accept all。开始安装。
我2M的无线网大概用了两个半小时。安装可能比较耗费时间。
安装好的样子是
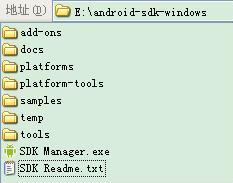
然后点击打开platforms 你可以看到这这样几个文件夹
android-3/android-4/android-7/android-8/android-9等等。
(4)接下来打开E:/android-sdk-windows/tools下你可以看到很多很多批处理文件和jar文件。这些文件是要在命令行执行的,既然要在命令行执行,我们就需要把这些文件加入到环境变量中。有过java学习经验的人都知道如何将这些命令加入到path中。还是说一下吧
我的电脑--->属性--->高级--->环境变量--->系统变量--->path--->编辑 把E:/android-sdk-windows/tools(你的目录)加入到path中。需要注意的是和前面已经有的路径用分号隔开。看下我的吧(O(∩_∩)O~比较多)C:/jdk1.6/bin;C:/oracle/product/10.1.0/Db_3/bin;C:/oracle/product/10.1.0/Db_3/jre/1.4.2/bin/client;C:/oracle/product/10.1.0/Db_3/jre/1.4.2/bin;%SystemRoot%/system32;%SystemRoot%;%SystemRoot%/System32/Wbem;C:/Program Files/Common Files/Thunder Network/KanKan/Codecs;C:/Program Files/TortoiseSVN/bin;E:/android-sdk-windows/tools
检验环境变量有没有配好在dos命令行下敲android然后回车:(【开始---》运行---》cmd】然后在黑窗口敲android)
C:/Documents and Settings/Administrator>android
[INFO] Starting Android SDK and AVD Manager
No command line parameters provided, launching UI.
See 'android --help' for operations from the command line.
二、其次介绍ADT的安装
ADT是个Eclipse插件。其他没有什么好说的,此处特别说明的是安装需要的Java jdk最好是jdk1.6版及jdk7(马上要出来了么)。而eclipse需要的版本google给出的建议的最好使用3.4或者3.5版的。我用的是Version: 3.6.1。170MB的那个。MB的GWF把eclipse的官方网站也给墙掉了。Eclipse的下载解压我就不说了。
eclipse插件的安装方式通用的有两种。不多说了,我使用的是在线安装,如果你网速慢可以使用另外一种。
eclipse--->help--->install new software 在work with-->add 的地址栏输入:
https://dl-ssl.google.com/android/eclipse/
以下是官方网站的安装说明。英文不好但是也是可以看懂的。
【
Installing the ADT Plugin
The sections below provide instructions on how to download and install ADT into your Eclipse environment. If you encounter problems, see the Troubleshooting section.
Preparing Your Development Computer
ADT is a plugin for the Eclipse IDE. Before you can install or use ADT, you must have a compatible version of Eclipse installed on your development computer.
- If Eclipse is already installed on your computer, make sure that it is a version that is compatible with ADT and the Android SDK. Check the System Requirements document for a list of Eclipse versions that are compatible with the Android SDK.
- If you need to install or update Eclipse, you can download it from this location:
http://www.eclipse.org/downloads/
For Eclipse 3.5 or newer, the "Eclipse Classic" version is recommended. Otherwise, a Java or RCP version of Eclipse is recommended.
Additionally, before you can configure or use ADT, you must install the Android SDK starter package, as described in Downloading the SDK Starter Package . Specifically, you need to install a compatible version of the Android SDK Tools and at least one development platform. To simplify ADT setup, we recommend installing the Android SDK prior to installing ADT.
When your Eclipse and Android SDK environments are ready, continue with the ADT installation as described in the steps below.
Downloading the ADT Plugin
Use Update Manager feature of your Eclipse installation to install the latest revision of ADT on your development computer.
Assuming that you have a compatible version of the Eclipse IDE installed, as described in Preparing for Installation , above, follow these steps to download the ADT plugin and install it in your Eclipse environment.
| Eclipse 3.5 (Galileo) and 3.6 (Helios) | Eclipse 3.4 (Ganymede) |
|---|---|
|
|
Configuring the ADT Plugin
Once you've successfully downloaded ADT as described above, the next step is to modify your ADT preferences in Eclipse to point to the Android SDK directory:
- Select Window > Preferences... to open the Preferences panel (Mac OS X: Eclipse > Preferences ).
- Select Android from the left panel.
- For the SDK Location in the main panel, click Browse... and locate your downloaded SDK directory.
- Click Apply , then OK .
Done! If you haven't encountered any problems, then the installation is complete. If you're installing the Android SDK for the first time, return to Installing the SDK to complete your setup.
Troubleshooting ADT Installation
If you are having trouble downloading the ADT plugin after following the steps above, here are some suggestions:
- If Eclipse can not find the remote update site containing the ADT plugin, try changing the remote site URL to use http, rather than https. That is, set the Location for the remote site to:
http://dl-ssl.google.com/android/eclipse/
- If you are behind a firewall (such as a corporate firewall), make sure that you have properly configured your proxy settings in Eclipse. In Eclipse, you can configure proxy information from the main Eclipse menu in Window (on Mac OS X, Eclipse ) > Preferences > General > Network Connections .
If you are still unable to use Eclipse to download the ADT plugin as a remote update site, you can download the ADT zip file to your local machine and manually install it:
- Download the current ADT Plugin zip file from the table below (do not unpack it).
Name Package Size MD5 Checksum ADT 8.0.1 ADT-8.0.1.zip 8724909 bytes 0e62185279083ddc01f18098ce7ba2d1 - Follow steps 1 and 2 in the default install instructions (above).
- In the Add Site dialog, click Archive .
- Browse and select the downloaded zip file.
- Enter a name for the local update site (e.g., "Android Plugin") in the "Name" field.
- Click OK .
- Follow the remaining procedures as listed for default installation above, starting from step 4.
To update your plugin once you've installed using the zip file, you will have to follow these steps again instead of the default update instructions.
Other install errors
Note that there are features of ADT that require some optional Eclipse components (for example, WST). If you encounter an error when installing ADT, your Eclipse installion might not include these components. For information about how to quickly add the necessary components to your Eclipse installation, see the troubleshooting topic ADT Installation Error: "requires plug-in org.eclipse.wst.sse.ui" .
For Linux users
If you encounter this error when installing the ADT Plugin for Eclipse:
An error occurred during provisioning.

Cannot connect to keystore.

JKS
...then your development machine lacks a suitable Java VM. Installing Sun Java 6 will resolve this issue and you can then reinstall the ADT Plugin.
Updating the ADT Plugin
From time to time, a new revision of the ADT Plugin becomes available, with new features and bug fixes. Generally, when a new revision of ADT is available, you should update to it as soon as convenient.
In some cases, a new revision of ADT will have a dependency on a specific revision of the Android SDK Tools. If such dependencies exist, you will need to update the SDK Tools component of the SDK after installing the new revision of ADT. To update the SDK Tools component, use the Android SDK and AVD Manager, as described in Adding SDK Components .
To learn about new features of each ADT revision and also any dependencies on the SDK Tools, see the listings in the Revisions section. To determine the version currently installed, open the Eclipse Installed Software window using Help > Software Updates and refer to the version listed for "Android Development Tools".
Follow the steps below to check whether an update is available and, if so, to install it.
| Eclipse 3.5 (Galileo) and 3.6 (Helios) | Eclipse 3.4 (Ganymede) |
|---|---|
|
|
If you encounter problems during the update, remove the existing ADT plugin from Eclipse, then perform a fresh installation, using the instructions for Installing the ADT Plugin .
】
安装好ADT之后就可以看到如下:
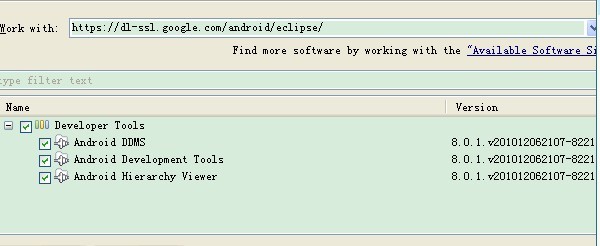
DDMS是调试用的
android development tools是开发工具。
安装成功之后就可以在Eclipse上看到

这个图片。你会发现多了一个图标是吧。
点击箭头乡下的图标
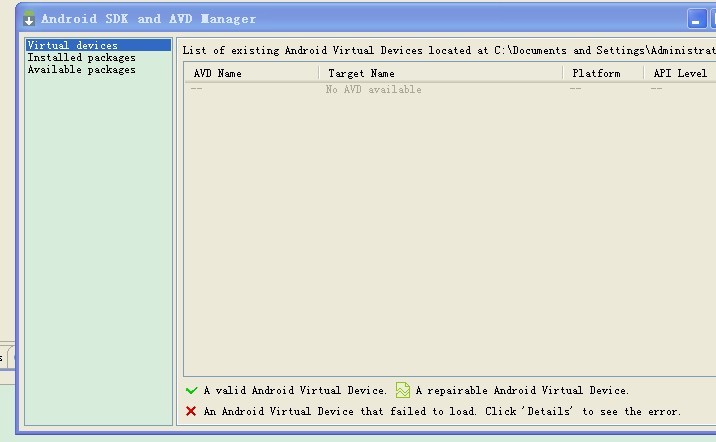
这个对话框的意思是让你配置andorid虚拟设备的配置。
三、Android模拟器的配置
从上图可以看到virtual devices 是虚拟机的配置。
install packages你已经安装的SDK,第一次点击这个可能会有错误。我说的是可能。这个时候你需要点击Eclipse的preferences --->android.算了我上图
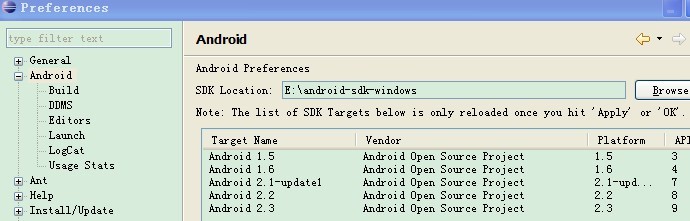
你需要把SDK Location:配置下就OK了。
第三个available packages是更新的。
回到第一步。virtual devices 创建一个新的android 模拟器add之后你就可以创建了。name可以随便起的。target是你的模拟器的版本。现在市面上
各种版本都有。所以这不是一个艰难的决定。需要开发那个版本的就create那个版本的。SD card不多说了,就是手机SD 卡。

配置好这个模拟器之后就可以start了。
第一次启动可能比较慢。需要几分钟的样子。of course if your computer 配置足够好的话。启动会快一点。
上图:
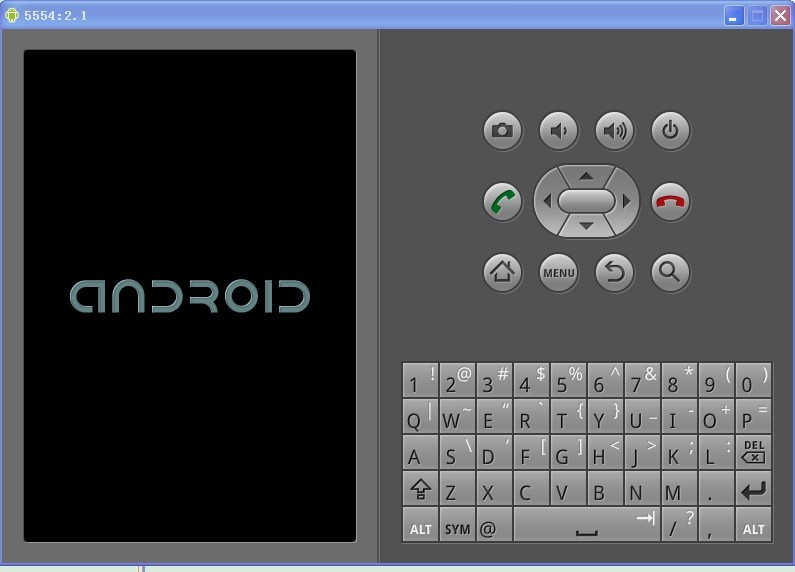
这个是正在启动的样子。等待吧。。。。。。


 334
334


 被折叠的 条评论
为什么被折叠?
被折叠的 条评论
为什么被折叠?
 到【灌水乐园】发言


