


这篇文章在上一篇 STS: Spring Boot and Spring MVC 的基础上,说说使用 MyBatis 访问数据库的事儿。
工具:Spring Tool Suite Version: 3.7.3.RELEASE
数据库:MySQL Example Database: world
在接下来的代码中,将遵照 Spring Boot 简化编码的思想,使用最简单的方法实现代码。这包括三个方面:
1. 使用 mybatis-spring-boot-starter 集成 MyBatis,参阅:Spring Boot 集成 MyBatis
2. 使用 @Select 注解实现 SQL 映射,参阅:Spring Boot MyBatis 连接数据库
3. 使用 @Service、@Controller 注解实现 Bean 定义,参阅:注解实现 Bean 定义 使用 Java 配置进行 Spring bean 管理 装配bean,spring XML格式配置
新建 Spring Starter Project
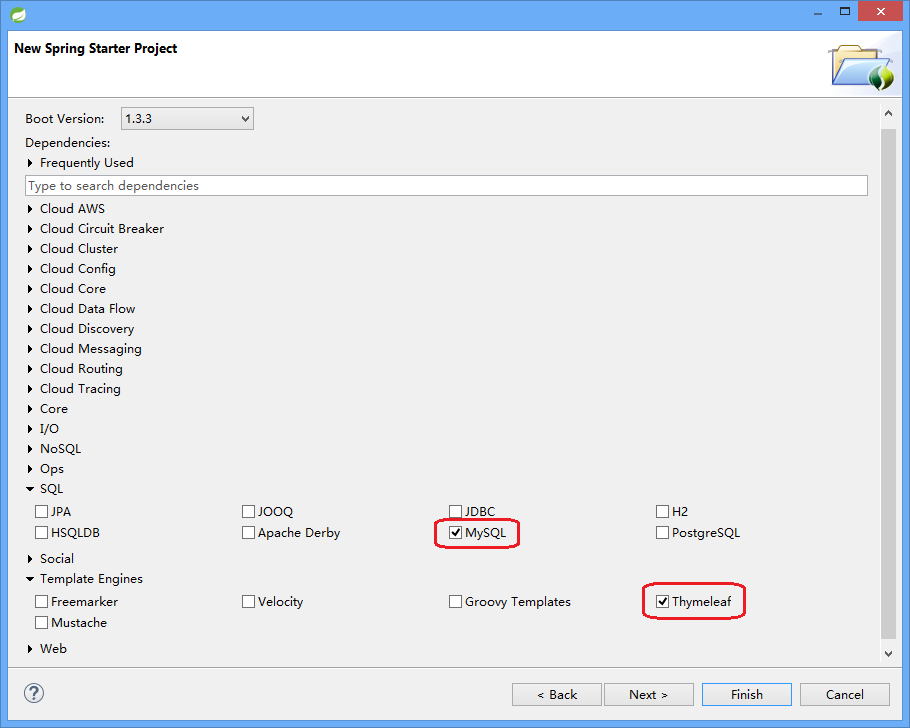
点击菜单 File -> New -> Spring Starter Project,打开 New Spring Starter Project 对话框,将 Name 改为 mybatis-example,然后点击〖Next >〗按钮,进入下一个对话框。展开 SQL 节点,选中 MySQL,再展开 Template Engines,选中 Thymeleaf。然后点击〖Finish〗按钮,创建 mybatis-example 项目。
添加 mybatis-spring-boot-starter Dependency
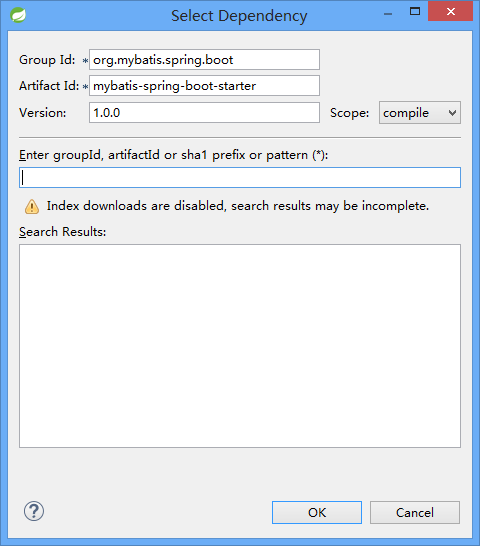
打开 pom.xml 文件,切换到 dependencies 选项卡,点击〖Add…〗按钮,弹出 Select Dependency 对话框,Group Id 输入 org.mybatis.spring.boot,Artifact Id 输入 mybatis-spring-boot-starter,Version 输入 1.0.0,然后点击〖 OK 〗按钮完成添加。如下图所示:
添加完成后,Dependencies 显示如下图所示:
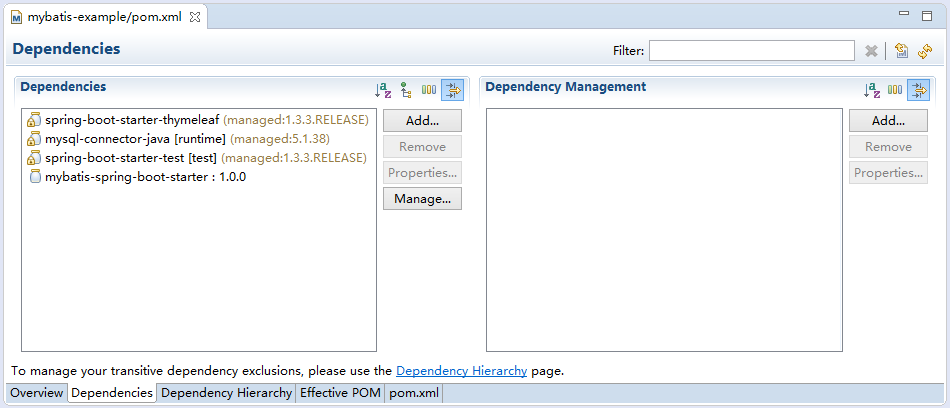
最后点击工具栏的 Save 按钮,将更改保存到 pom.xml 文件,并自动下载相关 .jar 文件。
设置 DataSource 信息
展开 src/main/resources 节点,打开 application.properties 文件,输入如下内容:
spring.datasource.driver-class-name=com.mysql.jdbc.Driver
spring.datasource.url=jdbc:mysql://localhost:3306/world
spring.datasource.username=root
spring.datasource.password=xxxxx
创建项目文件夹
参考 Spring 的典型项目结构创建 domain、mapper、service 和 web 四个文件夹。
展开 src/main/java 节点,在 com.example 节点上点击鼠标右键,在弹出菜单上选择 New -> Folder 项,弹出 New Folder 对话框,Folder name 输入 domain,然后点击〖Finish〗按钮创建文件夹。
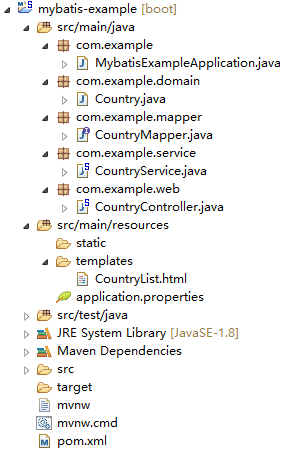
重复上面的步骤,依次创建 mapper、service 和 web 文件夹。完成后的项目结构如下图所示:

给启动类添加 @MapperScan 注解
展开 com.example 节点,打开 MybatisExampleApplication.java 文件,在 MybatisExampleApplication 类上添加如下注解:@MapperScan("com.example.mapper")
添加 @MapperScan 注解后的 MybatisExampleApplication.java 内容如下所示:
package com.example;

import org.mybatis.spring.annotation.MapperScan;
import org.springframework.boot.SpringApplication;
import org.springframework.boot.autoconfigure.SpringBootApplication;

@SpringBootApplication
@MapperScan("com.example.mapper")
public class MybatisExampleApplication {

    public static void main(String[] args) {
        SpringApplication.run(MybatisExampleApplication.class, args);
    }
}
创建数据模型
在 com.example.domain 节点上点击鼠标右键,在弹出菜单上选择 New -> Class 项,弹出 New Java Class 对话框,在 Name 栏输入 Country,然后点击〖Finish〗按钮创建 Country 类。
新创建的 Country.java 文件会自动打开,编辑文件内容如下:
package com.example.domain;

public class Country {

    private String code;
    private String code2;
    private String name;
    private String continent;
    private int    population;
    private float  surfaceArea;

    public String getCode() {
        return code;
    }

    public void setCode(String code) {
        this.code = code;
    }

    public String getCode2() {
        return code2;
    }

    public void setCode2(String code2) {
        this.code2 = code2;
    }

    public String getName() {
        return name;
    }

    public void setName(String name) {
        this.name = name;
    }

    public String getContinent() {
        return continent;
    }

    public void setContinent(String continent) {
        this.continent = continent;
    }

    public int getPopulation() {
        return population;
    }

    public void setPopulation(int population) {
        this.population = population;
    }

    public float getSurfaceArea() {
        return surfaceArea;
    }

    public void setSurfaceArea(float surfaceArea) {
        this.surfaceArea = surfaceArea;
    }

    @Override
    public String toString() {
        return this.name;
    }
}
创建映射接口
在 com.example.mapper 节点上点击鼠标右键,在弹出菜单上选择 New -> Interface 项,弹出 New Java Interface 对话框,在 Name 栏输入 CountryMapper,然后点击〖Finish〗按钮创建 CountryMapper 接口。
新创建的 CountryMapper.java 文件会自动打开,编辑文件内容如下:
package com.example.mapper;

import java.util.List;
import org.apache.ibatis.annotations.Select;
import com.example.domain.Country;

public interface CountryMapper {
    @Select("SELECT code, code2, name, continent, population, surfaceArea FROM country ORDER BY name")
    List<Country> findAll();
}
创建 Service
在 com.example.service 节点上点击鼠标右键,在弹出菜单上选择 New -> Class 项,弹出 New Java Class 对话框,在 Name 栏输入 CountryService,然后点击〖Finish〗按钮创建 CountryService 类。
新创建的 CountryService.java 文件会自动打开,编辑文件内容如下:
package com.example.service;

import java.util.List;

import org.springframework.beans.factory.annotation.Autowired;
import org.springframework.stereotype.Service;

import com.example.domain.Country;
import com.example.mapper.CountryMapper;

@Service
public class CountryService {
    @Autowired
    private CountryMapper countryMapper;

    public List<Country> findAll() {
        return countryMapper.findAll();
    }
}
创建 Controller
在 com.example.web 节点上点击鼠标右键,在弹出菜单上选择 New -> Class 项,弹出 New Java Class 对话框,在 Name 栏输入 CountryController,然后点击〖Finish〗按钮创建 CountryController 类。
新创建的 CountryController.java 文件会自动打开,编辑文件内容如下:
package com.example.web;

import org.springframework.beans.factory.annotation.Autowired;
import org.springframework.stereotype.Controller;
import org.springframework.ui.Model;
import org.springframework.web.bind.annotation.RequestMapping;

import com.example.service.CountryService;

@Controller
public class CountryController {
    @Autowired
    private CountryService countryService;

    @RequestMapping("/")
    public String countryList(Model model) {
        model.addAttribute("countries", countryService.findAll() );
        return "countryList";
    }
}
创建模板
在 src/main/resources 下面的 templates 文件夹内创建 CountryList.html 文件,编辑文件内容如下:
<!DOCTYPE html>
<html xmlns:th="http://www.thymeleaf.org">
<head>
<meta http-equiv="Content-Type" content="text/html; charset=UTF-8" />
<title>国家</title>
</head>
<body>
    <table>
        <thead>
            <tr>
                <th>代码</th>
                <th>名称</th>
                <th>面积</th>
                <th>人口</th>
                <th>洲</th>
            </tr>
        </thead>
        <tbody>
            <tr th:each="country : ${countries}">
                <td th:text="${country.code2}"></td>
                <td th:text="${country.name}"></td>
                <td th:text="${#numbers.formatDecimal(country.surfaceArea,1,0)}"></td>
                <td th:text="${country.population}"></td>
                <td th:text="${country.continent}"></td>
            </tr>
        </tbody>
    </table>
</body>
</html>
完成后的项目结构
经过上面这些步骤,我们已经完成了这个项目。最终的项目结构如下图所示:
运行程序
在项目名称 mybatis-example 上点击鼠标右键,在弹出菜单上选择 Run As -> Spring Boot App。
程序启动后,打开浏览器,在地址栏中输入 http://localhost:8080 即可查看运行结果。
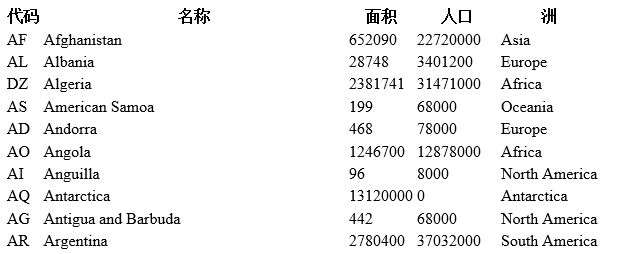
运行结果如下图:


 被折叠的 条评论
为什么被折叠?
被折叠的 条评论
为什么被折叠?
 到【灌水乐园】发言


