


通常来说,在linux系统上,使用yolo官方提供的darknet代码编译,同时使用它提供的python例程代码就可以运行yolo网络。在Windows下,使用AlexeyAB贡献的C++版yolo代码,也可以运行,而且他还提供了将yolo编译成.dll的工程(CPU版本和GPU版本都有),非常方便。本文的目的在于提供在Windows下python版本的yolo调用接口。
众所周知,Windows环境下python是无法直接调用.dll的,当然可以借助ctypes包来调用.dll。不过我在使用Dependency Walker软件查看yolo_cpp_dll.dll时,发现里面的函数接口名字包含奇怪的字符,而且我试图按照yolo_v2_class.hpp里面封装好的函数接口在python中调用也失败了。于是,只好自己想办法生成python调用的接口。
目录
1 pybind11—python C/C++扩展编译
pybind11功能强大,将C++ 程序包装为python接口,对于不太熟悉C++的同学只需要调用python接口即可,方便实用。一般的步骤是:
- 首先调试好C++代码,确保代码正常运行
- 包含pybind11库,为C++代码编写python接口
- 使用Visual Studio生成.pyd扩展
- 在python中导入.pyd,调用python接口
生成.pyd
调用.pyd
2 pybind11使用
pybind11对于Ubuntu和Windows系统都支持,篇幅有限,以下介绍在Windows下的使用。
2.1 Pybind11配置安装
Requires
- Microsoft Visaul Studio 2019(pybind11对于vs的版本有要求,必须vs2015的部分较高版本及vs2017,vs2019,否则报错)
- Anaconda3 , with python 3.7
首先直接下载pybind11
https://github.com/pybind/pybind11
pybind11不需要编译动态链接库,在vs中直接include即可。
使用VS2019测试
使用C++编写python扩展(python调用C++),首先以hello,world为例进行测试。
新建一个vs c++工程

工程配置:
- 设置编译输出类型
- 添加include包含
- 添加lib路径
- 链接器添加lib
1. 编译输出类型
打开visual studio2019的项目-->属性,按照下图设置


2. include包含路径
- python/include
- pybind11/include

3. lib路径

4. 链接器配置

C++代码
很简单的一个代码,编写一个python扩展模块,模块中包含一个函数foo() 这是一个lamda函数。
#include <pybind11/pybind11.h>

namespace py = pybind11;

PYBIND11_MODULE(example, m) {

    m.doc() = "pybind11 example module";

    // Add bindings here
    m.def("foo", []() {
        return "Hello, World!";
    });

}
编译生成.pyd, .lib

注意:在上述C++代码中的第5行,PYBIND11_MODULE(example, m)中的名字是example,所以需要将生成的pybind.lib和pybind.pyd重命名为example.lib和example.pyd。两者必须保持一致,否则python中import失败。
测试pyd扩展

依次输入
import example
print(example.foo())
运行成功后将输出"Hello,World!"
2.2 Yolo-v3封装为python接口
1 工程配置


2 include包含路径
- python/include
- pybind11/include
- darknet-master/src

3 lib路径

4 链接器配置

C++代码
python_api.cpp 这是调用yolov3的核心代码
#include<pybind11/pybind11.h>
#include<pybind11/stl.h>
#include<pybind11/numpy.h>
#include<string>
#include<vector>
#include<opencv2/opencv.hpp>
#include<yolo_v2_class.hpp>
#include "mat_warper.h"

using namespace cv;

namespace py = pybind11;


image_t cv_mat_to_image_t(cv::Mat& image) {

	float* data = new float[image.rows * image.cols * image.channels()];
	if (data == nullptr)
	{
		std::runtime_error("failed to malloc men!");
	}
	int cnt = 0;
	for (int i = 0; i < image.rows; i++)
	{
		for (int j = 0; j < image.cols; j++)
		{
			if (image.channels() == 3)
			{
				float r = image.at<Vec3b>(i, j)[2] / 255.0f;
				float g = image.at<Vec3b>(i, j)[1] / 255.0f;
				float b = image.at<Vec3b>(i, j)[0] / 255.0f;

				data[cnt] = r;
				data[cnt + 1] = g;
				data[cnt + 2] = b;

				cnt += 3;
			}
			else
			{
				data[cnt] = static_cast<float>(image.at<uchar>(i, j)) / 255.0f;
				cnt += 1;
			}

		}
	}

	image_t imaget;
	imaget.c = image.channels();
	imaget.h = image.rows;
	imaget.w = image.cols;
	imaget.data = data;
}


image_t make_empty_image(int w, int h, int c)
{
	image_t out;
	out.data = 0;
	out.h = h;
	out.w = w;
	out.c = c;
	return out;
}


image_t make_image(int w, int h, int c)
{
	image_t out = make_empty_image(w, h, c);
	out.data = new float[w * h * c];
	return out;
}

image_t cv_mat_to_image_t2(cv::Mat& image) {

	Mat dst;
	cv::cvtColor(image, dst, COLOR_BGR2RGB);
	int w, h, c;
	w = image.cols;
	h = image.rows;
	int channels = image.channels();
	unsigned char* data = dst.data;
	if (!data)
		throw std::runtime_error("file not found");
	if (channels) c = channels;
	int i, j, k;
	image_t im = make_image(w, h, c);
	for (k = 0; k < c; ++k) {
		for (j = 0; j < h; ++j) {
			for (i = 0; i < w; ++i) {
				int dst_index = i + w * j + w * h * k;
				int src_index = k + c * i + c * w * j;
				im.data[dst_index] = (float)data[src_index] / 255.;
			}
		}
	}
	//free(data);
	return im;
}


class Object
{
public:
	Object();
	Object(int id, float confidence, std::vector<int> rect, std::string name);
	~Object();

public:
	int id;
	float confidence;
	std::vector<int> rect;  //[xmin, ymin, xmax, ymax]
	std::string name;


};

Object::Object() {
}

Object::Object(int id, float confidence, std::vector<int> rect, std::string name) {
	this->id = id;
	this->confidence = confidence;
	this->rect = rect;
	this->name = name;
}

Object::~Object() {
}


class core_Detector : public Detector {

public:
	std::string weights_file;
	std::string cfg_file;

private:
	std::vector<std::string> classNames;
	image_t cvMat_to_image_t(cv::Mat& image) {

		image_t dst;
		dst.w = image.cols;
		dst.h = image.rows;
		dst.c = image.channels();

		dst.data = new float[dst.w * dst.h * dst.c * sizeof(float)];
		int count = 0;
		for (int i = 0; i < image.rows; i++)
		{
			for (int j = 0; j < image.cols; j++)
			{
				cv::Vec3b pixel = image.at<Vec3b>(i, j);
				dst.data[count] = (float)pixel[0];
				dst.data[count + 1] = (float)pixel[1];
				dst.data[count + 2] = (float)pixel[2];

				count += 3;

			}
		}

		return dst;
	}

public:
	core_Detector(std::string weights_file, std::string cfg_file) :Detector(cfg_file, weights_file) {
		this->weights_file = weights_file;
		this->cfg_file = cfg_file;
	};

	~core_Detector() {};

public:

	void setName(std::vector<std::string> names) {
		for (auto i : names)
		{
			this->classNames.push_back(i);
		}
	}

	 image: BGR Format
	//std::vector<Object> detectImage(cv::Mat& image) {

	//  Mat rgb_image;
	//  cvtColor(image, rgb_image, COLOR_BGR2RGB);

	//  cv::resize(rgb_image, rgb_image, cv::Size(this->get_net_width(), this->get_net_height()));

	//  image_t image_ = this->cvMat_to_image_t(rgb_image);
	//

	//  auto res = this->detect(image_);
	//  std::vector<Object> objs;

	//  for (auto i:res)
	//  {
	//      objs.push_back(Object(i.obj_id, i.prob, { (int)i.x, (int)i.y, (int)(i.x + i.w), (int)(i.y + i.h) }, classNames[i.obj_id]));
	//  }

	//  return objs;

	//}


		// image: BGR Format
	std::vector<Object> detectFromFile(std::string image_name) {


		auto res = this->detect(Detector::load_image(image_name));
		std::vector<Object> objs;

		for (auto i : res)
		{
			objs.push_back(Object(i.obj_id, i.prob, { (int)i.x, (int)i.y, (int)(i.x + i.w), (int)(i.y + i.h) }, classNames[i.obj_id]));
		}

		return objs;

	}

	std::vector<Object> detectImage(py::array_t<unsigned char>& input) {

		/*float* data = new float[image.rows*image.cols*image.channels()];
		if (data==nullptr)
		{
			std::runtime_error("failed to malloc men!");
		}
		int cnt = 0;
		for (int i = 0; i < image.rows; i++)
		{
			for (int j = 0; j < image.cols; j++)
			{
				if (image.channels()==3)
				{
					float r = image.at<Vec3b>(i, j)[2] / 255.0f;
					float g = image.at<Vec3b>(i, j)[1] / 255.0f;
					float b = image.at<Vec3b>(i, j)[0] / 255.0f;

					data[cnt] = r;
					data[cnt+1] = g;
					data[cnt+2] = b;

					cnt += 3;
				}
				else
				{
					data[cnt] = static_cast<float>(image.at<uchar>(i, j)) / 255.0f;
					cnt += 1;
				}

			}
		}

		image_t imaget;
		imaget.c = image.channels();
		imaget.h = image.rows;
		imaget.w = image.cols;
		imaget.data = data;

		std::cout << "yolo: image input ok!" << std::endl;
		std::cout << "yolo: start to detect" << std::endl;*/
		cv::Mat image = numpy_uint8_3c_to_cv_mat(input);
		auto imaget = cv_mat_to_image_t2(image);

		auto res = this->detect(imaget);

		//std::cout << "yolo:finish to detect" << std::endl;

		std::vector<Object> objs;

		for (auto i : res)
		{
			objs.push_back(Object(i.obj_id, i.prob, { (int)i.x, (int)i.y, (int)(i.x + i.w), (int)(i.y + i.h) }, classNames[i.obj_id]));
		}

		return objs;
	}


};


#if 0

int main() {

	const std::string CFG_FILE = "D:\\YOLO-v3\\darknet-master\\cfg\\yolov3.cfg";
	const std::string WEIGHT_FILE = "D:\\YOLO-v3\\yolov3.weights";
	const std::string COCO_NAMES = "D:\\YOLO-v3\\darknet-master\\cfg\\coco.names";

	//读取目标类别文件,80类
	std::vector<std::string> classNames;
	std::ifstream fileIn(COCO_NAMES, std::ios::in);
	if (!fileIn.is_open()) {
		std::cerr << "failed to load COCO.names!" << std::endl;
		return -1;
	}
	for (int i = 0; i < 80; i++) {
		char temp1[100];
		fileIn.getline(temp1, 100);
		std::string temp2(temp1);
		classNames.push_back(temp2);

	}

	core_Detector detector(WEIGHT_FILE, CFG_FILE);
	detector.setName(classNames);

	cv::Mat image = cv::imread("D:\\YOLO-v3\\darknet-test.jpg");

	auto detectObjects = detector.detectImage("D:\\YOLO-v3\\darknet-test.jpg");


	for (auto& i : detectObjects) {
		cv::rectangle(image, Rect(i.rect[0], i.rect[1], i.rect[2] - i.rect[0], i.rect[3] - i.rect[1]), Scalar(0, 255, 255), 2);
		//putText(image, i.name, i.rect.tl(), 1, 1.8, Scalar(255, 0, 0), 2);
	}

	imshow("yolo", image);
	waitKey(0);


}

#endif

#if 1
PYBIND11_MODULE(core, m) {

	py::class_<Object>(m, "Object")
		.def(py::init<int, float, std::vector<int>, std::string>())
		.def_readwrite("id", &Object::id)
		.def_readwrite("confidence", &Object::confidence)
		.def_readwrite("rect", &Object::rect)
		.def_readwrite("name", &Object::name);

	py::class_<core_Detector>(m, "core_Detector")
		.def(py::init<std::string, std::string>())
		.def("detectFromFile", &core_Detector::detectFromFile, py::arg("image_file"))
		.def("detectImage", &core_Detector::detectImage, py::arg("image_bgr"))
		.def("setName", &core_Detector::setName);

}

#endif
需要注意的是,OpenCV在C++中图像的数据结构是Mat,而在python版本的OpenCV中图像的数据结构是numpy.为了解决这个问题,需要进行转换。
mat_warper.cpp
#include "mat_warper.h"
#include <pybind11/numpy.h>
//#include<opencv2/opencv.hpp>
/*
Python->C++ Mat
*/

//namespace py = pybind11;

cv::Mat numpy_uint8_1c_to_cv_mat(py::array_t<unsigned char>& input)
{

	if (input.ndim() != 2)
		throw std::runtime_error("1-channel image must be 2 dims ");

	py::buffer_info buf = input.request();

	cv::Mat mat(buf.shape[0], buf.shape[1], CV_8UC1, (unsigned char*)buf.ptr);

	return mat;
}


cv::Mat numpy_uint8_3c_to_cv_mat(py::array_t<unsigned char>& input) {

	if (input.ndim() != 3)
		throw std::runtime_error("3-channel image must be 3 dims ");

	py::buffer_info buf = input.request();

	cv::Mat mat(buf.shape[0], buf.shape[1], CV_8UC3, (unsigned char*)buf.ptr);

	return mat;
}


/*
C++ Mat ->numpy
*/
py::array_t<unsigned char> cv_mat_uint8_1c_to_numpy(cv::Mat& input) {

	py::array_t<unsigned char> dst = py::array_t<unsigned char>({ input.rows,input.cols }, input.data);
	return dst;
}

py::array_t<unsigned char> cv_mat_uint8_3c_to_numpy(cv::Mat& input) {

	py::array_t<unsigned char> dst = py::array_t<unsigned char>({ input.rows,input.cols,3 }, input.data);
	return dst;
}


//PYBIND11_MODULE(cv_mat_warper, m) {
//
//  m.doc() = "OpenCV Mat -> Numpy.ndarray warper";
//
//  m.def("numpy_uint8_1c_to_cv_mat", &numpy_uint8_1c_to_cv_mat);
//  m.def("numpy_uint8_1c_to_cv_mat", &numpy_uint8_1c_to_cv_mat);
//
//
//}
mat_warper.h
#ifndef MAT_WARPER_H_

#include<opencv2/opencv.hpp>
#include<pybind11/pybind11.h>
#include<pybind11/numpy.h>

namespace py = pybind11;

cv::Mat numpy_uint8_1c_to_cv_mat(py::array_t<unsigned char>& input);

cv::Mat numpy_uint8_3c_to_cv_mat(py::array_t<unsigned char>& input);

py::array_t<unsigned char> cv_mat_uint8_1c_to_numpy(cv::Mat& input);

py::array_t<unsigned char> cv_mat_uint8_3c_to_numpy(cv::Mat& input);

#endif // !MAT_WARPER_H_
同时,为了保证代码可以顺利编译执行,还需要复制一些.dll文件到代码的路径下。

编译

编译成功后即可得到如下图所示

同样地,将pybind.lib和pybind.pyd更名为core.lib和core.pyd,因为在python_api.cpp中的代码为PYBIND11_MODULE(core, m)
3 在python中调用
python代码
import core
import cv2
import numpy as np

detector = core.core_Detector(
    'C:\\Users\\Administrator\\Desktop\\detection.weights',
    'C:\\Users\\Administrator\\Desktop\\detection.cfg')

Name = []
with open('C:\\Users\\Administrator\\Desktop\\detection\\data\\detection.names',
          'r') as f:
    for i in f:
        Name.append(i.rstrip())

detector.setName(Name)

cap = cv2.VideoCapture('C:\\Users\Administrator\\Desktop\\detection\\test.mp4')

print("Video is Open:  " + str(cap.isOpened()))
width = (int(cap.get(cv2.CAP_PROP_FRAME_WIDTH)))
print("Video width is :  " + str(width))
height = int(cap.get(cv2.CAP_PROP_FRAME_HEIGHT))
print("Video height is :  " + str(height))
while (cap.isOpened()):
    ret, image = cap.read()
    if ret is True:
        out = detector.detectImage(image)
        #image = detector.detectFromFile('D:\\YOLOv3\\test.jpg')

        for i in out:
            rect = i.rect
            cv2.rectangle(image, (rect[0], rect[1]), (rect[2], rect[3]), (0, 255, 255))
            cv2.putText(image, i.name, (rect[0], rect[1]), 1, 1, (0, 0, 255))

        cv2.imshow('yolo', image)
        cv2.waitKey(30)
    else:
        break
运行结果

4 进阶
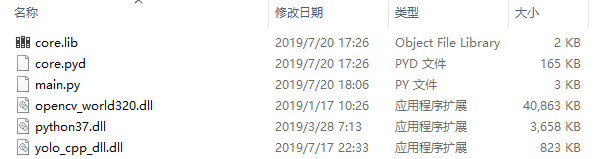
为了工程上的代码依赖更简单,我使用Dependency Walker软件对生成的core.pyd进行了分析,发现其依赖yolo_cpp_dll.dll,python37.dll,opencv_world320.dll。需要把这些dll文件复制到上述python代码的路径,最终,只需短短几行代码的main.py就可以成功import core,成功运行yolo


 412
412


 被折叠的 条评论
为什么被折叠?
被折叠的 条评论
为什么被折叠?
 到【灌水乐园】发言


