


核心 API
spark core API 指的是 spark 预定义好的算子。无论是 spark streaming 或者 Spark SQL 都是基于这些最基础的 API 构建起来的。理解这些核心 API 也是写出高效 Spark 代码的基础。
Transformation
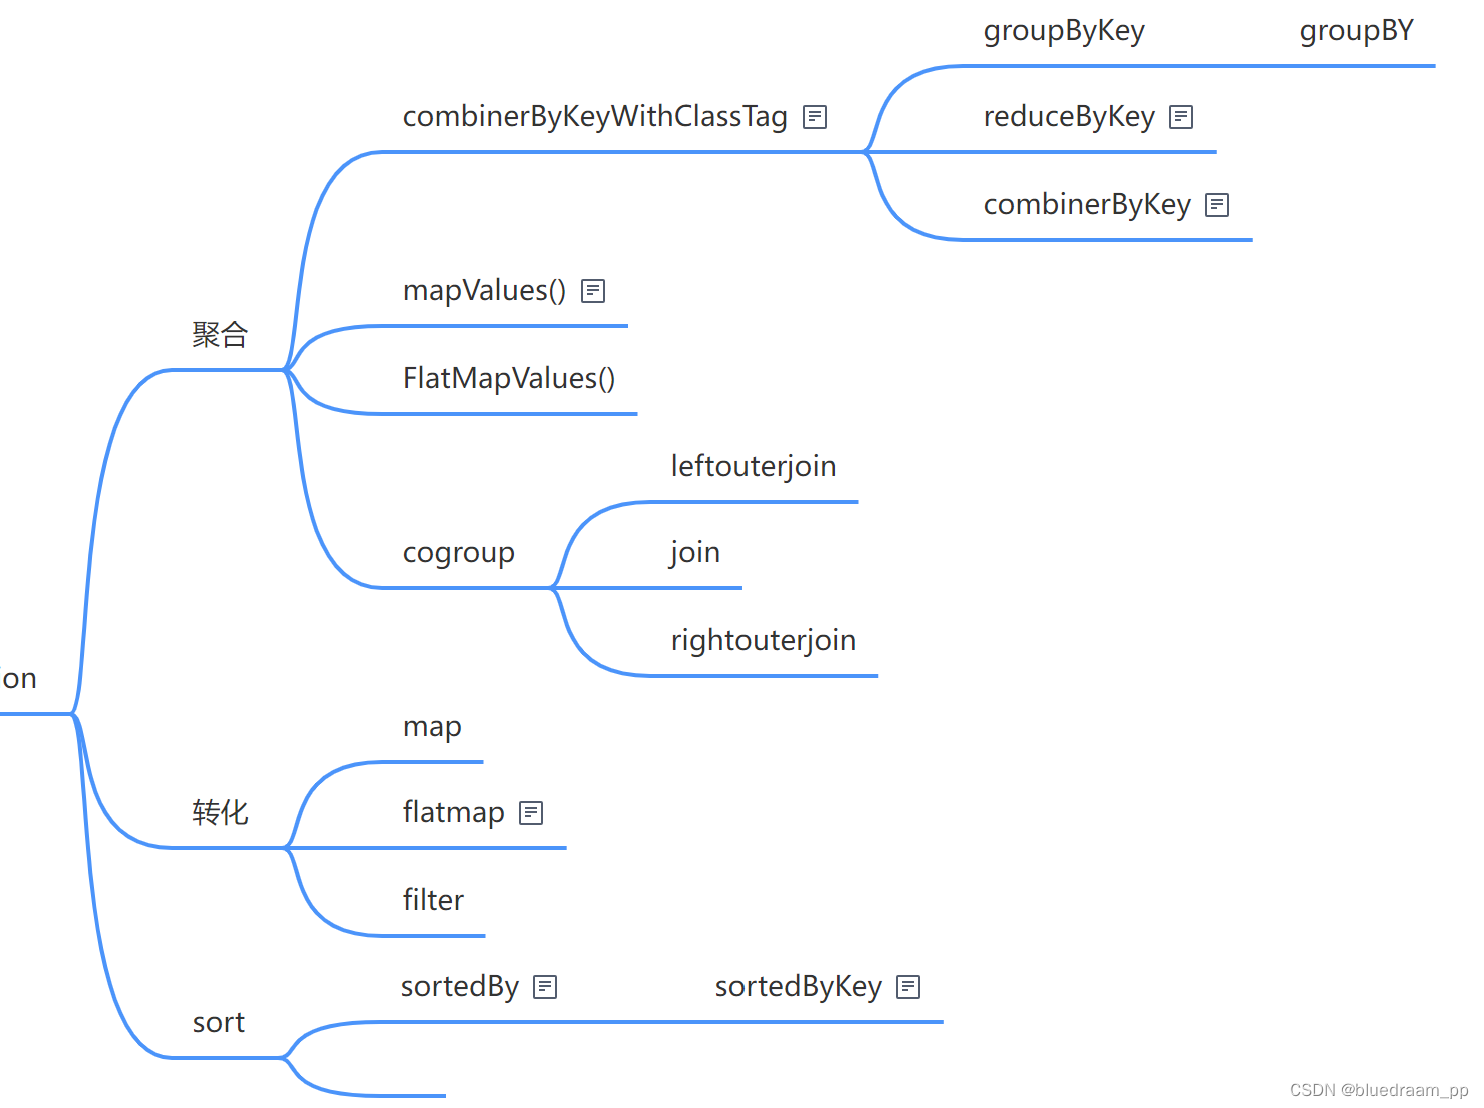
转化类的算子是最多的,学会使用这些算子就应付多数的数据加工需求了。他们有啥呢?可以如下分发:
- 转化算子: map、flatMap、filter
- 聚合算子:reduceByKey、reducerBy、groupBy、groupByKey、conbinerByKey、mapValues、flatMapValues
- 连接算子: cogroup、join、union、leftOuterJoin、rightOuterJoin、union
- 排序算子:sortBy、sortByKey
看起来好多,其实就这四种数据加工操作。他们之间又有实现上依赖关系。如下图所示:
转化算子
在做数据加工的时候,我经常会将某个字段的值进行加工,例如,格式化日期、正则匹配、数据计算、逻辑判断、过滤。 都可以使用转化算子进行加工。举个例子,将过来出 158 开头的手机号,显示出来的电话中间四位替换为*。
import org.apache.spark.{SparkConf, SparkContext}

object CSDN {
  def main(args: Array[String]): Unit = {

    val conf = new SparkConf().setMaster("local").setAppName(CSDN.getClass.getCanonicalName)
    val sc = new SparkContext(conf)
    sc.parallelize(List("15899887112"
      , "15799887112"
      , "15999887152"
      , "15799887192"
    )).filter(x => x.startsWith("158"))
    .map(x => x.substring(0 , 3) + "****" + x.substring(7 , x.length))
    .foreach(println);
  }

}
总结一下,map 做的事情就是 A -> B ,filter 是过滤的功能。
flatMap 的功能比较难理解,他是这样的,A -> [B , B , B] ,flatMap 返回的是一个数组。还是用一个例子来说明吧。有如下例子,
| group | player |
|---|---|
| Lakers | James,Davis |
| Celtics | Atum,Borrow |
转化为
| player | group |
|---|---|
| James | Lakers |
| Davis | Lakers |
| Atum | Celtics |
| Borrow | Celtics |
代码是:
    val conf = new SparkConf().setMaster("local").setAppName(CSDN.getClass.getCanonicalName)
    val sc = new SparkContext(conf)
    sc.parallelize(List(
      ("Lakers" , "James,Davis")
      ,("Celtics" , "Atum,Borrow")
    )).flatMap(x => {
      x._2.split(",").map(xx => (x._1 , xx))
    }).foreach(println)
还有两个和 map 和 flatMap 长的差不多的,分别是 mapValue 和 flatMapValues 两个函数。这两个函数是 PairRDDFunctions 的匿名类中的函数,从 PairRDDFunctions 的名称中可以知道,PairRDDFunctions 是真的键值对的,也就是说 RDD 中的数据是键值对的时候,我们可以调 PairRDDFunctions 的函数,scala 这个功能好像类的被动技能。这是对 RDD 功能一种扩展。说了写废话,还是说回 mapValue 和 flatMapValue ,当这个两个算子接收到 我们字段的函数后,作用到的是 key-value 的 value 上面的, map 和 flapMap 是作用到整个数据上的。例如,我们的数据是 ( James , 37) ,我自定义的函数是 self_define_function , map 和 flatMap 的效果是 self_define_function((James , 37)) , 而 mapValue 和 flatMapValues 则是 (James , self_define_function(value))。
聚合算子
聚合算子包括 combinerByKeyWithClassTag、reduceBykey、reduceBy,然后把数据连接启动的算子:cogroup、join、leftOuterJoin、rightOuterJoin,还有 union 这几个东西。
combinerByKeyWithClassTag 是一个基础类,当明白了它,reduceByKey 和 reduceBy 都会明白了。conbinerByKey 和 Accumulator(累加器) 的计算逻辑一样的。就看一下它的入参吧。
combineByKeyWithClassTag[C](
      createCombiner: V => C,
      mergeValue: (C, V) => C,
      mergeCombiners: (C, C) => C,
      partitioner: Partitioner,
      mapSideCombine: Boolean = true,
      serializer: Serializer = null)
createCombiner : 是一个函数,此函数的入参是 V 返回的是一个 C , V 和 C 是泛型。此函数的功能是创建一个初始值。
mergeValue :也是一个函数,此函数的入参是 C 和 V 返回的是 V ,此函数会接收各个分区每条数据 V ,然后经过加工,返回的还是一个 C 。
mergeCombiner: 又是一个函数,它是合并各个分区 combiner 后的值。
partitioner: 是分区器,它是用来位每条记录计算分区用的。
mapSideCombiner:这个是设置是否在 shuffle 的过程执行,执行 map-side 的局部聚合。
serializer:是数据序列化器,数据在不同的通过网络间传输的时候,需将数据序列化后传输的,这样可以提高效率。
下面
此算子是 PairRDDFunctions 的,所以它是处理 key-value 类型数据的算子。以 word count 为例子。
这需要假设我设置了 mapSideCombine = true 从可以的。
val conf = new SparkConf().setMaster("local[*]").setAppName("");
val sc = new SparkContext(conf)
sc.parallelize(List(
"Java","Spark","Scala","Python","Shell","Lisp"
)).map((_,1)).
combineByKeyWithClassTag(
 (x:Int) => x
,(x:Int,y:Int) => x + y
,(x:Int,y:Int) => x + y
,new HashPartitioner(3)
,true
,null
)
.foreach(println)
在上面的的 combinerBykeyWithClassTag 的用户相当于 reduceByKey(+) 的用法,里面的 + 其实 (x:Int,y:Int) => x + y 的简写。
搞聚合的还有一个 groupByKey 和 groupBy() 这两个东西,既然咱们知道了 combinerByKeyWithClassTag 这个函数,其实通过看源码就可以看到 groupByKey 的功能了。
// 进入 PairRDDFunction 对象的 groupByKey 方法里面
  def groupByKey(partitioner: Partitioner): RDD[(K, Iterable[V])] = self.withScope {
    val createCombiner = (v: V) => CompactBuffer(v)
    val mergeValue = (buf: CompactBuffer[V], v: V) => buf += v
    val mergeCombiners = (c1: CompactBuffer[V], c2: CompactBuffer[V]) => c1 ++= c2
    // 底层就是使用的 combinerByKeyWithClassTag 这个函数
    val bufs = combineByKeyWithClassTag[CompactBuffer[V]](
      createCombiner, mergeValue, mergeCombiners, partitioner, mapSideCombine = false)
    bufs.asInstanceOf[RDD[(K, Iterable[V])]]
  }
从源码中,可以看到 groupByKey 底层还是用的 combineByKeyWithClassTag,我来看看它里面三个非常重要的函数:
val createCombiner = (v: V) => CompactBuffer(v)这是初始化 combiner 函数,返回的是一个 CompactBuffer ,这是一个底层保存是数组,这个看以看成是一个 list 。val mergeValue = (buf: CompactBuffer[V], v: V) => buf += v,这个是 mergeValue 的函数,它的做法是将 value 的值放到 CompactBuff 列表的。val mergeCombiners = (c1: CompactBuffer[V], c2: CompactBuffer[V]) => c1 ++= c2,这是 mergeCombiner 的函数,此函数是将两个 CompactBuffer 合并成一个 CompactBuffer 中。
这样算下来,groupByKey 其实是将相同 key 下面的 value 放入到一个 CompactBuffer 中,然后然后在像求什么值,在进行计算就行了。可以使用 mapValues 此函数。这个函数也是 PairRDDFunction 的。
现在再来 groupBy 吧,上源码:
// 打开 RDD 的 groupBy 方法
  def groupBy[K](f: T => K, p: Partitioner)(implicit kt: ClassTag[K], ord: Ordering[K] = null)
      : RDD[(K, Iterable[T])] = withScope {
    val cleanF = sc.clean(f)
    // 先使用 map 将 RDD 转化为一个 PairRDD ,然后就可以使用 groupByKey 了
    this.map(t => (cleanF(t), t)).groupByKey(p)
  }
从代码中可以看到,先是将 RDD 转为 PairRDD ,然后将再使用 groupBykey。转化为 PairRDD 中,使用到 f 这个我们自定义的函数,此函数接收一个 RDD 中的数据,然后返回的是个 key 值,f 其实是定义 key 的函数。
下面看一个例子,
| player | group |
|---|---|
| James | Lakers |
| Davis | Lakers |
| Atum | Celtics |
| Borrow | Celtics |
转化为
| group | player |
|---|---|
| Lakers | James,Davis |
| Celtics | Atum,Borrow |
代码为:
    val conf = new SparkConf().setMaster("local[*]").setAppName(this.getClass.getCanonicalName.init)
    val sc = new SparkContext(conf)
    sc.setLogLevel("ERROR")
    val value = sc.parallelize(List(("Lakers", "James")
      , ("Lakers", "Davis")
      , ("Celtics", "Atum")
      , ("Celtics", "Borrow")
    ))
    value
      .groupByKey()
      .mapValues(x => x.mkString(","))
      .foreach(x => println(s"key: ${x._1} , value:${x._2}"))
    sc.stop()

// 第二种写法

    val value:RDD[(String,String)] = sc.parallelize(List(("Lakers", "James")
      , ("Lakers", "Davis")
      , ("Celtics", "Atum")
      , ("Celtics", "Borrow")
    ))
    value
      .groupBy(x=>x._1)
      .mapValues(x => x.mkString(","))
      .foreach(x => println(s"key: ${x._1} , value:${x._2}"))
    sc.stop()
排序算子
排序算子比较少,就两个一个 sortByKey ,另外一个就是 sortBy ,先来看 sortByKey 。
sortByKey 也是一个 PairRDDFunction 的函数,其处理的是 key-value 中的 key ,也就是根据 key 值来进行的排序,看一个例子吧。
    sc.parallelize(List("A" , "C" , "B" , "E" , "F" ))
      .map((_,0))
      // 这里必须设置分区数量为1,否则,打印出来的元素就不排序了。
      .sortByKey(true , 1)
    sc.stop()
其实,sortBy 就是基于 sortByKey ,来看看源码就知道了。
  def sortBy[K](
      f: (T) => K,
      ascending: Boolean = true,
      numPartitions: Int = this.partitions.length)
      (implicit ord: Ordering[K], ctag: ClassTag[K]): RDD[T] = withScope {
    this.keyBy[K](f)
        .sortByKey(ascending, numPartitions)
        .values
  }
keyBy(func) 可以理解为 RDD.map(x => (func(x) , x)) 其实就是将 RDD 转化为一个 PairRDD , 这样就能用 sortByKey 了,最后把 PairRDD 转化为原来的 RDD 。
连接类的算子
首先要讲的就是 cogroup 算子,它也是一个基础的算子,像 join、lelfOuterJoin、rightOuterJoin、intersection、fullOuterjoin 都是依赖 cogroup 实现的。
看一下 congroup 实现订单表和商品维表关联取出商品价格的情况。
    val conf = new SparkConf().setMaster("local[*]").setAppName(this.getClass.getCanonicalName.init)
    val sc = new SparkContext(conf)
    sc.setLogLevel("ERROR")
    val order:RDD[String] = sc.parallelize(List("order1,product1,1", "order1,product2,2", "order1,product3,4"))
    val product:RDD[String] = sc.parallelize(List("product1,10", "product2,30", "product3,87"))
    val productTuple:RDD[(String,String)] = product.map(x => {
      val strings = x.split(",")
      (strings(0), strings(1))
    })
    val orderTuple:RDD[(String,String)] = order.map(x => {
      val strings = x.split(",")
      (strings(1), x)
    })
    orderTuple
      .cogroup(productTuple)
      .mapValues(x => {
          x._1.map(xx => {
            val strings = xx.split(",")
            var rs = ""
            var price:Int = 0
            if(!x._2.isEmpty){
              price = x._2.head.toInt
              rs = xx.concat(s",${price.toInt},${price.toInt*strings(2).toInt}")
            }
            rs
          })
        }).values.foreach(println)
   sc.stop()
再看一下 join 的实现吧
// join 算子是 PairRDDFunction 的
  def join[W](other: RDD[(K, W)], partitioner: Partitioner): RDD[(K, (V, W))] = self.withScope {
    this.cogroup(other, partitioner).flatMapValues( pair =>
      // 笛卡尔积
      for (v <- pair._1.iterator; w <- pair._2.iterator) yield (v, w)
    )
  }
从上面的代码可以知道,是对 pair 进行笛卡尔积操作,而且前后都不为 Seq() ,也就是不为空。
再来看一下 fullOuterJoin 吧。
  def fullOuterJoin[W](other: RDD[(K, W)], partitioner: Partitioner)
      : RDD[(K, (Option[V], Option[W]))] = self.withScope {
    this.cogroup(other, partitioner).flatMapValues {
      case (vs, Seq()) => vs.iterator.map(v => (Some(v), None))
      case (Seq(), ws) => ws.iterator.map(w => (None, Some(w)))
      case (vs, ws) => for (v <- vs.iterator; w <- ws.iterator) yield (Some(v), Some(w))
    }
  }
从上面的代码里面,发现 fullOuterJoin 的实现和 join 实现差不多,但是多了对应左右列表为空的处理。这和 SQL 这的 full join 的语义是相同的。这个的 case 是 scala 里面的偏函数,在 scala 的源码中应用非常的广泛。
知道了 join 和 fullOuerJoin ,就再来看看 leftOuterJoin 和 rightOuterJoin :
// leftOuterJoin 也是 PairRDDFuntion 的函数
  def leftOuterJoin[W](
      other: RDD[(K, W)],
      partitioner: Partitioner): RDD[(K, (V, Option[W]))] = self.withScope {
    this.cogroup(other, partitioner).flatMapValues { pair =>
      if (pair._2.isEmpty) {
        pair._1.iterator.map(v => (v, None))
      } else {
        for (v <- pair._1.iterator; w <- pair._2.iterator) yield (v, Some(w))
      }
    }
  }
// rightOuterJoin 也是 PairRDDFunction 的函数
  def rightOuterJoin[W](other: RDD[(K, W)], partitioner: Partitioner)
      : RDD[(K, (Option[V], W))] = self.withScope {
    this.cogroup(other, partitioner).flatMapValues { pair =>
      if (pair._1.isEmpty) {
        pair._2.iterator.map(w => (None, w))
      } else {
        for (v <- pair._1.iterator; w <- pair._2.iterator) yield (Some(v), w)
      }
    }
  }
从上面的代码展示来看看,[left | right]OuterJoin 和 SQL 中的 left join 和 right join 的语义也是相同的。
在这里可以得到一个结论,join、leftOuterJoin、rightOuterJoin、fullOuterJoin 的计算效率其实是相同的,都取决于 cogroup 的效率。
最后看一个 RDD 中的函数 intersection
def intersection(other: RDD[T]): RDD[T] = withScope {
    this.map(v => (v, null)).cogroup(other.map(v => (v, null)))
        .filter { case (_, (leftGroup, rightGroup)) => leftGroup.nonEmpty && rightGroup.nonEmpty }
        .keys
  }
从上面的代码中可以看到,是去掉了左右没有关联到的数据。这和 SQL 里面的 inner join 的语义是一致的。其实是和 join 逻辑相似,但是并没有将左右边的元素进行笛卡尔积的计算。
在实现维表关联的场景下,还有一个重要的算子,就是 broadcast 算子。来看一个例子。
    val conf = new SparkConf().setMaster("local[*]").setAppName(this.getClass.getCanonicalName.init)
    val sc = new SparkContext(conf)
    //设置文件切分大小
    sc.hadoopConfiguration.setLong("fs.local.block.size",128*1024*1024)
    //数据合并,有大量的数据移动
    val productRDD: RDD[(String, String)] = sc.parallelize(List("product1;10"))
      .map { line =>
        val field = line.split(";")
        (field(0), line)
      }
    //广播变量
    val productBC: Broadcast[collection.Map[String, String]] = sc.broadcast(productRDD.collectAsMap())
    //map task 完成数据准备
    val orderInfoRDD: RDD[(String, String)] = sc.parallelize(List("order1;10;product1"))
      .map { line =>
        val field = line.split(";")
        (field(2), line)
      }
    //map 端的join
    val resultRDD: RDD[(String, (String, String))] = orderInfoRDD.map {
      case (pid, orderInfo) => {
        val product: collection.Map[String, String] = productBC.value
        (pid, (orderInfo, product.getOrElse(pid, null)))
      }
    }

    resultRDD.foreach(println)

    Thread.sleep(100)

    sc.stop()
广播是非常好的优化方式,他会将维表的一个副本复制到各个分区里面,然后就可以和进行拉宽做了。
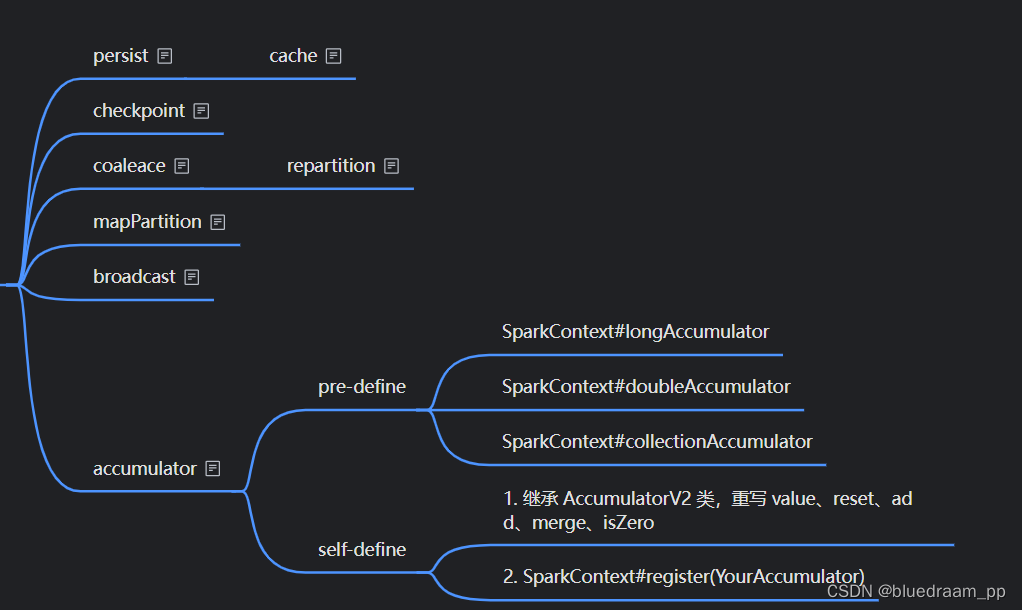
控制类的算子
控制类算子是一类和优化相关的算子。
例如,当我们重复利用一些计算结果的时候,可以将中间的计算结果保存到缓存中。例如,我计算某个商品在某些城市的销售额,我们希望计算每天、每周、每月的销售额,我们希望计算这些,怎么计算呢?我们可以计算先计算出每天的销售额,然后在这个基础上计算出每周和每月的销售额。
    val conf = new SparkConf().setMaster("local[*]").setAppName(this.getClass.getCanonicalName.init)
    val sc = new SparkContext(conf)
    sc.setLogLevel("ERROR")
     val dimDataRDD:RDD[String] = sc.parallelize(List(
           "2024-02-29,1,02"
          ,"2024-03-01,2,03"
          ,"2024-03-01,2,03"
          ,"2024-03-02,2,03"
          ,"2024-03-03,2,03"
          ,"2024-03-04,2,03"
      ))
    val dimDateBroadcast = sc.broadcast(dimDataRDD.map(x => {
      val strings = x.split(",")
      (strings(0), x)
    }).collectAsMap())
    val orderRDD:RDD[String] = sc.parallelize(List(
        "2024-03-01,order1,product1,city1,10"
        , "2024-03-01,order1,product1,city3,11"
        , "2024-03-01,order1,product1,city4,11"
        , "2024-03-01,order1,product1,city5,34"
        , "2024-03-01,order1,product1,city3,13"
        , "2024-03-01,order1,product1,city3,33"
        , "2024-03-02,order1,product1,city3,19"
        , "2024-03-02,order1,product1,city4,13"
        , "2024-03-02,order1,product1,city5,34"
        , "2024-03-02,order1,product1,city3,19"
        , "2024-03-02,order1,product1,city1,38"
        , "2024-03-03,order1,product1,city5,34"
        , "2024-03-03,order1,product1,city3,19"
        , "2024-03-03,order1,product1,city1,38"
        , "2024-03-04,order1,product1,city5,34"
        , "2024-03-04,order1,product1,city3,19"
        , "2024-03-04,order1,product1,city1,38"
        , "2024-02-29,order1,product1,city1,38"
      , "2024-02-28,order1,product1,city1,12"
    ))
    val byDay = orderRDD.map(x => {
      val strings = x.split(",")
      ((strings(0), strings(3)), strings(4).toInt)
    }).reduceByKey((s: Int, x: Int) => {
      s + x
    })
    println("====by day city sum(amt)===")
    byDay.foreach(println)
    val byDayWithMonthAndWeek = byDay.map(x => {
      val dimss = dimDateBroadcast.value
      val rs = dimss.getOrElse(x._1._1, Nil) match {
        case Nil => ("", "")
        case str: String => {
          val strings = str.split(",")
          (strings(1), strings(2))
        }
      }
      //日期+城市 周 月
      (x._1, rs._1, rs._2, x._2)
    })
    byDayWithMonthAndWeek.cache()

    println("====by city , week  sum(amt)===")
    byDayWithMonthAndWeek
      .keyBy(x => (x._1._2 ,x._2))
      .combineByKey(
        (a:((String,String) , String , String , Int)) => a._4
        ,(s:Int , x:((String,String) , String , String , Int))=>{
         s + x._4
      },
        (x:Int , y:Int) => {
          x + y
        }
      ).foreach(println)
    println("====by city , month  sum(amt)===")
    byDayWithMonthAndWeek.keyBy(x => (x._1._2 ,x._3))
      .combineByKey(
        (a:((String,String) , String , String , Int)) => a._4
        ,(s:Int , x:((String,String) , String , String , Int))=>{
          s + x._4
        },
        (x:Int , y:Int) => {
          x + y
        }
      ).foreach(println)
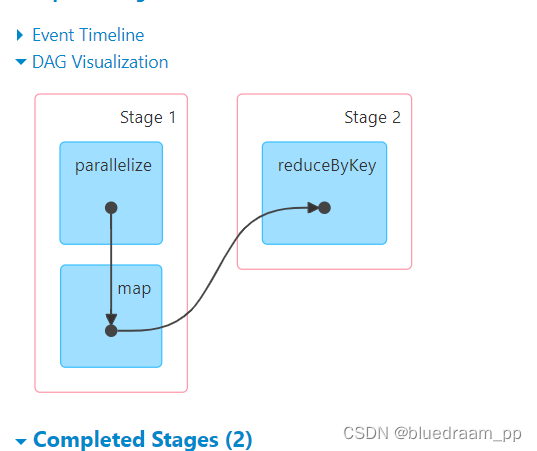
上面的代码完成了最初的逻辑。我们来看看里面的执行过程。
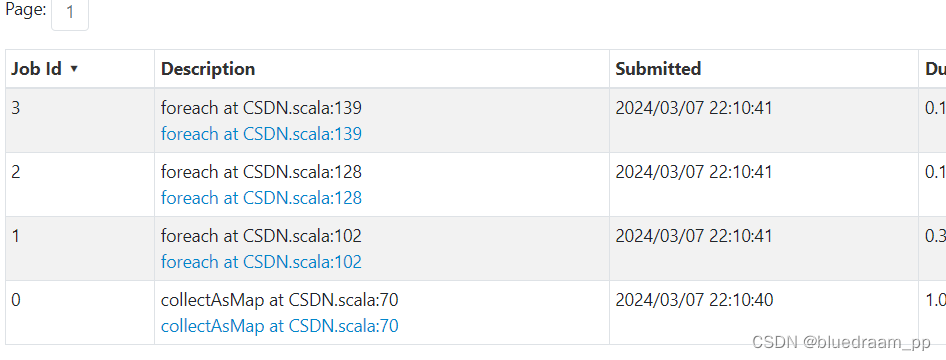
从上面的图中可以看到,有四个 job 执行,从函数来看,
0 号代表广播流
1 号代表了输出的是天、城市粒度下销售额
2 号代表输出的是城市、周粒度下的销售额汇总
3 号代表了输出的是城市、月粒度下的销售额汇总
咱们一个一个点进去看看
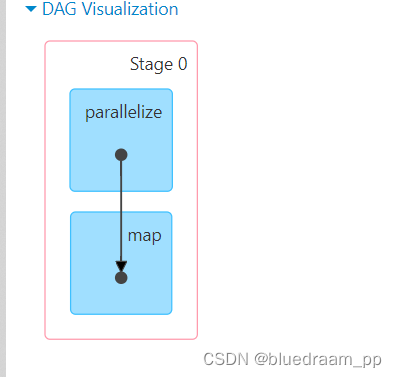
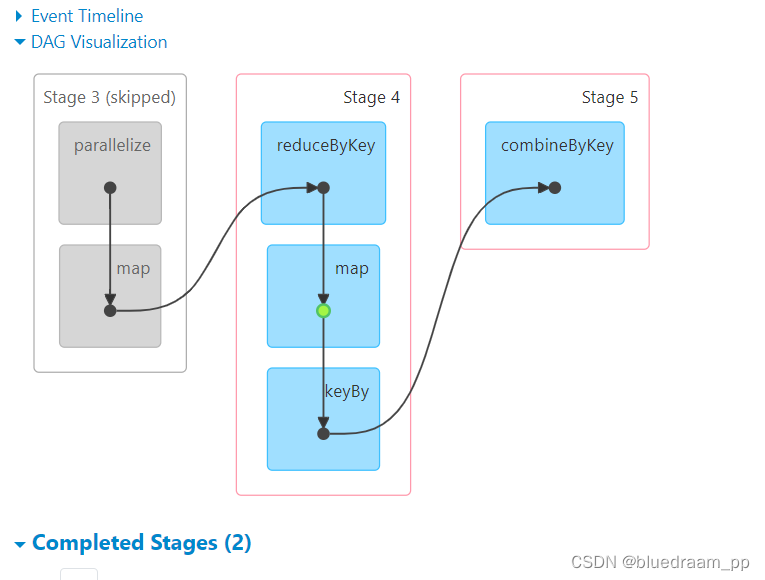
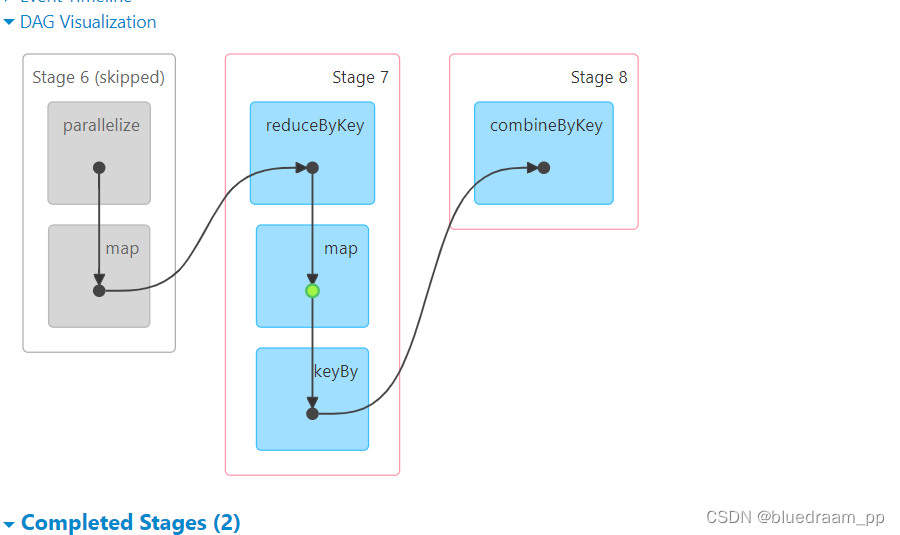
从 2 和 3 中可以看到前面 Stage6 和 stage3 都是 skip 的,在 Stage7 和 Stage8 中的 map 是有一个绿色的标识的,此标识就是代表了使用缓存。如果讲 cache 去掉的话。在来看看效果。
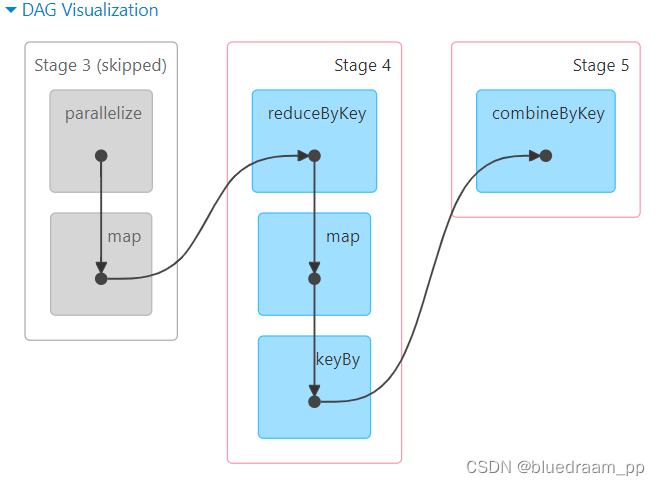
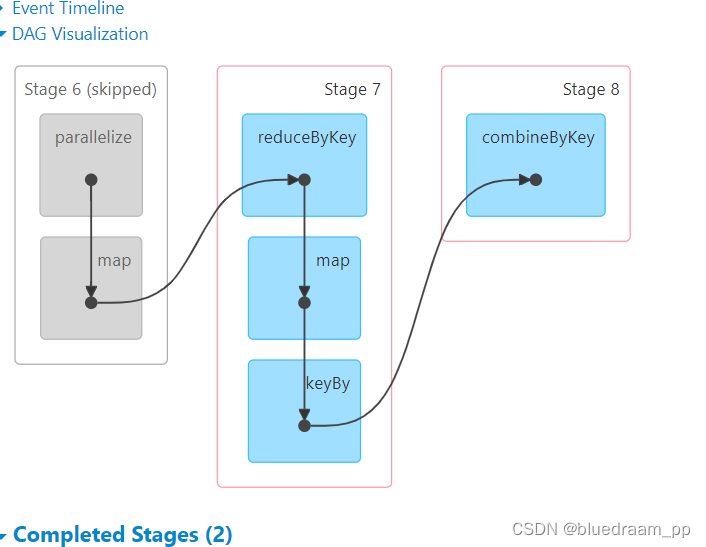
从上面的图中,可以看到 Stage7 和 Stage4 中的 map 没有绿色的标识了,说明缓存已经没了。
下面一个是 persist(), 我们先一个 cache() 的源码:
  def cache(): this.type = persist()
  def persist(): this.type = persist(StorageLevel.MEMORY_ONLY)
从上面的代码,可以知道,cache 是 persist 实现的,而且 persist 里面可以设置不同的保存级别:
  val NONE = new StorageLevel(false, false, false, false)
  val DISK_ONLY = new StorageLevel(true, false, false, false)
  val DISK_ONLY_2 = new StorageLevel(true, false, false, false, 2)
  val DISK_ONLY_3 = new StorageLevel(true, false, false, false, 3)
  val MEMORY_ONLY = new StorageLevel(false, true, false, true)
  val MEMORY_ONLY_2 = new StorageLevel(false, true, false, true, 2)
  val MEMORY_ONLY_SER = new StorageLevel(false, true, false, false)
  val MEMORY_ONLY_SER_2 = new StorageLevel(false, true, false, false, 2)
  val MEMORY_AND_DISK = new StorageLevel(true, true, false, true)
  val MEMORY_AND_DISK_2 = new StorageLevel(true, true, false, true, 2)
  val MEMORY_AND_DISK_SER = new StorageLevel(true, true, false, false)
  val MEMORY_AND_DISK_SER_2 = new StorageLevel(true, true, false, false, 2)
  val OFF_HEAP = new StorageLevel(true, true, true, false, 1)
它起的名字还是见名知意的。所以它可以保存缓存到内存、磁盘、堆外,并且可以序列化。
其实这些都不够安全,最安全的办法就是缓存保存到 HDFS 中。这样就最保险了。也是就有 checkpoint()
spark 的 checkpoint 值是将中间结果缓存,达到中间数据重复使用的效果,和 Flink 对比,Flink 的 checkpint 本质是一种分布式事务,可以协调各个算子完成同一批数据处理,通过checkpoin 就能实现 exactly-once 的语义,但是 spark 就不能这样。
下一个重要的控制算子就是 Accumulator ,它是一个全局性的累计器。可以保存全局性的累计值。下面是是用 accumulator 实现的 workcount。
object TestAccumulate {
  def main(args: Array[String]): Unit = {
    val conf = new SparkConf().setAppName("test_accumulate").setMaster("local[*]")
    val sc = new SparkContext(conf)
    val value:RDD[String] = sc.makeRDD(List("Hi,", "Hello", "ww", "hhh"))
    val sum:LongAccumulator = sc.longAccumulator("sum")
    val accu:MyAccumulator = new MyAccumulator()
    sc.register(accu , name = "accu")
    value.foreach(x => {
        accu.add(x)
        sum.add(1)
    })
    val value1: mutable.Map[String, Int] = accu.value
    println(s"size ${value1.size}")
    println(s"sum ${sum.value}")
    for( (key ,value) <- value1){
      println(s"key is ${key} , and value is ${value}")
    }
    sc.stop()
  }

}
class MyAccumulator extends AccumulatorV2[String , mutable.Map[String , Int]]{
  // 定义一个集合,来记录以 H 开头的字符串的个数
  var map:mutable.Map[String , Int] = mutable.Map[String , Int]()

  override def isZero: Boolean = true

  override def copy(): AccumulatorV2[String, mutable.Map[String, Int]] = {
      val rs:MyAccumulator = new MyAccumulator()
      rs.map = this.map
      rs
  }

  override def reset(): Unit = {
    this.map.clear()
  }

  override def add(v: String): Unit = {
    if(v.startsWith("H")){
      this.map.put(v , map.getOrElse(v , 0) + 1)
    }
  }

  override def merge(other: AccumulatorV2[String, mutable.Map[String, Int]]): Unit = {
    val map1:mutable.Map[String , Int] = map
    val map2:mutable.Map[String , Int] = other.value
    map = map1.foldLeft(map2) {
      (map2, kv) => {
        map2(kv._1) = map2.getOrElse(kv._1, 0) + kv._2
        map2
      }
    }
  }

  override def value: mutable.Map[String, Int] = this.map
}
Accumulator 的计算逻辑和 combinerByKey 的逻辑十分的相似。Spark 还为我们预定义了三个累加器,longAccumulator、doubleAcculator、collectionAccumulator 三个,其实现方式也是继承了AccumulatorV2 类,然后,在 SparkContext 中注册就可以使用了。
coalesce 是将 RDD 中的分区重新划分分区,这个的作用可以处理数据倾斜的问题,其实数据倾斜的根源就是在于分区中有多有的少,我们可以使用 key 值的组合,然后重新分区达到各个分区数据量差不多的情况。
action 算子
action 算子是真正出发计算的算子,在 action 算子之前, 所有的算子就像流水线上的一个工序,按照我们想要的结果设置好了加工模具,action 才能够决一个 job 的开始。一个 Spark 任务中,可以有多个 job ,一个 job 里面可以多个 Stage 。
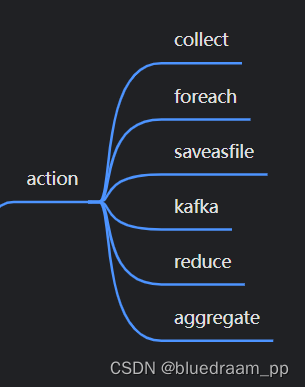
其中,kafka 是后来使用 KafkaUtil 加入的 Kafka 的消费算子,其他都是 RDD 中自带的算子,这些算子中的共同特点是源码中都使用了 SparkContext#runJob()
下面来看看 foreach 函数:
  def foreach(f: T => Unit): Unit = withScope {
    val cleanF = sc.clean(f)
    sc.runJob(this, (iter: Iterator[T]) => iter.foreach(cleanF))
  }
下面来说是 KafkaUtils 这是 Spark 扩展,它的功能是让 Spark 可以消费和生产 Kafka 里面的数据,这样 Spark 就能处理流式计算了。
数据源算子
数据源算子是设置数据源的算子。
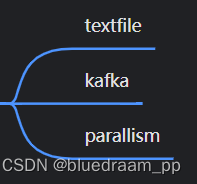
textfile 是从文件系统中取出数据,可以是 disk 中,或者从 HDFS 中拉出来。
parallism 是可以从 List 消费数据,这个算子经常用来测试功能。


 1376
1376


 被折叠的 条评论
为什么被折叠?
被折叠的 条评论
为什么被折叠?
 到【灌水乐园】发言


