


目录
FileInputStream:(文件字节输入流——对文件读取字节,掌握)
FileOutputStream(文件字节输出流,对文件输入字节,掌握)
字符输入流(FileReader和FileWriter,掌握)
BufferedInputStream (掌握)和 BufferOutputStream(掌握)
ObjectInuputStream和ObjectOutputStream
打印流(PrintStream、PrintWriter)(了解)
文件的基本操作
传入文件路径的三种方式

创建文件路径的两种方式
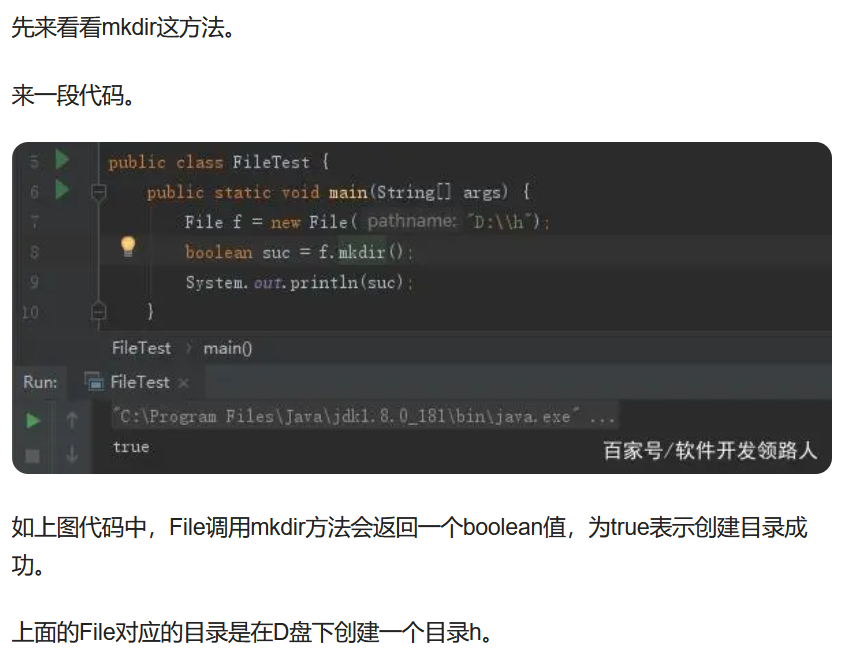
file.mkdir;创建单级目录
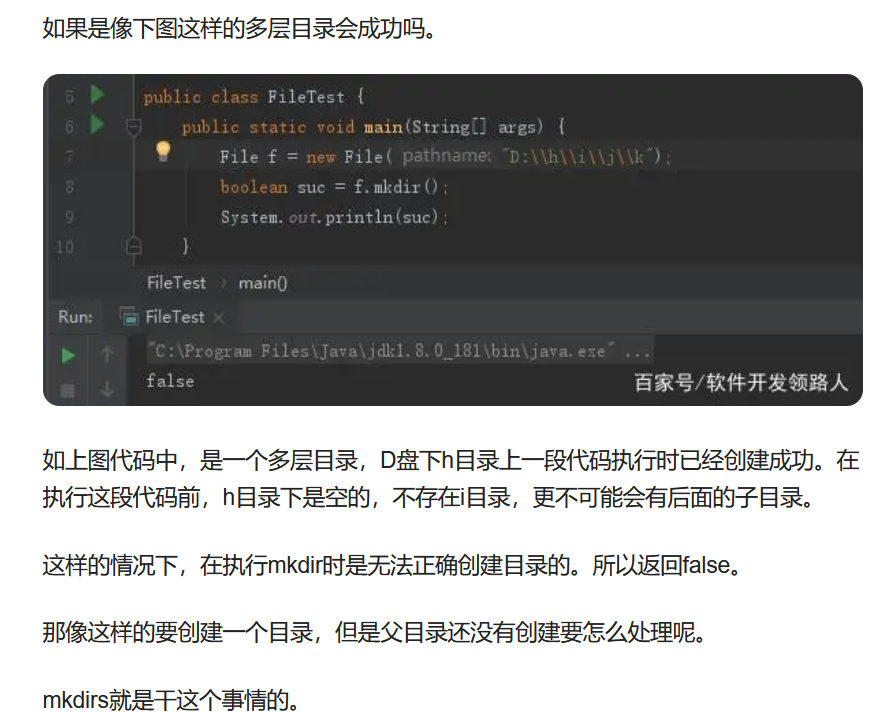
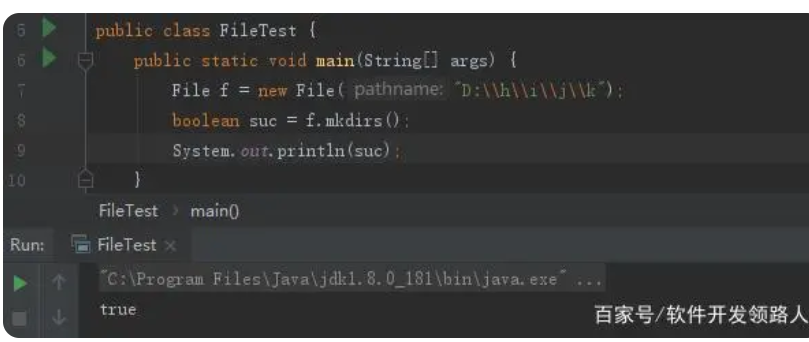
file.mkdirs;创建多级目录
后面这两个方法的区别就是mkdir如果父目录不存在,则无法成功创建指定的目录。而mkdirs如果父目录不存在,则会同时把父目录也创建出来。注意路径都是文件夹,如果要创建具体的文件比如hello.txt需要用createNewFile方法
方式一:
String filepath = "D:\\FileTest\\news01.txt";
File file = new File(filepath);//filepath——文件路径
file.createNewFile();

方式二:
File parentName = new File("D:\\FileTest\\");
String childName = "news02.txt";
File file = new File(parentName, childName);
file.createNewFile();

方式三:
String parent = "D:\\FileTest\\";
String child = "news03.txt";
new File(parent,child).createNewFile();

//注意:调用createNewFile();方法是必不可少的,这一步才是在硬盘中创建文件的动作,前面的new File只是在内存层创建的文件对象
且它会抛出一个编译异常——IOException(IO流异常),我们必须要去捕获
操作文件的相关方法(注意文件的相关方法只对文件表层的操作,他无法操作文件内部的数据,文件内部的数据操作得用IO流才可以操作)
还有一个注意点 :File file = new File(D:/feifei); 可以分为以下几步
- 这个时候我们先是在方法区中声明了一个File类型的引用file
- 然后再堆中创建了一个File类型的实例对象
- 创建这个File对象的时候我们要看这个File对象的是否对应了一个硬盘中实际存在的文件或者文件目录 a.这个时候如果不存在,那么就给这个File对象中的一些特殊的依赖于硬盘中实际文件的属性赋一个默认值 b.如果这个时候存在,那么就给这个File对象中的一些特殊的依赖于硬盘中的实际存在的文件的属性赋值一些具体的值—这些值就是我们根据这个硬盘中实际存在的文件的属性而确定的
- 然后让我们的file引用指向我们创建的这个对象
- 然后让我们的file引用指向我们创建的这个对象
总结:也就是说我们在new File的时候只是在内存层面创建了一个文件对象,他在创建的时候会先根据你传入的路径判断目标文件是否如果存在的话他并不会冲突,他直接就默认的指向了你已经们存在的那个目标文件了,就相当于你给已经存在的目标文件赋予了一个引用。如果目标文件不存在则通过调用File的方法file.createNewFile(),即使你的目标文件已经存在你调用该方法他也不会报错也不会重复的给你在硬盘中创建新的文件,只不过调这方法没意义了。
//文件的相关操作
        File file = new File("D:\\FileTest\\newsTest.txt");
        file.getAbsolutePath();//获取目标文件绝对路径返回字符串
        file.getPath();//获取目标文件相对路径返回字符串
        file.getParentFile();//获取目标文件的父级目录返回字符串“D:\FileTest”
        file.length();//获取目标文件大小,返回long型
        file.exists();//判断硬盘层中文件是否存在返回boolean值(这里为false,因为还没有调用createFile)
        file.isFile();//判断file是否为一个文件返回boolean(这里是true)
        file.isDirectory();//判断是否为目录返回boolean(这里为false)
        file.delete();//删除文件
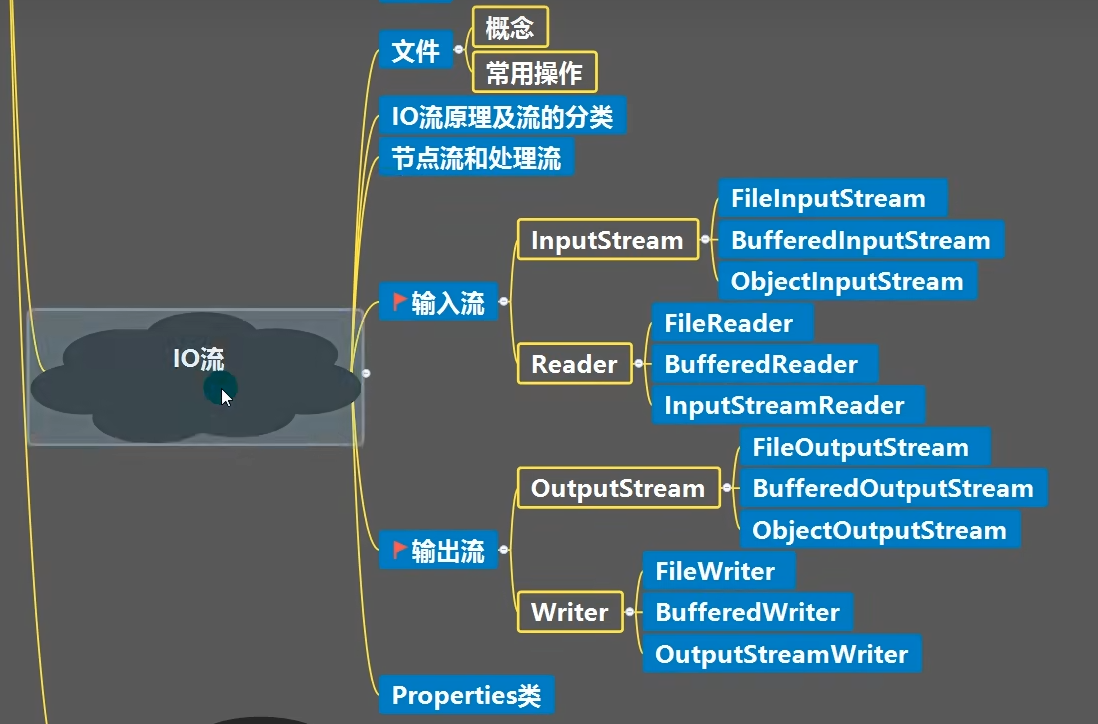
IO流概念:
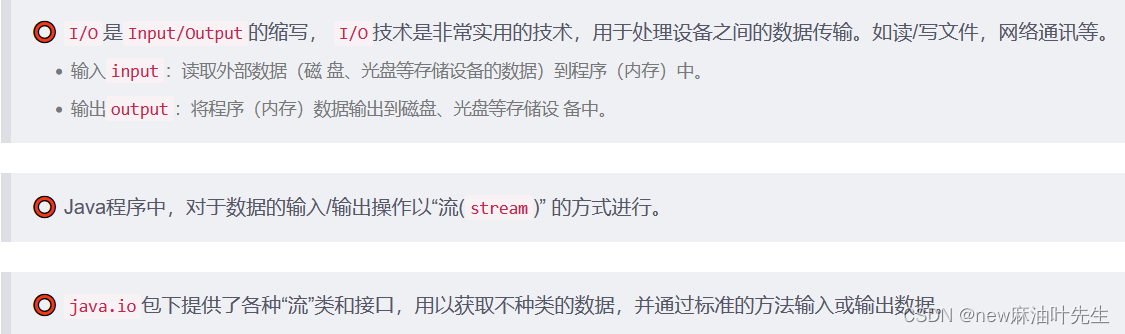
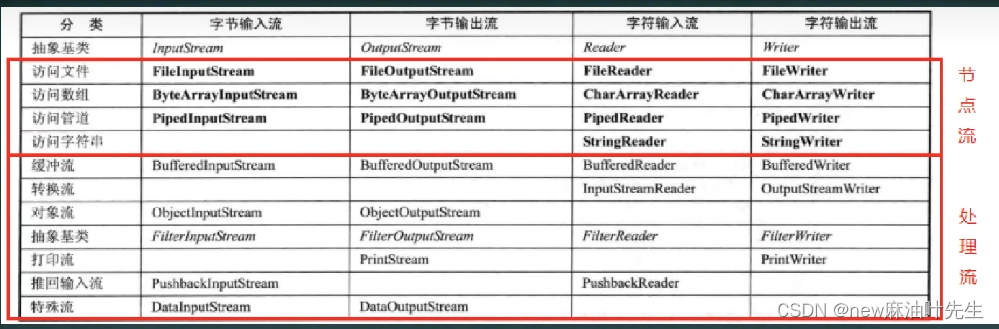
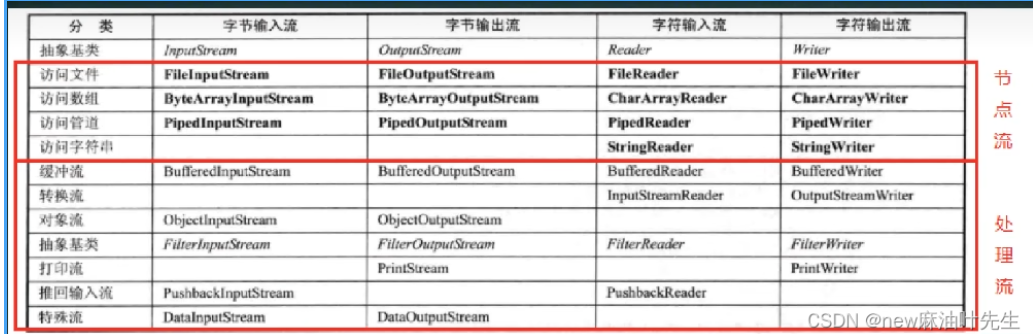
流的分类:
按操作数据单位不同分为:字节流(8 bit)——比如视频音频类文件也就是二进制文件,
字符流(16 bit)——文本文件。
按数据的流向可分为:输入和输出流
按流的角色不同可以分为:节点流,处理流/包装流。

//以上四个流都是抽象流不可直接创建对象,所有流的操作都是通过创建他们的子类流来操作的
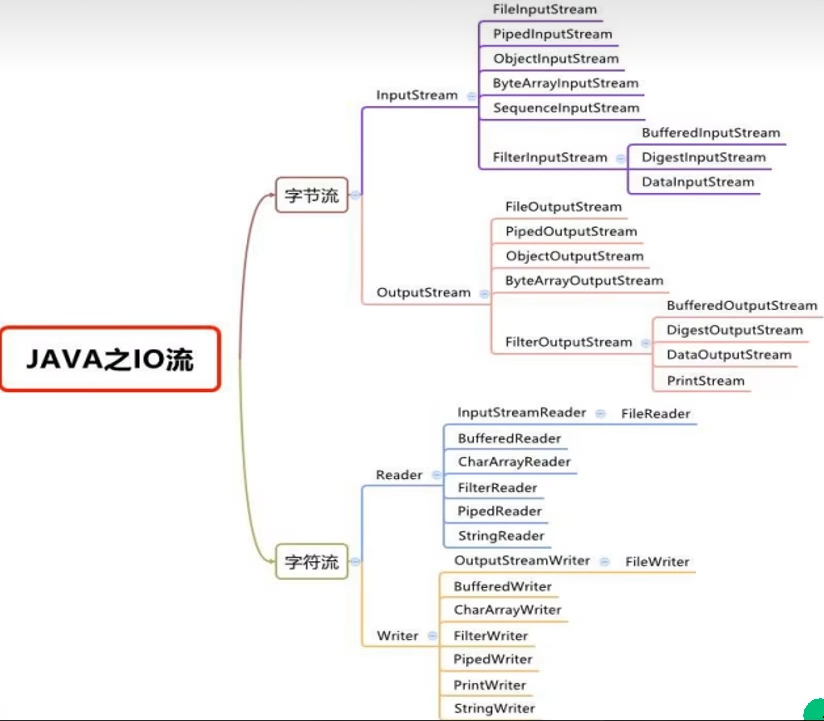
在整个IO流的体系中所有关于字节的都是流中都包含(input和output),
所有关于字符的流中都包含(reader和writer)
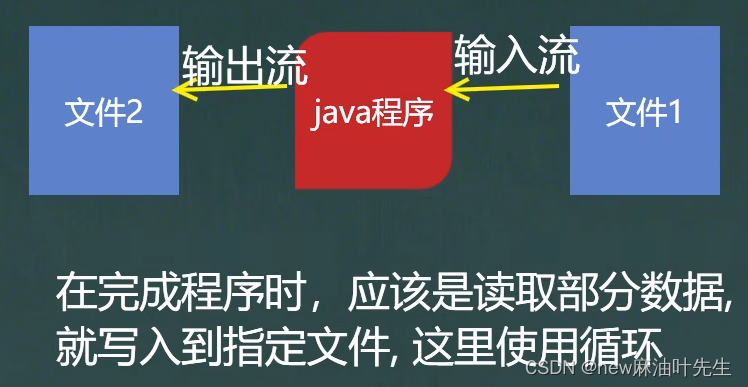
流VS文件
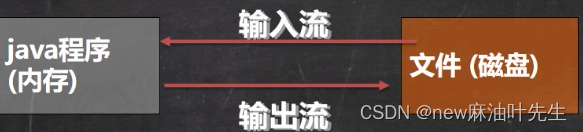
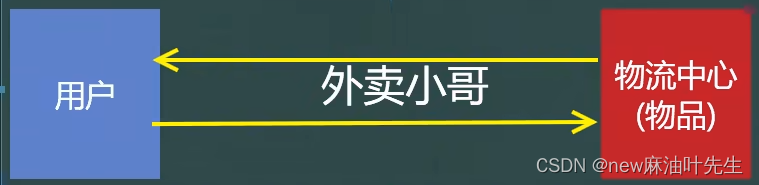
//java程序就好比如用户,流就好比如外卖小哥,物品中心就好比如文件
FileInputStream:(文件字节输入流——对文件读取字节,掌握)
首先你要明白一点,我们是不可以对文件直接进行数据操作的,我们只能用流对象进行文件的数据操作,流对象关联着目标文件,你可以这样理解流对象是内存层的一个类对象,当你把地址传给流对象后他就表示目标文件。
下列代码演示中:"d:\\FileTest\\hello.txt"目标文件中包含“Hello,World”
int read()方法:从目标文件依次读取单个字节,并将字节的值以int的形式返回,每一次读取返回下一个字节数,当无法读取到字节的时候返回-1,read的返回值是int型。
String path = new String("d:\\FileTest\\hello.txt");
        File file = new File(path);
        FileInputStream fileInputStream = null;
        int readData = 0;
        try {
             fileInputStream = new FileInputStream(file);
            while ((readData = fileInputStream.read())!=-1)
            System.out.print((char)readData);
            //因为他的返回值是int型所以我们需要把它转成char类型才能打印出字符对应的char值
        } catch (IOException e) {
            //这里面 catch的异常得用IOException因为有两个异常
            e.printStackTrace();
        }finally {
            try {
                fileInputStream.close();
            } catch (IOException e) {
                e.printStackTrace();
            }
        }
//注意:该方法如果目标文件包含中文的话会乱码,因为一个中文有三个字符。
read( byte [length] )方法:从目标文件中依次读取length个字节,每次返回实际读取到字节个数,如果没有字节可读则返回-1,假如我这个length为8,那么他每次从目标文件中读取8个字节,每次返回读取的实际字节个数。如果目标文件没有8个字节假如有13个字节,他第一次读取8个字节返回8,第二次读取的时候把剩下的5个字节读取完毕后返回5
void Test02(){//read(byte[])方法演示
        String path = new String("d:\\FileTest\\hello.txt");
        File file = new File(path);
        FileInputStream fileInputStream = null;
        byte[] bytes = new byte[8];
        int readLen = 0;//每次返回的值,也就是实际长度
        try {
            fileInputStream = new FileInputStream(file);
            while ((readLen = fileInputStream.read(bytes))!=-1) {
                System.out.print(new String(bytes,0,readLen));}

        } catch (IOException e) {
            e.printStackTrace();
        }finally {
            try {
                if(fileInputStream != null){//这里是为了防止空指针异常,他不能确定你这个
                                                fileInputStream对象是否存在
                fileInputStream.close();
                    }
            } catch (IOException e) {
                e.printStackTrace();
            }
        }
     //第一次循环把 “Hello,Wo” 这8个字节读取出来并保存到 bytes数组里面,
     // 此时数组里面是保存了这几个字节的
     //第二次循环把"rld" 这3个字节读取出来并保存到bytes数组中,此时他并不会在后面添加
     //因为你已经满了,你这个相当于重新对数组赋值,所以他会把前面字符三个替换掉。
     //但是你注意后面的5个字符是没有改变的,因为数组说到底还是指针的形式,你只是把前三个
     //的值改变了
     //并没有改变后面的,不过这里我限制了每次循环打印从0到readLen,第二次循环readLen是3
    //所以我最后打印的是"Hello,World"
第一次循环:
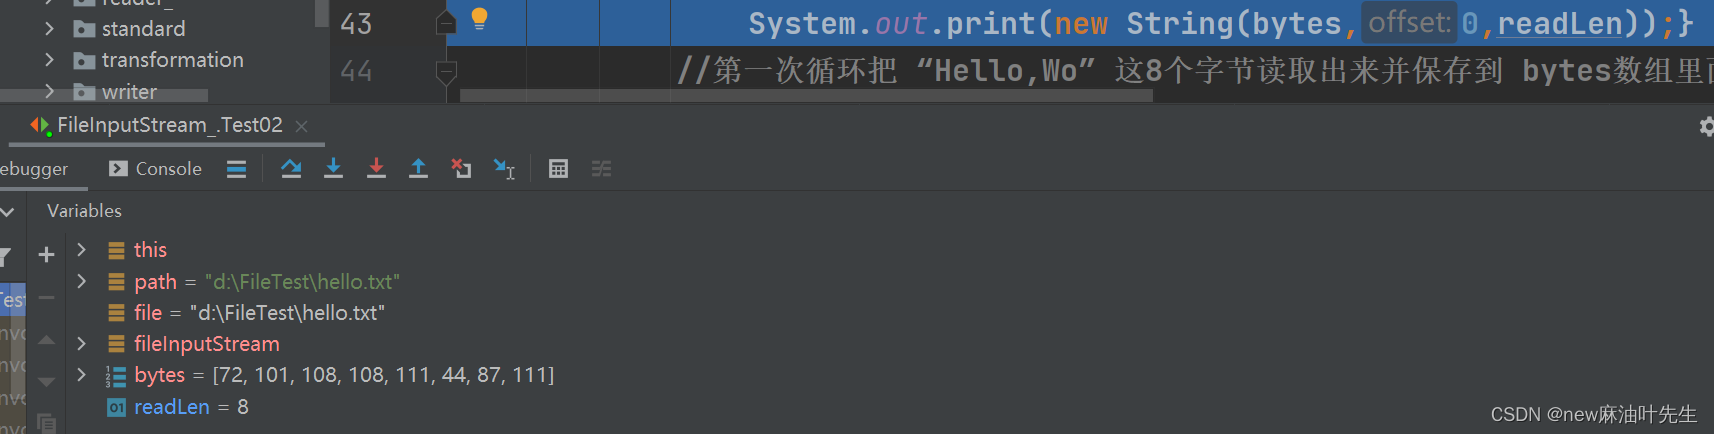
第二次循环:
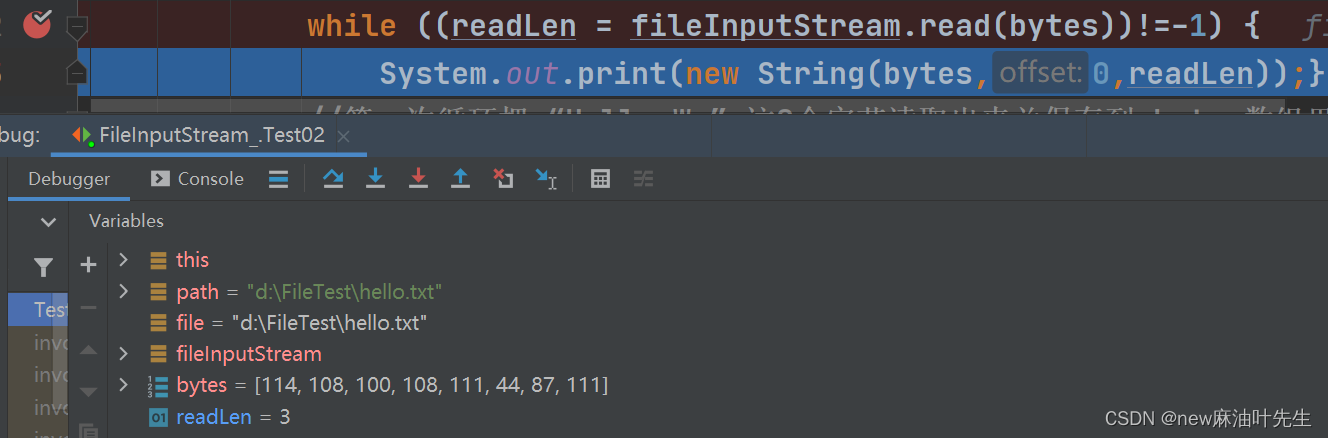
第三次循环的时候readLen就变成了-1了
FileOutputStream(文件字节输出流,对文件输入字节,掌握)
- 在创建FileOutputStream对象的时候,当你把目标文件的目录传进去的时候回如果目标文件不存在他会给你创建目标文件。前提是文件目录需要存在。
- 创建对象的方式
创建对象有两种方式: 方式一:new FileOutputStream(String path); 方式二:new FileOutputStream(String path,boolean append); 第一种方式在每次执行程序的时候会把内容清空,第二种方式不会清空 文件内容当你输出字节的时候他会在后面追加 - write方
String str = "Hello,World";
fileOutputStream = new FileOutputStream(path);//如果目标文件不存在则会被创建
fileOutputStream.write('H');//输出单个字节(对目标文件输入)
fileOutputStream.write(str.getBytes());//输出字符数组
fileOutputStream.write(str.getBytes(),0,4);//指定输出字符数组

//注意上面三种输出方式在同一次执行程序的时候他们并不会相互覆盖,
//当你把第一个H写入后此时指针向后移动一位此时程序并没有执行完毕他
//继续执行第二个写入程序,执行完第二个写入程序后指针移动到下一位
//然后执行第三个写入程序。
//当程序执行完毕后在下一次执行程序的时候文件会被清空,指针会移动到
//第一位,这就是在new FileOutputStream(path)的时候回append
//的值为false时的覆盖机制
文件拷贝
思想:
public class FileCopy {
    public static void main(String[] args) {
        //从"D:\\FileTest\\Kola.jpg"拷贝一份Kola.jpg
        //到"D:\\FileTest\\Kola2.jpg"到这里拷贝后的文件名为Kola2.jpg
        String srcPath = "D:\\FileTest\\Kola.jpg";//源文件
        String targetPath = "D:\\FileTest\\Kola2.jpg";

        //输入流和输出流的准备工作
        FileInputStream fileInputStream = null;
        FileOutputStream fileOutputStream = null;
        int readLen = 0;
        byte[] bytes = new byte[1024];

        try {
            //让输入流对象关联源文件,输出流对象关联目标文件
            fileInputStream = new FileInputStream(srcPath);
            fileOutputStream = new FileOutputStream(targetPath);
            //用循环的方式在每一次读取后对目标文件输出
            while ((readLen = fileInputStream.read(bytes)) != -1) {
                //一定要用这种方式输出,
                fileOutputStream.write(bytes, 0, readLen);
                //如果用输出,如果你用fileOutputStream.write(bytes);假如你要拷贝的文件
                //有1039个字节,那么你第二次拷贝的时候就只剩下15个字节,但是第二次拷贝你
                //还是按1024去拷贝的,他就会把剩下的15个字节+上前面第一次拷贝到的第16-1024
                //字节拷贝进去,这样的话图片就会不一样了。如果不懂就回去看前面的输入
            }
            System.out.println("拷贝成功");
        } catch (IOException e) {
            e.printStackTrace();
        }finally {
            try {
                if(fileInputStream != null){
                    fileInputStream.close();
                }
                if(fileOutputStream != null){
                    fileOutputStream.close();
                }
//这里面你可能有疑惑为什么需要做这样一层判断,因为这里如果不作判断的话他会报
一个编译异常——空指针异常,他不知道你这个流对象是否存在,因为前面可能会发生错误
当发生错误抛出异常的时候这个流对象就会被释放掉,那释放掉以后这个流对象的引用就为NUll
了

            } catch (IOException e) {
                e.printStackTrace();
            }

        }
    }
}
字符输入流(FileReader和FileWriter,掌握)

int read();读取1字符数据,并将字符的值作为int类型返回范围(0~255),所以虽然是读取单个字符但是他不会直接给你返回字符,你还是需要把它转成char才能正常输出。
注意这里面的read和前面的InputStream中的read是不一样的,前面返回的是单个字节的int值
这里返回的是单个字符的int值,就比如前面读取一个中文字符他需要读取三次才能把这个中文字符读取完整,这里只需要读取一次。因为一个中文字符占三个字节。
@Test//按单字符读取,返回单个字读的int值
void testFileReader01(){
    String path = "D:\\FileTest\\testReader.txt";
    FileReader fileReader= null;
    //这个变量特别有用,用来判断的同时也用来读取输出字符
    int data = 0;
    try {
        fileReader = new FileReader(path);
        while ((data = fileReader.read()) != -1){
            System.out.print((char)data);
        }
        System.out.println();
    } catch (IOException e) {
        e.printStackTrace();
    }finally {
        try {
            fileReader.close();
        } catch (IOException e) {
            e.printStackTrace();
        }
    }
}

@Test//按字符数组读取,返回实际读取的个数
void testFileReader02(){
    String path = "D:\\FileTest\\testReader.txt";
    FileReader fileReader= null;
    //这个变量特别有用,用来判断的同时也用来读取输出字符
    int readLen = 0;
    char[] chars = new char[8];
    try {
        fileReader = new FileReader(path);
        while ((readLen = fileReader.read(chars)) != -1){
            System.out.print(new String(chars,0,readLen));
        }
        System.out.println();
    } catch (IOException e) {
        e.printStackTrace();
    }finally {
        try {
            fileReader.close();
        } catch (IOException e) {
            e.printStackTrace();
        }
    }
}
 @Test
    void testFileWrite(){
        FileWriter fileWriter = null;
        String path = "D:\\FileTest\\b.txt";
        try {
            fileWriter = new FileWriter(path);
            fileWriter.write('H');//写入单个字符
            fileWriter.write("Hello,World");
            char[] chars = {'a','b','c'};
            fileWriter.write(chars);
            fileWriter.write(chars,0,2);//只能取到0和1
        } catch (IOException e) {
            e.printStackTrace();
        }finally {
            try {
                fileWriter.flush();
//           或者fileWriter.close();
            } catch (IOException e) {
                e.printStackTrace();
            }
        }
    }
read方法解读
注意点:你很容易把int read();读取单个字符和int rede(char[])读取字符数组的返回值int搞混,读取单个字符返回的是单个字符的int值,当读取到末尾读取不到的时候返回-1。读取字符数组返回的是实际读取的字符个数,正常读取的情况下每次返回的是你的char[]的长度,当剩余字符不满足改长度的时候返回实际读取的长度,当读取到末尾读取不到的时候返回-1.并且字符串数组需要定义int readLen;来保存实际长度变量。
read方法读取单个字符直接把返回的值转成char类型输出,read方法在读取字符数组的时候每次读取后他读取到的内容是放在char数组里面的,返回的值是实际读取个数,所以你在输出的时候需要把字符数组转成String来输出。
write方法解读
注意点:
- write写入的机制是每次写入一个数据会把指针移动到下一位。并且他写入的数据会先写入到内存中的缓冲区,所以执行完write语句一定调用流对象的flush方法——刷新,否则你的数据不会写入到目标文件。这个flush的作用就是将缓冲区的内容写进目标文件也就是硬盘。也可以调用close,其实close底层是先对内存缓冲区flush一下才关闭的,这个flush才是关键。
- 在new FileWriter(path,append)的时候这个append的值会决定你写入的内容是否覆盖,append的值默认为false,也就是new FileWriter(path)这样他就会覆盖,这个覆盖的概念不是说每次写入都会覆盖前面的数据,他的覆盖机制是在执行下一次程序的时候会把前面的数据清空重新写入数据,但是在同一次执行程序的多个写入语句不会覆盖,因为同一个程序写入语句时写一个指针就跳到一下,所以不会覆盖。
- 在new流对象传入目标文件的时候如果目标文件存在则流对象指向该目标文件,如果目标文件不存在则会在对应的目录中创建该目标文件。
- 在写入数组的指定范围时注意他的范围取不到重点下标,比如0~2,他是从只能取到下标0和1的值。
处理流
前面我们说的四个流都属于节点流,节点流指的流对象直接从数据源去读写数据的流。当然这数据源远远不止于文件,还有数组、管道等别的甚至字符都可以作为数据源,而不同的数据源都会有不同的节点流。节点流的功能比较单一,他是一个低级的流。
处理流也称包装流,一般是包装节点流来使用,是功能更加强大的流。比如BufferReader

//这个Reader不仅仅局限于文件也可以是别的数据源的节点流,只要是Reader的子类都可以。
深入理解处理流

下面是模拟的修饰器设计模式
public abstract class Reader_ {//抽象基类
    public void read(){}
}

public class FileReader_ extends Reader_{
    @Override
    public void read(){
        System.out.println("文件字节流读取");
        }
}

public class StringReader_ extends Reader_ {
    @Override
    public void read(){
        System.out.println("字符串节点流读取");
    }
}

//封装FileReader_中的read实现多次读取
public class BufferedReader extends Reader_{//处理流
    private Reader_ reader_;
    public BufferedReader(Reader_ reader_) {
        this.reader_ = reader_;
    }

    public void readFiles(int count){
        for (int i = 0; i < count; i++) {
            reader_.readFile();
        }
    }

//封装StringReader_中的reader实现多次读取
    public void readStrings(int count){
        for (int i = 0; i < count; i++) {
            reader_.readString();
        }
    }

public class Test_ {
    public static void main(String[] args) {
        BufferedReader bufferedReader = new BufferedReader(new StringReader_());
        bufferedReader.read(5);
        BufferedReader bufferReader1 = new BufferedReader(new FileReader_());
        bufferedReader1.read(10);
    }
}
输出结果
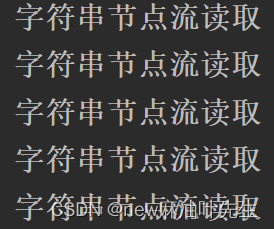

通过上述的代码你应该要知道真正在操作数据的其实还是节点流,处理流说白了只是对节点流进行了封装让他里面的,使他的数据源实现多态性、操作数据的方法更强大。
虽然真正操作数据的是节点流但是我们在使用处理流的时候只需要关闭外层的处理流即可,因为关闭外层的处理流他底层其实还是调用节点流的close去关闭节点流。
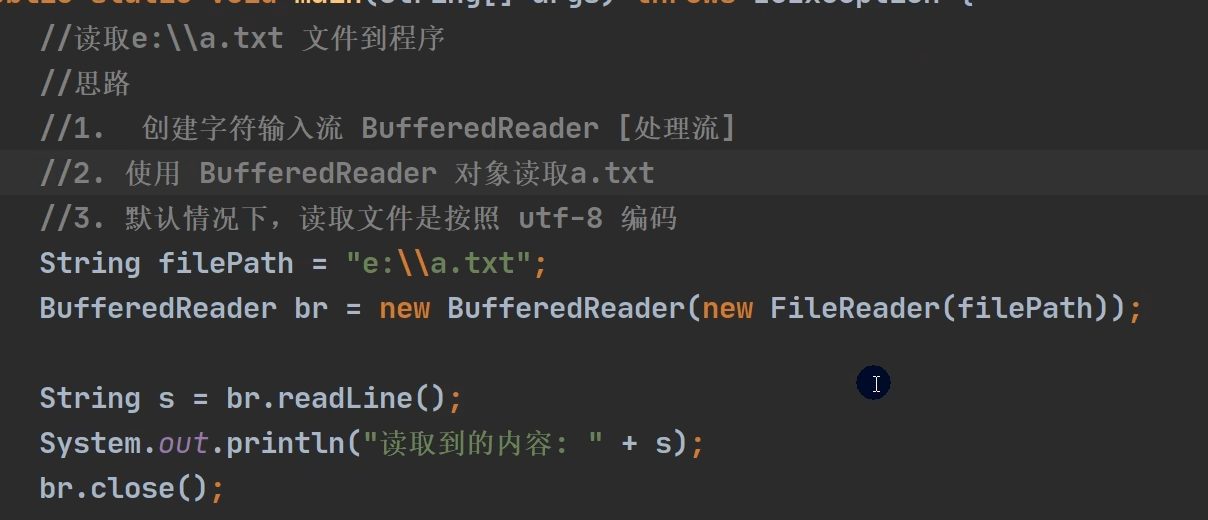
BufferedReader(字符输入处理流,掌握)
首先它是一个按字符串读取的处理流,里面可以传入Reader的任意子类.
代码演示:
String path = "D:\\FileTest\\testReader.txt";
    BufferedReader bufferedReader = new BufferedReader(new FileReader(path));
    //按行读取,正常返回返回目标文件中的一行,如读取完毕无内容读取返回null
    String strLine = "";
    while ((strLine = bufferedReader.readLine()) != null){
        System.out.println(strLine);
    }
    bufferedReader.close();
}
//当然,这个处理流的read方法远不止此,他重载了很多的read,用到的时候查阅即可
BufferedWriter(字符输出处理流,掌握)
这里不再演示BufferedWriter和拷贝的代码案例了,他的使用方式跟前面的演示是一样的
字节处理流
无论何种流无非分为输入和输出,我们先说处理流来操作字节的输入
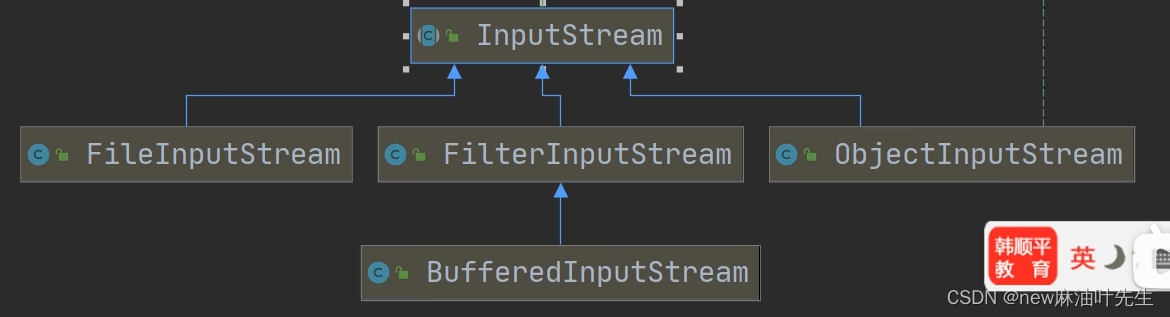
BufferedInputStream (掌握)和 BufferOutputStream(掌握)
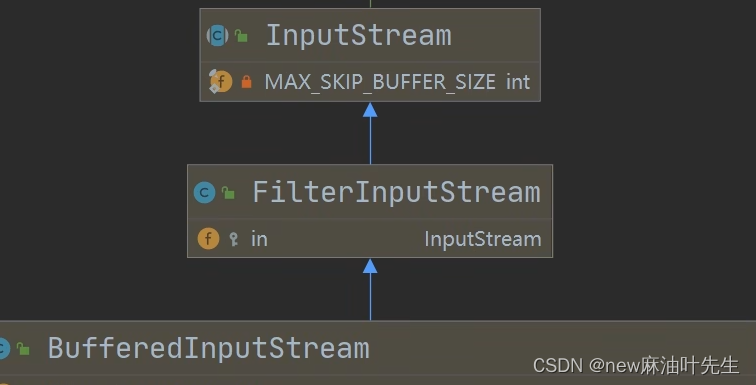
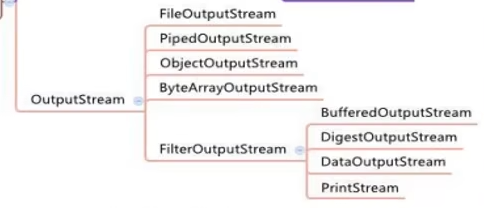
我先分析一下上面这张结构图,首先他的基类肯定是InputStream没问题,第二个FilterInputStream这个和前面讲的FileInputStream可不一样,千万别搞混了。看下面这张图

结合上面两张图,我们可以看出FilterInputStream里面放了一个InpuStream基类,他用来接收不同的节点流。然后FilterInputStream下面又有三个实现子类是不同的处理流。
同样的BufferedOutputStream得分析也是跟一样的,这里不再赘述

下面用一个拷贝文件演示
     @Test
    public void testBufferedCopy() throws IOException {
        //操作二进制数据
        //String strPath= "D:\\FileTest\\testReader.txt";
        //String destPath= "D:\\FileTest\\testReader01.java";
        //操作字符数据
        String strPath= "D:\\FileTest\\testReader.txt";
        String destPath= "D:\\FileTest\\testReader01.java";

        BufferedInputStream bis = null;
        BufferedOutputStream bos = null;

        byte[] bytes = new byte[1024];
        int readLen;
        try {
            FileInputStream fip = new FileInputStream(strPath);
            FileOutputStream fop = new FileOutputStream(destPath);
            bis = new BufferedInputStream(fip);
            bos = new BufferedOutputStream(fop);

            while ((readLen = bis.read(bytes)) != -1){
                bos.write(bytes,0,readLen);
            }
        } catch (Exception e) {
            e.printStackTrace();
        } finally {
            if(bis != null){
                bis.close();
            }
            if(bos != null){
                bos.close();
            }
        }

    }
对象处理流
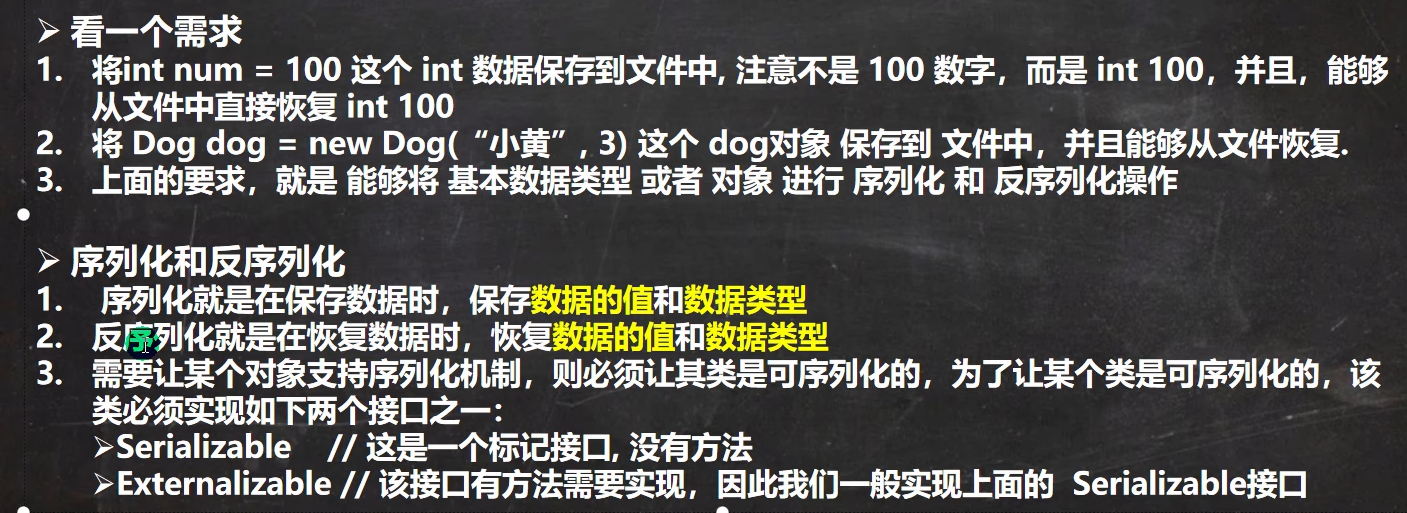

ObjectInuputStream和ObjectOutputStream
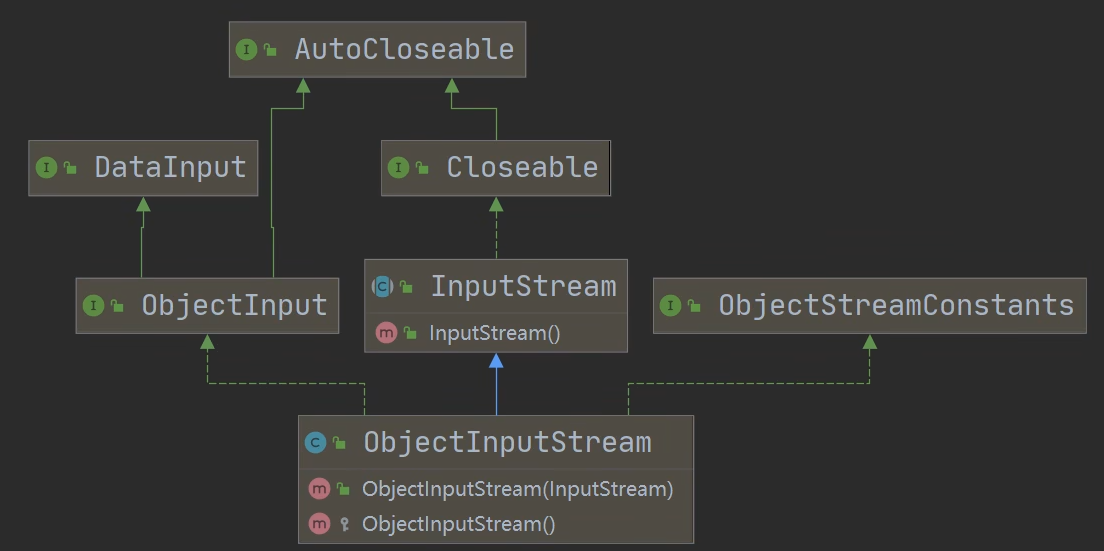
序列化输出演示(ObjectOutputStream)
public static void main(String[] args) throws Exception {
    String destPath = "D:\\FileTest\\testObjectOut.txt";

        ObjectOutputStream oos = new ObjectOutputStream(new FileOutputStream(destPath));


        oos.writeInt(100);//底层会转成integer,然后integer满足可序列化(实现了Serializable)
        oos.writeChar(100);//char会转成Character->他实现了Serializable
        //这里面还可以传入其他任何类型的数据
        // (boolean、double等等他们底层都会先转成对应的包装类,然后他们的包装类都实现了可序列化的)
        //接口Serializable满足了对象流writer方法的传参特点
        //还可以传入实现了可序列化接口(Serializable)的自定义对象
        oos.writeObject(new Dog_("Tom",13));
        oos.close();
    }
}
class Dog_ implements Serializable{
    private String name;
    private int age;
     //serialVersionUID  序列化版本号,可以提高兼容性。
     private static final long serialVersionUID = 1L;
    public Dog_(String name, int age) {
        this.name = name;
        this.age = age;
    }

//公共类Dog
//反序列化演示(ObjecteInputeStream)
public class ObjectInputStream_ {
    public static void main(String[] args) throws Exception {
        String strPath = "D:\\FileTest\\testObjectOut.txt";

        ObjectInputStream ois = new ObjectInputStream(new FileInputStream(strPath));

        //反序列化读取细节:
        //1.反序列化读取的顺序必须与序列化输出的顺序一致。
        //2.在读取自定义类的时候需要向下转型,因为你是用Object来接收读取的
        //不向下转无法调用自定义类里面的方法。
        //3.如果你需要对自定义对象序列化输入和输出,那么你这个自定义对象
        //必须放在可引用的公共包下,也就是说你必须得保证你的序列化对象
        // 在输入与输出时调用的是同一个对象,否则会序列化无效

        System.out.println(ois.readInt());
        System.out.println(ois.readChar());

        Object obj = ois.readObject();
        Dog_ dog1 = (Dog_)obj;
        System.out.println(dog1.getName());
        System.out.println(dog1.getAge());
        ois.close();
    }
} 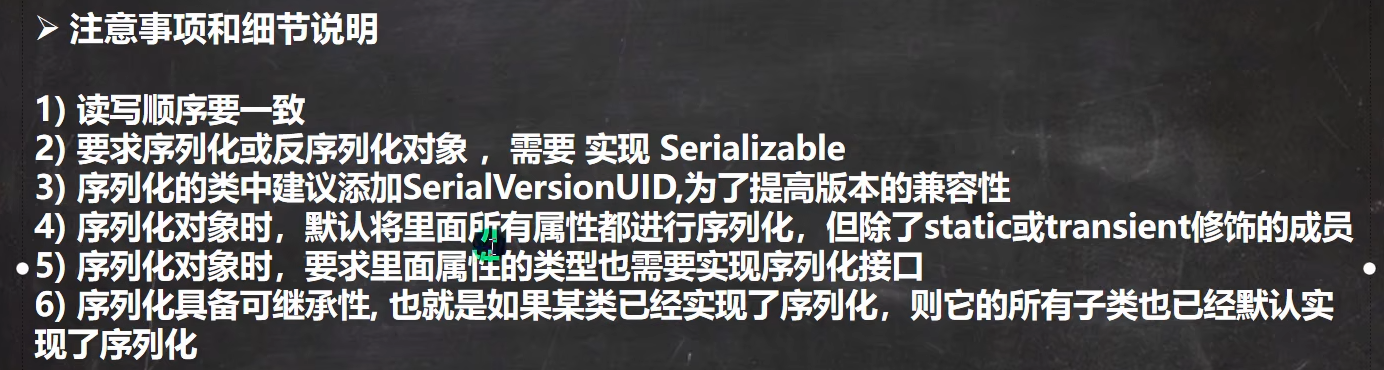
这里要说下第二点:他是一个属性,当你需要对一个自定义类对象进行序列化的时候,建议加入这个属性,并且把它定义为static final,它的作用是比如你后面在对这个自定义类进行修改的时候他会认为你这个类是跟之前是同一个类,只是版本不一样,而不会认为你是重新定义的一个新的类。
标准输入输出流(了解)
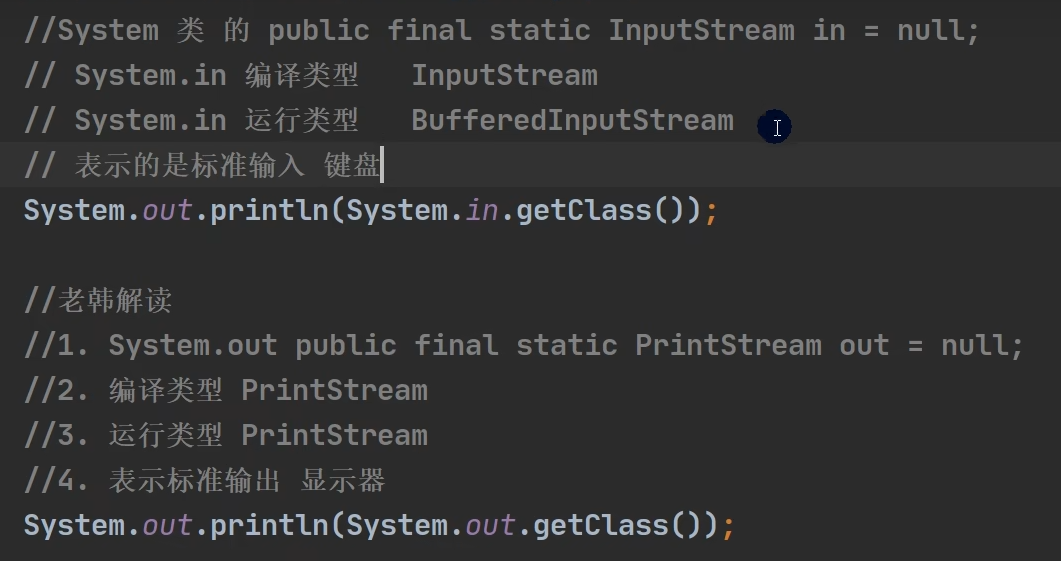
//也就是说他们分别对应一个输入流和输出流(都是处理流)
Sysem.out表示标准的输出到显示器的流
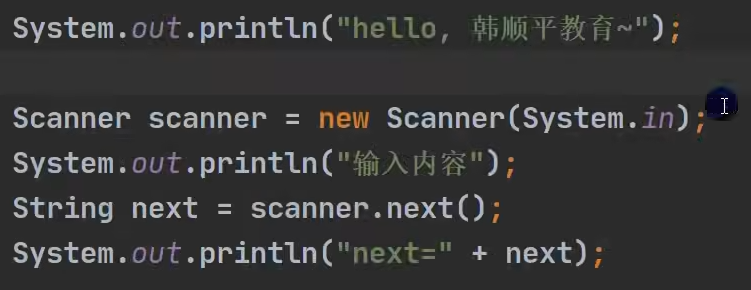
System.in表示标准的从键盘输入流,scanner.next会从这个标准的输入流中读取你所输入的字符
转换流
引出
我们按照上面的读取方式是默认读取utf-8的字符编码来读取的,一旦你的目标文件不是utf-8的字符编码就很可能会出现乱码。那我们就需要指定字符编码去读取目标文件,指定字符编码只有字节流才可以指定,那么我们就需要先通过字节流指定编码去读取,然后在通过转换流把字节流转换成字符流。
InputStreamReader(字符输入处理流)
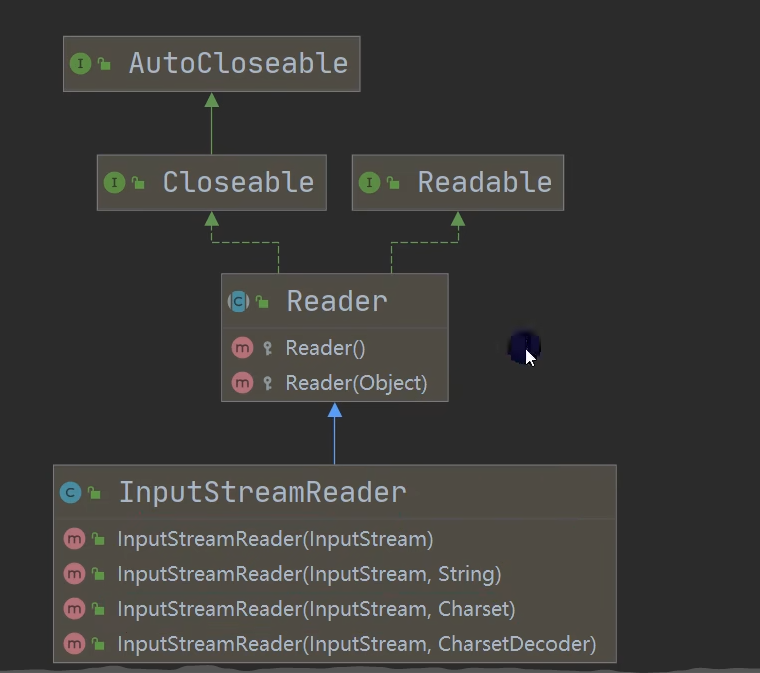
InputStreamReader是一个字符输入处理流(转换流),他里面的构造器都可以放任意的字节输入流。因为inputStream是字节输入流的基类。(可以对照下面的图)
然后我们指定字符编码转换用的是这个构造器。
![]()
Charset——指定的字符编码。
String strPath = "D:\\FileTest\\a.txt";
        InputStreamReader isr = new InputStreamReader(new FileInputStream(strPath),"gbk");
        BufferedReader br = new BufferedReader(isr);
        String str = br.readLine();
        System.out.println(str);
        br.close();

/**InputStreamReader类是从字节流到字符流的桥接器:
它使用指定的字符集读取字节并将它们解码为字符。
通过字节流FileInputStream去读取,且读取的字节编码为gbk,
然后用字符流InputStreamReader str
来接收。也就是说此时isr返回的就是一个字符了。*/
//因为BufferedReader的构造器可以传入一个Reader基类,而InputStreamReader
 //是Reader的实现子类。
OutputStreamWriter(字符输出处理流)
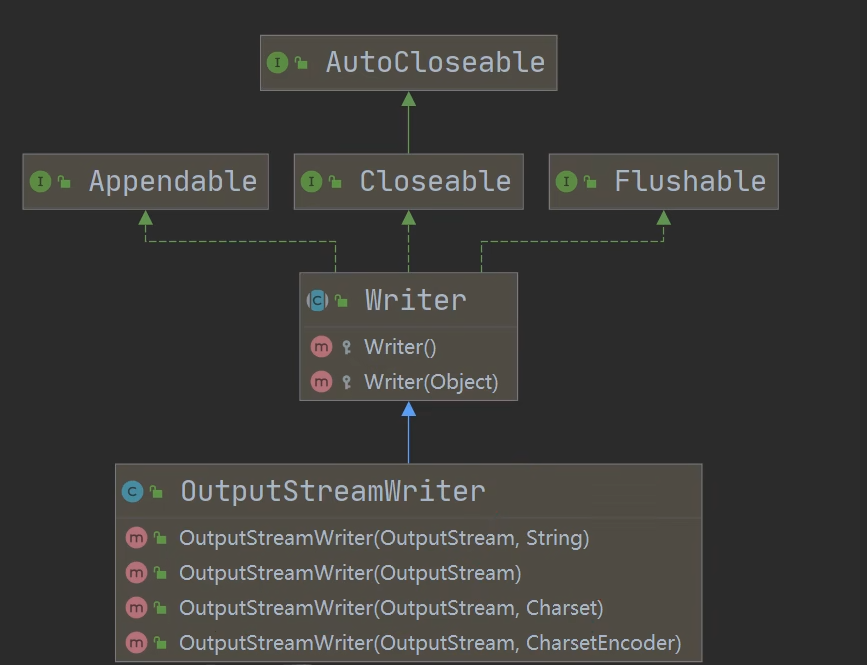
同样的,OutputStreamWriter是一个字符输出处理流(转换流),他里面的构造器都可以放任意的字节输出流。因为OutputStream是字节输出流的基类。(可以对照下面的图)
String descPath = "D:\\FileTest\\g.txt";
OutputStreamWriter osw = new OutputStreamWriter(new FileOutputStream(descPath),"gbk");
BufferedWriter bw = new BufferedWriter(osw);
String str = "袁水明Six_six_six,哈哈哈哈";
bw.write(str);
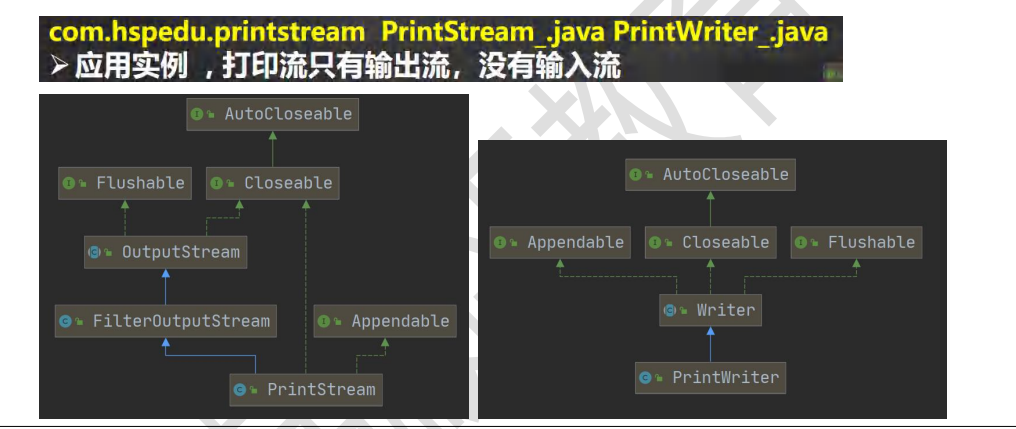
bw.close();打印流(PrintStream、PrintWriter)(了解)
打印流只有输出没有输入。
它对应的两个流是字节输出流(PrintStream)和字符输出流(PrintWriter)。
打印的本质还是输出,这两个流的默认输出是显示到控制台,我们可以对其修改位置的可以是文件或其他地方。
//演示PrintStream(字节打印流)的时候用方式
        PrintStream out = System.out;//因为System.out就是返回PrintStream类型
        out.print("john, hello");//直接传入字符串
        /**因为print底层先转成字符数组,再使用的是write ,
            所以我们可以直接调用write也可以进行打印(输出)*/
        out.write("韩顺平,你好".getBytes());
        out.close();

        //我们可以去修改打印流输出的位置/设备
        //1. 输出修改成到 "e:\\f1.txt"
        //2. "hello, 韩顺平教育~" 就会输出到 e:\f1.txt
        //3. public static void setOut(PrintStream out) {
        //        checkIO();
        //        setOut0(out); // native 方法,修改了out
        //   }
        System.setOut(new PrintStream("e:\\f1.txt"));//这个地方就相当于重定向打印的位置
        System.out.println("hello, 韩顺平教育~");
演示PrintWriter使用方式
//PrintWriter printWriter = new PrintWriter(System.out);
        PrintWriter printWriter = new PrintWriter(new FileWriter("e:\\f2.txt"));
        printWriter.print("hi, 北京你好~~~~");
        printWriter.close();//flush + 关闭流, 才会将数据写入到文件..
Properties类(了解、用到在看)
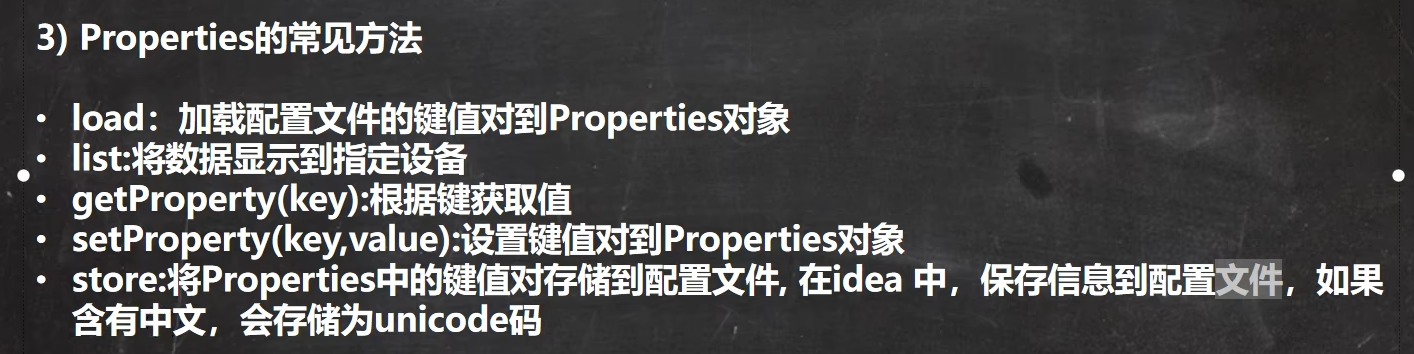
这个Properties是用来读取或者操作配置文件(aa.properties)的。
我现在有一个这样的配置文件
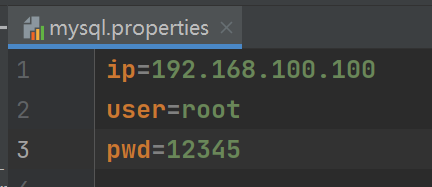
引出:
 //读取mysql.properties 文件,并得到ip, user 和 pwd
        BufferedReader br = new BufferedReader(new FileReader("src\\mysql.properties"));
        String line = "";
        while ((line = br.readLine()) != null) { //循环读取
            String[] split = line.split("=");
            //如果我们要求指定的ip值
            if("ip".equals(split[0])) {
                System.out.println(split[0] + "值是: " + split[1]);
            }
        }
        br.close();

//这样写很麻烦
//使用Properties 类来读取mysql.properties 文件
        //1. 创建Properties 对象
        Properties properties = new Properties();
        //2. 加载指定配置文件
        properties.load(new FileReader("src\\mysql.properties"));
        //3. 把k-v显示控制台
        properties.list(System.out);
        //4. 根据key 获取对应的值
        String user = properties.getProperty("user");
        String pwd = properties.getProperty("pwd");
        System.out.println("用户名=" + user);
        System.out.println("密码是=" + pwd);
//使用Properties 类来创建 配置文件, 修改配置文件内容
Properties properties = new Properties();
//创建
//1.如果该文件没有key 就是创建
//2.如果该文件有key ,就是修改
properties.setProperty("charset", "utf8");
properties.setProperty("user", "汤姆");//注意保存时,是中文的 unicode码值
properties.setProperty("pwd", "888888");
//将k-v 存储文件中即可
properties.store(new FileOutputStream("src\\mysql2.properties"), null);
System.out.println("保存配置文件成功~");
作业:
/**
 * @author 杨志浩
 * @version 1.0
 *
 * (1)在判断e盘下是否有文件夹mytemp ,如果没有就创建mytemp
 * (2) 在e:\\mytemp 目录下,创建文件 hello.txt
 * (3)如果hello.txt 已经存在,提示该文件已经存在,就不要再重复创建了
 * (4)并在hello.txt 文件中,写入 hello,world~
 */
public class homework01 {
    public static void main(String[] args) throws IOException {
        String directoryPath = "D:\\myTemp";//目录路径
        File file = new File(directoryPath);
        if(file.exists()){
            System.out.println("目录已存在");
        }else{
            file.mkdir();//创建单级目录,前提是父级d存在(这里是存在的)
        }

        String directoryPath2 = directoryPath+"\\hello.txt";
        //此时目录路径已经发生变化重新判断
        File file1 = new File(directoryPath2);
        if(file1.exists()){
            System.out.println("文件已存在");
        }else{
            file1.createNewFile();//创建单级目录,前提是父级D:\myTemp存在(这里是存在的)
        }

        //按字节读取
//        FileOutputStream fileOutputStream = new FileOutputStream(file1);
//        fileOutputStream.write("hello,word~".getBytes());
//        fileOutputStream.close();

        //按字符读取
        FileWriter fileWriter = new FileWriter(file1,true);
        fileWriter.write("hello,word~");
        fileWriter.close();
    }

}
/**
* @author 杨志浩
* @version 1.0
* 要求: 使用BufferedReader读取一个文本文件,为每行加上行号
* 再连同内容一并输出到屏幕上。
*/
public class homework02 {
public static void main(String[] args) throws IOException {
}
@Test
//文件为utf8编码
void reader_utf8() throws IOException {
String strPath = "d:\\FileTest\\testReader.txt";
FileReader fileReader = new FileReader(strPath);
BufferedReader br = new BufferedReader(fileReader);
int lineNum = 1;
String str_readLine = "";
while ((str_readLine = br.readLine()) != null) {
System.out.println(lineNum + ". " + str_readLine);
lineNum++;
}
br.close();
}
@Test
//文件为gbk编码
void read_gbk() throws IOException {
String strPath = "d:\\FileTest\\testReader.txt";
int lineNum = 1;
String str_readLine = "";
BufferedReader br = null;
try {
InputStreamReader isr = new InputStreamReader(new FileInputStream(strPath),"gbk");
br = new BufferedReader(isr);
while ((str_readLine = br.readLine()) != null) {
System.out.println(lineNum + ". " + str_readLine);
lineNum++;
}
} catch (IOException e) {
e.printStackTrace();
} finally {
if(br != null){
br.close();
}
}
}
}/**
* @author 韩顺平
* @version 1.0
*/
public class Homework03 {
public static void main(String[] args) throws IOException {
/**
* (1) 要编写一个dog.properties name=tom age=5 color=red
* (2) 编写Dog 类(name,age,color) 创建一个dog对象,读取dog.properties 用相应的内容完成属性初始化, 并输出
* (3) 将创建的Dog 对象 ,序列化到 文件 e:\\dog.dat 文件
*/
String filePath = "src\\dog.properties";
Properties properties = new Properties();
properties.load(new FileReader(filePath));
String name = properties.get("name") + ""; //Object -> String
int age = Integer.parseInt(properties.get("age") + "");// Object -> int
String color = properties.get("color") + "";//Object -> String
Dog dog = new Dog(name, age, color);
System.out.println("===dog对象信息====");
System.out.println(dog);
//将创建的Dog 对象 ,序列化到 文件 dog.dat 文件
String serFilePath = "e:\\dog.dat";
ObjectOutputStream oos = new ObjectOutputStream(new FileOutputStream(serFilePath));
oos.writeObject(dog);
//关闭流
oos.close();
System.out.println("dog对象,序列化完成...");
}
//在编写一个方法,反序列化dog
@Test
public void m1() throws IOException, ClassNotFoundException {
String serFilePath = "e:\\dog.dat";
ObjectInputStream ois = new ObjectInputStream(new FileInputStream(serFilePath));
Dog dog = (Dog)ois.readObject();
System.out.println("===反序列化后 dog====");
System.out.println(dog);
ois.close();
}
}
class Dog implements Serializable{
private String name;
private int age;
private String color;
public Dog(String name, int age, String color) {
this.name = name;
this.age = age;
this.color = color;
}
@Override
public String toString() {
return "Dog{" +
"name='" + name + '\'' +
", age=" + age +
", color='" + color + '\'' +
'}';
}
}


 3058
3058


 被折叠的 条评论
为什么被折叠?
被折叠的 条评论
为什么被折叠?
 到【灌水乐园】发言


