


目录
4.小技巧之sql映射文件在mybatis-config.xml配置路径
5.小技巧之在idea配置mybatis核心文档和Sql映射文档
返回Map< String , Map< String,Object > >大Map集
方案三:两条SQL语句,分步查询。(这种方式常用:优点一是可复用。优点二是支持懒加载。
常见bug:
1.注解不生效原因:若注解不生效,但是在web.xml文件中又可以用则很有可能是在web.xml中
metadata-complete="true"
把这个true改为false,若为true则代表只支持web.xml文件配置,
改为false则代表都支持
常见注意事项:
关于mapper.xml
<?xml version="1.0" encoding="UTF-8" ?>
<!DOCTYPE mapper
        PUBLIC "-//mybatis.org//DTD Mapper 3.0//EN"
        "http://mybatis.org/dtd/mybatis-3-mapper.dtd">
<!--(id,car_num,brand,guide_price,produce_time,car_type)-->
<!--下面这个namespace名字必须是接口的全类名-->
<mapper namespace="com.yzh.mybatis.mapper.CarMapper">
    <!--下面这些id的值必须要填接口中的方法名-->
    <insert id="insert">
    <!--insert语句中的#{}里面必须要填的是属性名字 -->
        insert into t_car values(null,#{},#{},#{},#{},#{})
    </insert>
    <!--查询语句中的查询字段必须为数据库中的字段
    若数据库的字段与封装类的属性名不一致需要修改别名
    否则无法给你封装到那个pojo类对象中,封装过后的属性值为null-->
    <select id="selectById" resultType="com.yzh.mybatis.pojo.Car"></select>
</mapper>
类的根路径下:
类指的是全类名,全类名的上一级目录就是类的根路径,那他的上一级目录就是那个蓝色的java文件
比如说com.yzh.mybatis.mapper.CarMapper.javar
还有一个细节:在mybatis中,resources文件就是从类的全路径下开始找,也就是从蓝色的java文件下开始找。一般情况下若属性名出现resources="";这样的那么你都可以放在resources这个文件下,因为这个文件就相当于是类的根路径。
1.关于日志
mybatis有以下几种实现方式:
SLF4J(沙拉疯):一种日志标准,logback就是继承沙拉疯实现的
LOG4J:
LOG4J2:
STDOUT_LOGGING:MyBatis内部实现的日志组件,
logback、log4j、log4j2是同一个作者编写的。
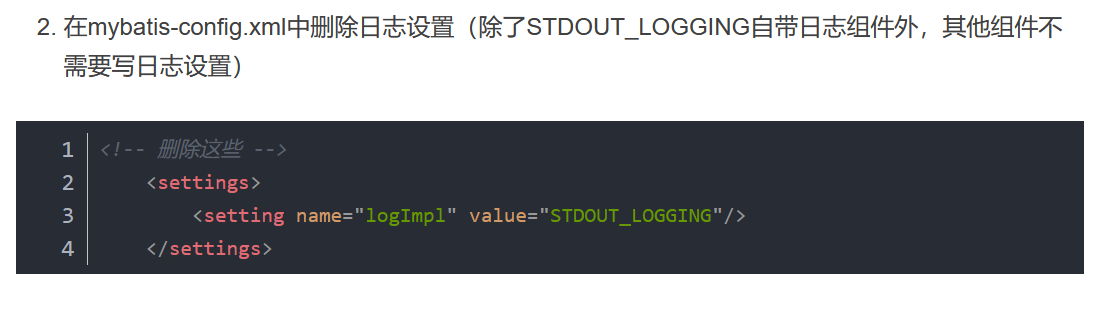
其中STDOUT_LOGGING已经被mybatis实现了只需要在mybatis核心文档中开启以下即可:
<configuration>
    <settings>
        <setting name="logImpl " value="STDOUT_LOGGING"/>
    </settings>
</configuration>

//翻译为设置s
//logImpl指的是Log implementation翻译为日志缩写,
注意:settings标签必须添加在configuration下面
但是这个自带的日志我们一把不用,我们使用最常用的logback组件(就是SLF4J(沙拉疯))。
配置logback日志框架:
第一步:在Maven(pom.xml)中引入logback依赖
        <dependency>
            <groupId>ch.qos.logback</groupId>
            <artifactId>logback-classic</artifactId>
            <version>1.2.11</version>
            <scope>test</scope>
        </dependency>
第三步:编写logback所必须的xml配置文件(主要配置日志输出相关的级别以及日志具体的格式。)。
这个配置文件的名字必须叫做: logback.xml或者logback-test.xml,不能是其它的名字。
这个配置文件必须放到类的根路径下。不能是其他位置。那放到resources文件下即可,因为resources默认就是在类的根路径下,直接创建logback.xml把下面的复制过去即可。
问:为什么引入了logback的依赖还要配置这个东西?因为下面这个是对logback日志文件信息的格式设置,虽然引入了依赖但是没有制定日志信息格式。
<?xml version="1.0" encoding="UTF-8"?>
<configuration debug="false">
<!-- 设置控制台输出 -->
<appender name="STDOUT" class="ch.qos.logback.core.ConsoleAppender">
<encoder class="ch.qos.logback.classic.encoder.PatternLayoutEncoder">
<!--格式化输出:%d表示日期,%thread表示线程名,%-5level:级别从左显示5个字符宽度%msg:日志消息,%n是换行符-->
<pattern>%d{yyyy-MM-dd HH:mm:ss.SSS} [%thread] %-5level %logger{50} - %msg%n</pattern>
</encoder>
</appender>
<!--mybatis log configure-->
<logger name="com.apache.ibatis" level="TRACE"/>
<logger name="java.sql.Connection" level="DEBUG"/>
<logger name="java.sql.Statement" level="DEBUG"/>
<logger name="java.sql.PreparedStatement" level="DEBUG"/>
<!-- 日志输出级别,logback日志级别包括五个:TRACE < DEBUG < INFO < WARN < ERROR -->
<root level="DEBUG">
<appender-ref ref="STDOUT"/>
<appender-ref ref="FILE"/>
</root>
<!-- 按照每天生成日志文件,设置日志保留的天数,可以删掉
<appender name="FILE" class="ch.qos.logback.core.rolling.RollingFileAppender">
<rollingPolicy class="ch.qos.logback.core.rolling.TimeBasedRollingPolicy">
<!--日志文件输出的文件名-->
<FileNamePattern>${LOG_HOME}/TestWeb.log.%d{yyyy-MM-dd}.log</FileNamePattern>
<!--日志文件保留天数-->
<MaxHistory>30</MaxHistory>
</rollingPolicy>
<encoder class="ch.qos.logback.classic.encoder.PatternLayoutEncoder">
<!--格式化输出:%d表示日期,%thread表示线程名,%-5level:级别从左显示5个字符宽度%msg:日志消息,%n是换行符-->
<pattern>%d{yyyy-MM-dd HH:mm:ss.SSS} [%thread] %-5level %logger{50} - %msg%n</pattern>
</encoder>
<!--日志文件最大的大小-->
<triggeringPolicy class="ch.qos.logback.core.rolling.SizeBasedTriggeringPolicy">
<MaxFileSize>100MB</MaxFileSize>
</triggeringPolicy>
</appender>
-->
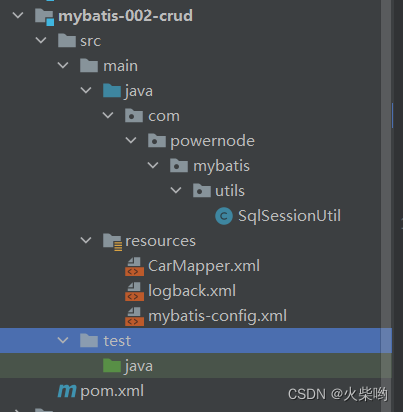
</configuration>2.编写一个获取SqlSession对象的工具类
编写原因:每次获取SqlSession对象都很麻烦需要经过以下步骤才能拿到
SqlSessionFactoryBuilder sqlSessionFactoryBuilder = new SqlSessionFactoryBuilder();
InputStream is = Resources.getResourceAsStream("mybatis-config.xml");
SqlSessionFactory sqlSessionFactory = sqlSessionFactoryBuilder.build(is);
SqlSession sqlSession = sqlSessionFactory.openSession();
所以编写一个类似于JDBCUtil的工具类。我们先来解读一下以上代码:
SqlSessionFactory翻译为Sql会话工厂,用来获取一个操作数据库的会话对象,
一个SqlSessionFactory对应一个环境,也就是一个数据库:
<environment id="development">里面配置链接数据库的信息</environment>一个environment对应一个数据库(例如:db01、db02....),所以:以下三行代码
SqlSessionFactoryBuilder sqlSessionFactoryBuilder = new SqlSessionFactoryBuilder();
InputStream is = Resources.getResourceAsStream("mybatis-config.xml");
SqlSessionFactory sqlSessionFactory = sqlSessionFactoryBuilder.build(is);
理应在类加载时加载,不需要在每次获取SqlSession对象时重复创建。
public class SqlSessionUtil {
    private static SqlSessionFactory sqlSessionFactory;
    private SqlSessionUtil(){}
    static {
        SqlSessionFactoryBuilder sqlSessionFactoryBuilder = new SqlSessionFactoryBuilder();
        try {
            sqlSessionFactory = sqlSessionFactoryBuilder.build(Resources.getResourceAsReader("mybatis-config.xml"));
        } catch (IOException e) {
            e.printStackTrace();
        }
    }
    public static SqlSession getSession(){
        return sqlSessionFactory.openSession();
    }
}
3.CRUD
3.1 MyBatis中完成Map集合传参完成insert
第一个入门程序已完成,现在我们来做MyBatis的CRUD操作
入门程序有个问题:实战的时候新增数据表行数据不可能是固定值
回顾:
<mapper namespace="org.mybatis.example.BlogMapper">
<insert id="insertCar">
insert into t_car(id,car_num,brand,guide_price,produce_time,car_type)
values (null,1003,"面包车",13.00,"2020-10-13","飞行汽车")
</insert>
</mapper>
继续完善这个程序,新建一个模块叫CRUD,如图,把模块1的一些文件拷贝过来,maven依赖引用
修改CarMapper.xml文件,加上占位符
在MyBatis中占位符为#{},对应JDBC的?
    <insert id="insertCar">
        insert into t_car(id,car_num,brand,guide_price,produce_time,car_type)
        values (null,#{},#{},#{},#{},#{})
    </insert>
编写测试代码
public class CarMapperTest {
    @Test
    public void insertCar(){
        SqlSession session = SqlSessionUtil.openSession();
        Map<String,Object> map = new HashMap<>();
        map.put("carNum","1004");
        map.put("brand","比亚迪汉");
        map.put("guidePrice",160.00);
        map.put("produceTime","2022-06-08");
        map.put("carType","新能源汽车");

        int count= session.insert("insertCar", map);
        System.out.println("新增的条目:"+count);
        session.commit();

        session.close();
    }
}
修改mapper文件中的占位符#{}(大括号中间填入map.get(key)里面的key)
<mapper namespace="org.mybatis.example.BlogMapper">
    <insert id="insertCar">
        insert into t_car(id,car_num,brand,guide_price,produce_time,car_type)
        values (null,#{carNum},#{brand},#{guidePrice},#{produceTime},#{carType})
    </insert>
</mapper>
3.2 MyBatis中通过POJO类完成传参
新建POJO包、类(pojo.Car)
public class Car {
//注意这里为什么要写包装类?因为这个id是主键自增,你需要传null,
//但是使用int和long不传值或者传null会报错,包括下面的Double(有时候需要传null)
    private Long id;
    private String carNum;
    private String brand;
    private Double guidePrice;
    private String produceTime;
    private String carType;
    //此处省略构造方法、gett、set、toString方法
    .....
}
编写测试代码
    @Test
    public void testInsertCarByPOJO(){
       SqlSession session =  SqlSessionUtil.getSession();
        Car car = new Car(null,"10001","宝马",78.5,"2013","宝马X5");
        session.insert("insertCar",car);
       session.commit();
       session.close();
    }
编辑mapper文件
<mapper namespace="car">
    <insert id="insertCar">
        insert into t_car
            (id,car_num,brand,guide_price,produce_time,car_type)
            values
            (null,#{carNum},#{brand},#{guidePrice},#{produceTime},#{carType});
    </insert>
</mapper>
注意注意:#{这里面填的是Car类这个javabean中的getXxx的xxx} ,比如:#{carNum}找到他的get方法,为这样:getCarNum,那你就得在括号里面填入carNum,首字母改为小写后面的照着抄即可,不要纠结后面的大小写,你只要注意首字母的变化规则然后后面的照着抄即可。
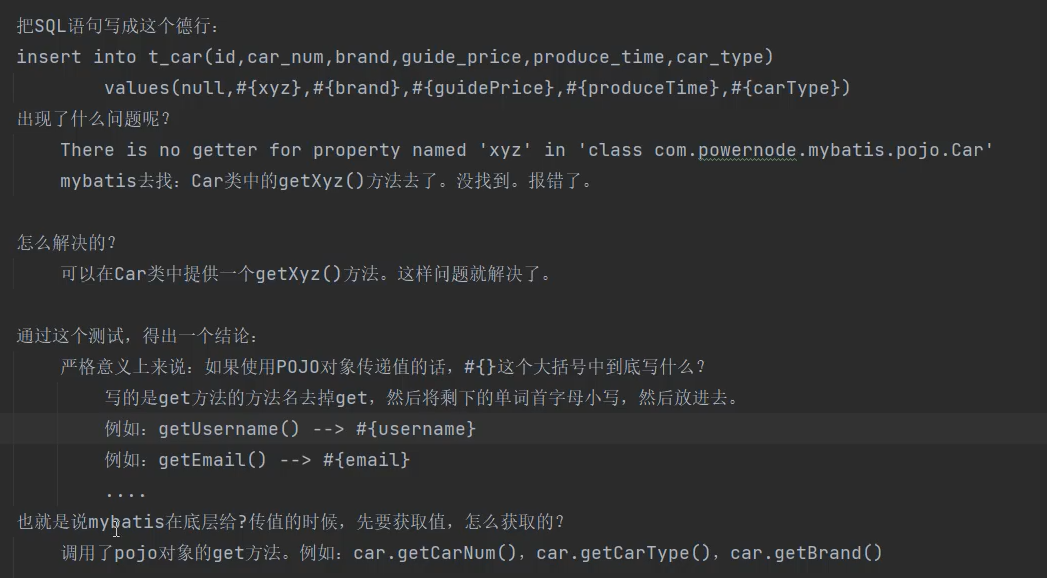
就是说若#{xyz},mybatis底层不是按照你在括号面填入的名字去找属性名的,它首先把xyz拿出来,把首字母改成大写"Xyz",然后在前面加上get变为"getXyz",通过这个"getXyz"去找到对应属性值。若你吧carNum的get方法改为这样:

这样子,他是不会报错的,一样可以拿到carNum。
mapper文件中填写的#{carType}),MyBatis会通过反射机制查找getCarType()方法得到值
3.3 实现Delete删除
新增Mapper删除
    <delete id="deleteById">
        delete from t_car where id = #{id}
    </delete>
编写测试方法
    @Test
    public void deleteById(){
        SqlSession session = SqlSessionUtil.openSession();
        session.delete("deleteById",17);
        session.commit();
        session.close();
    }
注意事项
当参数只有一个时,#{这里随便填,参数名可以随意},但是尽量做到见名知意
3.4 实现update修改
编写mapper
    <update id="updateById">
        update t_car
            set car_num = #{carNum},
                brand = #{brand},
                guide_price = #{guidePrice},
                produce_time = #{produceTime},
                car_type = #{carType}
            where id = #{id};
    </update>
编写测试类
    @Test
    public void testUpdateCarById(){
        SqlSession session = SqlSessionUtil.getSession();
        Car car = new Car(14L,"1002","凯美瑞",23.3,"2018-7-12","燃油车");
        session.update("updateById",car);
        session.commit();
        session.close();
    }
3.5实现查询
编写mapper
    <select id="selectById" resultType="com.yzh.mybatis.pojo.Car">
        select id,
               car_num as carNum,
               brand,
               guide_price as guidePrice,
               produce_time as produceTime,
               car_type as carType
               from t_car
        where id = #{id};
    </select>

//这里为什么要取别名是因为我定义的javabean:Car中取的属性名与数据库的字段名不一致
//比如:car_num as carNum 若不取别名,因为返回的结果集会封装到Car对象,则carNum
//为null
编写测试方法
    @Test
    public void testSelectCarById(){
        SqlSession session = SqlSessionUtil.getSession();
        Object car = session.selectOne("selectById", 13);
        System.out.println(car);
        session.commit();
        session.close();
    }
注意事项:
在Mapper映射文件中的<select>标签要增加一个resultType="全类名" 属性用来指定mybatis返回结果集后封装成什么样的对象。否则会报错,并且有时候
查询所有数据表所有数据
编写Mapper
    <select id="selectAll" resultType="com.yzh.mybatis.pojo.Car">
        select id,
               car_num as carNum,
               brand,
               guide_price as guidePrice,
               produce_time as produceTime,
               car_type as carType
        from t_car;
    </select>
编写测试方法
    @Test
    public void testSelectAllCar(){
        SqlSession session = SqlSessionUtil.getSession();
        List<Car> cars = session.selectList("selectAll");
        cars.forEach(car -> System.out.println(car));
        session.commit();
        session.close();
    }
3.6 Mapper映射文件的namespace

Mapper映射文件指的就是比如CarMapper.xml,一个映射文件一般对应一个数据表。创建完一个Mapper映射文件应该在mybatis核心文件:mybatis-config.xml中配置一下:
<configuration>
    <mappers>
        <mapper resource="CarMapper.xml"/>
    </mappers>
<configuration/>
说回这个namespace,假如说我现在有两个Mapper映射文件(CarMapper1.xml,CarMapper2.xml)
在这两个文件里面都写上:
CarMapper1.xml
<mapper namespace="car">
    <select id="selectAll" resultType="com.yzh.mybatis.pojo.Car">
        select id,
               car_num as carNum,
               brand,
               guide_price as guidePrice,
               produce_time as produceTime,
               car_type as carType
        from t_car;
    </select>
<mapper/>

--------------------------------------------------------------------------

CarMapper2.xml
<mapper namespace="aaaaa">
    <select id="selectAll" resultType="com.yzh.mybatis.pojo.Car">
        select id,
               car_num as carNum,
               brand,
               guide_price as guidePrice,
               produce_time as produceTime,
               car_type as carType
        from t_car;
    </select>
<mapper/>
很明显可以看到两个文件中有一个查询语句的id重名了,若你在还是以:
List<Car> cars = session.selectList("selectAll");这样的方式去填写id号,那么他就会报错说你这个不明确,应该这样写:
List<Car> cars = session.selectList("car.selectAll");
-------------------------------------------------
List<Car> cars = session.selectList("aaaaa.selectAll");
就是根据namespace的名字来精准定位。
补充:mybatis中有两个主要的配置文件:其中一个是: mybatis-config.ml,这是核心配置文件,主要配置连接数据库的信息等。 (只有一个)另一个是: XxxxMapper.xml,这个文件是专门用来编写SQL语句的配置文件。 (一个表一个)t_user表,一般会对应一个UserMapper.xml
t_student表,一般会对应一个StudentMapper.xml
四.Mybatis核心配置文件详解
4.1、mybatis-config.xml
<?xml version="1.0" encoding="UTF-8" ?>
//上面这一部分没啥好说的,任何一个xml文档都是这样写的
<!DOCTYPE configuration
PUBLIC "-//mybatis.org//DTD Config 3.0//EN"
"http://mybatis.org/dtd/mybatis-3-config.dtd">
//这一段重点看两个:
1.一般DOCTYPE后面这个名字就是我们XML根标签的名字,比如这里的
configuration,一个XML文档只有一个根标签。
2.最后这一行:"http://mybatis.org/dtd/mybatis-3-config.dtd"
这是一个dtd规范约束,就是说我们这个文档根标签下的约束规范。
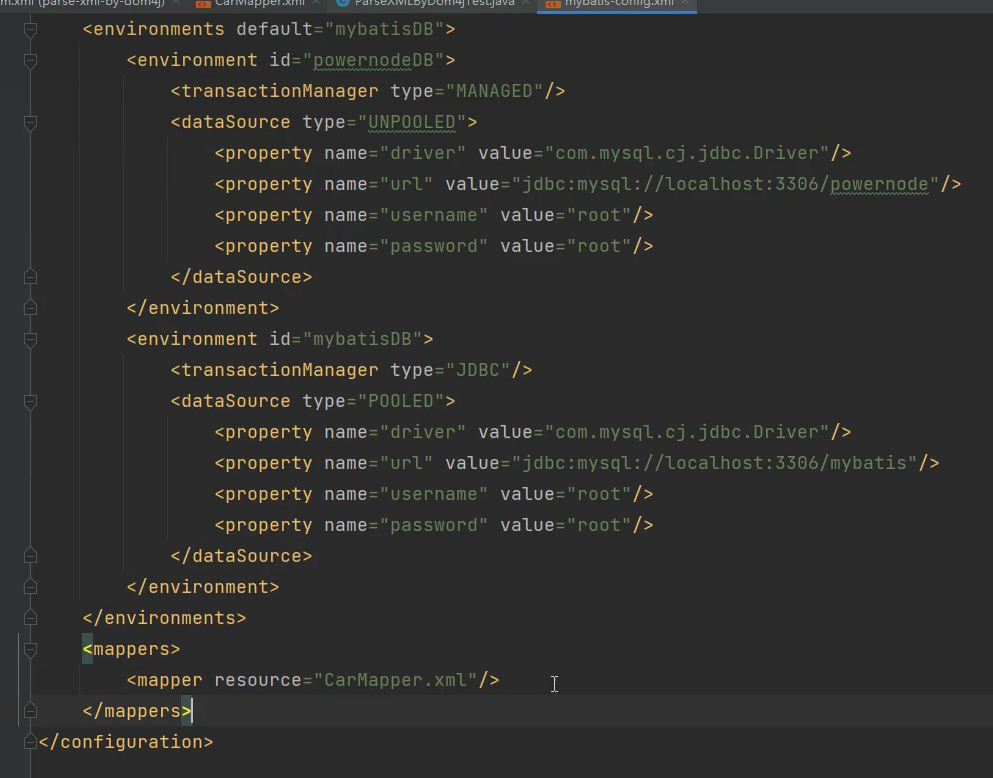
<configuration>
<environments default="powernodeDB">
<!--一个环境对应一个数据库-->
<environment id="powernodeDB">
<transactionManager type="JDBC"/>
<dataSource type="POOLED">
<property name="driver" value="com.mysql.cj.jdbc.Driver"/>
<property name="url" value="jdbc:mysql://localhost:3306/powernode"/>
<property name="username" value="root"/>
<property name="password" value=""/>
</dataSource>
</environment>
</environments>
<mappers>
<mapper resource="XxxMapper.xml"/>
</mappers>
</configuration>
//根标签下的这一部分我们现在暂时只需要知道两个标签:environments、mappers、properties。
environments代表环境的意思,加了一个s代表可以配置多个环境(<environment>)。
比如我现在上面只配置了一个环境,这个环境的id是powernodeDB(取名随意),
然后你在看在environments中有一个default属性指的是默认环境的意思,
value值为某个environment的id,就是某个环境的id,表示默认使用某个环境。
(一个环境对应一个数据库)。
默认环境什么意思?
当你使用mybatis创建SqlSessionFactory对象的时候,没有指定环境的话,默认使用哪个环境
比如说我现在在增加一个环境:
-------------------------------------------------------------------------------------
<environments default="powernodeDB">
<!--这个环境对应powenode数据库-->
<environment id="powernodeDB">
<transactionManager type="JDBC"/>
<dataSource type="POOLED">
<property name="driver" value="com.mysql.cj.jdbc.Driver"/>
<property name="url" value="jdbc:mysql://localhost:3306/powernode"/>
<property name="username" value="root"/>
<property name="password" value=""/>
</dataSource>
</environment>
<!--这个环境对应yzhDB数据库-->
<environment id="yzhDB">
<transactionManager type="JDBC"/>
<dataSource type="POOLED">
<property name="driver" value="com.mysql.cj.jdbc.Driver"/>
<property name="url" value="jdbc:mysql://localhost:3306/yzhDB"/>
<property name="username" value="root"/>
<property name="password" value=""/>
</dataSource>
</environment>
</environments>
----------------------------------------------------------------------------------
在java代码中我这样创建两个SqlSessionFactory对象是不一样的:
SqlSessionFactoryBuilder ssfb = new SqlSessionFactoryBuilder();
SqlSessionFactory ssf1 = ssfb.builder("mybatis-config.xml");
SqlSessionFactory ssf2 = ssfb.builder("mybatis-config.xml","yzhDB");
ssf1对应的是默认环境powernodeDB,ssf2对应的是yzhDB这个环境。
那么他们创键出来的SqlSession对象自然而然是用来操作不同的数据库。
---------------------------------------------------------------------------
transactionManager标签
每一个环境下还有一叫transactionManager标签,翻译为事务管理器
用于设置MyBatis的事务管理器,mybatis有两种管理事务的方式
JDBC:交给原生JDBC管理setAutoComit(false);需要手动comit()提交
MANAGED:交给JEE处理,一般由JEE框架处理,如Spring
理解:
1.一个环境对应一个数据库;(environment ---> database)
2.一般一个数据库会对应一个SqlSessionFactory对象。(注意是一个不是一种)
3.那也就是说一个environment 对应一个SqlSessionFactory对象 <environments default="powernodeDB">
<!--一个环境对应一个数据库-->
<environment id="powernodeDB">
<transactionManager type="JDBC"/>
<dataSource type="POOLED">
<property name="driver" value="com.mysql.cj.jdbc.Driver"/>
<property name="url" value="jdbc:mysql://localhost:3306/powernode"/>
<property name="username" value="root"/>
<property name="password" value=""/>
</dataSource>
</environment>
</environments>
--------------------------------------------------------
<dataSource type="POOLED">
.......
</dataSource>
问:这个标签有啥用
答:dataSource表示数据源,用来获取Connection对象
它的type属性可以填写三个值:
UNPOOLED:不使用数据库连接池,每次获取Connection都要创建一个新对象
POOLED:使用MyBatis自带的连接池
JNDI:连接第三方的数据源如druid、c3p0...(如果自己手写框架也可以用这个)
那么你需要知道的是:
<dataSource type="POOLED">type的值不一样会,那么你
<dataSource type="POOLED">
这里里面放的标签也会有所不同,具体能放什么标签请参考mybatis配置文档
https://mybatis.net.cn/
<dataSource/>
----------------------------------------------------------------------------------
这种再重点说一下type="POOLED"的时候,它的属性有哪些?
<?xml version="1.0" encoding="UTF-8" ?>
<!DOCTYPE configuration
PUBLIC "-//mybatis.org//DTD Config 3.0//EN"
"http://mybatis.org/dtd/mybatis-3-config.dtd">
<configuration>
<environments default="dev">
<environment id="dev">
<transactionManager type="JDBC"/>
<dataSource type="POOLED">
<property name="driver" value="com.mysql.cj.jdbc.Driver"/>
<property name="url" value="jdbc:mysql://localhost:3306/powernode"/>
<property name="username" value="root"/>
<property name="password" value="root"/>
<!--最大连接数-->
<property name="poolMaximumActiveConnections" value="3"/>
<!--这是一个底层设置,如果获取连接花费了相当长的时间,连接池会打印状态日志并重新尝试获取一个连接(避免在误配置的情况下一直失败且不打印日志),默认值:20000 毫秒(即 20 秒)。-->
<property name="poolTimeToWait" value="20000"/>
<!--强行回归池的时间-->
<property name="poolMaximumCheckoutTime" value="20000"/>
<!--最多空闲数量-->
<property name="poolMaximumIdleConnections" value="1"/>
</dataSource>
</environment>
</environments>
<mappers>
<mapper resource="CarMapper.xml"/>
</mappers>
</configuration>
-----------------------------------------------------------
poolMaximumActiveConnections:最大的活动的连接数量。默认值10
poolMaximumIdleConnections:最大的空闲连接数量。默认值5
poolMaximumCheckoutTime:强行回归池的时间。默认值20秒。
poolTimeToWait:当无法获取到空闲连接时,每隔20秒打印一次日志,避免因代码配置有误,导致傻等。(时长是可以配置的)
当然,还有其他属性。对于连接池来说,以上几个属性比较重要。
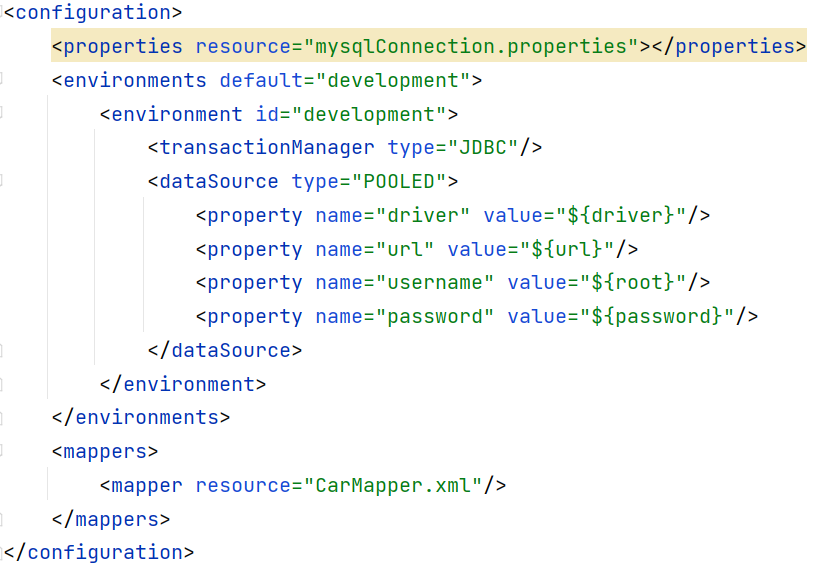
properties标签
这个标签想必你已经很熟悉了,就是用来引入properties配置文件的
修改一下代码:
-----------------------------------------------------------------------------
修改前:
<dataSource type="POOLED">
                <property name="driver" value="com.mysql.cj.jdbc.Driver"/>
                <property name="url" value="jdbc:mysql://localhost:3306/powernode"/>
                <property name="username" value="root"/>
                <property name="password" value=""/>
 </dataSource>
-----------------------------------------------------------------------------
修改后:
<dataSource type="POOLED">
                <property name="driver" value="${driver}"/>
                <property name="url" value="${url}"/>
                <property name="username" value="${root}"/>
                <property name="password" value="${password}"/>
 </dataSource>
-----------------------------------------------------------------------
在resources下创建一个mysqlConnection.properties文件,
并在里面写好连接数据库的配置信息
---------------------------------------------------------------
driver=com.mysql.cj.jdbc.Driver
url=jdbc:mysql://localhost:3306/powernode
username=root
password=""
--------------------------------------------------
回到mybatis核心文档(mybatis-config.xml),在根标签<configuration>下

引入:配置文件即可
<configuration>
    <properties resource="mysqlConnection.properties"></properties>
</configuration>

-------------------------------------------------------------
注意:在这个properties配置文件不是一定要放在resources文件下的,
你放在哪里都可以比如说我放在D:/mysqlConnection.properties
那么你在根标签的引入的方式就改为:
------------------------------------------------------------
<configuration>
    <properties url="file:///d:/mysqlConnection.properties"></properties>
</configuration>
这种方式不推荐!!!
------------------------------------------------------------------
properties两个属性:
resource:这个属性从类(resources文件就是默认从类的根路径下找)
的根路径下开始加载。【常用的。】
url:从指定的url加载,假设文件放在d:/jdbc.properties,

url="file:///d:/mysqlConnection.properties"注意是三个斜杠哦。
注意:如果不知道mybatis-config.xml文件中标签的编写顺序的话,
可以有两种方式知道它的顺序:
● 第一种方式:查看dtd约束文件。
● 第二种方式:通过idea的报错提示信息。【一般采用这种方式】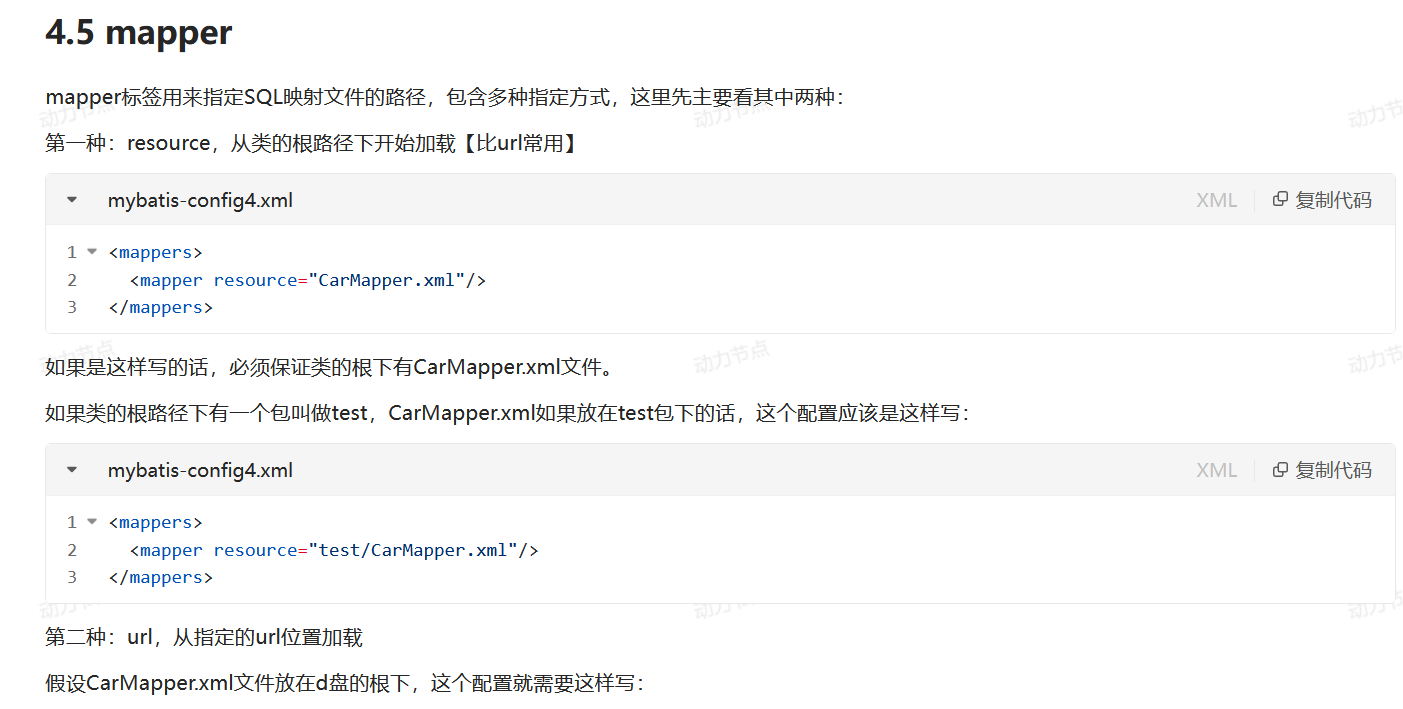

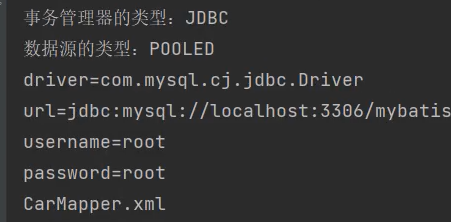
手写mybatis框架:
前奏:解析mybatis核心XML文档、SqlMapper(Sql映射文档)
大概流程:引入相关需要解析XML文档的依赖。解析相关的XML文档的标签,把标签的属性,属性value、元素内容(标签内部元素,如sql语句)获取到。
解析前:
解析后:
思考:接下来我们干啥?
明显从使用mybatis的角度出发任何操作都需要先获取会话对象是不是?那么获取会话对象需要三步:
SqlSessionFactoryBuilder sqlSessionFactoryBuilder = new SqlSessionFactoryBuilder();
        SqlSessionFactory sqlSessionFactory =
            sqlSessionFactoryBuilder.build(Resources.getResourceAsStream("mybatis-config.xml"));
        SqlSession session = sqlSessionFactory.openSession();
1.创建Resources对象

2.
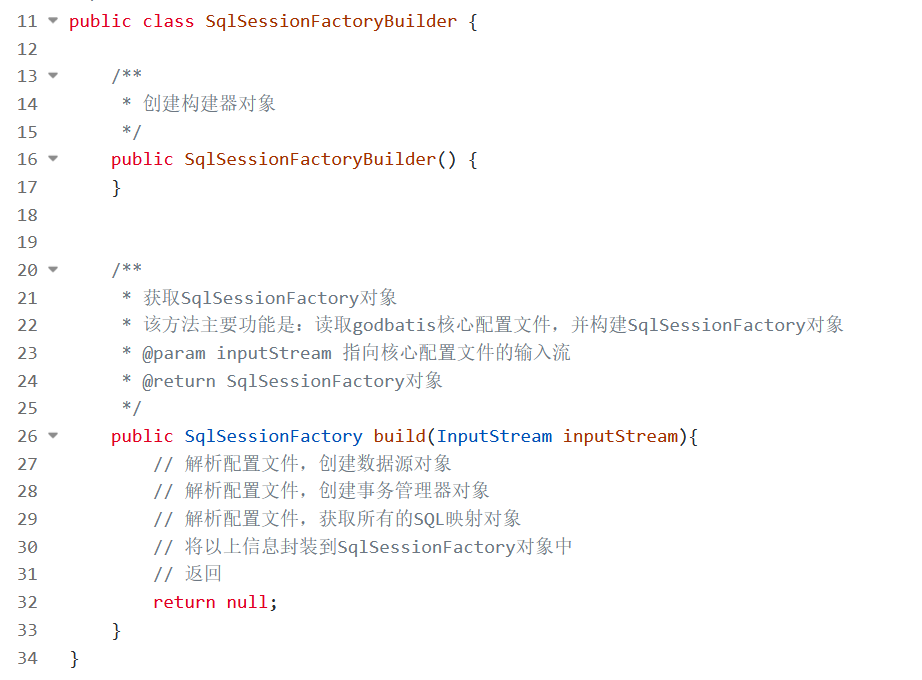
3.
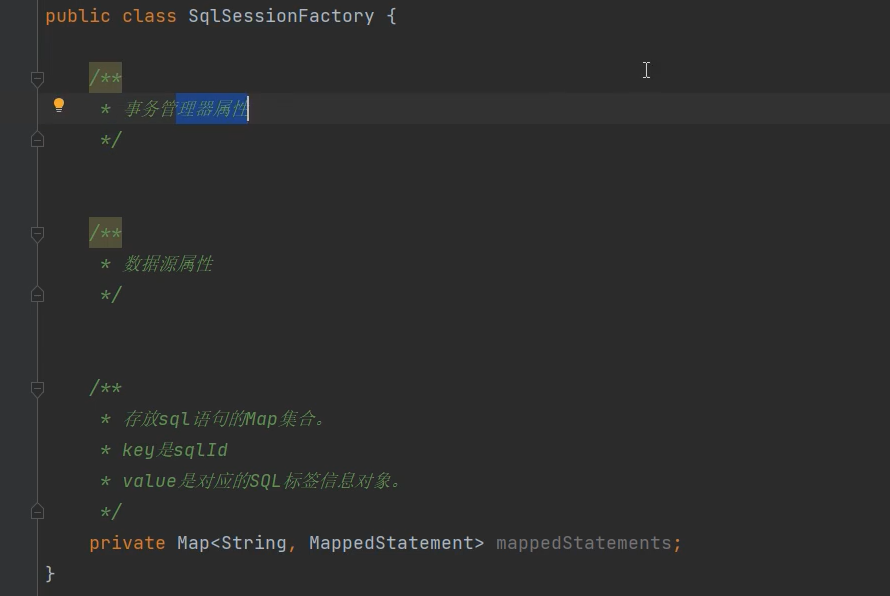
至此,由SqlSessionFactory和SqlSessionFactoryBuilder引出了一些列的封装类,因为这两个类需要解析mybatis核心文档,解析完后的数据需要封装到不同的类中,然后提供给这两个类去服务。
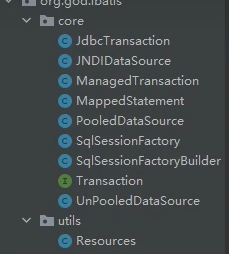
定义了一个事务接口,用于灵活切换![]()
中的Type,然后定义了三个不同的事务管理器实现类。
定义了三个数据源实现类,用于灵活切换
![]()
中的type ,这里不需要在定义数据源的接口,因为不管你啥数据源必须得实现JDK的DataSource接口。
定义了一个MapperStatement类,封装XxxMapper.XML中的SQL映射实体类,比如:
    <select id="selectAll" resultType="com.yzh.mybatis.pojo.Car">
            sql语句
    </select>
那么现在来看:一个SqlSessionFactory对象里面包含:
<environment id="development">
            <transactionManager type="JDBC"/>
            <dataSource type="POOLED">
                <property name="driver" value="${driver}"/>
                <property name="url" value="${url}"/>
                <property name="username" value="${root}"/>
                <property name="password" value="${password}"/>
            </dataSource>
</environment>


environment>transactionManager>dataSource>

Map<sql的id, MapperStatement对象>;

MapperStatement对象封装了XxxMapper.XML中的一个sql执行语句标签的内容:
比如:
    <select id="selectAll" resultType="com.yzh.mybatis.pojo.Car">
            sql语句
    </select>
封装了有:
    private String sqlId;
    private String resultType;
    private String sql;
    private String parameterType;
相关知识点:
ClassLoader.getSystemClassLoader().getResourceAsStream("从类路径开始找");
这个方法是java.long包下面的一个方法,返回一个输入流InputStream,
mybatis底层在解读resources目录下的文档,比如:
sqlSessionFactoryBuilder.build(Resources.getResourceAsReader("mybatis-config.xml"));
中的Resources.getResourceAsReader("mybatis-config.xml"),底层也是用的这个方法。

所以其实:Resources.getResourceAsReader("mybatis-config.xml")换成

 ClassLoader.getSystemClassLoader().getResourceAsStream("mybatis-config.xml");
是一样的
编不下去了...............自己回去看吧
javassist的使用
它的作用是动态生成类
       <!--引入javassist依赖-->
        <dependency>
            <groupId>org.javassist</groupId>
            <artifactId>javassist</artifactId>
            <version>3.29.1-GA</version>
        </dependency>
/**
* 使用javassist动态生成一个类
*/
public class JavassistTest {
@Test
public void testGenerateFirstClass() throws CannotCompileException, ClassNotFoundException, InstantiationException, IllegalAccessException, NoSuchMethodException, InvocationTargetException {
//获取类池(get类池返回一个类池)
ClassPool classPool = ClassPool.getDefault();
//制造类(需要告诉javassist,类名是啥)
CtClass ctClass = classPool.makeClass("com.yzh.bank.dao.impl.AccountDaoImpl");
//至此在若代码执行到这里:会动态的在com.yzh.bank.dao.impl下创建AccountDaoImpl类
//为AccountDaoImpl类动态创建一个方法
//制造方法 methodCode:翻译为方法代码
//要制造得先创造
String methodCode = "public void insert(){System.out.print(123);}";
//然后再把创造的方法指定给ctClass
CtMethod ctMethod = CtMethod.make(methodCode,ctClass);
//把这个方法添加到ctClass
ctClass.addMethod(ctMethod);
//在内存中生成这个类
ctClass.toClass();
//上面这一步可以直接返回Class<?> clazz,就可以省去下面这一步了
//把这个类加载到JVM中,返回AccountImpl类的字节码文件
Class<?> clazz = Class.forName("com.yzh.bank.dao.impl.AccountDaoImpl");
//创建AccountDaoImpl对象
Object object = clazz.newInstance();
//获取AccountDaoImpl对象的insert方法
Method insert = clazz.getDeclaredMethod("insert");
//调用方法insert
insert.invoke(object);
}
}/**
* 使用javassist动态生成一个类,并且这个类要去实现一个接口
* 以AccountDaoImpl类和AccountDao接口为例
*/
//首先在com.yzh.javassist下创建好一个接口
public interface AccountDao {
void update();
}
public class JavassistTest2 {
@Test
public void TestJavassist() throws CannotCompileException, InstantiationException, IllegalAccessException {
//获取类池
ClassPool pool = ClassPool.getDefault();
//制造接口(注意这个接口不是真正的在jvm中去实现,你可以想象成他javassist中实现),
//其目的是为了在javassist中提供给它的实现类去实现用的,最后在JVM中生成实现类
//的时候在com.yzh.javassist路径下是必须要真正存在一个AccountDao接口
//接口的。也就是说这个接口得你自己提前准备好
CtClass ctInterface = pool.makeInterface("com.yzh.javassist.AccountDao");
//制造类
CtClass ctClass = pool.makeClass("com.yzh.javassist.AccountDaoImpl");
//类实现接口
ctClass.addInterface(ctInterface);//相当于AccountDaoImpl implement AccountDao
//在实现类中重写接口的方法
//制造方法(注意实现接口后你得往这个类中添加一个重写接口的方法,比如这个delete()就是
// 重写接口中的delete())
String method = "public void update(){System.out.print(\"Hello Javassist\");}";
CtMethod ctMethod = CtMethod.make(method,ctClass);
//将方法添加到这个类中
ctClass.addMethod(ctMethod);
//在内存中生成这个类,并在加载JVM中
Class<?> aClass = ctClass.toClass();
//通过反射创建对象并且强转,因为我已经知道他实现了AccountDao接口
AccountDao accountDao = (AccountDao)aClass.newInstance();
accountDao.update();
}
}package com.powernode.bank.utils;
import org.apache.ibatis.javassist.CannotCompileException;
import org.apache.ibatis.javassist.ClassPool;
import org.apache.ibatis.javassist.CtClass;
import org.apache.ibatis.javassist.CtMethod;
import org.apache.ibatis.session.SqlSession;
import java.lang.reflect.Constructor;
import java.lang.reflect.Method;
import java.lang.reflect.Modifier;
import java.util.Arrays;
/**
* 使用javassist库动态生成dao接口的实现类
动态实现创建AccountDao接口的实现类,并且返回这个实现类的实例化对象
*/
public class GenerateDaoByJavassist {
/**
* 根据dao接口生成dao接口的代理对象
*
* @param sqlSession sql会话
* @param daoInterface dao接口
* @return dao接口代理对象
*/
public static Object getMapper(SqlSession sqlSession, Class daoInterface) {
ClassPool pool = ClassPool.getDefault();
// 生成代理类
CtClass ctClass = pool.makeClass(daoInterface.getPackageName() + ".impl." + daoInterface.getSimpleName() + "Impl");
// 接口
CtClass ctInterface = pool.makeClass(daoInterface.getName());
// 代理类实现接口
ctClass.addInterface(ctInterface);
// 获取所有的方法
Method[] methods = daoInterface.getDeclaredMethods();
Arrays.stream(methods).forEach(method -> {
// 拼接方法的签名
StringBuilder methodStr = new StringBuilder();
String returnTypeName = method.getReturnType().getName();
methodStr.append(returnTypeName);
methodStr.append(" ");
String methodName = method.getName();
methodStr.append(methodName);
methodStr.append("(");
Class<?>[] parameterTypes = method.getParameterTypes();
for (int i = 0; i < parameterTypes.length; i++) {
methodStr.append(parameterTypes[i].getName());
methodStr.append(" arg");
methodStr.append(i);
if (i != parameterTypes.length - 1) {
methodStr.append(",");
}
}
methodStr.append("){");
// 方法体当中的代码怎么写?
// 获取sqlId(这里非常重要:因为这行代码导致以后namespace必须是接口的全限定接口名,sqlId必须是接口中方法的方法名。)
String sqlId = daoInterface.getName() + "." + methodName;
// 获取SqlCommondType
String sqlCommondTypeName = sqlSession.getConfiguration().getMappedStatement(sqlId).getSqlCommandType().name();
if ("SELECT".equals(sqlCommondTypeName)) {
methodStr.append("org.apache.ibatis.session.SqlSession sqlSession = com.powernode.bank.utils.SqlSessionUtil.openSession();");
methodStr.append("Object obj = sqlSession.selectOne(\"" + sqlId + "\", arg0);");
methodStr.append("return (" + returnTypeName + ")obj;");
} else if ("UPDATE".equals(sqlCommondTypeName)) {
methodStr.append("org.apache.ibatis.session.SqlSession sqlSession = com.powernode.bank.utils.SqlSessionUtil.openSession();");
methodStr.append("int count = sqlSession.update(\"" + sqlId + "\", arg0);");
methodStr.append("return count;");
}
methodStr.append("}");
System.out.println(methodStr);
try {
// 创建CtMethod对象
CtMethod ctMethod = CtMethod.make(methodStr.toString(), ctClass);
ctMethod.setModifiers(Modifier.PUBLIC);
// 将方法添加到类
ctClass.addMethod(ctMethod);
} catch (CannotCompileException e) {
throw new RuntimeException(e);
}
});
try {
// 创建代理对象
Class<?> aClass = ctClass.toClass();
Constructor<?> defaultCon = aClass.getDeclaredConstructor();
Object o = defaultCon.newInstance();
return o;
} catch (Exception e) {
throw new RuntimeException(e);
}
}
}使用动态代理完成CRUD
定义接口
public interface CarMapper {//CarDao
    /**
     * 新增car
     * @param car
     * @return
     */
    int insert(Car car);

    /**
     * 根据id删除car
     * @param id
     * @return
     */
    int deleteById(Long id);

    /**
     * 改
     * @param car
     * @return
     */
    int update(Car car);

    /**
     * 根据id查询一条car
     * @param id
     * @return
     */
    Car selectById(Long id);

    /**
     * 获取所有car
     * @return
     */
    List<Car> selectAll();


}
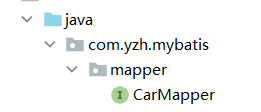
定义CarMapper.XML映射文档
<!--(id,car_num,brand,guide_price,produce_time,car_type)-->
<!--下面这个namespace名字必须是接口的全类名-->
<mapper namespace="com.yzh.mybatis.mapper.CarMapper">
    <!--下面这些id的值必须要填接口中的方法名-->
    <insert id="insert">
    <!--insert语句中的大括号里面必须要填的是属性名字 -->
        insert into t_car values(null,#{carNum},#{brand},#{guidePrice},#{produceTime},#{carType})
    </insert>
    <delete id="deleteById">
        delete from t_car where id=#{id}
    </delete>
    <update id="update">
        update t_car set
        car_num=#{carNum},brand=#{brand},guide_price=#{guidePrice},produce_time=#{produceTime},car_type=#{carType}
        where id=#{id}
    </update>
    <!--查询语句中的查询字段必须为数据库中的字段
    若数据库的字段与封装类的属性名不一致需要修改别名
    否则无法给你封装到那个pojo类对象中,封装过后的属性值为null-->
    <select id="selectById" resultType="com.yzh.mybatis.pojo.Car">
        select
                id,
                car_num as carNum,
                brand,
                guide_price as guidePrice,
                produce_time as produceTime,
                car_type as carType
        from t_car where id=#{id}
    </select>


    <select id="selectAll" resultType="com.yzh.mybatis.pojo.Car">
        select
            id,
            car_num as carNum,
            brand,
            guide_price as guidePrice,
            produce_time as produceTime,
            car_type as carType
        from t_car
    </select>
</mapper>
定义测试类
public class CarMapperTest {
@Test
public void testInsert(){
SqlSession sqlSession = SqlSessionUtil.getSession();
//面向接口获取动态代理,他底层其实会生成一个CarMapper的实现类
CarMapper mapper = sqlSession.getMapper(CarMapper.class);
Car car = new Car(null,"1002","86",23.3,"2018-7-12","燃油车");
int count = mapper.insert(car);
sqlSession.commit();
System.out.println(count);
}
@Test
public void testDelete(){
SqlSession sqlSession = SqlSessionUtil.getSession();
CarMapper mapper = sqlSession.getMapper(CarMapper.class);
int count = mapper.deleteById(15L);
sqlSession.commit();
System.out.println(count);
}
@Test
public void testUpdate(){
SqlSession sqlSession = SqlSessionUtil.getSession();
CarMapper mapper = sqlSession.getMapper(CarMapper.class);
Car car = new Car(14L,"1002","丰田凯美瑞",23.3,"2018-7-12","燃油车");
int count = mapper.update(car);
sqlSession.commit();
System.out.println(count);
}
@Test
public void testSelectById(){
SqlSession sqlSession = SqlSessionUtil.getSession();
CarMapper mapper = sqlSession.getMapper(CarMapper.class);
Car car = mapper.selectById(6L);
System.out.println(car);
}
@Test
public void testSelectAll(){
SqlSession sqlSession = SqlSessionUtil.getSession();
CarMapper mapper = sqlSession.getMapper(CarMapper.class);
List<Car> cars = mapper.selectAll();
cars.forEach(car -> System.out.println(car));
}
}重点:
1.要想使用动态代理机制创建接口对象——GeneratDaoProxy
CarMapper.XML文档中的namespace和每条映射语句的id必须必须必须要按照mybatis的规范来指定,否则他无法为你生成动态代理对象(接口对象)。
规范:
namespace名字必须是接口的全类名。
id的值必须要对应接口中的方法名。
第二:
CarMapper mapper = sqlSession.getMapper(CarMapper.class);
底层做了两件事:
1.生成CarMapper.class字节码文件
2.根据CarMapper.class字节码文件实例化了一个对象并且返回
也就是现在这个mapper变量在引用。
说白了其实就是因为你在编写mysql映射文档的时候遵循了mybatis提供的
GeneratDaoProxy动态代理机制。然后你就可以拿sqlsession对象去直接获取
CarMapper这个接口的实现类对象,你调用这个sqlSession.getMapper他就给你生成
并且返回这个对象
前提是:遵循mybatis规定的mysql映射文件编写:(namespace、id)
Mybatis小技巧
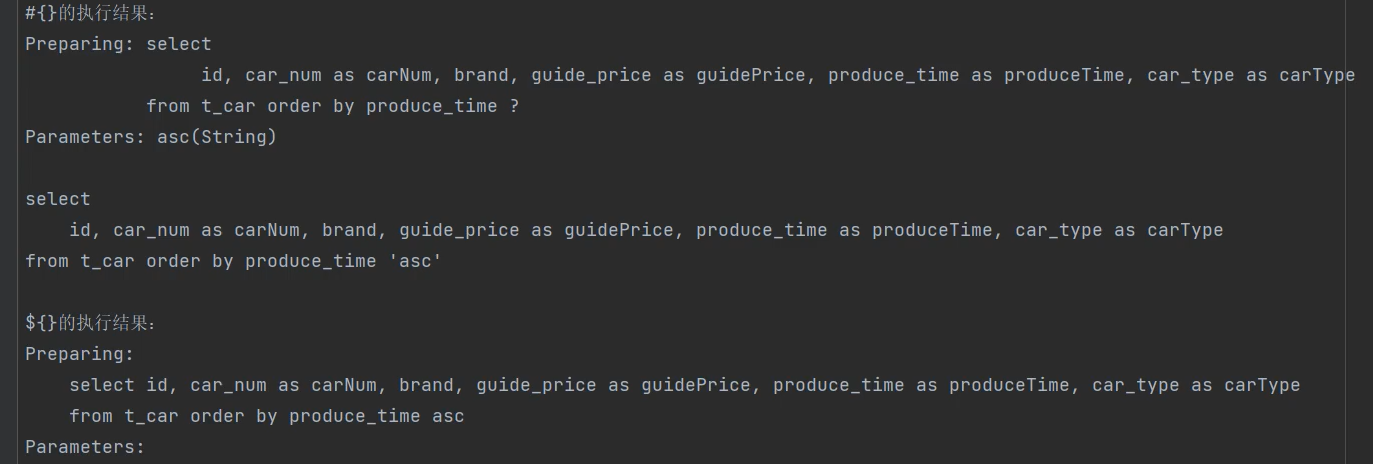
1.#{}和${}的区别
#{}:底层使用Preparedstatement。特点: 先进行SQL语句的编译,然后给SQL语句的占位符问号?传值。可以避免SOL注入的风险
${}: 底层使用Statement。特点: 先进行SQL语句的拼接,然后再对SQL语句进行编译。存在SQL注入的风险。
2.什么时候需要使用${}
注:优先使用#{},这是原则,可以避免sql注入风险。如果需要SQL语句的关键字放到SQL语句中,只能使用${},因为#{} 是以值的形式放到SQL语句当中的,比如我要给一个占位符赋值,这个占位符需要和sql进行拼接,比如select * from table order by ?;
我要对上面这个占位符进行传值(asc 或者 desc) ,这个占位符后面赋值后会作为sql语句的与部分来使用而不是单纯的参数。因为你传过来的肯定是以字符串的形式传asc或者desc。若此时再使用
#{}最后拼成的德行长这样:select * from table order by 'asc';
${}拼成:select * from table order by asc;
很明显下面这个才对。
总结:这个#{}虽说可以解决sql注入问题但是无法进行sql拼接,所以这个${}还有有用的而且很有用可以解决很多sql优化问题,自己私底下用到在研究吧。总之你现在要知道的就是。
以下应用场景你需要考虑使用${}
拼接表名、批量删除、模糊查询。这里不详细展示咋用了,自己去看视频吧
3.小技巧之别名机制<typeAliases>
这个别名机制是关于mysql映射文件中对e于select标签中的resultType来说的,比如说:
    <select id="selectAll" resultType="com.yzh.mybatis.pojo.Car">
    </select>
你不觉得这个resultType每次都要写这么长的全类名很麻烦吗,于是mybatis就有了这种别名机制,
在mybatis核心配置文件中mybatis-config.xml里面配置别名,
别名方式1:通过包取默认别名
<typeAliases>
            <package name="com.yzh.mybatis.pojo"/>
</typeAliases>
//直接把resultType="com.yzh.mybatis.pojo.Car"中的包名放进package
//那么他会自动把这个包下面的全部类都取一个默认的别名,这个别名就是
//简名,比如com.yzh.mybatis.pojo.Car取别名为Car
细节:这个默认别名是不区分大小写的,Car、car、CaR...都可以只要是这三个字母即可

配置完后回到CarMapper.xml
 <select id="selectAll" resultType="Car">
 </select>
修改即可


------------------------------------------------------------------------------
别名方式2:指定别名
<typeAliases>
          <typeAlias type="com.yzh.mybatis.pojo.Car" alias="hhh"/>
</typeAliases>
配置完后回到CarMapper.xml
 <select id="selectAll" resultType="hhh">
 </select>
修改即可
细节:hhh不区分大小写,在这里也可以把 alias="hhh"省略,他会自动取简名Car(不区分大小写)
为默认名
--------------------------------------------------------------------------
总结:无论哪种方式对resultType取别名都不区分大小写。另外在sql映射文档中的namespace不可以去别名:<mapper namespace="com.yzh.mybatis.mapper.CarMapper"> 不可取别名
4.小技巧之sql映射文件在mybatis-config.xml配置路径
//方式一:
<configuration>
    <mappers>
        <mapper resource="SqlMapper.xml"/>
    </mappers>
</configuration>

这种方式mybatis会直接在类的根路径下开始查找SqlMapper.xml,
类:这个类指的是你在SqlMapper.xml中配置的
           <mapper namespace="com.yzh.mybatis.mapper.SqlMapper">
           中的com.yzh.mybatis.mapper.SqlMapper这个类。
类的根路径下:指的就是全类名com.yzh.mybatis.mapper.CarMapper的上级目录

你可以直接把SqlMapper.xml放在com的上级目录下,注意是目录下,
也就是放在那个蓝色的java文件夹下。
也可以放在resources包下(一般放在这里),
因为在mybatis框架中规定了直接放在resources包下就相当于放
在类的根路径下也就是那个蓝色的java文件夹。
//方式二:
<mappers>
  <mapper url="file:///d:/mappers/SqlMapper.xml"/>
</mappers>
这种方式就是单纯的绝对路径,爱放哪放哪。
不推荐这种方式太死板,移植性差,比如换了mac操作系统后是没有D盘
//方式三:
<mappers>
<mapper class="com.yzh.mybatis.mapper.CarMapper"/>
</mappers>
这种方式你的SqlMapper.XML需要和com.yzh.mybatis.mapper.CarMapper这个类放在
同一个目录下也就是必须放在com.yzh.mybatis.mapper下,但是resources文件夹匹配的是
类的根路径也就是那个java文件夹。所以此时你需要在resources文件夹中添加
com/yzh/mybatis/mapper这样一层文件夹并把SqlMapper.XML这个文件夹放到
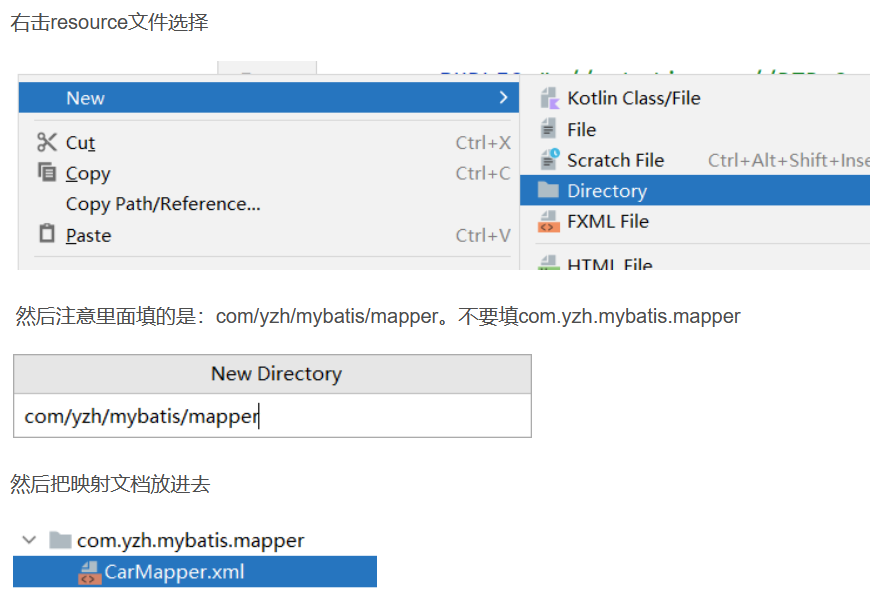
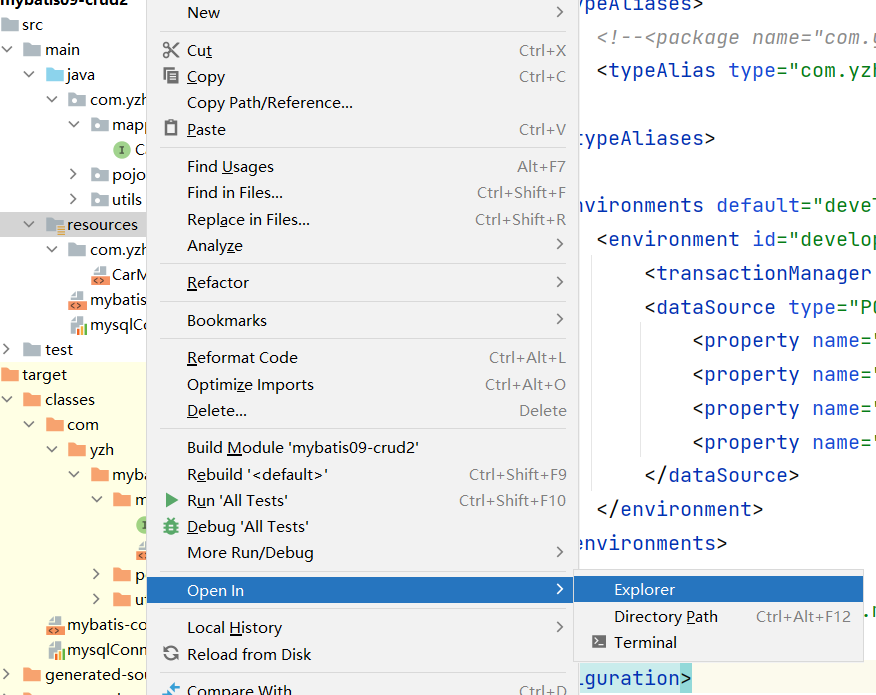
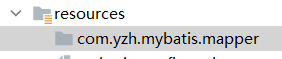
com/yzh/mybatis/mapper中如何在resources文件下创建文件夹?
右击resource文件选择
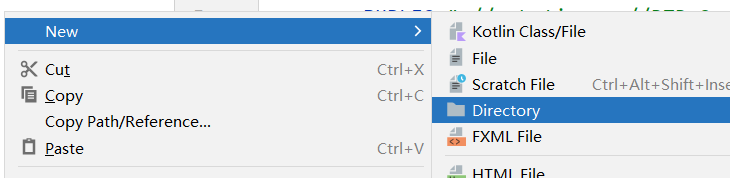
然后注意里面填的是:com/yzh/mybatis/mapper。不要填com.yzh.mybatis.mapper

然后把映射文档放进去

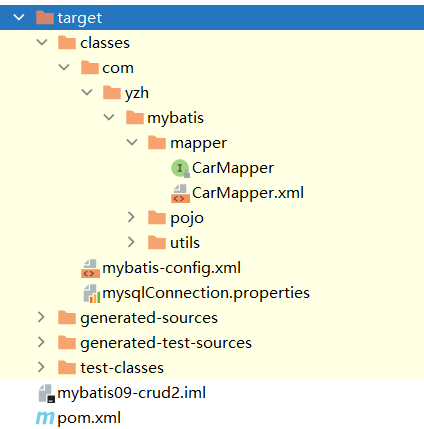
此时你会发现你在target文件中是这样的,你这个CarMapper接口(类)是和CarMapper.XML放在一起的,这个才是放在计算机中的样子。
方式四:最推荐写法
需要搭配第三种方式的配置:如下图
    <mappers>
        <package name="com.yzh.mybatis.mapper"/>
    </mappers>
直接把Sql映射文件中的<mapper namespace="com.yzh.mybatis.mapper.CarMapper">
com.yzh.mybatis.mapper.CarMapper去掉CarMapper只留下包名
他会匹配这个包下的所有SqlMapper.XML
这是开发中最常用的方式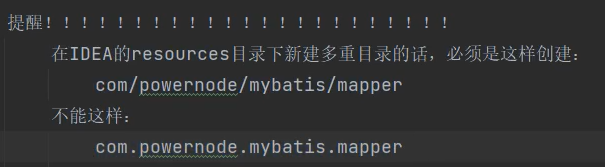
因为在这个resources文件下不存在创建包的说法,只能创建文件夹,如果你com.yzh.zz.aaa.bb这样创建文件那么他com.yzh.zz.aaa.bb都属于同一级目录。还有一种方式就是你一层一层文件夹建立那保准没问题。
建立好的文件夹可以右击resources>Open In>Explorer查看在计算机打开resources文件夹这样就一清二楚看到你是否创建正确了
SqlMapper.xml需要放到
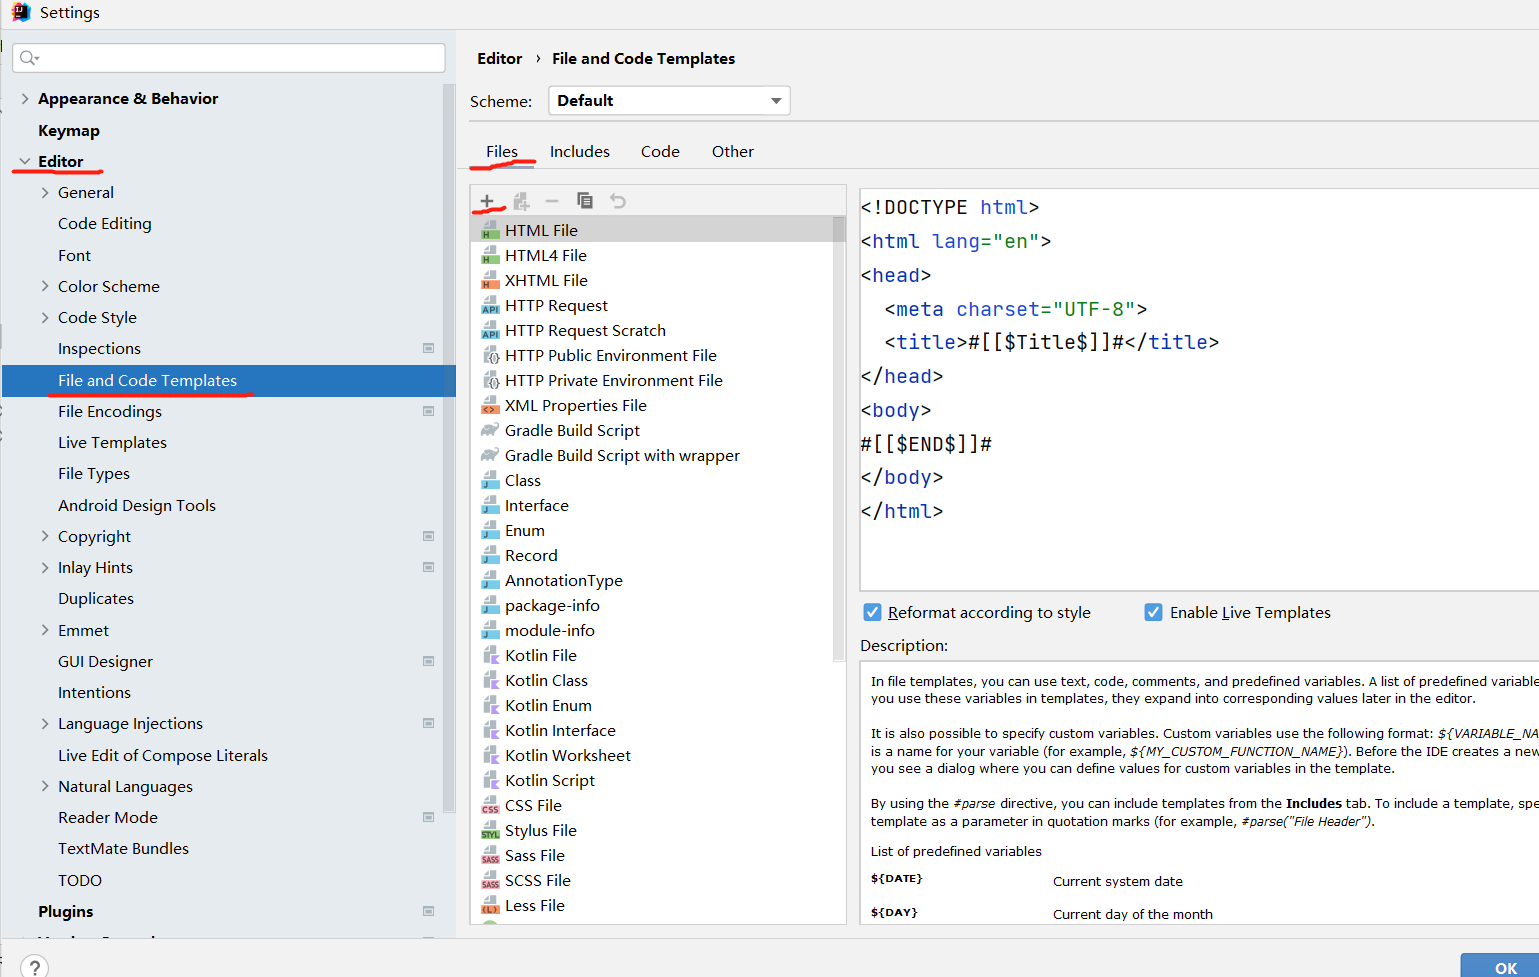
5.小技巧之在idea配置mybatis核心文档和Sql映射文档
File >Settings > Editor > File and Code Templates
核心配置文档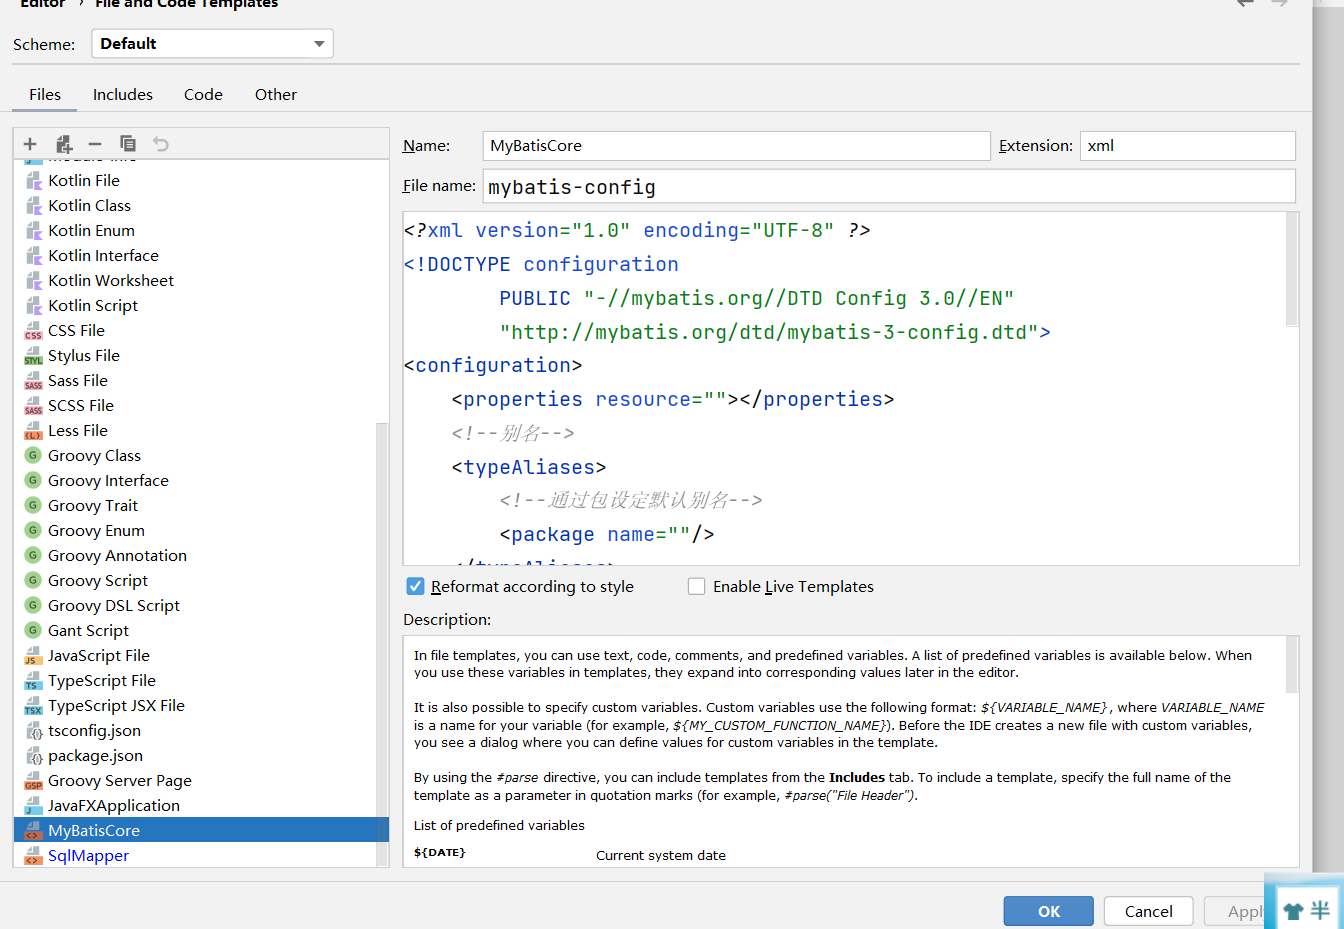
<?xml version="1.0" encoding="UTF-8" ?>
<!DOCTYPE configuration
        PUBLIC "-//mybatis.org//DTD Config 3.0//EN"
        "http://mybatis.org/dtd/mybatis-3-config.dtd">
<configuration>
     <!--jdbc连接配置-->
    <properties resource=""></properties>
    <!--响应类型的别名-->
    <typeAliases>
        <!--通过包设定默认别名-->
        <package name=""/>
    </typeAliases>

    <environments default="dev">
        <environment id="dev">
            <transactionManager type="JDBC"/>
            <dataSource type="POOLED">
            <!--下面的value要自己写上-->
                <property name="driver" value="${driver}"/>
                <property name="url" value="${url}"/>
                <property name="username" value="${root}"/>
                <property name="password" value="${password}"/>
            </dataSource>
        </environment>
    </environments>
    <mappers>
    <!--通过包名绑定sqlMapper映射文档-->
        <package name=""/>
    </mappers>
</configuration>
sql映射文档
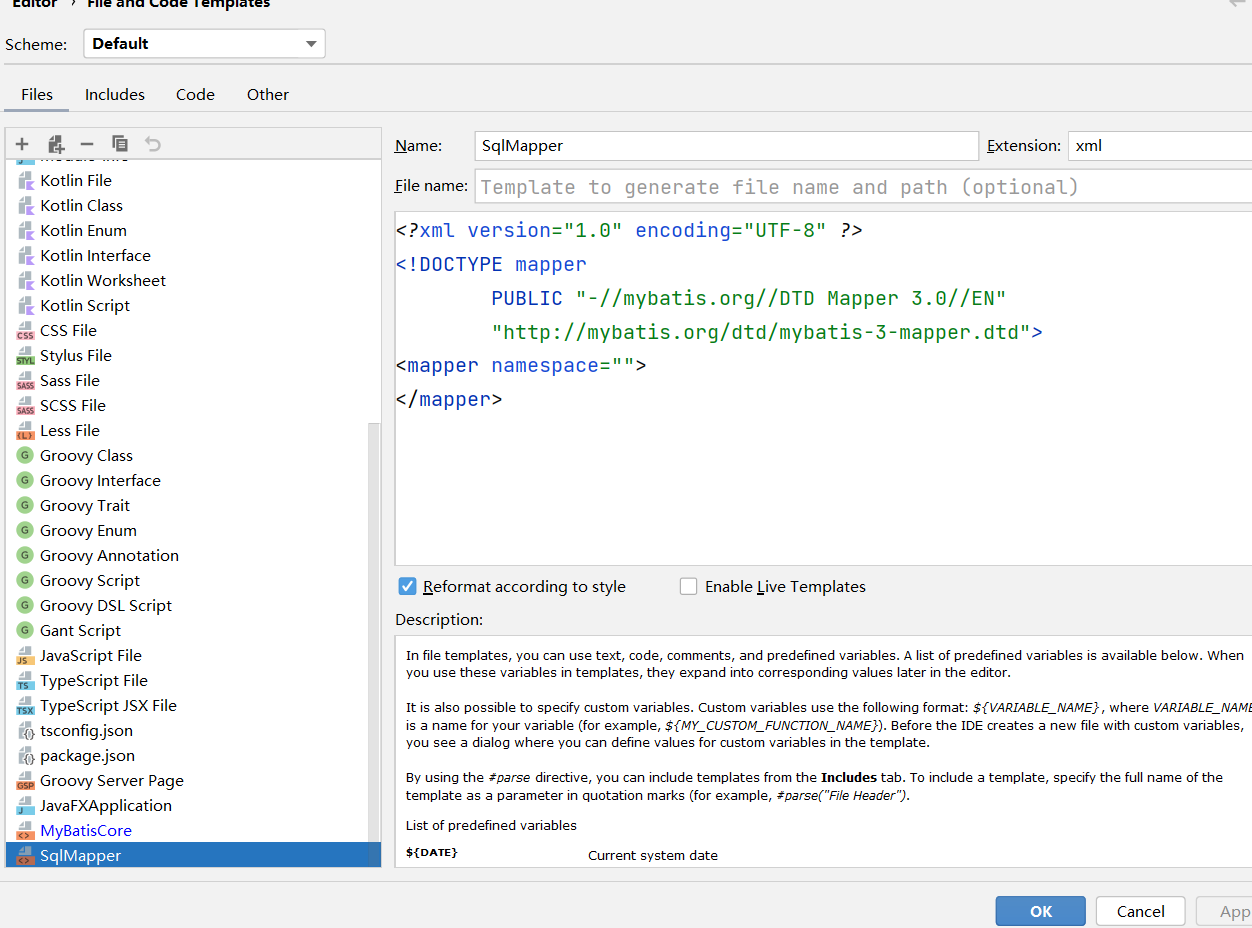
<?xml version="1.0" encoding="UTF-8" ?>
<!DOCTYPE mapper
        PUBLIC "-//mybatis.org//DTD Mapper 3.0//EN"
        "http://mybatis.org/dtd/mybatis-3-mapper.dtd">
<mapper namespace="">
</mapper>
6.小技巧之插入数据时返回自增主键
我们在设计数据表的时候很多时候是会把设计一个自增不为空的主键的,它与业务逻辑无关,所以一般在插入数据时这个id我们会传一个null。那么怎么才能让我们在插入数据的可以拿到自增主键呢?
//接口中编写方法
public interface CarMapper {//CarDao

    /**
     * 新增一条car并使用自动生成的自增主键
     */
    int insertCarUseGeneratedKeys(Car car);

}
//sql映射文件编写
//useGeneratedKeys="true"表示需要使用自动生成的主键
//keyProperty="id"表示用pojo类Car这个类的id属性去接收
//因为你在调用insertCarUseGeneratedKey方法时会传入一个Car对象
//所以这个id会存到你穿的那个Car对象的id属性中
<insert id="insertCarUseGeneratedKeys" useGeneratedKeys="true" keyProperty="id">
insert into t_car values
(null,#{carNum},#{brand},#{guidePrice},#{produceTime},#{carType})
</insert> @Test
public void testInsertCarUseGeneratedKeys(){
SqlSession sqlSession = SqlSessionUtil.getSession();
CarMapper mapper = sqlSession.getMapper(CarMapper.class);
Car car = new Car(null,"1002","86",23.3,"2018-7-12","燃油车");
mapper.insertCarUseGeneratedKeys(car);
System.out.println(car.getId());//可以拿到自增主键id
sqlSession.commit();
sqlSession.close();
}Mybatis的参数处理(mybatis核心)
参数指的是Mapper接口中的方法参数,如下图:
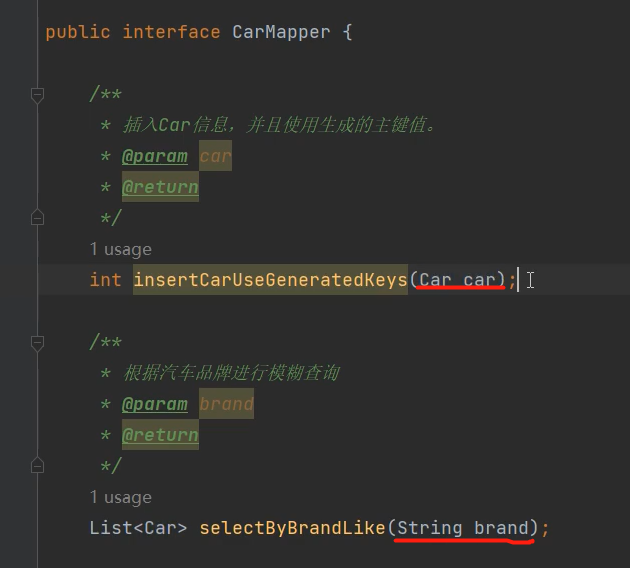
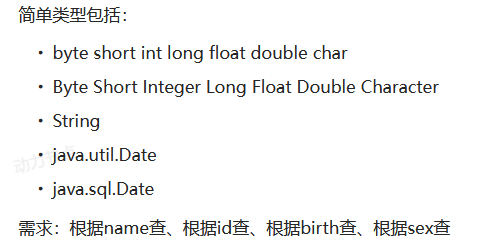
这里面的方法形参可以设置不同的形参,有简单类型参数(基本数据类型+包装类+字符串+...)、Map集合、实体类、多参数....
单个简单参数类型
   <select id="selectById" resultType="student" parameterType="java.lang.Long">
        select * from t_student where id = #{id}
    </select>

//parameterType="java.lang.Long"用来指定参数的类型

//底层会翻译成:select * from t_student where id = ?
然后通过ps.setXxxx(第几个问号,实参)这样去赋值,那么
他怎么判断这个setXxx到底是set什么类型的?
mysbatis框架会根据你的传的实参即#{id}去判断set什么类型。
所以大部分情况下这个parameterType=""是不用写的,他会自动推断
但是如果写了效率会更高。
其次mybatis框架内置了很多常用的别名,可以参考手册
比如这里的java.lang.Long可以写成_long、long、Long
基本数据类、包装类都内置了别名,这写别名都是就是简名和者_简名(都不区分大小写)
_简名这个是用来区别基本数据类型的
在看下面这段代码

很明显多了两个参数在#{},javaType和jdbcType都是用来做指定类型的。但是我们可以省略不写
因为mybatis可以自动推断,只不过写了效率会更高。
总结:单个简单参数这一小节说这些就是要你知道:其中sql语句中的javaType,jdbcType,以及select标签中的parameterType属性,都是用来帮助mybatis进行类型确定的。不过这些配置多数是可以省略的。因为mybatis它有强大的自动类型推断机制。
如果参数只有一个的话,#{} 里面的内容就随便写了。对于 ${} 来说,注意加单引号。
参数为Map
    /**StudentMapper接口编写
     * 使用map集合完成insert
     */
    int insertStudentByMap(Map<String,Object> map);
<!--SqlMapper.xml编写-->
<mapper namespace="com.yzh.mybatis.mapper.StudentMapper">
<!--参数为map的insert-->
<insert id="insertStudentByMap" >
insert into
t_student(id,name,age,height,birth,sex)
values(null,#{姓名},#{年龄},#{身高},#{生日},#{性别})
</insert>
</mapper>
//注意点:
1.#{这里面填的是map集合的key}
2.如果要使用${},记得加双引号——"${姓名}"
3.上面省略了parameterType="java.util.Map" @Test
public void testInsertStudentByMap(){
SqlSession sqlSession = SqlSessionUtil.getSession();
StudentMapper mapper = sqlSession.getMapper(StudentMapper.class);
Map<String, Object> map = new HashMap<>();
map.put("姓名","Kobe");
map.put("年龄",20);
map.put("身高",181);
map.put("生日",new Date());
map.put("性别","男");
mapper.insertStudentByMap(map);
sqlSession.commit();
sqlSession.close();
}总结:你可能会觉得这个map很别扭,不应该key对应一个pojo对象吗?
对的,确实有点别扭。但是如果你要用map你就必须得这样写,因为若果你要是用map作为参数,那么在sqlMapper的sql语句中#{}或${}占位符的大括号里面就必须得传map的key。
还有一个实体类的我就不演示了。
单个参数总结
单个参数无非就是单个简单参数、单个Map集合、单个实体类。
单个简单参数:#{} 或 ${} 大括号里面填啥随意。
单个Map集合参数:#{} 或 ${} 大括号里面必须填map的key。
单个实体类参数:#{} 或 ${} 大括号里面必须填实体类的属性名。
多参数
    /**编写Mapper接口
     * 根据name和age查询student
     */
    List<Student> selectStudentByNameAndAge(String name,Integer age);
思考:在单个参数的时候,他可以直接根据你的参数来去判断ps.setXxxx的Xxx类型然后去给?占位符赋值,那多个参数mybatis的底层是怎么做的?
如果是多个参数的情况下mybatis底层是这样做的:
创建一个Map集合,这个Map集合长这样
Map.put(arg0,name);
Map.put(arg1,age);
Map.put(arg2,参数名);
...
Map.put(param1,name);
Map.put(param2,age);
Map.put(param3,参数名);
.......
注意:以上不是两个集合,以上内容都是在同一个Map下的。别搞错了,说白了就是他在一个Map集合中key存了以0开始的参数下标,也存了以1开始的参数下表,他们的对应的value
都是参数名。
只不过这个下标前面会带arg和param开头。
 <!--编写SqlMapper.xml-->
<select id="selectStudentByNameAndAge" resultType="student">
        select * from t_student
            where name=#{arg0} and age=#{arg1}
 </select>

或者
<select id="selectStudentByNameAndAge" resultType="student">
        select * from t_student
            where name=#{param1} and age=#{param2}
 </select>

或者
<select id="selectStudentByNameAndAge" resultType="student">
        select * from t_student
            where name=#{arg0} and age=#{param2}
</select>提一点:这是高版本的mybatis才会带,使用mybatis3.4.2之前的版本时:要用#{0}和#{1}这种形式。
    @Test
    public void testsSelectStudentByNameAndAge(){
        SqlSession sqlSession = SqlSessionUtil.getSession();
        StudentMapper mapper = sqlSession.getMapper(StudentMapper.class);
        List<Student> students = mapper.selectStudentByNameAndAge("Kobe", 20);
        students.forEach(student -> System.out.println(student));
        sqlSession.close();
    }
多参数之注解Param
在上面我们提到的多参数使用arg0或者param1可读性太差了。于是引入了Param注解。
说白了不管是arg0还是param1都只是存了一个地址罢了,只是一个引用,最后在执行sql语句时还是用具体的实参值去crud的,那么我们可以通过注解Param指定参数对应的这个引用名。
/**接口
     * 根据name和age查询student,版本二使用Param注解
     * (@Param(value = "_name") value可以省略
     * 直接写(@Param("_name")
     */
    List<Student> selectStudentByNameAndAge2
    (@Param("_name") String name,@Param("_age")Integer age);

看清楚了就是在形参前面加@Param("指定名字")即可
//SqlMapper.XML
<!--根据name和age查询student,
版本二使用Param注解-->
<select id="selectStudentByNameAndAge2" resultType="student">
select * from t_student
where name=#{_name} and age=#{_age}
</select> @Test
public void testsSelectStudentByNameAndAge2(){
SqlSession sqlSession = SqlSessionUtil.getSession();
StudentMapper mapper = sqlSession.getMapper(StudentMapper.class);
List<Student> students = mapper.selectStudentByNameAndAge2("Kobe", 20);
students.forEach(student -> System.out.println(student));
sqlSession.close();
}注意:Param注解只是修改了Map集合中的arg,后面的param还是可以用的。使用Param注解后底层Map长这样:
Map.put(_name,name);
Map.put(_age,age);
Map.put(指定的名字,参数名);
...
Map.put(param1,name);
Map.put(param2,age);
Map.put(param3,参数名);
.......
再一次理解动态代理
* 代理对象:mapper
* 代理方法:目标方法的所有方法以及代理对象私有的方法
* 目标对象:接口对应的Class文件
* 目标方法:接口中的方法
*
* 再一次深入理解动态代理对象:
* 一开始提到动态代理对象是为了解决每次都需手动创建实现接口类。
* 然后使用到了这个动态代理后我们就只需要写接口即可。
*由这个方法为入口:sqlSession.getMapper(StudentMapper.class);
* mybatis在底层做了两件事
* 1.生成CarMapper.class字节码文件
* 2.根据CarMapper.class字节码文件实例化了一个对象并且返回,
*   也就是现在mapper这个引用所指向的那个对象
*
* 你需要理解的是:现在你通过这个mapper变量去调用的所有方法其实看似
* 是在调用XxxMapper接口中的方法,其实不是,他是在调用动态代理对象中的方法
* 这些方法叫动态方法,其次动态代理对象不只是只有接口中的那些方法,他还有属于
* 自己的方法,这些方法是接口中没有的。属于动态代理对象的方法。那说到这里你心里应该
* 有个底,这个动态代理对象只是copy了接口中的所有方法,他和你自己去创造一个接口实现类
* 是不一样的,其实你自己想一下,你在创建一个接口实现类的时候首先你肯定是要实现了接口中的
* 所有方法,那我这个实现类难道不能有别的方法吗?显然是可以的,那这个动态实现类还有别的方法
* 就很好理解了。其次你还要知道一点是,这个动态代理底层用的还是JBoss中的Javassist去实现的,
* 只不过mybatis把它给封装在自己的框架里面了。
* 那他动态代理对象具有哪些独有的方法?
* 目前我就知道解析Param注解,当然里面的内容远不止于此哦
*
* 什么是Javassist?
* Javassist是一个开源的分析、编辑和创建Java字节码的类库。是由东京工业大学的数学和计算机科
* 学系的Shigeru Chiba (千叶 滋)所创建的。它已加入了开放源代码JBoss 应用服务器项目,
* 通过使用Javassist对字节码操作为JBoss实现动态"AOP"框架。
、
查询专列
注意点:
- 查询的结果若为多个,但是返回值却只有一个时报错:TooManyResultsException。
模糊查询
    <select id="selectByLikeBrand" resultType="car">
        select id,
               car_num as carNum,
               brand,
               guide_price as guidePrice,
               produce_time as produceTime,
               car_type as carType
               from t_car
            where brand like "%"#{brand}"%"
    </select>

//注意点:
"%"#{brand}"%"
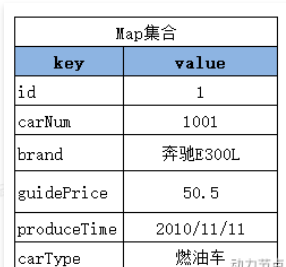
返回Map集合
应用场景:
1.当返回的数据,没有合适的实体类对应的话,可以采用Map集合接收。字段名做key,字段值做value。但是前提条件是查询结果可以保证只有一条数据。
/**接口
 * 通过id查询一条记录,返回Map集合
 */
Map<String,Object> selectById(Integer id);
//SqlMapper.xml编写
    <select id="selectById" resultType="map">
        select * from t_car where id=#{id}
    </select>

//注意点:resultType="map",这个map很明显是mybatis内置的别名
//原名是map的全类名
@Test
public void TestSelectById(){
SqlSession sqlSession = SqlSessionUtil.getSession();
CarMapper mapper = sqlSession.getMapper(CarMapper.class);
Map<String, Object> map = mapper.selectById(1);
System.out.println(map);
sqlSession.close();
}返回List<Map>
使用场景:
1.当返回的数据,没有合适的实体类对应。
2.查询结果可能返回多条语句。
3.只适合展示,若想得到里面的map集合操作会比较困难
//接口
List<Map<String,Object>> selectByCarType(String car_type);
<select id="selectByCarType" resultType="map">
select * from t_car where car_type=#{car_type}
</select>
注意点:
虽然返回值是List<Map<String,Object>>两层集合嵌套,但是很明显
实际直接封装记录的是里面那个Map集合,所以你的这个resultType要写map
不可以写list。
    @Test
    public void TestSelectByCarType(){
        SqlSession sqlSession = SqlSessionUtil.getSession();
        CarMapper mapper = sqlSession.getMapper(CarMapper.class);
        List<Map<String,Object>> cars = mapper.selectByCarType("燃油车");
        cars.forEach(map -> System.out.println(map));
    }
返回Map< String , Map< String,Object > >大Map集
说明:Map<id主键,Map<字段名,值>>
外层Map的key存的是单条记录的主键,value存的是单条记录。
使用场景:
1.当返回的数据,没有合适的实体类对应。
2.查询结果可能返回多条语句。
3.这种方式可以解决List<Map>难以操作的弊端。
注意:这种方式一定要在接口方法前加一个@MapKey(字段名)的注解,并且你这和字段在数据表中必须是唯一的,因为Map集合中key是唯一的。
//SqlMapper接口
@MapKey("id")
Map<Long,Map<String,Object>> selectByBrand(String brand);

//注意点:
一点要加一个@MapKey("id")注解,表名你要以id字段作为外层map的key
//SqlMapper.XML
<!--返回结果Map<String,Map<String,Object>>-->
<select id="selectByBrand" resultType="map">
select * from t_car
where brand like "%"#{brand}"%"
</select> @Test
public void TestSelectByBrand(){
SqlSession sqlSession = SqlSessionUtil.getSession();
CarMapper mapper = sqlSession.getMapper(CarMapper.class);
Map<Long,Map<String,Object>> map = mapper.selectByBrand("丰田");
System.out.println(map);
}查询之结果映射(重要)
问:数据表中的字段名与java对应的封装的类的属性名不一致导致查询结果无法封装到java类对象中,怎么办?
方案一:as 取别名,前面已经用过很多次了,很麻烦很鸡肋显然开发中不会有这种方式。
方案二:在SqlMapper.xml映射文件中配置。
比如:
//原来
-------------------------------------------------------------
<!--返回结果List<Car>-->
    <select id="selectByLikeType" resultType="Car">
        select id,
               car_num as carNum,
               brand,
               guide_price as guidePrice,
               produce_time as produceTime,
               car_type as carType
               from t_car
            where brand like "%"#{brand}"%"
    </select>
//修改后
-----------------------------------------------------
    <!--
            resultMap:
                id:这个结果映射的标识,作为select标签的resultMap属性的值。
                type:结果集要映射的类(一般为pojo类)。这里的car明显是用了别名。
    -->
    <resultMap id="CarResultType" type="car">
        <!--对象的唯一标识,官方解释是:为了提高mybatis的性能。建议写上。-->
        <id property="id" column="id"/>
        <result property="carNum" column="car_num"/>
        <!--当属性名和数据库列名一致时,可以省略。但建议都写上。-->
        <!--javaType用来指定属性类型。jdbcType用来指定列类型。一般可以省略。-->
        <result property="brand" column="brand" javaType="string" jdbcType="VARCHAR"/>
        <result property="guidePrice" column="guide_price"/>
        <result property="produceTime" column="produce_time"/>
        <result property="carType" column="car_type"/>
    </resultMap>

    <!--返回结果List<Car>-->
    <select id="selectByLikeType" resultMap="CarResultType" >
        select *
               from t_car
            where brand like "%"#{brand}"%"
    </select>
方案三:开启驼峰命名自动映射
使用这种方式的前提是:属性名遵循Java的命名规范,数据库表的列名遵循SQL的命名规范。
Java命名规范:首字母小写,后面每个单词首字母大写,遵循驼峰命名方式。
SQL命名规范:全部小写,单词之间采用下划线分割。
比如以下的对应关系:
| 实体类中的属性名 | 数据库表的列名 |
| carNum | car_num |
| carType | car_type |
| produceTime | produce_time |
如何启用该功能,在mybatis-config.xml文件中进行配置:
<!--放在properties标签后面-->
<settings>
  <setting name="mapUnderscoreToCamelCase" value="true"/>
</settings>
查询所有记录条数
//SqlMappeer接口
Long selectTotal();
//SqlMapper.xml映射文档
<!--返回总记录条数-->
<select id="selectTotal" resultType="Long">
select count(*) from t_car
</select>
注意点:resultType="Long"
显然这也是mybatis的一个内置的别名,原名就是全类名
其次count(*)或者count(1)都可以 @Test
public void TestSelectTotal(){
SqlSession sqlSession = SqlSessionUtil.getSession();
CarMapper mapper = sqlSession.getMapper(CarMapper.class);
Long count = mapper.selectTotal();
System.out.println(count);
}动态SQL
if标签
使用场景:多条件查询
SqlMapper接口
public interface CarMapper {
    //根据brand、guidePrice、carType
    List<Car> selectByMultCondition(@Param("brand") String brand,@Param("guidePrice")  Double guidePrice,@Param("carType")  String carType);
}
<!--SqlMapper.xml-->
<select id="selectByMultCondition" resultType="car">
select * from t_car where 1=1
<if test="brand != null and brand != ''">
and brand like "%"#{brand}"%"
</if>
<if test="guidePrice != null and guidePrice != '' ">
and guide_price > #{guidePrice}
</if>
<if test="carType != null and carType != '' ">
and car_type=#{carType}
</if>
</select>
//注意点:
1. if标签中test属性是必须的。
2. if标签中test属性的值是false或者true。
3.如果test是true,则if标签中的sql语句就会拼接。反之,则不会拼接
4.test属性中可以使用的是:
4.1在接口中对参数使用了@Param注解,那么test中要出现的是@Param注解指定的参数名。
比如:@Param("brand"),那么这里只能使用brand
4.2当没有使用@Param注解,那么test中要出现的是: param1 param2 param3 arg arg1 arg2...
4.3接口方法中传入的参数为pojo,那么test中出现的是POJO类的属性名。
4.4在mybatis的动态SOL当中,不能使用&&,只能使用and。
5.在where后面加1=1的原因是如果在一下三个if都不满足拼接条件那么最终的sql
语句就会变成:select * from t_car where
显然这肯定是会报错的。
6.每一个拼接条件记得加and!!!!! @Test
public void testSelectByMultCondition(){
SqlSession sqlSession = SqlSessionUtil.getSession();
CarMapper mapper = sqlSession.getMapper(CarMapper.class);
List<Car> cars = mapper.selectByMultCondition("丰田",23.30,"燃油车");
cars.forEach(car -> System.out.println(car));
}
-------------------------------------------------------------
最后执行查询的语句是:
Preparing: select * from t_car
where 1=1 and
brand like "%"?"%" and
guide_price > ? and
car_type=?
Parameters: 丰田(String), 23.3(Double), 燃油车(String)where标签
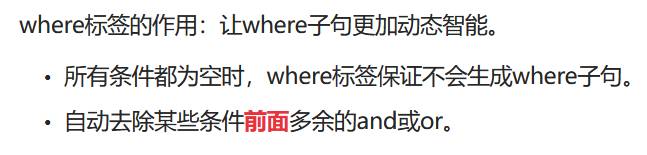
注意:里面的子句不止有if,可以放别的子句。他最主要的功能就是动态生成子句,其次才是去除前面多余的and和or
我们来改良一下上面这个if标签的案例
SqlMapper接口
public interface CarMapper {
    //根据brand、guidePrice、carType
    List<Car> selectByMultCondition(@Param("brand") String brand,@Param("guidePrice")  Double guidePrice,@Param("carType")  String carType);
}
<!--SqlMapper.xml-->
<select>
select * from t_car
<where>
<if test="brand != null and brand != ''">
and brand like "%"#{brand}"%"
</if>
<if test="guidePrice != null and guidePrice != '' ">
and guide_price > #{guidePrice}
</if>
<if test="carType != null and carType != '' ">
and car_type=#{carType}
</if>
</where>
</select>
--------------------------------------------------------------------
最后执行的语句:
select * from t_car WHERE brand like "%"?"%" and guide_price > ? and car_type=?
--------------------------------------------------------------------------------
很明显 <if test="brand != null and brand != ''">
and brand like "%"#{brand}"%"
</if>
这个and是多余的,然后他帮我们去除了。
//注意点:
1.where标签只能帮助去掉前面多余的and或者or,不能去掉后面多余的and或者or
比如说:
<where>
<if test="brand != null and brand != ''">
and brand like "%"#{brand}"%" and
</if>
</where>
很明显这两个都是多余的,但是他能帮你去掉前面那个。
2.他只能帮你智能去除前面的and或or,不能帮你自动增加and或or,
因为他咋知道你要添加and还是or
3.使用了where标签后在原来的语句中就不要再写where了比如:
错误写法:select * from t_car where <where> </where>
正确写法:select * from t_car <where> </where>
-------------------------------------------------------
如果你这样写也是不行的
<select>
select * from t_car
<where>
<if test="brand != null and brand != ''">
and brand like "%"#{brand}"%" and
</if>
<if test="guidePrice != null and guidePrice != '' ">
and guide_price > #{guidePrice}
</if>
</where>
</select>
//你可能会觉得在第一个if后面加了and,那他就会帮我去掉第二个if中前面的and
不,他不会,因为他压根就不会去检测你的第一条语句后面有没有and。所有就会造成
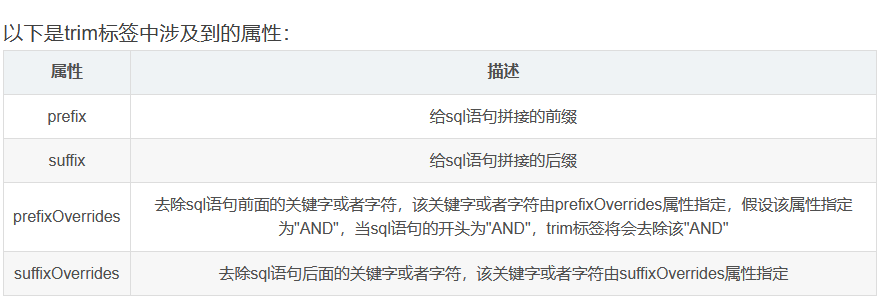
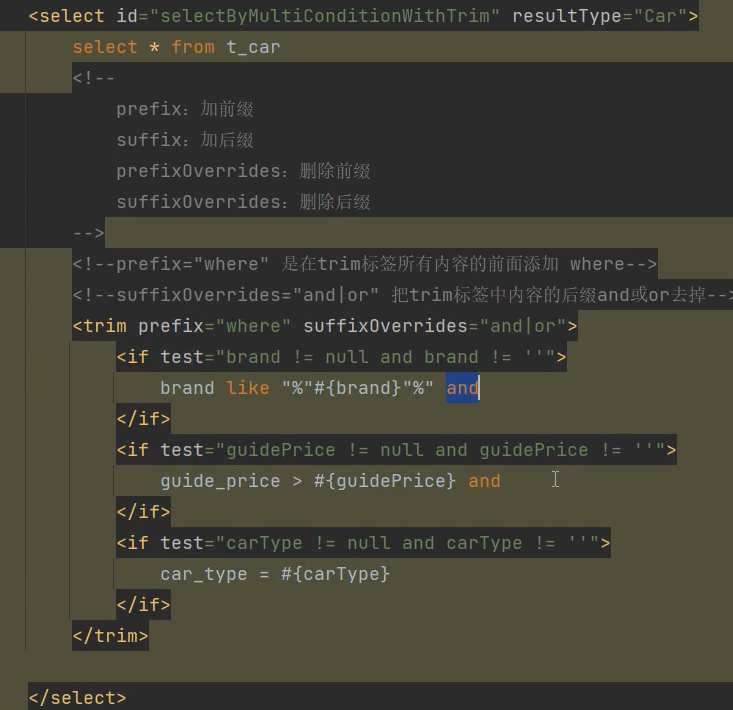
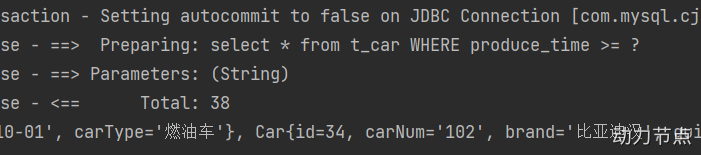
两个and 重复了trim标签
set标签
先看一个案例:
接口
int updateById(Car car);
<!--动态修改
//SqlMapper.xml
-->
<update id="updateById">
update t_car
set car_num = #{carNum},
brand = #{brand},
guide_price = #{guidePrice},
produce_time = #{produceTime},
car_type = #{carType}
where id = #{id}
</update> @Test
public void testUpdateById(){
SqlSession sqlSession = SqlSessionUtil.getSession();
CarMapper mapper = sqlSession.getMapper(CarMapper.class);
Car car = new Car(1L, null, null, null, null, null);
sqlSession.commit();
sqlSession.close();
mapper.updateById(car);
}很明显会把数据库里面的字段变为空了。
set标签主要使用在update语句当中,用来生成set关键字,同时去掉最后多余的“,”
比如我们只更新提交的不为空的字段,如果提交的数据是空或者"",那么这个字段我们将不更新。
int updateById(Car car); <update id="updateById">
update t_car
<set>
<if test="carNum != null and carNum != ''">
car_num = #{carNum},
</if>
<if test="brand != null and brand != ''">
brand = #{brand},
</if>
<if test="guidePrice != null and guidePrice != ''">
guide_price = #{guidePrice},
</if>
<if test="produceTime != null and produceTime != ''">
produce_time = #{produceTime},
</if>
<if test="carType != null and carType != ''">
car_type = #{carType},
</if>
</set>
where id = #{id}
</update> @Test
public void testUpdateById(){
SqlSession sqlSession = SqlSessionUtil.getSession();
CarMapper mapper = sqlSession.getMapper(CarMapper.class);
// (id,car_num,brand,guide_price,produce_time,car_type)
Car car = new Car(1L, "1003", "凯迪拉克", null, null, "燃油车");
mapper.updateById(car);
sqlSession.commit();
sqlSession.close();
}最后执行的sql:
update t_car SET car_num = ?, brand = ?, car_type = ? where id = ?
很明显这个SET是大写的代表是动态的修改。
而且他没有对参数为null或""进行修改。
注意:如果你的参数全为null,则最后执行sql是这样的:
update t_car where id = ?
全为null或者""的话,set关键字都没有了,此时肯定报sql语法错误了,
报错的话你要么避免这种情况,要么在java业务层去捕获异常处理
choose when otherwise
MyBatis 中动态语句 choose-when-otherwise 类似于 Java 中的 switch-case-default 语句。由于 MyBatis 并没有为 if 提供对应的 else 标签,如果想要达到<if>...<else>...</else> </if> 的效果,可以借助 <choose>、<when>、<otherwise> 来实现。
动态语句 choose-when-otherwise 语法如下。
    <choose>
        <when test="判断条件1">
            SQL语句1
        </when >
        <when test="判断条件2">
            SQL语句2
        </when >
        <when test="判断条件3">
            SQL语句3
        </when >
        <otherwise>
            SQL语句4
        </otherwise>
    </choose>
choose 标签按顺序判断其内部 when 标签中的判断条件是否成立,如果有一个成立,则执行相应的 SQL 语句,choose 执行结束;如果都不成立,则执行 otherwise 中的 SQL 语句。这类似于 Java 的 switch 语句,choose 为 switch,when 为 case,otherwise 则为 default。
以下示例要求:
下面使用 choose-when-otherwise 标签实现
需求:先根据品牌查询,如果没有提供品牌,再根据指导价格查询,如果没有提供指导价格,就根据生产日期查询。
接口

/**
* 使用choose when otherwise标签查询
* @param brand
* @param guidePrice
* @param produceTime
* @return
*/
List<Car> selectWithChoose(@Param("brand") String brand, @Param("guidePrice") Double guidePrice, @Param("produceTime") String produceTime);
<select id="selectWithChoose" resultType="car">
select * from t_car
<where>
<choose>
<when test="brand != null and brand != ''">
brand like #{brand}"%"
</when>
<when test="guidePrice != null and guidePrice != ''">
guide_price >= #{guidePrice}
</when>
<otherwise>
produce_time >= #{produceTime}
</otherwise>
</choose>
</where>
</select>@Test
public void testSelectWithChoose(){
CarMapper mapper = SqlSessionUtil.openSession().getMapper(CarMapper.class);
//List<Car> cars = mapper.selectWithChoose("丰田霸道", 20.0, "2000-10-10");
//List<Car> cars = mapper.selectWithChoose("", 20.0, "2000-10-10");
//List<Car> cars = mapper.selectWithChoose("", null, "2000-10-10");
List<Car> cars = mapper.selectWithChoose("", null, "");
System.out.println(cars);
}
foreach标签
看一个场景:
那这个sql的语句在mybatis中怎么去做?
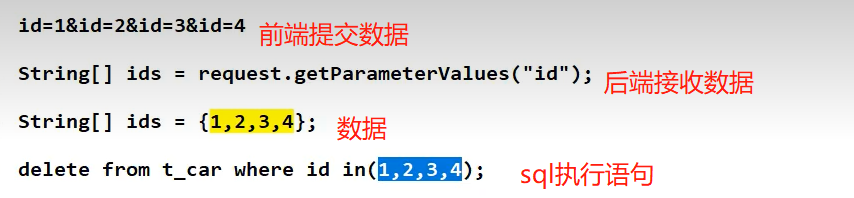
批量删除
/**CarMapper接口
* 通过foreach完成批量删除
* @param ids
* @return
*/
int deleteBatchByForeach(@Param("ids") Long[] ids);
<!--CarMapper.xml
collection:集合或数组
item:集合或数组中的元素(这个值是随意的,只是用于遍历时对元素的引用罢了)
separator:分隔符
open:foreach标签中所有内容的开始
close:foreach标签中所有内容的结束
-->
<delete id="deleteBatchByForeach">
delete from t_car where id in
<foreach collection="ids" item="id" separator="," open="(" close=")">
#{id}
</foreach>
</delete>
----------------------------------------------------------
<delete id="deleteBatchByForeach">
delete from t_car where id in(
<foreach collection="ids" item="id" separator=",">
#{id}
</foreach>
)
</delete>
---------------------------------------------------
@Test
public void testDeleteBatchByForeach(){
    CarMapper mapper = SqlSessionUtil.openSession().getMapper(CarMapper.class);
    int count = mapper.deleteBatchByForeach(new Long[]{40L, 41L, 42L});
    System.out.println("删除了几条记录:" + count);
    SqlSessionUtil.openSession().commit();
}
批量插入
//接口
int insertByBatch(@Param("cars") List<Car> cars);
//sqlMapper.xml
<insert id="insertByBatch">
insert into t_car values
<foreach collection="cars" separator="," item="car">
(
null,
#{car.carNum},
#{car.brand},
#{car.guidePrice},
#{car.produceTime},
#{car.carType}
)
</foreach>
</insert>
    @Test
    public void testInsertByBatch(){
        SqlSession sqlSession = SqlSessionUtil.getSession();
        CarMapper mapper = sqlSession.getMapper(CarMapper.class);
        Car car1 = new Car(null, "1004", "凯迪拉克", null, null, "燃油车");
        Car car2 = new Car(null, "1005", "凯迪拉克2", null, null, "燃油车");
        Car car3 = new Car(null, "1006", "凯迪拉克3", null, null, "燃油车");
        List<Car> cars = new ArrayList<>();
        cars.add(car1);
        cars.add(car2);
        cars.add(car3);
        mapper.insertByBatch(cars);
        sqlSession.commit();
        sqlSession.close();
    }
sql与include标签
//sql代码片段
<sql id="hhh">
        <where>
            <if test="brand != null and brand != ''">
                and brand like "%"#{brand}"%"
            </if>
            <if test="guidePrice != null and guidePrice != '' ">
                and guide_price > #{guidePrice}
            </if>
            <if test="carType != null and carType != '' ">
                and car_type=#{carType}
            </if>
        </where>
    </sql>

    <select id="selectByMultCondition" resultType="car">
        select * from t_car
    //把代码拼接进来
        <include refid="hhh"/>
    </select>
-----------------------------------------------------------------------
相当于:
---------------------------------------------------------
    <select id="selectByMultCondition" resultType="car">
        select * from t_car
         <where>
            <if test="brand != null and brand != ''">
                and brand like "%"#{brand}"%"
            </if>
            <if test="guidePrice != null and guidePrice != '' ">
                and guide_price > #{guidePrice}
            </if>
            <if test="carType != null and carType != '' ">
                and car_type=#{carType}
            </if>
        </where>
    </select>
高级映射
总结:
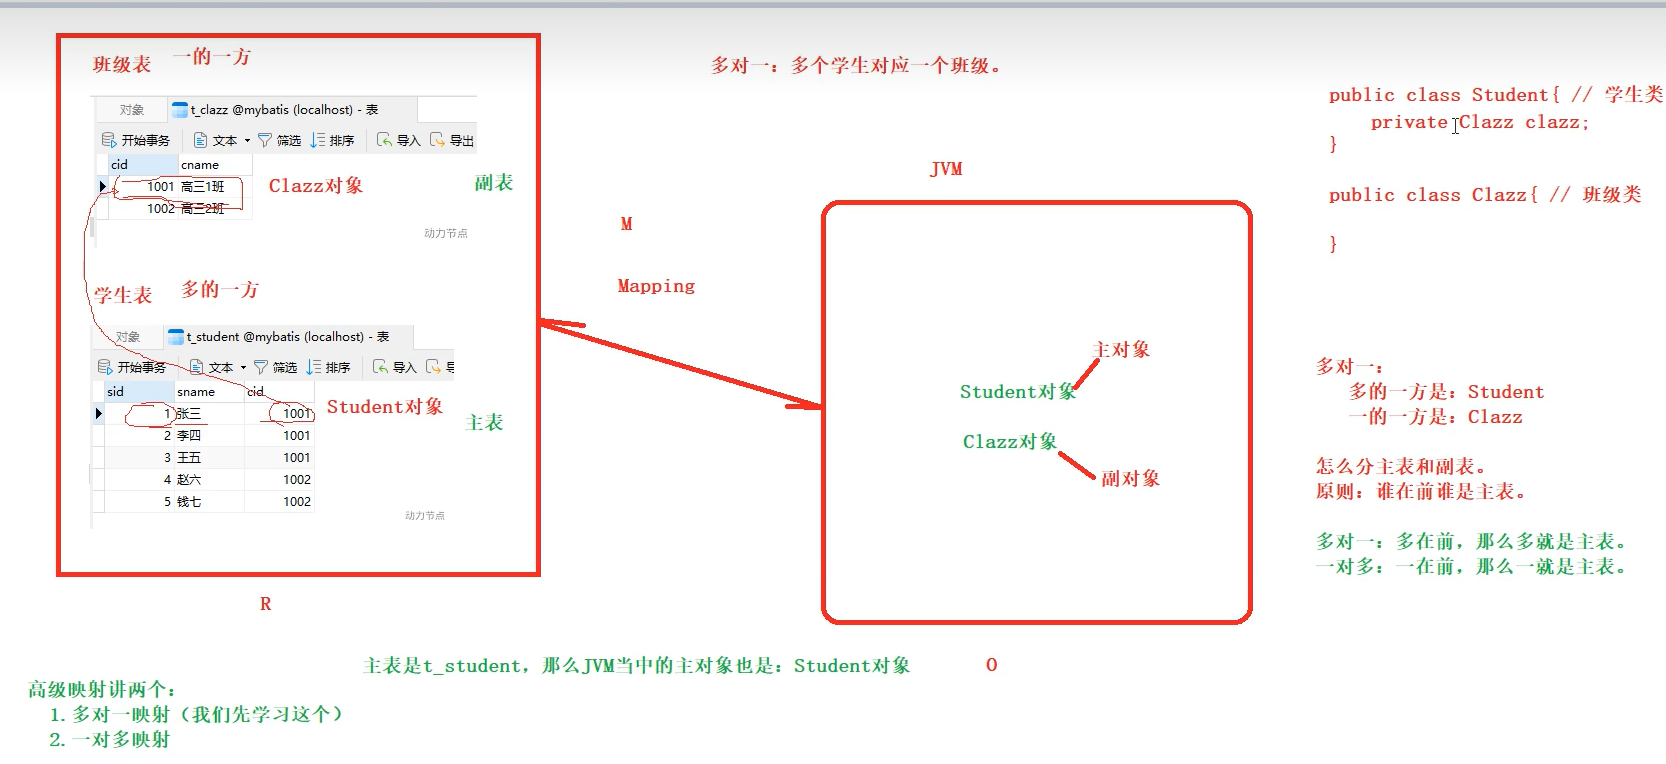
学生、班级
一对多和多对一的区别?
首先这两张表肯定是相关联的。宏观来看,学生为多,班级为一。一对多和多对一取决于你的第一出发点,比如我通过学生id去查看它对应的班级id,然后在通过班级id去查询对应的班级信息表。那么我的第一出发点就是学生,那就是多对一。
若通过班级id去学生表中查询班级id对应的学生,那么出发点就是从班级到学生,那么就是一对多。
多对多:比如说一个班级有很多学生,他们有语文课、数学课、英语课等很多课。一门课有很多人上,一个人上很多门课。这里学生和课程的关系就是多对多。
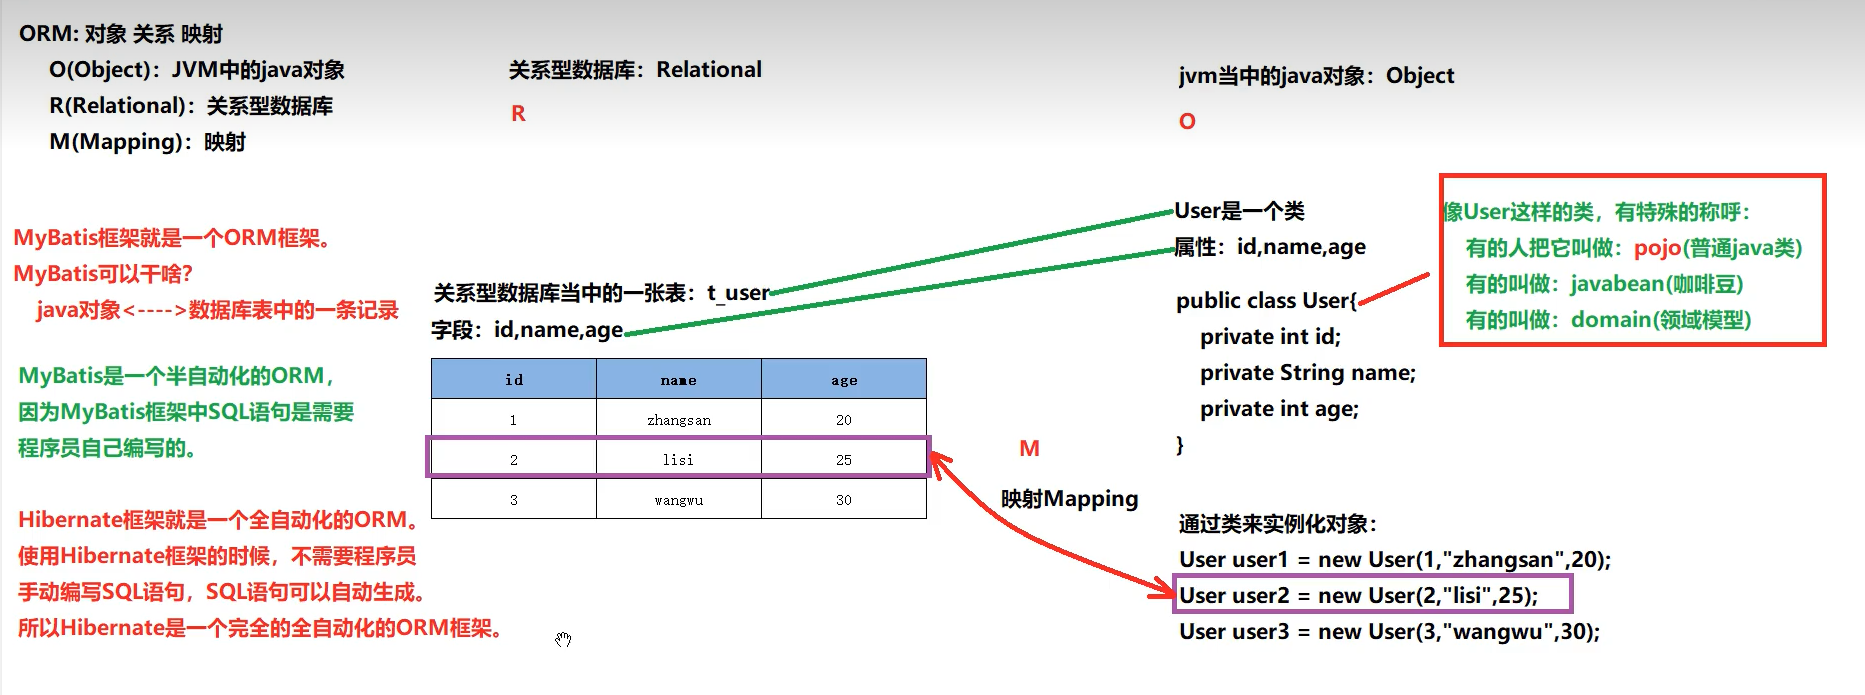
分析,原来时一个对象映射一条记录,要是一个对象需要用到多张表才能去映射,那怎么去映射呢?
高级映射多对一
需求:输入一个学生的id查询到学生的学号、姓名、班级信息。
为什么是多对一?
我的需是根据学生信息里面的班级id去查询班级信息,宏观来看待学生和班级,明显班级是一,然后学生是多,那么我现在以学生的角度为出发点去查询所以就是多对一
分析:主表为学生表,附表为班级表,那么就是说主要查询的对象是学生信息,其中学生信息当中带有了一个班级信息对象,先查出主要的学生信息,若该学生没有班级信息则返回班级信息为空。
到这里请先跳到左外连接去回顾知识点。左外连接

学生表

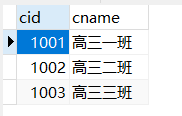
班级表
这两张表通过cid相关联
我们先定义两个pojo类,Student和Clazz
public class Student {//Student对象是多的一方
    private Long sid;
    private String sname;
    private Clazz clazz ;//Clazz对象是一的一方

... ...


public class Clazz {
    private Long cid;
    private String cname;
... ...
方案一:一条SQL语句,级联属性映射
/**接口
     * 根据id获取学生信息,同时获取学生关联的学生信息(学生对象中包含了班级对象)
     * @param id
     * @return
     */
    Student selectById(Integer sid);
SqlMapper.XML
 <resultMap id="studentResultMap" type="student">
        <id property="sid" column="sid"/>
        <result property="sname" column="sname"/>
        <result property="clazz.cid" column="cid"/>
        <result property="clazz.cname" column="cname"/>
    </resultMap>

    <select id="selectById" resultMap="studentResultMap">
        select
            s.sid,s.sname,c.cid,c.cname
        from
            t_stu as s left join t_clazz as c
        on s.cid = c.cid
        where s.sid = #{sid}
    </select>

---------------------------------------------------------------------
分两步来看:
先看下面的,
<select id="selectById" resultMap="studentResultMap">
        select
            s.sid,s.sname,c.cid,c.cname
        from
            t_stu as s left join t_clazz as c
        on s.cid = c.cid
        where s.sid = #{sid}
</select>
这里面查询用到的全都是数据库里面的字段名,除了最后那个#{id}也就是说
你看下面这一段你要把自己代入到数据库当中的查询那里去做,但这样在java代码中
肯定是查询不了的,因为属性名和映射对象不一致,在学生类中没有班级id和班级名的
他只有一个班级对象,所以我们需要通过上面这一段来修改映射的值
<resultMap id="studentResultMap" type="student">
        <id property="sid" column="sid"/>
        <result property="sname" column="sname"/>
        <result property="clazz.cid" column="cid"/>
        <result property="clazz.cname" column="cname"/>
</resultMap>
---------------------------------------------------
<resultMap id="studentResultMap" type="student">
这一句中id是用来定位当前resultMap标签的,type表示映射的对象,这里的student明显是一个别名
<id property="sid" column="sid"/> id是student这个类的id,column是对应数据库的字段
.......
@Test
public void testSelectByIdAssociation(){
SqlSession sqlSession = SqlSessionUtil.getSession();
StudentMapper mapper = sqlSession.getMapper(StudentMapper.class);
Student student = mapper.selectById(1);
System.out.println(student);
}方案二:一条sql语句,association
在方案一的基础上嵌套一个内置的关联映射类即可。只需要修改SqmMapper.XML即可。
<resultMap id="studentResultMapAssociation" type="student">
        <id property="sid" column="sid"/>
        <result property="sname" column="sname"/>
        <association property="clazz" javaType="Clazz">
            <id property="cid" column="cid"/>
            <result property="cname" column="cname"/>
        </association>
</resultMap>

    <select id="selectByIdAssociation" resultMap="studentResultMapAssociation">
        select s.*,c.*
            from t_stu as s left join t_clazz as c
            on s.cid = c.cid
            where s.sid = #{sid}
    </select>

-------------------------------------------------------
其他的都不用改,只需要修改的就是<resultMap>在这里面嵌套了一个
    <association property="clazz" javaType="Clazz">

    </association>
</resultMap>
映射类,其实作用就相当于<resultMap>内部又嵌套了一个<resultMap>,因为
我是两张表的关联查询,所以这里的association就相当于把被关联的那张表单独去映射
property的clazz值是student这个类的属性变量,javaType指定这个变量映射的那个pojo
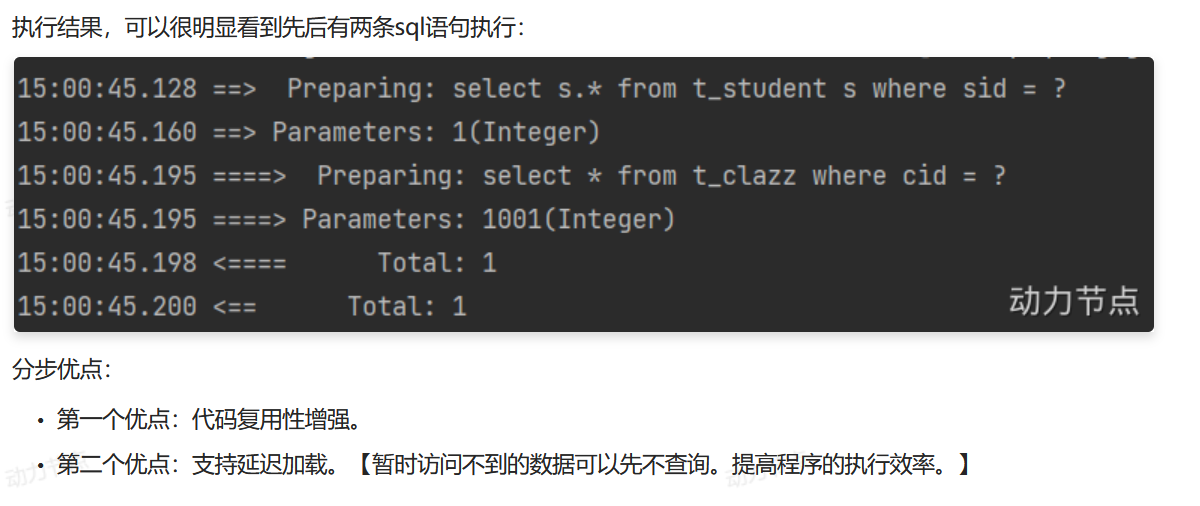
方案三:两条SQL语句,分步查询。(这种方式常用:优点一是可复用。优点二是支持懒加载。
 /**
     * 根据学生id查询学生信息,班级信息
     * 分步查询
     * 第一步:创建接口方法
     * @param sid
     * @return
     */
    Student selectByIdStep(Integer sid);
<!--第三步,对selectByIdStep这条查询语句的查询结果进行结果映射
当对cid这个查询结果进行映射时关联另外一句select语句,并且把
selectByIdStep这条查询语句查询的cid值传递给被关联的那条查询语句
-->
<resultMap id="studentResultMapStep" type="student">
<id property="sid" column="sid"/>
<result property="sname" column="sname"/>
<!--关联一个对象,这个对象的信息从另外一条select返回-->
<association property="clazz"
<!--插入一条查询语句,并且把cid传递过去,
跳到第四步编写这条查询语句-->
select="com.yzh.mybatis.mapper.ClazzMapper.selectClazzByCid"
column="cid"
<!--我得说一下这里上面这个column的值是听过你先面那条select语句查出来的
你下面查的是cid你就填cid,因为你要把这个cid传递给另外一条select语句
若你下面对这个cid去了别名那么你就得写这个别名在这上面-->
/>
</resultMap>
<!--第二步,先把主表信息查出来,共三个字段:
sid、sname、cid 注意:这三个字段是t_stu表中所有的
字段。并不是Student这个pojo类的所有属性。
这里就只是一条平平无奇的根据id查询学生信息
-->
<select id="selectByIdStep" resultMap="studentResultMapStep">
select sid,sname,cid from t_stu where sid=#{sid}
</select>//第四步:编写被关联查询语句的查询方法
public interface ClazzMapper {
//在ClazzMapper接口编写查询方法
Clazz selectClazzByCid(Integer cid);
} <!--第五步:编写被关联的语句,这条语句就是通过cid查询t_clzz这张表的班级信息-->
<select id="selectClazzByCid" resultType="Clazz">
select cid,cname from t_clazz where cid = #{cid}
<!-- #{cid} 这个值是在第一条select语句中查询的结果-->
</select> @Test
public void testSelectByIdStep(){
SqlSession sqlSession = SqlSessionUtil.getSession();
StudentMapper mapper = sqlSession.getMapper(StudentMapper.class);
Student student = mapper.selectByIdStep(2);
System.out.println(student);
}这个分步查询指的是分两步查询,先根据学生id:sid把主表对应的那个学生信息全部查询出来,因为主表和副表之间肯定是相关联的,这里的主表副表是通过cid相关联的,通过主表查询我得到了这位学生的cid,通过<association column="cid"> 把cid传递给另外一条查询语句,新建一个查询语句,该查询语句通过cid对副表进行进行查询。

<resultMap id="studentResultMap" type="Student">
<id property="sid" column="sid"/>
<result property="sname" column="sname"/>
<association property="clazz"
select="com.powernode.mybatis.mapper.ClazzMapper.selectByCid"
column="cid"
fetchType="lazy"/>
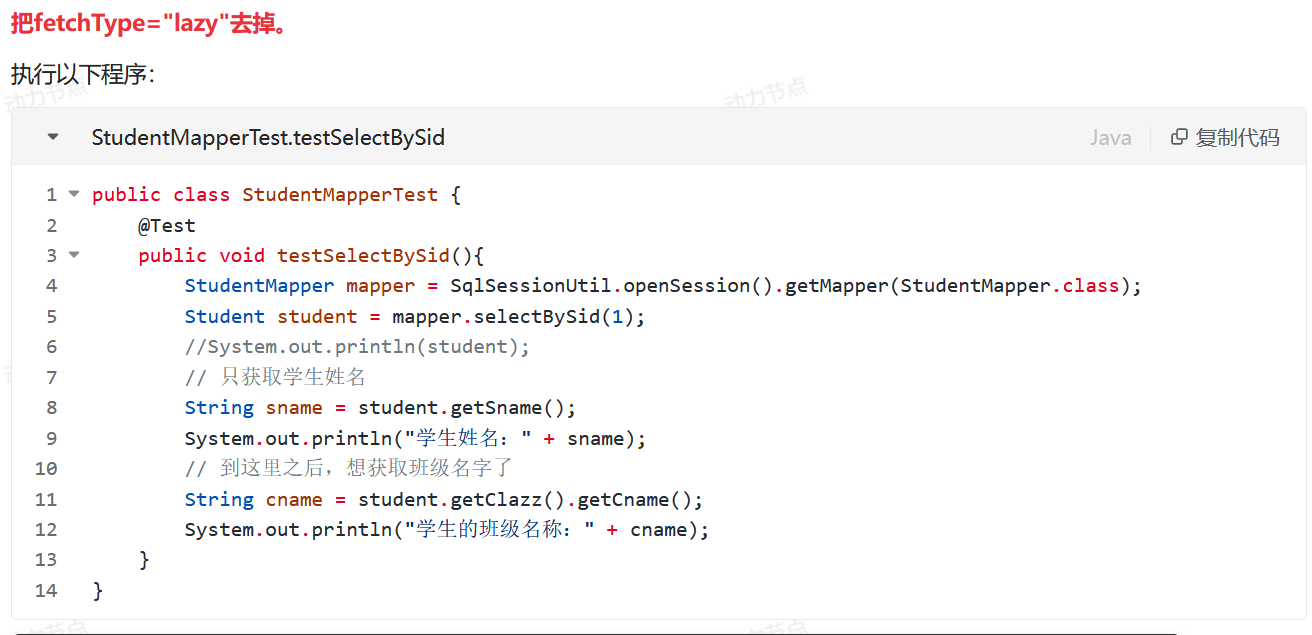
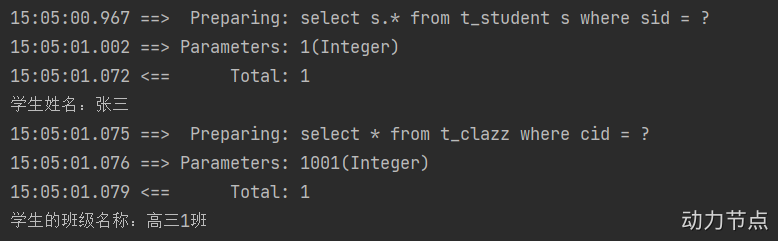
</resultMap>我们现在只查询学生名字,修改测试程序:
public class StudentMapperTest {
    @Test
    public void testSelectBySid(){
        StudentMapper mapper = SqlSessionUtil.openSession().getMapper(StudentMapper.class);
        Student student = mapper.selectBySid(1);
        //System.out.println(student);
        // 只获取学生姓名
        String sname = student.getSname();
        System.out.println("学生姓名:" + sname);
    }
}
如果后续需要使用到学生所在班级的名称,这个时候才会执行关联的sql语句,修改测试程序:
public class StudentMapperTest {
    @Test
    public void testSelectBySid(){
        StudentMapper mapper = SqlSessionUtil.openSession().getMapper(StudentMapper.class);
        Student student = mapper.selectBySid(1);
        //System.out.println(student);
        // 只获取学生姓名
        String sname = student.getSname();
        System.out.println("学生姓名:" + sname);
        // 到这里之后,想获取班级名字了
        String cname = student.getClazz().getCname();
        System.out.println("学生的班级名称:" + cname);
    }
}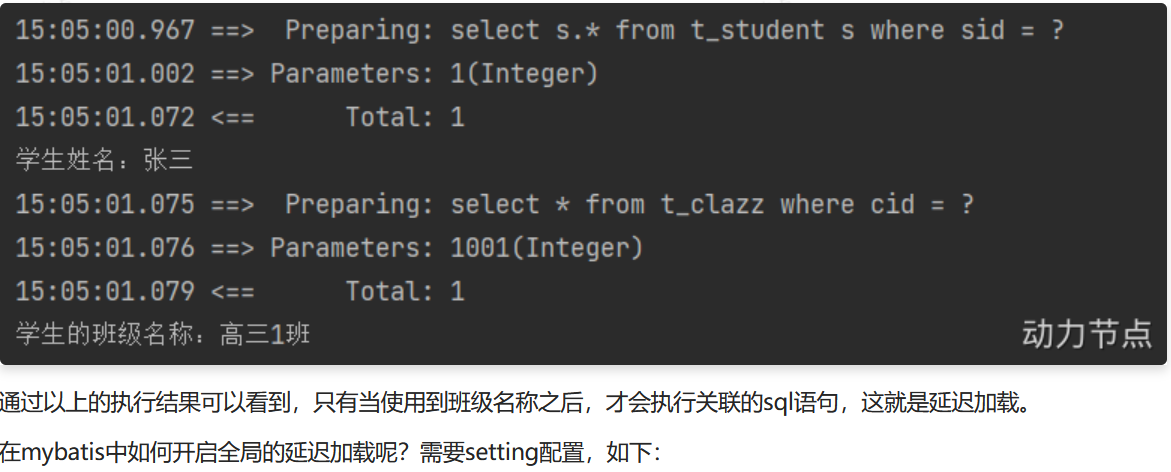
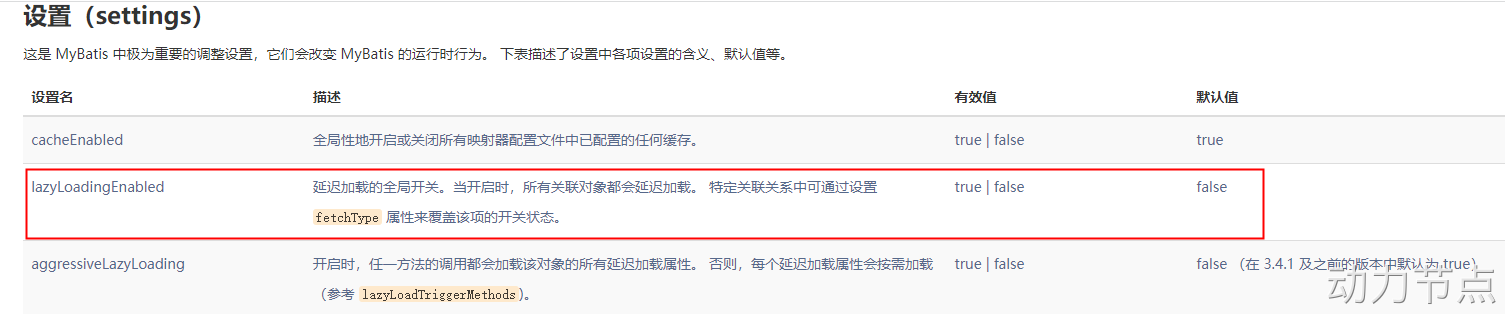

通过以上的测试可以看出,我们已经开启了全局延迟加载策略。
开启全局延迟加载之后,所有的sql都会支持延迟加载,如果某个sql你不希望它支持延迟加载怎么办呢?将fetchType设置为eager:
<resultMap id="studentResultMap" type="Student">
  <id property="sid" column="sid"/>
  <result property="sname" column="sname"/>
  <association property="clazz"
               select="com.powernode.mybatis.mapper.ClazzMapper.selectByCid"
               column="cid"
               fetchType="eager"/>
</resultMap>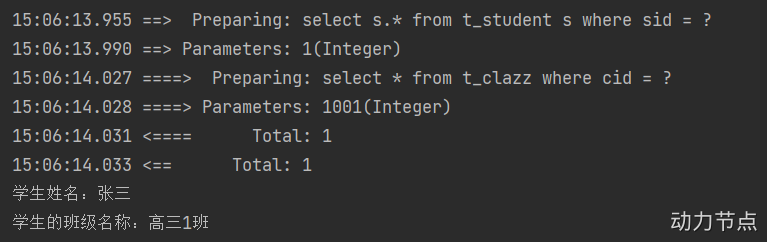
这样的话,针对某个特定的sql,你就关闭了延迟加载机制。
后期我们要不要开启延迟加载机制,主要看实际的业务需求是怎样的。
高级映射之一对多
从班级的角度去查询学生信息。班级只有一个,而一个班级有N个学生,所以是一对多
需求:查询一个班级信息,包括cid、cname、sid、sname。

前期工作:
在原来的Clazz.java 这个pojo类中添加一个集合private List<Student> students;并且重写toString、以及为他设置get、set方法。
//接口编写
//根据班级id查询班级信息{班级编号、班级名称、班级学生信息}
Clazz selectClazzByCid2(Integer cid);
//sqlMapper.xml编写
<resultMap id="clazzResultMapByCid" type="Clazz">
<id property="cid" column="cid"/>
<result property="cname" column="cname"/>
<collection property="students" ofType="Student">
<id property="sid" column="sid"/>
<result property="sname" column="sname"/>
</collection>
</resultMap>
<select id="selectClazzByCid2" resultMap="clazzResultMapByCid">
select c.cid,c.cname,s.sid,s.sname from t_clazz as c
left join t_stu as s
on c.cid = s.cid
where c.cid = #{cid}
</select>
//先写查询语句在写映射标签resultMap
在这里resultMap 不同于多对一里面的association,
在多对一的时候我这里面关联的是一个班级信息只包含cid、cname那也就是一个对象。
但是在这里多对一的情况下是一个班级对象关联多个学生,
那这个collection也是集合的意思,这很明显是关联一个集合的意思。
property指定Clzzz对象中的属性,ofType代表的是集合中元素对应的pojo类 @Test
public void testSelectClazzByCid(){
SqlSession sqlSession = SqlSessionUtil.getSession();
ClazzMapper mapper = sqlSession.getMapper(ClazzMapper.class);
Clazz clazz = mapper.selectClazzByCid2(1001);
System.out.println(clazz);
sqlSession.close();
}//查询结果
Clazz{cid=1001, cname='高三一班', students=[Student{sid=2, sname='李四', clazz=null}, Student{sid=3, sname='王五', clazz=null}, Student{sid=5, sname='钱七', clazz=null}]}
注意看,这里面的clazz为null,为什么?
因为我再
<collection property="students" ofType="Student">
<id property="sid" column="sid"/>
<result property="sname" column="sname"/>
</collection>这里面没有对Student这个关联的映射类做映射,
为什么映射?
因为这里必须得让他为null,在Studen类中包含一个Clazz,而Clazz类中又包含一个Student类,那这里要是进行映射的话他底层会不断的重复创建这两个类对象。
十四、MyBatis的缓存
缓存:cache
缓存的作用:通过减少IO的方式,来提高程序的执行效率。
mybatis的缓存:将select语句的查询结果放到缓存(内存)当中,下一次还是这条select语句的话,直接从缓存中取,不再查数据库。一方面是减少了IO。另一方面不再执行繁琐的查找算法。效率大大提升。
mybatis缓存包括:
- 一级缓存:将查询到的数据存储到SqlSession中。
- 二级缓存:将查询到的数据存储到SqlSessionFactory中。
- 或者集成其它第三方的缓存:比如EhCache【Java语言开发的】、Memcache【C语言开发的】等。
缓存只针对于DQL语句,也就是说缓存机制只对应select语句。
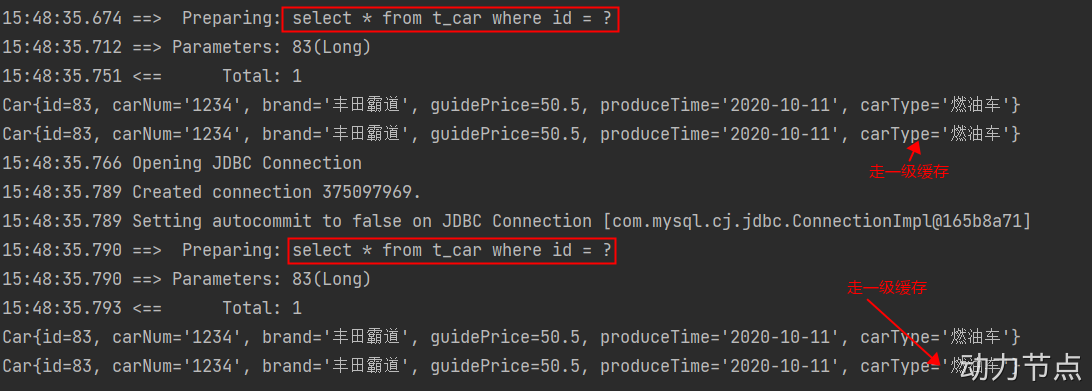
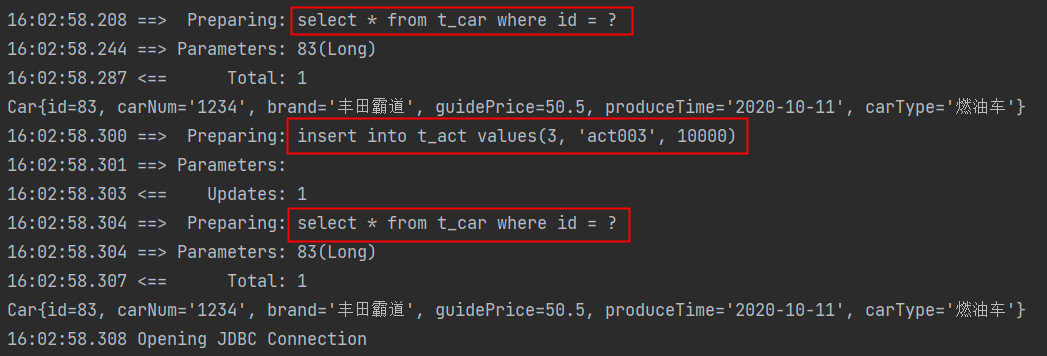
14.1 一级缓存
一级缓存默认是开启的。不需要做任何配置。
原理:只要使用同一个SqlSession对象执行同一条SQL语句,就会走缓存。
模块名:mybatis-010-cache
package com.powernode.mybatis.mapper;

import com.powernode.mybatis.pojo.Car;

public interface CarMapper {

    /**
     * 根据id获取Car信息。
     * @param id
     * @return
     */
    Car selectById(Long id);
}
<?xml version="1.0" encoding="UTF-8" ?>
<!DOCTYPE mapper
        PUBLIC "-//mybatis.org//DTD Mapper 3.0//EN"
        "http://mybatis.org/dtd/mybatis-3-mapper.dtd">

<mapper namespace="com.powernode.mybatis.mapper.CarMapper">

  <select id="selectById" resultType="Car">
    select * from t_car where id = #{id}
  </select>

</mapper>
package com.powernode.mybatis.test;
import com.powernode.mybatis.mapper.CarMapper;
import com.powernode.mybatis.pojo.Car;
import com.powernode.mybatis.utils.SqlSessionUtil;
import org.apache.ibatis.io.Resources;
import org.apache.ibatis.session.SqlSession;
import org.apache.ibatis.session.SqlSessionFactory;
import org.apache.ibatis.session.SqlSessionFactoryBuilder;
import org.junit.Test;
public class CarMapperTest {
@Test
public void testSelectById() throws Exception{
// 注意:不能使用我们封装的SqlSessionUtil工具类。
SqlSessionFactoryBuilder builder = new SqlSessionFactoryBuilder();
SqlSessionFactory sqlSessionFactory = builder.build(Resources.getResourceAsStream("mybatis-config.xml"));
SqlSession sqlSession1 = sqlSessionFactory.openSession();
CarMapper mapper1 = sqlSession1.getMapper(CarMapper.class);
Car car1 = mapper1.selectById(83L);
System.out.println(car1);
CarMapper mapper2 = sqlSession1.getMapper(CarMapper.class);
Car car2 = mapper2.selectById(83L);
System.out.println(car2);
SqlSession sqlSession2 = sqlSessionFactory.openSession();
CarMapper mapper3 = sqlSession2.getMapper(CarMapper.class);
Car car3 = mapper3.selectById(83L);
System.out.println(car3);
CarMapper mapper4 = sqlSession2.getMapper(CarMapper.class);
Car car4 = mapper4.selectById(83L);
System.out.println(car4);
}
}
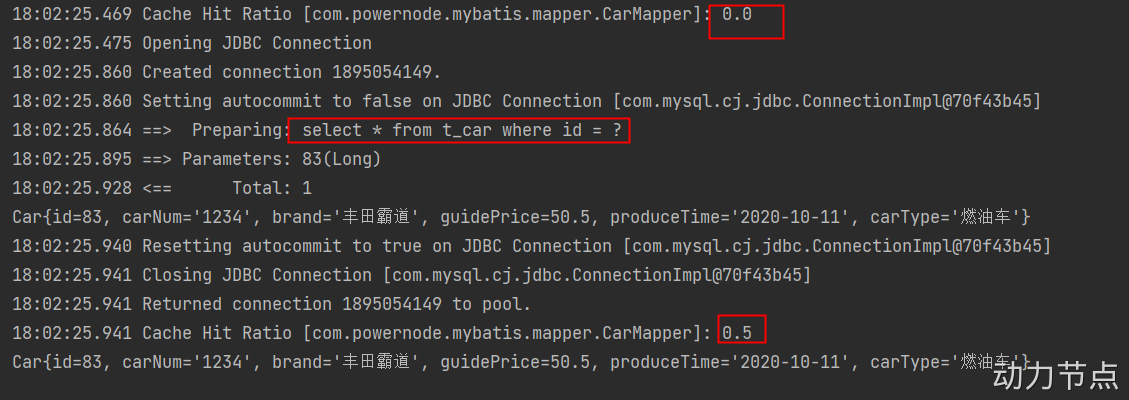
执行结果:
什么情况下不走缓存?
- 第一种:不同的SqlSession对象。
- 第二种:查询条件变化了。
一级缓存失效情况包括两种:
- 第一种:第一次查询和第二次查询之间,手动清空了一级缓存。
- 手动清空一级缓存:sqlSession.clearCache();
- 第二种:第一次查询和第二次查询之间,执行了增删改操作。【这个增删改和哪张表没有关系,只要有insert delete update操作,一级缓存就失效。】
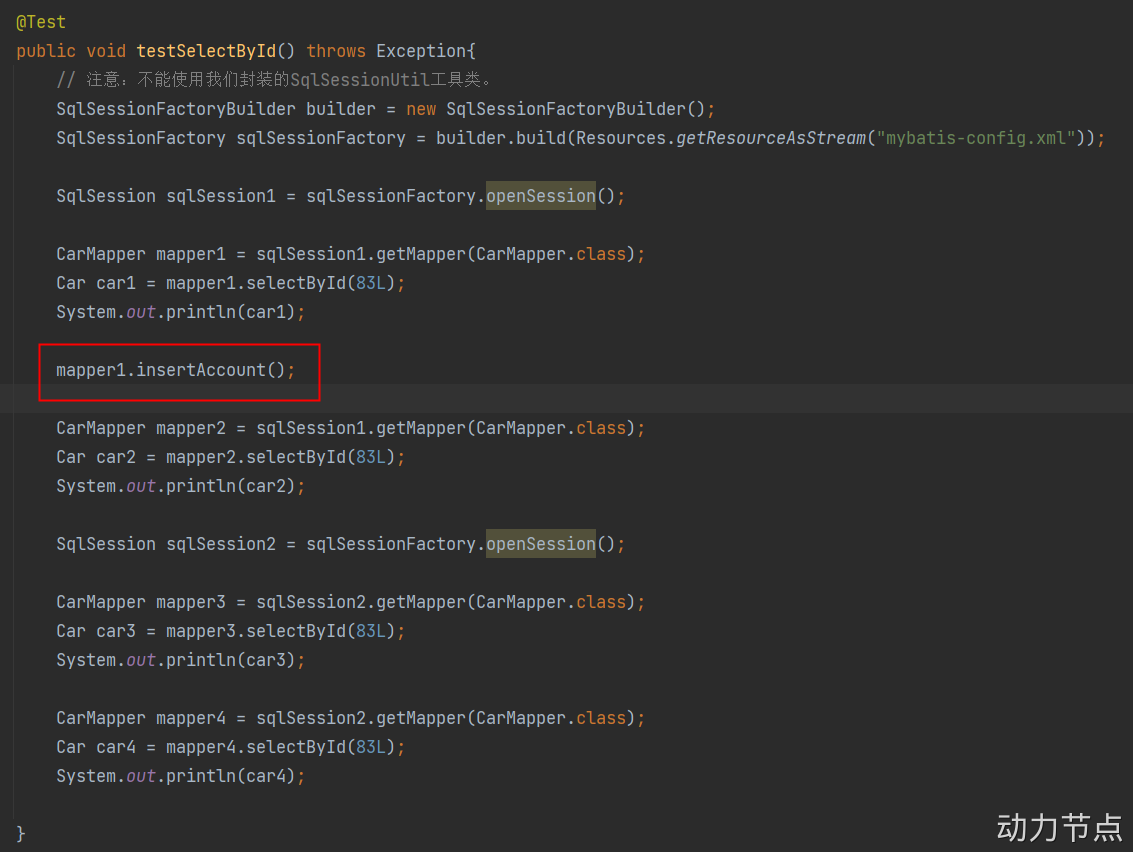
执行结果:
14.2 二级缓存
二级缓存的范围是SqlSessionFactory。
使用二级缓存需要具备以下几个条件:
- <setting name="cacheEnabled" value="true"> 全局性地开启或关闭所有映射器配置文件中已配置的任何缓存。默认就是true,无需设置。
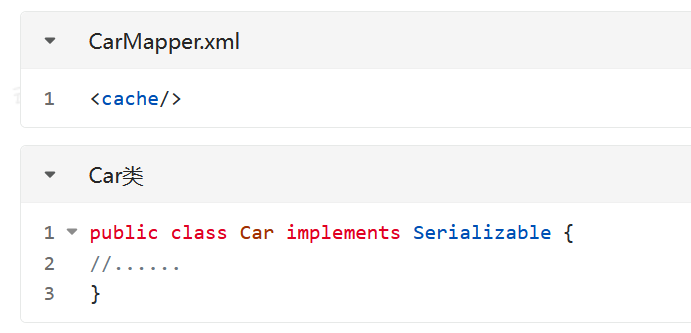
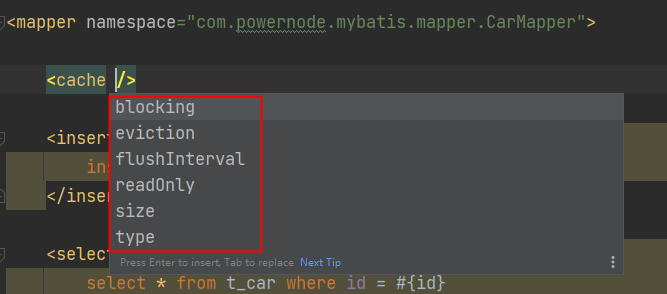
- 在需要使用二级缓存的SqlMapper.xml文件中添加配置:<cache />
- 使用二级缓存的实体类对象必须是可序列化的,也就是必须实现java.io.Serializable接口
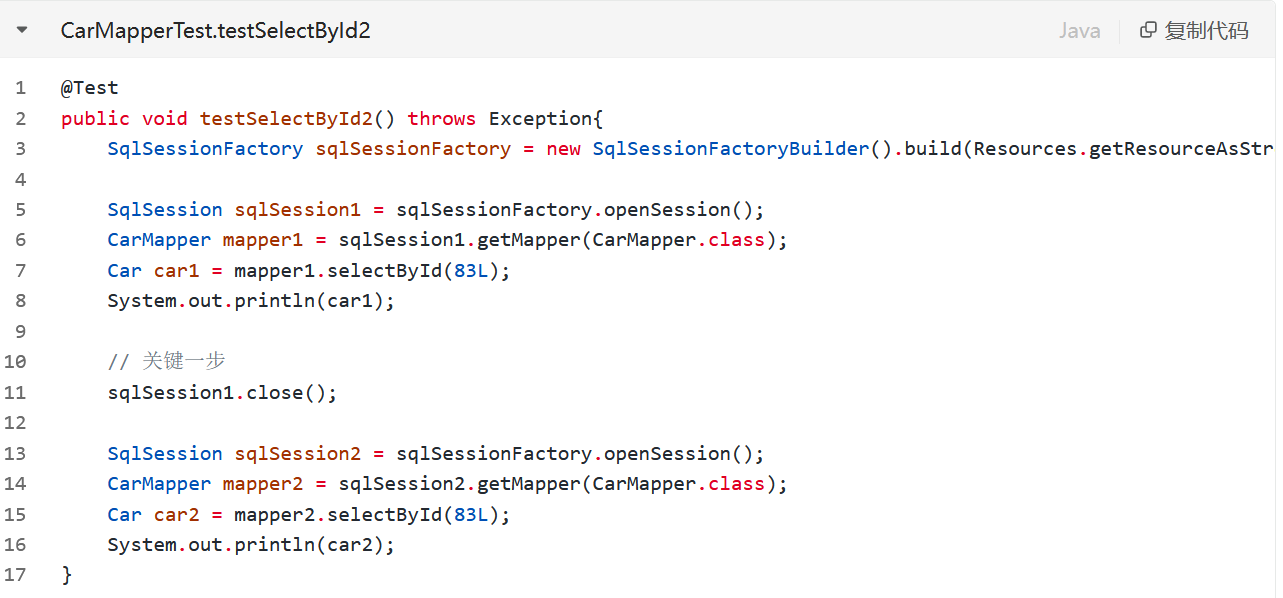
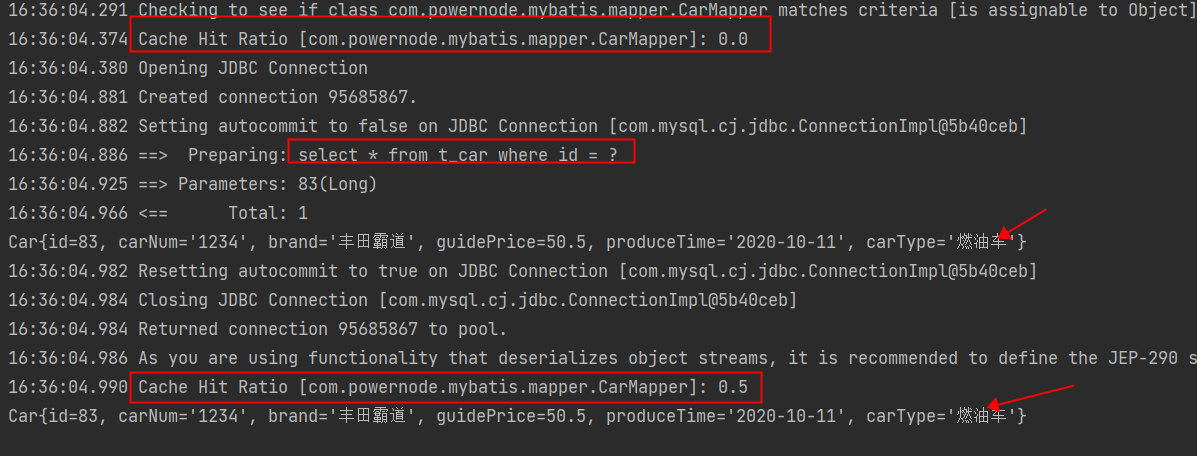
- SqlSession对象关闭或提交之后,一级缓存中的数据才会被写入到二级缓存当中。此时二级缓存才可用。
测试二级缓存:
二级缓存的失效:只要两次查询之间出现了增删改操作。二级缓存就会失效。【一级缓存也会失效】
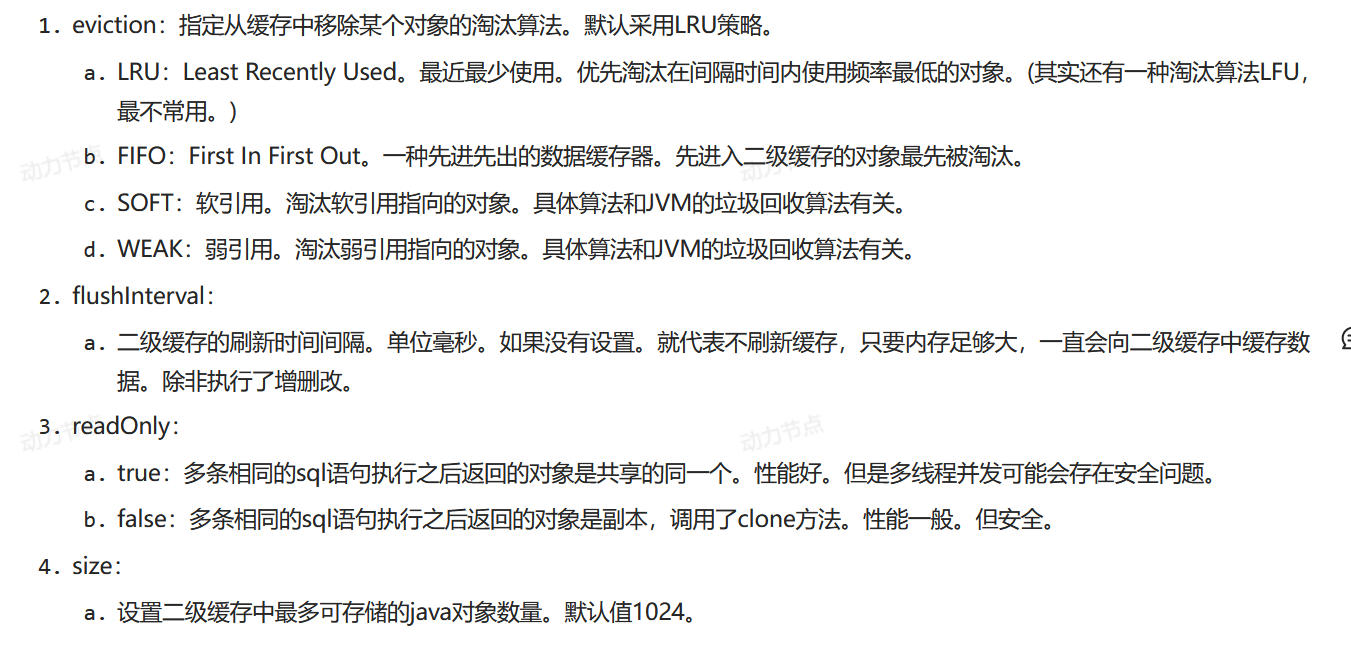
二级缓存的相关配置:

//pom.xml
<!--mybatis集成ehcache的组件-->
<dependency>
  <groupId>org.mybatis.caches</groupId>
  <artifactId>mybatis-ehcache</artifactId>
  <version>1.2.2</version>
</dependency>
//ehcache.xml
<?xml version="1.0" encoding="UTF-8"?>
<ehcache xmlns:xsi="http://www.w3.org/2001/XMLSchema-instance"
         xsi:noNamespaceSchemaLocation="http://ehcache.org/ehcache.xsd"
         updateCheck="false">
    <!--磁盘存储:将缓存中暂时不使用的对象,转移到硬盘,类似于Windows系统的虚拟内存-->
    <diskStore path="e:/ehcache"/>

    <!--defaultCache:默认的管理策略-->
    <!--eternal:设定缓存的elements是否永远不过期。如果为true,则缓存的数据始终有效,如果为false那么还要根据timeToIdleSeconds,timeToLiveSeconds判断-->
    <!--maxElementsInMemory:在内存中缓存的element的最大数目-->
    <!--overflowToDisk:如果内存中数据超过内存限制,是否要缓存到磁盘上-->
    <!--diskPersistent:是否在磁盘上持久化。指重启jvm后,数据是否有效。默认为false-->
    <!--timeToIdleSeconds:对象空闲时间(单位:秒),指对象在多长时间没有被访问就会失效。只对eternal为false的有效。默认值0,表示一直可以访问-->
    <!--timeToLiveSeconds:对象存活时间(单位:秒),指对象从创建到失效所需要的时间。只对eternal为false的有效。默认值0,表示一直可以访问-->
    <!--memoryStoreEvictionPolicy:缓存的3 种清空策略-->
    <!--FIFO:first in first out (先进先出)-->
    <!--LFU:Less Frequently Used (最少使用).意思是一直以来最少被使用的。缓存的元素有一个hit 属性,hit 值最小的将会被清出缓存-->
    <!--LRU:Least Recently Used(最近最少使用). (ehcache 默认值).缓存的元素有一个时间戳,当缓存容量满了,而又需要腾出地方来缓存新的元素的时候,那么现有缓存元素中时间戳离当前时间最远的元素将被清出缓存-->
    <defaultCache eternal="false" maxElementsInMemory="1000" overflowToDisk="false" diskPersistent="false"
                  timeToIdleSeconds="0" timeToLiveSeconds="600" memoryStoreEvictionPolicy="LRU"/>

</ehcache>
第三步:修改SqlMapper.xml文件中的<cache/>标签,添加type属性。
//CarMapper.xml
<cache type="org.mybatis.caches.ehcache.EhcacheCache"/>
第四步:编写测试程序使用。
@Test
public void testSelectById2() throws Exception{
    SqlSessionFactory sqlSessionFactory = new SqlSessionFactoryBuilder().build(Resources.getResourceAsStream("mybatis-config.xml"));

    SqlSession sqlSession1 = sqlSessionFactory.openSession();
    CarMapper mapper1 = sqlSession1.getMapper(CarMapper.class);
    Car car1 = mapper1.selectById(83L);
    System.out.println(car1);

    sqlSession1.close();

    SqlSession sqlSession2 = sqlSessionFactory.openSession();
    CarMapper mapper2 = sqlSession2.getMapper(CarMapper.class);
    Car car2 = mapper2.selectById(83L);
    System.out.println(car2);
} 
mybatis逆向工程
所谓的逆向工程是:根据数据库表逆向生成Java的pojo类,SqlMapper.xml文件,以及Mapper接口类等。
要完成这个工作,需要借助别人写好的逆向工程插件。
思考:使用这个插件的话,需要给这个插件配置哪些信息?
- pojo类名、包名以及生成位置。
- SqlMapper.xml文件名以及生成位置。
- Mapper接口名以及生成位置。
- 连接数据库的信息。
- 指定哪些表参与逆向工程。
- ......
这个逆向工程用到再说吧,下面还有一个注解式开发,这个很简单的,一般来说他只能用于简单的增删改查操作,对复杂的增删改查用注解式开发就显得很累赘了,有兴趣自己去了解吧


 1万+
1万+


 被折叠的 条评论
为什么被折叠?
被折叠的 条评论
为什么被折叠?
 到【灌水乐园】发言


