


1. 下载gdb
http://ftp.gnu.org/gnu/gdb/
http://ftp.gnu.org/gnu/gdb/gdb-8.2.tar.xz
解压到:
tar -Jxvf gdb-8.2.tar.xz
/home/semilog/working/gdb/gdb-8.2/
2. 编译
(1) 先编译在 pc 上运行的 gdb (arm-linux-gnueabihf-gdb)
此时使用的编译器是 ubuntu 下面的 gcc
./configure --target=arm-linux-gnueabihf --program-prefix=arm-linux-gnueabihf- --prefix=/home/semilog/working/gdb/pc_gdb
说明:
--target=arm-linux-gnueabihf :目标调试的类型,我们是要用来调试 arm 平台下的linux下应用
--program-prefix=arm-linux-gnueabihf- : 在pc上运行的调试目标arm 的程序的缀最终生成
--prefix=/home/semilog/working/gdb/pc_gdb : 安装目录, 表示在pc 上运行的gdb
此时在 /home/semilog/working/gdb/gdb-8.2/下面config 和 编译。
make -j4
make install
(2) 再来编译在ARM板上运行的 gdbserver
source env_setup.sh
#!/bin/sh
TOOLCHAIN_PATH=/home/semilog/semilog/gcc-linaro-5.3-2016.02-x86_64_arm-linux-gnueabihf
export CROSS_COMPILE=$TOOLCHAIN_PATH/bin/arm-linux-gnueabihf-
export PATH=$TOOLCHAIN_PATH/bin:$PATH
export PROJECT=gdb
#export PREFIX=/home/semilog/semilog/bin
export PS1="\[\e[32;1m\][$PROJECT]\[\e[0m\]:\w> "
/home/semilog/working/gdb/gdb-8.2 目录下:
make distclean
./configure --host=arm-linux-gnueabihf --target=arm-linux-gnueabihf --prefix=/home/semilog/working/gdb/arm_gdb
make -j2
make install
cd /home/semilog/working/gdb/arm_gdb/bin/
arm-linux-gnueabihf-strip gdbserver
arm-linux-gnueabihf-strip gdb
PS:
如果只想编译gdbserver, 可以按如下操作:
cd /home/semilog/working/gdb/gdb-8.2/gdb/gdbserver
./configure --host=arm-linux-gnueabihf --target=arm-linux-gnueabihf CC=arm-linux-gnueabihf-gcc
make -j2
arm-linux-gnueabihf-strip gdbserver
不需要 make install 了。 最后发现,这样编译出来的gdbserver 小很多,只有上面的3分之一 放在arm上运行也ok
3. 配置运行
gdb和gdbserver之间可以通过TCP(格式为: host:port)、UDP(格式为: udp: host:port)或者串口(比如/dev/ttyS2)来通信,我们以TCP方式为例来说明。
假设目标板的IP为192.168.1.1,主机为192.168.1.100,使用端口6000来调试,首先在目标板上运行gdbserver:
# gdbserver 192.168.1.1:6000 ./test_os
Process ./test_os created; pid = 1297
Listening on port 6000
然后在主机上运行gdb,并运行gdb命令“target remote 192.168.1.1:6000”:
$arm-linux-gnueabihf-gdb ./overflow
GNU gdb 8.2
Copyright (C) 2006 Free Software Foundation, Inc.
GDB is free software, covered by the GNU General Public License, and you are
welcome to change it and/or distribute copies of it under certain conditions.
Type "show copying" to see the conditions.
There is absolutely no warranty for GDB. Type "show warranty" for details.
This GDB was configured as "--host=i686-pc-linux-gnu --target=arm-linux"...
(gdb) target remote 192.168.1.1:6000
Remote debugging using 192.168.1.1:6000
0x28556080 in ??()
(gdb)
接下来你就可以象前面所介绍的那样使用gdb命令了,比如设置断点及查看变量单步执行等。
----------------------------------
4. 实际使用
出错如下:
(gdb) target remote 192.168.48.1:6000
Remote debugging using 192.168.48.1:6000
warning: Can not parse XML target description; XML support was disabled at compile time
Reading /lib/ld-linux-armhf.so.3 from remote target...
warning: File transfers from remote targets can be slow. Use "set sysroot" to access files locally instead.
Reading /lib/ld-linux-armhf.so.3 from remote target...
Reading symbols from target:/lib/ld-linux-armhf.so.3...done.
Remote 'g' packet reply is too long (expected 168 bytes, got 328 bytes): 0000000000000000000000000000000000000000000000000000000000000000000000000000000000000000000000000000000020fdffbe00000000007afdb6100000000000000000000000000000000000000000000000000000000000000000000000000000000000000000000000000000000000000000000000000000000000000000000000000000000000000000000000000000000000000000000000000000000000000000000000000000000000000000000000000000000000000000000000000000000000000000000000000000000000000000000000000000000000000000000000000000000000000000000000000000000000000000000000000000000000000000000000000000000000000000000000000000000000000000000000000000000000000000000000000000000000000000000000000000000000000000000000
(1). 没有XML库,出错
(gdb)target remote 192.168.48.1:6000
warning: Can not parse XML target description; XML support was disabled at compile time
https://github.com/libexpat/libexpat
配置并编译expat
ubuntu要安装:docbook-to-man
sudo apt-get install docbook-to-man
./buildconf.sh
./configure --without-docbook --prefix=/home/semilog/working/gdb/expat_out
make && make install
这个编译过程中可能会出错,把doc编译安装的去掉。一切ok
再编译:
./configure
./configure --target=arm-linux-gnueabihf --program-prefix=arm-linux-gnueabihf- --prefix=/home/semilog/working/gdb/pc_gdb --with-expat --includedir=/home/semilog/working/gdb/expat_out/include --libdir=/home/semilog/working/gdb/expat_out/lib
make
make install
这次再连接,果然就可以调试了。
(2)其中
Reading /lib/ld-linux-armhf.so.3 from remote target...
这里要设置
(gdb) set sysroot /system/out/targetfs/
targetfs 对应于arm板上的根文件系统:
5. 总结
使用流程如下:
test_os: 为要调试的arm板上的程序
arm板的ip地址:192.168.1.1
/home/semilog/output/targetfs/ : 根文件系统路径
/home/semilog/test/test_os: 下载到arm板上运行的程序test_os的路径
-tui: 参数的话,可以看到这块源码,根据个人习惯使用
1. 连上arm板
gdbserver 192.168.1.1:6000 test_os
2. ubuntu的pc上
arm-linux-gnueabihf-gdb -tui /home/semilog/test/test_os // 加上/home/semilog/test/test_os是为什么在pc 上看到源码,方便
进入GDB:
(gdb) set sysroot /home/semilog/output/targetfs/
(gdb) target remote 192.168.1.1:6000
然后就一样用了
经测试可以。
经测试可以使用如下命令指定符号表
(gdb) symbol-file /home/semilog/test/test_os
最后我发现,我用编译器自己带的arm-linux-gnueabihf-gdb 也可以连接上调试。看来版本并不一定要严格对应。
一、调试原理
这 里的gdb调试是在pc机上对在开发板上运行的程序进行调试。具体来说的话,在pc机上要运行gdb,在开发板上运行dbserver。gdb调试的时 候,pc机上的gdb向开发板上的gdbserver发出命令,而开发板上的gdbserver就会向应用程序发出信号,使应用程序停下来或者完成其他一 些工作!由此我们知道,pc机上要运行gdb,开发板上要运行gdbserver!
二、安装gdb与gdbserver:需要 gdb-7.4.tar.bz2
gdb:
1、下载: http://ftp.gnu.org/gnu/gdb/
2、解压:tar xvf gdb-7.4.tar.bz2
3、配置:cd gdb-7.4/
./configure --target=arm-linux
4、编译:make
5、安装:mkdir tmp
make install prefix=$PWD/tmp
这里是安装到了我们当前目录的tmp里面
6、查看PC机上以前安装好的gdb版本:arm-linux-gdb -v
发现是7.4版本的,我们编译的正好也是7.4版本的哦!
7、拷贝:cp tmp/bin/arm-linux-gdb /bin/
以后我们如果想使用我们自己编译的gdb的话可以使用绝对路径:/bin/arm-linux-gdb
gdbserver
1、cd gdb/gdbserver/
2、配置: ./configure --target=arm-linux --host=arm-linux
3、编译: make CC=/usr/local/arm/3.4.5/bin/arm-linux-gcc
出现错误:
linux-arm-low.c: In function `arm_stopped_by_watchpoint':
linux-arm-low.c:642: error: `PTRACE_GETSIGINFO' undeclared (first use in this function)
linux-arm-low.c:642: error: (Each undeclared identifier is reported only once
linux-arm-low.c:642: error: for each function it appears in.)
解决方法:这里提示没有PTRACE_GETSIGINFO这个东西,这里搜索PTRACE_GETSIGINFO的路径为-I指定的头文件以及交叉 编译工具链,我们不妨到交叉编译工具链里面去查找一下:
cd /usr/local/arm/3.4.5/
grep "PTRACE_GETSIGINFO" * -nR
找到如下信息:
arm-linux/sys-include/linux/ptrace.h:27:#define PTRACE_GETSIGINFO 0x4202
arm-linux/include/linux/ptrace.h:27:#define PTRACE_GETSIGINFO 0x4202
distributed/arm-linux/sys-include/linux/ptrace.h:27:#define PTRACE_GETSIGINFO 0x4202
distributed/arm-linux/include/linux/ptrace.h:27:#define PTRACE_GETSIGINFO 0x4202
说明PTRACE_GETSIGINFO是在交叉编译工具链:linux/ptrace.h文件里定义的,那么可能是头文件没有包含好吧!
我 们到gdbserver下的linux-arm-low.c里面一看,可不是嘛,只有:#include <sys/ptrace.h>而没有:#include <linux/ptrace.h>,于是加上:#include <linux/ptrace.h>,再次编译:make CC=/usr/local/arm/3.4.5/bin/arm-linux-gcc,成功!
4、拷贝:将gdbserver拷贝到开发板的bin目录下
三、调试
1、编译要调试的应用程序:必须要加-g选项
测试程序如下(名字是:test_debug.c):
#include <stdio.h>
void C(int *p)
{
*p = 0x12;
}
void B(int *p)
{
C(p);
}
void A(int *p)
{
B(p);
}
void A2(int *p)
{
C(p);
}
int main(int argc, char **argv)
{
int a;
int *p = NULL;
A2(&a); // A2 > C
printf("a = 0x%x\n", a);
A(p); // A > B > C
return 0;
}
按如下编译它:arm-linux-gcc -g -o test_debug test_debug.c
2、运行时出现错误:
/mnt/code/28th_app_debug # ./test_debug
a = 0x12
Segmentation fault
下面就开始进行调试
3、在开发板上:gdbserver 192.168.183.127:2345 ./test_debug
打印出如下信息:
Process ./test_debug created; pid = 751
Listening on port 2345
其中192.168.183.127:本开发板的ip
123:端口号,自己随便写的
./test_debug:要调试的程序
4、在PC上:/bin/arm-linux-gdb ./test-debug
target remote 192.168.183.127:2345
5、下面就可以正式调试了!我们先来说一下几个常用的命令
(1)l:列出所有源代码
(2)break main:在main处打断点
break test_debug.c:11:在test_debug.c的11行打断点
(3)c:运行到断点处
(4)step:单步执行
(5)next:单步执行,但是step会进入函数里面,但是next不会
(6)print a:打印a这个变量的值
(6)quit:退出,输入此命令则开发板上的gdbserver也退出
更详细的命令,我们在下一节里面会进一步来讲讲的!
6、另一种调试方法
让程序在开发板上直接运行,当它发生错误时,令它产生core dump文件
然后使用gdb根据core dump文件找到发生错误的地方
在ARM板上:
1. ulimit -c unlimited
2. 执行应用程序 : 程序出错时会在当前目录下生成名为core的文件
在PC上:
3、首先将core文件拷贝到pc机上
然后:/bin/arm-linux-gdb ./test_debug ./core
打印出如下信息:
GNU gdb (GDB) 7.4
Copyright (C) 2012 Free Software Foundation, Inc.
License GPLv3+: GNU GPL version 3 or later <http://gnu.org/licenses/gpl.html>
This is free software: you are free to change and redistribute it.
There is NO WARRANTY, to the extent permitted by law. Type "show copying"
and "show warranty" for details.
This GDB was configured as "--host=i686-pc-linux-gnu --target=arm-linux".
For bug reporting instructions, please see:
<http://www.gnu.org/software/gdb/bugs/>...
Reading symbols from /home/share/jz2440/test_debug...done.
[New LWP 748]
warning: `/lib/libc.so.6': Shared library architecture unknown is not compatible with target architecture arm.
warning: `/lib/ld-linux.so.2': Shared library architecture unknown is not compatible with target architecture arm.
Core was generated by `./test_debug'.
Program terminated with signal 11, Segmentation fault.
#0 0x000084ac in C (p=0x0) at test_debug.c:6
6 *p = 0x12;
4、bt:可以显示调用关系
#0 0x000084ac in C (p=0x0) at test_debug.c:6
#1 0x000084d0 in B (p=0x0) at test_debug.c:12
#2 0x000084f0 in A (p=0x0) at test_debug.c:17
#3 0x00008554 in main (argc=1, argv=0xbeb32eb4) at test_debug.c:34
实现ARM-Linux远程交叉调试---arm-linux-gdb(gdbclient)+gdbserver
2018年11月21日 16:02:12 假物者 阅读数 170
版权声明:凡本人原创,转发请注明出处,谢谢! https://blog.csdn.net/qq_41248872/article/details/83987670
环境:
目标板:ARM Cortex A9
交叉编译的环境:ubuntu
所需安装包:
1、ncurses-5.9.tar.gz(下载网址:http://linux.softpedia.com/get/Programming/Libraries/Ncurses-6097.shtml#download)
2、gdb-7.8.1.tar.gz(下载网址:http://ftp.gnu.org/gnu/gdb/ )
前言:
利用GDB进行远程调试,首先需要明确一下几点:
1、调试用的GDB必须是交叉编译产生的GDB;
2、调试的程序必须是交叉编译且带 “-g” 选项的可执行程序。
3、在宿主机和目标开发板上调试的必须是同一个可执行程序。
4、基于 3 ,我们必须要建立一个宿主机和开发板的NFS共享目录,以实现调试调试同一可执行程序。
5、目标开发板的gdbserver和宿主机用的GDB版本必须相同,最好是同一源文件编译同时产生的。
6、在开发板上必须开通远程调试所需要的端口,否则远程调试机无法通过端口远程连接到开发板上。
移植过程:
一、编译运行在PC端的gdbclient程序arm-linux-gdb
1) 解压
tar -xzvf gdb-7.8.1.tar.gz
2) 创建目标安装文件夹
cd gdb-7.8.1
mkdir _install
3) 配置
./configure --target=arm-none-linux-gnueabi --prefix=${PWD}/_install --disable-werror
*************修改源代码**************************
如果不修改,gdb执行l列出源代码时会出错!
(gdb) l
Remote 'g' packet reply is too long: 00000000ccade1be0000000000000000000000000000000000000000000000000000000000000000000000000000000000000000c0ace1be00000000c0770d40100000000000000000000000000000000000000000000000000000000000000000000000000000000000000000000000000000000000000000000000000000000000000000000000000000000000000000000000000000000000000000000000000000000000000000000000000000000000000000000000000000000000000000000000000000000000000000000000000000000000000000000000000000000000000000000000000000000000000000000000000000000000000000000000000000000000000000000000000000000000000000000000000000000000000000000000000000000000000000000000000000000000000000000000000000000000000000000000
需要修改gdb代码解决,办法是:修改gdb/remote.c文件,注释process_g_packet函数中的下列两行:
//if (buf_len > 2 * rsa->sizeof_g_packet)
//error (_(“Remote ‘g’ packet reply is too long: %s”), rs->buf);
在其后添加:
if (buf_len > 2 * rsa->sizeof_g_packet) {
rsa->sizeof_g_packet = buf_len ;
for (i = 0; i < gdbarch_num_regs (gdbarch); i++) {
if (rsa->regs->pnum == -1)
continue;
if (rsa->regs->offset >= rsa->sizeof_g_packet)
rsa->regs->in_g_packet = 0;
else
rsa->regs->in_g_packet = 1;
}
}
4)编译
make -j4
5)安装
make install (.../_install/bin/目录下生成arm-none-linux-gnueabi-gdb 和 arm-none-linux-gnueabi-run
两个可执行程序)
6)去除调试信息,减小内存占用
strip arm-none-linux-gnueabi-gdb
7)拷贝到原来交叉编译器(arm-linux-gcc路径下覆盖之前的arm-linux-gdb)
cp arm-none-linux-gnueabi-gdb /usr/local/arm/arm-2009q3/bin/
二、编译ARM端运行的gdbserver
1、ncurses的交叉编译
NOTE:ncurses为gdb的链接库,应该是没有这个库的话,gdb就编译不过去。有试着直接交叉编译gdb,在configure时候,就报找不到libterm的错误。
1) 解压
tar -xzvf ncurses-5.9.tar.gz
2) 创建目标安装文件夹
cd ncurses-5.9
mkdir _install
3) 配置
./configure --host=arm-none-linux-gnueabi --prefix=${PWD}/_install --without-ada --enable-termcap --with-shared
4) 编译
make -j4
5) 安装
make install
2、gdbserver的交叉编译
1) 解压
tar -xzvf gdb-7.8.1.tar.gz
2) 创建目标安装文件夹
cd gdb-7.8.1
mkdir _install
3) 配置
./configure --host=arm-none-linux-gnueabi --enable-shared --prefix=${PWD}/_install --without-x --disable-gdbtk --disable-tui --without-included-regex --without-included-gettext LDFLAGS="-L/home/jiangyu/software/gdb/ncurses-5.9/_install/lib" CPPFLAGS="-I/home/jiangyu/software/gdb/ncurses-5.9/_install/include"
Ø --enable-shared 动态编译
Ø --host=arm-none-linux-gnueabi 用arm-none-linux-gnueabi-gcc编译
Ø --prefix=$PWD/_install 安装目录
Ø --without-x 取消x windows 支持
Ø --disable-gdbtk 取消gdbtk,应该也是图形界面相关的
Ø --disable-tui 取消tui 界面
Ø --without-included-regex 关闭正则表达式库
Ø --without-included-gettext 去掉用于多语言处理的 gettext库正则表达式/gettext,暂时不需要,先去掉
Ø CPPFLAGS/LDFLAGS是确保能找到ARM版的ncurses库
4) 编译
make -j4
5) 安装
make install
3、拷贝到ARM板
1).拷贝依赖库libncurses.so
cp libncurses.so.5.9 /home/jiangyu/rootfs/lib/
ln -s libncurses.so.5.9 libncurses.so
2).拷贝gdbserver程序
(拷贝前去掉调试信息 ,减小文件大小,执行命令: arm-linux-uclibcgnueabi-strip gdbserver)
cp gdbserver /home/jiangyu/rootfs/usr/sbin
(拷贝的东西都需要记住加权限)
三、调试
(ARM板上执行gdbserver,作为server端,PC上执行arm-linux-gdb作为client端进行远程调试,编译代码时加入-g调试选项)
1)Target端(ARM板)建立远程调试服务
执行gdbserver 192.168.31.107:8889 gdbtest
(192.168.31.107为本机IP,8889为端口)
[root@Itop4412 ]#gdbserver 192.168.31.107:8889 gdbtest

(3)Host端(PC)GDB加载要调试的程序
执行:arm-none-linux-gnueabi-gdb gdbtest

(4)连接到目标板调试服务
执行:target remote 192.168.31.107:8889
(192.168.31.107是开发板IP)

执行l列出源代码
(gdb) l
设置断点
(gdb) b 9
执行
(gdb) c
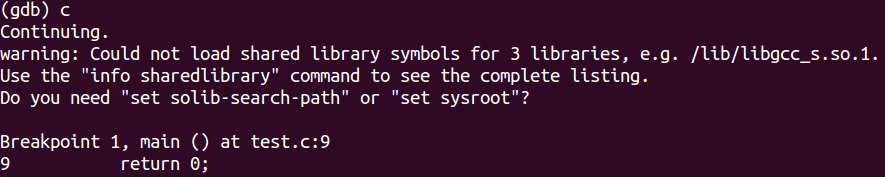 若产生这个错误主要是由于该调试的应用程序使用到了额外的库,而这个库在gdb默认的搜索路径内没有
(相对与远程调试,gdb默认搜索的路径即为交叉编译器的库路径,下面我会介绍到)
因此,这里我们需要修改一下gdb默认的共享库搜索路径。
set solib-search-path /usr/local/arm/arm-2009q3/arm-none-linux-gnueabi/libc/lib/
solib-absolute-prefix设置的是被搜索文件路径的前缀,一般设置为交叉编译工具链的库路径前缀,即不包括lib目录,lib目录的父目录,solib-search-path设置的是被搜索库文件的路径。solib-search-path可以有多个路径,中间按用:隔开, solib-absolute-prefix的值只能有一个。若在solib-absolute-prefix指定的路径内没有搜索到库,则再继续尝试从solib-search-path指定的路径进行搜索。
再次执行:
(gdb)c

调试成功。


 646
646


 被折叠的 条评论
为什么被折叠?
被折叠的 条评论
为什么被折叠?
 到【灌水乐园】发言


