


Retrofit使用及原理探索
1、Retrofit基本使用
1.1、创建接口
public interface Github {

    @GET("/repos/{owner}/{repo}/contributors")
    Call<List<Contributor>> contributors(
            @Path("owner") String owner,
            @Path("repo") String repo);

    class Contributor {
        public final String login;
        public final int contributions;

        public Contributor(String login, int contributions) {
            this.login = login;
            this.contributions = contributions;
        }
    }
}
1.2、构建实例发起请求
//构建retrofit实例。增加了Gson解析类
Retrofit retrofit = new Retrofit.Builder()
     .baseUrl(API_URL)
     .addConverterFactory(GsonConverterFactory.create())
     .build();
//使用retrofit生产能发起请求的实例。
Github github = retrofit.create(Github.class);
//发起请求
Call<List<Github.Contributor>> call = github.contributors("square", "retrofit");
List<Github.Contributor> contributors = call.execute().body();
for (Github.Contributor contributor : contributors) {
     System.out.println(contributor.login + " (" + contributor.contributions + ")");
}
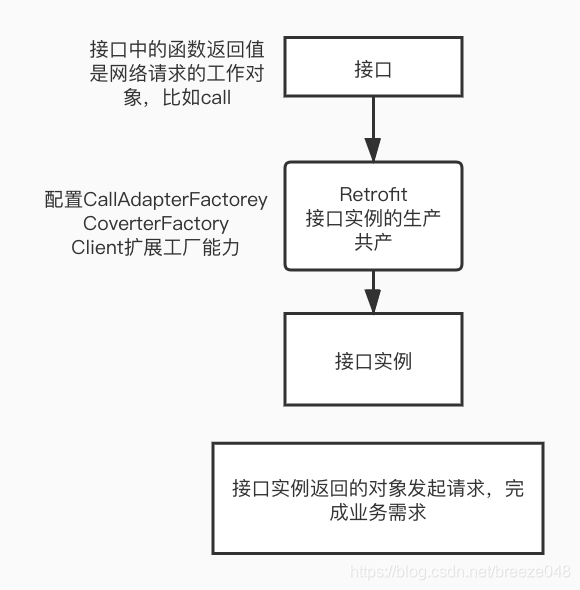
重点注意,Retrofit的作用是:生产能发起请求的实例!!!!!而不是Retrofit发起请求
1.3、使用Rxjava
public interface Github {
	//返回RxJava的Observable对象
    @GET("/repos/{owner}/{repo}")
    Observable<Repository> repo(
            @Path("owner") String owner,
            @Path("repo") String repo);

    class Repository {
        public final int id;
        public final String name;
        public final String html_url;

        public Repository(int id, String name, String html_url) {
            this.id = id;
            this.name = name;
            this.html_url = html_url;
        }

        @Override
        public String toString() {
            return "Repository{" +
                    "id=" + id +
                    ", name='" + name + '\'' +
                    ", html_url='" + html_url + '\'' +
                    '}';
        }
    }

}

//调用,注意addCallAdapterFactory增加了RxJava2CallAdapterFactory
Retrofit retrofit = new Retrofit.Builder()
     	.baseUrl(API_URL)
        .addConverterFactory(GsonConverterFactory.create())
        .addCallAdapterFactory(RxJava2CallAdapterFactory.create())
        .build();

Github github = retrofit.create(Github.class);

Observable<Github.Repository> observable =  github.repo("square", "retrofit");
//Rxjava的舒勇
observable.subscribe(repository ->
            System.out.println(repository)
);
1.4、增加自定义ConvertFactory
public interface Github {
	//这里增加了类型为Date的参数
    @GET("/repos/{owner}/{repo}/contributors")
    Call<List<Contributor>> contributors(
            @Path("owner") String owner,
            @Path("repo") String repo,
            @Query("current") Date now);
}

//调用
public class Demo {

    public static final String API_URL = "https://api.github.com";

    public static void main(String[] args) throws IOException {

        Retrofit retrofit = new Retrofit.Builder()
                .baseUrl(API_URL)
                .client(new OkHttpClient.Builder()
                        .addInterceptor(new HttpLoggingInterceptor(System.out::println).setLevel(HttpLoggingInterceptor.Level.BODY))
                        .build())
                .addConverterFactory(GsonConverterFactory.create())
                .addCallAdapterFactory(RxJava2CallAdapterFactory.create())
                .build();

        Github github = retrofit.create(Github.class);

        Call<List<Github.Contributor>> call = github.contributors("square", "retrofit", new Date());
        List<Github.Contributor> contributors = call.execute().body();
        for (Github.Contributor contributor : contributors) {
            System.out.println(contributor.login + " (" + contributor.contributions + ")");
        }
    }

}
查看拦截下来的日志,请求为:https://api.github.com/repos/square/retrofit/contributors?current=Wed%20Dec%2009%2023%3A44%3A54%20CST%202020
current参数的Date格式为Wed%20Dec%2009%2023%3A44%3A54%20CST%202020, 如果我们希望做一个Converter来实现Date格式的转化,该如何实现呢?
//第一步,实现一个Converter,对Date转换为String
public class DateConverter implements Converter<Date, String> {
    private static final SimpleDateFormat SIMPLE_DATE_FORMAT = new SimpleDateFormat("yyyyMMdd_HHmmss");
    @Nullable
    @Override
    public String convert(Date value) throws IOException {
        return SIMPLE_DATE_FORMAT.format(value);
    }

    //第二步,创建Factory,将DateConverter返回,注意这里是在stringConverter返回的DateConverter
    //Factory共可返回三类Converter,分别对应requestBody,responseBody和其他参数转换
    //其他参数转换用的是stringConverter,下面这段英文为官方对stringConverter的说明
     /**
     * Returns a {@link Converter} for converting {@code type} to a {@link String}, or null if
     * {@code type} cannot be handled by this factory. This is used to create converters for types
     * specified by {@link Field @Field}, {@link FieldMap @FieldMap} values,
     * {@link Header @Header}, {@link HeaderMap @HeaderMap}, {@link Path @Path},
     * {@link Query @Query}, and {@link QueryMap @QueryMap} values.
     */
    public static class DateConverterFactory extends Factory {
        @Nullable
        @Override
        public Converter<?, String> stringConverter(Type type, Annotation[] annotations, Retrofit retrofit) {
            if(type == Date.class){
                return new DateConverter();
            }
            return super.stringConverter(type, annotations, retrofit);
        }

        public static Factory create(){
            return new DateConverterFactory();
        }
    }
}
使用方式很简单,构建Retrofit时,addConvertFactory,加上该Converter
    Retrofit retrofit = new Builder()
          .baseUrl(API_URL)
            .client(new OkHttpClient.Builder()
                    .addInterceptor(new HttpLoggingInterceptor(System.out::println).setLevel(Level.BODY))
                    .build())
        .addConverterFactory(GsonConverterFactory.create())
            .addConverterFactory(DateConverterFactory.create())
        .build();
效果为:https://api.github.com/repos/square/retrofit/contributors?current=20201209_235715,格式化了Date
1.5、自定义CallAdapterFactory
CallAdapter,顾名思义,是对Call对象的转换,Retrofit常规定义的接口,返回的是Call对象。具体可能是Call或者Call<Response>。假定我们要支持返回kotlin协程的Deffered或Deffered<Response>,该如何实现呢?
class DeferredCallAdapterFactory private constructor(): CallAdapter.Factory() {
    companion object {
        @JvmStatic
        fun create() = DeferredCallAdapterFactory()
    }

    override fun get(returnType: Type, annotations: Array<Annotation>, retrofit: Retrofit): CallAdapter<*, *>? {
        if(getRawType(returnType) != Deferred::class.java){
            return null
        }
        if(returnType !is ParameterizedType){
            throw IllegalStateException("Deferred return type must be parameterized" + " as Deferred<Foo> or Deferred<? extends Foo>")
        }
        val innerType = getParameterUpperBound(0, returnType)
        if (getRawType(innerType) != Response::class.java){
            return BodyDeferredAdapter<Any>(innerType)
        }
        if(innerType !is ParameterizedType){
            throw IllegalStateException("Response must be parameterized" + " as Response<Foo> or Response<? extends Foo>")
        }
        val responseType = getParameterUpperBound(0, innerType)
        return ResponseDeferredAdapter<Any>(responseType)
    }
}

//支持Deffered<Response<R>>
class ResponseDeferredAdapter<R>(val responseType: Type): CallAdapter<R, Deferred<Response<R>>>{
    override fun responseType() = responseType

    override fun adapt(call: Call<R>): Deferred<Response<R>> {
        val completableDeferred = CompletableDeferred<Response<R>>()
        call.enqueue(object: Callback<R>{
            override fun onResponse(call: Call<R>, response: Response<R>) {
                completableDeferred.complete(response)
            }

            override fun onFailure(call: Call<R>, t: Throwable) {
                completableDeferred.completeExceptionally(t)
            }
        })
        return completableDeferred
    }
}

//支持Deffered<R>
class BodyDeferredAdapter<R>(val responseType: Type): CallAdapter<R, Deferred<R>>{
    override fun responseType() = responseType

    override fun adapt(call: Call<R>): Deferred<R> {
        val completableDeferred = CompletableDeferred<R>()
        call.enqueue(object: Callback<R>{
            override fun onResponse(call: Call<R>, response: Response<R>) {
                response.body()?.let(completableDeferred::complete)
                        ?:completableDeferred.completeExceptionally(NullPointerException())
            }

            override fun onFailure(call: Call<R>, t: Throwable) {
                completableDeferred.completeExceptionally(t)
            }
        })
        return completableDeferred
    }
}
使用
interface GitHubKt {
    @GET("/repos/{owner}/{repo}/contributors")
    fun contributors(
            @Path("owner") owner: String,
            @Path("repo") repo: String): Deferred<List<Contributor>>

    class Contributor(val login: String, val contributions: Int)
}

private const val API_URL = "https://api.github.com"

suspend fun main() {
    // Create a very simple REST adapter which points the GitHub API.
    val retrofit = Retrofit.Builder()
            .baseUrl(API_URL)
            .addConverterFactory(GsonConverterFactory.create())
            .addCallAdapterFactory(DeferredCallAdapterFactory.create())
            .build()

    // Create an instance of our GitHub API interface.
    val github = retrofit.create(GitHubKt::class.java)

    // Create a call instance for looking up Retrofit contributors.
    val call = github.contributors("square", "retrofit")

    // Fetch and print a list of the contributors to the library.
    GlobalScope.launch {
        val contributors = call.await()
        contributors.forEach { contributor ->
            println("""${contributor.login} (${contributor.contributions})""")
        }
    }.join()
}
2、接口的实现类如何生成的
//Github接口,Retrofit创建出实例
GitHub github = retrofit.create(GitHub.class);

//查看Retrofit的源码
//创建出实例的原理,使用java动态的代理
public <T> T create(final Class<T> service) {
    Utils.validateServiceInterface(service);
    if (validateEagerly) {
      eagerlyValidateMethods(service);
    }
    //这里使用了Java的动态代理
    return (T) Proxy.newProxyInstance(service.getClassLoader(), new Class<?>[] { service },
        new InvocationHandler() {
          private final Platform platform = Platform.get();
          private final Object[] emptyArgs = new Object[0];

          @Override public @Nullable Object invoke(Object proxy, Method method,
              @Nullable Object[] args) throws Throwable {
            // If the method is a method from Object then defer to normal invocation.
            // 从Object中继承的方法不需要代理,如toString/equals等方法
            if (method.getDeclaringClass() == Object.class) {
              return method.invoke(this, args);
            }
            //default方法是java8后有的,接口中允许有方法体的方法,这种就不需要代理了
            if (platform.isDefaultMethod(method)) {
              return platform.invokeDefaultMethod(method, service, proxy, args);
            }
            //剩余自定义的接口走代理
            return loadServiceMethod(method).invoke(args != null ? args : emptyArgs);
          }
        });
  }
3、Java动态代理的原理
3.1、Proxy.newProxyInstance()的实现
public static Object newProxyInstance(ClassLoader loader,
                                          Class<?>[] interfaces,
                                          InvocationHandler h)
        throws IllegalArgumentException
    {
        Objects.requireNonNull(h);

        final Class<?>[] intfs = interfaces.clone();
        final SecurityManager sm = System.getSecurityManager();
        if (sm != null) {
            checkProxyAccess(Reflection.getCallerClass(), loader, intfs);
        }

        /*
         * Look up or generate the designated proxy class.
         */
         //这里传ClassLoader和接口,生成了Class
        Class<?> cl = getProxyClass0(loader, intfs);

        /*
         * Invoke its constructor with the designated invocation handler.
         */
        try {
            if (sm != null) {
                checkNewProxyPermission(Reflection.getCallerClass(), cl);
            }
			//获取Class的构造方法,注意这里的参数类型是InvocationHandler
            final Constructor<?> cons = cl.getConstructor(constructorParams);
            final InvocationHandler ih = h;
            if (!Modifier.isPublic(cl.getModifiers())) {
                AccessController.doPrivileged(new PrivilegedAction<Void>() {
                    public Void run() {
                        cons.setAccessible(true);
                        return null;
                    }
                });
            }
            //构造实例,将InvocationHandler实例传入
            return cons.newInstance(new Object[]{h});
        } catch (IllegalAccessException|InstantiationException e) {
            throw new InternalError(e.toString(), e);
        } catch (InvocationTargetException e) {
            Throwable t = e.getCause();
            if (t instanceof RuntimeException) {
                throw (RuntimeException) t;
            } else {
                throw new InternalError(t.toString(), t);
            }
        } catch (NoSuchMethodException e) {
            throw new InternalError(e.toString(), e);
        }
    }
3.2、getProxyClass0如何生成Class
    private static Class<?> getProxyClass0(ClassLoader loader,
                                           Class<?>... interfaces) {
        if (interfaces.length > 65535) {
            throw new IllegalArgumentException("interface limit exceeded");
        }

        // If the proxy class defined by the given loader implementing
        // the given interfaces exists, this will simply return the cached copy;
        // otherwise, it will create the proxy class via the ProxyClassFactory
        // 这里的proxyClassCache只是个缓存,实际上生成操作是在ProxyClassFactory类
        // proxyClassCache是 proxyClassCache = new WeakCache<>(new KeyFactory(), new ProxyClassFactory());
        return proxyClassCache.get(loader, interfaces);
    }
3.3、查看ProxyClassFactory类代码
注意:WeakCache获取实例是通过apply方法,所以查看ProxyClassFactory的apply方法
public Class<?> apply(ClassLoader loader, Class<?>[] interfaces) {

    		/**
    		 * 下面显示根据interfaces的名称加载各个interface,并判断确实是interface,而不是类,如果是类会抛出异常
    		 */
            Map<Class<?>, Boolean> interfaceSet = new IdentityHashMap<>(interfaces.length);
            for (Class<?> intf : interfaces) {
                /*
                 * Verify that the class loader resolves the name of this
                 * interface to the same Class object.
                 */
                Class<?> interfaceClass = null;
                try {
                    interfaceClass = Class.forName(intf.getName(), false, loader);
                } catch (ClassNotFoundException e) {
                }
                if (interfaceClass != intf) {
                    throw new IllegalArgumentException(
                        intf + " is not visible from class loader");
                }
                /*
                 * 这里判断了传进来的class必须是接口,而不能是class
                 * Verify that the Class object actually represents an
                 * interface.
                 */
                if (!interfaceClass.isInterface()) {
                    throw new IllegalArgumentException(
                        interfaceClass.getName() + " is not an interface");
                }
                /*
                 * 不能传两个相同的interface
                 * Verify that this interface is not a duplicate.
                 */
                if (interfaceSet.put(interfaceClass, Boolean.TRUE) != null) {
                    throw new IllegalArgumentException(
                        "repeated interface: " + interfaceClass.getName());
                }
            }

            String proxyPkg = null;     // package to define proxy class in
    		// 动态代理默认生成的类是Public Final修饰的
            int accessFlags = Modifier.PUBLIC | Modifier.FINAL;

            /*
             * Record the package of a non-public proxy interface so that the
             * proxy class will be defined in the same package.  Verify that
             * all non-public proxy interfaces are in the same package.
             * 接口如果不是public,则生成的类的包名用该类的包名。
             * 如果接口不止一个不是public,并且又不在同一个包名下,则抛出异常~,因为一定会有interface访问不到
             */
            for (Class<?> intf : interfaces) {
                int flags = intf.getModifiers();
                if (!Modifier.isPublic(flags)) {
                    accessFlags = Modifier.FINAL;
                    String name = intf.getName();
                    int n = name.lastIndexOf('.');
                    String pkg = ((n == -1) ? "" : name.substring(0, n + 1));
                    if (proxyPkg == null) {
                        proxyPkg = pkg;
                    } else if (!pkg.equals(proxyPkg)) {
                        throw new IllegalArgumentException(
                            "non-public interfaces from different packages");
                    }
                }
            }

    		//如果接口都是public的,则会使用默认包名com.sun.proxy
            if (proxyPkg == null) {
                // if no non-public proxy interfaces, use com.sun.proxy package
                proxyPkg = ReflectUtil.PROXY_PACKAGE + ".";
            }

            /*
             * nextUniqueNumber是个静态成员,为了做到每次加一
             * Choose a name for the proxy class to generate.
             */
            long num = nextUniqueNumber.getAndIncrement();
    		// 包名.$ProxyN 这里的N是每次加1的
            String proxyName = proxyPkg + proxyClassNamePrefix + num;

            /*
             * 根据类名,实现的接口名称,修饰符生成class的字节码
             * Generate the specified proxy class.
             */
            byte[] proxyClassFile = ProxyGenerator.generateProxyClass(
                proxyName, interfaces, accessFlags);
            try {
                //根据字节码加载class
                return defineClass0(loader, proxyName,
                                    proxyClassFile, 0, proxyClassFile.length);
            } catch (ClassFormatError e) {
                /*
                 * A ClassFormatError here means that (barring bugs in the
                 * proxy class generation code) there was some other
                 * invalid aspect of the arguments supplied to the proxy
                 * class creation (such as virtual machine limitations
                 * exceeded).
                 */
                throw new IllegalArgumentException(e.toString());
            }
        }
    }
总结步骤:
1、根据参数中传过来的interface的名称,加载interface
2、校验interface确实是Interface,而不是class
3、根据interface是否是public,校验并生成将要生成的类的包名。规则:
3.1、接口如果只有一个不是public,则生成的类的包名用该类的包名。
3.2、如果接口不止一个不是public,并且又不在同一个包名下,则抛出异常~,因为一定会有interface访问不到
3.3、如果接口全都是public,则使用默认包名com.sun.proxy
4、生成的类名由为包名.$proxyN, 其中N每生成一个类加1
5、使用ProxyGenerator.generateProxyClass根据类名,实现接口名,修饰符生成字节码
6、加载字节码,返回class,这一步看源码是个native方法,暂不深究。
3.4、分析ProxyGenerator.generateProxyClass生成的class内容
3.4.1、这里ProxyGenerator的源码非常长,此处不分析源码。而通过生成一个class,分析class的内容来探索
    //IHello接口代码
public interface IHello {
    void hello();
}

//生成class的测试代码如下:
    public static void main(String[] args) {
        byte[] helloClassBytes = ProxyGenerator.generateProxyClass("MyProxy", new Class[]{IHello.class}, Modifier.PUBLIC | Modifier.FINAL);
        FilesKt.writeBytes(new File("MyProxy.class"), helloClassBytes);
    }
3.4.2、分析MyProxy.class
public final class MyProxy extends Proxy implements IHello {
    private static Method m1;
    private static Method m3;
    private static Method m2;
    private static Method m0;

    //构造方法传入的参数是InvacationHandler,对应上文说的获取参数为InvacationHandler的构造函数
    public MyProxy(InvocationHandler var1) throws  {
        super(var1);
    }

    public final boolean equals(Object var1) throws  {
        try {
            return (Boolean)super.h.invoke(this, m1, new Object[]{var1});
        } catch (RuntimeException | Error var3) {
            throw var3;
        } catch (Throwable var4) {
            throw new UndeclaredThrowableException(var4);
        }
    }

    public final void hello() throws  {
        try {
            super.h.invoke(this, m3, (Object[])null);
        } catch (RuntimeException | Error var2) {
            throw var2;
        } catch (Throwable var3) {
            throw new UndeclaredThrowableException(var3);
        }
    }

    public final String toString() throws  {
        try {
            return (String)super.h.invoke(this, m2, (Object[])null);
        } catch (RuntimeException | Error var2) {
            throw var2;
        } catch (Throwable var3) {
            throw new UndeclaredThrowableException(var3);
        }
    }

    public final int hashCode() throws  {
        try {
            return (Integer)super.h.invoke(this, m0, (Object[])null);
        } catch (RuntimeException | Error var2) {
            throw var2;
        } catch (Throwable var3) {
            throw new UndeclaredThrowableException(var3);
        }
    }

    // 为m1,m2,m3,m0等method赋值
    static {
        try {
            m1 = Class.forName("java.lang.Object").getMethod("equals", Class.forName("java.lang.Object"));
            m3 = Class.forName("com.breeze.test.IHello").getMethod("hello");
            m2 = Class.forName("java.lang.Object").getMethod("toString");
            m0 = Class.forName("java.lang.Object").getMethod("hashCode");
        } catch (NoSuchMethodException var2) {
            throw new NoSuchMethodError(var2.getMessage());
        } catch (ClassNotFoundException var3) {
            throw new NoClassDefFoundError(var3.getMessage());
        }
    }
}
可以看到实际上所有的方法走的都是h.invoke,那么h是什么呢?看Proxy类
    protected Proxy(InvocationHandler h) {
        Objects.requireNonNull(h);
        this.h = h;
    }
到此便分析清楚了,h就是Proxy.newProxyInstance方法传入的InvacationHandler。所有方法执行时都走的是InvacationHandler的invoke方法。
//这里的proxy就是生成的实例,method是代理的方法,args是透传的参数
//常见使用动态代理的错误写法:在invoke中写method.invoke(proxy,args)。这样写后调用proxy的method会造成死循环
public Object invoke(Object proxy, Method method, Object[] args)
        throws Throwable;
3.5、动态代理拓展
从上面的讲述中可得知,java自带的动态代理只能代理接口,如果想生成类的代理,会抛出异常。这时可以使用CgLib来实现。具体此处不讲述,API实际上和java的动态代理类似,原理其实也是一样的,生成字节码后加载。
4、Retrofit如何装配请求
Retrofit使用时,请求相关参数都是通过注解传递的,下面来看下retrofit如何解析注解的
以如下代码为例
public interface GitHub {
	@GET("/repos/{owner}/{repo}/contributors")
    Call<List<Contributor>> contributors(
            @Path("owner") String owner,
            @Path("repo") String repo);
}
从以上代码看,注解分两种,方法注解和参数注解
4.1、源码分析
GitHub github = retrofit.create(GitHub.class);
//回顾接口的实现类如何生成的章节,create方法最终走到的是
return loadServiceMethod(method).invoke(args != null ? args : emptyArgs);
//而loadServiceMethod方法源码如下
ServiceMethod<?> loadServiceMethod(Method method) {
	//注意serviceMethodCache的类型是ConcurrentHashMap,线程安全
    ServiceMethod<?> result = serviceMethodCache.get(method);
    if (result != null) return result;

    synchronized (serviceMethodCache) {
      result = serviceMethodCache.get(method);
      if (result == null) {
      	//这里解析的注解
        result = ServiceMethod.parseAnnotations(this, method);
        serviceMethodCache.put(method, result);
      }
    }
    return result;
  }
查看ServiceMethod源码
abstract class ServiceMethod<T> {
  //解析参数,装配请求参数
  static <T> ServiceMethod<T> parseAnnotations(Retrofit retrofit, Method method) {
    RequestFactory requestFactory = RequestFactory.parseAnnotations(retrofit, method);

    Type returnType = method.getGenericReturnType();
    if (Utils.hasUnresolvableType(returnType)) {
      throw methodError(method,
          "Method return type must not include a type variable or wildcard: %s", returnType);
    }
    if (returnType == void.class) {
      throw methodError(method, "Service methods cannot return void.");
    }
	//解析参数,装配请求
    return HttpServiceMethod.parseAnnotations(retrofit, method, requestFactory);
  }

  abstract @Nullable T invoke(Object[] args);
}
ServiceMethod主要处理的是两个事情:
1、装配请求参数
2、装配请求
4.2、装配请求参数
//Builder模式创建RequestFactory
static RequestFactory parseAnnotations(Retrofit retrofit, Method method) {
    return new Builder(retrofit, method).build();
  }

//重点看build方法
RequestFactory build() {
    //解析方法注解,对应解析请求类型GET/POST/...
	for (Annotation annotation : methodAnnotations) {
    	parseMethodAnnotation(annotation);
	}
    //此处省略一些代码

   //解析方法参数及注解,封装到ParameterHandler
   int parameterCount = parameterAnnotationsArray.length;
   parameterHandlers = new ParameterHandler<?>[parameterCount];
   for (int p = 0, lastParameter = parameterCount - 1; p < parameterCount; p++) {
   	parameterHandlers[p] = parseParameter(p, parameterTypes[p], parameterAnnotationsArray[p], p == lastParameter);
   }
}
4.3、装配请求实例
以默认的Call为例,
public <T> T create(final Class<T> service) {
    Utils.validateServiceInterface(service);
    if (validateEagerly) {
      eagerlyValidateMethods(service);
    }
    return (T) Proxy.newProxyInstance(service.getClassLoader(), new Class<?>[] { service },
        new InvocationHandler() {
          private final Platform platform = Platform.get();
          private final Object[] emptyArgs = new Object[0];

          @Override public @Nullable Object invoke(Object proxy, Method method,
              @Nullable Object[] args) throws Throwable {
            // If the method is a method from Object then defer to normal invocation.
            if (method.getDeclaringClass() == Object.class) {
              return method.invoke(this, args);
            }
            if (platform.isDefaultMethod(method)) {
              return platform.invokeDefaultMethod(method, service, proxy, args);
            }
            return loadServiceMethod(method).invoke(args != null ? args : emptyArgs);
          }
        });
  }
create方法中最后执行invoke方法,查看源码,查看的是HttpServiceMethod类
  @Override final @Nullable ReturnT invoke(Object[] args) {
    Call<ResponseT> call = new OkHttpCall<>(requestFactory, args, callFactory, responseConverter);
    //此处返回的适配器适配后的对象
    return adapt(call, args);
  }
如果是默认的适配器,此时还是Call对象,再调用enqueue发起请求,则能完成业务。
分析到此,验证了Retrofit实际上不发起请求,只是生产了能发起请求的实例!!!


 3924
3924


 被折叠的 条评论
为什么被折叠?
被折叠的 条评论
为什么被折叠?
 到【灌水乐园】发言


