


JavaScript 是前端核心, 掌握这门语言是步入前端高手行列必经之路, 现代前端当然别忘了还有TypeScript, 学习它需要面向对象(OOP)基础知识, 底层的浏览器原理、HTTP协议也必不可少, 本专栏从基础开始一步步带你实现俄罗斯方块小游戏, 让你从有趣的实战中学习JavaScript,事半功倍。
本节主要内容
Canvas对象
Canvas绘图关键API
一、创建一个HTML页面,包含Canvas标签
创建一个网页,其中包含canvas标签,并定义了id
canvas样式设置,使用了CSS中的position:absolute, 此属性会将元素脱离标准流,可使用top和left指定其在HTML页面中的位置
<!DOCTYPE html>
<html lang="en">
<head>
    <meta charset="UTF-8">
    <meta http-equiv="X-UA-Compatible" content="IE=edge">
    <meta name="viewport" content="width=device-width, initial-scale=1.0">
    <title>Canvas绘图基础</title>
    <style>
        canvas {
            position: absolute;
            background: white;
            width: 100%;
            height: 100%;
            top: 0;
            left: 0;
        }
        canvas {
            background: linear-gradient(120deg, #4a3934, #e6d5b9);
        }
    </style>
</head>
<body>
    <canvas id="canvas"></canvas>
    <script>
    </script>
</body>
核心知识点:canvas 标签, css中的position:absolute位置排版
二、使用canvas画布,画线
在<script>标签中编写代码
使用以下浏览器对象document的getElementById或querySelector方法获取canvas元素
document.getElementById('canvas')
document.querySelector('#canvas')
使用canvas对象的getContext获取2d上下文对象
设置canvas的宽度和高度,使用浏览器对象window的两个属性innerWidth和innerHeight
// canvas API 提示
/** @type {HTMLCanvasElement} */
//获取canvas元素
const canvas = document.getElementById('canvas')
//获取canvas绘图上下文对象
const ctx = canvas.getContext('2d')
//设置canvas宽度和高度
canvas.width = window.innerWidth
canvas.height = window.innerHeight
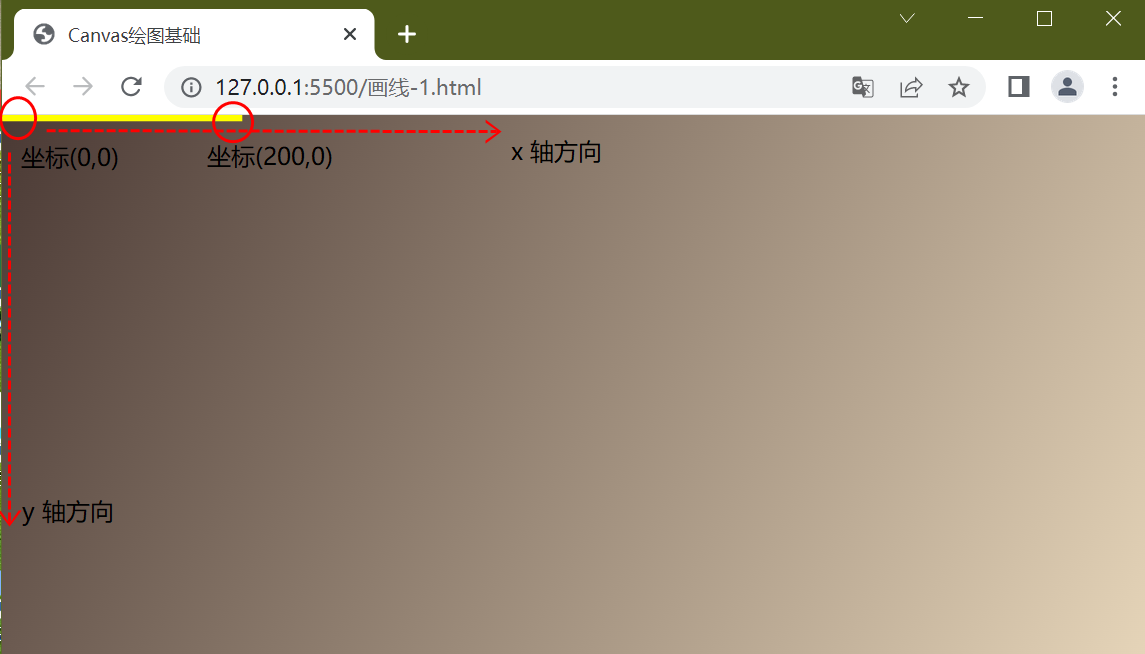
//从坐标(0,0) 到 (200, 0) 这个位置画一根线
ctx.moveTo(0, 0)
ctx.lineTo(200, 0)
//设定线的颜色
ctx.strokeStyle = "yellow"
//设定线宽
ctx.lineWidth = 10
//画线
ctx.stroke()运行结果
三、translate函数
使用ctx.translate函数,将原点坐标平移,可平移到任意坐标位置
平移坐标到 (100,100) 并以此为原点 ctx.translate(100,100),然后再绘图
// canvas API 提示
/** @type {HTMLCanvasElement} */

//获取canvas元素
const canvas = document.getElementById('canvas')
//获取canvas绘图上下文对象
const ctx = canvas.getContext('2d')
//设置canvas宽度和高度
canvas.width = window.innerWidth
canvas.height = window.innerHeight

//平移坐标到(100,100), 下面的绘图会以此为原点
ctx.translate(100,100)

//从坐标(0,0) 到 (200, 0) 这个位置画一根线
ctx.moveTo(0, 0)
ctx.lineTo(200, 0)
//设定线的颜色
ctx.strokeStyle =  "yellow"
//设定线宽
ctx.lineWidth = 10
//画线
ctx.stroke()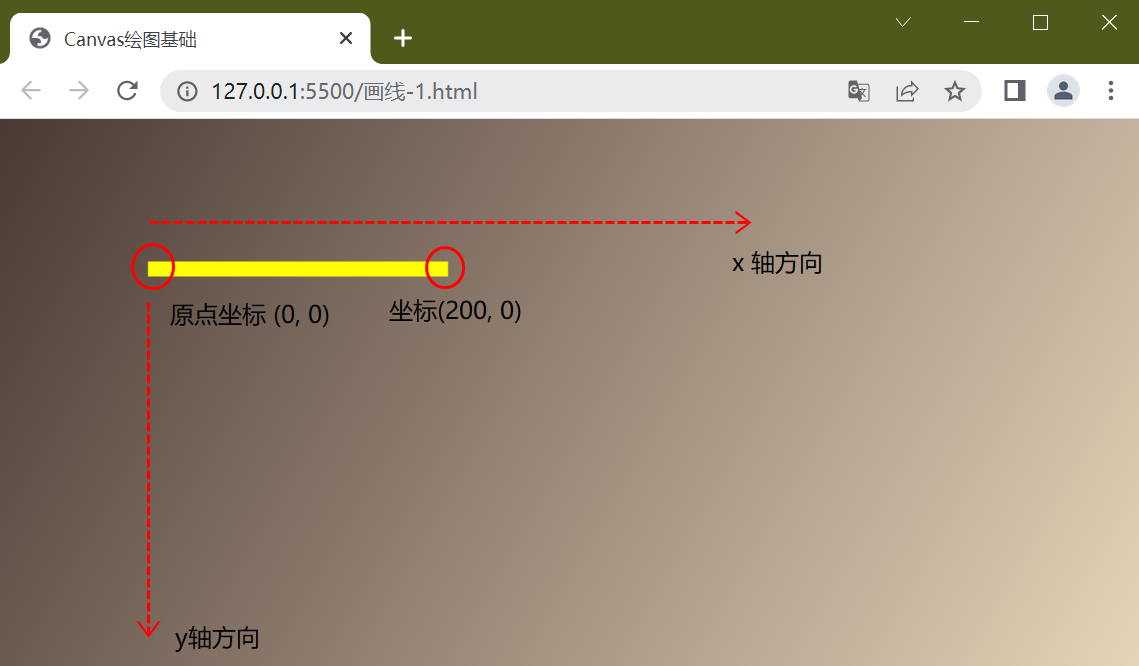
移动到canvas中心点,也就是当前绘图以canvas中心点为原点
//平移坐标到canvas的中心点, 下面的绘图会以此为原点
ctx.translate(canvas.width/2,canvas.height/2)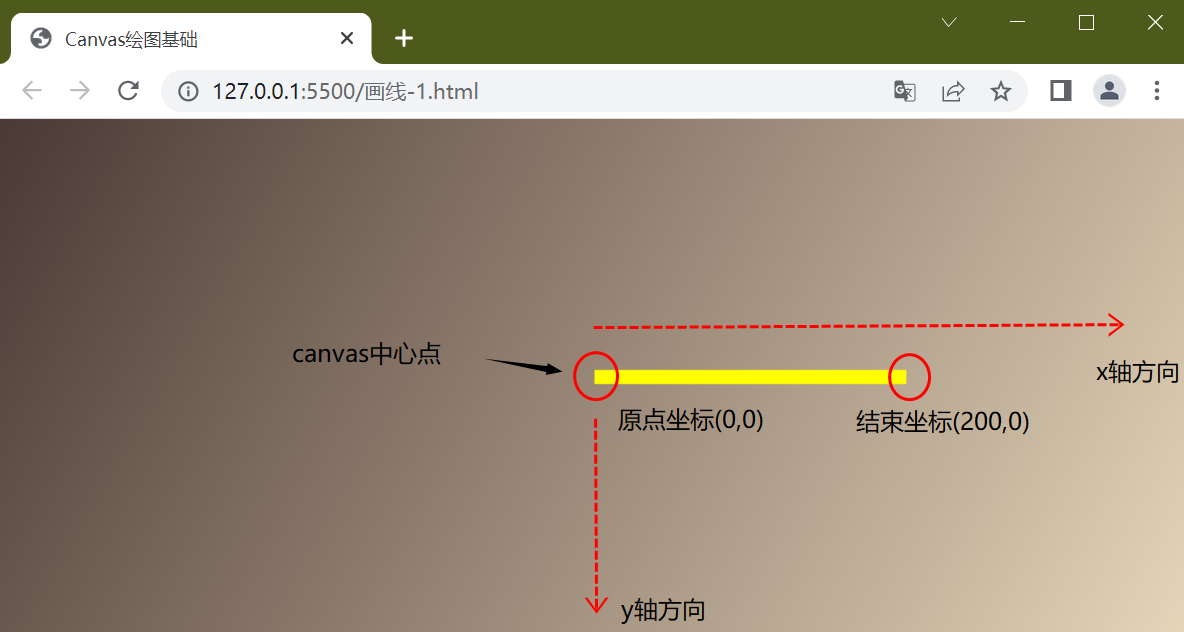
四、连续画线: beginPath()和closePath()
在上面代码的基础上再画一根红线
//指定线颜色
ctx.strokeStyle =  "red"
//指定结束位置坐标, 此次画线会以上次结束位置作为开始
ctx.lineTo(200, 30)
//线宽
ctx.lineWidth = 10
//画线
ctx.stroke()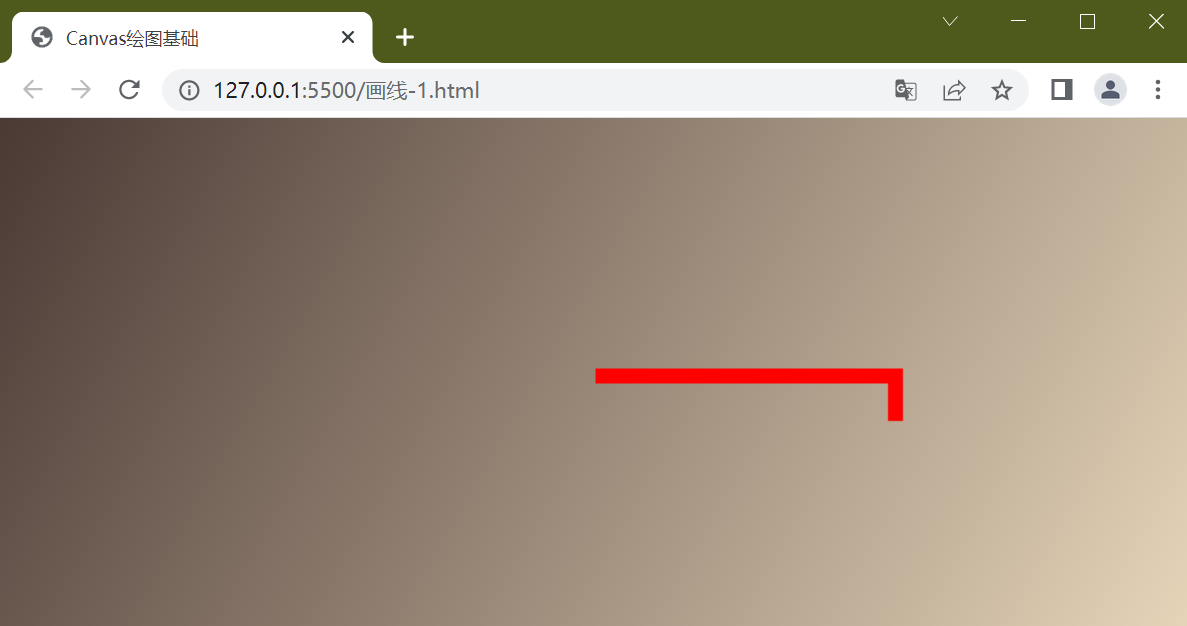
结果是第一次画的线也变成红色,canvas的 context连续画图样式会以最后一次设置为准
如果我们需要让第一根线是yellow, 第二根线为red,怎么办? 这时beginPath函数就派上用场了
// canvas API 提示
/** @type {HTMLCanvasElement} */
/* 省略前面部分代码 */
//将当前画布Canvas的中心点作为原点
ctx.translate(canvas.width/2,canvas.height/2)

//从坐标(0,0) 到 (200, 0) 这个位置画一根线
ctx.moveTo(0, 0)
ctx.lineTo(200, 0)
//设定线的颜色
ctx.strokeStyle =  "yellow"
//设定线宽
ctx.lineWidth = 10
//画线
ctx.stroke()

//第二根线
//重新开始新的路径,也可以想像成它是一个新的“层”
ctx.beginPath()
//设定颜色
ctx.strokeStyle =  "red"
//开始坐标位置
ctx.moveTo(200, 0)
//结束坐标位置
ctx.lineTo(200, 0)
//线宽
ctx.lineWidth = 10
//画线
ctx.stroke()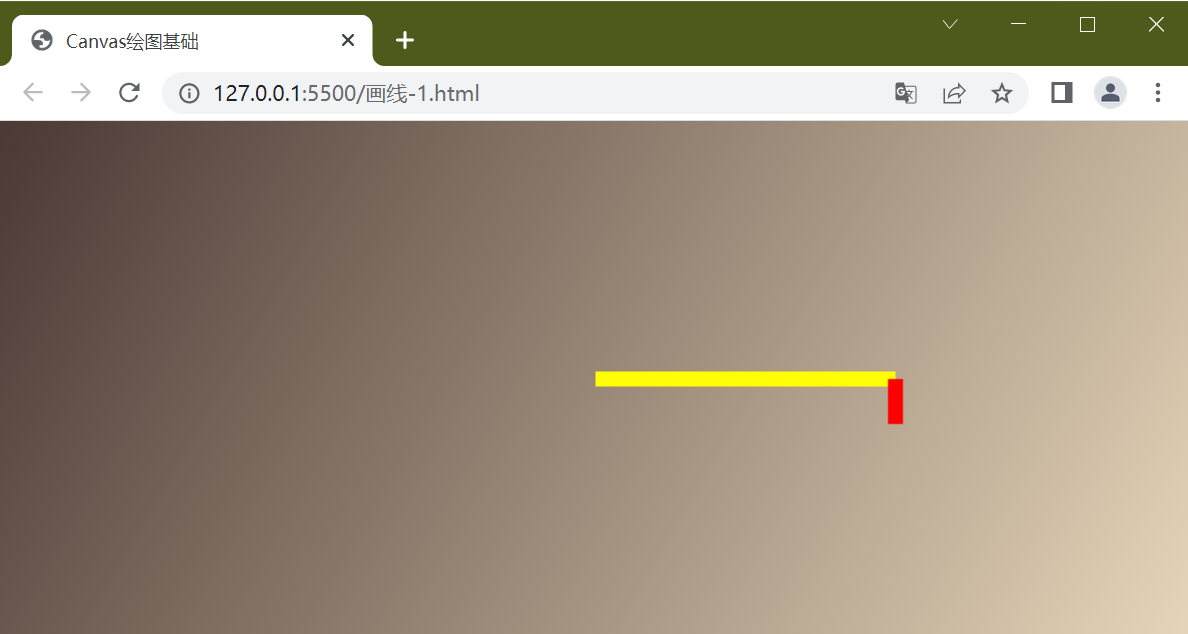
如果想从(0,0)位置开始画线,更改开始坐标位置即可,下面代码中结束坐标到(200,30)
// canvas API 提示
/** @type {HTMLCanvasElement} */
/* 省略前面部分代码 */
//将当前画布Canvas的中心点作为原点
ctx.translate(canvas.width/2,canvas.height/2)

//从坐标(0,0) 到 (200, 0) 这个位置画一根线
ctx.moveTo(0, 0)
ctx.lineTo(200, 0)
//设定线的颜色
ctx.strokeStyle =  "yellow"
//设定线宽
ctx.lineWidth = 10
//画线
ctx.stroke()

//第二根线
//重新开始新的路径,也可以想像成它是一个新的“层”
ctx.beginPath()
//设定颜色
ctx.strokeStyle =  "red"
//开始坐标位置
ctx.moveTo(0,0) //或者使用 ctx.lineTo(0, 0)
//结束坐标位置
ctx.lineTo(200, 30)
//线宽
ctx.lineWidth = 10
//画线
ctx.stroke()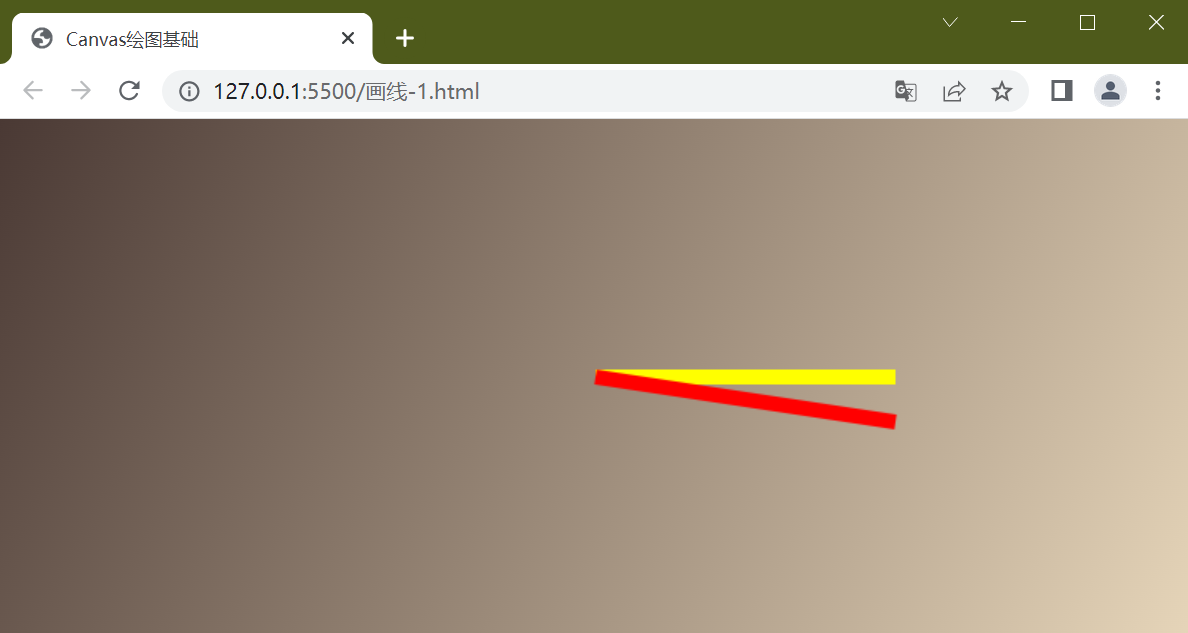
五、旋转rotate(弧度) 函数
下面利用旋转函数rotate画出下面的图形, 需要清楚一点几何知识
/*省略其它代码*/

//重新开始新的路径,也可以想像成它是一个新的“层”
ctx.beginPath()
//旋转0.5个弧度
ctx.rotate(0.5)
//设定颜色
ctx.strokeStyle =  "red"
//开始坐标位置
ctx.moveTo(0, 0)
//结束坐标位置
ctx.lineTo(200, 0)
//线宽
ctx.lineWidth = 10
//画线
ctx.stroke()
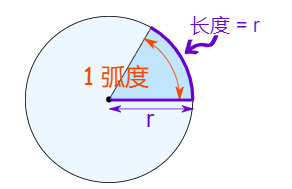
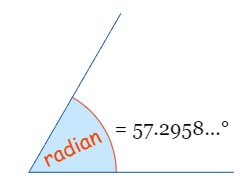
注意rotate函数的参数是弧度,1弧度约为57.2958...角度
下图描述了弧度和角度的关系
换算公式
1弧度是 大约 57.2958角度
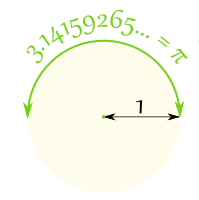
将弧度转换为角度:乘以 180,除以 π
将角度转换为弧度:乘以 π,除以 180
弧度是基于圆的半径的纯计量单位
在一个半圆上有 π 弧度,也等于 180°, 所以: π 弧度 = 180° 那么 : 1弧度 = 180°/π = 57.2958……°
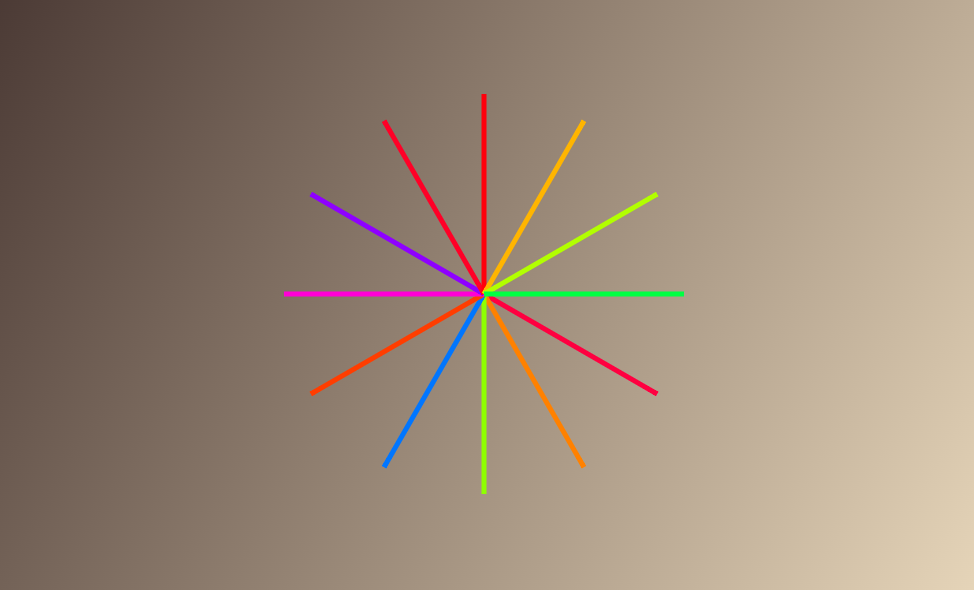
六、save()和restore()方法
根据上面的代码,旋转角度,再多画两根线, 一共4根线,每根线旋转弧度都是0.5
ctx.translate(canvas.width/2,canvas.height/2)
//从坐标(0,0) 到 (200, 0) 这个位置画一根线
ctx.moveTo(0, 0)
ctx.lineTo(200, 0)
//设定线的颜色样式为黄色
ctx.strokeStyle =  "yellow"
//设定线宽
ctx.lineWidth = 10
//画线
ctx.stroke()

//重新开始新的路径,也可以想像成它是一个新的“层”
ctx.beginPath()
//旋转0.5个弧度
ctx.rotate(0.5)
//设定颜色
ctx.strokeStyle =  "red"
//开始坐标位置
ctx.moveTo(0, 0)
//结束坐标位置
ctx.lineTo(200, 0)
//线宽
ctx.lineWidth = 10
//画线
ctx.stroke()


ctx.beginPath()
//旋转0.5个弧度
ctx.rotate(0.5)
//设定颜色
ctx.strokeStyle =  "blue"
//开始坐标位置
ctx.moveTo(0, 0)
//结束坐标位置
ctx.lineTo(200, 0)
//线宽
ctx.lineWidth = 10
//画线
ctx.stroke()

ctx.beginPath()
//旋转0.5个弧度
ctx.rotate(0.5)
//设定颜色
ctx.strokeStyle =  "orange"
//开始坐标位置
ctx.moveTo(0, 0)
//结束坐标位置
ctx.lineTo(200, 0)
//线宽
ctx.lineWidth = 10
//画线
ctx.stroke()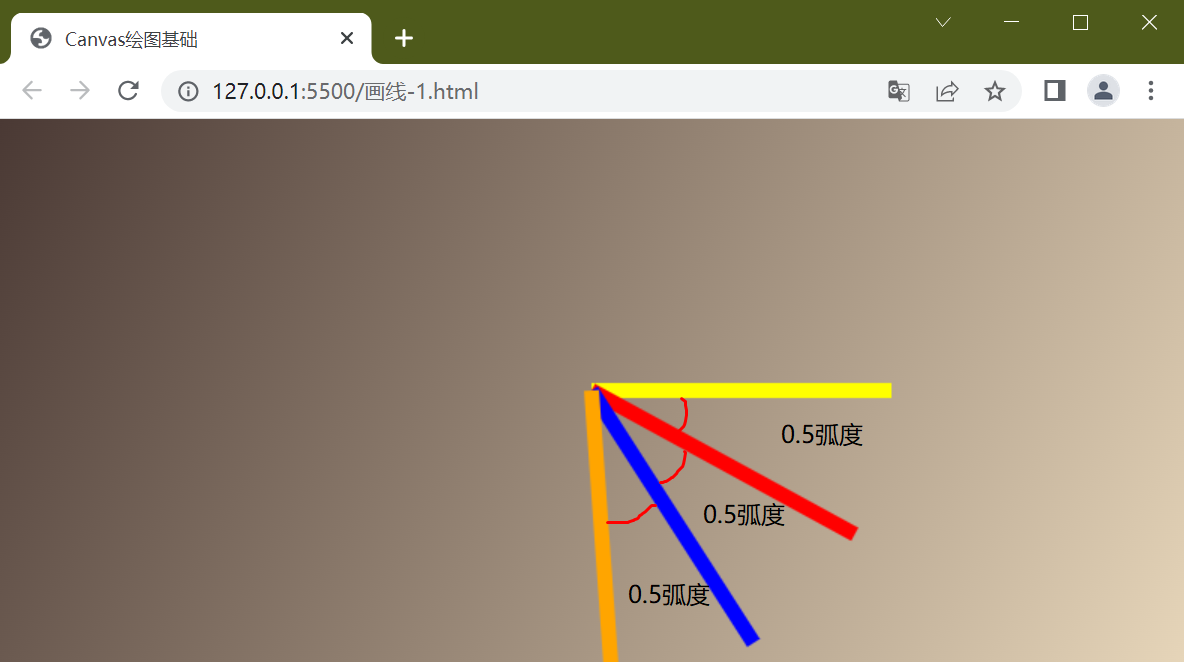
从上面的代码运行结果可以看出,每次画线都是相对于上一根线的位置旋转0.5个弧度,也就是说上一次绘制的图形会影响下一次的绘制, 如果我们希望红、蓝、橙三根线都相对于原始位置来画该怎么办? 此时save()和restore()方法就派上用场了
尝试在画蓝色线时使用save()和restore()方法
ctx.translate(canvas.width/2,canvas.height/2)
//从坐标(0,0) 到 (200, 0) 这个位置画一根线
ctx.moveTo(0, 0)
ctx.lineTo(200, 0)
//设定线的颜色样式为黄色
ctx.strokeStyle =  "yellow"
//设定线宽
ctx.lineWidth = 10
//画线
ctx.stroke()

//重新开始新的路径,也可以想像成它是一个新的“层”
ctx.beginPath()
//旋转0.5个弧度
ctx.rotate(0.5)
//设定颜色
ctx.strokeStyle =  "red"
//开始坐标位置
ctx.moveTo(0, 0)
//结束坐标位置
ctx.lineTo(200, 0)
//线宽
ctx.lineWidth = 10
//画线
ctx.stroke()

//------------------save()开始--------------------------------------------
ctx.save()
ctx.beginPath()
//旋转0.5个弧度
ctx.rotate(0.5)
//设定颜色
ctx.strokeStyle =  "blue"
//开始坐标位置
ctx.moveTo(0, 0)
//结束坐标位置
ctx.lineTo(200, 0)
//线宽
ctx.lineWidth = 10
//画线
ctx.stroke()
ctx.restore()
//-----------------------restore()结束---------------------------------


ctx.beginPath()
//旋转0.5个弧度
ctx.rotate(0.5)
//设定颜色
ctx.strokeStyle =  "orange"
//开始坐标位置
ctx.moveTo(0, 0)
//结束坐标位置
ctx.lineTo(200, 0)
//线宽
ctx.lineWidth = 10
//画线
ctx.stroke()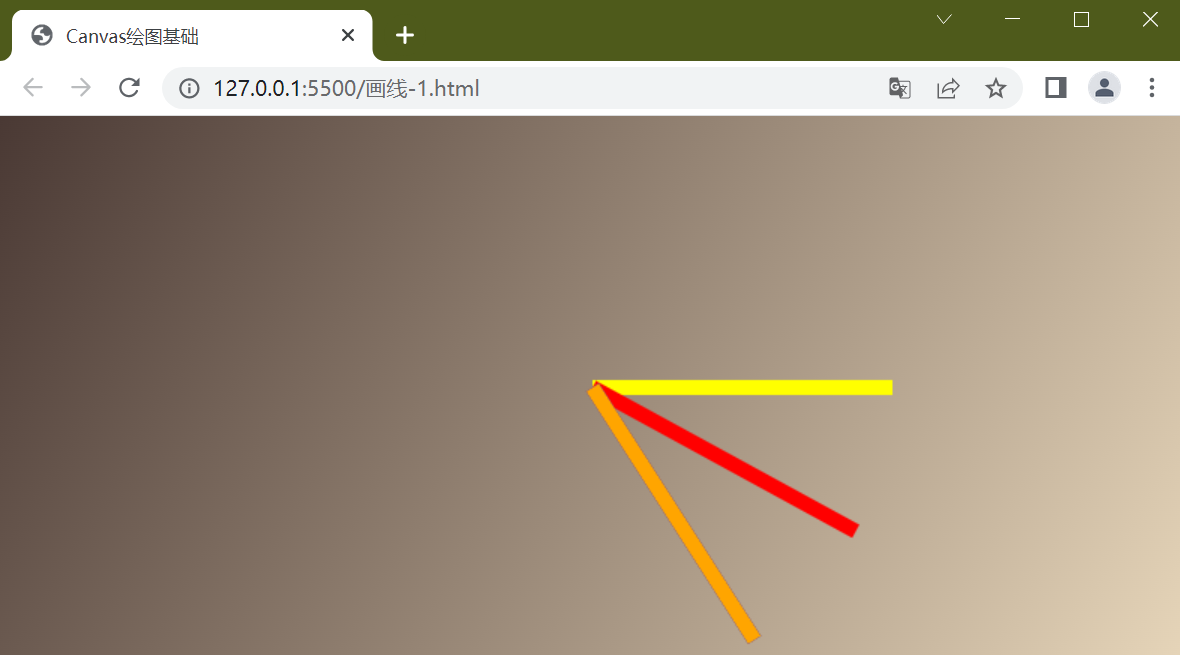
可以看到蓝色的线不见了,其实是被橙色的线给遮住了,你可以将橙色线的x坐标减小可以看到效果
ctx.beginPath()
//旋转0.5个弧度
ctx.rotate(0.5)
//设定颜色
ctx.strokeStyle =  "orange"
//开始坐标位置
ctx.moveTo(0, 0)
//结束坐标位置
ctx.lineTo(150, 0)  //橙色的线缩短一点
//线宽
ctx.lineWidth = 10
//画线
ctx.stroke()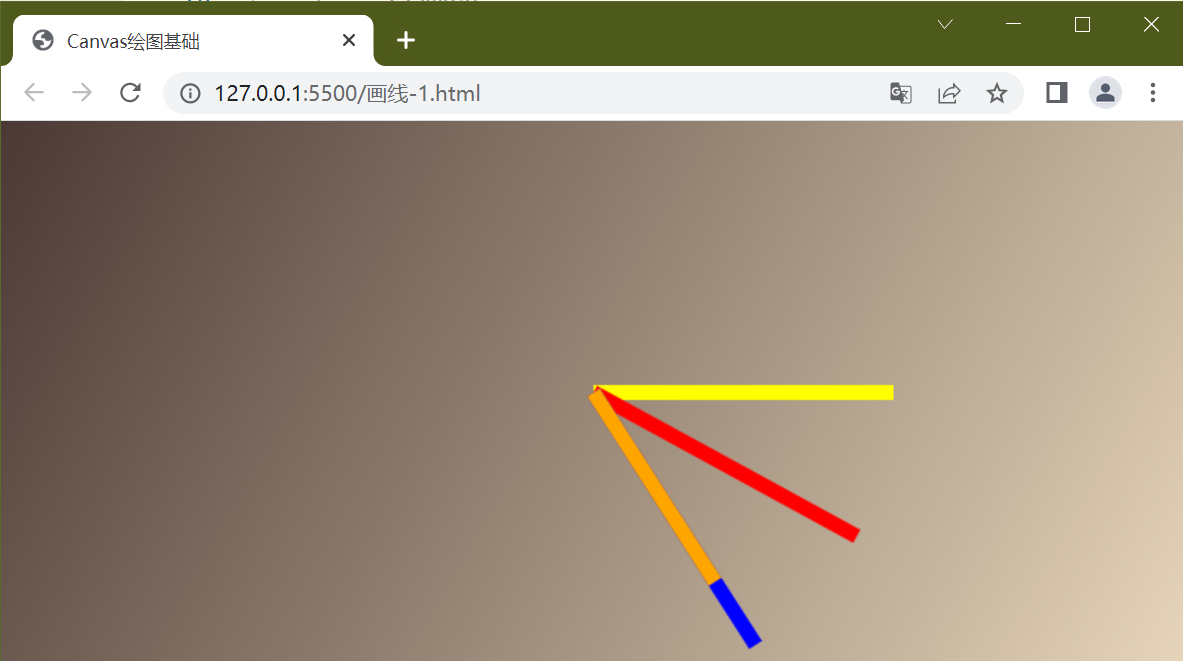
结果是第四根橙线不再依据第三根线旋转角度,而是依据第二根红线旋转角度,对于第四根橙线来说就好像第三根蓝线不存在一样, 可以认为save()和restore()方法包进去的画图独立存在,其实这里是使用的栈结构,也可以想像成类似于position:absolute让元素脱离标准流
七、小结
本文介绍了如何创建Canvas,并使用它进行绘图操作
常用函数translate() rotate() beginPath() closePath() save() restore()的使用方法
你能画出下面的图形吗?


 322
322


 被折叠的 条评论
为什么被折叠?
被折叠的 条评论
为什么被折叠?
 到【灌水乐园】发言


