炮兵
上一节我们细致地、猥琐地、小心翼翼地、犹如丝滑般抚摸、啊不,是讲解了如何去测量一个布局控件,再次强调,如我之前多次强调那样,控件的测量必须要逻辑缜密严谨,尽量少地避免出现较大的逻辑错误。在整个系列撰写的过程中,有N^N个朋友曾多次不间断地小窗我问View是否也有生命周期,我也多次细心地、耐心地打开小窗然后默默地关掉它,不是我不愿回答而是问的人太多我们干脆就在blog中详细阐述下,即便你是第一天学习Android,你也一定会用到Activity,用到Activity你一定会接触到onCreate方法,然后你会从各种途径了解到类似这样的方法还有7个,我们称之为Activity生命周期:
- /**
- * 主界面
- *
- * @author Aige {@link http://blog.csdn.net/aigestudio}
- * @since 2014/11/17
- */
- public class MainActivity extends Activity {
- @Override
- public void onCreate(Bundle savedInstanceState) {
- super.onCreate(savedInstanceState);
- }
- @Override
- protected void onStart() {
- super.onStart();
- }
- @Override
- protected void onResume() {
- super.onResume();
- }
- @Override
- protected void onPause() {
- super.onPause();
- }
- @Override
- protected void onStop() {
- super.onStop();
- }
- @Override
- protected void onRestart() {
- super.onRestart();
- }
- @Override
- protected void onDestroy() {
- super.onDestroy();
- }
- }
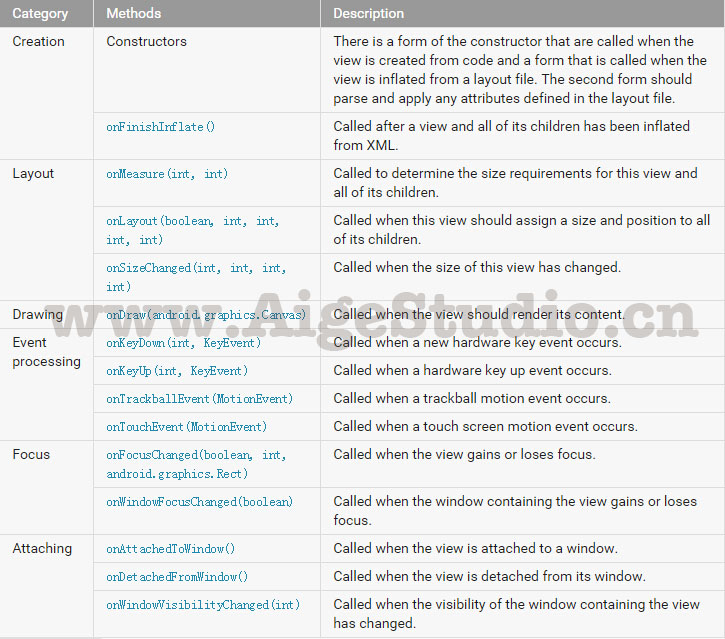
如上所示的这些方法,除了提到的“生命周期”方法外还有一些事件的回调,多说无益,我们还是来看看这些方法会在View的什么时候被调用,老样子我们新建一个继承于View的子类并重写这些方法:
- /**
- *
- * @author AigeStudio {@link http://blog.csdn.net/aigestudio}
- * @since 2015/1/27
- *
- */
- public class LifeCycleView extends View {
- private static final String TAG = "AigeStudio:LifeCycleView";
- public LifeCycleView(Context context) {
- super(context);
- Log.d(TAG, "Construction with single parameter");
- }
- public LifeCycleView(Context context, AttributeSet attrs) {
- super(context, attrs);
- Log.d(TAG, "Construction with two parameters");
- }
- @Override
- protected void onFinishInflate() {
- super.onFinishInflate();
- Log.d(TAG, "onFinishInflate");
- }
- @Override
- protected void onMeasure(int widthMeasureSpec, int heightMeasureSpec) {
- super.onMeasure(widthMeasureSpec, heightMeasureSpec);
- Log.d(TAG, "onMeasure");
- }
- @Override
- protected void onLayout(boolean changed, int left, int top, int right, int bottom) {
- super.onLayout(changed, left, top, right, bottom);
- Log.d(TAG, "onLayout");
- }
- @Override
- protected void onSizeChanged(int w, int h, int oldw, int oldh) {
- super.onSizeChanged(w, h, oldw, oldh);
- Log.d(TAG, "onSizeChanged");
- }
- @Override
- protected void onDraw(Canvas canvas) {
- super.onDraw(canvas);
- Log.d(TAG, "onDraw");
- }
- @Override
- protected void onAttachedToWindow() {
- super.onAttachedToWindow();
- Log.d(TAG, "onAttachedToWindow");
- }
- @Override
- protected void onDetachedFromWindow() {
- super.onDetachedFromWindow();
- Log.d(TAG, "onDetachedFromWindow");
- }
- @Override
- protected void onWindowVisibilityChanged(int visibility) {
- super.onWindowVisibilityChanged(visibility);
- Log.d(TAG, "onWindowVisibilityChanged");
- }
- }
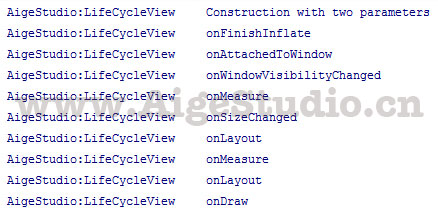
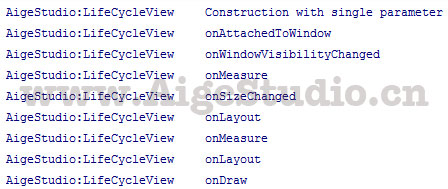
首先是调用了构造方法,这是不用猜都该知道的,然后呢调用了onFinishInflate方法,这个方法当xml布局中我们的View被解析完成后则会调用,具体的实现在LayoutInflater的rInflate方法中:
- public abstract class LayoutInflater {
- void rInflate(XmlPullParser parser, View parent, final AttributeSet attrs,
- boolean finishInflate) throws XmlPullParserException, IOException {
- // 省去无数代码…………
- if (finishInflate) parent.onFinishInflate();
- }
- }
- public class MainActivity extends Activity {
- @Override
- public void onCreate(Bundle savedInstanceState) {
- super.onCreate(savedInstanceState);
- setContentView(new LifeCycleView(this));
- }
- }
紧接着调用的是onAttachedToWindow方法,此时表示我们的View已被创建并添加到了窗口Window中,该方法后紧接着一般会调用onWindowVisibilityChanged方法,只要我们当前的Window窗口中View的可见状态发生改变都会被触发,这时View是被显示了,随后就会开始调用onMeasure方法对View进行测量,如果测量结果被确定则会先调用onSizeChanged方法通知View尺寸大小发生了改变,紧跟着便会调用onLayout方法对子元素进行定位布局,然后再次调用onMeasure方法对View进行二次测量,如果测量值与上一次相同则不再调用onSizeChanged方法,接着再次调用onLayout方法,如果测量过程结束,则会调用onDraw方法绘制View。我们看到,onMeasure和onLayout方法被调用了两次,很多童鞋会很纠结为何onMeasure方法回被多次调用,其实没必要过于纠结这个问题,onMeasure的调用取决于控件的父容器以及View Tree的结构,不同的父容器有不同的测量逻辑,比如上一节自定义控件其实很简单2/3中,我们在SquareLayout测量子元素时就采取了二次测量,在API 19的时候Android对测量逻辑做了进一步的优化,比如在19之前只会对最后一次的测量结果进行Cache而在19开始则会对每一次测量结果都进行Cache,如果相同的代码相同布局相同的逻辑在19和19之前你有可能会看到不一样的测量次数结果,所以没必要去纠结这个问题,一般情况下只要你逻辑正确onMeasure都会得到正确的调用。
上面这些方法都很好理解,我们主要关心的是其调用流程,虽然上面我们通过LogCat的输出大致了解了一下其执行顺序,但是如果你好奇心足够重,一定会想真是这样的么?在自定义控件其实很简单7/12中我曾留下一个疑问:
- /**
- *
- * @author AigeStudio {@link http://blog.csdn.net/aigestudio}
- * @since 2015/1/12
- *
- */
- public class ImgView extends View {
- private Bitmap mBitmap;// 位图对象
- public ImgView(Context context, AttributeSet attrs) {
- super(context, attrs);
- }
- @Override
- protected void onDraw(Canvas canvas) {
- // 绘制位图
- canvas.drawBitmap(mBitmap, 0, 0, null);
- }
- /**
- * 设置位图
- *
- * @param bitmap
- * 位图对象
- */
- public void setBitmap(Bitmap bitmap) {
- this.mBitmap = bitmap;
- }
- }
- public class MainActivity extends Activity {
- private ImgView mImgView;
- @Override
- public void onCreate(Bundle savedInstanceState) {
- super.onCreate(savedInstanceState);
- setContentView(R.layout.activity_main);
- mImgView = (ImgView) findViewById(R.id.main_pv);
- Bitmap bitmap = BitmapFactory.decodeResource(getResources(), R.drawable.lovestory);
- mImgView.setBitmap(bitmap);
- }
- }
- 处理控件动画的阶段
- 处理测量的阶段
- 处理绘制的阶段
Android的Animation动画体系庞大不在本系列的讲解范畴内,暂时Skip,测量和绘制的主要过程由我们之前所讲的三个方法onMeasure、onLayout和onDraw所控制,这三个方法呢在framework中又主要由measure、layout、draw以及其派生方法所控制,在View中形成这样一个体系:
再次注意:View的测量过程是由多个方法调用共同构成,measure和onMeasure仅仅代表该过程中的两个方法而已。
如果控件继承于ViewGroup实现的是一个布局容器,那么会多出一个dispatchDraw方法:
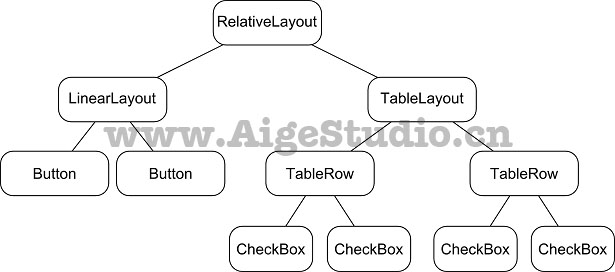
dispatchDraw方法本质上实现的是父容器对子元素的绘制分发,虽然逻辑不尽相同但是作用类似于draw,在高仿网易评论列表效果之界面生成中我们曾利用该方法在绘制子元素前绘制盖楼背景,具体不再多说了。在我们调用setContentView方法后,如果你传入的是一个资源文件ID,此时framework会使用LayoutInflater去解析布局文件,当解析到我们自定义控件LifeCycleView的标签时,通过反射获取一个对应的LifeCycleView类实例,此时构造方法被调用,尔后开始解析LifeCycleView标签下的各类属性并存值,LifeCycleView标签下的所有属性(如果是个容器的话也会层层解析)解析完成后调用onFinishInflate方法表示当前LifeCycleView所有的(注意不是整个布局哦仅仅是该View对应标签)xml解析完毕,之后尝试将View添加至当前Activity所在的Window,然后将处理UI事件的Msg压入Message Queue开始至上而下地对整个View Tree进行测量,假设我们有如下的View Tree结构:
那么我们的测量总是从根部RelativeLayout开始逐层往下进行调用,在Android翻页效果原理实现之引入折线中我们曾在讲滑动时对Message Queue作过一个简单的浅析,当Msg压入Queue并最终得到处理的这段过程并不是立即的,也就是说其中会有一定的延时,这相对于我们在setContentView后立即setBitmap来说时间要长很多很多,这也是为什么我们在onMeasure中获取Bitmap不为null的原因,具体的源码逻辑实现会在《深入剖析Android GUI框架》深度讲解,本系列除了后面要涉及到的事件分发外不会再涉及过多的源码毕竟与基础篇的定位不符,好了,这里我再留一个问题,setBitmap和onMeasure、onLayout等这些回调方法之间是异步呢还是同步呢?其实答案很明显了……OK,不说了,既然我们知道这样直接setBitmap是不对的(即便可行)那么我们该如何改进呢?答案很简单,Andorid提供给我们极其简便的方法,我们只需在设置Bitmap后调用requestLayout方法和invalidate即可:
- public void setBitmap(Bitmap bitmap) {
- this.mBitmap = bitmap;
- requestLayout();
- invalidate();
- }
requestLayout方法的意义在于如果你的操作有可能会让控件的尺寸或位置发生改变那么就可以调用该方法请求布局,调用该方法后framework会尝试调用measure对控件重新测量:
而invalidate方法呢我们则用的多了不再多说:
但是要注意的一点是,requestLayout方法和invalidate方法并非都必需调用的,比如我们有一个更改字体颜色的方法:
- public void setTextColor(int color) {
- mPaint.setColor(color);
- invalidate();
- }
- public void setTextSize(int size) {
- mPaint.setTextSize(size);
- requestLayout();
- invalidate();
- }
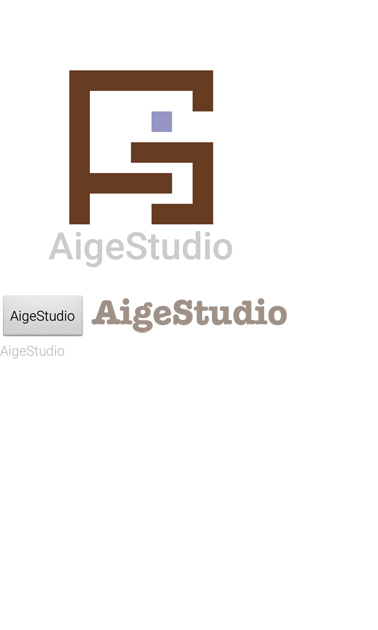
当时我们是直接extends View去做的,绘制了文本、绘制了Bitmap还有在此之前对其进行测量、定位等等,即便我们考虑周详,但是也极难将一个装载文本和图片的控件做成一个TextView和ImageView的复合体,更难以像TextView和ImageView那样提供尽可能多的接口方法,诶!等等!既然我们的这个图标控件看上去就是个TextView和ImageView杂交的后代,那么我们是否可以简单地将这两种控件组合起来变成一个新的控件呢?答案是肯定的撒!而且比起我们直接extends view来说简单很多很多很多,首先我们先定义一个布局,这个布局里面呢只包含一个ImageView和一个TextView,大体来说样式跟上面我们自定义的类似:
- <!-- http://blog.csdn.net/aigestudio -->
- <?xml version="1.0" encoding="utf-8"?>
- <LinearLayout xmlns:android="http://schemas.android.com/apk/res/android"
- android:layout_width="match_parent"
- android:layout_height="match_parent"
- android:background="#FFFFFFFF"
- android:gravity="center"
- android:orientation="vertical" >
- <ImageView
- android:id="@+id/view_complex_image_iv"
- android:layout_width="wrap_content"
- android:layout_height="wrap_content"
- android:src="@drawable/logo" />
- <TextView
- android:textSize="40sp"
- android:textStyle="bold"
- android:id="@+id/view_complex_title_tv"
- android:layout_width="wrap_content"
- android:layout_height="wrap_content"
- android:text="AigeStudio" />
- </LinearLayout>
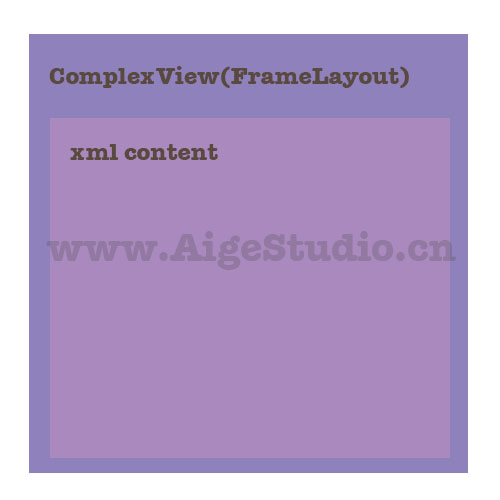
是不是跟我们自定义的一样呢?如我所说,仅仅是一个ImageView和TextView的组合而已,接下来我们要做的则是将这个xml布局文件“集成”到我们的自定义控件中去,方法也很简单,在自定义控件的构造方法里引入该布局文件并将其作为控件的布局则可:
- /**
- *
- * @author AigeStudio {@link http://blog.csdn.net/aigestudio}
- * @since 2015/2/6
- *
- */
- public class ComplexView extends FrameLayout {
- private ImageView ivIcon;// 复合控件中的ImageView
- private TextView tvTitle;// 复合控件中的TextView
- public ComplexView(Context context, AttributeSet attrs) {
- super(context, attrs);
- // 加载布局文件
- ((LayoutInflater) context.getSystemService(Context.LAYOUT_INFLATER_SERVICE)).inflate(
- R.layout.view_complex, this);
- // 获取控件
- ivIcon = (ImageView) findViewById(R.id.view_complex_image_iv);
- tvTitle = (TextView) findViewById(R.id.view_complex_title_tv);
- }
- }
- xxxxxxxxxxxxxxxxxxxxx.inflate(R.layout.view_complex, this);
而后我们只需直接使用这个ComplexView符合控件即可:
- <LinearLayout xmlns:android="http://schemas.android.com/apk/res/android"
- android:layout_width="match_parent"
- android:background="#ffffff"
- android:layout_height="match_parent" >
- <com.aigestudio.customviewdemo.views.ComplexView
- android:id="@+id/main_tv"
- android:layout_width="wrap_content"
- android:layout_height="wrap_content" />
- </LinearLayout>
非常完美,不需要我们去处理测绘逻辑,所有的这些都由Android自带的控件自行去计算,我们只是简单地将它们组合在一起了而已,所以说,每当Android提供的控件不能满足你的需求时,首先你应该想想是否可以在现有控件的基础上修改一下来达到你的目的,而不是盲目地直接重写View或ViewGroup类,你可以提供不同的接口方法来修改你复合控件中的各类元素,比如下面我们提供一个setImageIcon方法来为复合控件中的ImageView设置图片:
- public void setImageIcon(int resId) {
- ivIcon.setImageResource(resId);
- }
- public TextView getTitle() {
- return tvTitle;
- }
- /**
- *
- * @author AigeStudio {@link http://blog.csdn.net/aigestudio}
- * @since 2015/2/6
- *
- */
- public class ComplexView extends LinearLayout {
- private ImageView ivIcon;// 复合控件中的ImageView
- private TextView tvTitle;// 复合控件中的TextView
- public ComplexView(Context context, AttributeSet attrs) {
- super(context, attrs);
- // 设置线性布局排列方式
- setOrientation(LinearLayout.VERTICAL);
- // 设置线性布局子元素对齐方式
- setGravity(Gravity.CENTER);
- // 实例化子元素
- ivIcon = new ImageView(context);
- ivIcon.setImageResource(R.drawable.logo);
- tvTitle = new TextView(context);
- tvTitle.setText("AigeStudio");
- tvTitle.setTextSize(MeasureUtil.dp2px(context, 30));
- tvTitle.setTypeface(Typeface.DEFAULT_BOLD);
- // 将子元素添加到复合控件
- addView(ivIcon, new LinearLayout.LayoutParams(LinearLayout.LayoutParams.WRAP_CONTENT,
- LinearLayout.LayoutParams.WRAP_CONTENT));
- addView(tvTitle, new LinearLayout.LayoutParams(LinearLayout.LayoutParams.WRAP_CONTENT,
- LinearLayout.LayoutParams.WRAP_CONTENT));
- }
- }
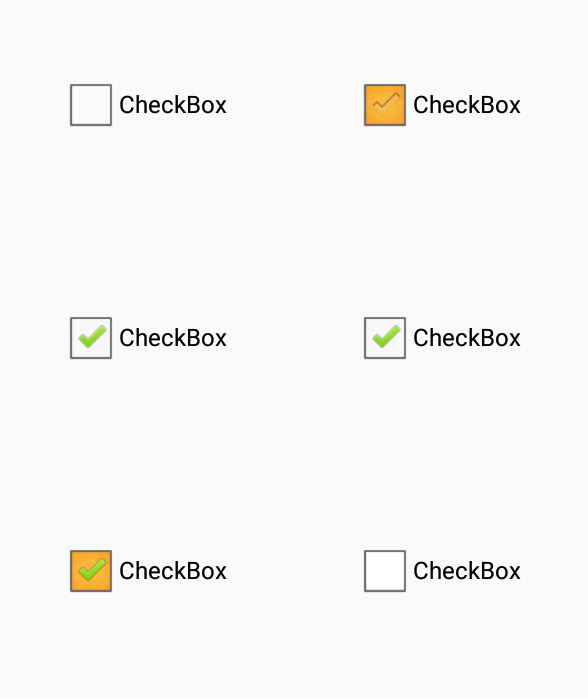
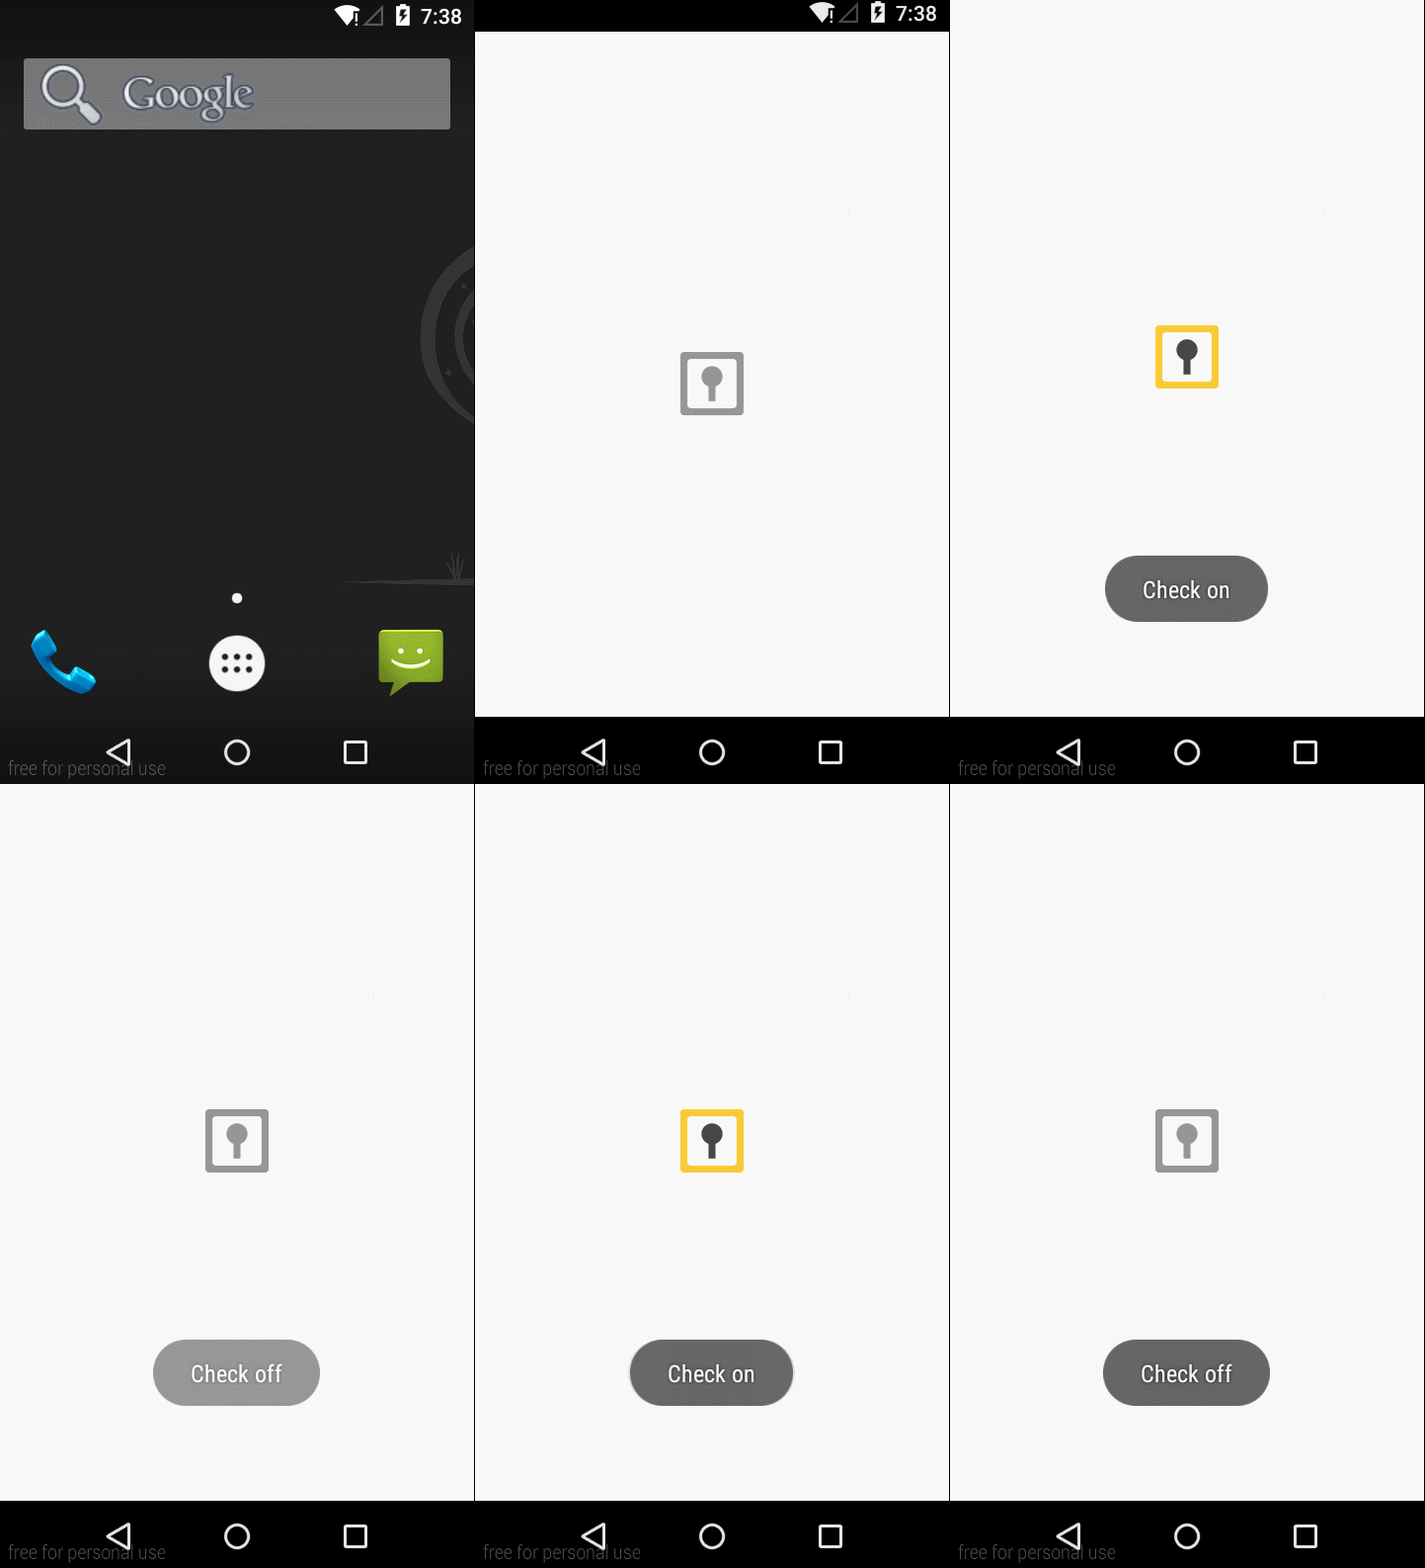
效果单一乏味不好看,而我想要的效果很简单也与之类似,通过不断点击控件往复切换控件的两种状态即可:
达到类似效果有多种方法,最简单的是更改checkBox,最复杂的是继承View自己写一个,而上面我们了解过复合控件,那么我们能不能马上学以致用使用一个复合控件来达到该效果呢?答案是肯定的!细心观察可以看得出上面的效果无非就是两张不同的图片来回显示/隐藏地切换而已,更直白地说就是两个ImageView不断地显示/隐藏切换对吧,Such easy,下面直接看全部代码:
- /**
- * 自定义CheckBox
- *
- * @author AigeStudio {@link http://blog.csdn.net/aigestudio}
- * @since 2015/2/6
- *
- */
- public class CustomCheckBox extends FrameLayout {
- private ImageView ivCheckOn, ivCheckOff;// 两种状态的ImageView
- private CustomCheckBoxChangeListener customCheckBoxChangeListener;// 切换的监听器
- private boolean isCheck;// 是否被选中的标志值
- public CustomCheckBox(Context context) {
- this(context, null);
- }
- public CustomCheckBox(Context context, AttributeSet attrs) {
- this(context, attrs, 0);
- }
- public CustomCheckBox(Context context, AttributeSet attrs, int defStyleAttr) {
- super(context, attrs, defStyleAttr);
- // 设置布局文件
- LayoutInflater.from(context).inflate(R.layout.view_custom_check_box, this);
- // 获取控件元素
- ivCheckOn = (ImageView) findViewById(R.id.view_custom_check_box_on);
- ivCheckOff = (ImageView) findViewById(R.id.view_custom_check_box_off);
- // 设置两个ImageView的点击事件
- ivCheckOn.setOnClickListener(new ClickListener());
- ivCheckOff.setOnClickListener(new ClickListener());
- // 读取xml中设置的资源属性ID
- TypedArray array = context.obtainStyledAttributes(attrs, R.styleable.CustomCheckBox);
- int imageOnResId = array.getResourceId(R.styleable.CustomCheckBox_imageOn, -1);
- int imageOffResId = array.getResourceId(R.styleable.CustomCheckBox_imageOff, -1);
- // 设置显示资源
- setOnImage(imageOnResId);
- setOffImage(imageOffResId);
- // 对象回收
- array.recycle();
- // 默认显示的是没被选中的状态
- setCheckOff();
- }
- /**
- * 为CustomCheckBox设置监听器
- *
- * @param customCheckBoxChangeListener
- * 监听器接口对象
- */
- public void setCustomCheckBoxChangeListener(
- CustomCheckBoxChangeListener customCheckBoxChangeListener) {
- this.customCheckBoxChangeListener = customCheckBoxChangeListener;
- }
- /**
- * 设置开启状态时CustomCheckBox的图片
- *
- * @param resId
- * 图片资源ID
- */
- public void setOnImage(int resId) {
- ivCheckOn.setImageResource(resId);
- }
- /**
- * 设置关闭状态时CustomCheckBox的图片
- *
- * @param resId
- * 图片资源ID
- */
- public void setOffImage(int resId) {
- ivCheckOff.setImageResource(resId);
- }
- /**
- * 设置CustomCheckBox为关闭状态
- */
- public void setCheckOff() {
- isCheck = false;
- ivCheckOn.setVisibility(GONE);
- ivCheckOff.setVisibility(VISIBLE);
- }
- /**
- * 设置CustomCheckBox为开启状态
- */
- public void setCheckOn() {
- isCheck = true;
- ivCheckOn.setVisibility(VISIBLE);
- ivCheckOff.setVisibility(GONE);
- }
- /**
- * 获取CustomCheckBox的选择状态
- *
- * @return true CustomCheckBox已被选择
- * @return false CustomCheckBox未被选择
- */
- public boolean isCheck() {
- return isCheck;
- }
- /**
- * 状态改变监听接口
- */
- public interface CustomCheckBoxChangeListener {
- void customCheckBoxOn();
- void customCheckBoxOff();
- }
- /**
- * 自定义CustomCheckBox中控件的事件监听器
- */
- private class ClickListener implements OnClickListener {
- @Override
- public void onClick(View v) {
- switch (v.getId()) {
- case R.id.view_custom_check_box_on:
- setCheckOff();
- customCheckBoxChangeListener.customCheckBoxOff();
- break;
- case R.id.view_custom_check_box_off:
- setCheckOn();
- customCheckBoxChangeListener.customCheckBoxOn();
- break;
- }
- }
- }
- }
- /**
- * 主界面
- *
- * @author Aige {@link http://blog.csdn.net/aigestudio}
- * @since 2014/11/17
- */
- public class MainActivity extends Activity {
- private CustomCheckBox ccbTest;
- @Override
- public void onCreate(Bundle savedInstanceState) {
- super.onCreate(savedInstanceState);
- setContentView(R.layout.activity_main);
- ccbTest = (CustomCheckBox) findViewById(R.id.main_ccb);
- ccbTest.setCustomCheckBoxChangeListener(new CustomCheckBoxChangeListener() {
- @Override
- public void customCheckBoxOn() {
- Toast.makeText(MainActivity.this, "Check on", Toast.LENGTH_SHORT).show();
- }
- @Override
- public void customCheckBoxOff() {
- Toast.makeText(MainActivity.this, "Check off", Toast.LENGTH_SHORT).show();
- }
- });
- }
- }
CustomCheckBox中加载用到的xml布局文件如下:
- <?xml version="1.0" encoding="utf-8"?>
- <FrameLayout xmlns:android="http://schemas.android.com/apk/res/android"
- android:layout_width="match_parent"
- android:layout_height="match_parent" >
- <ImageView
- android:id="@+id/view_custom_check_box_on"
- android:layout_width="match_parent"
- android:scaleType="fitCenter"
- android:layout_height="match_parent" />
- <ImageView
- android:id="@+id/view_custom_check_box_off"
- android:layout_width="match_parent"
- android:layout_height="match_parent"
- android:scaleType="fitCenter" />
- </FrameLayout>


 本文介绍了如何在Android应用中利用现有的控件和自定义控件来实现特定功能,通过组合不同类型的控件,如ImageView和TextView,创建复合控件以简化界面设计和实现复杂功能。文章提供了自定义CheckBox的实现案例,展示了如何通过继承现有控件和组合子元素来定制控件功能,并通过监听器接口实现状态切换的逻辑。






 5975
5975

 被折叠的 条评论
为什么被折叠?


