


背景
目前HuggingFace发布了关于微调LLMs的方法包——Parameter-Efficient Fine-Tuning(PEFT),其中包含下面6种方法:
- LoRA: LORA: LOW-RANK ADAPTATION OF LARGE LANGUAGE MODELS
- Prefix Tuning: Prefix-Tuning: Optimizing Continuous Prompts for Generation, P-Tuning v2: Prompt Tuning Can Be Comparable to Fine-tuning Universally Across Scales and Tasks
- P-Tuning: GPT Understands, Too
- Prompt Tuning: The Power of Scale for Parameter-Efficient Prompt Tuning
- AdaLoRA: Adaptive Budget Allocation for Parameter-Efficient Fine-Tuning
- LLaMA-Adapter: Efficient Fine-tuning of Language Models with Zero-init Attention
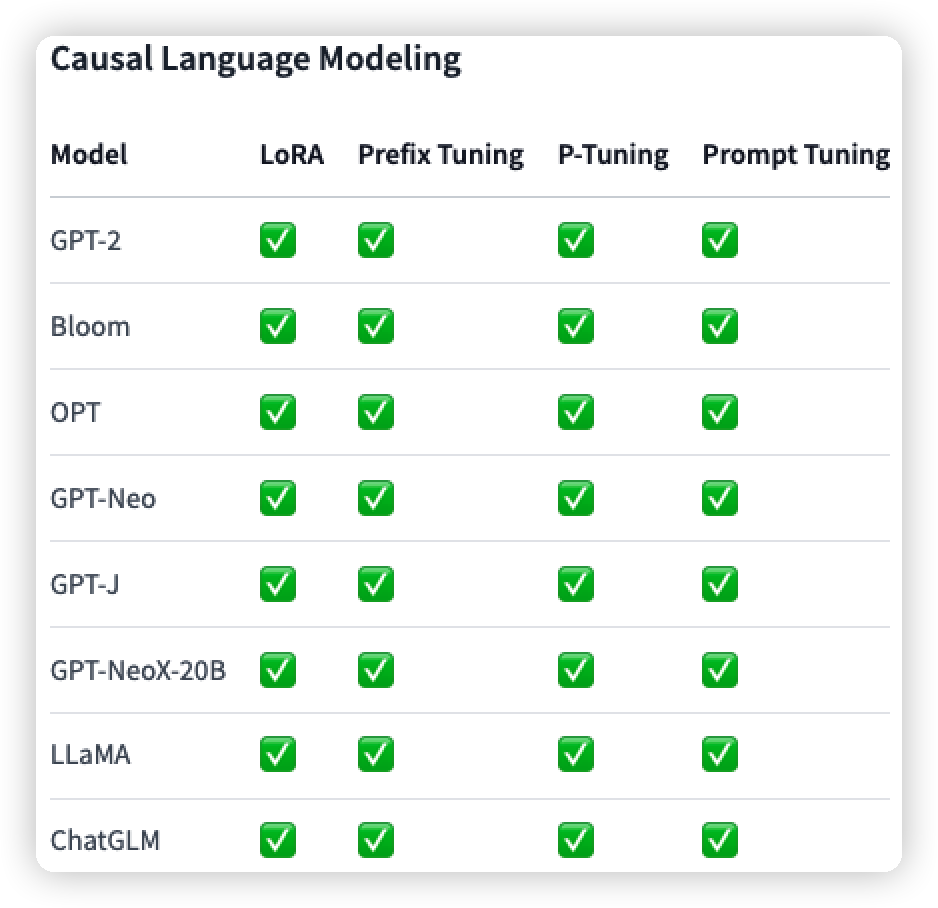
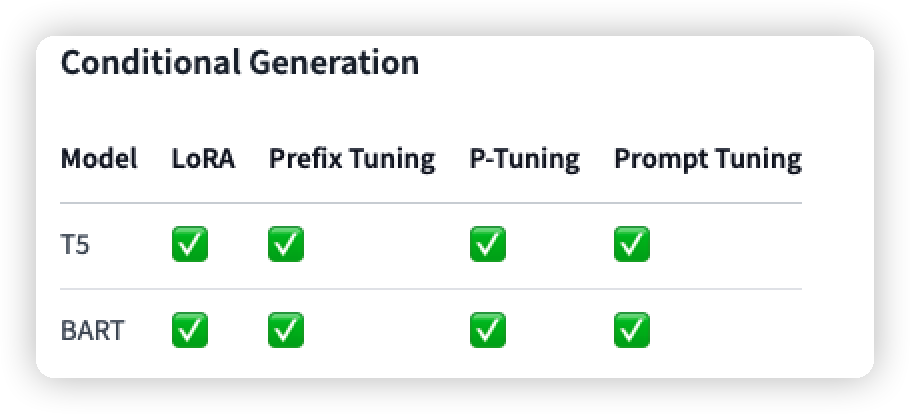
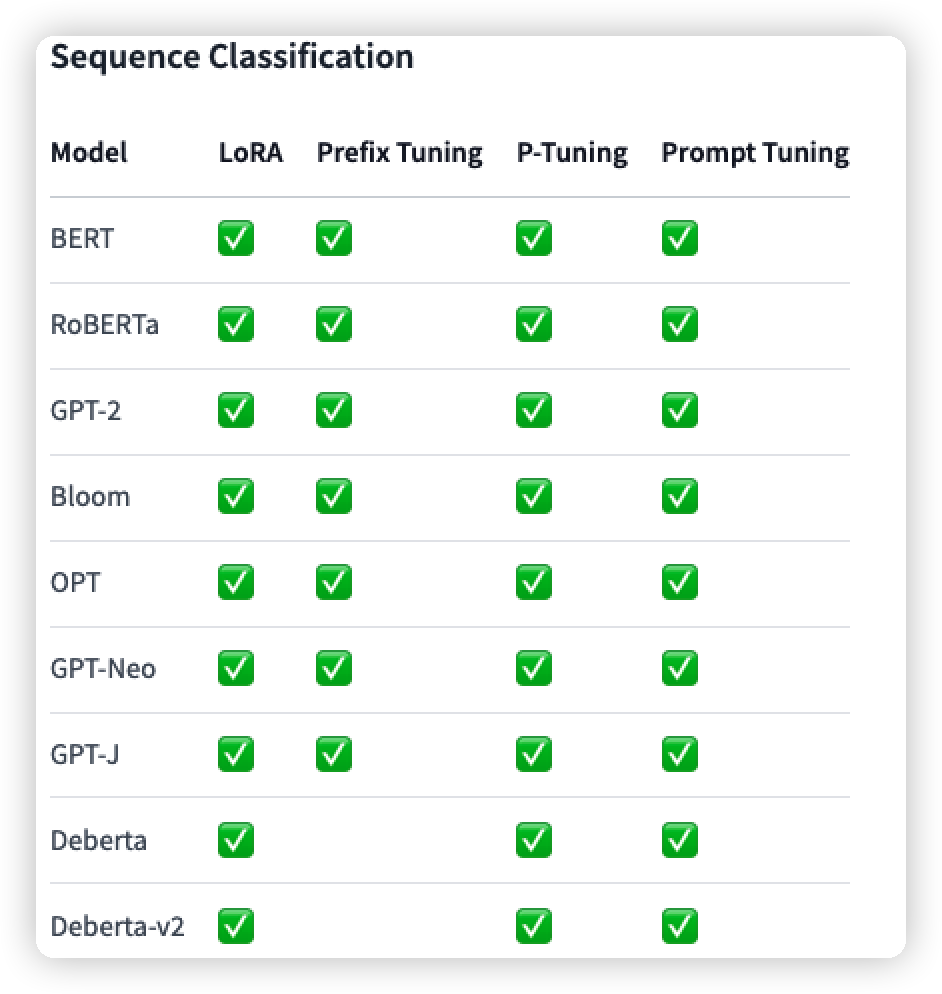
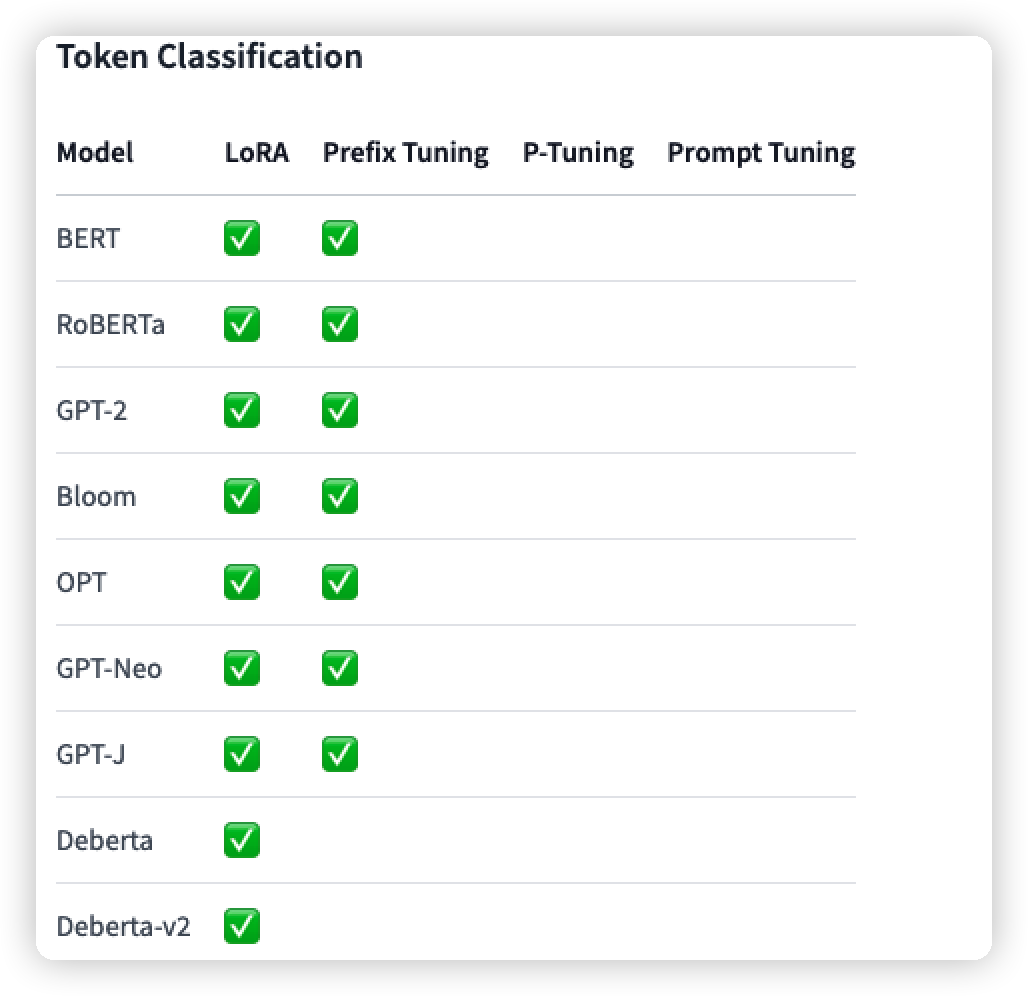
此外也列出了该包对不同的任务中,不同方法和模型的支持情况(我只列出了关于NLP的,还有部分图像的):
但是还没有P-Tuning v2: Prompt Tuning Can Be Comparable to Fine-tuning Universally Across Scales and Tasks的方法,因此我就看源码是怎么处理的。
在研究和阅读其他人blog期间,发现有些人对P-Tuning描述不准确。下面是一些存在的不准确描述情况❎:
- 把Prompt Tuning称作是P-Tuning ❎;
- 使用P-Tuning V2的时候,直接称作是P-Tuning❎;
- 使用了P-Tuning,但是却说是使用了P-TuningV2❎
- ……
因此需要注意甄别(主要是P-Tuning和Prompt-Tuning的方法提出时间就差了一个月,并且在方法上有一定的相似性,都是在Embedding中使用了continuous prompt)
Prompt-Tuning一文中对两者的不同做了说明:
P-tuning” where learnable continuous prompts are interleaved throughout the embedded input, using patterns based on human design. Prompt tuning approach removes this complication by simply prepending the prompt to the input. To achieve strong SuperGLUE results, P-tuning has to be used in conjunction with model tuning, that is, models jointly update both the prompt and the main model parameters【也就是全量微调,但是文章的论点是GPT在NLU任务上的表现,并且还突出few-shot场景下效果】, whereas our approach keeps the original language model frozen” “As another difference, P-tuning requires the addition of “anchor” tokens in the input (e.g. a question mark following the hypothesis in the RTE task) to achieve strong performance, while prompt tuning leaves inputs untouched.”
P-Tuning V2源码定位
这里以run_script/run_rte_roberta.sh为例,下面是代码:
export TASK_NAME=superglue
export DATASET_NAME=rte
export CUDA_VISIBLE_DEVICES=0

bs=32
lr=5e-3
dropout=0.1
psl=128
epoch=100

python3 run.py \
  --model_name_or_path roberta-large \
  --task_name $TASK_NAME \
  --dataset_name $DATASET_NAME \
  --do_train \
  --do_eval \
  --max_seq_length 128 \
  --per_device_train_batch_size $bs \
  --learning_rate $lr \
  --num_train_epochs $epoch \
  --pre_seq_len $psl \
  --output_dir checkpoints/$DATASET_NAME-roberta/ \
  --overwrite_output_dir \
  --hidden_dropout_prob $dropout \
  --seed 11 \
  --save_strategy no \
  --evaluation_strategy epoch \
  --prefix
通过查看arguments.py文件可以查看到prefix参数是如下定义的:
 prefix: bool = field(
        default=False,
        metadata={
            "help": "Will use P-tuning v2 during training"
        }
    )
【为什么非要用prefix呢?我一开始以为这个参数是使用prefix Tuning呢QAQ】
因为shell脚本中的task=superglue,可以看到第96行中引用了get_trainer:
if data_args.task_name.lower() == "superglue":
  assert data_args.dataset_name.lower() in SUPERGLUE_DATASETS
  from tasks.superglue.get_trainer import get_trainer
最终定位到了BertPrefixForQuestionAnswering类,可以看到P-Tuning V2的关键入口代码:
class BertPrefixForQuestionAnswering(BertPreTrainedModel):
    def __init__(self, config):
        super().__init__(config)
        self.num_labels = config.num_labels

        self.pre_seq_len = config.pre_seq_len
        self.n_layer = config.num_hidden_layers
        self.n_head = config.num_attention_heads
        self.n_embd = config.hidden_size // config.num_attention_heads

        self.bert = BertModel(config, add_pooling_layer=False)
        self.qa_outputs = torch.nn.Linear(config.hidden_size, config.num_labels)
        self.dropout = torch.nn.Dropout(config.hidden_dropout_prob)
        self.prefix_encoder = PrefixEncoder(config)
        self.prefix_tokens = torch.arange(self.pre_seq_len).long()

        for param in self.bert.parameters(): //冻结网络
            param.requires_grad = False
可以看到P-Tuning V2是冻结了整个PLM的参数,仅添加了可训练的PrefixEncoder网络,下面就是PrefixEncoder网络:
import torch
class PrefixEncoder(torch.nn.Module):
    r'''
    The torch.nn model to encode the prefix

    Input shape: (batch-size, prefix-length)

    Output shape: (batch-size, prefix-length, 2*layers*hidden)
    '''
    def __init__(self, config):
        super().__init__()
        self.prefix_projection = config.prefix_projection
        if self.prefix_projection:
            # Use a two-layer MLP to encode the prefix
            self.embedding = torch.nn.Embedding(config.pre_seq_len, config.hidden_size)
            self.trans = torch.nn.Sequential(
                torch.nn.Linear(config.hidden_size, config.prefix_hidden_size),
                torch.nn.Tanh(),
                torch.nn.Linear(config.prefix_hidden_size, config.num_hidden_layers * 2 * config.hidden_size)
            )
        else:
            self.embedding = torch.nn.Embedding(config.pre_seq_len, config.num_hidden_layers * 2 * config.hidden_size)

    def forward(self, prefix: torch.Tensor):
        if self.prefix_projection:
            prefix_tokens = self.embedding(prefix)
            past_key_values = self.trans(prefix_tokens)
        else:
            past_key_values = self.embedding(prefix)
        return past_key_values
past_key_values的出现定位
在model/question_answering.py文件中的第168行中,使用了这个参数:
 outputs = self.bert(
            input_ids,
            attention_mask=attention_mask,
            token_type_ids=token_type_ids,
            position_ids=position_ids,
            head_mask=head_mask,
            inputs_embeds=inputs_embeds,
            output_attentions=output_attentions,
            output_hidden_states=output_hidden_states,
            return_dict=return_dict,
            past_key_values=past_key_values,
        )
至此,终于定位到了PrefixEncoder网络中的使用了past_key_values关键词。但是这里有两个问题我当时没有理解:
- 那么这个关键词是怎么使用呢 ?
- 为什么
torch.nn.Linear(dim_ebd, num_layer * 2 * dim_ebd)要乘2 ?
接下来我们从HuggingFace源码的角度来解读这个问题。
HuggingFace Transformers中的BertModel
BertModel的类在HuggingFace的源码中是这样定义的:
def __init__(self, config, add_pooling_layer=True):
    super().__init__(config)
    self.config = config

    self.embeddings = BertEmbeddings(config)
    self.encoder = BertEncoder(config)
    self.pooler = BertPooler(config) if add_pooling_layer else None
那么BertEncoder就是模型的主干了,因此继续深挖BertEncoder这个类
def __init__(self, config):
    super().__init__()
    self.config = config
    self.layer = nn.ModuleList([BertLayer(config) for _ in range(config.num_hidden_layers)])
可以看到BertLayer就是Bert原文中的Layer了(base和lager版本在这个地方是不同的,由config.num_hidden_layers来决定),其是由Pytorch的ModuleList来封装的,那么最终定位到了BertAttention注意力机制的源码中:
 def __init__(self, config, position_embedding_type=None):
        super().__init__()
        self.self = BertSelfAttention(config, position_embedding_type=position_embedding_type)
        self.output = BertSelfOutput(config)
        self.pruned_heads = set()
BertSelfAttention就是最终past_key_values使用的地方。
past_key_values的使用
past_key_values参数是这样定义的: (tuple(tuple(torch.FloatTensor)) of length config.n_layers with each tuple having 4 tensors of shape (batch_size, num_heads, sequence_length - 1, embed_size_per_head)) — Contains precomputed key and value hidden states of the attention blocks. Can be used to speed up decoding.
那么就需要看看在Bert源码中这个参数是怎么使用的,通过定位HuggingFace中的BertSelfAttention类,看到了具体的使用
def transpose_for_scores(self, x):
        new_x_shape = x.size()[:-1] + (self.num_attention_heads, self.attention_head_size) # self.num_attention_heads * self.attention_head_size = hidden_size
        x = x.view(*new_x_shape)
        return x.permute(0, 2, 1, 3) #  (bs, num_attention_heads, length, attention_head_size)
def forward(
        self,
        hidden_states, # shape = (bs, length, hidden_size);length是包含past_key_value长度的
        attention_mask=None,
        head_mask=None,
        encoder_hidden_states=None,
        encoder_attention_mask=None,
        past_key_value=None,
        output_attentions=False,
    ):
        mixed_query_layer = self.query(hidden_states)

        # If this is instantiated as a cross-attention module, the keys
        # and values come from an encoder; the attention mask needs to be
        # such that the encoder's padding tokens are not attended to.
        is_cross_attention = encoder_hidden_states is not None

        if is_cross_attention and past_key_value is not None:
            # reuse k,v, cross_attentions
            key_layer = past_key_value[0]
            value_layer = past_key_value[1]
            attention_mask = encoder_attention_mask
        elif is_cross_attention:
            key_layer = self.transpose_for_scores(self.key(encoder_hidden_states))
            value_layer = self.transpose_for_scores(self.value(encoder_hidden_states))
            attention_mask = encoder_attention_mask
        elif past_key_value is not None: # 这个地方使用!!!
            key_layer = self.transpose_for_scores(self.key(hidden_states)) #  (bs, num_attention_heads, length, attention_head_size);self.key = nn.Linear(config.hidden_size, self.all_head_size),这个就是自注意力机制里面的训练参数W;
            value_layer = self.transpose_for_scores(self.value(hidden_states)) #  (bs, num_attention_heads, length, attention_head_size);self.value = nn.Linear(config.hidden_size, self.all_head_size),同上;
            key_layer = torch.cat([past_key_value[0], key_layer], dim=2) # 在length这个维度上concat
            value_layer = torch.cat([past_key_value[1], value_layer], dim=2)# 同上
        else:
            key_layer = self.transpose_for_scores(self.key(hidden_states))
            value_layer = self.transpose_for_scores(self.value(hidden_states))

        query_layer = self.transpose_for_scores(mixed_query_layer)
那么当传入past_key_value这个参数的时候就会执行下面的代码(部分注释我已经在上面写好了):
key_layer = self.transpose_for_scores(self.key(hidden_states))
value_layer = self.transpose_for_scores(self.value(hidden_states))
key_layer = torch.cat([past_key_value[0], key_layer], dim=2)
value_layer = torch.cat([past_key_value[1], value_layer], dim=2)
至此,我们就可以回答这个关键词是怎么使用呢?这个问题了,就是通过在length这个维度上concat,从而实现了下图中黄色部分的训练。

那么还剩下一个上面提到的问题:为什么 torch.nn.Linear(dim_ebd, num_layer * 2 * dim_ebd)要乘2?
past_key_values的继续深究(shape层面)
在BertModel的类在HuggingFace的源码中第954行中获取了past_key_values_length:
# past_key_values_length
past_key_values_length = past_key_values[0][0].shape[2] if past_key_values is not None else 0
我们不去讨论这个参数是怎么用的(源码中是在self.embedding中使用的),只看它的获取方式是从past_key_values第0个维度的第0个维度shape中的第3个值,因此结合past_key_values的定义:
(tuple(tuple(torch.FloatTensor)) of length config.n_layers with each tuple having 4 tensors of shape (batch_size, num_heads, sequence_length - 1, embed_size_per_head))
可以确定past_key_values的shape是**[(num_hidden_layers, batch_size, num_heads, sequence_length - 1, embed_size_per_head), (num_hidden_layers, batch_size, num_heads, sequence_length - 1, embed_size_per_head)]**,其中past_key_value[0]是past_key;past_key_value[1]是past_value。
保险起见,再验证一次,我们再回看P-Tuning V2源码的BertPrefixForQuestionAnswering类的forward方法:
 def forward(
        self,
        input_ids=None,
        attention_mask=None,
        token_type_ids=None,
        position_ids=None,
        head_mask=None,
        inputs_embeds=None,
        start_positions=None,
        end_positions=None,
        output_attentions=None,
        output_hidden_states=None,
        return_dict=None,
    ):
        r"""
        start_positions (:obj:`torch.LongTensor` of shape :obj:`(batch_size,)`, `optional`):
            Labels for position (index) of the start of the labelled span for computing the token classification loss.
            Positions are clamped to the length of the sequence (:obj:`sequence_length`). Position outside of the
            sequence are not taken into account for computing the loss.
        end_positions (:obj:`torch.LongTensor` of shape :obj:`(batch_size,)`, `optional`):
            Labels for position (index) of the end of the labelled span for computing the token classification loss.
            Positions are clamped to the length of the sequence (:obj:`sequence_length`). Position outside of the
            sequence are not taken into account for computing the loss.
        """
        return_dict = return_dict if return_dict is not None else self.config.use_return_dict

        batch_size = input_ids.shape[0]
        past_key_values = self.get_prompt(batch_size=batch_size)
        prefix_attention_mask = torch.ones(batch_size, self.pre_seq_len).to(self.bert.device)
        attention_mask = torch.cat((prefix_attention_mask, attention_mask), dim=1)

        outputs = self.bert(
            input_ids,
            attention_mask=attention_mask,
            token_type_ids=token_type_ids,
            position_ids=position_ids,
            head_mask=head_mask,
            inputs_embeds=inputs_embeds,
            output_attentions=output_attentions,
            output_hidden_states=output_hidden_states,
            return_dict=return_dict,
            past_key_values=past_key_values,
        )
直接定位与P-Tuning有关的地方,就是这个get_prompt方法,那么我们可以再看看这个方法是怎么定义的
def get_prompt(self, batch_size):
        prefix_tokens = self.prefix_tokens.unsqueeze(0).expand(batch_size, -1).to(self.bert.device)
        past_key_values = self.prefix_encoder(prefix_tokens) # 这个就是PrefixEncoder网络
        bsz, seqlen, _ = past_key_values.shape
        past_key_values = past_key_values.view(
            bsz,
            seqlen,
            self.n_layer * 2,
            self.n_head,
            self.n_embd
        )
        past_key_values = self.dropout(past_key_values)
        past_key_values = past_key_values.permute([2, 0, 3, 1, 4]).split(2)# 划分past_key和past_value, 构成一个元组
        return past_key_values
至此,验证了我们的想法,其shape也确定了下来。可以说作者非常巧妙地使用了这个参数,妙~。
扩展内容
use_cache 字段
在使用past_key_values的时候,无意中看到user_cache这个字段,下面是官方给出的字段说明:
If set to
True,past_key_valueskey value states are returned and can be used to speed up decoding (seepast_key_values).
也就是说这个参数有两个作用:返回存储和加速解码
我们先来看返回存储是怎么做的。
在BertEncoder类中第一次使用了这个参数,其用它定义了一个参数next_decoder_cache
next_decoder_cache = () if use_cache else None
接下来在源码中next_decoder_cache用来存储layer_outputs的结果,并用作数据类BaseModelOutputWithPastAndCrossAttentions的结果。其他地方就没有用到了。
  if use_cache:
    next_decoder_cache += (layer_outputs[-1],) #layer_outputs就是每层Attention之后的结果
  ……
   return BaseModelOutputWithPastAndCrossAttentions(
            last_hidden_state=hidden_states,
            past_key_values=next_decoder_cache,
            hidden_states=all_hidden_states,
            attentions=all_self_attentions,
            cross_attentions=all_cross_attentions,
        )
可以看到代码中是将next_decoder_cache赋给了past_key_values。这样就与BaseModelOutputWithPastAndCrossAttentions这个数据流的说明保持了一致。下面是官方的说明:
past_key_values (
tuple(tuple(torch.FloatTensor)), optional, returned whenuse_cache=Trueis passed or whenconfig.use_cache=True) — Tuple oftuple(torch.FloatTensor)of lengthconfig.n_layers, with each tuple having 2 tensors of shape(batch_size, num_heads, sequence_length, embed_size_per_head)) and optionally ifconfig.is_encoder_decoder=True2 additional tensors of shape(batch_size, num_heads, encoder_sequence_length, embed_size_per_head).Contains pre-computed hidden-states (key and values in the self-attention blocks and optionally if
config.is_encoder_decoder=Truein the cross-attention blocks) that can be used (seepast_key_valuesinput) to speed up sequential decoding.
这里也就可以说明其另一个作用是加速解码了。但是需要继续探讨当BERT作为decoder的时候,cross-attention的计算了。这不在本次的讨论内,给自己埋个坑。
总结来说,这个参数如果不在encoder-decode这个框架中,那么是用不到的,除非你非要想得到这个数值看看。
GPT2Model
在查阅相关使用的时候,我发现了另一篇的相近的blog内容GPT2模型源码阅读系列(二)一GPT2Model。该博主也是使用的HuggingFace,从而讨论了past_key_values在GPT2中的使用。这里就仅探讨past_key_values这个参数。
GPT2Model类中最主要的部分便是循环ModuleList层中的12个Block模块以及past_key_values元组中12个layer_past张量进行运算,这部分即为GPT2模型主体结构部分的运算过程。
past_key_values保存了上次迭代过程中的key和value(attention运算中的键值对)用于加速运算,因此在第一次迭代时为长度为12,值为None的list,在之后past_length为1
if past_key_values is None:
  past_length = 0
  # 若此时为GPT2模型第一次迭代, 则不存在上一次迭代返回的past_key_values列表(包含12个present的列表,
  # 也就是代码中的presents列表), 则此时past_key_values列表为一个包含12个None值的列表.
  past_key_values = [None] * len(self.h)
else:
	past_length = past_key_values[0][0].size(-2)
这部分内容其实就很像是我们前面讲到的内容,几乎是如出一辙。


 925
925


 被折叠的 条评论
为什么被折叠?
被折叠的 条评论
为什么被折叠?
 到【灌水乐园】发言


