


一、解决基本问题:
在做 RCP 项目的时候经常会遇到一个问题,就是要将一些控制信息输出到 RCP 自身的控制台,那么我们就可以扩展 Eclipse 扩展点 org.eclipse.ui.console.consoleFactories ,来实现我们自己的控制台,解决方法如下:
首先 ,在 plugin.xml 中定义扩展点:
plugin.xml:
<extension
point="org.eclipse.ui.console.consoleFactories">
<consoleFactory
class="com.hnjchina.intro.ConsoleFactory"
label=" 控制台 "/>
</extension>
其次 ,在 perspective 中加入 console View ,作为控制信息的控制台( console ):
在 Perspective .java 类中的 Public void createInitialLayout(IPageLayout layout) 方法中加入如下:
ConsoleFactory cf = new ConsoleFactory();
layout.addView(IConsoleConstants.ID_CONSOLE_VIEW, IPageLayout.BOTTOM,0.70f, layout.getEditorArea());
cf.openConsole();
最后 ,自定义 ConsoleFactory 类,主要实现 showConsole() 方法,然后在要输出信息的地方定义 printer 变量如下:
private MessageConsoleStream printer =ConsoleFactory.console.newMessageStream();
自定义的 ConsoleFactory 类具体代码如下:
package com.essp.eseai.maptool.perspective.views;

import java.io.IOException;
import java.io.PrintStream;
import org.eclipse.ui.console.ConsolePlugin;
import org.eclipse.ui.console.IConsole;
import org.eclipse.ui.console.IConsoleFactory;
import org.eclipse.ui.console.IConsoleManager;
import org.eclipse.ui.console.MessageConsole;
import org.eclipse.ui.console.MessageConsoleStream;

/** *//**
* 描述:样式显示控制台视图
* */
public class ConsoleViewPart implements IConsoleFactory ...{

   private static MessageConsole console = new MessageConsole("样式显示窗口", null);

   /** *//**
    * 描述:打开控制台
    * */
   public void openConsole() {
       showConsole();
   }

   /** *//**
    * 描述:显示控制台
    * */
   public static void showConsole() {
       try ...{
           if (console != null) {
               //得到默认控制台管理器
               IConsoleManager manager = ConsolePlugin.getDefault().getConsoleManager();
               //得到所有的控制台实例
               IConsole[] existing = manager.getConsoles();
               boolean exists = false;
               //新创建的MessageConsole实例不存在就加入到控制台管理器,并显示出来
               for (int i = 0; i < existing.length; i++) {
                   if (console == existing[i])
                       exists = true;
               }
               if(!exists)...{
                   System.out.println("aaaaaaaa");
                   manager.addConsoles(new IConsole[] { console });
               }
               manager.showConsoleView(console);
               MessageConsoleStream stream = console.newMessageStream();
               stream.write("测试!");
               System.setOut(new PrintStream(stream));
           }
       } catch (IOException e) {
           e.printStackTrace();
       }
      }

   /** *//**
    * 描述:关闭控制台
    * */
   public static void closeConsole() {
       IConsoleManager manager = ConsolePlugin.getDefault().getConsoleManager();
       if (console != null) {
           manager.removeConsoles(new IConsole[] { console });
       }
   }

   public static MessageConsole getConsole() ...{
       return console;
   }

}
二、总结:
重用 Console 有两种办法:
1 、作为组件来重用:
//getConsole 就是 new MessageConsole("", null);
mainConsole = ConsoleFactory.getConsole();
mainTab = new TabItem(tabFolder, SWT.NONE);
TextConsoleViewer tcv = new TextConsoleViewer(tabFolder, mainConsole);
mainTab.setText(" 主线程 ");
mainTab.setControl(tcv.getControl());
MessageConsoleStream printer = mainConsole.newMessageStream();
printer.setColor(Display.getCurrent() .getSystemColor(SWT.COLOR_BLACK));
ConsoleFactory.java :
public static MessageConsole getConsole() {
return new MessageConsole("", null);
}
2 、作为 view 重用:
<extension
id="Hapcent.ConsoleFactory"
name="Console Factory"
point="org.eclipse.ui.console.consoleFactories">
<consoleFactory
class="edu.fudan.hapcent.UI.ConsoleFactory"
icon="icons/sample2.gif"
label="Hapcent.consoleFactory"/>
</extension>
ConsoleFactory.java :
关键是一个方法:
public void openConsole() {
IConsoleManager manager = ConsolePlugin.getDefault().getConsoleManager();
IConsole[] existing = manager.getConsoles();
boolean exists = false;
for (int i = 0; i < existing.length; i++) {
if (console == existing)
exists = true;
}
if (!exists) {
manager.addConsoles(new IConsole[] { console });
}
manager.showConsoleView(console );
}
三、经常遇到的错误:
在显示视图时遇到如下错误:
java.lang.NoClassDefFoundError: org/eclipse/ui/console/IConsoleFactory
at java.lang.ClassLoader.defineClass1(Native Method)
at java.lang.ClassLoader.defineClass(Unknown Source)
……
 <!-- [endif]-->
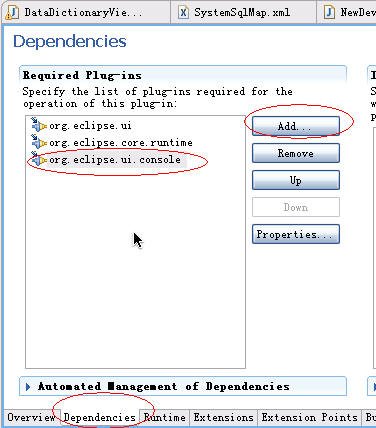
首先,应该检查在上图位置的地方是否加入需要的插件,即: org.eclipse.ui.console
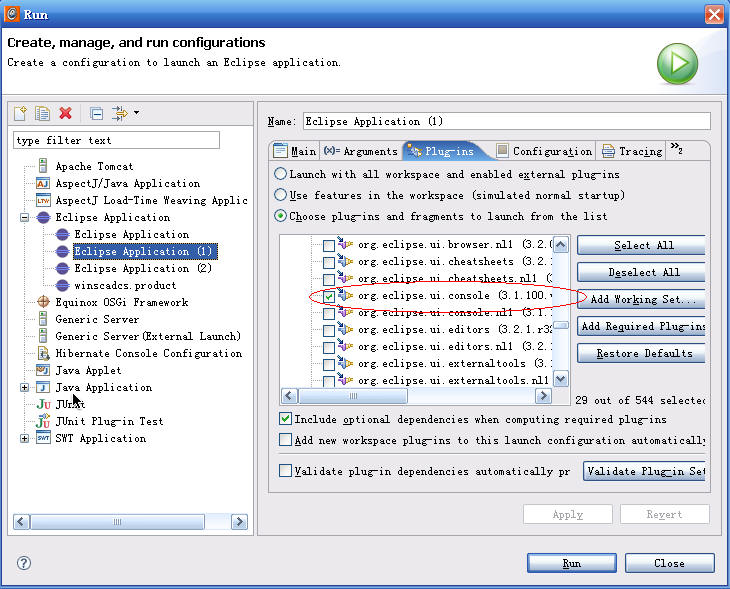
2 .在 Dependences 里面已经加入了运行需要的包,但是将 RCP 作为一个 eclipse 项目来运行时还是报错,而在项目的 .product 文件里先配置好运行需要用到的包,然后用 launch the product 选项 test 项目,可以运行:
这是运行配置的问题,作为项目运行的时候是使用的以前的配置,而那个配置里面没有添加这个包。同样道理,如果以后你再添加了其他的包而没有在你现在 .product 文件中添加的话,它同样不会自动添加,所以也会出问题。所以这是应该看看你运行时的这个地方有没有勾上 org.eclipse.ui.console ,如下图:
另外,在项目的 .product 文件里有一个 Synchronize, 点击这里可以同步你的运行配置
3 .当显示 Eclipse 自身的控制台后,状态栏的内容没有了:
分析:调用 IStatusLineManager.setMessage(String message) 会将信息写入 Eclipse 状态栏的共享区域,其他的插件例如 Console 也可以对这个区域进行修改,这样当第一次选中 Console 时,原有状态栏中的信息就会被清除。
解决:解决的方法是自己实现一个 IContributionItem ,并在 fill(Composite parent) 方法中定义其布局,然后在 ActionBarAdvisor.fillStatusLine(IStatusLineManager statusLine) 中调用 statusLine.add(IContributionItem item) 将其加入 Eclipse 的状态栏即可。
4 . 如何默认就是自己实现的控制台,通常情况下默认的控制台不是自己扩展的那个,而非得在视图里切换一下才行,还有就是能否把控制台视图里的那些ACTION不显示出来?
解决: 调用openConsole() 就可以默认显示你自己扩展的控制台了
四、自定义控制台,向其输出 RCP 中的一些实时信息:

public class SystemInfoView extends ViewPart ...{

       public static final String ID = "com.winscad.view.SystemInfoView";

       String strGetRespone = "";

       Text textSysInfo;

       /** *//**

        * Create contents of the view part

        * @param parent

        */

       @Override

       public void createPartControl(Composite parent) ...{

              final Composite container = new Composite(parent, SWT.NONE);

              //设置面板布局

              container.setLayout(new FillLayout());

              //创建带有水平和垂直滚动条的文本框

              textSysInfo = new Text(container,SWT.BORDER|SWT.V_SCROLL|SWT.H_SCROLL);

              //设置文本框的滚动条一直处于最下端

              textSysInfo.setTopIndex(0);

              final Timer timer = new Timer(true);

              //设置每隔1秒去读一次业务返回的响应数据,并循环显示(刷新)

             timer.scheduleAtFixedRate(new TimerTask()...{

                     public void run() ...{

                            Display.getDefault().asyncExec(new Runnable()...{

                                   public void run() ...{


                                   }

                            });

                     }}, 6*1000, 1*1000);


              createActions();

              initializeToolBar();

              initializeMenu();

       }

       /** *//**

        * Create the actions

        */

       private void createActions() ...{

              // Create the actions

       }


       /** *//**

        * Initialize the toolbar

        */

       private void initializeToolBar() ...{

              IToolBarManager toolbarManager = getViewSite().getActionBars().getToolBarManager();

              Action deleteAction = new Action()...{

                     public void run()...{

                            textSysInfo.setText("");

                     }

              };

              deleteAction.setText(Message.getString("ParameterView.Clear"));//清空

              deleteAction.setToolTipText(Message.getString("ParameterView.ClearSystem"));//清空系统信息

              deleteAction.setImageDescriptor(PlatformUI.getWorkbench().getSharedImages().

                                     getImageDescriptor(ISharedImages.IMG_TOOL_DELETE));

              toolbarManager.add(deleteAction);

              //为ToolBarManager添加自定义控件

              ComboContribution combo = new ComboContribution("Combo.contribution");

              toolbarManager.add(combo);

              toolbarManager.add(new ComboContribution2());

       }


       //自定义控件

       class ComboContribution extends ControlContribution...{

           public ComboContribution(String id)...{

               super(id);

           }

           @Override

           protected Control createControl(Composite parent)...{

               Combo combo = new Combo(parent, SWT.READ_ONLY);

               combo.setItems(new String[]...{ "First", "Secend", "Third" });

               combo.addSelectionListener(new SelectionListener()...{

                            public void widgetDefaultSelected(SelectionEvent e) ...{

                                   // TODO Auto-generated method stub

                            }

                            public void widgetSelected(SelectionEvent e) ...{

                                   // TODO Auto-generated method stub

                                   textSysInfo.append("View工具栏测试!");

                            }

               });

               return combo;

           }

       }

       //自定义控件

        class ComboContribution2 extends ContributionItem...{

               private ToolItem toolitem;

               private Combo fFindCombo;

               private Button upFindbutton;

               private Button downFindbutton;

               private Button allFindbutton;


               public ComboContribution2() ...{

                   super();

               }

               protected Control createControl(Composite parent) ...{


                   Composite composite = new Composite(parent, SWT.NONE);

                   //查询框

                   fFindCombo = new Combo(composite,SWT.NONE);

                   fFindCombo.setLocation(0, 2);

                   fFindCombo.setSize(130,20);

                   System.out.println(" fFindCombo == " + fFindCombo.getBounds());

                   //向上查

                   upFindbutton = new Button(composite, SWT.NONE);

                   upFindbutton.setLocation(135, 2);

                   upFindbutton.setSize(30,20);

                   upFindbutton.setText("上查");

                   upFindbutton.addSelectionListener(new SelectionListener()...{

                       public void widgetDefaultSelected(SelectionEvent e) ...{

                           // TODO 自动生成方法存根


                       }

                       public void widgetSelected(SelectionEvent e) ...{

                           fFindCombo.add(fFindCombo.getText());


                       }

                   });

                   System.out.println(" upFindbutton == " + upFindbutton.getBounds());

                   //向下查

                   downFindbutton = new Button(composite, SWT.NONE);

                   downFindbutton.setLocation(170, 2);

                   downFindbutton.setSize(30,20);

                   downFindbutton.setText("下查");

                   //全部查询

                   allFindbutton = new Button(composite, SWT.NONE);

                   allFindbutton.setLocation(205, 2);

                   allFindbutton.setSize(30,20);

                   allFindbutton.setText("全部");

                   toolitem.setWidth(240);

                   return composite;

               }

               public void fill(ToolBar parent, int index) ...{

                   toolitem = new ToolItem(parent, SWT.SEPARATOR, index);

                   Control control = createControl(parent);

                   toolitem.setControl(control);

               }

           }

       /** *//**

        * Initialize the menu

        */

       private void initializeMenu() ...{

              IMenuManager menuManager = getViewSite().getActionBars()

                            .getMenuManager();

       }

       @Override

       public void setFocus() ...{

              // Set the focus

       }

       public String getStrGetRespone() ...{

              return strGetRespone;

       }

       public void setStrGetRespone(String strGetRespone) ...{

              this.strGetRespone = strGetRespone;

       }

}


 1380
1380

 被折叠的 条评论
为什么被折叠?
被折叠的 条评论
为什么被折叠?
 到【灌水乐园】发言


