


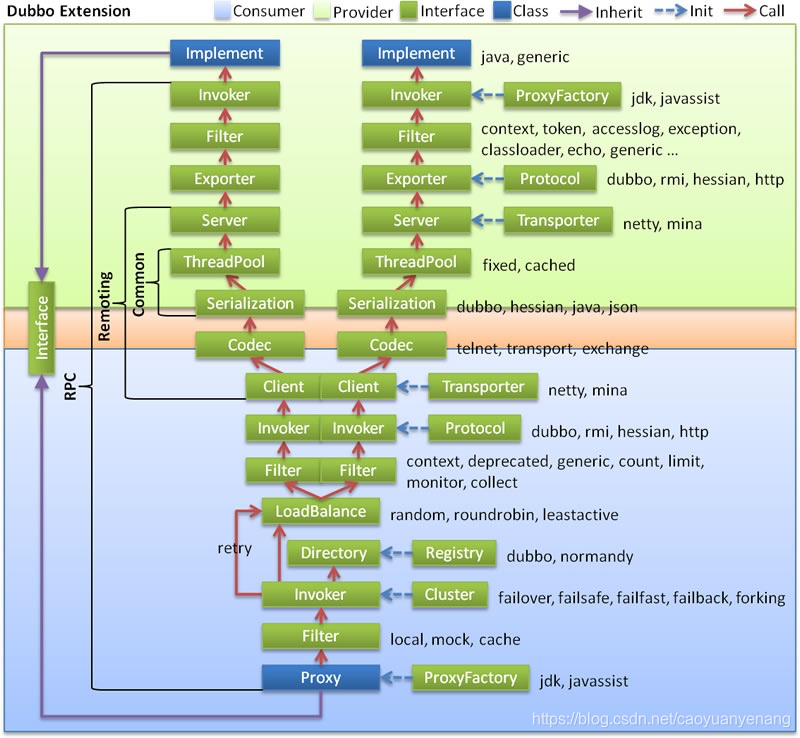
这里debug的代码用的是github上dubbo项目的dubbo-demo里的 dubbo-demo-xml下的代码。这里以默认的dubbo通信协议为debug的代码,在 《Spring解析并注册Dubbo consumer端过程详解》和 《Spring解析并发布Dubbo provider端过程详解》中已经详细讲到Spring解析服务提供方和消费方的配置流程,这一篇看下consumer方的调用的整个过程。dubbo官网上的一篇讲 dubbo的设计原则的文章,这里先贴出里面的调用链图:
demo里的consumer端的xml配置:
<beans
       // xmlns:xsi是xsi标签命名空间
       xmlns:xsi="http://www.w3.org/2001/XMLSchema-instance"
       // xmlns:dubbo是dubbo标签的命名空间
       xmlns:dubbo="http://dubbo.apache.org/schema/dubbo"
       // 当前那xml文件默认的命名空间
       xmlns="http://www.springframework.org/schema/beans"
       // xsi:schemaLocation 配置了每个命名空间对应里配置规范,用来做格式校验
       xsi:schemaLocation="http://www.springframework.org/schema/beans http://www.springframework.org/schema/beans/spring-beans-4.3.xsd
       http://dubbo.apache.org/schema/dubbo http://dubbo.apache.org/schema/dubbo/dubbo.xsd">

    <dubbo:application name="demo-consumer"/>

    <dubbo:registry address="zookeeper://127.0.0.1:2181" timeout="6000"/>

    <!--    协议配置-->
    <dubbo:protocol name="dubbo"/>

    <!--    consumer配置-->
    <dubbo:reference id="demoService" check="false" interface="org.apache.dubbo.demo.DemoService" timeout="6000" />

</beans>
调用入口代码:
public class Application {
    /**
     * In order to make sure multicast registry works, need to specify '-Djava.net.preferIPv4Stack=true' before
     * launch the application
     */
    public static void main(String[] args) throws Exception {
        ClassPathXmlApplicationContext context = new ClassPathXmlApplicationContext("spring/dubbo-consumer.xml");
        context.start();
        DemoService demoService = context.getBean("demoService", DemoService.class);
        for(int i=0;i<1000;i++){
            String hello = demoService.sayHello("world");
            System.out.println("result: " + hello);
            Thread.sleep(1000L);
        }
    }
}
在《Spring解析并注册Dubbo consumer端过程详解》中讲到dubbo:reference配置会被Spring容器解析成一个FactoryBean对象,在依赖注入或者直接调用getBean方法就会触发这个FactoryBean的getObject()方法从而返回真正的代理类,先贴出getObject()方法的结合dubbo官方的分层的完整时序图:

图中蓝色部分是是使用包装器模式,核心的DubboInvoker被层层包装,在调用时,就是从外层包装类层层往里调用。
这里主要分三步:
- consumer端发送请求
- provider端解析并处理请求,将结果发送给consumer端
- consumer端接收请求结果
1、consumer端发送请求
先贴出总时序图:

demoService.sayHello(“world”)这里的demoService实际是个代理对象,在《Spring解析并注册Dubbo consumer端过程详解》中讲到这个代理类的生成过程,这里贴出代理类反编译后的代码:
public class proxy0
implements ClassGenerator.DC,
Destroyable,
EchoService,
DemoService {
    public static Method[] methods;
    private InvocationHandler handler;

    @Override
    public Object $echo(Object object) {
        Object[] objectArray = new Object[]{object};
        Object object2 = this.handler.invoke(this, methods[0], objectArray);
        return object2;
    }

    public CompletableFuture sayHelloAsync(String string) {
        Object[] objectArray = new Object[]{string};
        Object object = this.handler.invoke(this, methods[1], objectArray);
        return (CompletableFuture)object;
    }

    // 实际是调用InvocationHandler的invoke
    public String sayHello(String string) {
        Object[] objectArray = new Object[]{string};
        Object object = this.handler.invoke(this, methods[2], objectArray);
        return (String)object;
    }

    @Override
    public void $destroy() {
        Object[] objectArray = new Object[]{};
        Object object = this.handler.invoke(this, methods[3], objectArray);
    }

    public proxy0() {
    }

    public proxy0(InvocationHandler invocationHandler) {
        this.handler = invocationHandler;
    }
}
可以看出我们在调用demoService.sayHello(String string)方法时,实际就是调用InvokerInvocationHandler的invoke方法,方法代码如下:
public Object invoke(Object proxy, Method method, Object[] args) throws Throwable {
        if (method.getDeclaringClass() == Object.class) {
            return method.invoke(this.invoker, args);
        } else {
            String methodName = method.getName();
            Class<?>[] parameterTypes = method.getParameterTypes();
            if (parameterTypes.length == 0) {
                if ("toString".equals(methodName)) {
                    return this.invoker.toString();
                }

                if ("$destroy".equals(methodName)) {
                    this.invoker.destroy();
                    return null;
                }

                if ("hashCode".equals(methodName)) {
                    return this.invoker.hashCode();
                }
            } else if (parameterTypes.length == 1 && "equals".equals(methodName)) {
                return this.invoker.equals(args[0]);
            }
            // 构造RpcInvocation信息,分装了接口、方法、参数等元数据信息
            RpcInvocation rpcInvocation = new RpcInvocation(method, this.invoker.getInterface().getName(), args);
            rpcInvocation.setTargetServiceUniqueName(this.invoker.getUrl().getServiceKey());
            // 调用invoker链
            return this.invoker.invoke(rpcInvocation).recreate();
        }
    }
实际是调用了被层层包装的invoker.invoke(rpcInvocation)方法。接着上面的代码可以看出主要逻辑就是将被调用的类、方法、参数这些元数据信息封装成RpcInvocation对象,调用生成的invoker链的invoke方法,这个invoker链的生成过程也在《Spring解析并注册Dubbo consumer端过程详解》里讲过,invoker包装链如下:

最终会调用到FailoverClusterInvoker.invoke(Invocation invocation)方法里,代码如下:
public Result invoke(Invocation invocation) throws RpcException {
        this.checkWhetherDestroyed();
        Map<String, Object> contextAttachments = RpcContext.getContext().getAttachments();
        if (contextAttachments != null && contextAttachments.size() != 0) {
            ((RpcInvocation)invocation).addAttachments(contextAttachments);
        }
        // 1 通过注册中心对象获取适合的服务提供方
        List<Invoker<T>> invokers = this.list(invocation);
        // 2 根据负载均衡策略,从多个服务提供方中选择一个
        LoadBalance loadbalance = this.initLoadBalance(invokers, invocation);
        RpcUtils.attachInvocationIdIfAsync(this.getUrl(), invocation);
        // 3 调用最终选中的invoker
        return this.doInvoke(invocation, invokers, loadbalance);
    }
这里分关键的三步:
- 通过注册中心对象获取适合的服务提供方
- 根据负载均衡策略,从多个服务提供方中选择一个
- 调用最终选中的invoker
1.1 通过注册中心对象获取符合路由策略的服务提供方列表
List<Invoker<T>> invokers = this.list(invocation);
最终会调用RegistryDirectory.doList(Invocation invocation)方法,主干代码如下:
public List<Invoker<T>> doList(Invocation invocation) {
        ...
            List invokers = null;

            try {
            // 通过路由链来过滤
                invokers = this.routerChain.route(this.getConsumerUrl(), invocation);
            } catch (Throwable var4) {
                logger.error("Failed to execute router: " + this.getUrl() + ", cause: " + var4.getMessage(), var4);
            }

            return invokers == null ? Collections.emptyList() : invokers;
      ...
    }
这里需要注意的一点是,这里的服务提供方及路由配置信息都是由注册发现对象RegistryDirectory本地缓存好的,而更新动作是通过注册中心的监听回调来触发的(详见《Spring解析并注册Dubbo consumer端过程详解》)。
1.2 根据负载均衡策略选取一个服务提供者进行调用
protected LoadBalance initLoadBalance(List<Invoker<T>> invokers, Invocation invocation) {
        return CollectionUtils.isNotEmpty(invokers) ? (LoadBalance)ExtensionLoader.getExtensionLoader(LoadBalance.class).getExtension(((Invoker)invokers.get(0)).getUrl().getMethodParameter(RpcUtils.getMethodName(invocation), "loadbalance", "random")) : (LoadBalance)ExtensionLoader.getExtensionLoader(LoadBalance.class).getExtension("random");
    }
这里是通过SPI扩展机制获取所有的负载均衡策略,然后检查URL中是否有针对当前方法指定负载策略,如果有则获取对应的扩展实现类,负责使用默认的随机负载,关于SPI机制可以看这里
private Invoker<T> doSelect(LoadBalance loadbalance, Invocation invocation, List<Invoker<T>> invokers, List<Invoker<T>> selected) throws RpcException {
        if (CollectionUtils.isEmpty(invokers)) {
            return null;
        } else if (invokers.size() == 1) {
            return (Invoker)invokers.get(0);
        } else {
        // 根据负载策略选取一个服务提供者
            Invoker<T> invoker = loadbalance.select(invokers, this.getUrl(), invocation);
            if (selected != null && selected.contains(invoker) || !invoker.isAvailable() && this.getUrl() != null && this.availablecheck) {
                try {
                    Invoker<T> rInvoker = this.reselect(loadbalance, invocation, invokers, selected, this.availablecheck);
                    if (rInvoker != null) {
                        invoker = rInvoker;
                    } else {
                        int index = invokers.indexOf(invoker);

                        try {
                            invoker = (Invoker)invokers.get((index + 1) % invokers.size());
                        } catch (Exception var9) {
                            logger.warn(var9.getMessage() + " may because invokers list dynamic change, ignore.", var9);
                        }
                    }
                } catch (Throwable var10) {
                    logger.error("cluster reselect fail reason is :" + var10.getMessage() + " if can not solve, you can set cluster.availablecheck=false in url", var10);
                }
            }

            return invoker;
        }
    }
在《Spring解析并注册Dubbo consumer端过程详解》)中关于服务发现的逻辑里可以看到,当注册中心的服务提供方节点发生变化时,会通知服务发现对象来变更本地维护的invoker列表,这里会将invoker做层层包装,每一层包装都会添加新的特性,那么在调用时,也会层层调用。
1.2.1 组装Request对象,设置request的id
设置request的id是为了异步调用,这样一个请求发出后,不用阻塞下一个请求,并且返回的response也会带上这个id,从而通过id来匹配返回的response是哪个请求发出的,这样能提高吞吐量。核心代码在HeaderExchangeChannel的request方法里,代码如下:
public CompletableFuture<Object> request(Object request, int timeout, ExecutorService executor) throws RemotingException {
        if (this.closed) {
            throw new RemotingException(this.getLocalAddress(), (InetSocketAddress)null, "Failed to send request " + request + ", cause: The channel " + this + " is closed!");
        } else {
            // 设置id
            Request req = new Request();
            req.setVersion(Version.getProtocolVersion());
            req.setTwoWay(true);
            req.setData(request);
            // 设置异步结果,并将结果缓存到DefaultFuture的全局map中
            DefaultFuture future = DefaultFuture.newFuture(this.channel, req, timeout, executor);

            try {
            // 发送请求
                this.channel.send(req);
                // 返回异步结果
                return future;
            } catch (RemotingException var7) {
                future.cancel();
                throw var7;
            }
        }
    }
1.2.2 封装异步结果DefaultFuture,并将异步结果缓存到全局的Map中以便后续唤醒阻塞等待结果的consumer线程
接着上面的代码,在DefaultFuture future = DefaultFuture.newFuture(this.channel, req, timeout, executor);中会将当前异步结果缓存到全局的Map中,代码在DefaultFuture的构造器内,源码如下:
// 全局Map
private static final Map<Long, DefaultFuture> FUTURES = new ConcurrentHashMap();

public static DefaultFuture newFuture(Channel channel, Request request, int timeout, ExecutorService executor) {
    // 调用构造器,在构造器里会将DefaultFuture缓存到全局Map中
    DefaultFuture future = new DefaultFuture(channel, request, timeout);
    // 将线程池对象封装到DefaultFuture对象中
    future.setExecutor(executor);
    timeoutCheck(future);
    return future;
}

// 构造器方法
private DefaultFuture(Channel channel, Request request, int timeout) {
        this.channel = channel;
        this.request = request;
        this.id = request.getId();
        this.timeout = timeout > 0 ? timeout : channel.getUrl().getPositiveParameter("timeout", 1000);
        // 以Id为key,将结果缓存到全局的静态Map中
        FUTURES.put(this.id, this);
        CHANNELS.put(this.id, channel);
    }
在后续接收到provider结果后,会通过Response的id在这个全局Map找到对应的DefaultFuture,从而找到封装到DefaultFuture对象里的线程池对象executor,往线程池的阻塞队里中提交Runnable,唤醒被AsyncRpcResult.get()阻塞的consumer线程。
1.2.3 调用NettyClient发送Request,返回异步结果AsyncRpcResult
DubboInvoker.doInvoke(Invocation invocation)代码如下:
protected Result doInvoke(Invocation invocation) throws Throwable {
        // 封装请求元数据信息
        RpcInvocation inv = (RpcInvocation)invocation;
        String methodName = RpcUtils.getMethodName(invocation);
        inv.setAttachment("path", this.getUrl().getPath());
        inv.setAttachment("version", this.version);
        ExchangeClient currentClient;
        if (this.clients.length == 1) {
            currentClient = this.clients[0];
        } else {
            currentClient = this.clients[this.index.getAndIncrement() % this.clients.length];
        }

        try {
            boolean isOneway = RpcUtils.isOneway(this.getUrl(), invocation);
            int timeout = this.getUrl().getMethodPositiveParameter(methodName, "timeout", 1000);
            if (isOneway) {
                boolean isSent = this.getUrl().getMethodParameter(methodName, "sent", false);
                currentClient.send(inv, isSent);
                return AsyncRpcResult.newDefaultAsyncResult(invocation);
            } else {
                ExecutorService executor = this.getCallbackExecutor(this.getUrl(), inv);
                // 通过NettyClient发送请求
                CompletableFuture<AppResponse> appResponseFuture = currentClient.request(inv, timeout, executor).thenApply((obj) -> {
                    return (AppResponse)obj;
                });
                FutureContext.getContext().setCompatibleFuture(appResponseFuture);
                AsyncRpcResult result = new AsyncRpcResult(appResponseFuture, inv);
                result.setExecutor(executor);
                return result;
            }
        } catch (TimeoutException var10) {
            throw new RpcException(2, "Invoke remote method timeout. method: " + invocation.getMethodName() + ", provider: " + this.getUrl() + ", cause: " + var10.getMessage(), var10);
        } catch (RemotingException var11) {
            throw new RpcException(1, "Failed to invoke remote method: " + invocation.getMethodName() + ", provider: " + this.getUrl() + ", cause: " + var11.getMessage(), var11);
        }
    }
通过ExchangeClient来发送请求,最终是通过NettyClient发送请求,时序图如下:

1.3 通过异步AsyncRpcResult的get()方法阻塞等待provider返回结果
DubboInvoker返回的是个异步结果Future,需要阻塞等待转成同步调用,这个逻辑在AsyncToSyncInvoker中,主干代码如下:
public Result invoke(Invocation invocation) throws RpcException {
        Result asyncResult = this.invoker.invoke(invocation);
        ...
        if (InvokeMode.SYNC == ((RpcInvocation)invocation).getInvokeMode()) {
            // 阻塞等待
            asyncResult.get(2147483647L, TimeUnit.MILLISECONDS);
        }
        ...
        return asyncResult;
    }
这个阻塞逻辑需要讲一下,设计到后面在provider返回结果后的唤醒逻辑,简单说就是利用了线程池的阻塞队列实现的,waitAndDrain()方法会从线程池的阻塞队列中取数据,当没有数据时,就会阻塞住,而当provider有返回结果时,就会往这个阻塞队列中加入数据,从而达到唤醒consumer线程的目的,同时consumer线程会去执行runnable的逻辑(包括解码逻辑),获得最后的结果。代码如下:
public Result get(long timeout, TimeUnit unit) throws InterruptedException, ExecutionException, TimeoutException {
    if (this.executor != null) {
        ThreadlessExecutor threadlessExecutor = (ThreadlessExecutor)this.executor;
        // 阻塞等待
        threadlessExecutor.waitAndDrain();
    }
    return (Result)this.responseFuture.get(timeout, unit);
}

public void waitAndDrain() throws InterruptedException {
        Runnable runnable = (Runnable)this.queue.take();
        synchronized(this.lock) {
            this.waiting = false;
            runnable.run();
        }

        for(runnable = (Runnable)this.queue.poll(); runnable != null; runnable = (Runnable)this.queue.poll()) {
            try {
                runnable.run();
            } catch (Throwable var4) {
                logger.info(var4);
            }
        }

    }
2、provider端处理请求
先贴出总时序图:

2.1 NettyServer监听到channel的accept事件,将accepted的channel绑定到一个worker上
先贴出Netty Server端的处理流程图:

Netty Server端是一个bossGroup负责监听accept事件,当监听到accept事件后,再从workerGroup中选择一个NioEventLoop绑定对应的channel,进而处理该channel的读写事件。在《Spring解析并发布Dubbo provider端过程详解》中在暴露服务时,会同时创建并启动一个NettyServer,从而开启监听,代码如下:
    public NettyServer(URL url, ChannelHandler handler) throws RemotingException {
       // 父类构造器中会调用doOpen()方法
        super(ExecutorUtil.setThreadName(url, "DubboServerHandler"), ChannelHandlers.wrap(handler, url));
    }

    protected void doOpen() throws Throwable {
        // 创建Netty的Server端启动类
        this.bootstrap = new ServerBootstrap();
        // 构造bossGroup,该group负责accept事件监听
        this.bossGroup = new NioEventLoopGroup(1, new DefaultThreadFactory("NettyServerBoss", true));
        // 构造workerGroup,该group负责处理IO的读写
        this.workerGroup = new NioEventLoopGroup(this.getUrl().getPositiveParameter("iothreads", Constants.DEFAULT_IO_THREADS), new DefaultThreadFactory("NettyServerWorker", true));
        final NettyServerHandler nettyServerHandler = new NettyServerHandler(this.getUrl(), this);
        this.channels = nettyServerHandler.getChannels();
        // 设置相关配置
        ((ServerBootstrap)((ServerBootstrap)this.bootstrap.group(this.bossGroup, this.workerGroup).channel(NioServerSocketChannel.class)).option(ChannelOption.SO_REUSEADDR, Boolean.TRUE)).childOption(ChannelOption.TCP_NODELAY, Boolean.TRUE).childOption(ChannelOption.ALLOCATOR, PooledByteBufAllocator.DEFAULT).childHandler(new ChannelInitializer<NioSocketChannel>() {
            protected void initChannel(NioSocketChannel ch) throws Exception {
                int idleTimeout = UrlUtils.getIdleTimeout(NettyServer.this.getUrl());
                // 设置channel的接收(inBound)和发送(outBound)链路中的编解码类
                NettyCodecAdapter adapter = new NettyCodecAdapter(NettyServer.this.getCodec(), NettyServer.this.getUrl(), NettyServer.this);
                if (NettyServer.this.getUrl().getParameter("ssl-enabled", false)) {
                    ch.pipeline().addLast("negotiation", SslHandlerInitializer.sslServerHandler(NettyServer.this.getUrl(), nettyServerHandler));
                }

                ch.pipeline().addLast("decoder", adapter.getDecoder()).addLast("encoder", adapter.getEncoder()).addLast("server-idle-handler", new IdleStateHandler(0L, 0L, (long)idleTimeout, TimeUnit.MILLISECONDS)).addLast("handler", nettyServerHandler);
            }
        });
        // 绑定端口,启动ServerSocket服务和端口监听
        ChannelFuture channelFuture = this.bootstrap.bind(this.getBindAddress());
        channelFuture.syncUninterruptibly();
        this.channel = channelFuture.channel();
    }
核心逻辑在ChannelFuture channelFuture = this.bootstrap.bind(this.getBindAddress());里,最终会调到initAndRegister()方法,这里分两步:
1、init()方法,初始化NioServerSocketChannel的入站及出站处理链,其中会在入站的ChannelHandler链中加入ServerBootstrap.ServerBootstrapAcceptor,该类的channelRead()会将acceted的channel注册到一个worker上,代码如下:
public void channelRead(ChannelHandlerContext ctx, Object msg) {
            final Channel child = (Channel)msg;
            child.pipeline().addLast(new ChannelHandler[]{this.childHandler});
            AbstractBootstrap.setChannelOptions(child, this.childOptions, ServerBootstrap.logger);
            Entry[] var4 = this.childAttrs;
            int var5 = var4.length;

            for(int var6 = 0; var6 < var5; ++var6) {
                Entry<AttributeKey<?>, Object> e = var4[var6];
                child.attr((AttributeKey)e.getKey()).set(e.getValue());
            }

            try {
            // 从workGroup里选择一个NioEventLoop来绑定
                this.childGroup.register(child).addListener(new ChannelFutureListener() {
                    public void operationComplete(ChannelFuture future) throws Exception {
                        if (!future.isSuccess()) {
                            ServerBootstrap.ServerBootstrapAcceptor.forceClose(child, future.cause());
                        }

                    }
                });
            } catch (Throwable var8) {
                forceClose(child, var8);
            }

        }
2、register()方法,在初始化完毕后,会从负责处理accept事件的BossGroup中选一个NioEventLoop绑定这个NioServerSocketChannel,代码如下:
public ChannelFuture register(Channel channel) {
        return this.next().register(channel);
    }
最主要作用就是将NioServerSocketChannel注册到Selector上,开启监听,代码如下:
protected void doRegister() throws Exception {
        boolean selected = false;

        while(true) {
            try {
                this.selectionKey = this.javaChannel().register(this.eventLoop().unwrappedSelector(), 0, this);
                return;
            } catch (CancelledKeyException var3) {
                if (selected) {
                    throw var3;
                }

                this.eventLoop().selectNow();
                selected = true;
            }
        }
    }
在《Spring解析并注册Dubbo consumer端过程详解》中讲到,在监听注册中心的服务提供方配置,刷新本地的服务列表过程中会直接和provider建立长连接,从而触发accept事件。
2.2 监听Read事件,读取和解码数据,解析出请求中的元数据信息
主要流程就是调用处理入站请求的handler链去处理channel,其中包括解码操作、反序列化IO流中的数据并包装成Request对象,其中重要的数据有两个:
RequestId:每次请求都有一个Id,在返回Response时,也会将这个id传回,用于消费端匹配是哪个请求的Response
RpcInvocation:封装了请求的元数据信息,包括类名、接口名、版本号、调用参数等数据
时序图如下:

2.3 根据请求中的元数据信息匹配对应的invoker进行处理
debug图如下:

可以看出在调用过程中是通过类名、端口、版本号、分组这四个维度来确定唯一的Invoker,在《Spring解析并发布Dubbo provider端过程详解》讲到在服务暴露过程中,已经将这个key和封装了invoker的Exporter缓存到了DubboProtocol对象的exporterMap属性中。
时序图如下:

2.4 将处理结果包装成Response对象通过HeaderExchangeHandler发送给调用方
主要分两步:
- 将返回结果包装成Response对象,Response对象中需要包含RequestId
- 通过HeaderExchangeHandler发送结果
时序图如下:

3、consumer端接收Response
入口同样是Netty的WorkGroup的NioEventLoop类,时序图如下(下半部分是接收时序图):

3.1 监听到channel的read事件,通过Hessian2反序列化IO数据,封装成Response对象
debug图如下:

3.2 通过Response的Id,在DefaultFuture的全局的Map中找到对应的Future,并通过Future获取对应的线程池,往线程池的阻塞队列中添加Runnable,从而唤醒被AsyncRpcResult.get()阻塞的consumer线程
consumer阻塞逻辑在1.3,唤醒的核心代码在AllChannelHandler的received方法里,代码如下:
public void received(Channel channel, Object message) throws RemotingException {
        // 通过Response的Id,从DefaultFuture的全局的Map中找到对应的Future,并通过Future获取对应的线程池
        ExecutorService executor = this.getPreferredExecutorService(message);
        // 往线程池的阻塞队列里添加任务,唤醒被阻塞的consumer线程
        try {
            executor.execute(new ChannelEventRunnable(channel, this.handler, ChannelState.RECEIVED, message));
        } catch (Throwable var5) {
            if (message instanceof Request && var5 instanceof RejectedExecutionException) {
                this.sendFeedback(channel, (Request)message, var5);
            } else {
                throw new ExecutionException(message, channel, this.getClass() + " error when process received event .", var5);
            }
        }
    }


    public ExecutorService getPreferredExecutorService(Object msg) {
        if (msg instanceof Response) {
            Response response = (Response)msg;
            // 通过Response的Id从全局Map中获取Future
            DefaultFuture responseFuture = DefaultFuture.getFuture(response.getId());
            if (responseFuture == null) {
                return this.getSharedExecutorService();
            } else {
                ExecutorService executor = responseFuture.getExecutor();
                if (executor == null || executor.isShutdown()) {
                    executor = this.getSharedExecutorService();
                }

                return executor;
            }
        } else {
            return this.getSharedExecutorService();
        }
    }
3.3 被唤醒的consumer线程解码请求数据,返回请求结果
debug图如下:


 3万+
3万+

 被折叠的 条评论
为什么被折叠?
被折叠的 条评论
为什么被折叠?
 到【灌水乐园】发言


