


一、milvus向量数据库简介
Milvus是一款开源的向量数据库,旨在为用户提供高性能、可扩展和易于使用的向量存储和检索服务。Milvus支持多种向量相似度搜索算法,包括余弦相似度、欧氏距离等,能够满足不同应用场景下的需求。Milvus具有以下特点:
- 高性能:Milvus采用了优化的向量索引结构和查询算法,能够快速高效地进行向量检索。
- 可扩展性:Milvus支持水平扩展,可以轻松地扩展到上百亿甚至更大规模的向量数据。
- 易于使用:Milvus提供了丰富的API和客户端SDK,方便用户快速集成和使用。
Milvus适用于各种向量数据的存储和检索场景,包括图像搜索、推荐系统、智能问答等。用户可以通过Milvus快速构建高性能的向量检索系统,提升数据处理和查询效率。博文实验环境如下:
- 操作系统:银河麒麟桌面版 V10 SP1
- milvus版本:2.3.9
二、安装步骤
1、安装docker
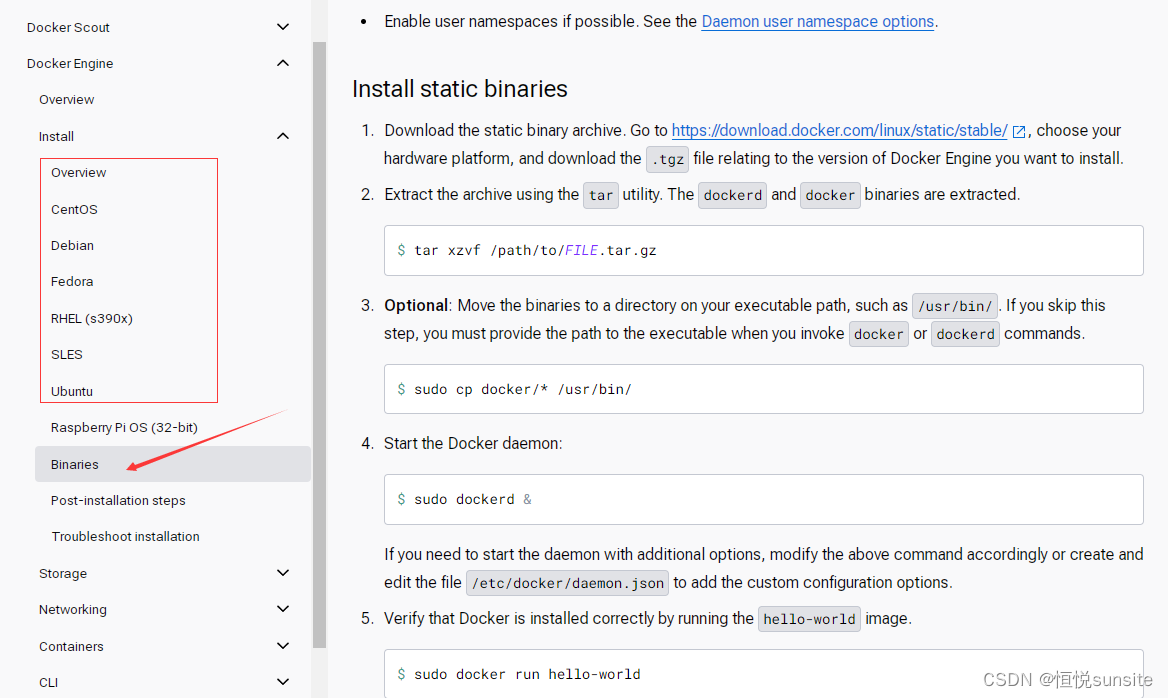
milvus单机安装,官网建议使用docker方式安装,所以我们需要先安装docker。docker引擎适配的安装环境中并没有银河麒麟,我们可以使用二进制安装方式。银河麒麟环境下安装docker,可以参考博文Docker之centos7环境离线安装。
2、下载standalone_embed.sh
root@kylinv10:/data# wget https://raw.githubusercontent.com/milvus-io/milvus/master/scripts/standalone_embed.sh
3、启动milvus容器
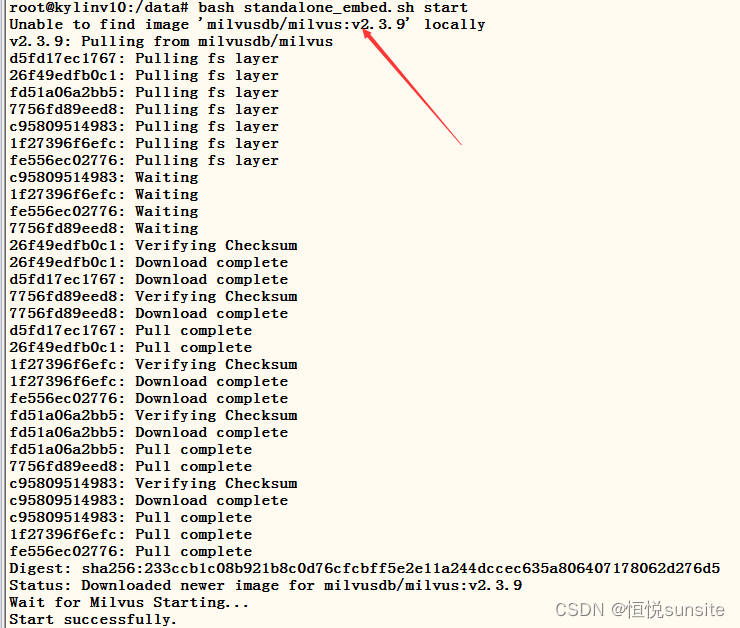
首次执行启动脚本会查找milvus容器镜像,找不到会自动拉取milvus镜像文件。拉取完成后会根据脚本中配置的启动参数启动milvus容器。
root@kylinv10:/data# bash standalone_embed.sh start
Wait for Milvus Starting…
Start successfully.
root@kylinv10:/data# docker images
REPOSITORY TAG IMAGE ID CREATED SIZE
milvusdb/milvus v2.3.9 4ac083425e24 3 weeks ago 987MB
4、查看milvus容器进程
root@kylinv10:/data# docker ps
CONTAINER ID IMAGE COMMAND CREATED STATUS PORTS NAMES
e30ad0a379a4 milvusdb/milvus:v2.3.9 “/tini – milvus run…” About a minute ago Up About a minute (healthy) 0.0.0.0:2379->2379/tcp, :::2379->2379/tcp, 0.0.0.0:9091->9091/tcp, :::9091->9091/tcp, 0.0.0.0:19530->19530/tcp, :::19530->19530/tcp milvus-standalone
5、查看milvus健康状态
通过浏览器访问服务器IP:9091端口检查milvus服务,显示ok说明milvus向量数据库安装运行正常。

6、milvus服务管理
#启动milvus
bash standalone_embed.sh start
#停止milvus
bash standalone_embed.sh stop
#删除milvus容器
bash standalone_embed.sh delete
三、milvus向量库验证
1、创建一个python虚拟环境
使用官网的hello_milvus.py代码进行验证,要求milvus版本是2.3.11,python版本3.7.1以上,为了方便python环境管理我们使用anaconda3创建一个python虚拟环境。关于anaconda3的安装和使用可以参考博文Linux之anaconda3安装及使用。博文实验环境milvus版本2.3.9也可以正常运行hello_milvus.py代码。
- Milvus 2.3.11
- Python 3 (3.7.1 or later)
- PyMilvus 2.3.6
(test) wuhs@kylinv10:/tmp$ conda create -n test python=3.11
2、安装PyMilvus和numpy
代码中需要引用numpy和pymilvus模块,使用pip3安装这两个软件包。
(test) bdsc@kylinv10:~/anaconda3/envs$ pip3 install pymilvus numpy
3、下载hello_milvus.py
(test) wuhs@kylinv10:/tmp$ wget https://raw.githubusercontent.com/milvus-io/pymilvus/master/examples/hello_milvus.py
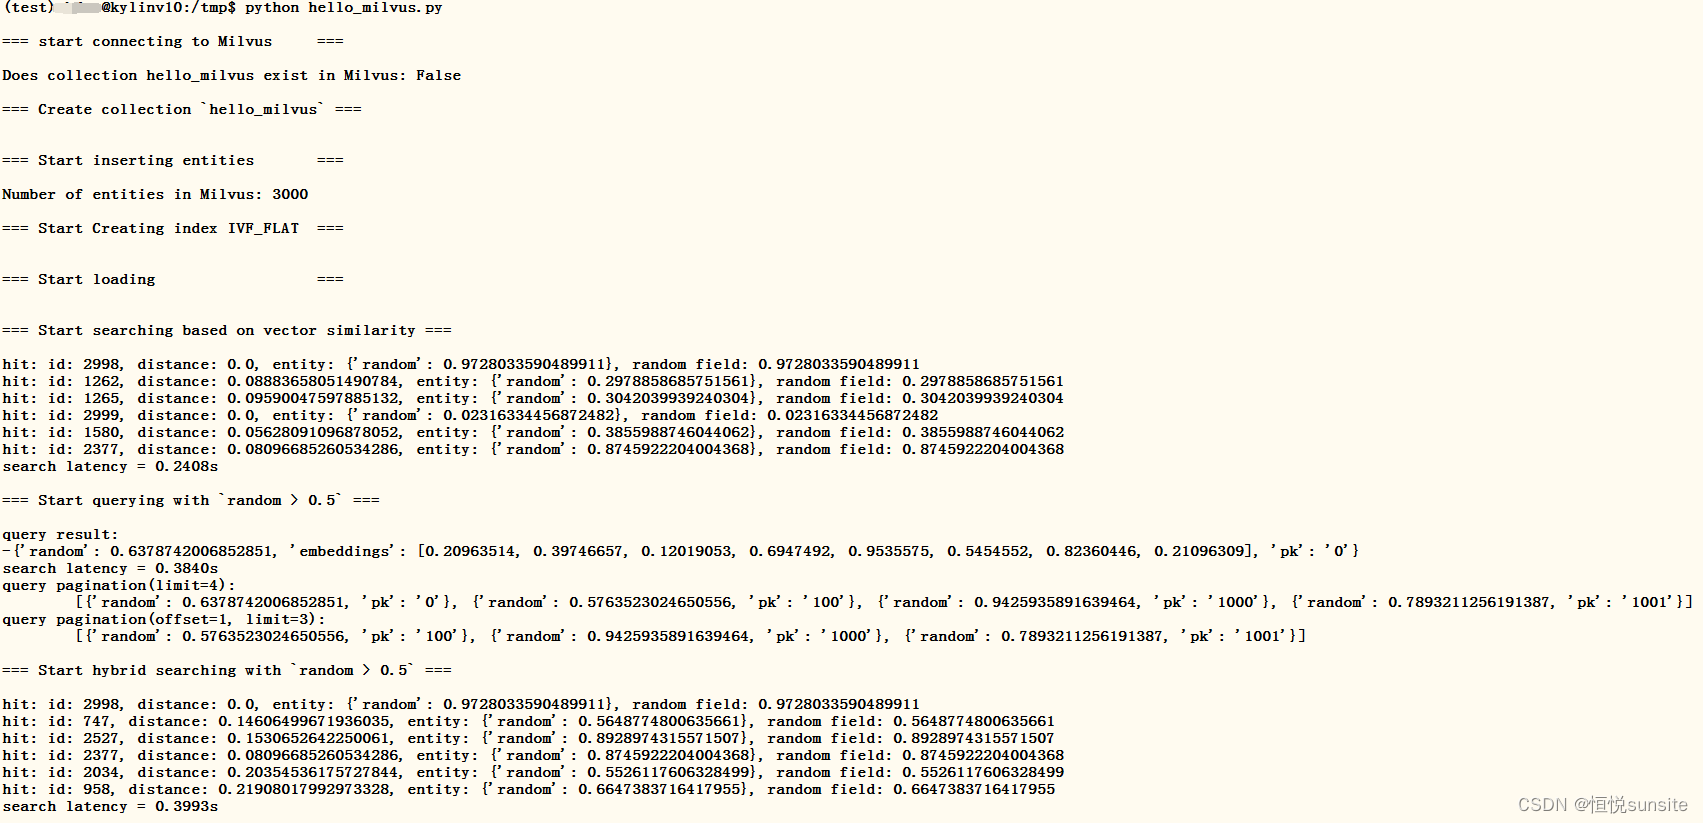
4、运行hello_milvus.py
(test) wuhs@kylinv10:/tmp$ python hello_milvus.py

四、附录:hello_milvus.py代码
(test) wuhs@kylinv10:~/anaconda3/envs$ cat /tmp/hello_milvus.py
# hello_milvus.py demonstrates the basic operations of PyMilvus, a Python SDK of Milvus.
# 1. connect to Milvus
# 2. create collection
# 3. insert data
# 4. create index
# 5. search, query, and hybrid search on entities
# 6. delete entities by PK
# 7. drop collection
import time

import numpy as np
from pymilvus import (
    connections,
    utility,
    FieldSchema, CollectionSchema, DataType,
    Collection,
)

fmt = "\n=== {:30} ===\n"
search_latency_fmt = "search latency = {:.4f}s"
num_entities, dim = 3000, 8

#################################################################################
# 1. connect to Milvus
# Add a new connection alias `default` for Milvus server in `localhost:19530`
# Actually the "default" alias is a buildin in PyMilvus.
# If the address of Milvus is the same as `localhost:19530`, you can omit all
# parameters and call the method as: `connections.connect()`.
#
# Note: the `using` parameter of the following methods is default to "default".
print(fmt.format("start connecting to Milvus"))
connections.connect("default", host="localhost", port="19530")

has = utility.has_collection("hello_milvus")
print(f"Does collection hello_milvus exist in Milvus: {has}")

#################################################################################
# 2. create collection
# We're going to create a collection with 3 fields.
# +-+------------+------------+------------------+------------------------------+
# | | field name | field type | other attributes |       field description      |
# +-+------------+------------+------------------+------------------------------+
# |1|    "pk"    |   VarChar  |  is_primary=True |      "primary field"         |
# | |            |            |   auto_id=False  |                              |
# +-+------------+------------+------------------+------------------------------+
# |2|  "random"  |    Double  |                  |      "a double field"        |
# +-+------------+------------+------------------+------------------------------+
# |3|"embeddings"| FloatVector|     dim=8        |  "float vector with dim 8"   |
# +-+------------+------------+------------------+------------------------------+
fields = [
    FieldSchema(name="pk", dtype=DataType.VARCHAR, is_primary=True, auto_id=False, max_length=100),
    FieldSchema(name="random", dtype=DataType.DOUBLE),
    FieldSchema(name="embeddings", dtype=DataType.FLOAT_VECTOR, dim=dim)
]

schema = CollectionSchema(fields, "hello_milvus is the simplest demo to introduce the APIs")

print(fmt.format("Create collection `hello_milvus`"))
hello_milvus = Collection("hello_milvus", schema, consistency_level="Strong")

################################################################################
# 3. insert data
# We are going to insert 3000 rows of data into `hello_milvus`
# Data to be inserted must be organized in fields.
#
# The insert() method returns:
# - either automatically generated primary keys by Milvus if auto_id=True in the schema;
# - or the existing primary key field from the entities if auto_id=False in the schema.

print(fmt.format("Start inserting entities"))
rng = np.random.default_rng(seed=19530)
entities = [
    # provide the pk field because `auto_id` is set to False
    [str(i) for i in range(num_entities)],
    rng.random(num_entities).tolist(),  # field random, only supports list
    rng.random((num_entities, dim)),    # field embeddings, supports numpy.ndarray and list
]

insert_result = hello_milvus.insert(entities)

hello_milvus.flush()
print(f"Number of entities in Milvus: {hello_milvus.num_entities}")  # check the num_entities

################################################################################
# 4. create index
# We are going to create an IVF_FLAT index for hello_milvus collection.
# create_index() can only be applied to `FloatVector` and `BinaryVector` fields.
print(fmt.format("Start Creating index IVF_FLAT"))
index = {
    "index_type": "IVF_FLAT",
    "metric_type": "L2",
    "params": {"nlist": 128},
}

hello_milvus.create_index("embeddings", index)

################################################################################
# 5. search, query, and hybrid search
# After data were inserted into Milvus and indexed, you can perform:
# - search based on vector similarity
# - query based on scalar filtering(boolean, int, etc.)
# - hybrid search based on vector similarity and scalar filtering.
#

# Before conducting a search or a query, you need to load the data in `hello_milvus` into memory.
print(fmt.format("Start loading"))
hello_milvus.load()

# -----------------------------------------------------------------------------
# search based on vector similarity
print(fmt.format("Start searching based on vector similarity"))
vectors_to_search = entities[-1][-2:]
search_params = {
    "metric_type": "L2",
    "params": {"nprobe": 10},
}

start_time = time.time()
result = hello_milvus.search(vectors_to_search, "embeddings", search_params, limit=3, output_fields=["random"])
end_time = time.time()

for hits in result:
    for hit in hits:
        print(f"hit: {hit}, random field: {hit.entity.get('random')}")
print(search_latency_fmt.format(end_time - start_time))

# -----------------------------------------------------------------------------
# query based on scalar filtering(boolean, int, etc.)
print(fmt.format("Start querying with `random > 0.5`"))

start_time = time.time()
result = hello_milvus.query(expr="random > 0.5", output_fields=["random", "embeddings"])
end_time = time.time()

print(f"query result:\n-{result[0]}")
print(search_latency_fmt.format(end_time - start_time))

# -----------------------------------------------------------------------------
# pagination
r1 = hello_milvus.query(expr="random > 0.5", limit=4, output_fields=["random"])
r2 = hello_milvus.query(expr="random > 0.5", offset=1, limit=3, output_fields=["random"])
print(f"query pagination(limit=4):\n\t{r1}")
print(f"query pagination(offset=1, limit=3):\n\t{r2}")


# -----------------------------------------------------------------------------
# hybrid search
print(fmt.format("Start hybrid searching with `random > 0.5`"))

start_time = time.time()
result = hello_milvus.search(vectors_to_search, "embeddings", search_params, limit=3, expr="random > 0.5", output_fields=["random"])
end_time = time.time()

for hits in result:
    for hit in hits:
        print(f"hit: {hit}, random field: {hit.entity.get('random')}")
print(search_latency_fmt.format(end_time - start_time))

###############################################################################
# 6. delete entities by PK
# You can delete entities by their PK values using boolean expressions.
ids = insert_result.primary_keys

expr = f'pk in ["{ids[0]}" , "{ids[1]}"]'
print(fmt.format(f"Start deleting with expr `{expr}`"))

result = hello_milvus.query(expr=expr, output_fields=["random", "embeddings"])
print(f"query before delete by expr=`{expr}` -> result: \n-{result[0]}\n-{result[1]}\n")

hello_milvus.delete(expr)

result = hello_milvus.query(expr=expr, output_fields=["random", "embeddings"])
print(f"query after delete by expr=`{expr}` -> result: {result}\n")


###############################################################################
# 7. drop collection
# Finally, drop the hello_milvus collection
print(fmt.format("Drop collection `hello_milvus`"))
utility.drop_collection("hello_milvus")


 431
431

 被折叠的 条评论
为什么被折叠?
被折叠的 条评论
为什么被折叠?
 到【灌水乐园】发言


