


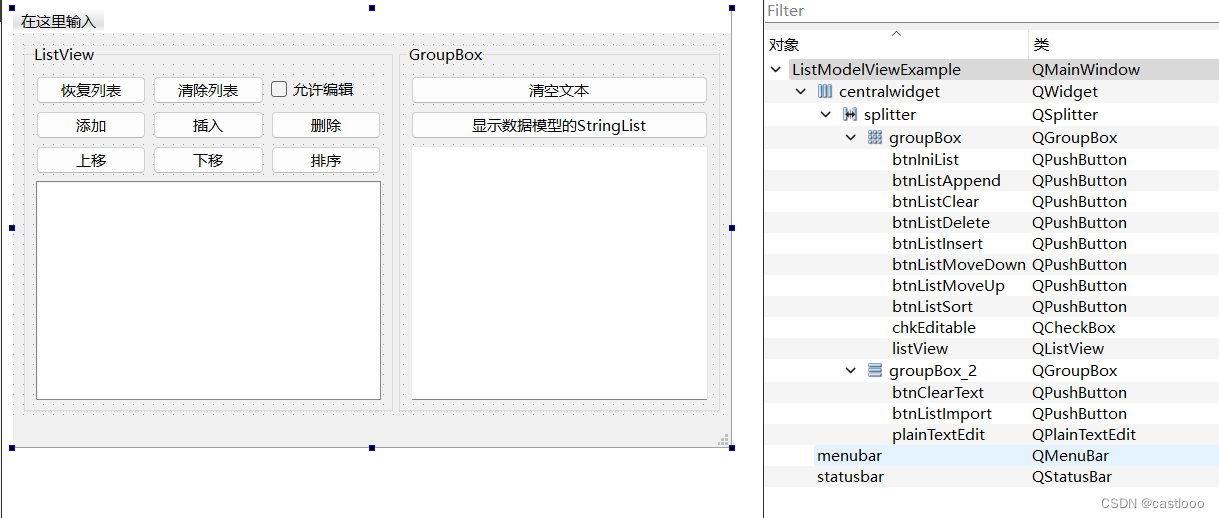
1.QStringListModel 绑定到listView,从而实现MV模型视图
2.通过QStringListModel的新增、删除、插入、上下移动,listView来展示出来
3.下移动一行,传入curRow+2 的个人理解
布局
.h声明
private:
    QStringList m_strList;
    QStringListModel *m_model;
.cpp
#include "listmodelviewexample.h"
#include "ui_listmodelviewexample.h"

ListModelViewExample::ListModelViewExample(QWidget *parent)
    : QMainWindow(parent)
    , ui(new Ui::ListModelViewExample)
{
    ui->setupUi(this);

    m_strList<<"北京"<<"上海"<<"广州"<<"深圳"<<"天津"<<"成都"<<"山东"<<"河南"<<"河北";
    m_model= new QStringListModel(this);
    m_model->setStringList(m_strList);

    ui->listView->setModel(m_model);
    ui->chkEditable->setChecked(true);
    ui->listView->setEditTriggers(QAbstractItemView::DoubleClicked|
                                  QAbstractItemView::SelectedClicked);
}

ListModelViewExample::~ListModelViewExample()
{
    delete ui;
}

void ListModelViewExample::on_btnIniList_clicked()
{
    m_model->setStringList(m_strList);//重新载入
}


void ListModelViewExample::on_btnListClear_clicked()
{
    m_model->removeRows(0,m_model->rowCount());
}


void ListModelViewExample::on_chkEditable_clicked(bool checked)
{
    if(checked)
        ui->listView->setEditTriggers(QAbstractItemView::DoubleClicked
                                      |QAbstractItemView::SelectedClicked);
    else
        ui->listView->setEditTriggers(QAbstractItemView::NoEditTriggers);
}


void ListModelViewExample::on_btnListAppend_clicked()
{
    m_model->insertRow(m_model->rowCount());
    QModelIndex index= m_model->index(m_model->rowCount()-1,0);
    m_model->setData(index,"new Item",Qt::DisplayRole);
    ui->listView->setCurrentIndex(index);
}


void ListModelViewExample::on_btnListInsert_clicked()
{
    QModelIndex index= ui->listView->currentIndex();
    m_model->insertRow(index.row());
    m_model->setData(index,Qt::AlignRight,Qt::TextAlignmentRole);
    ui->listView->setCurrentIndex(index);
}


void ListModelViewExample::on_btnListDelete_clicked()
{
    QModelIndex index= ui->listView->currentIndex();
    m_model->removeRow(index.row());
}


void ListModelViewExample::on_btnListMoveUp_clicked()
{
    int curRow = ui->listView->currentIndex().row();
    QModelIndex index = QModelIndex();
    /*
    moveRow这个方法,为什么要-1? 我理解如下,
    1. 在目标位置curRow-1插入一行 插入的新行的行号为curRow-2
    2. 复制原curRow行到目标位置curRow-2
    3. 删除原curRow行
    */
    m_model->moveRow(index,curRow,index,curRow-1);
}


void ListModelViewExample::on_btnListMoveDown_clicked()
{
    int curRow = ui->listView->currentIndex().row();
    QModelIndex index = QModelIndex();
    /*
    moveRow这个方法,为什么要+2? 我理解如下,
    1. 在目标位置curRow+2插入一行
    2. 复制curRow行到目标位置curRow+1
    3. 删除curRow行
    */

   m_model->moveRow(index,curRow,index,curRow+2);
}

void ListModelViewExample::on_btnClearText_clicked()
{
    ui->plainTextEdit->clear();
}


void ListModelViewExample::on_btnListImport_clicked()
{
    QStringList tmpList = m_model->stringList();
    for(int i=0;i<tmpList.size();i++)
    {
        ui->plainTextEdit->appendPlainText(tmpList.at(i));
    }
}


void ListModelViewExample::on_btnListSort_clicked(bool checked)
{
    if(checked)
        m_model->sort(0,Qt::AscendingOrder);
    else
        m_model->sort(0,Qt::DescendingOrder);
}

void ListModelViewExample::on_listView_clicked(const QModelIndex &index)
{
    QString str1 = QString::asprintf("模型索引行号:row=%d,column=%d;\t",
                                     index.row(),index.column());

    QVariant var = m_model->data(index,Qt::DisplayRole);
    QString str2 = var.toString();

    int curRow = ui->listView->currentIndex().row();
    QString str3 = QString::asprintf(";\tlistView:row=%d",
                                     curRow);

    ui->statusbar->showMessage(str1+ str2+ str3);

}
QStringListModel->moveRow 上移传入curRow-1 下移传入curRow+2 这是为什么?有些别扭
inline bool QAbstractItemModel::moveRow(const QModelIndex &sourceParent, int sourceRow,
                                        const QModelIndex &destinationParent, int destinationChild)
以下仅为个人理解。
destinationChild:创建了一个新行,该新行需要插入的位置,插入新行后,原行删除。
如下移一行,就需要在curRow+2的前面插入一行,插入的新行的行号为curRow+2,删除原行后变成curRow+1
再如上移一行,需要在curRow-1的前面插入一行,插入的新行号变成了curRow-1,而原curRow-1变成了curRow行号


 1万+
1万+


 被折叠的 条评论
为什么被折叠?
被折叠的 条评论
为什么被折叠?
 到【灌水乐园】发言


