


此spring cloud笔记系列都来源于翟永超的spring cloud微服务实战一书,可自行去下载,我这里只是记录一下学习的笔记
此文档有关于服务注册中心。
快速构建一个服务注册中心项目
Pom
<parent>
        <groupId>org.springframework.boot</groupId>
        <artifactId>spring-boot-starter-parent</artifactId>
        <version>1.5.6.RELEASE</version>
        <relativePath/> <!-- lookup parent from repository -->
    </parent>

<!-- spring cloud -->
        <dependency>
            <groupId>org.springframework.cloud</groupId>
            <artifactId>spring-cloud-starter-eureka-server</artifactId>
        </dependency>

<dependencyManagement>
        <dependencies>
            <dependency>
                <groupId>org.springframework.cloud</groupId>
                <artifactId>spring-cloud-dependencies</artifactId>
                <!-- 此版本和springboot版本有关,可查官网,我这里用的springboot1.5,所以用了Dalston -->
                <version>Dalston.SR3</version>
                <type>pom</type>
                <scope>import</scope>
            </dependency>
        </dependencies>
    </dependencyManagement>
主类
package com.example.eurekaserver;

import org.springframework.boot.SpringApplication;
import org.springframework.boot.autoconfigure.SpringBootApplication;
import org.springframework.cloud.netflix.eureka.server.EnableEurekaServer;
/*
 * 启动一个服务注册中心提供给其他应用进行对话
 */
@EnableEurekaServer
@SpringBootApplication
public class EurekaServerApplication {

    public static void main(String[] args) {
        SpringApplication.run(EurekaServerApplication.class, args);
    }
}
默认设置下,该服务注册中心也会将自己作为客户端来尝试注册它自己
所以我们需要禁用它的客户端注册行为
Application.properties
server.port = 1111

eureka.instance.hostname = localhost
# don't register selt in eureka
eureka.client.register-with-eureka = false
# don't search service,only Maintain  service instance
eureka.client.fetch-registry = false
eureka.client.serviceUrl.defaultZone = http://${eureka.instance.hostname}:${server.port}/eureka/
可以发现现在注册中心还没有注册任何服务,现在我们来把一个已有的springboot应用加入到eureka服务治理中。
注册服务提供者
如果你本地有一个springboot的普通应用,这就再好不过了,改造即可。当然重新构建一个也没问题。
添加Pom
<dependencies>
        <dependency>
            <groupId>org.springframework.boot</groupId>
            <artifactId>spring-boot-starter-web</artifactId>
        </dependency>

        <dependency>
            <groupId>org.springframework.boot</groupId>
            <artifactId>spring-boot-starter-test</artifactId>
            <scope>test</scope>
        </dependency>

        <!-- eureka -->
        <dependency>
            <groupId>org.springframework.cloud</groupId>
            <artifactId>spring-cloud-starter-eureka</artifactId>
        </dependency>
    </dependencies>

    <dependencyManagement>
        <dependencies>
            <dependency>
                <groupId>org.springframework.cloud</groupId>
                <artifactId>spring-cloud-dependencies</artifactId>
                <!-- 此版本和springboot版本有关,可查官网,我这里用的springboot1.5,所以用了Dalston -->
                <version>Dalston.SR3</version>
                <type>pom</type>
                <scope>import</scope>
            </dependency>
        </dependencies>
    </dependencyManagement>
改造Controller
@RestController
@RequestMapping(value="/user")
public class UserController {
    private final Logger logger = Logger.getLogger(getClass());

    @Autowired
    private DiscoveryClient client;

    @RequestMapping("/hello")
    public String greet() {
        ServiceInstance instance = client.getLocalServiceInstance();
//打印服务相关内容
        logger.info("/hello,host:"+instance.getHost()+", service_id:"+instance.getServiceId());
        return "Hello";
    }
}
主类
@EnableDiscoveryClient
@SpringBootApplication
public class ClientServiceApplication {

    public static void main(String[] args) {
        SpringApplication.run(ClientServiceApplication.class, args);
    }
}
主类中加上此注解@EnableDiscoveryClient,激活Eureka中的DiscoveryClient实现(自动化配置,创建DiscoveryClient接口针对Eureka客户端的EnableDiscoveryClient实例),才能实现Controller中对服务信息的输出。
Application.properties:
# name the service
spring.application.name = hello-service
# define the register url
eureka.client.serviceUrl.defaultZone = http://localhost:1111/eureka/
启动此项目(此时注册中心eruka-server应该启动着),在此访问注册中心
http://localhost:1111/
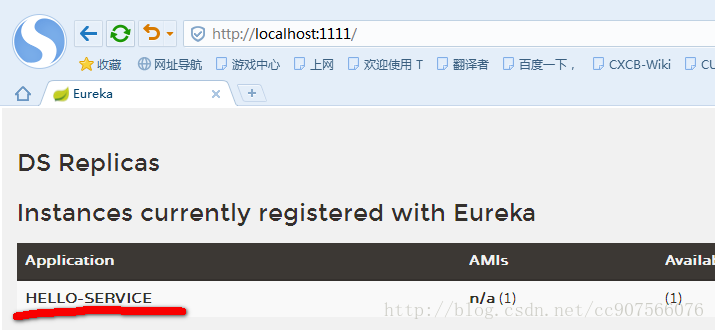
标明服务注册到其中。
访问刚才的controller:http://localhost:8080/user/hello
控制台打印了:

高可用注册中心
Eureka Server的高可用实际上就是将自己作为服务向其他服务注册中心注册自己,这样就可以形成一组互相注册的服务注册中心,以实现服务清单的互相同步,达到高可用的效果。下面我们来尝试搭建高可用的服务注册中心集群。
在eureka-server服务注册中心的基础之上进行扩展,构建一个双节点的服务注册中心集群。
Application.properties:
# don't register selt in eureka
eureka.client.register-with-eureka = false
# don't search service,only Maintain  service instance
eureka.client.fetch-registry = false
创建application-peer1.properties与application-peer2.properties
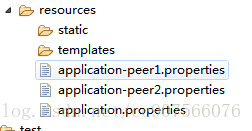
Application-peer1.properties:
spring.application.name=eureka-server
server.port=1111

# double nodes : first--peer1,that directs peer2
eureka.instance.hostname=peer1

eureka.client.serviceUrl.defaultZone=http://peer2:1112/eureka/
Application-peer2.properties:
server.port = 1112
spring.application.name = eureka-server

# double nodes : second--peer2,that directs peer1
eureka.instance.hostname = peer2

eureka.client.serviceUrl.defaultZone = http://peer1:1111/eureka/
clean项目然后maven clean-maven install
target下此时jar包最新
hosts文件
需要在本机系统中配置peer1,peer2使系统能通过他们找到ip
windows文件位置:
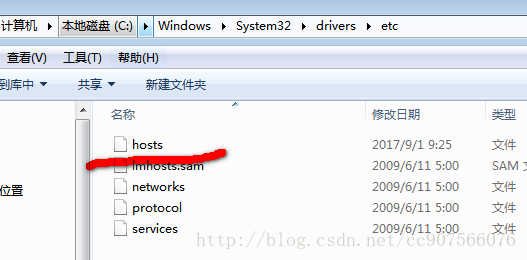
打开此文件配置如下:
127.0.0.1 peer1
127.0.0.1 peer2
我们通过jar命令与profile配置分别启动peer1与peer2,实际中也可以两个注册中心项目,application.properties中分别指向彼此,启动。


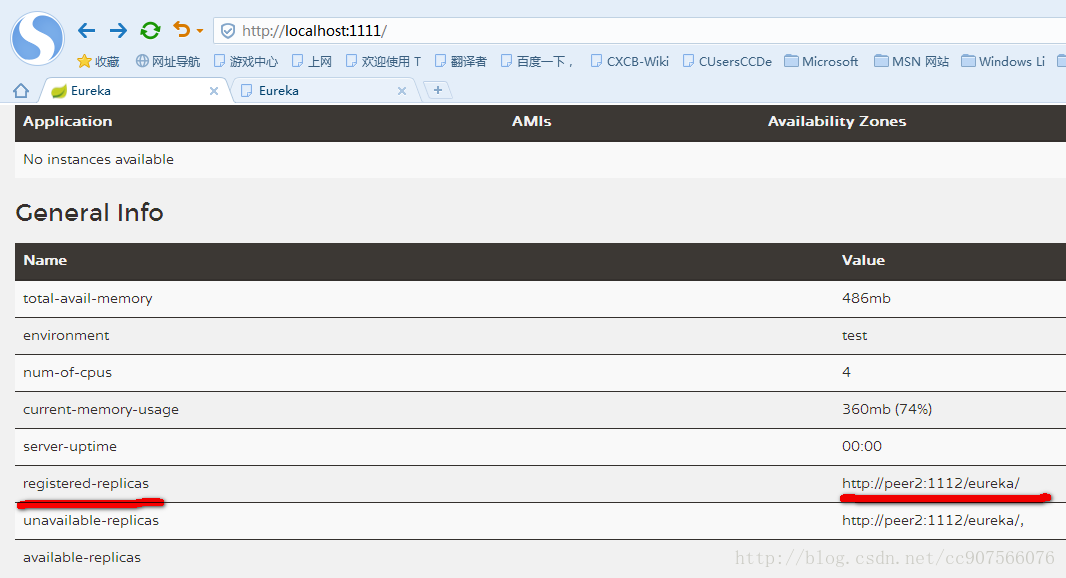
访问如下即配置完成:

现在我们来实验一下注册服务,启动之前需要把注册地址都填上:
之前的client-service的application.properties中修改注册地址如下:
# define the register url
eureka.client.serviceUrl.defaultZone = http://peer1:1111/eureka/,http://peer2:1112/eureka/
启动此服务,重新访问两个注册节点:
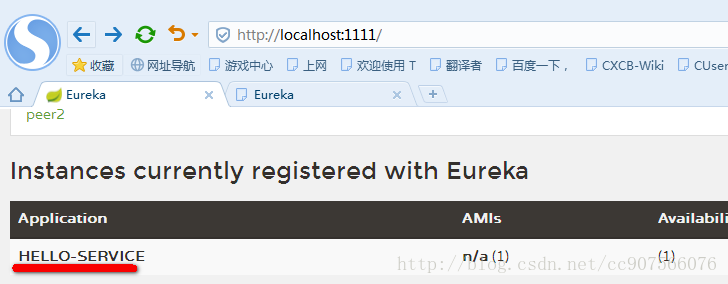
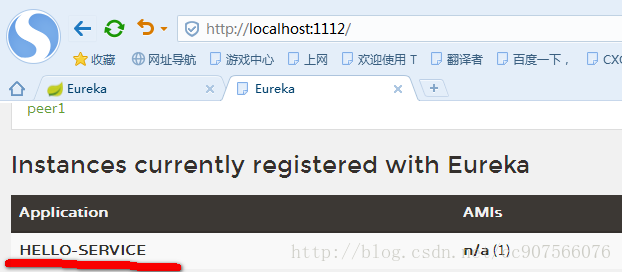
这样我们两个注册中心彼此都有注册,其中一个dang,另一个仍然可以工作。服务依然可访问。
如果我们不想使用主机名来定义注册中心的地址,也可以使用IP地址的形式,但是需要配置文件中增加配置参数eureka.instance.prefer-ip-address=true,该默认为false。然后当应用程序向eureka注册时,它将使用IP地址而不是主机名


 1万+
1万+

 被折叠的 条评论
为什么被折叠?
被折叠的 条评论
为什么被折叠?
 到【灌水乐园】发言


