


目录
1. 准备工作
1.1 导入依赖
<?xml version="1.0" encoding="UTF-8"?>
<project xmlns="http://maven.apache.org/POM/4.0.0"
         xmlns:xsi="http://www.w3.org/2001/XMLSchema-instance"
         xsi:schemaLocation="http://maven.apache.org/POM/4.0.0 http://maven.apache.org/xsd/maven-4.0.0.xsd">
    <modelVersion>4.0.0</modelVersion>
    <groupId>org.example</groupId>
    <artifactId>ssm_demo1</artifactId>
    <version>1.0-SNAPSHOT</version>
    <packaging>war</packaging>
    <properties>
        <maven.compiler.source>8</maven.compiler.source>
        <maven.compiler.target>8</maven.compiler.target>
        <project.build.sourceEncoding>UTF-8</project.build.sourceEncoding>
    </properties>
    <dependencies>
        <!--spring webmvc依赖-->
        <dependency>
            <groupId>org.springframework</groupId>
            <artifactId>spring-webmvc</artifactId>
            <version>5.2.15.RELEASE</version>
        </dependency>
        <!--mybatis的依赖-->
        <dependency>
            <groupId>org.mybatis</groupId>
            <artifactId>mybatis</artifactId>
            <version>3.5.9</version>
        </dependency>
        <!--mysql驱动依赖-->
        <dependency>
            <groupId>mysql</groupId>
            <artifactId>mysql-connector-java</artifactId>
            <version>5.1.6</version>
        </dependency>
        <!--druid连接池-->
        <dependency>
            <groupId>com.alibaba</groupId>
            <artifactId>druid</artifactId>
            <version>1.2.8</version>
        </dependency>
        <!--spring和mybatis整合的依赖-->
        <dependency>
            <groupId>org.mybatis</groupId>
            <artifactId>mybatis-spring</artifactId>
            <version>2.0.7</version>
        </dependency>
        <dependency>
            <groupId>org.springframework</groupId>
            <artifactId>spring-jdbc</artifactId>
            <version>5.2.15.RELEASE</version>
        </dependency>
        <!--jackson的依赖-->
        <dependency>
            <groupId>com.fasterxml.jackson.core</groupId>
            <artifactId>jackson-databind</artifactId>
            <version>2.13.4</version>
        </dependency>
        <!--pageHelper的依赖-->
        <dependency>
            <groupId>com.github.pagehelper</groupId>
            <artifactId>pagehelper</artifactId>
            <version>5.3.0 </version>
        </dependency>
        <!--oss的依赖-->
        <dependency>
            <groupId>com.aliyun.oss</groupId>
            <artifactId>aliyun-sdk-oss</artifactId>
            <version>3.15.1</version>
        </dependency>
        <!--文件上传的依赖-->
        <dependency>
            <groupId>commons-fileupload</groupId>
            <artifactId>commons-fileupload</artifactId>
            <version>1.3.3</version>
        </dependency>
        <!--其他依赖-->
        <dependency>
            <groupId>javax.servlet</groupId>
            <artifactId>javax.servlet-api</artifactId>
            <version>4.0.1</version>
        </dependency>
        <dependency>
            <groupId>javax.servlet.jsp</groupId>
            <artifactId>jsp-api</artifactId>
            <version>2.2</version>
        </dependency>
        <dependency>
            <groupId>junit</groupId>
            <artifactId>junit</artifactId>
            <version>4.13.2</version>
            <scope>test</scope>
        </dependency>
        <dependency>
            <groupId>org.projectlombok</groupId>
            <artifactId>lombok</artifactId>
            <version>1.18.24</version>
        </dependency>
        <dependency>
            <groupId>javax.servlet</groupId>
            <artifactId>jstl</artifactId>
            <version>1.2</version>
        </dependency>

    </dependencies>
</project>
1.2 导入数据库
- student表
SET FOREIGN_KEY_CHECKS=0;
-- ----------------------------
-- Table structure for student
-- ----------------------------
DROP TABLE IF EXISTS `student`;
CREATE TABLE `student` (
  `sid` int(11) NOT NULL AUTO_INCREMENT,
  `sname` varchar(255) DEFAULT NULL,
  `age` int(11) DEFAULT NULL,
  `sex` char(255) DEFAULT NULL,
  `class_id` int(11) DEFAULT NULL,
  PRIMARY KEY (`sid`)
) ENGINE=InnoDB AUTO_INCREMENT=10010 DEFAULT CHARSET=utf8;

-- ----------------------------
-- Records of student
-- ----------------------------
INSERT INTO `student` VALUES ('10010', '张一山', '30', '男', '3');
INSERT INTO `student` VALUES ('10011', '胡歌', '32', '男', '1');
INSERT INTO `student` VALUES ('10012', '迪丽热巴', '26', '男', '4');
- class表
SET FOREIGN_KEY_CHECKS=0;
-- ----------------------------
-- Table structure for class
-- ----------------------------
DROP TABLE IF EXISTS `class`;
CREATE TABLE `class` (
  `cid` int(11) NOT NULL AUTO_INCREMENT,
  `cname` varchar(255) DEFAULT NULL,
  PRIMARY KEY (`cid`)
) ENGINE=InnoDB AUTO_INCREMENT=5 DEFAULT CHARSET=utf8;

-- ----------------------------
-- Records of class
-- ----------------------------
INSERT INTO `class` VALUES ('1', 'qy163');
INSERT INTO `class` VALUES ('2', 'qy164');
INSERT INTO `class` VALUES ('3', 'qy165');
INSERT INTO `class` VALUES ('4', 'qy166');
1.3 配置web.xml文件
<?xml version="1.0" encoding="UTF-8"?>
<web-app xmlns="http://xmlns.jcp.org/xml/ns/javaee"
         xmlns:xsi="http://www.w3.org/2001/XMLSchema-instance"
         xsi:schemaLocation="http://xmlns.jcp.org/xml/ns/javaee http://xmlns.jcp.org/xml/ns/javaee/web-app_4_0.xsd"
         version="4.0">

    <!--注册DispatchServlet-->
    <servlet>
        <servlet-name>springmvc</servlet-name>
        <servlet-class>org.springframework.web.servlet.DispatcherServlet</servlet-class>
        <!--如果没有指定参数默认解析WEB-INF/servlerName-servlet.xml-->
        <init-param>
            <param-name>contextConfigLocation</param-name>
            <param-value>classpath*:springmvc.xml</param-value>
        </init-param>
    </servlet>
    <servlet-mapping>
        <servlet-name>springmvc</servlet-name>
        <url-pattern>/</url-pattern>
    </servlet-mapping>
    <!--乱码处理过滤器,由SpringMVC提供-->
    <!-- 处理post请求乱码 -->
    <filter>
        <filter-name>CharacterEncodingFilter</filter-name>
        <filter-class>org.springframework.web.filter.CharacterEncodingFilter</filter-class>
        <init-param>
            <!-- name固定不变,value值根据需要设置 -->
            <param-name>encoding</param-name>
            <param-value>UTF-8</param-value>
        </init-param>
        <init-param>
            <param-name>forceEncoding</param-name>
            <param-value>true</param-value>
        </init-param>
    </filter>
    <filter-mapping>
        <filter-name>CharacterEncodingFilter</filter-name>
        <!-- 所有请求都设置utf-8的编码 -->
        <url-pattern>/*</url-pattern>
    </filter-mapping>
</web-app>
1.4 配置springmvc.xml文件
<?xml version="1.0" encoding="UTF-8"?>
<beans xmlns="http://www.springframework.org/schema/beans"
xmlns:xsi="http://www.w3.org/2001/XMLSchema-instance"
xmlns:context="http://www.springframework.org/schema/context"
xmlns:mvc="http://www.springframework.org/schema/mvc"
xsi:schemaLocation="http://www.springframework.org/schema/beans
http://www.springframework.org/schema/beans/spring-beans.xsd
http://www.springframework.org/schema/context
https://www.springframework.org/schema/context/spring-context.xsd
http://www.springframework.org/schema/mvc
https://www.springframework.org/schema/mvc/spring-mvc.xsd">
<!--1.包扫描-->
<context:component-scan base-package="com.aaa.controller,com.aaa.service"/>
<!--2.注解驱动-->
<mvc:annotation-driven/>
<!--3.静态资源放行-->
<mvc:default-servlet-handler/>
<!--4.视图解析器-->
<bean class="org.springframework.web.servlet.view.InternalResourceViewResolver">
<property name="prefix" value="/views/"/>
<property name="suffix" value=".jsp"/>
</bean>
<!--文件上传解析器-->
<bean id="multipartResolver"
class="org.springframework.web.multipart.commons.CommonsMultipartResolver">
<!-- 设定文件上传的最大值为50MB,50*1024*1024 -->
<property name="maxUploadSize" value="52428800"></property>
<!-- 设定文件上传时写入内存的最大值,如果小于这个参数不会生成临时文件,默认为10240 -->
<property name="maxInMemorySize" value="40960"></property>
</bean>
<!--5.配置数据源-->
<bean id="datasource" class="com.alibaba.druid.pool.DruidDataSource">
<property name="driverClassName" value="com.mysql.jdbc.Driver"/>
<property name="url" value="jdbc:mysql://localhost:3306/db_ssm?useSSL=false&useServerPrepStmts=true&characterEncoding=utf-8"/>
<property name="username" value="root"/>
<property name="password" value="970812"/>
</bean>
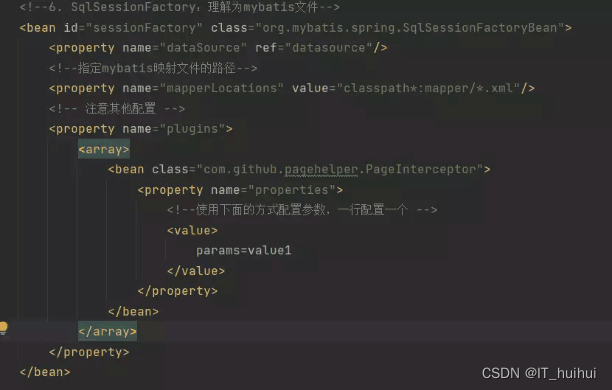
<!--6. SqlSessionFactory:理解为mybatis文件-->
<bean id="sessionFactory" class="org.mybatis.spring.SqlSessionFactoryBean">
<property name="dataSource" ref="datasource"/>
<!--指定mybatis映射文件的路径-->
<property name="mapperLocations" value="classpath*:mapper/*.xml"/>
<!-- 注意其他配置 -->
<property name="plugins">
<array>
<bean class="com.github.pagehelper.PageInterceptor">
<property name="properties">
<!--使用下面的方式配置参数,一行配置一个 -->
<value>
params=value1
</value>
</property>
</bean>
</array>
</property>
</bean>
<!--7.设置dao接口的代理实现类-->
<bean class="org.mybatis.spring.mapper.MapperScannerConfigurer">
<property name="sqlSessionFactoryBeanName" value="sessionFactory"/>
<!--dao接口所在的包-->
<property name="basePackage" value="com.aaa.dao"/>
</bean>
</beans>
2.查询所有
2.1 前端布局
在webapp下创建list.jsp
2.1.1 引入文件
下载相关的vue和axios和element文件并在list.jsp中引入
<script type="text/javascript" src="/js/vue.js"></script>
<script type="text/javascript" src="/js/axios.min.js"></script>
<%--引入elementui css样式--%>
<link rel="stylesheet" href="/css/index.css">
<%--引入elementui js组件  js的引入必须要放在vue引入的下方--%>
<script type="text/javascript" src="/js/index.js"></script>
2.1.2 前端布局
<%@ page contentType="text/html;charset=UTF-8" language="java" %>
<html>
<head>
    <title>查询学生信息</title>
    <script type="text/javascript" src="/js/vue.js"></script>
    <script type="text/javascript" src="/js/axios.min.js"></script>
    <%--引入elementui css样式--%>
    <link rel="stylesheet" href="/css/index.css">
    <%--引入elementui js组件  js的引入必须要放在vue引入的下方--%>
    <script src="https://unpkg.com/element-ui/lib/index.js"></script>
</head>
<body>
<div id="app">
    <button @click="getAll">查询所有</button>
    <%--
    el-table:elementui中表格的标签
    :data:绑定vue中表格的数据
    --%>
    <el-table
            :data="students"
            border
            style="width: 100%">
        <%--
            el-table-column:表格的列
            prop:显示的数据属性名
            lable:表头名称
            width:宽度  如果没有标记该属性  默认平均分配剩余宽度
        --%>
        <el-table-column
                prop="sid"
                label="编号"
                width="180">
        </el-table-column>
        <el-table-column
                prop="sname"
                label="姓名"
                width="180">
        </el-table-column>
        <el-table-column
                prop="age"
                label="年龄">
        </el-table-column>
        <el-table-column
                prop="sex"
                label="性别">
        </el-table-column>
        <el-table-column
                prop="classs.cname"
                label="班级">
        </el-table-column>
        <el-table-column
                fixed="right"
                label="操作"
                width="220">
            <template slot-scope="scope">
                <el-button type="primary" icon="el-icon-edit" @click="editStudent(scope.row)" size="small">编辑
                </el-button>
                <el-button type="danger" icon="el-icon-delete" @click="deleteStudent(scope.row.sid)" size="small">删除
                </el-button>
            </template>
        </el-table-column>
    </el-table>
</div>
</body>
<script>
    let app = new Vue({
        el: "#app",
        data: {
            //所有学生信息
            students: []
        },
        methods: {
            getAll() {
                var that = this;
                axios.get("/student/list").then(function (result) {
                    if (result.data.code == 200) {
                        that.students = result.data.data; //result.data获取统一的json对象
                        //result.data.data获取json对象中的属性data值
                    } else {
                        alert(result.data.msg);
                    }
                })
            }
        }
    })
</script>
</html>
2.2 后端代码
2.1.1 pojo层
- Student
@Data
public class Student {
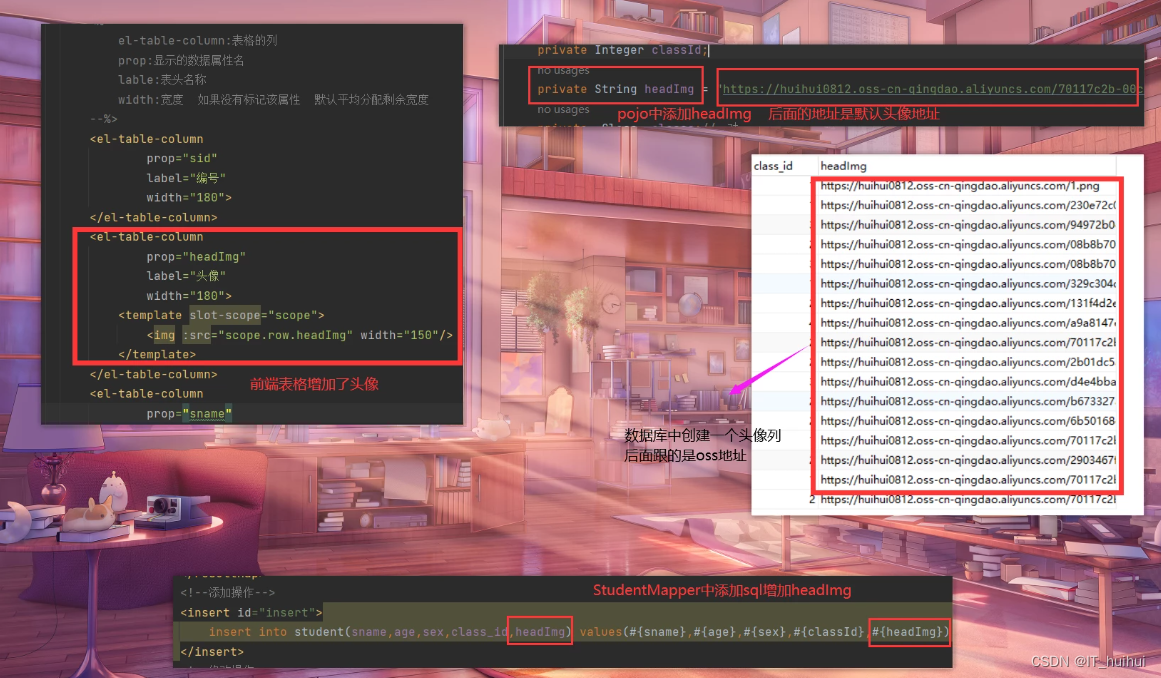
private Integer sid;
private String sname;
private Integer age;
private String sex;
private Integer classId;
private Class classs;//一对一
}
- Class
@Data
public class Class {
    private Integer cid;
    private String cname;
}
2.1.2 vo层
为了满足统一的数据接口,我们需要定义一个统一的格式的类:
- Result
@NoArgsConstructor
@AllArgsConstructor
@Data
public class Result {
    //表示状态码
    private Integer code;
    //消息提示
    private String msg;
    //响应的数据内容
    private Object data;
}
2.1.3 controller层
- StudentController
@Controller
@RequestMapping("/student")
public class StudentController {
    @Autowired
    private StudentService studentService;
    @RequestMapping("/list")
    @ResponseBody//注解有效必须引入jackson的jar包
    public Result list() { //返回类型是统一的json类对象
        List<Student> students = studentService.selectAll();
        if (students.size() == 0) {
            return new Result(500, "查询数据失败", null);
        }
        return new Result(200, "查询所有学生成功", students);
    }
}
2.1.4 service层
- StudentService
public interface StudentService {
    List<Student> selectAll();
}
- StudentServiceImpl
@Service
public class StudentServiceImpl implements StudentService {
    @Autowired
    private StudentDao studentDao;
    @Override
    public List<Student> selectAll() {
        return studentDao.findAll();
    }
}
2.1.5 StudentDao层
- StudentDao
public interface StudentDao {
    /**
     * 查询所有学生信息
     * @return
     */
    List<Student> findAll();
}
- StudentMapper.xml
<?xml version="1.0" encoding="UTF-8" ?>
<!DOCTYPE mapper PUBLIC "-//mybatis.org//DTD Mapper 3.0//EN"
        "http://mybatis.org/dtd/mybatis-3-mapper.dtd">
<!--namesapce的内容必须和对应的接口路径映射-->
<mapper namespace="com.aaa.dao.StudentDao">
    <resultMap id="MyStudentMap" type="com.aaa.pojo.Student" autoMapping="true">
        <id property="sid" column="sid"/>
        <result property="sname" column="sname"/>
        <result property="classId" column="class_id"/>
        <!--一对一标签-->
        <association property="classs" javaType="com.aaa.pojo.Class" autoMapping="true">
            <id property="cid" column="cid"/>
            <result property="cname" column="cname"/>
        </association>
    </resultMap>
    <!--查询所有-->
    <select id="findAll" resultMap="MyStudentMap">
        /*select * from tbl_emp;*/
        select  sid,sname,age,sex,class_id,cid,cname,headImg
        from student  join class  on class_id = cid order by sid
    </select>
</mapper>
3. 删除功能
3.1 前端布局
---去掉查询所有的按钮,并设置页面加载完成后立即执行查询所有
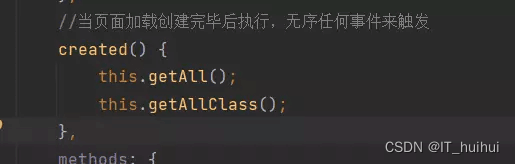
//当页面加载创建完毕后执行,无序任何事件来触发
created() {
    this.getAll();
}
3.1.1.删除按钮
--- 添加点击事件 并传入当前行的学生id作为参数
<el-table-column
        fixed="right"
        label="操作"
        width="220">
    <template slot-scope="scope">
        <el-button type="primary" icon="el-icon-edit" @click="editStudent(scope.row)" size="small">编辑
        </el-button>
        <el-button type="danger" icon="el-icon-delete" @click="deleteStudent(scope.row.sid)" size="small">删除
        </el-button>
    </template>
</el-table-column>
3.1.2 methods 添加删除事件
//删除事件
deleteStudent(sid) {
    this.$confirm('确认删除?', '提示', {
        confirmButtonText: '确定',
        cancelButtonText: '取消',
        type: 'info'
    }).then(() => {
        //通过axios调用我们的删除接口
        var that = this;
        axios.get("/student/delete?sid=" + sid).then(function (result) {
            if (result.data.code == 200) {
                //1.弹出一个消息
                that.$message.success(result.data.msg);
                //2.重新加载表格
                that.getAll();
            } else {
                //1.弹出一个消息
                that.$message.error(result.data.msg);
            }
        })

    }).catch(() => {
        this.$message({
            type: 'info',
            message: '已取消删除'
        });
    });
}
3.2 后端代码
3.2.1 controller层
- StudentController
@RequestMapping("/delete")
@ResponseBody
public Result delete(Integer sid) {
    int row = studentService.deleteById(sid);
    if (row == 0) {
        return new Result(500, "删除失败", null);
    }
    return new Result(200, "删除成功", null);
}
3.2.2 service层
- StudentService
public interface StudentService {
    int deleteById(Integer sid);
}
- StudentServiceImpl
@Service
public class StudentServiceImpl implements StudentService {
    @Autowired
    private StudentDao studentDao;
    @Override
    @Override
    public int deleteById(Integer sid) {
        int row = studentDao.delete(sid);
        return row;
    }
}
3.3.3 dao层
- StudentDao
int delete(Integer sid);- StudentMapper
<!--删除操作-->
<delete id="delete">
    delete from student where sid = #{sid}
</delete>
4. 添加功能
4.1 前端布局
  <%-- 添加对话框开始--%>
<el-dialog
          title="添加学生"
          :visible.sync="dialogVisible"
          width="30%"
          @close="addClose"
  >
      <%-- el-form 表示表单标签
          :model 表示表单对象 它和vue中的data要绑定在一起
          label-width  文本宽度
       --%>
      <el-form ref="form" :model="addStudentForm"  label-width="80px">

          <el-form-item label="学生姓名">
              <el-input v-model="addStudentForm.sname"></el-input>
          </el-form-item>
          <el-form-item label="学生年龄">
              <el-input v-model.number="addStudentForm.age"></el-input>
          </el-form-item>
          <el-form-item label="性别" >
              <el-radio-group v-model="addStudentForm.sex">
                  <el-radio label="男"></el-radio>
                  <el-radio label="女"></el-radio>
              </el-radio-group>
          </el-form-item>
          <el-form-item label="所在班级">
              <el-select v-model="addStudentForm.classId" placeholder="请选择所在班级" style="width: 100%">
                  <el-option v-for="classs in clazz" :label="classs.cname" :value="classs.cid"></el-option>
              </el-select>
          </el-form-item>
      </el-form>
      <span slot="footer" class="dialog-footer">
  <el-button @click="dialogVisible = false">取 消</el-button>
  <el-button type="primary" @click="confirmAddStudent">确 定</el-button>
</span>
  </el-dialog>
  <%-- 添加对话框结束--%>
4.1.1 data中添加数据
data: {
    //控制添加对话框的显示和隐藏
    dialogVisible: false,
    //添加学生的表单对象
    addStudentForm: {},
}
4.1.2 methods中加入事件
//添加按钮事件
addStudent() {
    this.dialogVisible = true;
},
4.1.3 methods中加入查询所有班级的事件
//查询所有班级信息
getAllClass() {
    var that = this;
    axios.get("/class/list").then(function (result) {
        that.clazz = result.data.data;//把后台响应的所有学生信息赋值给vue变量
    })
},
----data中加入保存班级的事件
//所有班级信息
clazz: [],
---- created中加入页面加载后自动显示班级的事件
//当页面加载创建完毕后执行,无序任何事件来触发
created() {
    this.getAll();
    this.getAllClass();
},
4.1.4 优化表单---增加回显功能
  <el-dialog
          title="添加学生"
          :visible.sync="dialogVisible"
          width="30%"
          @close="addClose"
  >
      <%-- el-form 表示表单标签
          :model 表示表单对象 它和vue中的data要绑定在一起
          label-width  文本宽度
       --%>
      <el-form ref="form" :model="addStudentForm"  label-width="80px">
          <el-form-item label="学生姓名">
              <el-input v-model="addStudentForm.sname"></el-input>
          </el-form-item>
          <el-form-item label="学生年龄">
              <el-input v-model.number="addStudentForm.age"></el-input>
          </el-form-item>
          <el-form-item label="性别">
              <el-radio-group v-model="addStudentForm.sex">
                  <el-radio label="男"></el-radio>
                  <el-radio label="女"></el-radio>
              </el-radio-group>
          </el-form-item>
          <el-form-item label="所在班级" >
              <el-select v-model="addStudentForm.classId" placeholder="请选择所在班级" style="width: 100%">
                  <el-option v-for="classs in clazz" :label="classs.cname" :value="classs.cid"></el-option>
              </el-select>
          </el-form-item>
      </el-form>
      <span slot="footer" class="dialog-footer">
  <el-button @click="dialogVisible = false">取 消</el-button>
  <el-button type="primary" @click="confirmAddStudent">确 定</el-button>
</span>
  </el-dialog>
  <%-- 添加对话框结束--%>
4.1.5 确认添加按钮
---- 确认添加按钮事件绑定
<el-button type="primary" @click="confirmAddStudent">确 定</el-button>
---- 点击确定,按钮执行confirmAddStudent方法
//确认添加学生事件
confirmAddStudent() {
            var that = this;
            axios.post("/student/insert", this.addStudentForm).then(function (result) {
                if (result.data.code == 200) {
                    that.$message.success(result.data.msg);
                    //关闭对话框
                    that.dialogVisible = false;
                    //重新加载表格数据
                    that.getAll();
                } else {
                    that.$message.error(result.data.msg);
            }
     })
},
4.2 后端代码
4.2.1 class表
- controller层
@Controller
@RequestMapping("/class")
public class ClassController {
    @Autowired
    private ClassService classService;
    @RequestMapping("/list")
    @ResponseBody
    public Result list(){
        List<Class>  list=  classService.findAll();
        return new Result(200,"查询所有班级信息成功",list);
    }
}
- service层
①ClassService
public interface ClassService {
    List<Class> findAll();
}
②ClassServiceIm
@Service
public class ClassServiceImpl implements ClassService {
    @Autowired
    private ClassDao classDao;
    @Override
    public List<Class> findAll() {
        return classDao.selectAll();
    }
}
- dao层
①ClassDao
public interface ClassDao {
    List<Class> selectAll();
}
②ClassMapper.xml
<?xml version="1.0" encoding="UTF-8" ?>
<!DOCTYPE mapper PUBLIC "-//mybatis.org//DTD Mapper 3.0//EN"
        "http://mybatis.org/dtd/mybatis-3-mapper.dtd">
<!--namesapce的内容必须和对应的接口路径映射-->
<mapper namespace="com.aaa.dao.ClassDao">
    <select id="selectAll" resultType="com.aaa.pojo.Class">
        select * from class
    </select>
</mapper>
4.2.2 student表
- controller层
@Controller
@RequestMapping("/student")
public class StudentController {
    @Autowired
    private StudentService studentService;
    @RequestMapping("/insert")
    @ResponseBody //把java对象转化为json对象
    public Result insert(@RequestBody Student student) { //RequestBody把前端的json对象转化为java对象
    int row = studentService.save(student);
    if (row == 0) {
        return new Result(500, "添加失败", null);
    }
    return new Result(200, "添加成功", null);
  }
}
- service层
①StudentService
public interface StudentService {
    int save(Student student);
}
②StudentServiceImpl
@Service
public class StudentServiceImpl implements StudentService {
    @Autowired
    private StudentDao studentDao;
    @Override
    public int save(Student student) {
      int row = studentDao.insert(student);
      return row;
    }
}
- dao层
①StudentDao
public interface StudentDao {
    int insert(Student student);
}
②StudentMapper
<!--添加操作-->
<insert id="insert">
    insert into student(sname,age,sex,class_id) values(#{sname},#{age},#{sex},#{classId})
</insert>
5. 修改功能
5.1 前端布局
5.1.1 编辑修改事件
<el-button type="primary" icon="el-icon-edit" @click="editStudent(scope.row)" size="small">编辑</el-button>
5.1.2 methods加入编辑按钮事件
//编辑按钮事件
editStudent(row) {
    this.editDialogVisible = true;
    //当前行赋值给修改表单对象
    this.editStudentForm = row;
},
5.1.3 新增编辑表单
<%--编辑对话框开始
     :visible.sync:控制对话框的显示和隐藏
 --%>
  <el-dialog
          title="修改学生"
          :visible.sync="editDialogVisible"
          width="30%"
  >
      <%-- el-form 表示表单标签
          :model 表示表单对象 它和vue中的data要绑定在一起
          label-width  文本宽度
       --%>
      <el-form ref="form" :model="editStudentForm" label-width="80px">
          <el-form-item label="学生姓名">
              <el-input v-model="editStudentForm.sname"></el-input>
          </el-form-item>
          <el-form-item label="学生年龄">
              <el-input v-model="editStudentForm.age"></el-input>
          </el-form-item>
          <el-form-item label="性别">
              <el-radio-group v-model="editStudentForm.sex">
                  <el-radio label="男"></el-radio>
                  <el-radio label="女"></el-radio>
              </el-radio-group>
          </el-form-item>
          <el-form-item label="所在班级">
              <el-select v-model="editStudentForm.classId" placeholder="请选择所在班级" style="width: 100%">
                  <el-option v-for="classs in clazz" :label="classs.cname" :value="classs.cid"></el-option>
              </el-select>
          </el-form-item>
      </el-form>
      <span slot="footer" class="dialog-footer">
  <el-button @click="editDialogVisible = false">取 消</el-button>
  <el-button type="primary" @click="confirmEditStudent">确 定</el-button>
</span>
  </el-dialog>
  <%-- 编辑对话框结束--%>
5.1.3 data中添加事件
//控制编辑对话框的显示和隐藏
editDialogVisible: false,
//修改学生的表单对象
editStudentForm: {},
5.1.4 点击编辑的确定事件
---- 点击确定会触发confirmEditStudent事件
//确认修改员学生信息
confirmEditStudent() {
    var that = this;
    axios.post("/student/update", this.editStudentForm).then(function (result) {
        if (result.data.code == 200) {
            that.$message.success(result.data.msg);
            //关闭对话框
            that.editDialogVisible = false;
            //重新加载表格数据
            that.getAll();
        } else {
            that.$message.error(result.data.msg);
        }
    })
},
5.2 后端代码
5.2.1 controller层
//修改功能
@RequestMapping("/update")
@ResponseBody
public Result update(@RequestBody Student student) {
    int row = studentService.update(student);
    if (row == 0) {
        return new Result(500, "修改失败", null);
    }
    return new Result(200, "修改成功", null);
}
5.2.2 service层
- StudentService
public interface StudentService {
    int update(Student student);
}
- StudentServiceImpl
@Service
public class StudentServiceImpl implements StudentService {
    @Autowired
    private StudentDao studentDao;
    @Override
public int update(Student student) {
    int row = studentDao.update(student);
    return row;
  }
}
5.2.3 dao层
- StudentDao
public interface StudentDao {
    int update(Student student);
}
- StudentMapper.xml
<!--修改操作-->
<update id="update">
    update student set sname=#{sname},age=#{age},sex=#{sex},class_id=#{classId} where sid=#{sid}
</update>
6. 分页查询功能
6.1 准备工作
6.1.1 分页组件的显示布局
6.1.2 引入pageHelper依赖
<!--pageHelper的依赖-->
 <dependency>
   <groupId>com.github.pagehelper</groupId>
   <artifactId>pagehelper</artifactId>
   <version>5.3.0</version>
 </dependency>
6.1.3 配置springmvc.xml文件
<!-- 注意其他配置 -->
  <property name="plugins">
    <array>
      <bean class="com.github.pagehelper.PageInterceptor">
          <property name="properties">
              <!--使用下面的方式配置参数,一行配置一个 -->
              <value>
                  params=value1
              </value>
          </property>
      </bean>
    </array>
  </property>
6.2 前端代码
6.2.1 分页组件
<%--  分页组件
    size-change:大小改变,每页显示的条数
    current-change:当前页面发生改变时触发的事件
    current-page:当前页面
    page-sizes:
    page-size:默认显示的条数
    total:总条数
--%>
<el-pagination
        @size-change="handleSizeChange"
        @current-change="handleCurrentChange"
        :current-page="currentPage4"
        :page-sizes="[2,5,10, 15]"
        :page-size="pageSize"
        layout="total, sizes, prev, pager, next, jumper"
        :total="total">
</el-pagination>
6.2.2 data中添加数据
data: {
    //当前每页显示的条数
    pageSize: 2,
    //当前页码
    currentPage4: 1,
    //总条数
    total: 0,
}
6.2.3 methods中添加事件
//每页显示的条数触发时的事件
handleSizeChange(val) {
    this.pageSize = val;
    this.getAll();
},
//当前页码发生改变时触发的事件
handleCurrentChange(val) {
    this.currentPage4 = val;
    this.getAll()
},
6.2.4 更新getAll方法
6.3 后端代码
6.3.1 controller层
@Controller
@RequestMapping("/student")
public class StudentController {
    @Autowired
    private StudentService studentService;

    @RequestMapping("/listByPage")
    @ResponseBody
    public Result listByPage(@RequestParam(defaultValue = "1") Integer currentPage,
                             @RequestParam(defaultValue = "5") Integer pageSize) {
        PageInfo<Student> page = studentService.queryAll(currentPage, pageSize);
        return new Result(200, "查询所有员工成功", page);
    }
}
6.3.2 service层
- StudentService
public interface StudentService {
    PageInfo<Student> queryAll(+);
}
- StudentServiceImpl
@Service
public class StudentServiceImpl implements StudentService {
    @Autowired
    private StudentDao studentDao;
    @Override
    public PageInfo<Student> queryAll(Integer currentPage, Integer pageSize) {
        PageHelper.startPage(currentPage,pageSize);
         List<Student> all = studentDao.findAll();
         //把查询的结果封装到Page对象中。
        PageInfo<Student> pageInfo=new PageInfo<Student>(all);
         return pageInfo;
    }
}
6.3.3 dao层和xml不变
7. 条件查询功能
7.1 前端页面
7.1.1 条件查询组件
<el-form :inline="true" :model="studentSearchForm" class="demo-form-inline">
    <el-form-item label="学生姓名">
        <el-input v-model="studentSearchForm.sname" placeholder="学生姓名"></el-input>
    </el-form-item>
    <el-form-item label="学生年龄">
        <el-input v-model="studentSearchForm.age" placeholder="学生年龄"></el-input>
    </el-form-item>
    <el-form-item label="所在班级">
        <el-select v-model="studentSearchForm.classId" placeholder="所在班级">
            <el-option v-for="classs in clazz" :label="classs.cname" :value="classs.cid"></el-option>
        </el-select>
    </el-form-item>
    <el-form-item>
        <el-button type="primary" @click="searchStudent">查询</el-button>
        <el-button type="primary" @click="resetSearchForm">重 置</el-button>
        <el-button type="success" @click="addStudent">添加</el-button>
    </el-form-item>
</el-form>
7.1.2 data添加数据
data: {
    //搜索表单对象
    studentSearchForm: {},
}
7.1.3 methods
//搜索方法
searchStudent() {
    this.currentPage4 = 1;
    this.getAll()
},
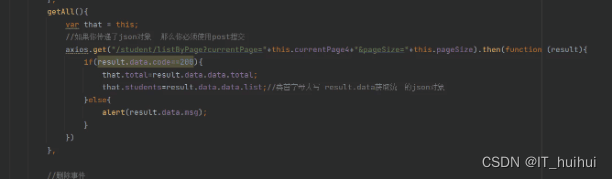
7.1.4 getAll方法更新
getAll() {
    var that = this;
    //如果你传递了json对象  那么你必须使用post提交
    axios.post("/student/listPageByCondition?currentPage=" + this.currentPage4 + "&pageSize=" + this.pageSize, this.studentSearchForm).then(function (result) {
        if (result.data.code == 200) {
            that.total = result.data.data.total;
            that.students = result.data.data.list;//类首字母大写 result.data获取统一的json对象
        } else {
            alert(result.data.msg);
        }
    })
},
7.1.5 重置功能
- 按钮
<el-button type="primary" @click="resetSearchForm">重 置</el-button>
- methods方法
//重置
resetSearchForm() {
    this.studentSearchForm = {}
    this.getAll();
},
7.2 后端代码
7.2.1 在vo层--创建StudentVo
/**
 * 接收前端员工的搜索条件对象
 */
@Data
public class StudentVo {
    private String sname;
    private Integer age;
    private Integer classId;
}
7.2.2 controller层
@Controller
@RequestMapping("/student")
public class StudentController {
    @Autowired
    private StudentService studentService;
    @RequestMapping("/listPageByCondition")
    @ResponseBody
    public Result listPageCondition(@RequestParam(defaultValue = "1") Integer currentPage,
                                @RequestParam(defaultValue = "5") Integer pageSize,
                                @RequestBody StudentVo studentVo) {
    PageInfo<Student> page = studentService.queryAll(currentPage, pageSize,studentVo);
    return new Result(200, "查询所有员工成功", page);
}
7.2.3 service层
- StudentService
public interface StudentService {
    PageInfo<Student> queryAll(Integer currentPage, Integer pageSize, StudentVo studentVo);
}
- StudentServiceImpl
@Service
public class StudentServiceImpl implements StudentService {
    @Autowired
    private StudentDao studentDao;
    @Override
    public PageInfo<Student> queryAll(Integer currentPage, Integer pageSize, StudentVo studentVo) {
        PageHelper.startPage(currentPage,pageSize);
        List<Student> all = studentDao.findAllByCondition(studentVo);
        //把查询的结果封装到Page中
        PageInfo<Student> pageInfo=new PageInfo<Student>(all);
        return pageInfo;
    }
}
7.2.4 dao层
- StudentDao
public interface StudentDao {
    List<Student> findAllByCondition(StudentVo studentVo);
}
- StudentMapper
<!--条件查询-->
<select id="findAllByCondition" resultMap="MyStudentMap">
    select  sid,sname,age,sex,class_id,cid,cname,headImg
    from student  join class  on class_id = cid
    <where>
        <if test="sname!=null and sname!=''">
            and sname like concat('%',#{sname},'%')
        </if>
        <if test="age!=null">
            and age=#{age}
        </if>
        <if test="classId!=null">
            and class_id=#{classId}
         </if>
    </where> order by sid
</select>
8. 文件上传功能
原来文件上传:传递到本地服务器。 把上传的文件远程服务器oss。阿里云
8.1 准备工作
8.1.1 引入依赖
<!--文件上传的依赖-->
<dependency>
    <groupId>commons-fileupload</groupId>
    <artifactId>commons-fileupload</artifactId>
    <version>1.3.3</version>
</dependency>
8.1.2 修改springmvc.xml文件
<!--文件上传解析器-->
<bean id="multipartResolver"
      class="org.springframework.web.multipart.commons.CommonsMultipartResolver">
    <!-- 设定文件上传的最大值为50MB,50*1024*1024 -->
    <property name="maxUploadSize" value="52428800"></property>
    <!-- 设定文件上传时写入内存的最大值,如果小于这个参数不会生成临时文件,默认为10240 -->
    <property name="maxInMemorySize" value="40960"></property>
</bean>
8.1.3 其他修改
8.1.4 封装一个oss文件上传的工具类
8.2 前端代码
8.2.1 添加功能上传头像表单
 <%-- el-form 表示表单标签
          :model 表示表单对象 它和vue中的data要绑定在一起
          label-width  文本宽度
       --%>
      <el-form ref="studentFormRule" :model="addStudentForm" :rules="studentFormRule" label-width="80px">
          <el-form-item label="学生头像">
              <el-upload
                      class="avatar-uploader"
                      action="/student/upload "
                      :show-file-list="false"
                      :on-success="handleAvatarSuccess"
                      :before-upload="beforeAvatarUpload">
                  <img v-if="imageUrl" :src="imageUrl" class="avatar">
                  <i v-else class="el-icon-plus avatar-uploader-icon"></i>
              </el-upload>
          </el-form-item>
          <el-form-item label="学生姓名" prop='sname'>
              <el-input v-model="addStudentForm.sname"></el-input>
          </el-form-item>
          <el-form-item label="学生年龄" prop='age'>
              <el-input v-model.number="addStudentForm.age"></el-input>
          </el-form-item>
          <el-form-item label="性别" prop="sex">
              <el-radio-group v-model="addStudentForm.sex">
                  <el-radio label="男"></el-radio>
                  <el-radio label="女"></el-radio>
              </el-radio-group>
          </el-form-item>
          <el-form-item label="所在班级" prop="classId">
              <el-select v-model="addStudentForm.classId" placeholder="请选择所在班级" style="width: 100%">
                  <el-option v-for="classs in clazz" :label="classs.cname" :value="classs.cid"></el-option>
              </el-select>
          </el-form-item>
      </el-form>
      <span slot="footer" class="dialog-footer">
  <el-button @click="dialogVisible = false">取 消</el-button>
  <el-button type="primary" @click="confirmAddStudent">确 定</el-button>
</span>
  </el-dialog>
  <%-- 添加对话框结束--%>
8.2.2 css
<style>
    .avatar-uploader .el-upload {
        border: 1px dashed #d9d9d9;
        border-radius: 6px;
        cursor: pointer;
        position: relative;
        overflow: hidden;
    }

    .avatar-uploader .el-upload:hover {
        border-color: #409EFF;
    }

    .avatar-uploader-icon {
        font-size: 28px;
        color: #8c939d;
        width: 100px;
        height: 100px;
        line-height: 100px;
        text-align: center;
    }

    .avatar {
        width: 100px;
        height: 100px;
        display: block;
    }
</style>
8.2.3 data添加数据
//头像地址
imageUrl: "",
8.2.4 methods添加事件
//文件上传成功后触发的事件
handleAvatarSuccess(res, file) {
    this.imageUrl = res.data;
    this.addStudentForm.headImg = this.imageUrl;
    //console.log(res)
},
//上传之前的文件
beforeAvatarUpload(file) {
    const isJPG = file.type === 'image/jpeg';
    const isLt2M = file.size / 1024 / 1024 < 2;

    if (!isJPG) {
        this.$message.error('上传头像图片只能是 JPG 格式!');
    }
    if (!isLt2M) {
        this.$message.error('上传头像图片大小不能超过 2MB!');
    }
    return isJPG && isLt2M;
},
8.3 后端代码
8.3.1 controller层
@Controller
@RequestMapping("/student")
public class StudentController {
    @Autowired
    private StudentService studentService;
    //头像上传功能
    @RequestMapping("/upload")
    @ResponseBody
    public Result upload(MultipartFile file){ //名称必须叫file
        String path = UploadUtil.upload(file);
        if(path==null){
            return new Result(500,"上传失败",null);
        }
        return new Result(200,"上传成功",path);
    }
}
------其他层不变
9. 添加表单验证功能
-----前端修改,后端不变
9.1 前端代码
9.1.1 data中添加数据
//表单校验规则
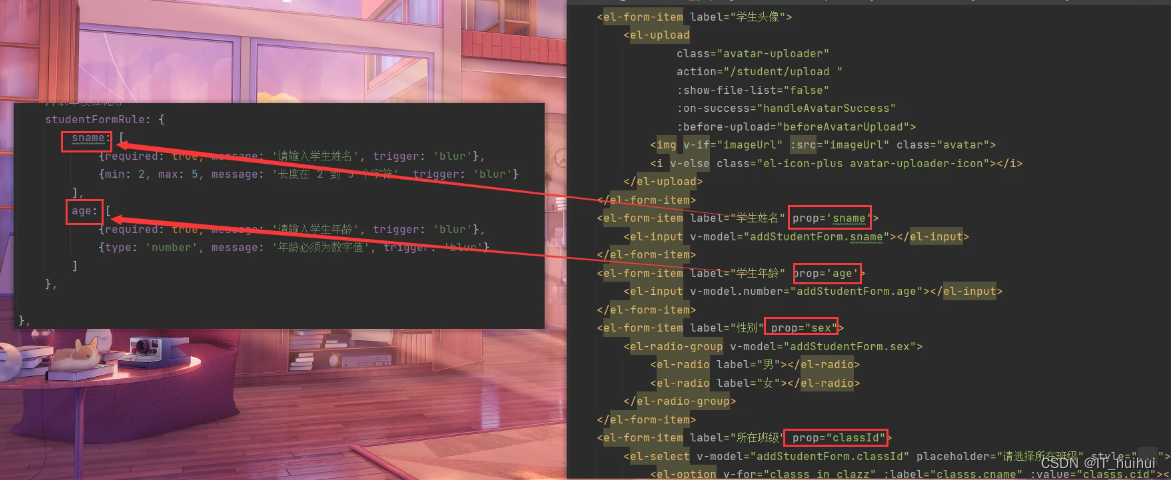
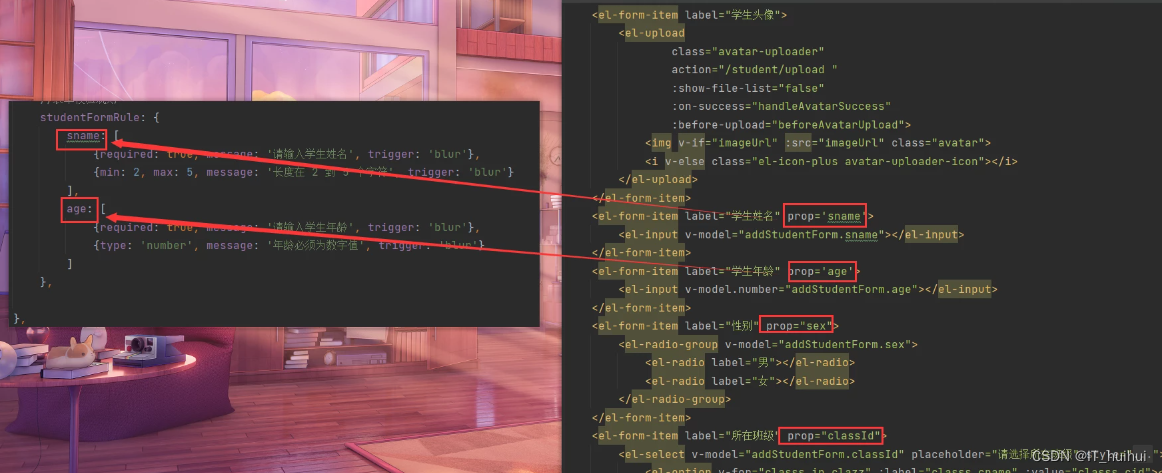
studentFormRule: {
sname: [
{required: true, message: '请输入学生姓名', trigger: 'blur'},
{min: 2, max: 5, message: '长度在 2 到 5 个字符', trigger: 'blur'}
],
age: [
{required: true, message: '请输入学生年龄', trigger: 'blur'},
{type: 'number', message: '年龄必须为数字值', trigger: 'blur'}
]
},
9.1.2 对应关系
-----prop每个值都要写
9.1.3 修改确认添加事件
confirmAddStudent() {
    this.$refs.studentFormRule.validate((valid) => {
        if (valid) {
            var that = this;
            axios.post("/student/insert", this.addStudentForm).then(function (result) {
                if (result.data.code == 200) {
                    that.$message.success(result.data.msg);
                    //关闭对话框
                    that.dialogVisible = false;
                    //重新加载表格数据
                    that.getAll();
                } else {
                    that.$message.error(result.data.msg);
                }

            })
        }
    })
},
9.2 再次点击添加表单数据清空
每一个表单项必须使用prop 就是<el-form-item>里面都要加prop=""


 2万+
2万+


 被折叠的 条评论
为什么被折叠?
被折叠的 条评论
为什么被折叠?
 到【灌水乐园】发言


