


前言
写这篇文章其实是很必要的。
因为对于java而言,那么多成熟的开发组件,框架,几乎大部分人都已经变成框架搬运工了,那么从头开始搭建整合一个合自己用的框架所耗费的时间是很多的,这里先写出一部分重点,以便参考。
这篇文章是参考了:
gradle】idea+gradle 多模块项目创建教程入门例子
一起开发一个文件服务器–1、配置springweb环境【试验稿】
下面要先说明,gradle多模块项目的如何创建。
gradle多模块项目配置
项目创建配置
新建项目
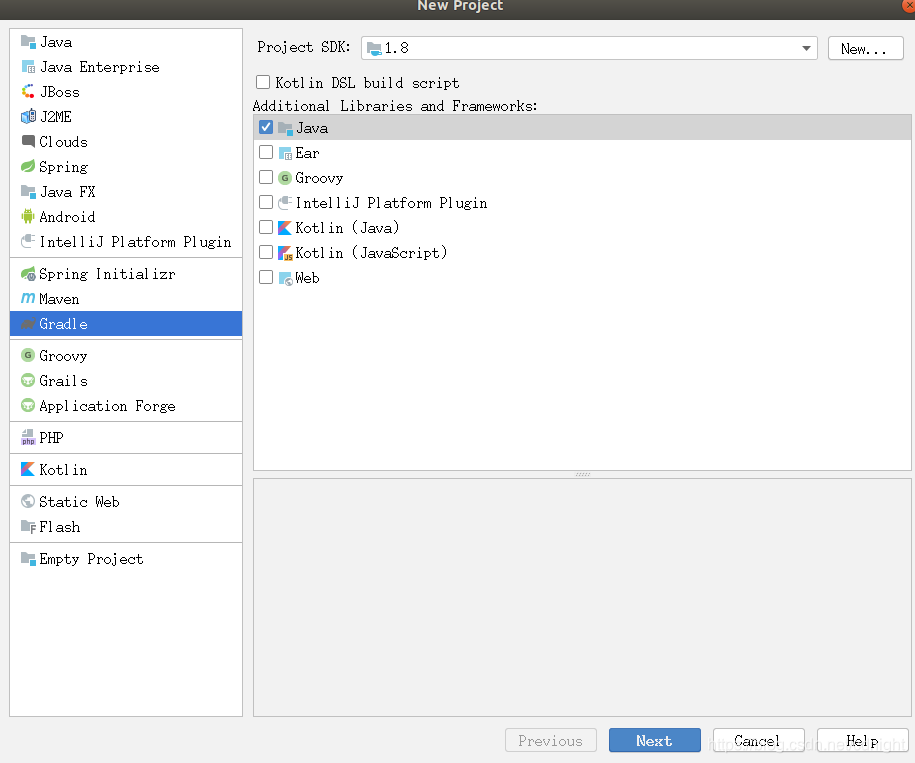
选择本地的gradle,保证gradle的版本至少为4或以上。

填写group、artifactid、版本号。
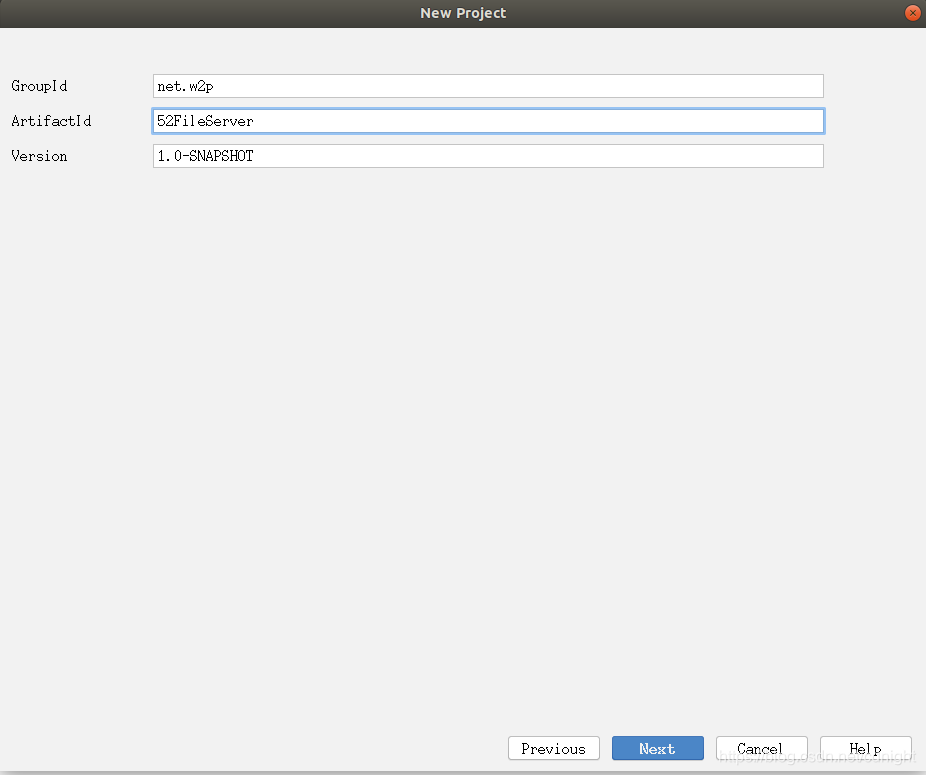
根节点项目创建完毕。
然后,创建多个模块,假设背景为需要进行远程调用的提供者服务,这里以 api 和 web 模块为例,
api -模块
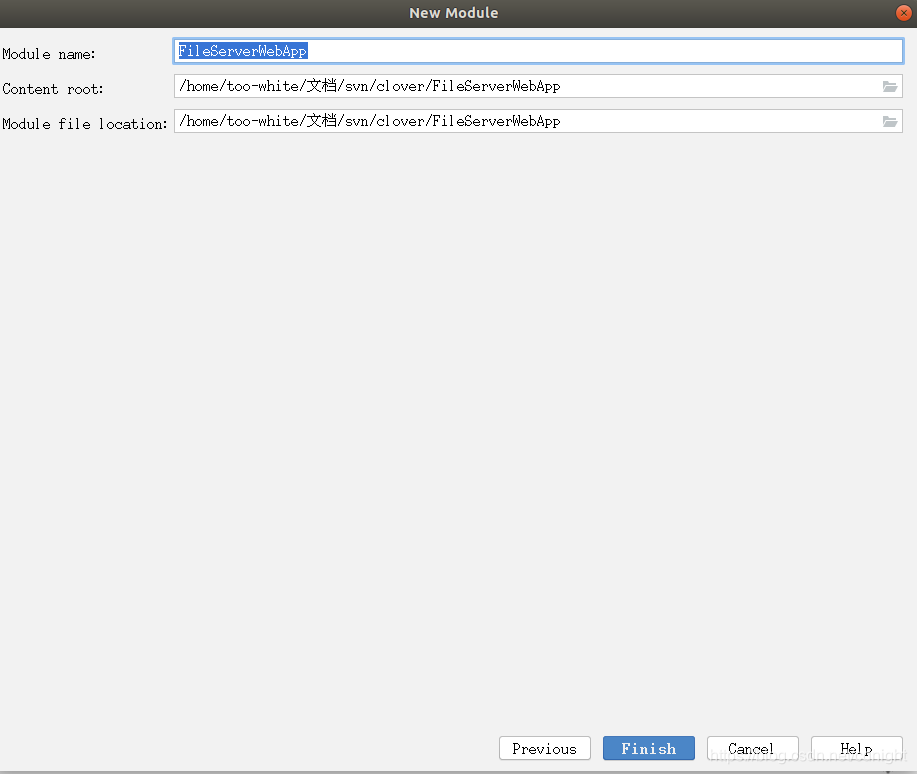
新建模块:
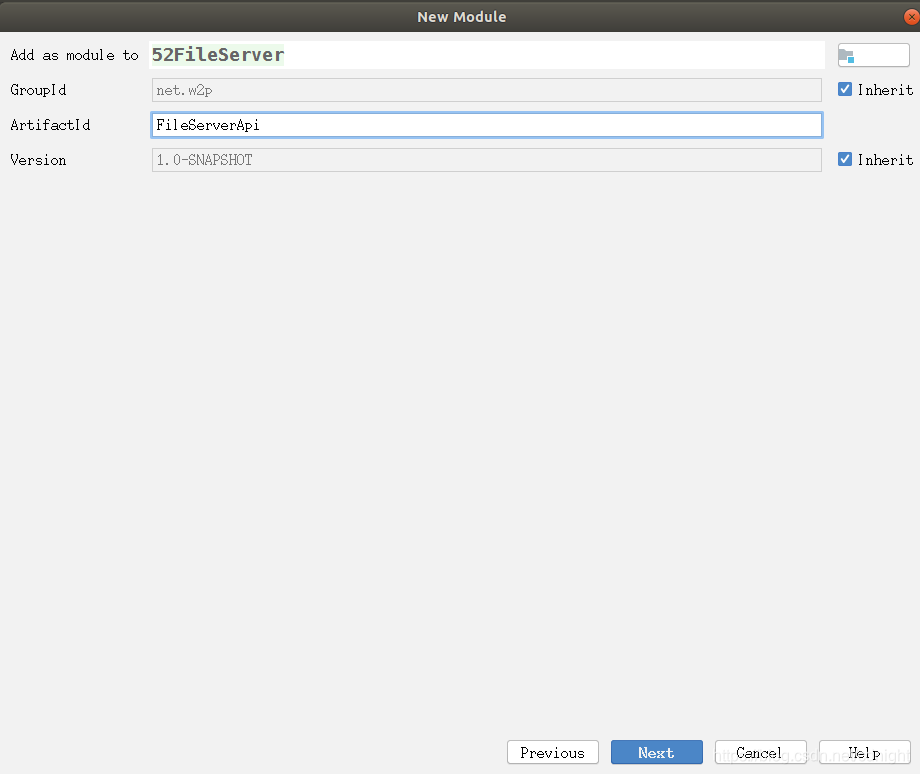
模块名称存放位置:
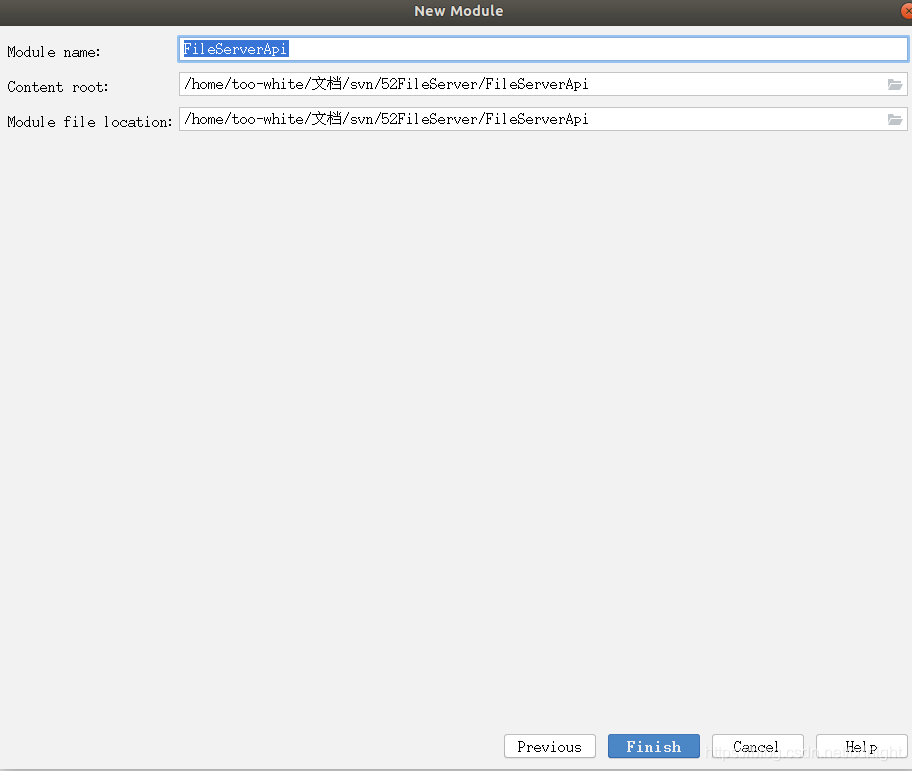
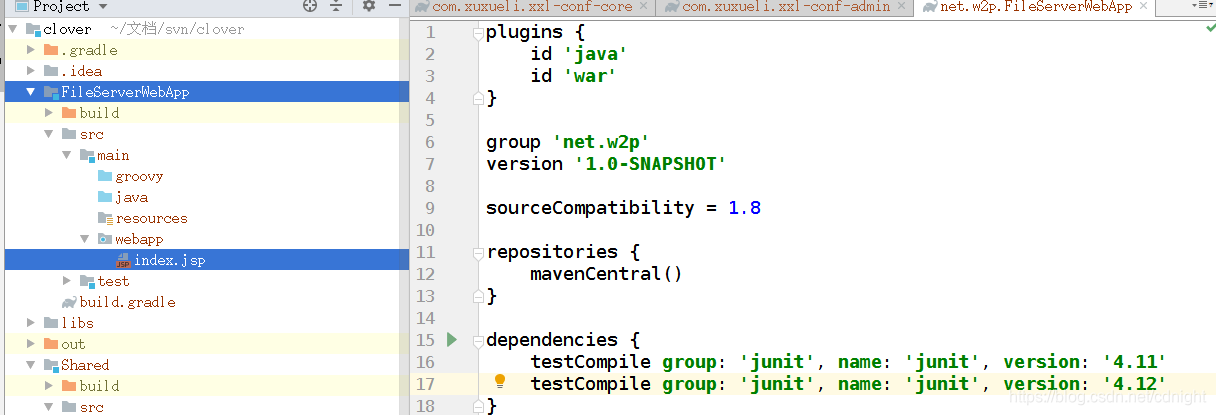
创建成功。
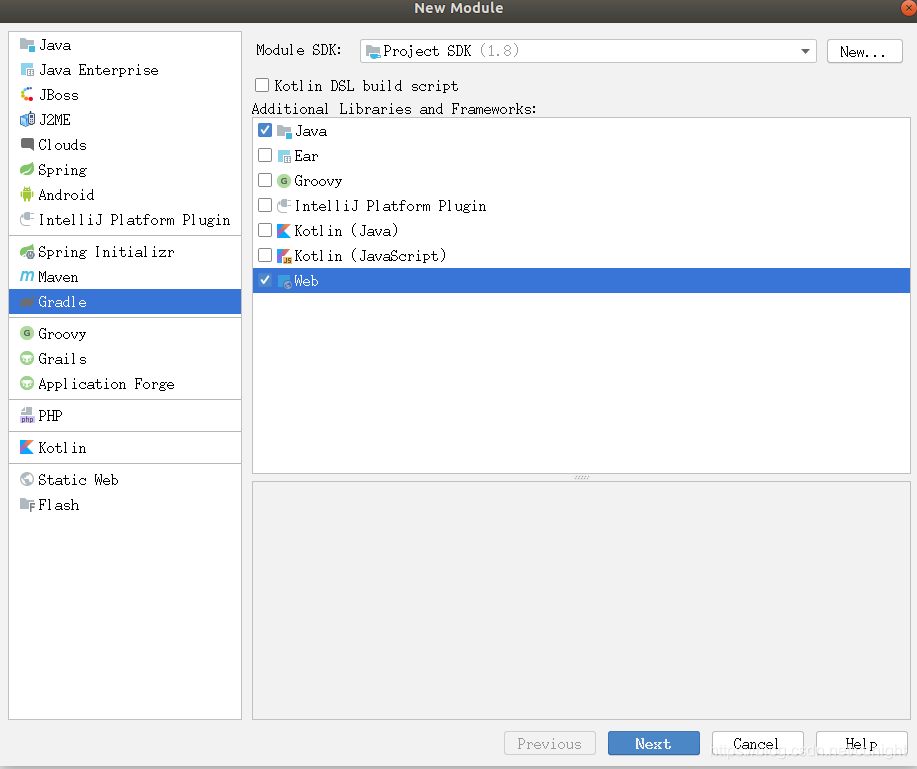
web模块

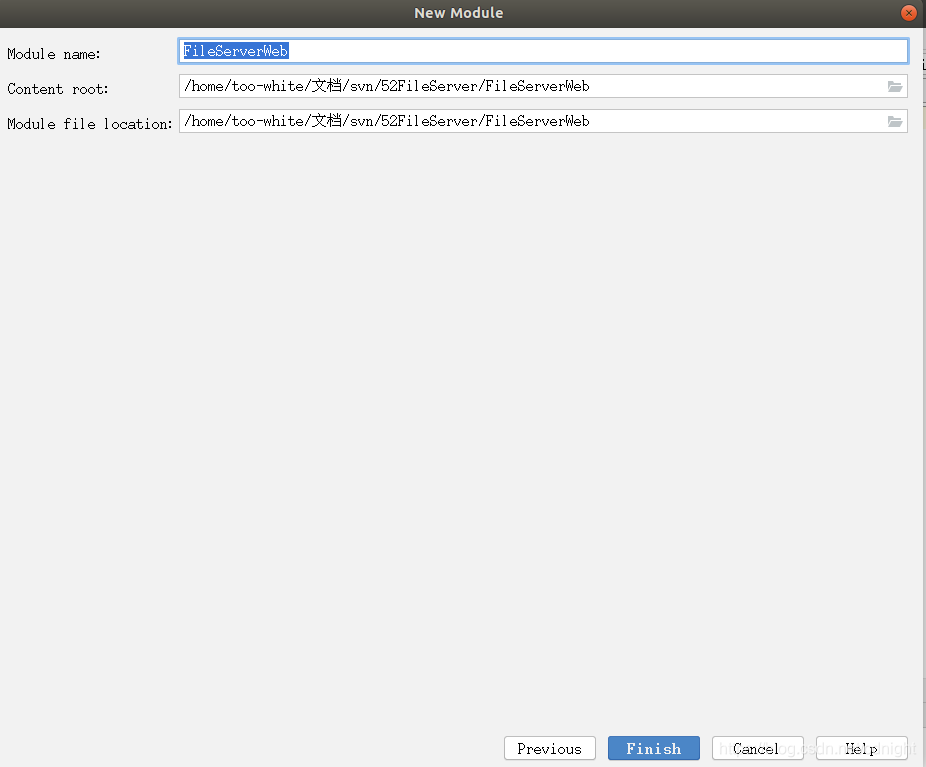
创建成功。
配置
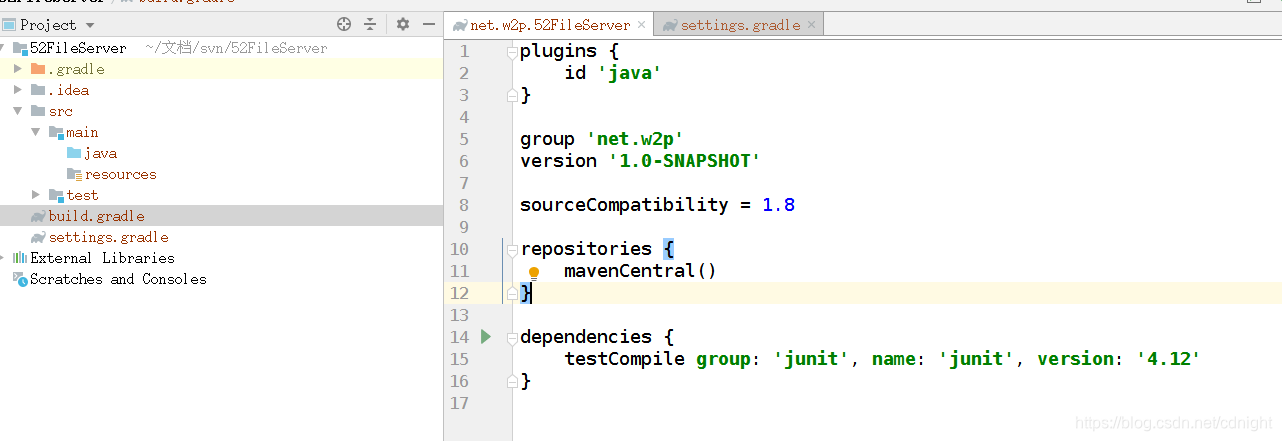
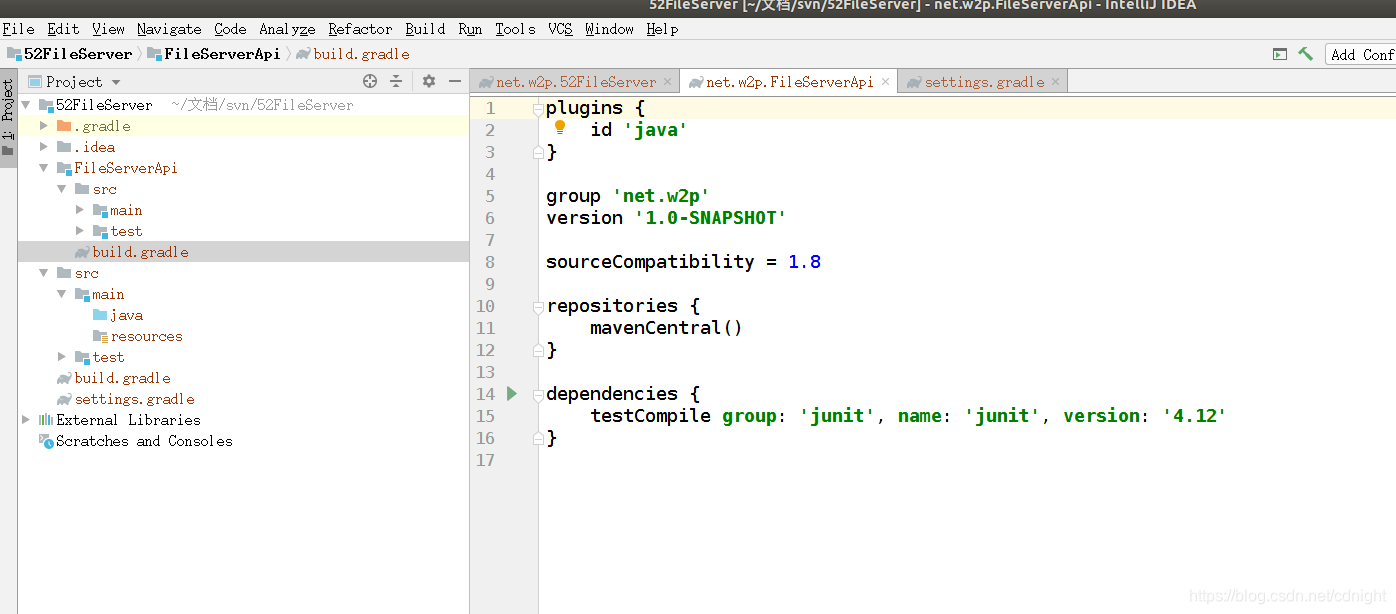
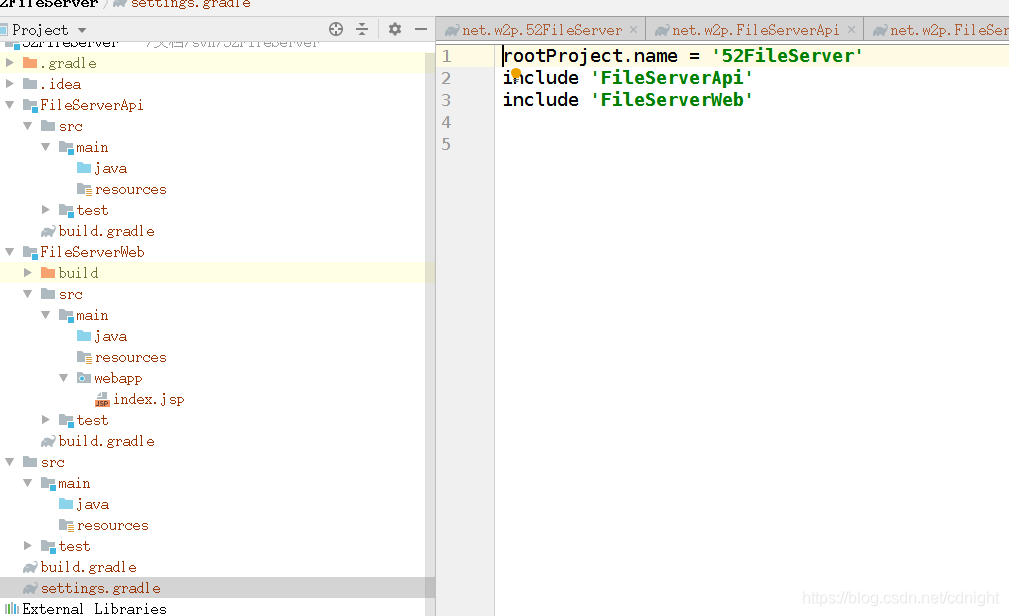
可以看到根目录下面的setting.gradle的内容为:
修改根项目下面的build.gradle
例子:
/***所有项目共通***/
group 'net.w2p'
version '1.0-SNAPSHOT'


allprojects {

    apply plugin: 'java'
    apply plugin: 'idea'
    apply plugin: 'groovy'


    sourceCompatibility = 1.8
    targetCompatibility = 1.8

    idea {
        module {
            inheritOutputDirs = true
        }
    }
    tasks.withType(JavaCompile) {
        options.encoding = "UTF-8"
    }
    tasks.withType(GroovyCompile) {
        groovyOptions.encoding = "MacRoman"
    }

    // java编译的时候缺省状态下会因为中文字符而失败
    [compileJava,compileTestJava,javadoc]*.options*.encoding = 'UTF-8'

    repositories {
        maven{
            //更换为阿里的仓库
            url  'http://maven.aliyun.com/nexus/content/groups/public'
        }
        //有些jar包在中央仓库是没有的,需要手动添加上去
//        flatDir {  dirs 'local_jars' }
//        mavenCentral()
    }
    dependencies {
        testCompile group: 'junit', name: 'junit', version: '4.12'


    }
}
// 所有子项目的通用配置
subprojects {

    dependencies {
        // 通用依赖

        // 测试依赖
        testCompile(
                "junit:junit:4.12"
        )
    }

}
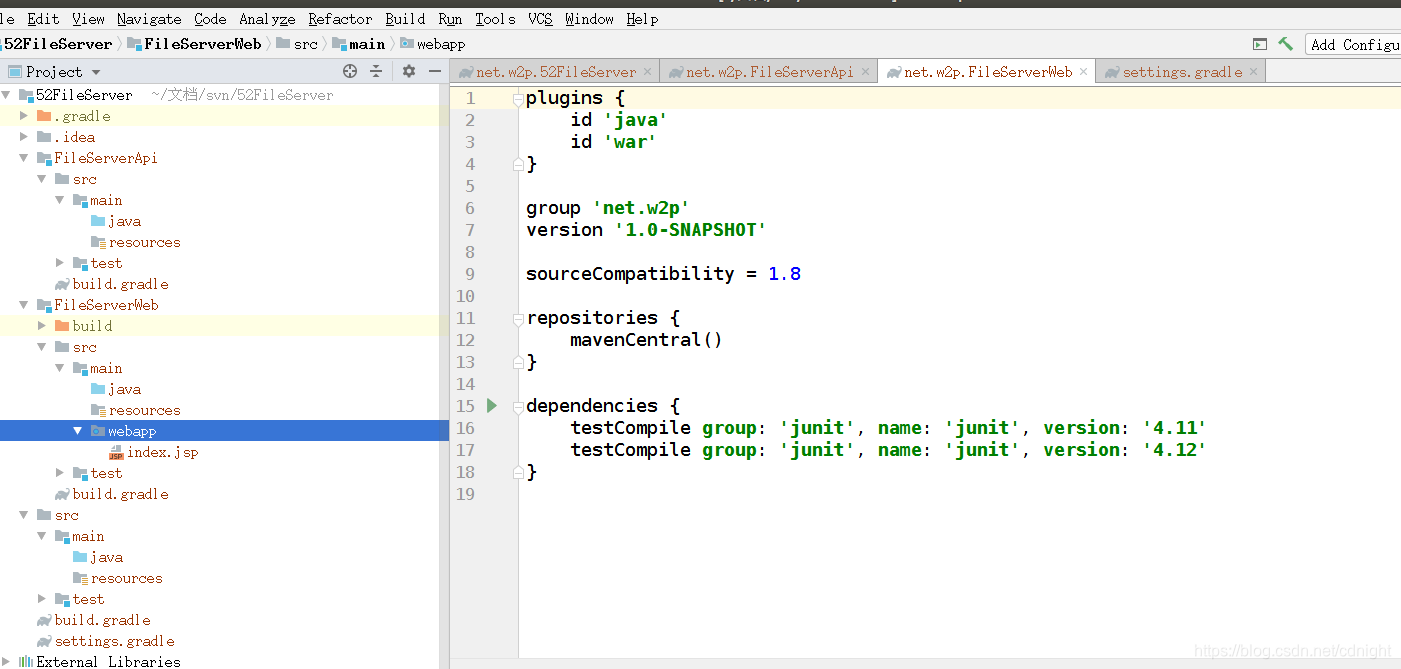
在web项目下面引入api项目的依赖,
plugins {
    id 'java'
    id 'war'
}

group 'net.w2p'
version '1.0-SNAPSHOT'


repositories {
    mavenCentral()
}

dependencies {
    compile project(":FileServerApi")

    testCompile group: 'junit', name: 'junit', version: '4.11'
    testCompile group: 'junit', name: 'junit', version: '4.12'

}
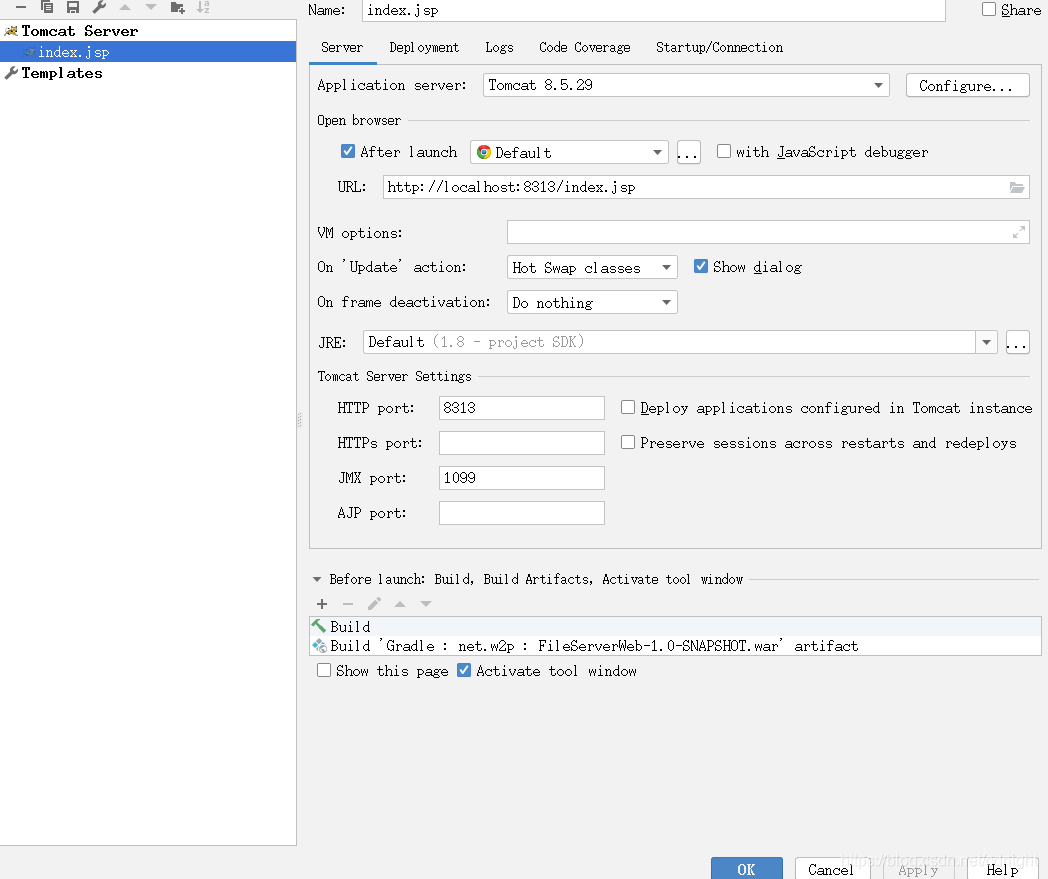
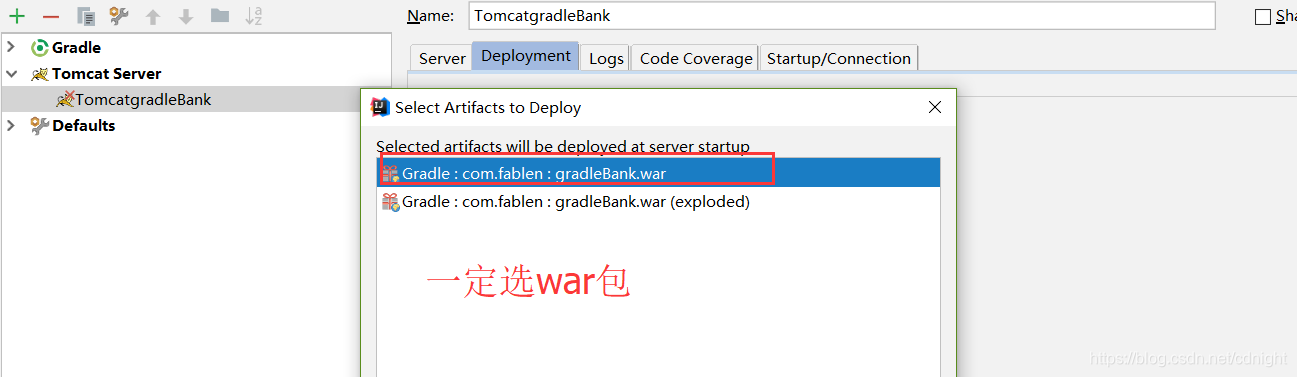
然后,编译web项目部署到tomcat下面,tomcat部署设置如下:
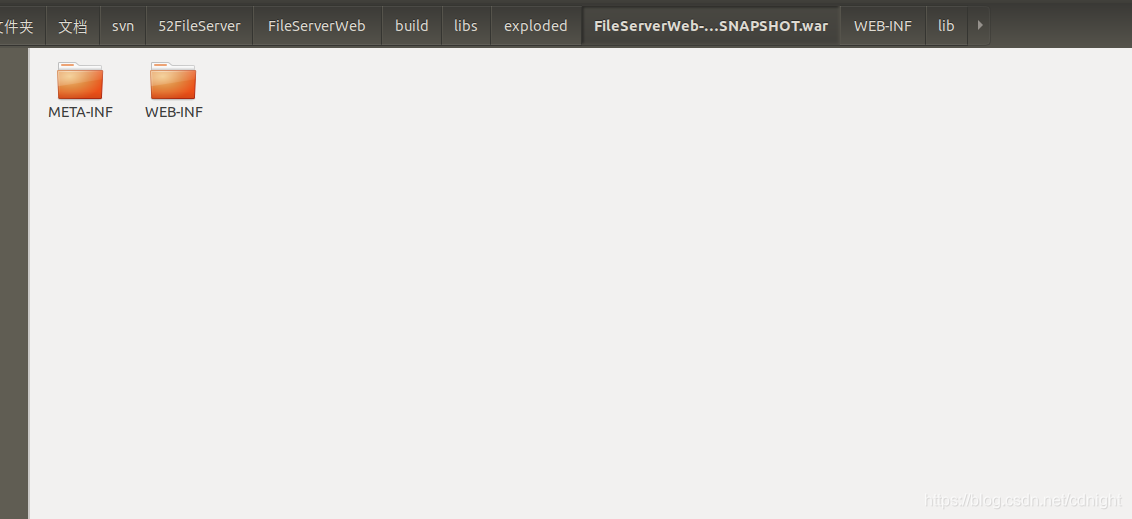
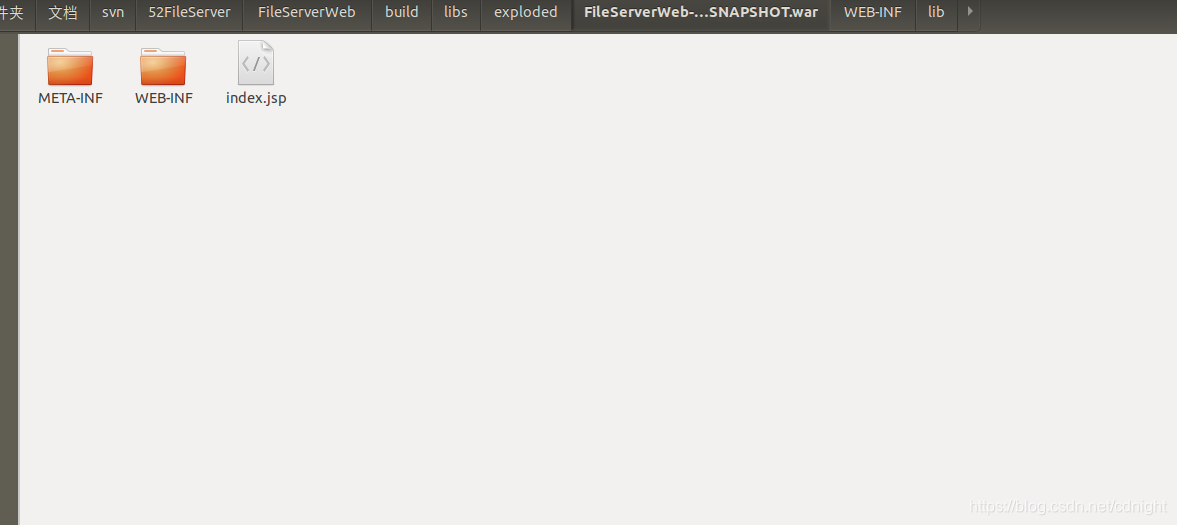
成功生成,可以看到文件目录:
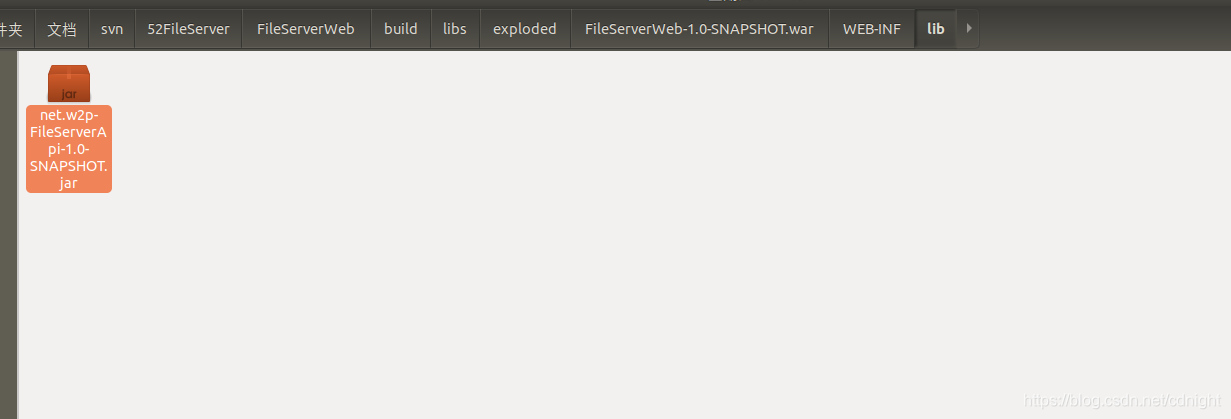
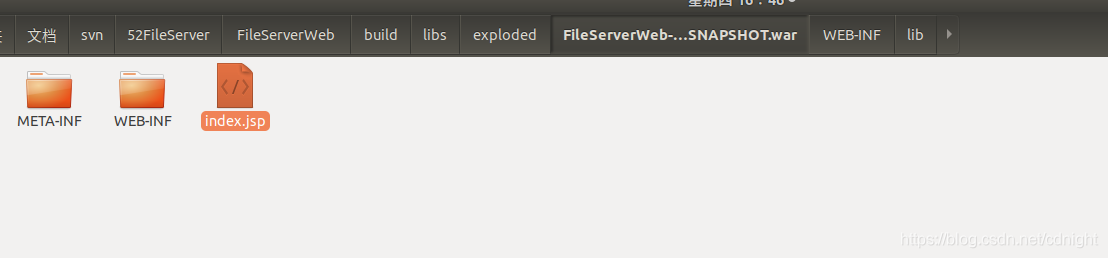

FileServerApi项目正常编译过来,而且FileServerWeb项目的资源以及jsp文件正常部署。
idea的web网站404访问勘误
假如到上面一步你可以直接访问到index.jsp,那么就不用往下面看了。
假如不是的话,而是

这样无法访问,可以继续往下面看。
当看到这个的时候查了一下资料,有:
IntelliJ IDEA新建Gradle项目启动404
这位兄弟说:
另外一篇文章,
IDEA Gradle 项目 Tomcat运行 404
作者说的是:
以下图片文字都摘抄自【小孩小烦恼】的博客,请知悉。
出现404的解决方案:
于是,问题解决。
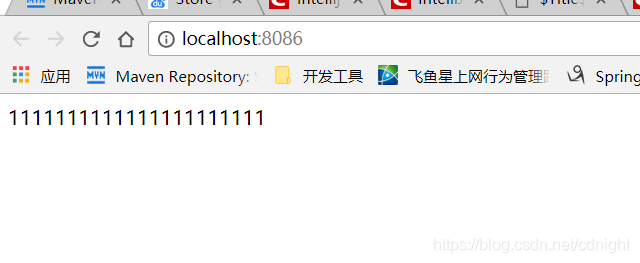
【小孩小烦恼】的文章抄录完毕
上面的方法是针对其中一部分问题的解决方案,不过,话说,Store generated project files externally 到底是什么,为什么会导致404的?下面进行求证
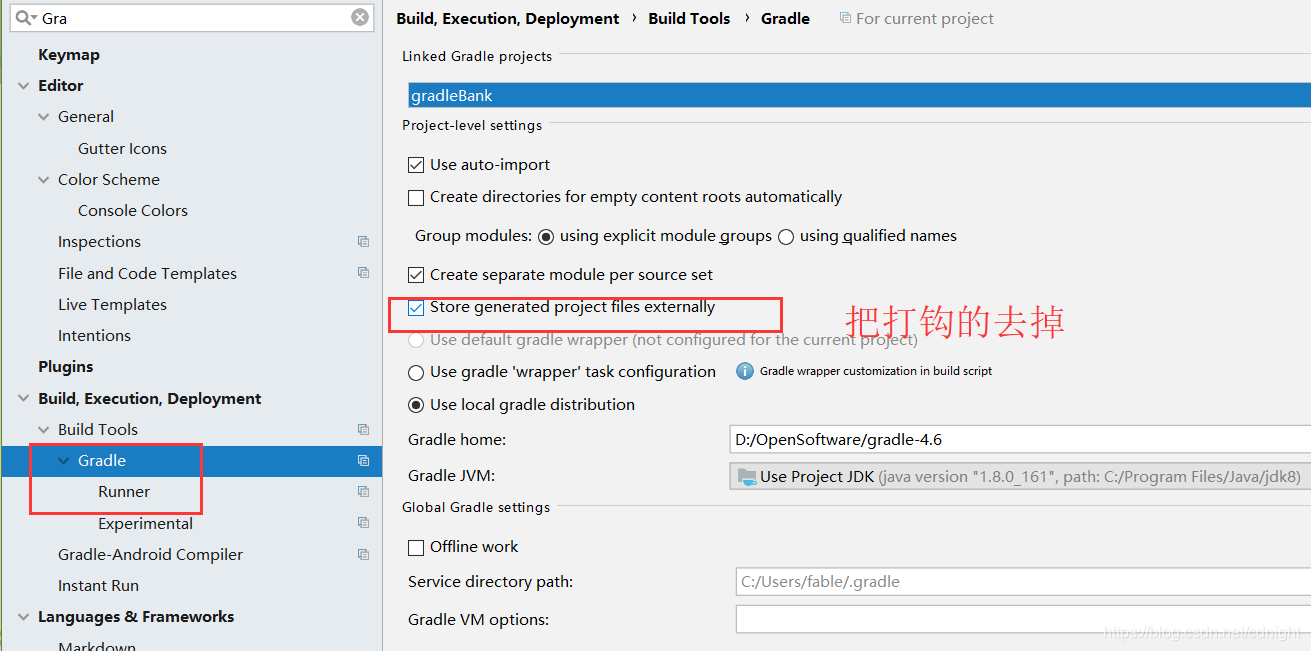
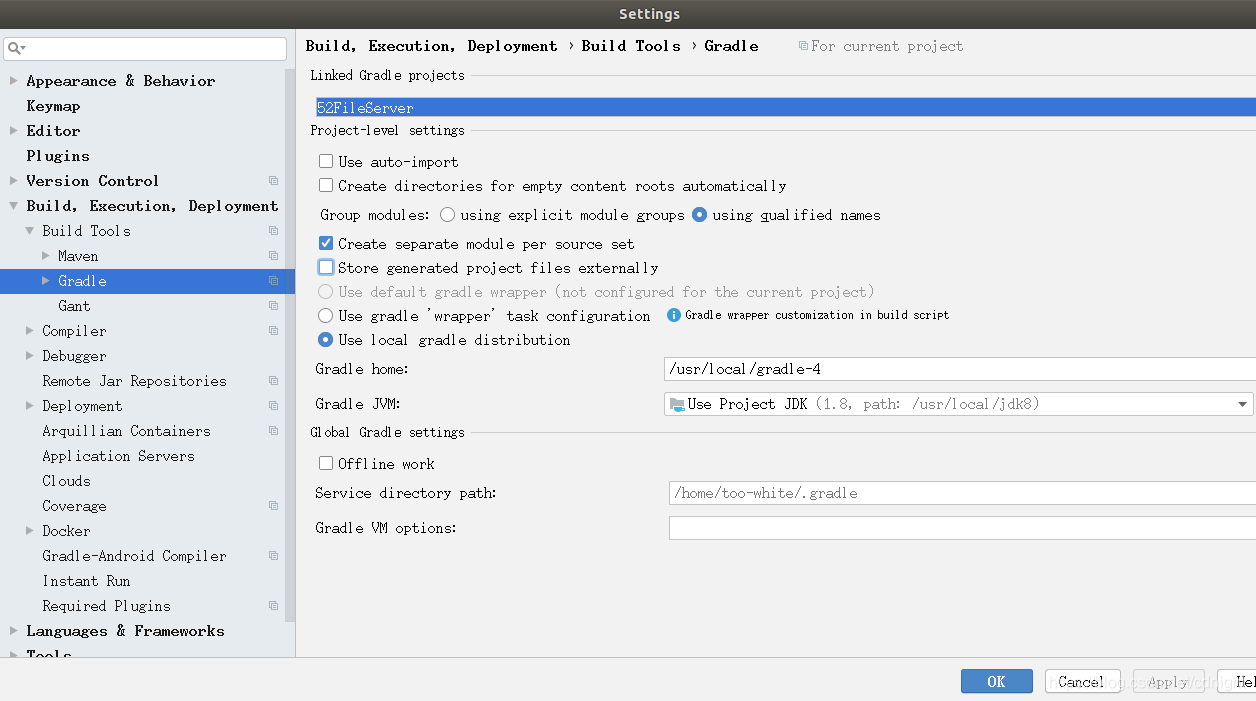
Store generated project files externally的选项的作用
我们分别对setting里面的Store generated project files externally进行留空以及勾选,然后查看一下生成的文件目录有无变化,以此求证。
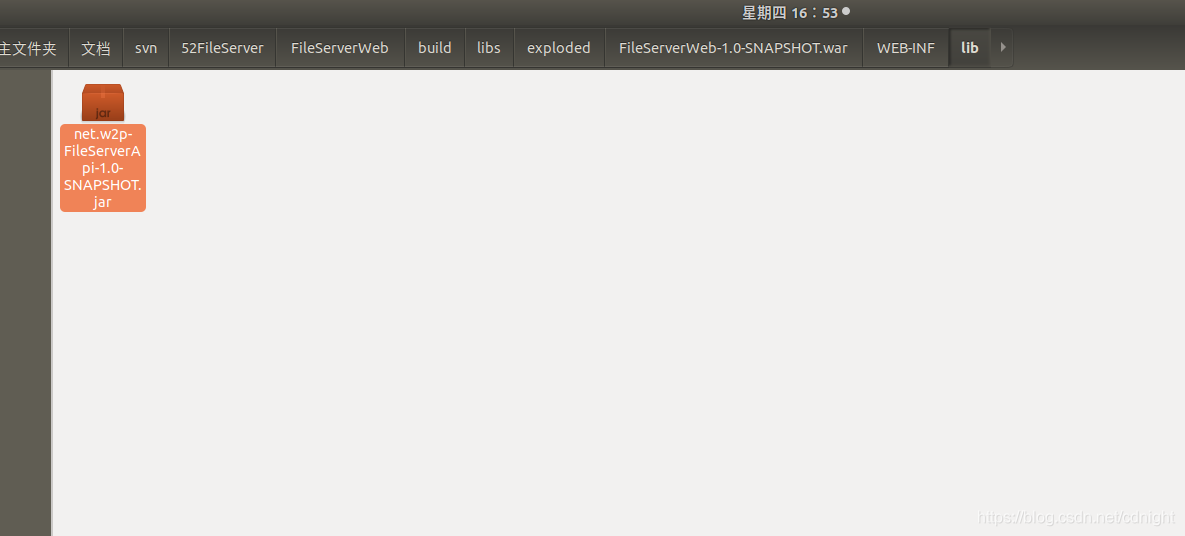
在留空的情况下,编译,部署,观察输出的文件为:
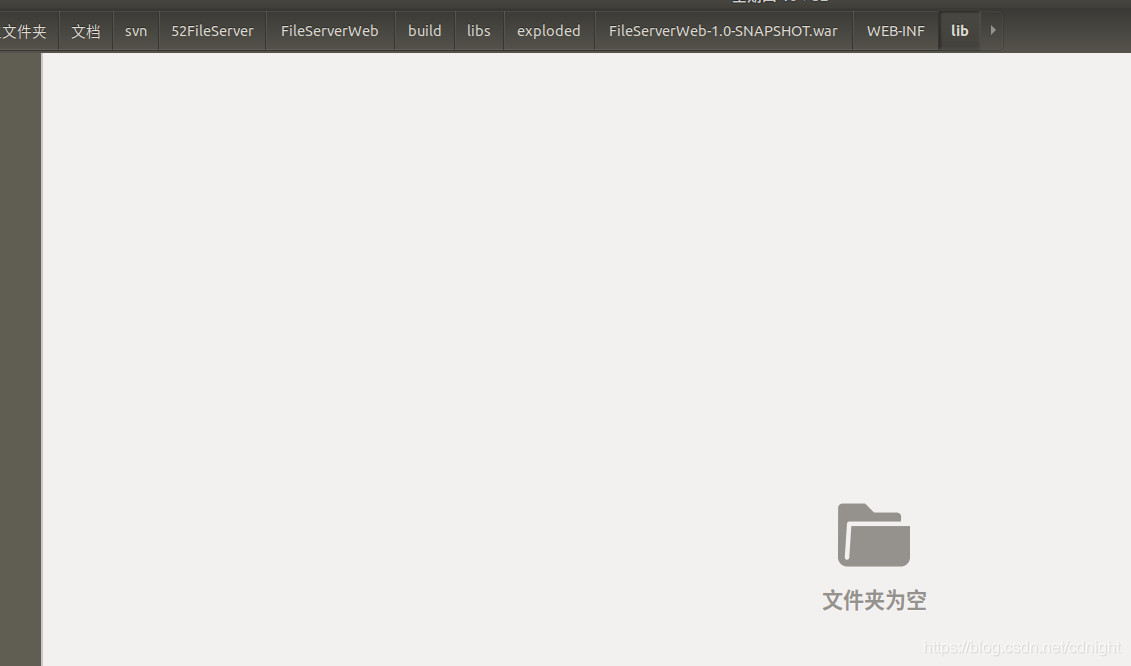
额,上面jsp文件没有,jar编译后的lib也没有,都为空-
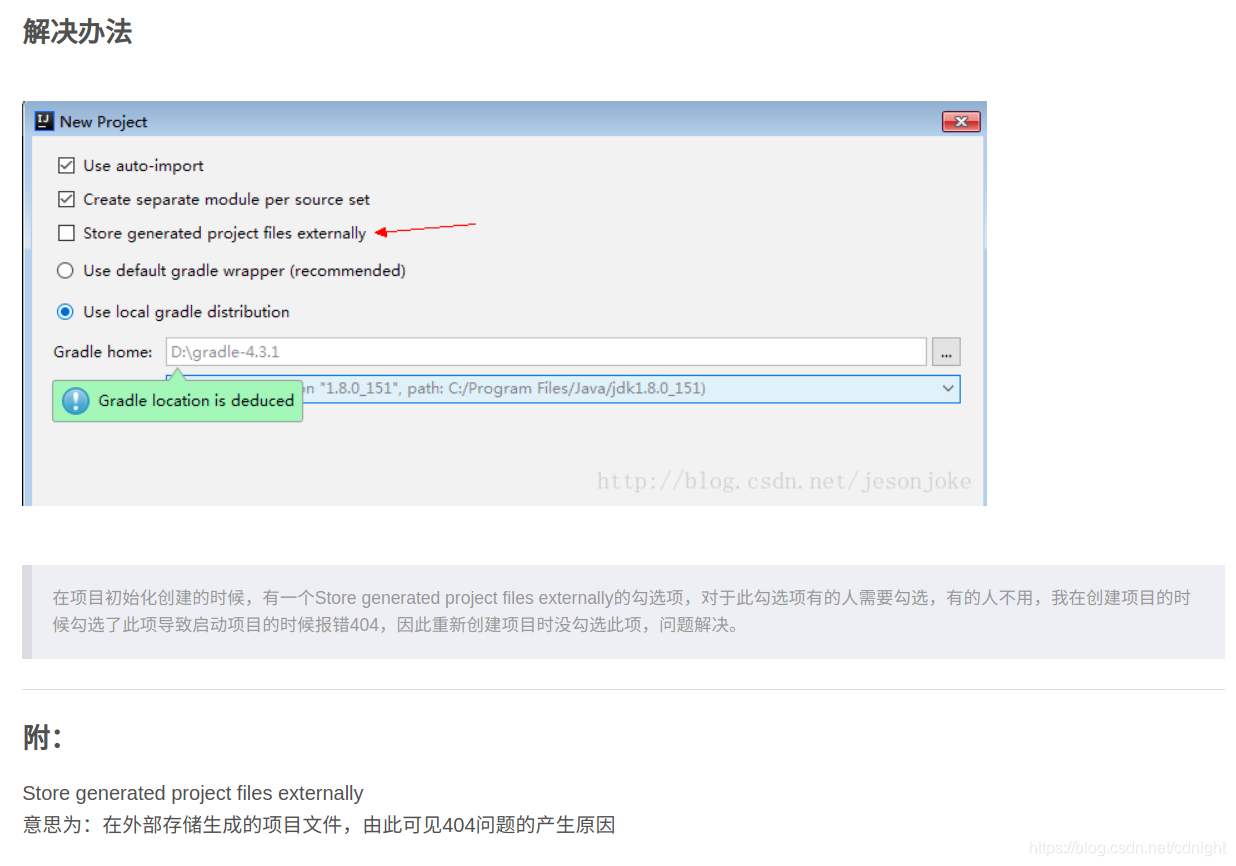
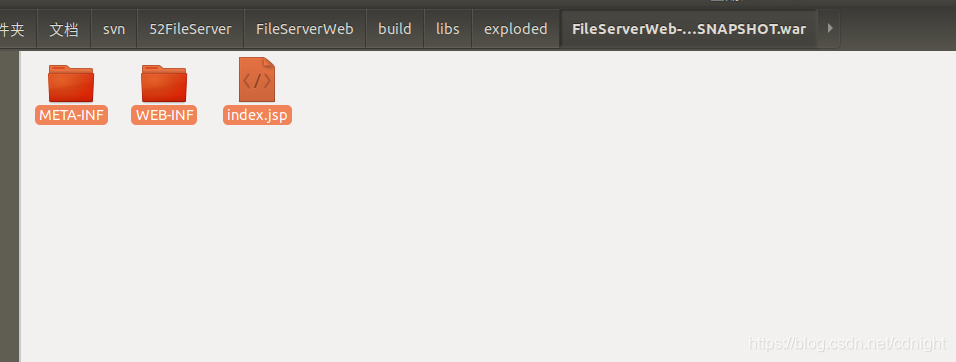
那么下面点选

然后编译部署看看结果:
这次算是正常了,所以结论是:
Store generated project files externally 这个选项的意思是,是否将编译好的文件到输出到目标目录下面。
一般情况下,我们配置好的tomcat的网站目录都是
这样的目录,一旦设置不输出,那么默认情况下是不可能能够正常运行网站的。
其中一种引起404的问题 — idea默认的application context问题
虽然Store generated project files externally不是引起404的原因,但是受到启发,查看一下部署的设置,结果发现了:
看到没有,application context—网站上下文简直乱码一样,于是,改为:
好了,重新编译部署,然后可以看到:
就是网站上下文context path的问题了。
多模块项目总结
gradle多模块多项目的创建实际上只是一个基础,以后将用来进行分布式服务提供者程序的开发。
下面放出基本demo例子供下载:
【gradle】idea+gradle 多模块项目创建教程入门例子资源
后续1-优化
根据上面的步骤,固然可以新建一个多模块项目,但是总感觉就是一堆代码堆砌而成,完全没有整体的概念,针对这个问题,这里做了一下优化,赋予根目录更多责任和权限。
现在规定根项目负责各个子模块的版本管理以及依赖,根目录的build.gradle内容变更为:
plugins {
    id 'java'
}

group 'net.w2p'
version '1.0-SNAPSHOT'


/***所有项目共通***/
allprojects {
    sourceCompatibility = 1.8
    targetCompatibility = 1.8
    apply plugin: 'java'
    apply plugin: 'idea'
    apply plugin: 'groovy'
    ext{

        /***常见或主要第三方依赖版本号定义 begin***/
        globalSpringVersion = "5.1.4.RELEASE"
        globalSpringDataJpaVersion ="2.1.2.RELEASE"
        globalSpringBootVersion = '2.1.1.RELEASE'
        globalFastJsonVersion="1.2.54"
        globalMyBatisVersion="3.4.6"
        globalGoogleGuavaVersion="27.0.1-jre"
        globalDom4jVersion="1.6.1"
        globalJavaMailVersion="1.4.7"
        globalJsoupVersion="1.11.3" //--一个过滤html危险字符串api,用于web安全
        globalQuartzVersion="2.3.0"
        globalFlexmarkVersion="0.34.32" //--java对markdown语法的解释以及翻译api
        globalPostgresqlJdbcDriverVersion="42.2.5"
        globalQiniuSdkVersion="7.2.18"//--七牛上传下载客户端sdk
        globalApacheAntVersion="1.10.5"
        globalGoogleZXingVersion="3.3.3"
        globalFastdfsClientVersion="1.27"
        globalLog4jVersion="1.2.17"
        globalSlf4jVersion="1.7.25"
        globalRedisClientVersion="2.10.1"
        globalFreemarkerVersion="2.3.28"
        /***常见或主要第三方依赖版本号定义 end***/


        /****常见或者程序主要引用依赖定义 begin****/
        //--这个是spring boot要直接compile进去的框架。
        ref4SpringBoot=[
                /***spring boot 相关依赖***/
                "org.springframework.boot:spring-boot:$globalSpringBootVersion",
                "org.springframework.boot:spring-boot-starter:$globalSpringBootVersion",
                "org.springframework.boot:spring-boot-starter-web:$globalSpringBootVersion",
                "org.springframework.boot:spring-boot-starter-freemarker:$globalSpringBootVersion",
                "org.springframework.boot:spring-boot-devtools:$globalSpringBootVersion"
        ]
        //--这个是spring boot要compileOnly的类库
        ref4SpringBootProvided=[
                "org.springframework.boot:spring-boot-dependencies:$globalSpringBootVersion",
        ]
        //--这个是spring boot的测试框架,用testCompile导入
        ref4SpringBootTest=[
                "org.springframework.boot:spring-boot-starter-test:$globalSpringBootVersion"
        ]
        //--spring框架api
        ref4SpringFramework=[
                "org.springframework:spring-web:$globalSpringVersion",
                "org.springframework:spring-webmvc:$globalSpringVersion",
                "org.springframework:spring-context-support:$globalSpringVersion",
                "org.springframework.data:spring-data-jpa:$globalSpringDataJpaVersion",
                "org.springframework:spring-test:$globalSpringVersion"
        ]

        //--jsp&servlet等javaweb容器api,通常都用 compileOnly引用的。
        ref4JspAndServletApi=[
                "javax.servlet:javax.servlet-api:3.1.0",
                "javax.servlet.jsp:jsp-api:2.2",
                "javax.servlet.jsp.jstl:javax.servlet.jsp.jstl-api:1.2.1"
        ]

        //--jstl等java web的tag标准api,引入的话要用compile
        ref4Jstl=[
                'taglibs:standard:1.1.2',
                'jstl:jstl:1.2'
        ]
        //--mybatis
        ref4MyBatis=[
                "org.mybatis:mybatis:$globalMyBatisVersion"
        ]
        //--这是apache common 类库引用的地址
        ref4ApacheCommons = [
                'commons-lang:commons-lang:2.6',
                'commons-logging:commons-logging:1.2',
                'commons-io:commons-io:2.5',
                'commons-fileupload:commons-fileupload:1.3.2',
                'commons-codec:commons-codec:1.10',
                'commons-beanutils:commons-beanutils:1.9.3',
                'commons-httpclient:commons-httpclient:3.1',
                'org.apache.httpcomponents:fluent-hc:4.3.6',
                'org.apache.httpcomponents:httpclient:4.5.3',
                'org.apache.httpcomponents:httpclient-cache:4.5.3',
                'org.apache.httpcomponents:httpcore:4.4.8',
                'org.apache.httpcomponents:httpmime:4.5.3',
                'org.apache.curator:curator-framework:4.0.1',
                'org.jfree:jfreechart:1.0.19',
                'org.apache.velocity:velocity:1.7',
                'org.apache.poi:poi:3.16'
        ]
        //--redis client
        ref4RedisClient=["redis.clients:jedis:$globalRedisClientVersion"]

        ref4Freemarker=["org.freemarker:freemarker:$globalFreemarkerVersion"]

        //--这是阿里云短信引用的第三方类库
        ref4AliYunSms=[
                'com.aliyun:aliyun-java-sdk-core:3.2.8',
                'com.aliyun:aliyun-java-sdk-dysmsapi:1.1.0'
        ]
        //--阿里云图片裁剪
        ref4AliSimpleImage=[
                'com.alibaba:simpleimage:1.2.3'
        ]
        //--阿里fast json引用地址
        ref4FastJson=["com.alibaba:fastjson:$globalFastJsonVersion"]
        //--json-lib引用地址
        ref4JsonLib=["net.sf.json-lib:json-lib:2.4:jdk15"]
        //--jdom1&jdom2以及相关api
        ref4Jdom=[
                'org.jdom:jdom2:2.0.6',
                'org.jdom:jdom:1.1.3',
                'joda-time:joda-time:2.9.7'
        ]

        //--google guava
        ref4GoogleGuava=["com.google.guava:guava:$globalGoogleGuavaVersion"]
        //--dom4j
        ref4Dom4j=["dom4j:dom4j:$globalDom4jVersion"]

        ref4JavaMail=["javax.mail:mail:$globalJavaMailVersion"]

        ref4Jsoup=["org.jsoup:jsoup:$globalJsoupVersion"]

        ref4Quartz=[
                "org.quartz-scheduler:quartz:$globalQuartzVersion",
                "org.quartz-scheduler:quartz-jobs:$globalQuartzVersion"
        ]


        ref4Flexmark=[
                "com.vladsch.flexmark:flexmark-all:$globalFlexmarkVersion"
        ]

        ref4PostgresqlJdbcDriver=[
                "org.postgresql:postgresql:$globalPostgresqlJdbcDriverVersion"
        ]

        ref4QiuniuSdkVersion=[
                "com.qiniu:qiniu-java-sdk:$globalQiniuSdkVersion"
        ]

        ref4ApacheAnt=["org.apache.ant:ant:$globalApacheAntVersion"]

        //--二维码
        ref4ZXing=[
                "com.google.zxing:core:$globalGoogleZXingVersion",
                "com.google.zxing:javase:$globalGoogleZXingVersion"
        ]
        ref4FastdfsClient=["cn.bestwu:fastdfs-client-java:$globalFastdfsClientVersion"]


        ref4Log4j=["log4j:log4j:$globalLog4jVersion"]

        ref4Slf4jToLog4j=["org.slf4j:slf4j-log4j12:$globalSlf4jVersion"]

        /****常见或者程序主要引用依赖定义 end****/

    }
    idea {
        module {
            inheritOutputDirs = true
        }
    }
    tasks.withType(JavaCompile) {
        options.encoding = "UTF-8"
    }
    tasks.withType(GroovyCompile) {
        groovyOptions.encoding = "MacRoman"
    }
    repositories {
        maven{
            //更换为阿里的仓库
            url  'http://maven.aliyun.com/nexus/content/groups/public'
        }

        //有些jar包在中央仓库是没有的,需要手动添加上去
//        flatDir {  dirs 'local_jars' }
//        mavenCentral()
    }
    dependencies {
        testCompile group: 'junit', name: 'junit', version: '4.12'
    }
}
从中可以看到根目录的build.gradle中定义了各种类库版本以及依赖地址,
那么下面来看看子模块如何使用这些依赖:
以下代码来自实际应用的模块
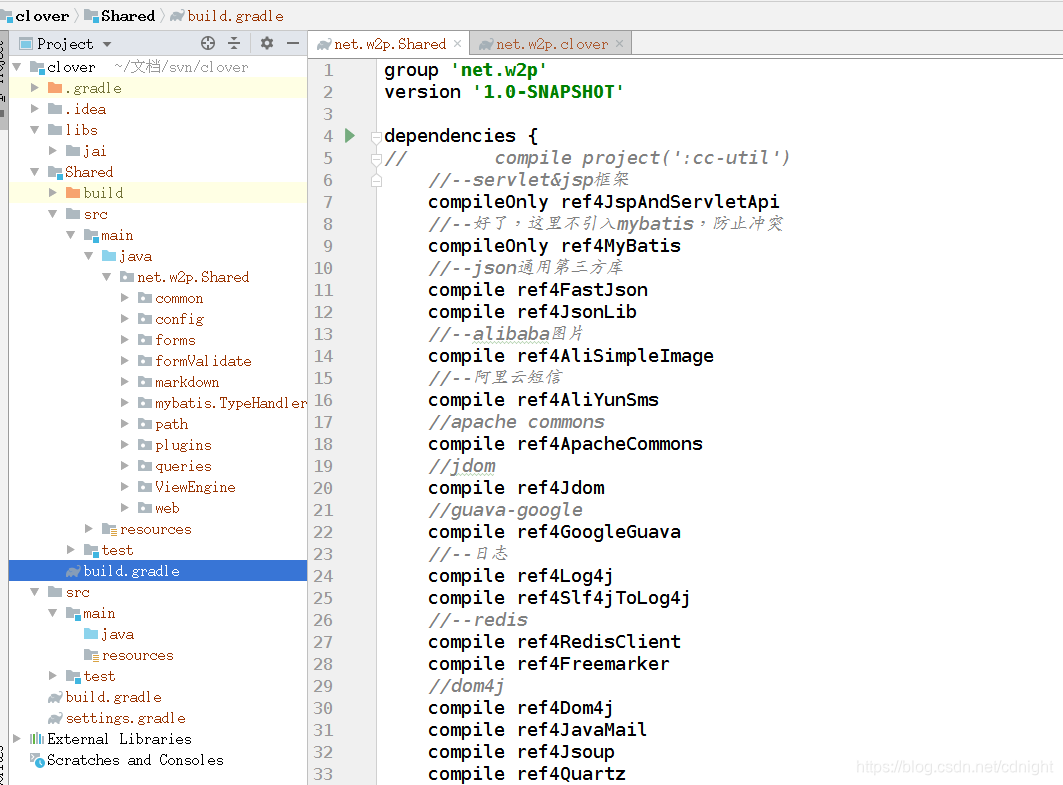
group 'net.w2p'
version '1.0-SNAPSHOT'

dependencies {
//        compile project(':cc-util')
    //--servlet&jsp框架
    compileOnly ref4JspAndServletApi
    //--好了,这里不引入mybatis,防止冲突
    compileOnly ref4MyBatis
    //--json通用第三方库
    compile ref4FastJson
    compile ref4JsonLib
    //--alibaba图片
    compile ref4AliSimpleImage
    //--阿里云短信
    compile ref4AliYunSms
    //apache commons
    compile ref4ApacheCommons
    //jdom
    compile ref4Jdom
    //guava-google
    compile ref4GoogleGuava
    //--日志
    compile ref4Log4j
    compile ref4Slf4jToLog4j
    //--redis
    compile ref4RedisClient
    compile ref4Freemarker
    //dom4j
    compile ref4Dom4j
    compile ref4JavaMail
    compile ref4Jsoup
    compile ref4Quartz
    //java 翻译 markdown语法
    compile ref4Flexmark
    compile ref4PostgresqlJdbcDriver

    //七牛
    compile ref4QiuniuSdkVersion
    //apache ant
    compile ref4ApacheAnt
    //--二维码
    compile ref4ZXing

    //--fastdfs客户端 - java版本
    compile ref4FastdfsClient

//    compile 'antlr:antlr:2.7.7'
//    compile 'org.antlr:antlr4-runtime:4.1'
//    compile 'javax.activation:activation:1.1.1'

    /**
 * compile 'javax.media:jai_core:1.1.3'
 * 这个在各个仓库默认都是没有的,已经存放到本机jar中去了。
 * **/
    compile files('../libs/jai/jai_core-1.1.3.jar')

}
这样一来,感觉项目的第三方类库会变得很容易掌控。
接下来就是喜闻乐见的spring mvc的整合了。
spring web配置
spring 及 spring mvc的整合
新添加一个gradle的web模块。


好了,经过一轮过程,创建模块以后默认的内容应该是这样的:
下面我们直接改写build.gradle,改为适合项目的一般规范,好了,我又要将根目录的build.gradle放出来了,因为子模块的版本依赖全都是由根节点决定的。这是考虑过得。
plugins {
    id 'java'
}

group 'net.w2p'
version '1.0-SNAPSHOT'


/***所有项目共通***/
allprojects {
    sourceCompatibility = 1.8
    targetCompatibility = 1.8
    apply plugin: 'java'
    apply plugin: 'idea'
    apply plugin: 'groovy'
    ext{

        /***常见或主要第三方依赖版本号定义 begin***/
        globalSpringVersion = "5.1.4.RELEASE"
        globalSpringDataJpaVersion ="2.1.2.RELEASE"
        globalSpringBootVersion = '2.1.1.RELEASE'
        globalFastJsonVersion="1.2.54"
        globalMyBatisVersion="3.4.6"
        globalMyBatisSpringVersion="1.3.2" //mybatis-spring
        globalGoogleGuavaVersion="27.0.1-jre"
        globalDom4jVersion="1.6.1"
        globalJavaMailVersion="1.4.7"
        globalJsoupVersion="1.11.3" //--一个过滤html危险字符串api,用于web安全
        globalQuartzVersion="2.3.0"
        globalFlexmarkVersion="0.34.32" //--java对markdown语法的解释以及翻译api
        globalPostgresqlJdbcDriverVersion="42.2.5"
        globalQiniuSdkVersion="7.2.18"//--七牛上传下载客户端sdk
        globalApacheAntVersion="1.10.5"
        globalGoogleZXingVersion="3.3.3"
        globalFastdfsClientVersion="1.27"
        globalLog4jVersion="1.2.17"
        globalSlf4jVersion="1.7.25"
        globalRedisClientVersion="2.10.1"
        globalFreemarkerVersion="2.3.28"
        globalSpringBootStaterVersionOfMyBatis="1.3.2"
        globalMysqlJdbcDriverVersion="5.1.40"
        globalApacheCommonLang3Version="3.8.1"

        /***常见或主要第三方依赖版本号定义 end***/


        /****常见或者程序主要引用依赖定义 begin****/
        //--这个是spring boot要直接compile进去的框架。
        ref4SpringBoot=[
                /***spring boot 相关依赖***/
                "org.springframework.boot:spring-boot:$globalSpringBootVersion",
                "org.springframework.boot:spring-boot-starter:$globalSpringBootVersion",
                "org.springframework.boot:spring-boot-starter-web:$globalSpringBootVersion",
                "org.springframework.boot:spring-boot-starter-freemarker:$globalSpringBootVersion",
                "org.springframework.boot:spring-boot-devtools:$globalSpringBootVersion"
        ]
        //--这个是spring boot要compileOnly的类库
        ref4SpringBootProvided=[
                "org.springframework.boot:spring-boot-dependencies:$globalSpringBootVersion",
        ]
        //--这个是spring boot的测试框架,用testCompile导入
        ref4SpringBootTest=[
                "org.springframework.boot:spring-boot-starter-test:$globalSpringBootVersion"
        ]
        //--spring框架api
        ref4SpringFramework=[
                "org.springframework:spring-web:$globalSpringVersion",
                "org.springframework:spring-webmvc:$globalSpringVersion",
                "org.springframework:spring-jdbc:$globalSpringVersion",
                "org.springframework:spring-context-support:$globalSpringVersion",
                "org.springframework.data:spring-data-jpa:$globalSpringDataJpaVersion",
                "org.springframework:spring-test:$globalSpringVersion"
        ]

        //--jsp&servlet等javaweb容器api,通常都用 compileOnly引用的。
        ref4JspAndServletApi=[
                "javax.servlet:javax.servlet-api:3.1.0",
                "javax.servlet.jsp:jsp-api:2.2",
                "javax.servlet.jsp.jstl:javax.servlet.jsp.jstl-api:1.2.1"
        ]

        //--jstl等java web的tag标准api,引入的话要用compile
        ref4Jstl=[
                'taglibs:standard:1.1.2',
                'jstl:jstl:1.2'
        ]
        //--mybatis
        ref4MyBatis=[
                "org.mybatis:mybatis:$globalMyBatisVersion"
        ]
        ref4MybatisSpring=[
                "org.mybatis:mybatis-spring:$globalMyBatisSpringVersion"
        ]

        //--这是apache common 类库引用的地址
        ref4ApacheCommons = [
                'commons-lang:commons-lang:2.6',
                'commons-logging:commons-logging:1.2',
                'commons-io:commons-io:2.5',
                'commons-fileupload:commons-fileupload:1.3.2',
                'commons-codec:commons-codec:1.10',
                'commons-beanutils:commons-beanutils:1.9.3',
                'commons-httpclient:commons-httpclient:3.1',
                'org.apache.httpcomponents:fluent-hc:4.3.6',
                'org.apache.httpcomponents:httpclient:4.5.3',
                'org.apache.httpcomponents:httpclient-cache:4.5.3',
                'org.apache.httpcomponents:httpcore:4.4.8',
                'org.apache.httpcomponents:httpmime:4.5.3',
                'org.apache.curator:curator-framework:4.0.1',
                'org.jfree:jfreechart:1.0.19',
                'org.apache.velocity:velocity:1.7',
                'org.apache.poi:poi:3.16'
        ]
        //--redis client
        ref4RedisClient=["redis.clients:jedis:$globalRedisClientVersion"]

        ref4Freemarker=["org.freemarker:freemarker:$globalFreemarkerVersion"]

        //--这是阿里云短信引用的第三方类库
        ref4AliYunSms=[
                'com.aliyun:aliyun-java-sdk-core:3.2.8',
                'com.aliyun:aliyun-java-sdk-dysmsapi:1.1.0'
        ]
        //--阿里云图片裁剪
        ref4AliSimpleImage=[
                'com.alibaba:simpleimage:1.2.3'
        ]
        //--阿里fast json引用地址
        ref4FastJson=["com.alibaba:fastjson:$globalFastJsonVersion"]
        //--json-lib引用地址
        ref4JsonLib=["net.sf.json-lib:json-lib:2.4:jdk15"]
        //--jdom1&jdom2以及相关api
        ref4Jdom=[
                'org.jdom:jdom2:2.0.6',
                'org.jdom:jdom:1.1.3',
                'joda-time:joda-time:2.9.7'
        ]

        //--google guava
        ref4GoogleGuava=["com.google.guava:guava:$globalGoogleGuavaVersion"]
        //--dom4j
        ref4Dom4j=["dom4j:dom4j:$globalDom4jVersion"]

        ref4JavaMail=["javax.mail:mail:$globalJavaMailVersion"]

        ref4Jsoup=["org.jsoup:jsoup:$globalJsoupVersion"]

        ref4Quartz=[
                "org.quartz-scheduler:quartz:$globalQuartzVersion",
                "org.quartz-scheduler:quartz-jobs:$globalQuartzVersion"
        ]


        ref4Flexmark=[
                "com.vladsch.flexmark:flexmark-all:$globalFlexmarkVersion"
        ]

        ref4PostgresqlJdbcDriver=[
                "org.postgresql:postgresql:$globalPostgresqlJdbcDriverVersion"
        ]

        ref4QiuniuSdkVersion=[
                "com.qiniu:qiniu-java-sdk:$globalQiniuSdkVersion"
        ]

        ref4ApacheAnt=["org.apache.ant:ant:$globalApacheAntVersion"]

        //--二维码
        ref4ZXing=[
                "com.google.zxing:core:$globalGoogleZXingVersion",
                "com.google.zxing:javase:$globalGoogleZXingVersion"
        ]
        ref4FastdfsClient=["cn.bestwu:fastdfs-client-java:$globalFastdfsClientVersion"]


        ref4Log4j=["log4j:log4j:$globalLog4jVersion"]

        ref4Slf4jToLog4j=["org.slf4j:slf4j-log4j12:$globalSlf4jVersion"]


        /****常见或者程序主要引用依赖定义 end****/

    }
    idea {
        module {
            inheritOutputDirs = true
        }
    }
    tasks.withType(JavaCompile) {
        options.encoding = "UTF-8"
    }
    tasks.withType(GroovyCompile) {
        groovyOptions.encoding = "MacRoman"
    }
    repositories {
        maven{
            //更换为阿里的仓库
            url  'http://maven.aliyun.com/nexus/content/groups/public'
        }

        //有些jar包在中央仓库是没有的,需要手动添加上去
//        flatDir {  dirs 'local_jars' }
//        mavenCentral()
    }
    dependencies {
        testCompile group: 'junit', name: 'junit', version: '4.12'
    }
}
那么,根据根节点的设置,FileServerWebApp的build.gradle如下:
plugins {
    id 'war'
}

group 'net.w2p'
version '1.0-SNAPSHOT'

dependencies {
    //【http相关api】
    providedCompile ref4JspAndServletApi
    compile ref4Jstl
    //【spring 框架】
    compile ref4SpringFramework

    //【mybatis】
    compile ref4MyBatis
    compile ref4MybatisSpring

    //【apache commons】
    compile ref4ApacheCommons

}
设置web.xml,配置application.xml以及spring-mvc.xml
注意,我新建的web模块没有web.xml,请在webapp目录下面新建WEB-INF/web.xml文件:
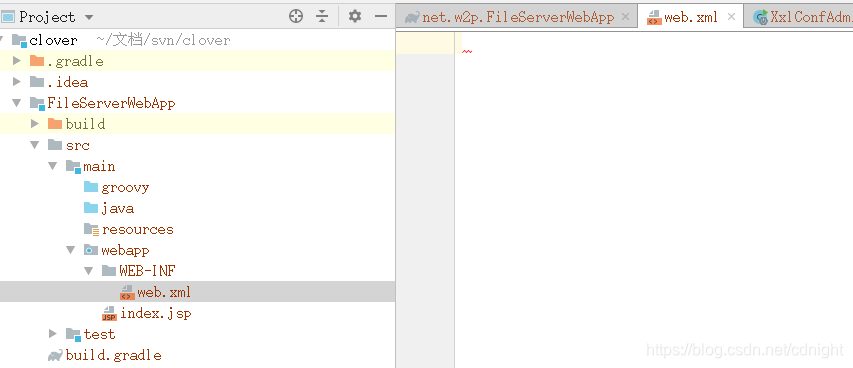
内容如下:
<?xml version="1.0" encoding="UTF-8"?>
<web-app xmlns="http://xmlns.jcp.org/xml/ns/javaee"
         xmlns:xsi="http://www.w3.org/2001/XMLSchema-instance"
         xsi:schemaLocation="http://xmlns.jcp.org/xml/ns/javaee http://xmlns.jcp.org/xml/ns/javaee/web-app_3_1.xsd"
         version="3.1">


    <!--注意,spring项目可以用dispatcherServlet也可以用contextLoaderListener,
 两者区别在:https://blog.csdn.net/cdnight/article/details/82658355,建议不要同时使用,
 https://www.cnblogs.com/weknow619/p/6341395.html
 https://blog.csdn.net/chaijunkun/article/details/6925889
 https://blog.csdn.net/chaozhi_guo/article/details/51287745?utm_source=blogxgwz5
 否则很可能导致重复初始化实例的异常执行情况。

 参考:http://blog.csdn.net/zjw10wei321/article/details/40145241
tomcat在加载的时候会先加载listner,然后再加载servlet。
ContextLoaderListener加载的时候会实例化加载了比如DAO、service等Bean的spring context;
DispatcherContext加载的时候会以ContextLoaderListener加载的spring context容器作为parent context容器,
这个spring context里边主要定义的bean一般是和spring mvc相关的controller、页面跳转等;
其中ContextLoaderListener的使用方法如下:
http://blog.csdn.net/zjw10wei321/article/details/40145241
其中DispatcherContext的使用方法如下:
http://blog.jobbole.com/30133/
 2018-11-04:补充,根据需要,contextLoaderListener主要负责初始化程序的dao service 等,由于需要在listener里面捕获web context就必须
 要先初始化一个context,那么只能配置两个context了,分别是父子context。
 -->

    <context-param>
        <param-name>contextConfigLocation</param-name>
        <!--<param-value>classpath*:applicationContext-*.xml,/WEB-INF/applicationContext.xml,/WEB-INF/classes/applicationContext-*.xml</param-value>-->
        <param-value>classpath:applicationContext.xml</param-value>
    </context-param>

    <listener>
        <listener-class>org.springframework.web.context.ContextLoaderListener</listener-class>
    </listener>


    <!--注意,spring项目可以用dispatcherServlet也可以用contextLoaderListener,
    两者区别在:https://blog.csdn.net/cdnight/article/details/82658355,建议不要同时使用,
    https://www.cnblogs.com/weknow619/p/6341395.html
    https://blog.csdn.net/chaijunkun/article/details/6925889
    https://blog.csdn.net/chaozhi_guo/article/details/51287745?utm_source=blogxgwz5
    否则很可能导致重复初始化实例的异常执行情况。

    参考:http://blog.csdn.net/zjw10wei321/article/details/40145241
tomcat在加载的时候会先加载listner,然后再加载servlet。
ContextLoaderListener加载的时候会实例化加载了比如DAO、service等Bean的spring context;
DispatcherContext加载的时候会以ContextLoaderListener加载的spring context容器作为parent context容器,
这个spring context里边主要定义的bean一般是和spring mvc相关的controller、页面跳转等;
其中ContextLoaderListener的使用方法如下:
http://blog.csdn.net/zjw10wei321/article/details/40145241
其中DispatcherContext的使用方法如下:
http://blog.jobbole.com/30133/
    2018-11-04:补充,根据需要,contextLoaderListener主要负责初始化程序的dao service 等,由于需要在listener里面捕获web context就必须
    要先初始化一个context,那么只能配置两个context了,分别是父子context。
    -->
    <servlet>
        <servlet-name>dispatcher</servlet-name>
        <servlet-class>org.springframework.web.servlet.DispatcherServlet</servlet-class>
        <init-param>
            <param-name>contextConfigLocation</param-name>
            <!--<param-value>-->
            <!--classpath*:config/spring/spring-mvc.xml-->
            <!--/WEB-INF/applicationContext.xml,-->
            <!--/WEB-INF/spring/spring-*.xml</param-value>-->
            <param-value>
                classpath:spring-mvc.xml</param-value>
        </init-param>
        <load-on-startup>1</load-on-startup>
        <async-supported>true</async-supported>
    </servlet>


    <servlet-mapping>
        <servlet-name>dispatcher</servlet-name>
        <url-pattern>*.do</url-pattern>
    </servlet-mapping>


</web-app>
然后添加applicationContext.xml以及spring-mvc.xml都在resource文件目录下:
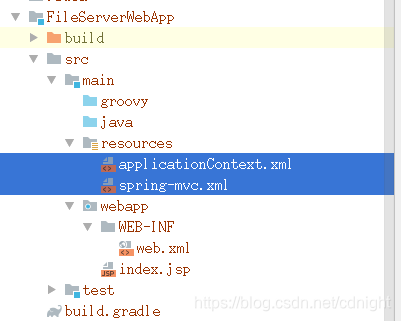
两个文件配置内容为:
applicationContext.xml内容:
<?xml version="1.0" encoding="UTF-8"?>
<beans xmlns="http://www.springframework.org/schema/beans"
       xmlns:context="http://www.springframework.org/schema/context"
       xmlns:p="http://www.springframework.org/schema/p"
       xmlns:aop="http://www.springframework.org/schema/aop"
       xmlns:tx="http://www.springframework.org/schema/tx"
       xmlns:xsi="http://www.w3.org/2001/XMLSchema-instance"
       xmlns:mvc="http://www.springframework.org/schema/mvc"
       xmlns:task="http://www.springframework.org/schema/task"
       xsi:schemaLocation="http://www.springframework.org/schema/beans http://www.springframework.org/schema/beans/spring-beans-4.0.xsd
    http://www.springframework.org/schema/context http://www.springframework.org/schema/context/spring-context-4.0.xsd
    http://www.springframework.org/schema/aop http://www.springframework.org/schema/aop/spring-aop-4.0.xsd http://www.springframework.org/schema/tx http://www.springframework.org/schema/tx/spring-tx-4.0.xsd
    http://www.springframework.org/schema/util http://www.springframework.org/schema/util/spring-util-4.0.xsd
    http://www.springframework.org/schema/mvc http://www.springframework.org/schema/mvc/spring-mvc-4.1.xsd
 http://www.springframework.org/schema/task http://www.springframework.org/schema/task/spring-task-4.0.xsd"

>
    <!--注意,该上下文配置文件只用于 contextLoaderListener,是程序基本上下文,作为父context被其他上下文引用-->
    <!--分工:整个Web应用程序需要共享的一些组件,比如DAO,数据库的ConnectionFactory等,mybatis,等等-->


</beans>
spring-mvc.xml内容:
<?xml version="1.0" encoding="UTF-8"?>
<beans xmlns="http://www.springframework.org/schema/beans"
       xmlns:context="http://www.springframework.org/schema/context"
       xmlns:p="http://www.springframework.org/schema/p"
       xmlns:aop="http://www.springframework.org/schema/aop"
       xmlns:tx="http://www.springframework.org/schema/tx"
       xmlns:xsi="http://www.w3.org/2001/XMLSchema-instance"
       xmlns:mvc="http://www.springframework.org/schema/mvc"
       xmlns:task="http://www.springframework.org/schema/task"
       xsi:schemaLocation="http://www.springframework.org/schema/beans http://www.springframework.org/schema/beans/spring-beans-4.0.xsd
    http://www.springframework.org/schema/context http://www.springframework.org/schema/context/spring-context-4.0.xsd
    http://www.springframework.org/schema/aop http://www.springframework.org/schema/aop/spring-aop-4.0.xsd http://www.springframework.org/schema/tx http://www.springframework.org/schema/tx/spring-tx-4.0.xsd
    http://www.springframework.org/schema/util http://www.springframework.org/schema/util/spring-util-4.0.xsd
    http://www.springframework.org/schema/mvc http://www.springframework.org/schema/mvc/spring-mvc-4.1.xsd
 http://www.springframework.org/schema/task http://www.springframework.org/schema/task/spring-task-4.0.xsd"

>
    <!--注意,该上下文配置文件只用于 dispatch servlet,是web前端上下文,作为子context将继承父context [app-context.xml]-->
    <!--分工:DispatcherServlet创建的ApplicationContext主要用于和该Servlet相关的一些组件,比如Controller、ViewResovler等。-->


    <!--注意,mvc 上下文中扫描托管的bean,文件夹不能与app 上下文的有重合部分!否则会出现两个上下文同时初始化一份自己的bean对象的情况-->
    <!--这个位置请根据你实际目录结构而定。-->
    <context:component-scan base-package="net.w2p.FileServerWebApp.controller"/>


    <!-- configure the InternalResourceViewResolver 配置引擎及模板所在目录,模板的后缀
    话说我个人感觉 jsp很好用,如果苛求更好的模板体验,应该直接用vuejs或其他前端框架的,别为难后台模板了。-->
    <bean class="org.springframework.web.servlet.view.InternalResourceViewResolver"
          id="internalResourceViewResolver">
        <!-- 前缀 -->
        <property name="prefix" value="/WEB-INF/views/" />
        <!-- 后缀 -->
        <property name="suffix" value=".jsp" />
    </bean>
    <!--控制器路由,view层配置 end-->


</beans>
注意,spring mvc.xml里面设置了spring框架要扫描一个包,叫做net.w2p.FileServerWebApp.controller,【请根据你实际目录结构来定】这是用来做控制器的,而模板引擎用的是原生的jsp,就放在/WEB-INF/views下面
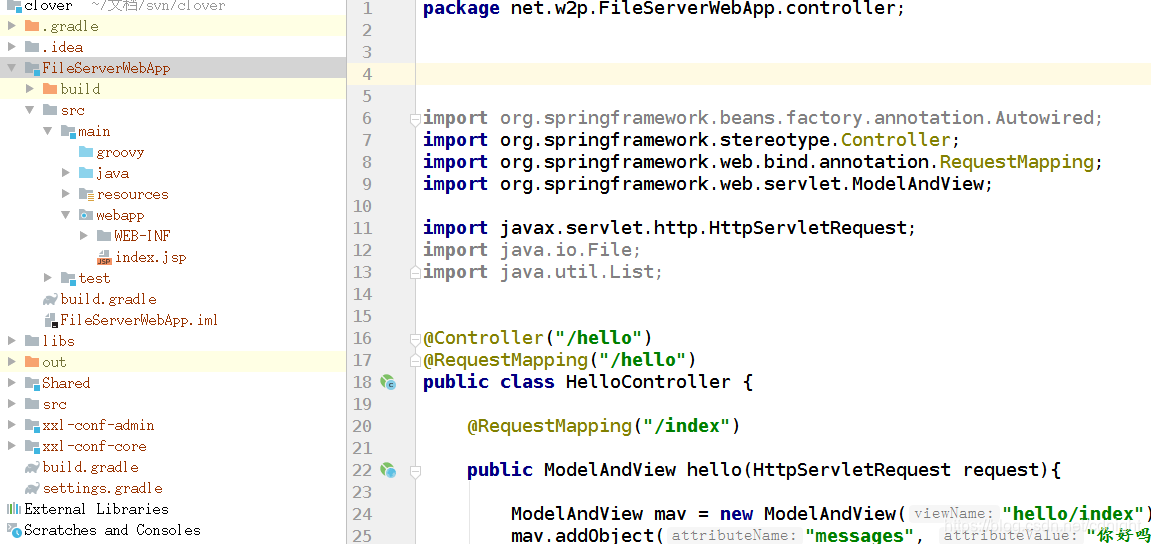
新建一个测试用的控制器以及对应的视图文件。
如下图:
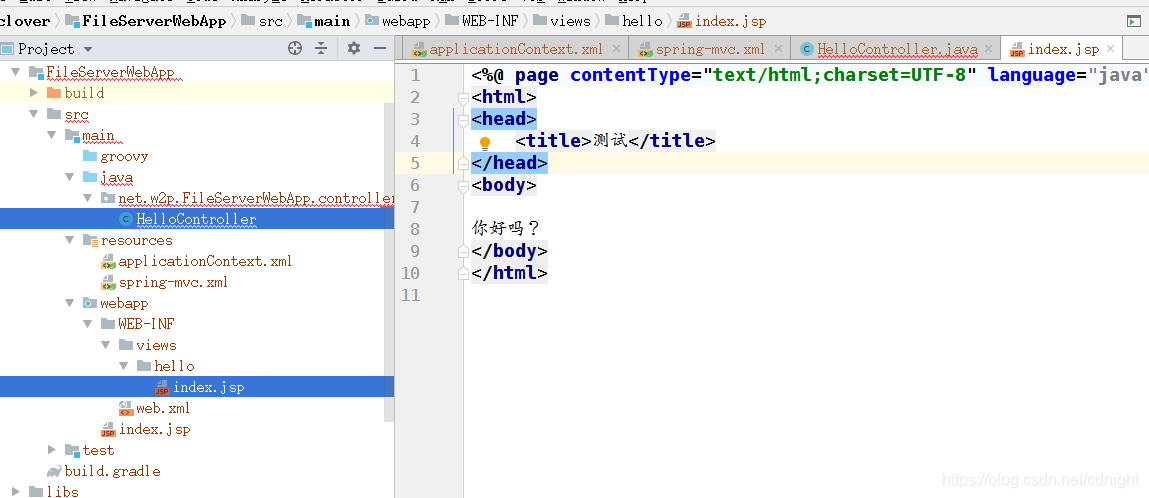
控制器内容:
package net.w2p.FileServerWebApp.controller;


import org.springframework.beans.factory.annotation.Autowired;
import org.springframework.stereotype.Controller;
import org.springframework.web.bind.annotation.RequestMapping;
import org.springframework.web.servlet.ModelAndView;

import javax.servlet.http.HttpServletRequest;
import java.io.File;
import java.util.List;


@Controller("/hello")
@RequestMapping("/hello")
public class HelloController {

    @RequestMapping("/index")

    public ModelAndView hello(HttpServletRequest request){

        ModelAndView mav = new ModelAndView("hello/index");
        mav.addObject("messages", "你好吗");
        request.setAttribute("obj", "你好吗");

        try {


        }
        catch (Exception ed){
            ed.printStackTrace();
        }
        System.out.println("---end--");

        return mav;
    }
}
视图文件内容:
<%@ page contentType="text/html;charset=UTF-8" language="java" %>
<html>
<head>
    <title>测试</title>
</head>
<body>

你好吗?
</body>
</html>
接下来。。。就要配置jsp web网站的运行方式了。
请点击
“run”->“Edit Configurations”->
然后点击符号“+”添加一个tomcat server-》Local的,
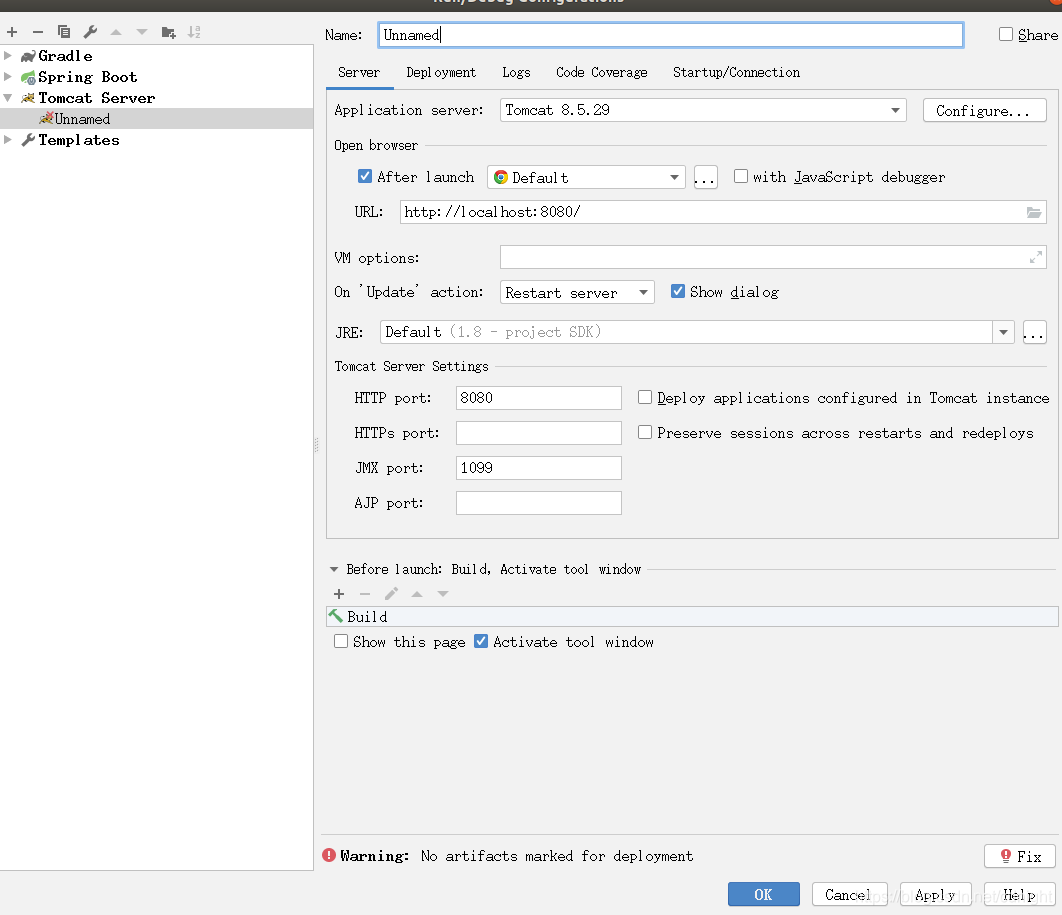
好了,配置一下名称,端口:

看到右下角的Fix警告按钮没有?这个是警告你没有选定网站发布的网站文件的,点击以后我选择的是【实际上这个在deployment标签页的那里也可以设置】:

选择以后警告消失:
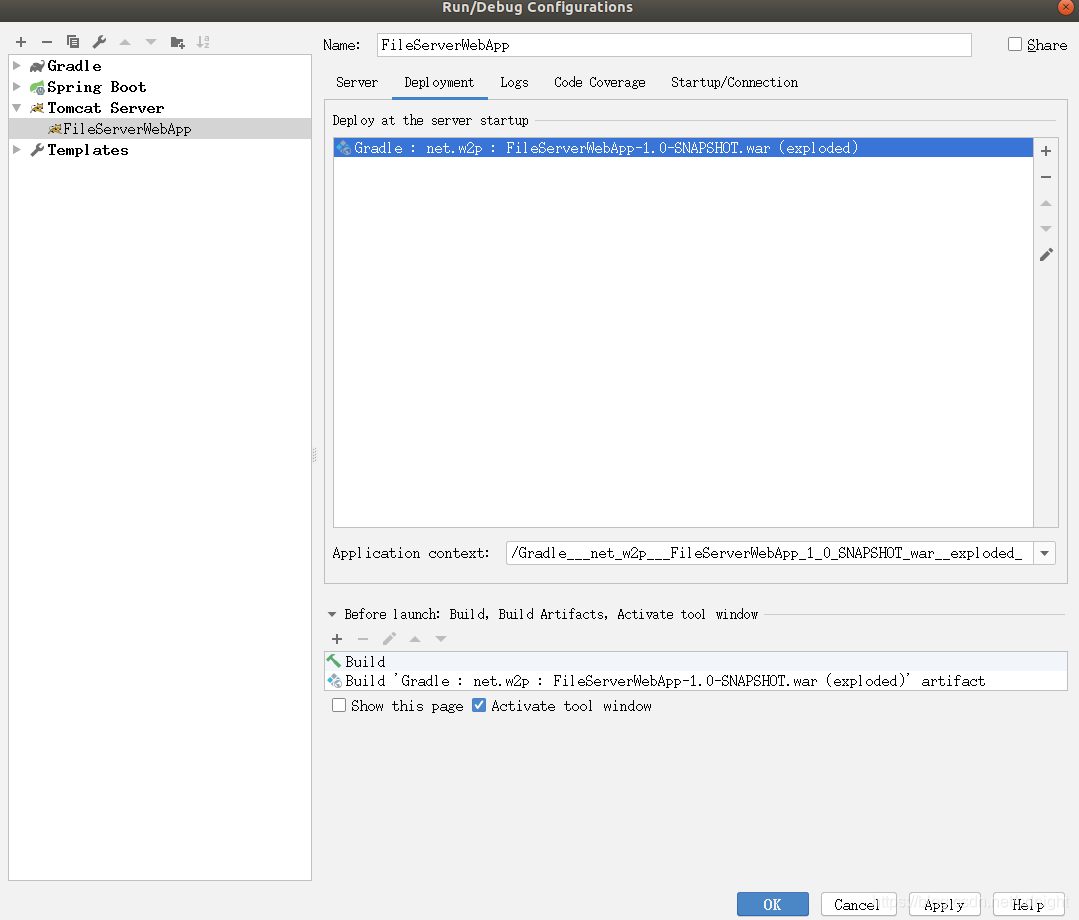
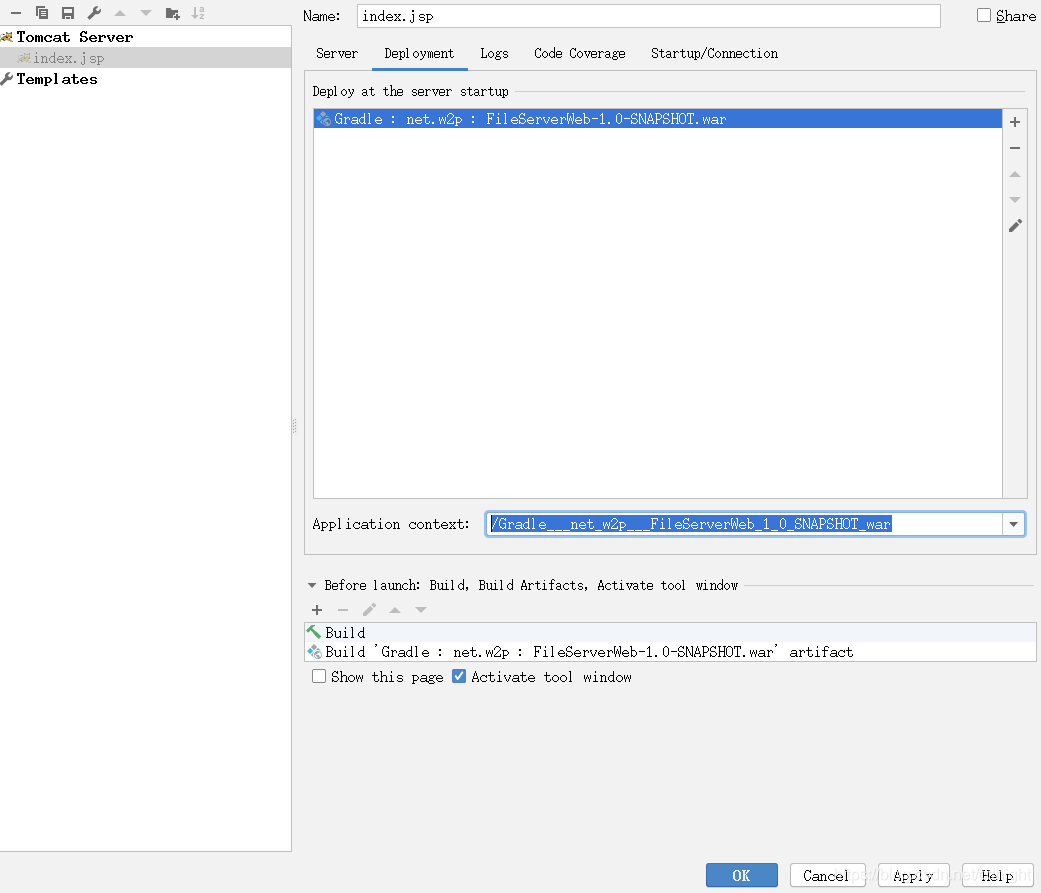
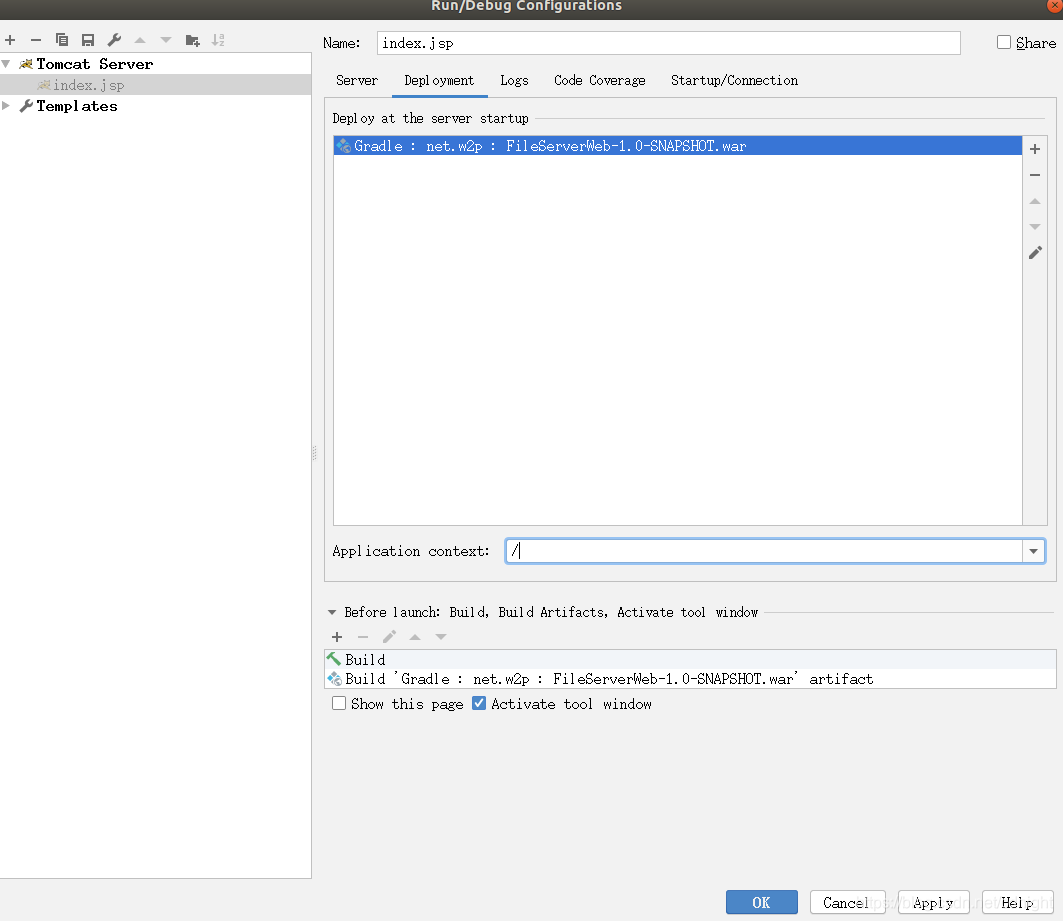
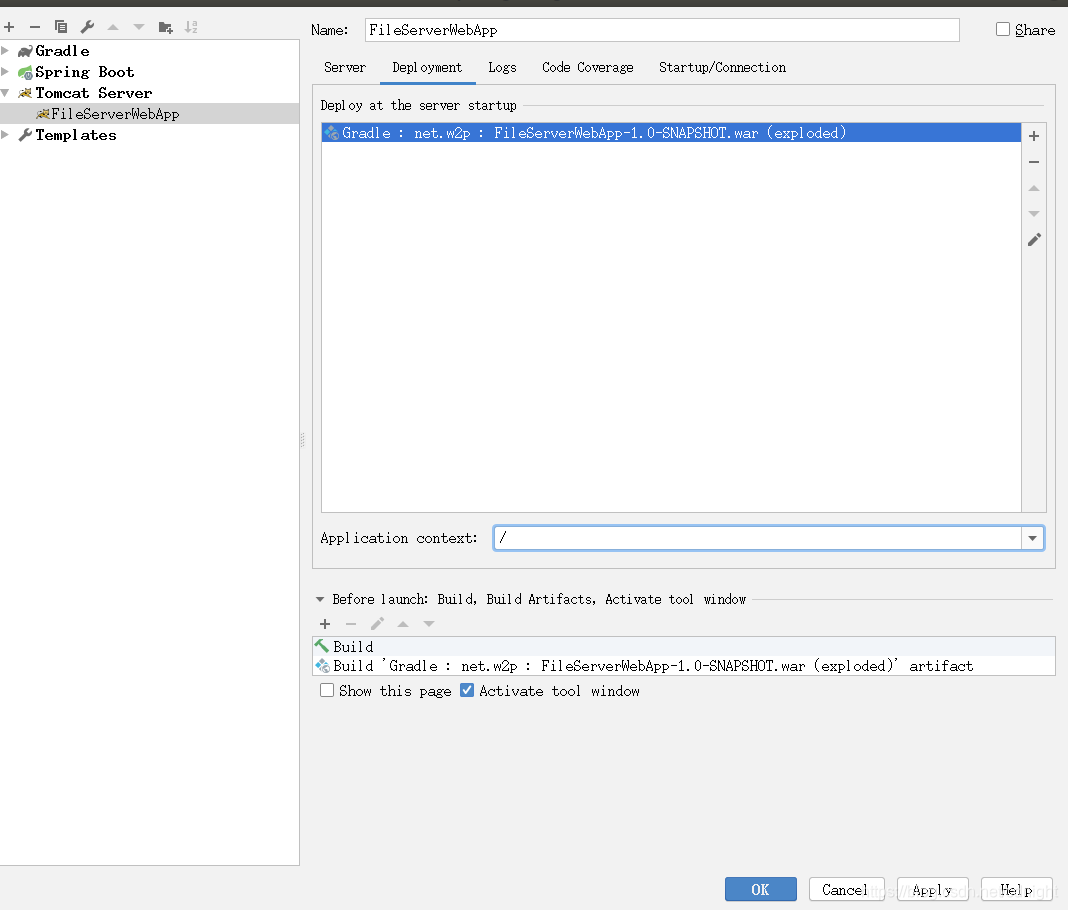
对了,别忘记检查一下application context path—实际上就是context path ,url的二级目录,譬如,这次的默认配置就有问题了:

直接将产出物的名称填上去,我们直接一个/ 斜杠即可。
好了,接下来要导入所有引用的类库:
注意到这个没有?

点击import changes
然后你会发现红色的警告线都没有了,已经可以正常识别类库了:
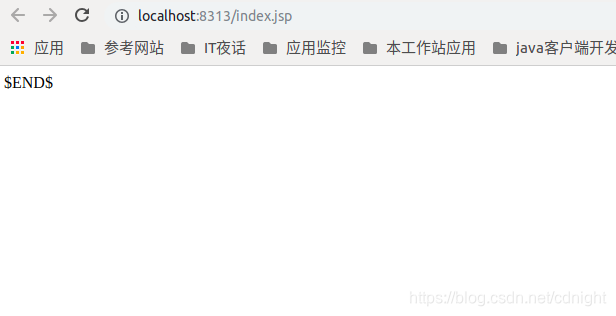
接下来,run->选择刚才新建的FileServerWebApp,接下来就是查看结果了:

页面显示为:


 178
178


 被折叠的 条评论
为什么被折叠?
被折叠的 条评论
为什么被折叠?
 到【灌水乐园】发言


