


参考https://ai.baidu.com/forum/topic/show/959046 PaddleHub人脸关键点实现贴纸之眼镜
抗击疫情,众志成城,人人有责。
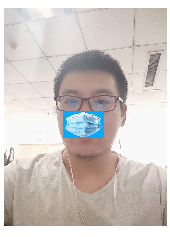
效果
代码
以下代码是在 notebook 中的代码,如果是在本地执行,推荐使用 opencv 进行图像展示
%reload_ext autoreload

%autoreload 2

%matplotlib inline
安装版本
!pip install -q paddlehub==1.6.1引入所需要的包
import paddlehub as hub

from random import randrange

import math

import numpy as np

import cv2

import matplotlib.pyplot as plt

import matplotlib.image as mpimg
两幅图像融合
def overlay_transparent(background_img, img_to_overlay_t, x, y, overlay_size=None):
    bg_img = background_img.copy()
    # convert 3 channels to 4 channels
    if bg_img.shape[2] == 3:
        bg_img = cv2.cvtColor(bg_img, cv2.COLOR_BGR2BGRA)

    if overlay_size is not None:
        img_to_overlay_t = cv2.resize(img_to_overlay_t.copy(), overlay_size)

    b, g, r, a = cv2.split(img_to_overlay_t)

    mask = cv2.medianBlur(a, 5)

    h, w, _ = img_to_overlay_t.shape
    roi = bg_img[int(y - h / 2):int(y + h / 2), int(x - w / 2):int(x + w / 2)]

    img1_bg = cv2.bitwise_and(roi.copy(), roi.copy(), mask=cv2.bitwise_not(mask))
    img2_fg = cv2.bitwise_and(img_to_overlay_t, img_to_overlay_t, mask=mask)

    bg_img[int(y - h / 2):int(y + h / 2), int(x - w / 2):int(x + w / 2)] = cv2.add(img1_bg, img2_fg)

    # convert 4 channels to 3 channels
    bg_img = cv2.cvtColor(bg_img, cv2.COLOR_BGRA2BGR)

    return bg_img
然后简单测试一下 paddlehub 的关键点检测情况
src_img = cv2.imread('test.jpg')

module = hub.Module(name="face_landmark_localization")
result = module.keypoint_detection(images=[src_img])
# module = hub.Module(name="pyramidbox_face_detection")
# result = module.face_detection(images=[src_img])
tmp_img = src_img.copy()
for index, point in enumerate(result[0]['data'][0]):
	# print(point)
    if (index >17 and index<27) or (index>=36 and index<48):
        continue
	# cv2.putText(img, str(index), (int(point[0]), int(point[1])), cv2.FONT_HERSHEY_COMPLEX, 3, (0,0,255), -1)
    cv2.circle(tmp_img, (int(point[0]), int(point[1])), 2, (0, 0, 255), -1)

res_img_path = 'face_landmark.jpg'
cv2.imwrite(res_img_path, tmp_img)

img = mpimg.imread(res_img_path)
# 展示预测68个关键点结果
plt.figure(figsize=(10,10))
plt.imshow(img)
plt.axis('off')
plt.show()
计算中心点
def get_center_point(landmarks, idx1, idx2):
    center_x = (landmarks[idx1][0] + landmarks[idx2][0]) // 2
    center_y = (landmarks[idx1][1] + landmarks[idx2][1]) // 2
    return (center_x, center_y)
图片预处理以及融合
def wear_masks(image, masks, chin_l,chin_r):
    chin_l = np.array(chin_l)
    chin_r = np.array(chin_r)
    masks_center = np.mean([chin_l, chin_r], axis=0)  # put masks's center to this center
    masks_size = np.linalg.norm(chin_l - chin_r) * 2  # the width of masks mask
    rotated_masks=masks
    try:
        image = overlay_transparent(image, rotated_masks, masks_center[0], masks_center[1],
                                    overlay_size=(
                                        int(masks_size),
                                        int(rotated_masks.shape[0] * masks_size / rotated_masks.shape[1]))
                                    )
    except Exception as e:
        print('failed overlay image')
        print(e)
    return image
生成视频和图片
import os
import matplotlib.animation as animation
from IPython.display import HTML

masks_lists = []
fig = plt.figure()
module = hub.Module(name="face_landmark_localization")

for path in os.listdir('mask'):
    image_file = 'test.jpg'
    masks_file = 'mask/' + path

    image = cv2.imread(image_file)
    print(image.shape)
    masks = cv2.imread(masks_file, cv2.IMREAD_UNCHANGED)
    if masks.shape[2]==3:
        masks = cv2.cvtColor(masks, cv2.COLOR_BGR2BGRA)
    result = module.keypoint_detection(images=[image])
    landmarks = result[0]['data'][0]
    a=landmarks[2]
    b=landmarks[14]
    l=int(b[0]-a[0])
    c=landmarks[8]
    w=int(c[1]-b[1])
    masks=cv2.resize(masks,(l,w),interpolation=cv2.INTER_CUBIC)
    # nose=get_center_point(landmarks,27,36)
    chin_l=landmarks[30]
    chin_r=landmarks[67]
    image = wear_masks(image, masks, chin_l, chin_r)
    image = cv2.cvtColor(image, cv2.COLOR_RGB2BGR)
    im = plt.imshow(image, animated=True)
    plt.axis('off')
    masks_lists.append([im])

ani = animation.ArtistAnimation(fig, masks_lists, interval=1000, blit=True, repeat_delay=1000)
HTML(ani.to_html5_video())
最终效果可以进入到 AI Studio 项目中进行查看


 1万+
1万+


 被折叠的 条评论
为什么被折叠?
被折叠的 条评论
为什么被折叠?
 到【灌水乐园】发言


