


CALayer简介
1. CALayer是核心动画的基础,通过设置CALayer属性可以做圆角,边框,阴影等效果.
2. 每个UIView内部都有一个CALayer类型的属性layer.
3. 在实现核心动画时,本质上是把CALayer中的内容转换成位图,从而便于图形硬件的操作。
CALayer一些常用属性设置
设置UIView的layer属性
获取当前图层或使用静态方法layer初始化CALayer后,可以设置以下属性:
bounds:宽度和高度
position:位置(默认指中心点,具体由anchorPoint决定)
anchorPoint:锚点(x,y的范围都是0-1),决定了position的含义
backgroundColor:背景颜色(CGColorRef类型)
borderColor:边框颜色(CGColorRef类型)
borderWidth:边框宽度
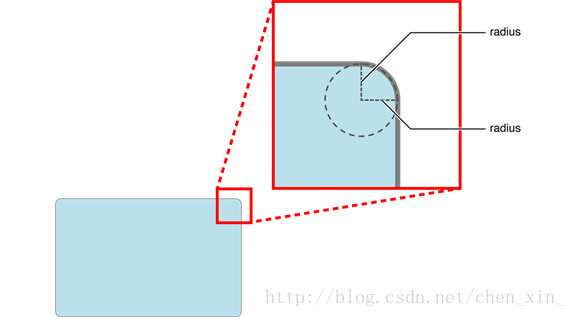
cornerRadius:圆角半径
contents:内容(比如设置为图片CGImageRef)
UIView *subView=[[UIViewalloc]initWithFrame:CGRectMake(60,20,200,200)];
[subView setBackgroundColor:[UIColororangeColor]];
//设置视图的圆角半径
subView.layer.cornerRadius=30.0;
[self.viewaddSubview:subView];
//设置阴影,默认阴影的颜色是黑色,要想让阴影生效必须同时设置偏移量和阴影透明度
subView.layer.shadowColor=[UIColorgrayColor].CGColor;
//设置阴影的偏移量,所谓偏移就是相对于原始坐标向x轴和y轴偏移
subView.layer.shadowOffset=CGSizeMake(10.0,10.0);
//设置阴影的透明度
subView.layer.shadowOpacity=1.0f;
//设置边框颜色和宽度
subView.layer.borderColor=[UIColorpurpleColor].CGColor;
subView.layer.borderWidth=2.0;
注意:在设置阴影的时候必须偏移量和透明度同事设置,阴影效果才能表现出来,因为阴影默认是没有偏移量,所谓偏移就是相对于原始坐标向x轴和y轴偏移
设置UIImageView的layer属性
UIImageView *subView=[[UIImageViewalloc]initWithFrame:CGRectMake(60,240,200,200)];
subView.image=[UIImageimageNamed:@"3.jpeg"];
//设置视图的圆角半径
subView.layer.cornerRadius=30.0;
//注意:再设置UIImageView的圆角时和UIView不同,要想让圆角效果生效,必须设置遮罩效果为yes
subView.layer.masksToBounds=YES;
[self.viewaddSubview:subView];
//如果设置了圆角效果,图片的阴影效果就会不起作用
//设置阴影,默认阴影的颜色是黑色,要想让阴影生效必须同时设置偏移量和阴影透明度
subView.layer.shadowColor=[UIColorgrayColor].CGColor;
//设置阴影的偏移量,所谓偏移就是相对于原始坐标向x轴和y轴偏移
subView.layer.shadowOffset=CGSizeMake(10.0,10.0);
//设置阴影的透明度
subView.layer.shadowOpacity=1.0f;
//设置边框颜色和宽度
subView.layer.borderColor=[UIColororangeColor].CGColor;
subView.layer.borderWidth=2.0;
//CALayer中的变形属性,重复设置transform属性,只有最后一次生效,因为前面度被覆盖
//平移操作,向上移动100点
[subView.layersetTransform:CATransform3DMakeTranslation(20,0,0)];
//缩放0.5倍
[subView.layersetTransform:CATransform3DMakeScale(0.5,0.5,1.0)];
//绕z轴旋转45度
[subView.layersetTransform:CATransform3DMakeRotation(M_PI_4,0,0,1)];
//用KVC来设置形变,这样可以同时设置平移,缩放,旋转属性
[subView.layersetValue:@20.0forKeyPath:@"transform.translation.x"];
[subView.layersetValue:@0.5forKeyPath:@"transform.scale"];
[subView.layersetValue:@M_PI_4forKeyPath:@"transform.rotation.z"];
注意:如果设置了圆角效果,图片的阴影效果就会不起作用
CALayer中的变形属性,重复设置transform属性,只有最后一次生效,因为前面度被覆盖,用KVC来设置形变,这样可以同时设置平移,缩放,旋转属性。UIKit框架只能应用在iOS而不能用于Mac,但是Quartz2D是可以跨平台的,因此在使用颜色时,不能直接使用UIColor而需要将颜色转成CGColor
下面列出了keypath属性列表
| Field Key Path | Description |
| rotation.x | Set to an NSNumber object whose value is the rotation, in radians, in the x axis. |
| rotation.y | Set to an NSNumber object whose value is the rotation, in radians, in the y axis. |
| rotation.z | Set to an NSNumber object whose value is the rotation, in radians, in the z axis. |
| rotation | Set to an NSNumber object whose value is the rotation, in radians, in the z axis. This field is identical to setting therotation.z field. |
| scale.x | Set to an NSNumber object whose value is the scale factor for the x axis. |
| scale.y | Set to an NSNumber object whose value is the scale factor for the y axis. |
| scale.z | Set to an NSNumber object whose value is the scale factor for the z axis. |
| scale | Set to an NSNumber object whose value is the average of all three scale factors. |
| translation.x | Set to an NSNumber object whose value is the translation factor along the x axis. |
| translation.y | Set to an NSNumber object whose value is the translation factor along the y axis. |
| translation.z | Set to an NSNumber object whose value is the translation factor along the z axis. |
| translation | Set to an NSValue object containing an NSSize orCGSize data type. That data type indicates the amount to translate in the x and y axis. |
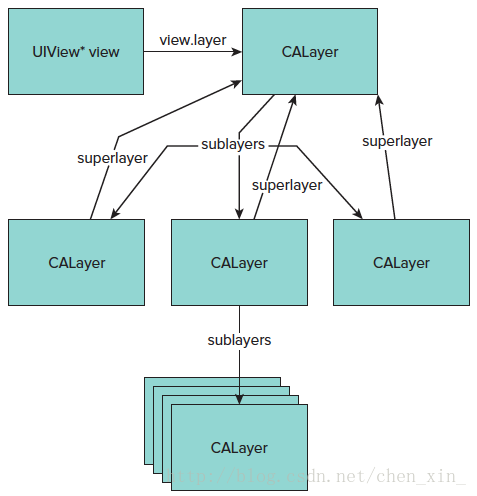
CALayer和UIView之间的关系
创建视图对象时,视图会自己创建一个层,视图在绘图(如drawRect:)时,会将内容画在自己的层上。当视图在层上完成绘图后,系统会将图层拷贝至屏幕。每个视图都有一个层,而每个图层又可以有多个子层。除提供可视内容外,Layer不负责视图的事件响应、内容绘制等工作,同时Layer不能参与到响应者链条中
CALayer层次结构图
UIView中添加CALayer对象
CALayer *myLayer=[CALayerlayer];
myLayer.bounds=CGRectMake(0,0,200,200);
//position代表图层的中心点,此中心点和anchor有关
myLayer.position=CGPointMake(100,100);
//设置layer的内容,
myLayer.contents=(id)[UIImageimageNamed:@"icon.jpeg"].CGImage;
//设置锚点,锚点x,y范围为0-1.默认的锚点就是图层的中心点,即0.5,0.5,代表layer的为之比例
//作用控制图层位置,以及旋转的轴
myLayer.anchorPoint=CGPointMake(0,0);
[myLayer setTransform:CATransform3DMakeRotation(M_PI_4,0,0,1)];
[self.view.layeraddSublayer:myLayer];
self.myLayer=myLayer;
CALayer隐式动画
//设置动画事务
[CATransactionbegin];
// 关闭隐式动画
// [CATransaction setDisableActions:YES];
//设置动画时间,默认时间1/4秒
[CATransactionsetAnimationDuration:0.5];
//设置自定义Layer的中心点
CGPoint location=[touchlocationInView:self.view];
self.myLayer.position=location;
self.index++;
//为layer设置图片
UIImage *image=[UIImageimageNamed:[NSStringstringWithFormat:@"%d.jpg",self.index%2+1]];
self.myLayer.contents=(id)image.CGImage;
self.myLayer.masksToBounds=YES;
//为layer设置背景颜色,如果设置了图片,将会覆盖背景颜色
NSInteger r1=arc4random_uniform(self.colorArray.count);
self.myLayer.backgroundColor=[self.colorArray[r1]CGColor];
//设置圆角半径
NSInteger r2=arc4random_uniform(25)+5;
self.myLayer.cornerRadius=r2;
//设置绕z轴的旋转角度
CGFloat angle=arc4random_uniform(180)/180.0*M_PI;
[self.myLayersetTransform:CATransform3DMakeRotation(angle,0,0,1)];
//设置layer大小
CGFloat size=arc4random_uniform(50)+51.0;
self.myLayer.bounds=CGRectMake(0,0, size, size);
[CATransactioncommit];
在CALayer上绘图
要在CALayer上绘图,有两种方法:
1. 创建一个CALayer的子类,然后覆盖drawInContext:方法,可以使用Quartz2D API在其中进行绘图
2. 设置CALayer的delegate,然后让delegate实现drawLayer:inContext:方法进行绘图
不能再将UIView设置为这个CALayer的delegate,因为UIView对象已经是内部层的delegate,再次设置会出问题
无论使用哪种方法,都必须向层发送setNeedsDisplay消息,以触发相应绘图方法的调用
设置CALayer的delegate
- (void)viewDidLoad
{
[superviewDidLoad];
// Do anyadditional setup after loading the view.
CALayer *myLayer=[CALayerlayer];
myLayer.bounds=CGRectMake(0,0,200,200);
myLayer.position=CGPointMake(100,100);
myLayer.backgroundColor=[[UIColororangeColor]CGColor];
myLayer.delegate=self;
[self.view.layeraddSublayer:myLayer];
[myLayer setNeedsDisplay];
}
覆写drawLayer方法
-(void)drawLayer:(CALayer *)layer inContext:(CGContextRef)ctx{
CGRectrct=CGRectMake(50,50,100,100);
CGContextAddRect(ctx,rct);
CGContextSetRGBStrokeColor(ctx,1.0,1.0,1.0,1.0);
CGContextSetRGBFillColor(ctx,0.5,0.5,0.5,1.0);
CGContextSetLineWidth(ctx,4.0);
CGContextDrawPath(ctx,kCGPathEOFillStroke);
}
然后覆盖drawInContext:方法
自定义一个MyLayer类继承自CALayer,并覆写drawInContext方法,然后将MyLayer加入到一个UIVIew中根layer中
UIView执行绘图的顺序
drawLayer ->drawRect->drawInContext;
-(void)drawInContext:(CGContextRef)ctx{
NSLog(@"drawInContext");
[superdrawInContext:ctx];
//保存context的状态,以便完成设置后恢复
CGContextSaveGState(ctx);
//在绘制img时图像时倒立的,所以通过设置y轴缩放-1可以把img正过来,
CGContextScaleCTM(ctx,1.0, -1.0);
//但是要把img向下移动一个高度才能恢复倒原来位置
CGContextTranslateCTM(ctx,0, -self.bounds.size.height);
UIImage *image=[UIImageimageNamed:@"2.jpg"];
//绘制图像
CGContextDrawImage(ctx,CGRectMake(50,50,100,100),image.CGImage);
//恢复上下文
CGContextRestoreGState(ctx);
//绘制圆形图案
CGContextSetRGBFillColor(ctx,1.0,0.0,0.0,1.0);
CGRectrect1=CGRectMake(0,0,self.bounds.size.width/2,self.bounds.size.height/2);
CGContextAddEllipseInRect(ctx, rect1);
CGContextDrawPath(ctx,kCGPathFillStroke);
CGContextSetRGBFillColor(ctx,0.0,0.5,0.5,1.0);
CGRectrect2=CGRectMake(self.bounds.size.width/2,self.bounds.size.height/2,self.bounds.size.width/2,self.bounds.size.height/2);
CGContextAddEllipseInRect(ctx, rect2);
CGContextDrawPath(ctx,kCGPathFillStroke);
}


 1868
1868

 被折叠的 条评论
为什么被折叠?
被折叠的 条评论
为什么被折叠?
 到【灌水乐园】发言


