


 该文详细介绍了在STM32平台上使用SDIO接口对SD卡进行移植和调试的过程,包括查看GPIO配置、上电初始化、SD卡电源管理、初始化流程、时钟配置、数据宽度设置以及读写数据接口的实现。在调试过程中遇到的问题,如数据线信号异常和命令响应错误,也给出了相应的解决方案。
目录
前言
SDIO接口是最常用数据通信接口之一,使用在WiFi,U盘、sdcard等
移植调试过程:
一、查看原理图确认所使用的的GPIO口
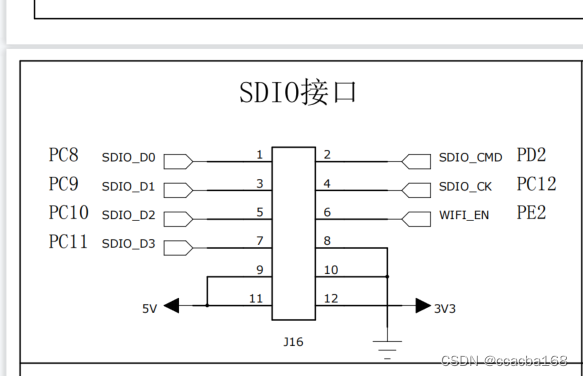
GPIO基本是固定的,clk由控制器输出,cmd为指令控制,data为读写数据使用
二、上电初始化
1.配置GPIO
void SD_LowLevel_Init(void)
{
  GPIO_InitTypeDef  GPIO_InitStructure;

  /* GPIOC and GPIOD Periph clock enable */
  RCC_AHB1PeriphClockCmd(RCC_AHB1Periph_GPIOC | RCC_AHB1Periph_GPIOD, ENABLE);

  GPIO_PinAFConfig(GPIOC, GPIO_PinSource8, GPIO_AF_SDIO);
  GPIO_PinAFConfig(GPIOC, GPIO_PinSource9, GPIO_AF_SDIO);
  GPIO_PinAFConfig(GPIOC, GPIO_PinSource10, GPIO_AF_SDIO);
  GPIO_PinAFConfig(GPIOC, GPIO_PinSource11, GPIO_AF_SDIO);
  GPIO_PinAFConfig(GPIOC, GPIO_PinSource12, GPIO_AF_SDIO);
  GPIO_PinAFConfig(GPIOD, GPIO_PinSource2, GPIO_AF_SDIO);

  /* Configure PC.08, PC.09, PC.10, PC.11 pins: D0, D1, D2, D3 pins */
  GPIO_InitStructure.GPIO_Pin = GPIO_Pin_8 | GPIO_Pin_9 | GPIO_Pin_10 | GPIO_Pin_11;
  GPIO_InitStructure.GPIO_Speed = GPIO_Speed_50MHz;
  GPIO_InitStructure.GPIO_Mode = GPIO_Mode_AF;
  GPIO_InitStructure.GPIO_OType = GPIO_OType_PP;
  GPIO_InitStructure.GPIO_PuPd = GPIO_PuPd_UP;
  GPIO_Init(GPIOC, &GPIO_InitStructure);

  /* Configure PD.02 CMD line */
  GPIO_InitStructure.GPIO_Pin = GPIO_Pin_2;
  GPIO_Init(GPIOD, &GPIO_InitStructure);

  /* Configure PC.12 pin: CLK pin */
  GPIO_InitStructure.GPIO_Pin = GPIO_Pin_12;
  GPIO_InitStructure.GPIO_PuPd = GPIO_PuPd_NOPULL;
  GPIO_Init(GPIOC, &GPIO_InitStructure);

  /* Enable the SDIO APB2 Clock */
  RCC_APB2PeriphClockCmd(RCC_APB2Periph_SDIO, ENABLE);

  /* Enable the DMA2 Clock */
  RCC_AHB1PeriphClockCmd(SD_SDIO_DMA_CLK, ENABLE);
}
2.给SDcard上电
/**
  * @brief  Enquires cards about their operating voltage and configures
  *   clock controls.
  * @param  None
  * @retval SD_Error: SD Card Error code.
  */
SD_Error SD_PowerON(void)
{
  __IO SD_Error errorstatus = SD_OK;
  uint32_t response = 0, count = 0, validvoltage = 0;
  uint32_t SDType = SD_STD_CAPACITY;

  /*!< Power ON Sequence -----------------------------------------------------*/
  /*!< Configure the SDIO peripheral */
  /*!< SDIO_CK = SDIOCLK / (SDIO_INIT_CLK_DIV + 2) */
  /*!< on STM32F4xx devices, SDIOCLK is fixed to 48MHz */
  /*!< SDIO_CK for initialization should not exceed 400 KHz */
  SDIO_InitStructure.SDIO_ClockDiv = SDIO_INIT_CLK_DIV;
  SDIO_InitStructure.SDIO_ClockEdge = SDIO_ClockEdge_Rising;
  SDIO_InitStructure.SDIO_ClockBypass = SDIO_ClockBypass_Disable;
  SDIO_InitStructure.SDIO_ClockPowerSave = SDIO_ClockPowerSave_Disable;
  SDIO_InitStructure.SDIO_BusWide = SDIO_BusWide_1b;
  SDIO_InitStructure.SDIO_HardwareFlowControl = SDIO_HardwareFlowControl_Disable;
  SDIO_Init(&SDIO_InitStructure);

  /*!< Set Power State to ON */
  SDIO_SetPowerState(SDIO_PowerState_ON);

  /*!< Enable SDIO Clock */
  SDIO_ClockCmd(ENABLE);

  /*!< CMD0: GO_IDLE_STATE ---------------------------------------------------*/
  /*!< No CMD response required */
  SDIO_CmdInitStructure.SDIO_Argument = 0x0;
  SDIO_CmdInitStructure.SDIO_CmdIndex = SD_CMD_GO_IDLE_STATE;
  SDIO_CmdInitStructure.SDIO_Response = SDIO_Response_No;
  SDIO_CmdInitStructure.SDIO_Wait = SDIO_Wait_No;
  SDIO_CmdInitStructure.SDIO_CPSM = SDIO_CPSM_Enable;
  SDIO_SendCommand(&SDIO_CmdInitStructure);

  errorstatus = CmdError();

  if (errorstatus != SD_OK)
  {
    /*!< CMD Response TimeOut (wait for CMDSENT flag) */
    return(errorstatus);
  }

  /*!< CMD8: SEND_IF_COND ----------------------------------------------------*/
  /*!< Send CMD8 to verify SD card interface operating condition */
  /*!< Argument: - [31:12]: Reserved (shall be set to '0')
               - [11:8]: Supply Voltage (VHS) 0x1 (Range: 2.7-3.6 V)
               - [7:0]: Check Pattern (recommended 0xAA) */
  /*!< CMD Response: R7 */
  SDIO_CmdInitStructure.SDIO_Argument = SD_CHECK_PATTERN;
  SDIO_CmdInitStructure.SDIO_CmdIndex = SDIO_SEND_IF_COND;
  SDIO_CmdInitStructure.SDIO_Response = SDIO_Response_Short;
  SDIO_CmdInitStructure.SDIO_Wait = SDIO_Wait_No;
  SDIO_CmdInitStructure.SDIO_CPSM = SDIO_CPSM_Enable;
  SDIO_SendCommand(&SDIO_CmdInitStructure);

  errorstatus = CmdResp7Error();

  if (errorstatus == SD_OK)
  {
    CardType = SDIO_STD_CAPACITY_SD_CARD_V2_0; /*!< SD Card 2.0 */
    SDType = SD_HIGH_CAPACITY;
  }
  else
  {
    /*!< CMD55 */
    SDIO_CmdInitStructure.SDIO_Argument = 0x00;
    SDIO_CmdInitStructure.SDIO_CmdIndex = SD_CMD_APP_CMD;
    SDIO_CmdInitStructure.SDIO_Response = SDIO_Response_Short;
    SDIO_CmdInitStructure.SDIO_Wait = SDIO_Wait_No;
    SDIO_CmdIni
最低0.47元/天 解锁文章


 550
550

 被折叠的 条评论
为什么被折叠?
被折叠的 条评论
为什么被折叠?
 到【灌水乐园】发言


