


1.html5支持
兼容html4旧版本用 shiv方法:缺点就是需要链接google。不需要去除<!--
<!-- 对于ie9及之前版本浏览器不支持html5的方法,在head添加中间绿色那部分代码 -->

<head>
<title>HTML5</title>
<meta charset="utf-8">
<!--[if lt IE 9]>
<script src="http://html5shiv.googlecode.com/svn/trunk/html5.js">
</script>
<![endif]-->
</head>
2.html5语义元素
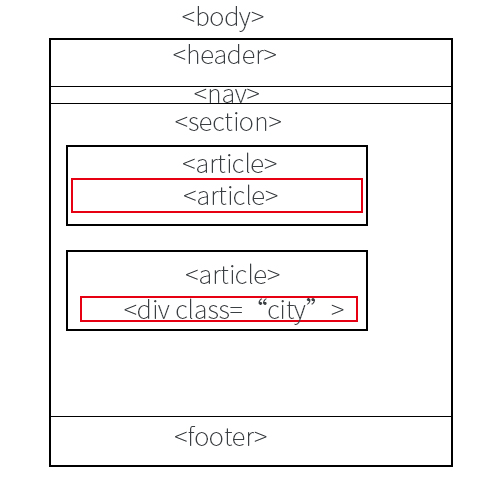
section能作为article的容器,article也能作为section的容器。
article能作为article容器,article也能作为div的容器。
<!DOCTYPE html>
<!-- lang="en"是个标记。作用是告诉搜索引擎本网站是英文的 -->
<html lang="en">
<head>
	<!-- 标题,搜索关键 -->
	<title>html</title>
	<!-- 设置页面语言为utf-8 -->
	<meta charset="utf-8">

	<!-- 以下是兼容旧版本代码 -->
	<!--[if lt IE 9]>
	<script src="http://html5shiv.googlecode.com/svn/trunk/html5.js">
	</script>
	<![endif]-->

	<!-- 由于style的type唯一值是text/css,所以type可不用,但规范是要有的	 -->
	<style type="text/css">
		body{
			font-family: Verdana,sans-serif;
			font-size: 0.8em;
			/*0.8em表示取浏览器默认字体大小的80%*/
		}
		header,footer,section,article{
			border: 1px solid grey; /*粗细1像素,实线,灰色*/
			margin: 5px;margin-bottom: 15px;/*外部间距*/
			padding: 8px;/*内部间距*/
			background-color: white;
		}
		header,footer{
			color: white;
			background-color: #444;margin-bottom: 5px;
		}
		section{
			background-color: #ddd;
		}
		nav ul{
			margin:1;/*这是控制列表与另一个列表之间的间距*/
			padding:0;
		}
		nav ul li{
			display: inline;/*就是本来会自动换行的模块不分行*/
			margin: 5px;  /*这是控制列表内行与行之间的间距*/
		}
	</style>
</head>
<body>
<header>This is header</header>
<nav>
	<ul>
		<li>导航1</li>
		<li>导航2</li>
		<li>导航3</li>
	</ul>
</nav>
<section>
	<h2>This is a section</h2>
	<p>section,section,sectionsection,section,section,section</p>
	<article>
	<h2>This is a article</h2>
	<p>article,article,article,article,article,article,article,article,</p>
	<p>article,article,article,article,article,article,article,article,</p>
	<p>article,article,article,article,article,article,article,article,</p>
	</article>
	<article>
	<h2>This is a article</h2>
	<p>article,article,article,article,article,article,article,article,</p>
	<p>article,article,article,article,article,article,article,article,</p>
	<p>article,article,article,article,article,article,article,article,</p>
	</article>
</section>
<footer>test by hjc</footer>
</body>
</html>
图片紧跟下方有个说明标题的使用
<figure>
    <img src="">
    <figcaption>这是图片的文字描述</figcaption>
</figure>
3.代码约定
在html中,没有特别
①正确得文档类型: <!DOCTYPE html>
②元素名小写: <section>....</section>
③元素部分结尾都有关闭,比如:<p>... </p>
④关闭空的html元素:<meta charset=“utf-8” />
⑤属性名小写:<div class="xxx">
⑥属性值带双引号:<table class="table striped">
⑦必须的属性:图片加alt属性,width属性,height属性
⑧等号两边的空格都是违法的。
⑨避免单行长代码
⑩没有必要使用tab,仅使用两个空格代替,模块较短也不使用缩进。
①①不推荐省略<html><body>,虽然能呗省略
①②省略<head>能降低复杂性,但<>
①③对语言<html lang=“”>和字符编码<meta charset=“”>定义,tittle定义。
①④<!--空格内容空格-->
①⑤样式表规范:在开括{号前+空格。
①⑥简单快速加载样式表: <link rel="stylesheet" href="styles.css">
①⑦简单快速加载javascript: <script src="myscript.js">
①⑧文件名小写。
①⑨文件扩展名HTML文件是.html,不是htm
4.canvas绘制图形(像素图形,还有是svg矢量图形【未练习】)
实例:把鼠标悬停在矩形上可以看到坐标
<!DOCTYPE html>
<html lang="zh-cmn">
<head>
	<title>在特定框内获取相应像素点的坐标</title>
	<meta charset="utf-8">
	<style type="text/css">
		body {
			font-size:70%;
			font-family: verdana,helvetica,arial,sans-serif;
		}
	</style>

</head>
<body style="margin:0px;">
<p>鼠标悬停下矩形可以看到坐标</p>
<!-- 创建一个div框,鼠标在上面移动就运转function。 -->
<div id="coordiv" style="float: left;width: 299px;height: 99px;border: 1px solid #c3c3c3"
onmousemove="cnvs_getCoordinates(event)" onmouseout="cnvs_clearCoordinates()"></div>
	<script type="text/javascript">  //外部js放在<head>里,像这样的内部js应该放在body里。
		// 这个是控制显示坐标位置和内容的代码
		function cnvs_getCoordinates(e) {//程序名为cnvs_...
			x=e.clientX;//x获取鼠标x轴
			y=e.clientY;//y获取鼠标y轴
			//将Coordinates:(,)显示在id为xycoordinates元素位置上,
			document.getElementById("xycoordinates").innerHTML="Coordinates:(" + x +"," + y + ")";
			//x和y左右必须有两个加号,不懂???
		}
		function cnvs_clearCoordinates() {
			document.getElementById("xycoordinates").innerHTML="";
		}
	</script>
<div id="xycoordinates"></div><!--这个确定显示坐标的确切位置-->
<!-- 因为运用了响应式float,所以框右面空间大,就会显示在右边先,不足才会显示在框下面。 -->
</body>
</html>
实例:划线
<!DOCTYPE html>
<html>
<head>
	<title>drawline</title>
</head>
<body>

<canvas id="myCanvas" width="200" height="100" style="border: 1px solid #c3c3c3">
	Your brower does not support the canvas elements.
</canvas>

<script type="text/javascript">
	var c=document.getElementById("myCanvas");
	var cxt=c.getContext("2d");
	cxt.moveTo(10,10);
	cxt.lineTo(150,50);
	cxt.lineTo(10,50);
	cxt.stroke();
</script>

</body>
</html>
实例:画圆
<!DOCTYPE html>
<html>
<head>
	<title>drawcircle</title>
</head>
<body>
<canvas id="myCanvas" width="200" height="100" style="border: 1px solid #c3c3c3">
	Your browser does not support the canvas element.
</canvas>
<script type="text/javascript">
	var c=document.getElementById('myCanvas')
	var cxt=c.getContext("2d");
	cxt.fillStyle="#FF0000";//填充样式
	cxt.beginPath();//开始绘画路径
	cxt.arc(70,48,25,0,Math.PI*2,true);//(x坐标,y坐标,半径,开始弧度,结束弧度(2PI=360°),ture为逆时针)
	cxt.closePath();//结束绘画路径
	cxt.fill();//填充颜色
</script>
</body>
</html>
实例:创建渐变
<!DOCTYPE html>
<html>
<head>
	<title>graduated colors</title>
</head>
<body>
<canvas id="myCanvas" width="200" height="100" style="border: 1px solid #c3c3c3;">
	Your brower does not support the canvas element.
</canvas>


<script type="text/javascript">
	var c=document.getElementById("myCanvas");
	var cxt=c.getContext("2d");
	var grd=cxt.createLinearGradient(0,0,175,50);//(x坐标,y坐标,长,宽)
	grd.addColorStop(0,"#ff0000");//红
	grd.addColorStop(0.5,"#00ff00");//绿
	grd.addColorStop(1,"#0000ff");//蓝
	cxt.fillStyle=grd;
	cxt.fillRect(0,0,175,50);
</script>
</body>
</html>
实例:图片
<!DOCTYPE html>
<html>
<head>
	<title>image</title>
</head>
<body>
<canvas id="myCanvas" width="200" height="100" style="border: 1px solid #c3c3c3;">
	Your brower does not support the canvas element.
</canvas>
<script type="text/javascript">
	var c=document.getElementById('myCanvas')
	var cxt=c.getContext("2d");
	var img=new Image()//注意大小写,空格
	img.src="798673327829202925.jpg"
	cxt.drawImage(img,0,0)
</script>

</body>
</html>
5.html音频
最好的音频解决方案(内嵌式)
<!DOCTYPE html>
<html>
<head>
	<title>musictest</title>
</head>
<body>

<!-- 最好的音频解决方案,但是出错无法显示错误。而且需要自己弄两种格式的音频。 -->
<audio controls="controls">
	<!-- 可能系统原因,不能直接通过/连接下级目录。 -->
	<source src="C:/Users/HuangJC/Desktop/web/music/musictest.mp3" type="audio/mp3"><!--IE,chrome,safari-->
	 <source src="C:/Users/HuangJC/Desktop/web/music/musictest.mp3" type="audio/ogg"> <!--firefox和opera仅支持这个 -->
	<embed height="100" width="100" src="C:/Users/HuangJC/Desktop/web/music/musictest.mp3"></embed>
</audio>
最快的音频解决方案(利用浏览器内部插件)
<!-- 下面这个是最简单方法 -->
<a href="musictest.mp3">音乐</a>
</body>
</html>
6.html视频
最好的视频解决方案
<!DOCTYPE html>
<html>
<body>

<video width="320" height="240" controls="controls" autoplay="autoplay">
  <source src="/i/movie.ogg" type="video/ogg" />
  <source src="/i/movie.mp4" type="video/mp4" />
  <source src="/i/movie.webm" type="video/webm" />
  <object data="/i/movie.mp4" width="320" height="240">
    <embed width="320" height="240" src="/i/movie.swf" />
  </object>
</video>

</body>
</html>
优酷解决方案
<!DOCTYPE html>
<html>
<body>
<!--src中填写是上传到优酷视频的flash地址-->
<embed src="http://player.youku.com/player.php/sid/XMzI2NTc4NTMy/v.swf"
width="480" height="400"
type="application/x-shockwave-flash">
</embed>

</body>
</html>
7.html获取地理位置
<!DOCTYPE html>
<html>
<head>
<title>获取百度静态图定位</title>
<meta charset="utf-8">
</head>
<body>
<p id="demo">点击按钮获取定位</p>
<button onclick="getLocation()">定位</button>
<div id="mapholder" style="width: 480;height: 320;"></div>
<script type="text/javascript">
var x=document.getElementById("demo");
function getLocation() {
if (navigator.geolocation) {
// 如果getCurrentPosition()运行成功,则向参数showPosition中规定的函数返回一个coordinates(坐标)对象
navigator.geolocation.getCurrentPosition(showPosition,showError);
}
else{//不成功就报错
x.innerHTML="Geolocation is not supported by this brower.";
}
}
function showPosition(position){
var lonlat=position.coords.longitude+","+position.coords.latitude;
x.innerHTML="坐标是:"+lonlat;
var img_url="http://api.map.baidu.com/staticimage/v2?ak=AhcgwLQOw2oVUHivxy3CPlo11Byc8NvS&mcode=666666¢er="+lonlat+"&width=300&height=200&zoom=11&scale=2&markers="+lonlat;
//ak码从百度开放平台获取,center对应坐标,zoom对应地图缩放比(3-18)值越高,地图越大。scale在地图原有基础上加大一倍视窗和zoom+1,markers对应红色标记点。
document.getElementById("mapholder").innerHTML="<img src='"+img_url+"' />";
}
// 错误返回函数
function showError(error) {
switch(error.code){
case error.PERMISSION_DENIED:
x.innerHTML="User denied the request for Geolocation(您的系统设置拒绝访问定位)."//用户拒绝访问
break;
case error.POSITION_UNAVAILABLE:
x.innerHTML="Location information is unavailable(定位坐标无效)."
break;
case error.TIMEOUT:
x.innerHTML="The request to get user location timed out(定位请求超时)."
break;
case error.UNKNOWN_ERROR:
x.innerHTML="An unknown error occurred(未知错误)."
}
}
</script>
</body>
</html>8.Html5拖放
<!-- 在拖动目标上触发事件 (源元素):
ondragstart - 用户开始拖动元素时触发
ondrag - 元素正在拖动时触发
ondragend - 用户完成元素拖动后触发

释放目标时触发的事件:
ondragenter - 当被鼠标拖动的对象进入其容器范围内时触发此事件
ondragover - 当某被拖动的对象在另一对象容器范围内拖动时触发此事件
ondragleave - 当被鼠标拖动的对象离开其容器范围内时触发此事件
ondrop - 在一个拖动过程中,释放鼠标键时触发此事件 -->

<!DOCTYPE HTML>
<html>
<head>
<style type="text/css">
#div1, #div2
{float:left; width:198px; height:66px; margin:10px;padding:10px;border:1px solid #aaaaaa;}
</style>

</head>
<body>
<!-- ondrop释放鼠标触发,ondragover在另一个容易范围内触发 -->
<div id="div1" ondrop="drop(event)" ondragover="allowDrop(event)">
  <!-- draggable表示可拖动,ondragstart用户开始拖动元素时触发 -->
  <img src="test.gif" draggable="true" ondragstart="drag(event)" id="drag1" />
</div>
<div id="div2" ondrop="drop(event)" ondragover="allowDrop(event)"></div>

<script type="text/javascript">
function allowDrop(ev)
{
  //默认地,数据/元素无法被放置到其他元素中。
ev.preventDefault();
}


function drag(ev)
{
// 设置数据
ev.dataTransfer.setData("Text",ev.target.id);
}

function drop(ev)
{
  // preventDefault阻止数据的浏览器默认处理方式,(drop事件默认以链接形式打开)
ev.preventDefault();
// 获取数据
var data=ev.dataTransfer.getData("Text");//得到的数据是图片的id
//释放数据
ev.target.appendChild(document.getElementById(data));
}
</script>

</body>
</html>
9.本地存储
<!-- 对于需要关闭浏览器数据随之消失,直接将sessionStorage代理localStorage即可。 -->
<!DOCTYPE html>
<html>
<head>
	<title>本地储存localStorage</title>
	<meta charset="utf-8">
</head>
<body>
	<h2>本地存储测试:</h2>
	<p>这里的是永久存储在本地,即使关闭浏览器,数据也不丢,再次打开浏览器,数据直接从本地取回。</p>
	<div id="div1">这里将直接显示值:<span id="span2">xxx</span></div>
	<div id="div2"><p>这里将显示计数:<span id="span">~~~</span></p></div>
	<button type="button" onclick="clickcount()">计数按钮</button>
	<button type="button" onclick="removecount()">清除计数</button>

	<script type="text/javascript">
		localStorage.setItem("name","Wlcome");
		document.getElementById('span2').innerHTML=localStorage.name;

		function clickcount() {
			//首先确定能用本地存储
			if (typeof(Storage)!== "undefined") {
				//其次判断count这个变量的值是否不等于0
				if (localStorage.count) {
					localStorage.count=Number(localStorage.count)+1;
				}
				else{
					//0的话就置1
					localStorage.count=1;
				}
				document.getElementById("span").innerHTML=localStorage.count+"次";
			}
			else{
				document.getElementById('div2').innerHTML="浏览器不支持本地存储";
			}
		}
		function removecount() {
			localStorage.removeItem("count");
			document.getElementById("span").innerHTML="~~~";
		}
	</script>
</body>
</html>
10.应用缓存
(缓存页面,但动态页面要经常去修改manifest文件,可以通过控制台g)
创建一个manifest文件,如:test.appcache
#一定会缓存项
#但指向manifest的页面也会被缓存
#修改下面#后面的时间会更新test.appcache
CACHE MANIFEST
# 2012-02-21 v1.0.0
/test.jpg

#一定不缓存项
NETWORK:
login.asp

#先更新,否则使用缓存项代替(/联网更新项/ /更新失败代替项)
FALLBACK:
/html/ /offline.html
然后在html文件指向manifest文件即可。
<!DOCTYPE html>
<html manifest="/test.appcache">
<head>
	<title></title>
</head>
<body>

</body>
</html>
11.客户端调用服务器上的js
html文件:
<!DOCTYPE html>
<html>
<head>
	<title>知来物</title>
	<meta charset="utf-8">
</head>
<body>
<h2>客户端调用服务器上的js</h2>
<p id="showerror">计数:<output id="timed"></output></p>
<button type="button" onclick="startWorker()">开始计数</button>
<button type="button" onclick="stopWorker()">停止计数</button>
<script type="text/javascript">
	var w;
	function startWorker() {
		if (typeof(Worker)!=="undefined") {
			if (typeof(w)=="undefined") {
				w=new Worker("/jstest.js");
				w.onmessage=function (event) { //调用函数可以没名字
					document.getElementById('timed').innerHTML=event.data;
				}

			}
		}
		else{
			document.getElementById('showerror').innerHTML="your browser dont support Worker";
		}
	}
	function stopWorker() {
		w.terminate(); //对象停止监控,这个必须有
		w=undefined;  //让程序可重复再运转。undefined是个类型,不是值。
	}
</script>
</body>
</html>
js文件:
var i=0;

function timedCount() {
	i=i+1;
	postMessage(i);
	setTimeout("timedCount()",1000); //1000ms=1s,1s后继续迭代。
}
//当引用本js,会执行下面一行。
timedCount();
12.SSE(实时获取服务器更新数据)不支持IE
大致和Worker差不多,就是对象变成了EventSource。还有需要能返回数据php或者asp文件。
http://www.w3school.com.cn/html/html5_serversentevents.asp


 741
741


 被折叠的 条评论
为什么被折叠?
被折叠的 条评论
为什么被折叠?
 到【灌水乐园】发言


