


yum安装
官方安装指导文档:nginx: Linux packages
添加nginx的官方源
vim /etc/yum.repos.d/nginx.repo
[nginx-stable]
name=nginx stable repo
baseurl=http://nginx.org/packages/centos/$releasever/$basearch/
gpgcheck=1
enabled=1
gpgkey=https://nginx.org/keys/nginx_signing.key
module_hotfixes=true

[nginx-mainline]
name=nginx mainline repo
baseurl=http://nginx.org/packages/mainline/centos/$releasever/$basearch/
gpgcheck=1
enabled=0
gpgkey=https://nginx.org/keys/nginx_signing.key
module_hotfixes=true
安装nginx
yum -y install nginx
#  查看nginx版本
nginx -v
Nginx配置文件

http块、server块location块都可以有各自独立的访问日志
server层日志写入的优先级高于http层。
日志可以重新配置格式,也可以切割。
负载均衡
运用一些负载均衡策略,可以将nginx作为非常有效的HTTP负载均衡器来,把流量分配到多个应用程序服务器。
Nginx负载均衡是通过upstream模块来实现的,内置实现了3种负载策略
下面内容基本是官方文档的汉化及补充
Using nginx as HTTP load balancer
轮循(默认)
例:
http {
    upstream tomcats {
        server srv1.example.com;
        server srv2.example.com;
        server srv3.example.com;
    }

    server {
        listen 80;

        location / {
            proxy_pass http://tomcats;
        }
    }
}
参数:
weight
例:
upstream tomcats {
    server srv1.example.com weight=2; # 2/6次
    server srv2.example.com weight=3; # 3/6次
    server srv3.example.com weight=1; # 1/6次
}
上例配置,表示6次请求中,1分配2次,2分配3次,3分配1次
max_fails+fail_timeout
分别默认为1,10秒。Server允许请求失败的次数,在超过max_fails后,在fail_timeout时间内,新的请求将不会分配给这台机器。
例:
upstream tomcats {
    server srv1.example.com max_fails=5 fail_timeout=60;
    server srv2.example.com;
    server srv3.example.com;
}
srv1.example.com这台机器,如果有5次请求失败,nginx在1分钟内,不会将新的请求分配给它。
backup
备份机,所有服务器挂了之后才会生效
例如:
upstream tomcats {
    server srv1.example.com;
    server srv2.example.com;
    server srv3.example.com backup;
}
前两台挂了,第三台才会生效,不可以与下面的ip_hash一起使用
down
标识某一台server不可用
max_conns
限制分配给某台Server处理的最大连接数量,超过这个数量,将不会分配新的连接给 它。默认为0,表示不限制。
resolve
指定域名解析服务器
例:
http {
    resolver 10.0.0.1;
    upstream u {
    zone ...;
    ...
    server example.com resolve;
    }
}
表示example.com域名,由10.0.0.1服务器来负责解析。
最少连接
nginx将尝试不使繁忙的应用程序服务器具有过多的请求,分发新的请求到连接数最少的服务器。
upstream tomcats {
        least_conn;
        server srv1.example.com;
        server srv2.example.com;
        server srv3.example.com;
    }
ip_hash
每个请求按访问ip的hash结果分配,这样每个访客固定访问一个后端服务器,可以保证会话持久性。
upstream tomcats {
    ip_hash;
    server srv1.example.com;
    server srv2.example.com;
    server srv3.example.com;
}
第三方负载策略
在使用yum安装Nginx时,默认安装的是官方提供的二进制包,这些包通常不包含第三方模块。如果需要使用第三方负载均衡模块,需要通过源码安装Nginx,并在编译时指定需要的模块。
fair:根据服务器的响应时间来分配请求,响应时间短的优先分配,即负载压力小的优先会分配。
url_hash:按请求url的hash结果来分配请求,使每个url定向到同一个后端服务器,服务器做缓 存时比较有效。1.7.2版本以后,url_hash模块已经集成到了nginx源码当中,不需要单独安装。之前 的版本仍需要单独安装。
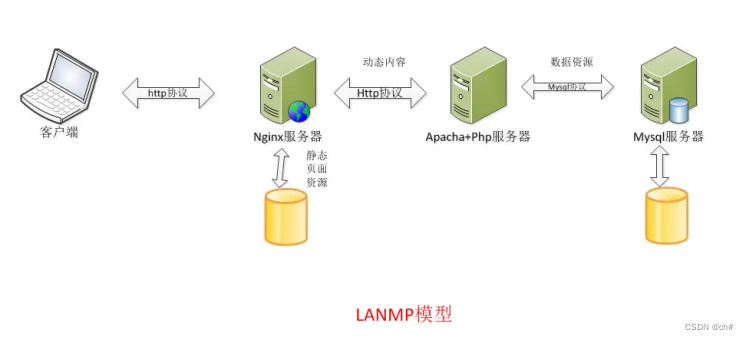
动静分离:fastcgi实现lnmp实现动静分离
动静分离,就是把动态和静态请求分开,在不同的环境里处理响应。可以理解为:Nginx处理静态页面, Tomcat处理动态页面。
LNMP代表的就是:Linux系统下Nginx+MySQL+PHP这种网站服务器架构。
FastCGI(Fast Common Gateway Interface):是一种用于Web服务器和应用程序之间通信的协议。传统的CGI中,每个请求都需要启动一个新的进程或线程来处理,这会导致性能瓶颈。而FastCGI使用长连接(persistent connection)的方式,可以在多个请求之间共享同一个进程或线程,从而提高了性能。支持多种编程语言,包括PHP、Python、Ruby等。
本次架构服务器分配
| 角色 | IP | 安装软件 |
|---|---|---|
| nginx代理服务器1 | 192.168.126.13 | phpMyAdmin,nginx |
| apache动态服务器2 | 192.168.126.14 | phpMyAdmin,php,mysql |
| nginx静态服务器3 | 192.168.126.15 | phpMyAdmin,nginx |
三台服务器都安装phpMyAdmin
链接:https://files.phpmyadmin.net/phpMyAdmin/4.0.10.20/phpMyAdmin-4.0.10.20-all-languages.tar.gz
wget https://files.phpmyadmin.net/phpMyAdmin/4.0.10.20/phpMyAdmin4.0.10.20-all-languages.tar.gz --no-check-certificate
tar xf phpMyAdmin-4.0.10.20-all-languages.tar.gz -C /data/nginx/html/
# 解压缩phpMyAdmin
cd /data/nginx/html
ln -sv phpMyAdmin-4.0.10.20-all-languages/ pma
# 创建软链接方便访问
服务器1配置
配置ngixn文件
vim /etc/nginx/conf.d/main.conf
server {
        listen 80;
        index index.php index.html;
        location / {
        root /data/nginx/html;
        proxy_pass http://192.168.126.15:80;
        }
        location ~* \.php$ {
        fastcgi_pass 192.168.126.14:9000;
        fastcgi_index index.php;
        fastcgi_param SCRIPT_FILENAME
/data/apps/$fastcgi_script_name;
        include fastcgi_params;
        fastcgi_keep_conn on;
        fastcgi_cache fcache;
        fastcgi_cache_key $request_uri;
        fastcgi_cache_valid 200 302 10m;
        fastcgi_cache_valid 301 1h;
        fastcgi_cache_valid any 1m;
        }
        location ~* ^/(status|ping)$ {
        include fastcgi_params;
        fastcgi_pass 192.168.126.14:9000;
        fastcgi_param SCRIPT_FILENAME
$fastcgi_script_name;
        }
}
vim /etc/nginx/nginx.conf
......
http {
    include       /etc/nginx/mime.types;
    default_type  application/octet-stream;
    proxy_cache_path /data/nginx/cache levels=1:1:1
keys_zone=pcache:10m max_size=2g;
    fastcgi_cache_path /data/nginx/fcgicache levels=2:2:2
keys_zone=fcache:10m max_size=2g;
    log_format  main  '$remote_addr - $remote_user [$time_local] "$request" '
                      '$status $body_bytes_sent "$http_referer" '
                      '"$http_user_agent" "$http_x_forwarded_for"';
    access_log  /var/log/nginx/access.log  main;
    sendfile        on;
    #tcp_nopush     on;
    keepalive_timeout  65;
    #gzip  on;
    include /etc/nginx/conf.d/*.conf;
}
把/etc/nginx/conf.d下的其他conf文件移除,或修改后缀,我的是之前的

启动nginx
 mkdir /data/nginx/html
systemctl start nginx
服务器2配置
安装php,php的配置文件,“;”表示注释
yum -y install php-mysql php-fpm php-mbstring phmcrypt mariadb-serverp
cd /etc/php-fpm.d/
vim www.conf
listen = 0.0.0.0:9000
# 监听所有ip的9000端口
;listen.allowed_clients = 127.0.0.1
# 把他注释掉,标识监听所有客户端
user = apache
# 因为没有安装nginx,所以不用改
group = apache
pm = dynamic#动态资源
pm.max_children =150
pm.start_servers = 5
pm.min_spare_servers = 5
pm.max_spare_servers = 35
pm.status_path = /status
# 信息页
ping.path = /ping
# 健康状态监测
php_value[session.save_path] = /var/lib/php/session
# 创建此目录,并赋予Apache属主组织权限
mkdir -pv /var/lib/php/session
# 创建session目录
chown apache:apache /var/lib/php/session
# 设置属主属组
mkdir -pv /data/apps
vim /data/apps/index.php #编辑PHP信息页
<?php
phpinfo();
?>编辑phpMyAdmin配置文件
cd /data/apps/phpMyAdmin-4.0.10.20-all-languages/
cp config.sample.inc.php config.inc.php
# 备份原配置文件
vim config.inc.php
...
*/
$cfg['blowfish_secret'] = '点击几下键盘添加随机数'; /* YOU MUST FILL IN THIS FOR COOKIE AUTH! */
...
编辑mysql配置文件
vim /etc/my.cnf
[mysqld]
bind_address=0.0.0.0
vim /etc/my.cnf.d/server.cnf
[mysqld]
skip_name_resolve=ON
# 关闭地址解析
innodb_file_per_table=ON创建MySQL远程连接权限(两个用户root和test都可以)
mysql> create user 'test'@'%' identified with mysql_native_password by 'Ch#123456';
Query OK, 0 rows affected (0.01 sec)

mysql> GRANT select ON *.* TO 'test';

mysql> update mysql.user set plugin = 'mysql_native_password' where user = 'root';
Query OK, 1 row affected (0.01 sec)

mysql> flush privileges;
Query OK, 0 rows affected (0.01 sec)

mysql> select user,host,plugin,authentication_string from mysql.user;
+------------------+-----------+-----------------------+------------------------------------------------------------------------+
| user             | host      | plugin                | authentication_string                                                  |
+------------------+-----------+-----------------------+------------------------------------------------------------------------+
| root             | %         | mysql_native_password | $A$005$s}uC)[Q
m,x:E*Pp(X/QGzYywSOU7Fp4rYzWOKk2kyGIOTO0gjwz.IZS8HB75 |
| test             | %         | mysql_native_password | *18ADA4B62B5F60187B38323F5BC86206EBEE401D                              |
| mysql.infoschema | localhost | caching_sha2_password | $A$005$THISISACOMBINATIONOFINVALIDSALTANDPASSWORDTHATMUSTNEVERBRBEUSED |
| mysql.session    | localhost | caching_sha2_password | $A$005$THISISACOMBINATIONOFINVALIDSALTANDPASSWORDTHATMUSTNEVERBRBEUSED |
| mysql.sys        | localhost | caching_sha2_password | $A$005$THISISACOMBINATIONOFINVALIDSALTANDPASSWORDTHATMUSTNEVERBRBEUSED |
+------------------+-----------+-----------------------+------------------------------------------------------------------------+
5 rows in set (0.00 sec)

mysql> update mysql.user set authentication_string ='*18ADA4B62B5F60187B38323F5BC86206EBEE401D' where user = 'root';
Query OK, 1 row affected (0.00 sec)
Rows matched: 1  Changed: 1  Warnings: 0

mysql> flush privileges;
Query OK, 0 rows affected (0.01 sec)
启动php与mysql
systemctl start php-fpm
systemctl start mysqld
查看端口

服务器3配置
配置nginx文件
如上扼杀其他/etc/nginx/conf.d/下的其他conf文件
vim /etc/nginx/conf.d/nginx.conf
server {
    listen 80;
    server_name _;
    location / {
    root /data/nginx/html;
    index index.html;
    }
}
配置静态页面
vim /data/nginx/html/index.html
<h2>STATIC HTML asdjaocbabcbaui from 15</h2>
结果
访问静态服务器

访问动态服务器

登陆后可以访问phpMyAdmin连接数据库页面

根据location规则也可以用ping或者status进行访问动态服务器


 1442
1442


 被折叠的 条评论
为什么被折叠?
被折叠的 条评论
为什么被折叠?
 到【灌水乐园】发言


