


A Model Rendering Demo
现在我们开始编写一个示例程序,用于演示上一节讲述的模型系统。在该示例中,渲染一个只包含单个mesh的sphere模型。该模型(Shpere.obj)存储一个Wavefront OBJ格式的文件中,可以在本书配套网站上获取。渲染时还会使用BasicEffect.fx文件(BasicEffect中没有使用纹理,只是对vertex colors进行插值计算)。首先,创建一个ModelDemo类,该的声明代码与上一章的CubeDemo类相同。然后在ModelDemo类中增加两个新的成员,一个用于存储模型的indices数量的无符号整形变量(ModelDemo::mIndexCount),还有一个CreateVertex()函数,函数原型如下:
void CreateVertexBuffer(ID3D11Device* device, const Mesh& mesh, ID3D11Buffer** vertexBuffer) const;
列表15.7 Loading a Model
void ModelDemo::Initialize()
{
	// ... Previously presented code omitted for brevity ...

	// Load the model
	std::unique_ptr<Model> model(new Model(*mGame, "Content\\Models\\Sphere.obj", true));

	// Create the vertex and index buffers
	Mesh* mesh = model->Meshes().at(0);
	CreateVertexBuffer(mGame->Direct3DDevice(), *mesh, &mVertexBuffer);
	mesh->CreateIndexBuffer(&mIndexBuffer);
	mIndexCount = mesh->Indices().size();
}

void ModelDemo::Draw(const GameTime& gameTime)
{
	ID3D11DeviceContext* direct3DDeviceContext = mGame->Direct3DDeviceContext();
	direct3DDeviceContext->IASetPrimitiveTopology(D3D11_PRIMITIVE_TOPOLOGY_TRIANGLELIST);
	direct3DDeviceContext->IASetInputLayout(mInputLayout);

	UINT stride = sizeof(BasicEffectVertex);
	UINT offset = 0;
	direct3DDeviceContext->IASetVertexBuffers(0, 1, &mVertexBuffer, &stride, &offset);
	direct3DDeviceContext->IASetIndexBuffer(mIndexBuffer, DXGI_FORMAT_R32_UINT, 0);

	XMMATRIX worldMatrix = XMLoadFloat4x4(&mWorldMatrix);
	XMMATRIX wvp = worldMatrix * mCamera->ViewMatrix() * mCamera->ProjectionMatrix();
	mWvpVariable->SetMatrix(reinterpret_cast<const float*>(&wvp));

	mPass->Apply(0, direct3DDeviceContext);

	direct3DDeviceContext->DrawIndexed(mIndexCount, 0, 0);
}

void ModelDemo::CreateVertexBuffer(ID3D11Device* device, const Mesh& mesh, ID3D11Buffer** vertexBuffer) const
{
	const std::vector<XMFLOAT3>& sourceVertices = mesh.Vertices();

	std::vector<BasicEffectVertex> vertices;
	vertices.reserve(sourceVertices.size());
	if (mesh.VertexColors().size() > 0)
	{
		std::vector<XMFLOAT4>* vertexColors = mesh.VertexColors().at(0);
		assert(vertexColors->size() == sourceVertices.size());

		for (UINT i = 0; i < sourceVertices.size(); i++)
		{
			XMFLOAT3 position = sourceVertices.at(i);
			XMFLOAT4 color = vertexColors->at(i);
			vertices.push_back(BasicEffectVertex(XMFLOAT4(position.x, position.y, position.z, 1.0f), color));
		}
	}
	else
	{
		for (UINT i = 0; i < sourceVertices.size(); i++)
		{
			XMFLOAT3 position = sourceVertices.at(i);
			XMFLOAT4 color = ColorHelper::RandomColor();
			vertices.push_back(BasicEffectVertex(XMFLOAT4(position.x, position.y, position.z, 1.0f), color));
		}
	}

	D3D11_BUFFER_DESC vertexBufferDesc;
	ZeroMemory(&vertexBufferDesc, sizeof(vertexBufferDesc));
	vertexBufferDesc.ByteWidth = sizeof(BasicEffectVertex) * vertices.size();
	vertexBufferDesc.Usage = D3D11_USAGE_IMMUTABLE;
	vertexBufferDesc.BindFlags = D3D11_BIND_VERTEX_BUFFER;

	D3D11_SUBRESOURCE_DATA vertexSubResourceData;
	ZeroMemory(&vertexSubResourceData, sizeof(vertexSubResourceData));
	vertexSubResourceData.pSysMem = &vertices[0];
	if (FAILED(device->CreateBuffer(&vertexBufferDesc, &vertexSubResourceData, vertexBuffer)))
	{
		throw GameException("ID3D11Device::CreateBuffer() failed.");
	}
}
在ModelDemo::Initialize()函数中通过实例化一个Model类对象加载Sphere.obj文件。如果加载成功,就可以通过Model::Meshes()函数获取到Sphere object中唯一的mesh。然后就可以使用该mesh初始化vertex和index buffers。
在上一节已经讨论过Mesh::CreateIndexBuffer()函数,在这里我们主要讨论ModelDemo::CreateVertexBuffer()函数。在该函数中,最后几行用于创建vertex buffer的代码,与cube示例中手动构建vertices的代码完全一样。但是在ModelDemo::CreateVertexBuffer()函数中,是根据mesh中存储的数据动态的创建BasicEffectVertex数组。其中有一个用于测试vertex colors的条件语句,如果在该mesh中含有vertex colors,就直接使用这些colors,否则就为每一个vertex指定一个随机的color(如果愿意,你也可以指定一个固定的color)。
ModelDemo::Draw()函数与cube示例中的Draw函数也基本相同,除了需要在调用ID3D11DeviceContext::Draw()函数时把mIndexCount作为第一个参数之外。
把ModelDemo集成到RenderingGame类中,就可以得到类似与图15.1所示的输出。
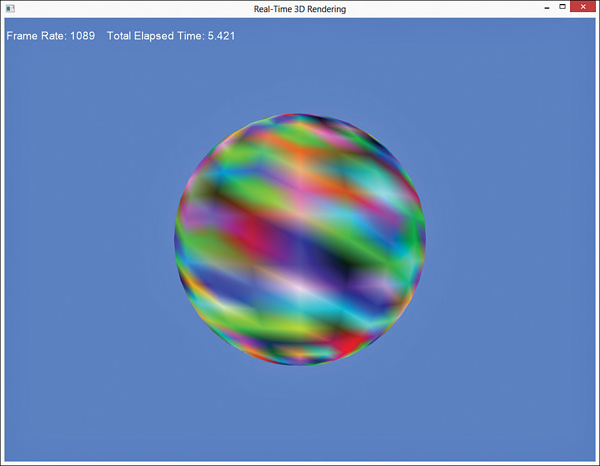
图15.1 Output of the model demo.
Texture Mapping
下面,我们在model示例的基础上添加使用一个texture。首先,通过拷贝ModelDemo类的代码创建一个新的类TextureModelDemo。然后,在该类中增加如下的成员函数:
ID3D11ShaderResourceView* mTextureShaderResourceView;
ID3DX11EffectShaderResourceVariable* mColorTextureVariable;
其中ID3D11ShaderResourceView接口类型指定了shader中使用的一种资源(例如,一种纹理资源)。ID3DX11EffectShaderResourceVariable接口是Effect 11类型,用于表示shader变量,该变量接受一种shader资源(比如,HLSL中的Texture2D类型)。
在这个示例中,我们将使用在第5章“Texture Mapping”中所编写的TextureMapping.fx effect。首先简单回顾一下TextureMapping.fx effect,在这个effect中有两个shader constants,一个WorldViewProjection矩阵和一个ColorTexture,在vertex shader中接受一个object坐标和纹理坐标用于每一个vertex。然后,还需要使用main11 technique替换main10,并使用technique11关键字。
由于在TextureMapping effect中有一个不同的输入标志(TextureCoordinates),因此需要使用一个与BasicEffectVertex类型不同的vertex结构,取而代之的是使用TextureMappingVertex结构体,该结构体的声明如下:
typedef struct _TextureMappingVertex
{
	XMFLOAT4 Position;
	XMFLOAT2 TextureCoordinates;
	_TextureMappingVertex() { }
	_TextureMappingVertex(XMFLOAT4 position, XMFLOAT2
		textureCoordinates)
		: Position(position), TextureCoordinates(textureCoordinates) {
	}
} TextureMappingVertex;
其他的改变都是在TexturedModelDemo类的实现代码中。列表15.8列出了TexturedModelDemo::Initialize(),TexturedModelDemo::Draw(),以及TexturedModelDemo::CreateVertexBuffer()函数。可以在本书的配套网站上查看TexturedModelDemo的完整实现代码。
列表15.8 The TexturedModelDemo Class Implementation (Abbreviated)
#include "TexturedModelDemo.h"
#include "Game.h"
#include "GameException.h"
#include "MatrixHelper.h"
#include "ColorHelper.h"
#include "Camera.h"
#include "Utility.h"
#include "D3DCompiler.h"
#include "Model.h"
#include "Mesh.h"
#include <WICTextureLoader.h>

namespace Rendering
{
	RTTI_DEFINITIONS(TexturedModelDemo)

	TexturedModelDemo::TexturedModelDemo(Game& game, Camera& camera)
		: DrawableGameComponent(game, camera),
		  mEffect(nullptr), mTechnique(nullptr), mPass(nullptr), mWvpVariable(nullptr), mTextureShaderResourceView(nullptr), mColorTextureVariable(nullptr),
		  mInputLayout(nullptr), mWorldMatrix(MatrixHelper::Identity), mVertexBuffer(nullptr), mIndexBuffer(nullptr), mIndexCount(0)
	{
	}

	TexturedModelDemo::~TexturedModelDemo()
	{
		ReleaseObject(mColorTextureVariable);
		ReleaseObject(mTextureShaderResourceView);
		ReleaseObject(mWvpVariable);
		ReleaseObject(mPass);
		ReleaseObject(mTechnique);
		ReleaseObject(mEffect);
		ReleaseObject(mInputLayout);
		ReleaseObject(mVertexBuffer);
		ReleaseObject(mIndexBuffer);
	}

	void TexturedModelDemo::Initialize()
	{
		SetCurrentDirectory(Utility::ExecutableDirectory().c_str());

		// Compile the shader
		UINT shaderFlags = 0;

	#if defined( DEBUG ) || defined( _DEBUG )
		shaderFlags |= D3DCOMPILE_DEBUG;
		shaderFlags |= D3DCOMPILE_SKIP_OPTIMIZATION;
	#endif

		ID3D10Blob* compiledShader = nullptr;
		ID3D10Blob* errorMessages = nullptr;
		HRESULT hr = D3DCompileFromFile(L"Content\\Effects\\TextureMapping.fx", nullptr, nullptr, nullptr, "fx_5_0", shaderFlags, 0, &compiledShader, &errorMessages);
		if (FAILED(hr))
		{
			char* errorMessage = (errorMessages != nullptr ? (char*)errorMessages->GetBufferPointer() : "D3DX11CompileFromFile() failed");
			GameException ex(errorMessage, hr);
			ReleaseObject(errorMessages);

			throw ex;
		}

		// Create an effect object from the compiled shader
		hr = D3DX11CreateEffectFromMemory(compiledShader->GetBufferPointer(), compiledShader->GetBufferSize(), 0, mGame->Direct3DDevice(), &mEffect);
		if (FAILED(hr))
		{
			throw GameException("D3DX11CreateEffectFromMemory() failed.", hr);
		}

		ReleaseObject(compiledShader);

		// Look up the technique, pass, and WVP variable from the effect
		mTechnique = mEffect->GetTechniqueByName("main11");
		if (mTechnique == nullptr)
		{
			throw GameException("ID3DX11Effect::GetTechniqueByName() could not find the specified technique.", hr);
		}

		mPass = mTechnique->GetPassByName("p0");
		if (mPass == nullptr)
		{
			throw GameException("ID3DX11EffectTechnique::GetPassByName() could not find the specified pass.", hr);
		}

		ID3DX11EffectVariable* variable = mEffect->GetVariableByName("WorldViewProjection");
		if (variable == nullptr)
		{
			throw GameException("ID3DX11Effect::GetVariableByName() could not find the specified variable.", hr);
		}

		mWvpVariable = variable->AsMatrix();
		if (mWvpVariable->IsValid() == false)
		{
			throw GameException("Invalid effect variable cast.");
		}

		variable = mEffect->GetVariableByName("ColorTexture");
		if (variable == nullptr)
		{
			throw GameException("ID3DX11Effect::GetVariableByName() could not find the specified variable.", hr);
		}

		mColorTextureVariable = variable->AsShaderResource();
		if (mColorTextureVariable->IsValid() == false)
		{
			throw GameException("Invalid effect variable cast.");
		}

		// Create the input layout
		D3DX11_PASS_DESC passDesc;
		mPass->GetDesc(&passDesc);

		D3D11_INPUT_ELEMENT_DESC inputElementDescriptions[] =
		{
			{ "POSITION", 0, DXGI_FORMAT_R32G32B32A32_FLOAT, 0, 0, D3D11_INPUT_PER_VERTEX_DATA, 0 },
			{ "TEXCOORD", 0, DXGI_FORMAT_R32G32_FLOAT, 0, D3D11_APPEND_ALIGNED_ELEMENT, D3D11_INPUT_PER_VERTEX_DATA, 0 }
		};

		if (FAILED(hr = mGame->Direct3DDevice()->CreateInputLayout(inputElementDescriptions, ARRAYSIZE(inputElementDescriptions), passDesc.pIAInputSignature, passDesc.IAInputSignatureSize, &mInputLayout)))
		{
			throw GameException("ID3D11Device::CreateInputLayout() failed.", hr);
		}

		// Load the model
		std::unique_ptr<Model> model(new Model(*mGame, "Content\\Models\\Sphere.obj", true));

		// Create the vertex and index buffers
		Mesh* mesh = model->Meshes().at(0);
		CreateVertexBuffer(mGame->Direct3DDevice(), *mesh, &mVertexBuffer);
		mesh->CreateIndexBuffer(&mIndexBuffer);
		mIndexCount = mesh->Indices().size();

		// Load the texture
		std::wstring textureName = L"Content\\Textures\\EarthComposite.jpg";
		if (FAILED(hr = DirectX::CreateWICTextureFromFile(mGame->Direct3DDevice(), mGame->Direct3DDeviceContext(), textureName.c_str(), nullptr, &mTextureShaderResourceView)))
		{
			throw GameException("CreateWICTextureFromFile() failed.", hr);
		}
	}

	void TexturedModelDemo::Draw(const GameTime& gameTime)
	{
		ID3D11DeviceContext* direct3DDeviceContext = mGame->Direct3DDeviceContext();
		direct3DDeviceContext->IASetPrimitiveTopology(D3D11_PRIMITIVE_TOPOLOGY_TRIANGLELIST);
		direct3DDeviceContext->IASetInputLayout(mInputLayout);

		UINT stride = sizeof(TextureMappingVertex);
		UINT offset = 0;
		direct3DDeviceContext->IASetVertexBuffers(0, 1, &mVertexBuffer, &stride, &offset);
		direct3DDeviceContext->IASetIndexBuffer(mIndexBuffer, DXGI_FORMAT_R32_UINT, 0);

		XMMATRIX worldMatrix = XMLoadFloat4x4(&mWorldMatrix);
		XMMATRIX wvp = worldMatrix * mCamera->ViewMatrix() * mCamera->ProjectionMatrix();
		mWvpVariable->SetMatrix(reinterpret_cast<const float*>(&wvp));
		mColorTextureVariable->SetResource(mTextureShaderResourceView);

		mPass->Apply(0, direct3DDeviceContext);

		direct3DDeviceContext->DrawIndexed(mIndexCount, 0, 0);
	}

	void TexturedModelDemo::CreateVertexBuffer(ID3D11Device* device, const Mesh& mesh, ID3D11Buffer** vertexBuffer) const
	{
		const std::vector<XMFLOAT3>& sourceVertices = mesh.Vertices();

		std::vector<TextureMappingVertex> vertices;
		vertices.reserve(sourceVertices.size());

		std::vector<XMFLOAT3>* textureCoordinates = mesh.TextureCoordinates().at(0);
		assert(textureCoordinates->size() == sourceVertices.size());

		for (UINT i = 0; i < sourceVertices.size(); i++)
		{
			XMFLOAT3 position = sourceVertices.at(i);
			XMFLOAT3 uv = textureCoordinates->at(i);
			vertices.push_back(TextureMappingVertex(XMFLOAT4(position.x, position.y, position.z, 1.0f), XMFLOAT2(uv.x, uv.y)));
		}

		D3D11_BUFFER_DESC vertexBufferDesc;
		ZeroMemory(&vertexBufferDesc, sizeof(vertexBufferDesc));
		vertexBufferDesc.ByteWidth = sizeof(TextureMappingVertex) * vertices.size();
		vertexBufferDesc.Usage = D3D11_USAGE_IMMUTABLE;
		vertexBufferDesc.BindFlags = D3D11_BIND_VERTEX_BUFFER;

		D3D11_SUBRESOURCE_DATA vertexSubResourceData;
		ZeroMemory(&vertexSubResourceData, sizeof(vertexSubResourceData));
		vertexSubResourceData.pSysMem = &vertices[0];
		if (FAILED(device->CreateBuffer(&vertexBufferDesc, &vertexSubResourceData, vertexBuffer)))
		{
			throw GameException("ID3D11Device::CreateBuffer() failed.");
		}
	}
}
在TexturedModelDemo::Initialize()函数中,首先编译TextureMapping.fx文件,创建一个effect对象,并使用该对象加载main11 technique和p0 pass。然后,获取WorldViewProjection和ColorTexture变量。接着创建一个input layout,在这里所使用的D3D11_INPUT_ELEMENT_DESC数组中,指定了用于shader输入的POSITION和TEXCOORD semantics。
下一步,加载Sphere.obj模型文件,并创建相应的vertex和index buffers。在这个示例中,TexturedModelDemo::CreateVertexBuffer()函数通过从模型中读取positions和texture coordinates创建TextureMappingVertex objeects,shader中不再包含vertex colors。
最后,通过调用CreateWICTextureFromFile()函数把EarthComposite.jpg文件加载到mTextureShaderResourceView成员变量中。该函数在WICTextureLoader.h头文件中声明,并包含在DirectX命名空间中。WICTextureLoader.h头文件包含在DirectXTK库中,在第3章“Tools of the Trade”中已经介绍了DirectXTK库。在使用该库之前,确保已经在工程中配置了相关依赖项。EarthComposite.jpg文件可以在本书的配套网站找到。
TexturedModelDemo::Draw()函数则与最开始的model示例中的Draw()函数类似。不同的是,调用ID3D11DeviceContext::IASetVertexBuffers()函数使用TextureMappingVertex结构体大小作为pStride参数,并调用成员变量mColorTextureVariable的SetResource()函数设置纹理数据。
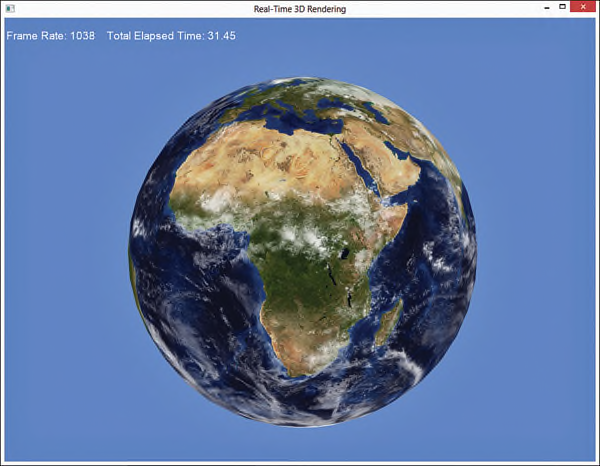
图15.2显示了textured model示例的输出结果。
图15.2 The output of the textured model demo. (Original texture from Reto Stöckli, NASA Earth Observatory. Additional texturing by Nick Zuccarello, Florida Interactive Entertainment Academy.)
总结
本章主要讲解在应用程序中如何使用3D模型。其中,使用Open Asset Import Library读取多种同格式的模型文件,并编写了一组类函数用于在运行时处理模型文件。然后编写了两个示例程序用于测试模型系统,并讲解了如何在模型中使用2D纹理。
下一章,将会编写一个材质系统用于支持之前编写的所有shaders,以及代码复用。
Exercises
1. Create a build-time content pipeline from the code you’ve written in this chapter. This can be as simple as a command-line application that accepts a single input file and produces a single output, or your application can operate on a batch of file inputs. Ideally, your content pipeline will be presented through a graphical user interface.
2. Experiment with loading various model formats. For example, write demos to load .x and .3ds files (DirectX and 3D Studio Max formats). If your models use .dds texture files, investigate the CreateDDSTextureFromFile() method from the DirectXTK library.
1. 使用本章所缩写的代码创建一个编译期的content管线。可以简单的创建一个命令行程序,接收单个文件作为输入参数,并产生单个的输出数据,或者让程序处理批量的输入文件。当然,最好是创建一个GUI)graphical user interface)程序,能显示content管线的运行过程。
2. 尝试加载多种不同格式的模型文件。比如,编写一个示例用于加载.x和.3dx格式的文件(DirectX和3D Studio Max 格式)。如果模型中使用了.ddx格式的纹理文件,研究一下如何使用DirectXTK库的CreateDDSTextureFromFile()函数。
本章配套学习代码:
http://download.csdn.net/detail/chenjinxian_3d/9585829
支持多种格式的模型文件,只需要在代码中修改对应的文件名就可以加载不同格式的文件,要在场景中显示出某个模型,需要适当的调用camera的位置和方向。


 757
757


 被折叠的 条评论
为什么被折叠?
被折叠的 条评论
为什么被折叠?
 到【灌水乐园】发言


