


Spring5
注:作者主要参考尚硅谷并结合个人理解所作的笔记,如有错误麻烦指出!
1.1 优点
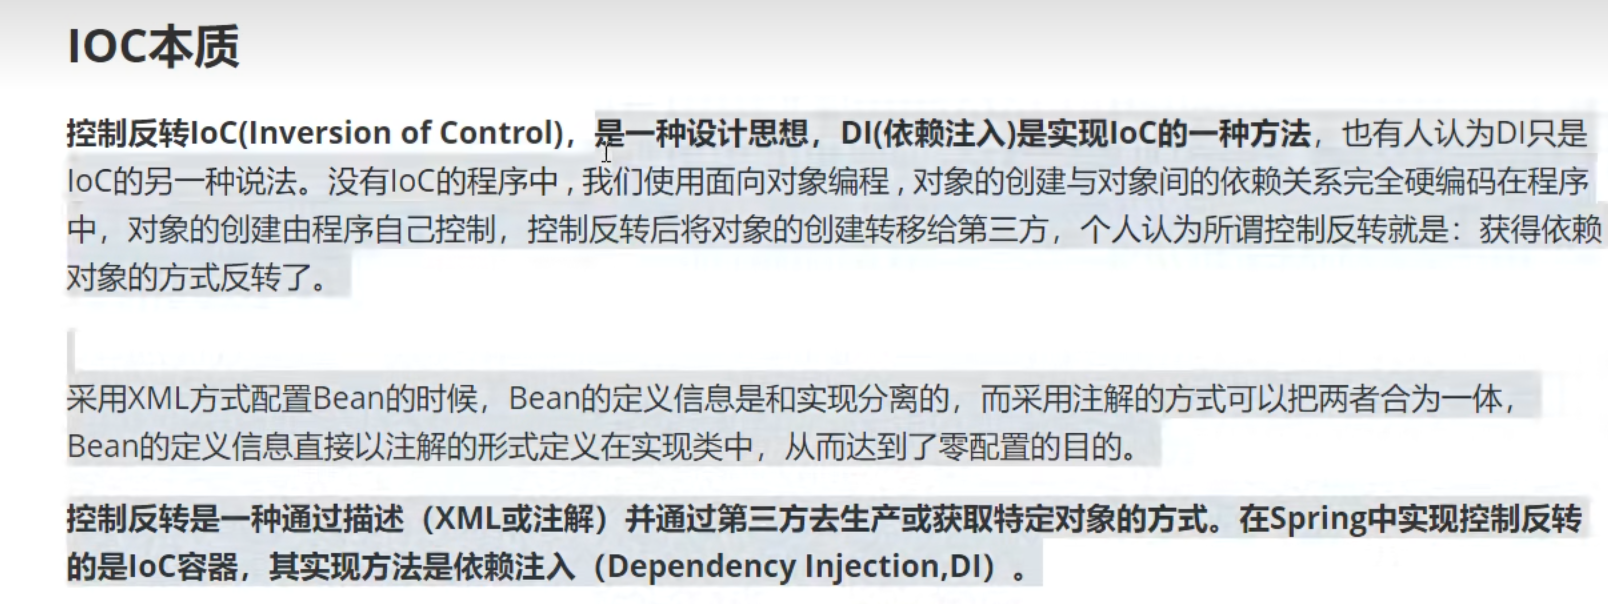
Spring是一个轻量级的控制反转(IOC)和面向切面编程(AOP)的框架
2 IOC
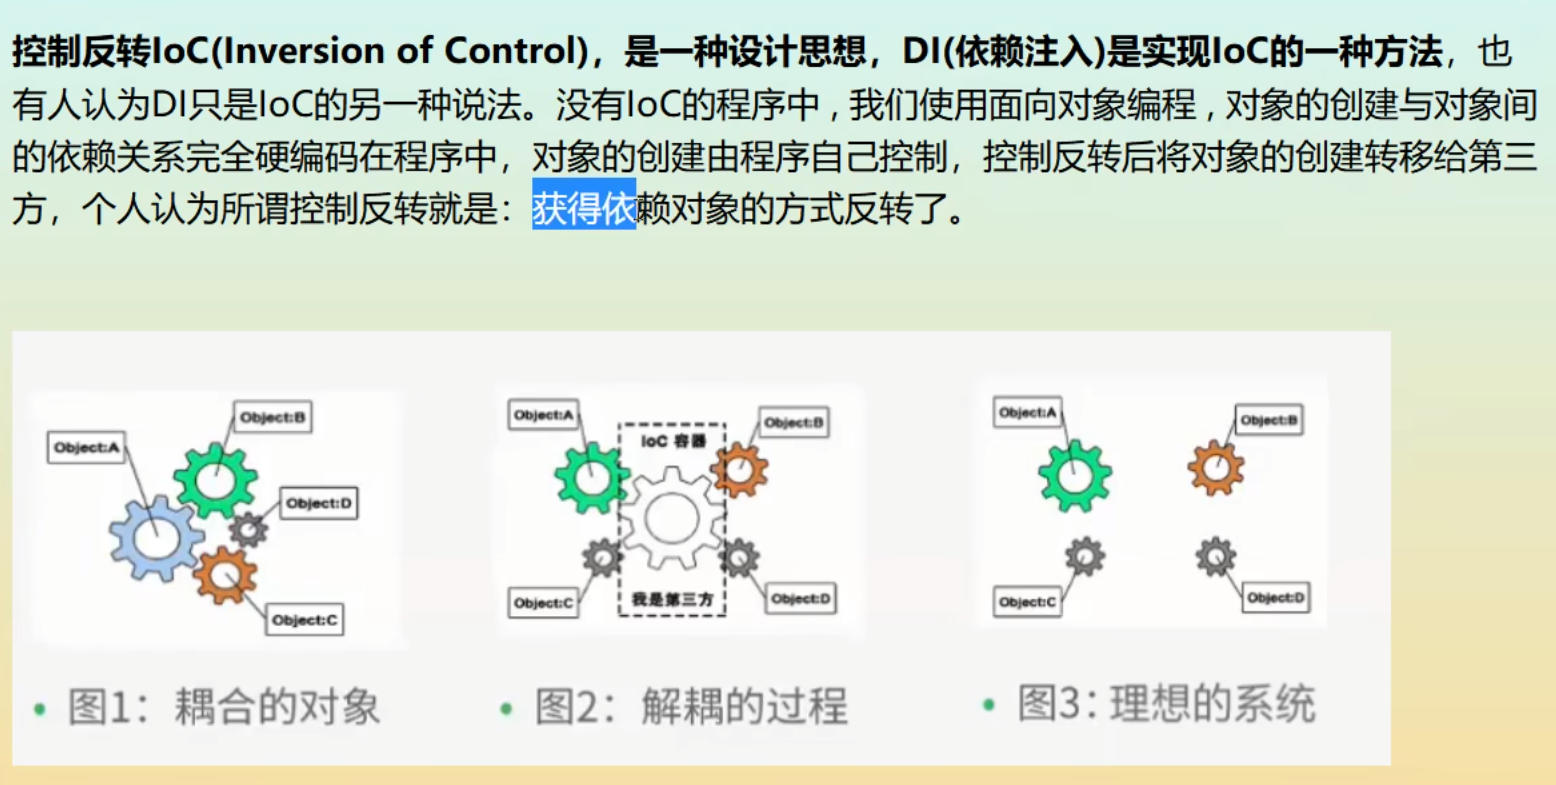
bean就相当于创建一个对象,无论调用者只调用其中一个bean,但所有bean都被实例化
2.1 IOC创建对象的方式
<!--        下标创建-->
<!--       <constructor-arg index="0" value="下标赋值"></constructor-arg>-->

<!--       变量名创建-->
<!--       <constructor-arg name="name" value="变量名赋值"></constructor-arg>-->

<!--       变量类型创建-->
       <constructor-arg type="java.lang.String" value="变量类型创建"></constructor-arg>
在配置文件加载的时候,容器中管理的对象就已经初始化了
3 Spring创建
3.1 别名
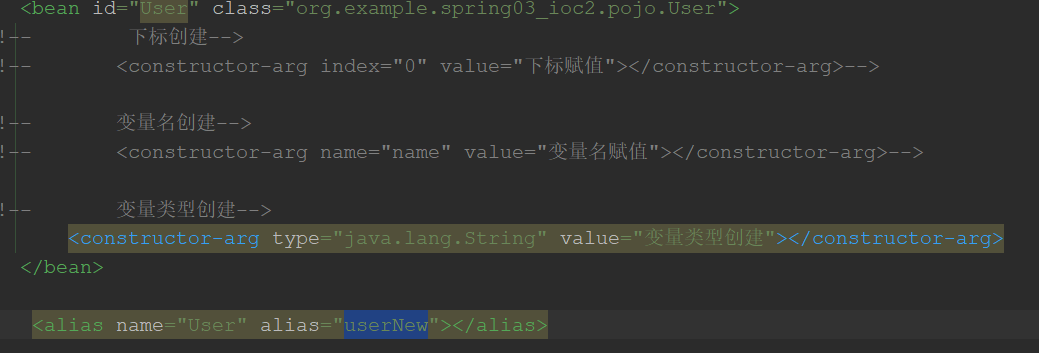
可以通过使用alias别名获取对象
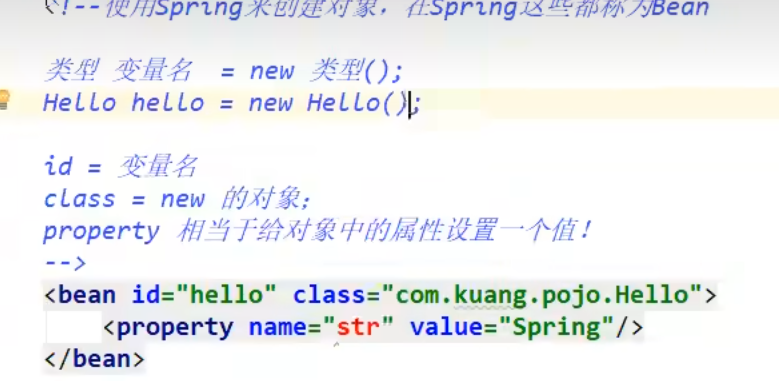
3.2 配置
<!--
    id: bean的唯一标识符,也就是对象名
    class: bean对象所对应的全限定名:报名+类型
    name: 也是别名,而且name可以同时取多个别名
-->
    <bean id="UserT" class="org.example.spring03_ioc2.pojo.UserT" name="user2 u2,u3;u4">
        <constructor-arg name="name" value="张三"></constructor-arg>
    </bean>
3.3 import
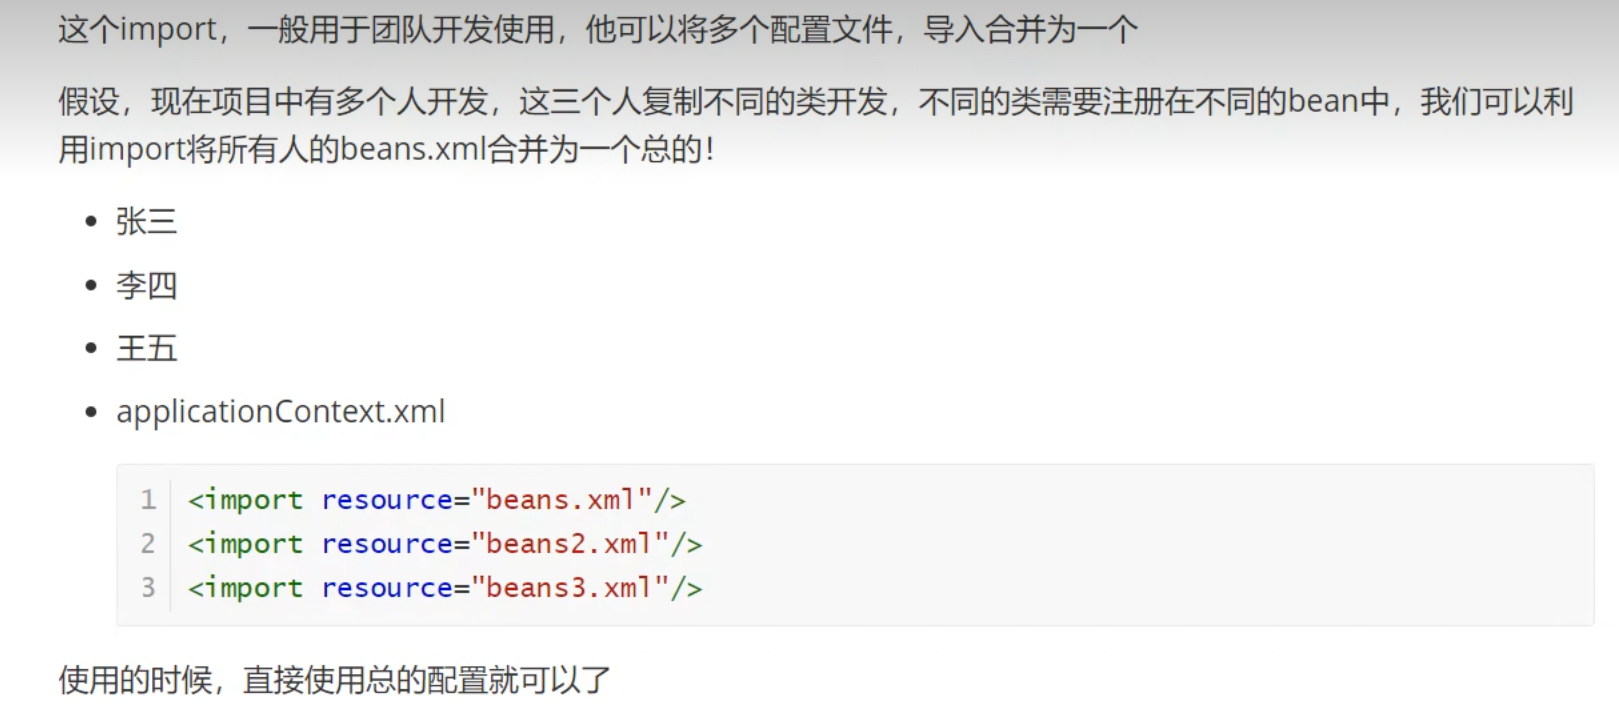
**重复的内容会被合并,假如俩个beans文件存在相同bean,别名不同那么会创建俩个
4 依赖注入
4.1 普通注入
 <bean id="address" class="org.example.pojo.Address">
        <property name="address" value="广州"></property>
    </bean>
<!--  第一种,普通值注入,value  -->
   <bean id="student" class="org.example.pojo.Student">
       <property name="name" value="张三"></property>
<!--       ref注入-->
       <property name="address" ref="address"></property>
<!--       数组-->
       <property name="books">
           <array>
               <value>红楼梦</value>
           </array>
       </property>
<!--       List-->
       <property name="hobbys">
           <list>
               <value>写代码</value>
           </list>
       </property>
<!--   Map-->
       <property name="cards">
           <map>
               <entry key="姓名" value="张三"></entry>
           </map>
       </property>
<!--       Set-->
       <property name="games">
           <set>
               <value>英雄联盟</value>
           </set>
       </property>
<!--       null注入-->
       <property name="wife">
           <null></null>
       </property>
<!--       Properties-->
       <property name="info">
           <props>
               <prop key="学号">2112205179</prop>
               <prop key="姓名">康哥</prop>
           </props>
       </property>
   </bean>
4.2 set 注入
4.3 p-namespace c-namespace
先导入相应依赖,然后使用即可
<beans xmlns="http://www.springframework.org/schema/beans"
    xmlns:xsi="http://www.w3.org/2001/XMLSchema-instance"
    xmlns:p="http://www.springframework.org/schema/p"
    xsi:schemaLocation="http://www.springframework.org/schema/beans
        https://www.springframework.org/schema/beans/spring-beans.xsd">

    <bean name="john-classic" class="com.example.Person">
        <property name="name" value="John Doe"/>
        <property name="spouse" ref="jane"/>
    </bean>

    <bean name="john-modern"
        class="com.example.Person"
        p:name="John Doe"
        p:spouse-ref="jane"/>

    <bean name="jane" class="com.example.Person">
        <property name="name" value="Jane Doe"/>
    </bean>
</beans>
<beans xmlns="http://www.springframework.org/schema/beans"
    xmlns:xsi="http://www.w3.org/2001/XMLSchema-instance"
    xmlns:c="http://www.springframework.org/schema/c"
    xsi:schemaLocation="http://www.springframework.org/schema/beans
        https://www.springframework.org/schema/beans/spring-beans.xsd">

    <bean id="beanTwo" class="x.y.ThingTwo"/>
    <bean id="beanThree" class="x.y.ThingThree"/>

    <!-- traditional declaration with optional argument names -->
    <bean id="beanOne" class="x.y.ThingOne">
        <constructor-arg name="thingTwo" ref="beanTwo"/>
        <constructor-arg name="thingThree" ref="beanThree"/>
        <constructor-arg name="email" value="something@somewhere.com"/>
    </bean>

    <!-- c-namespace declaration with argument names -->
    <bean id="beanOne" class="x.y.ThingOne" c:thingTwo-ref="beanTwo"
        c:thingThree-ref="beanThree" c:email="something@somewhere.com"/>

</beans>
4.4 Bean的作用域
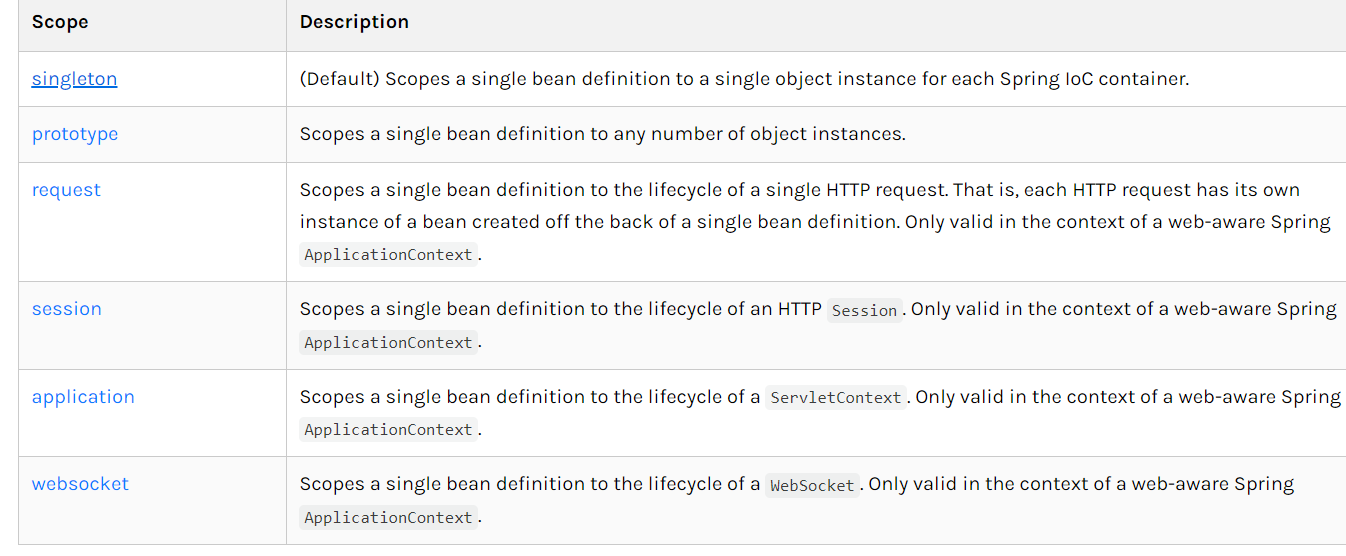
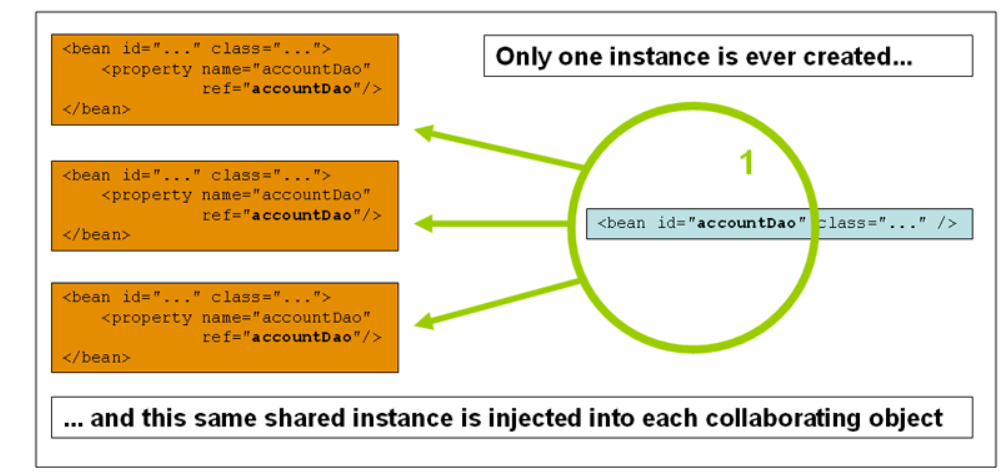
1 单例模式 singleton(Spring默认机制)
2 原型模式 prototype,每次从ioc容器中get的时候,都会产生一个新对象
<bean id="xxx匿名" class="服务的全类名" scope="prototype"/>
3 其余的request session application,这些个只能在web开发中使用到
5 Bean的自动装配
- 自动装配是spring满足bean依赖的一种方式
- Spring会在上下文自动寻找,并自动给bean装配属性
- 构成应用程序主干并由Spring IoC容器管理的对象称为bean。bean是一个由Spring IoC容器实例化、组装和管理的对象
在spring中有三种装配的方式
- 在xml中显示的配置,即上面所采用的方式
- 在java中显示的配置
- 隐式的自动装配
5.1 ByType ByName自动装配
<bean id="cat" class="org.example.pojo.Cat"></bean>
    <bean id="Dog" class="org.example.pojo.Dog"></bean>

<!--
    ByName 会自动在容器上下文中寻找,和自己对象set方法后面的值对应的beanid,例如setDog id要为小写,id唯一
    ByType 会自动在容器上下文寻找,和自己对象属性类型相同的bean,并且这个bean需要和自动注入的属性类型一致,bean的class唯一
-->
    <bean id="people" class="org.example.pojo.People" autowire="byName">
        <property name="name" value="张三"></property>
<!--        <property name="dog" ref="dog"/>-->
<!--        <property name="cat" ref="cat"/>-->
    </bean>
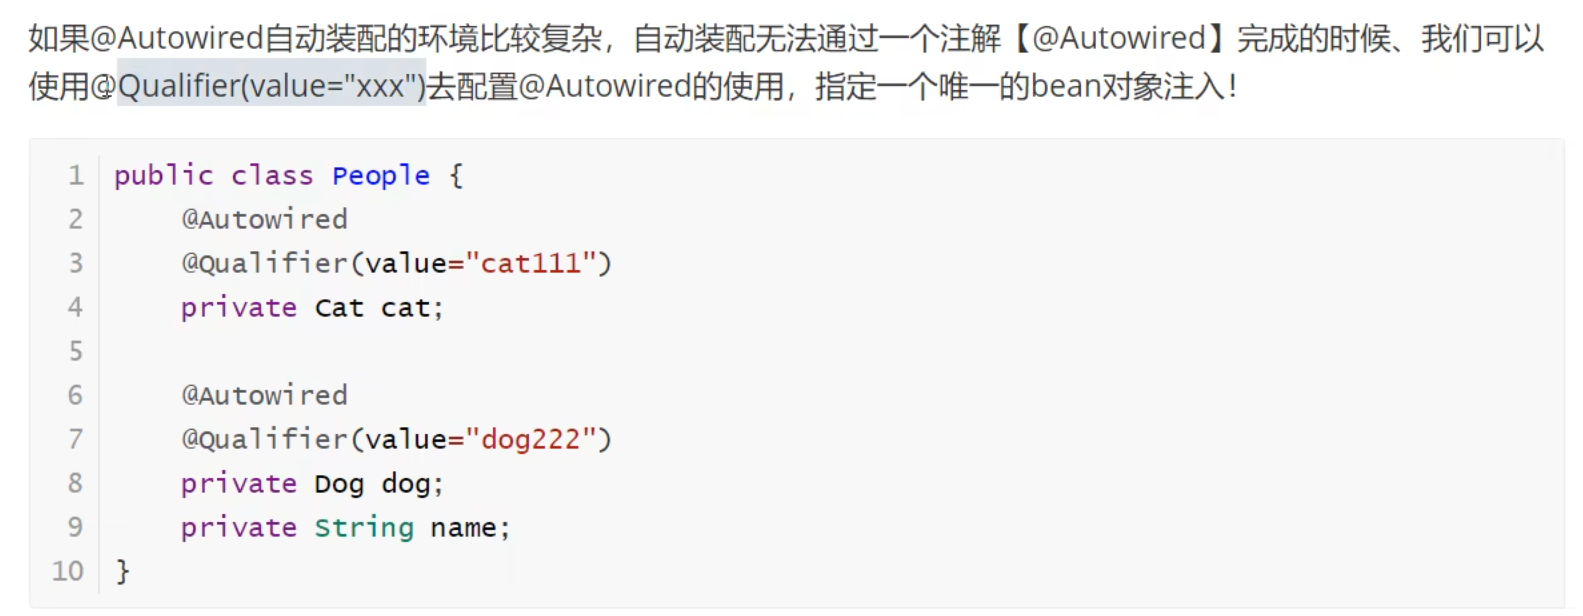
5.2 使用注解实现自动装配
@Autowried
直接在属性上使用即可,也可以在set方式上使用
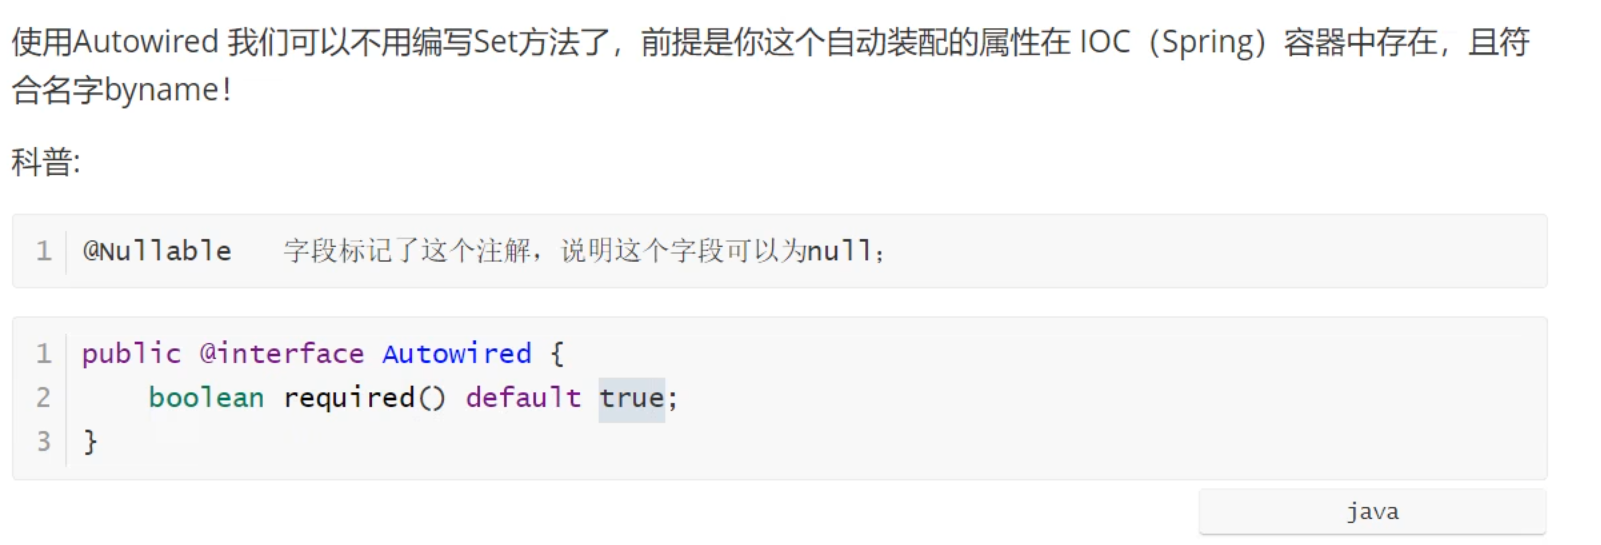
使用Autowired注解可以不用编写set方法,
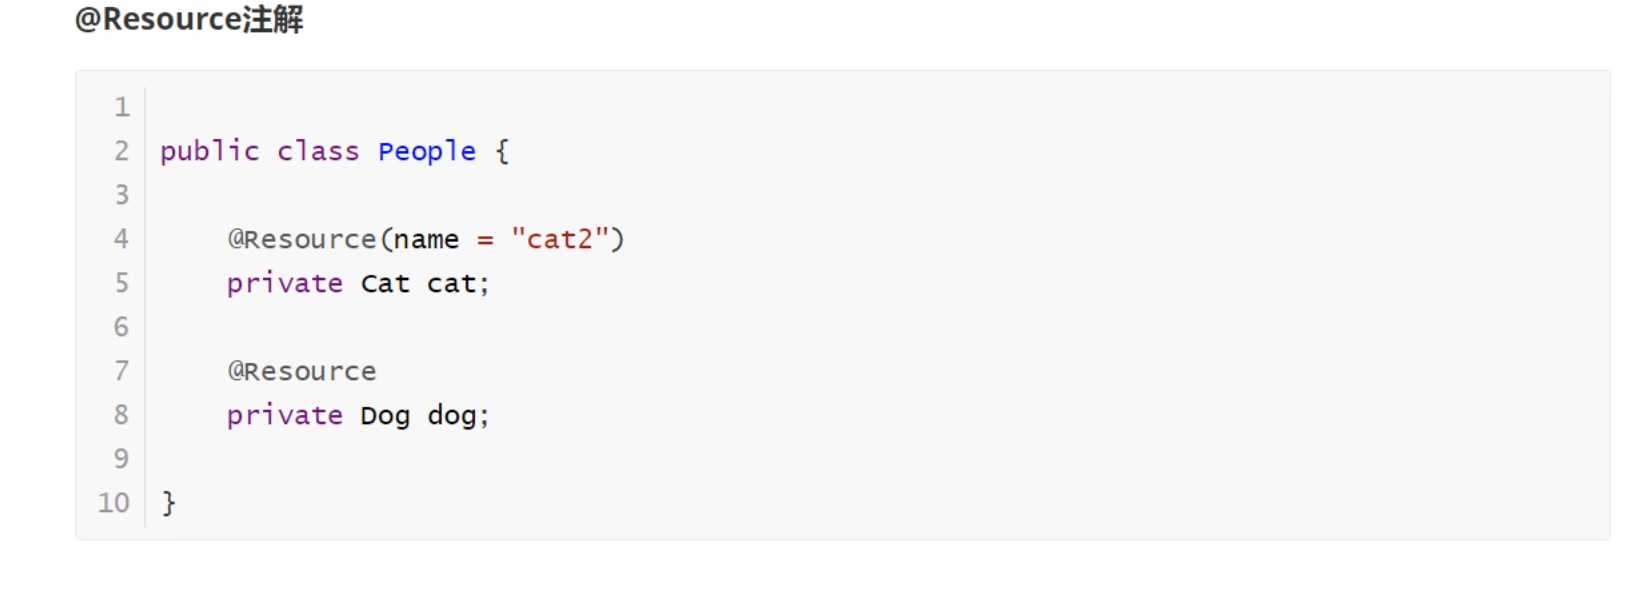
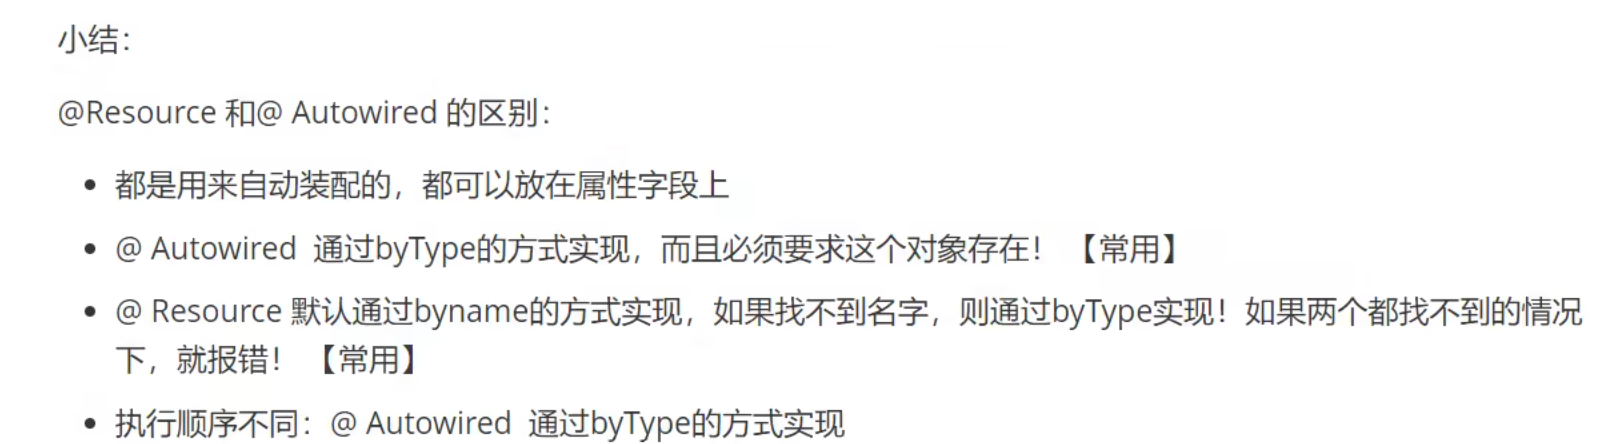
@Resource
@Nullable
字段标记这个了注解,说明这个字段可以为null
6 使用注解开发
6.1 环境配置
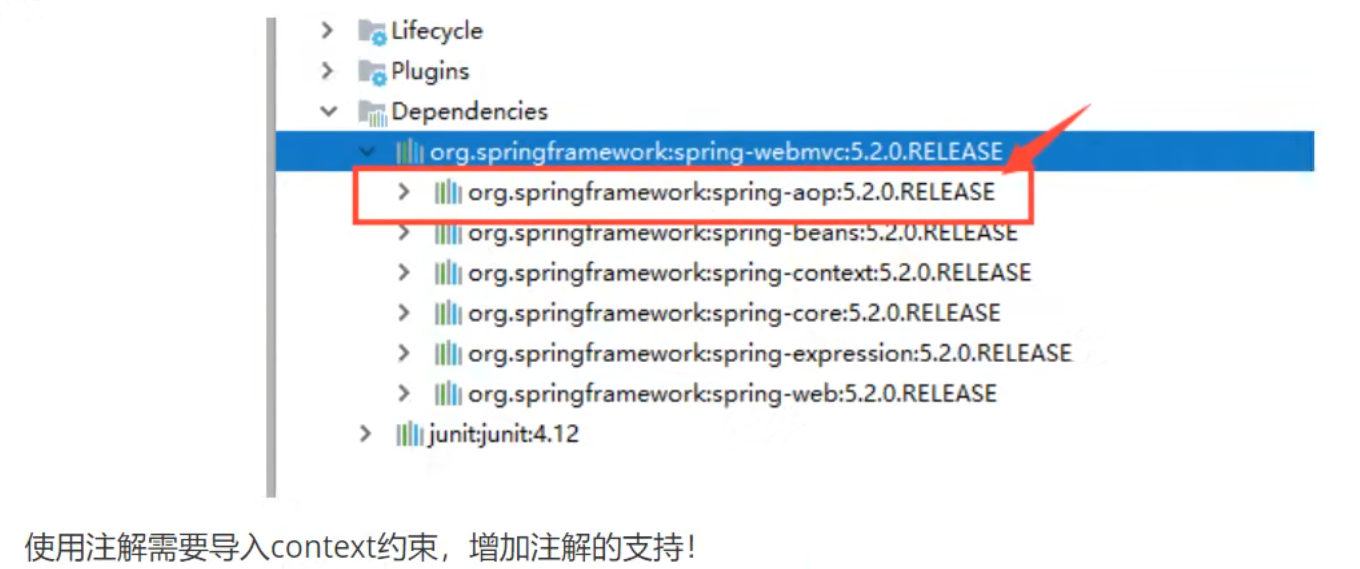
在使用spring4之后,要使用注解开发,必须要保证aop的包导入了
6.2 属性如何注入
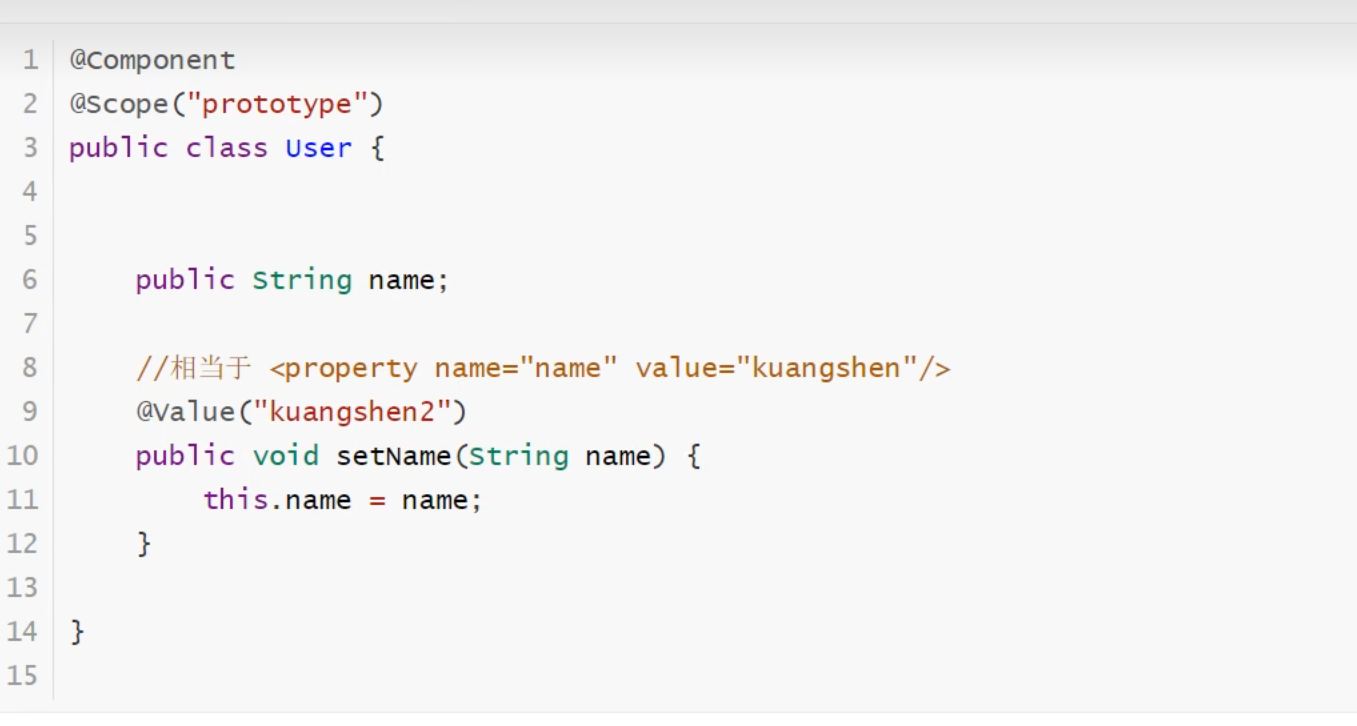
@Component
// 等价于<bean id="user class="org.example.pojo.User"/>
@Value(“李四”)
等价于<property name="name" value="李四"/>
6.3 衍生的注解
@Component有几个衍生的注解,我们在web开发中,会按照mvc三层架构分层
- dao【@Respository】
- service【@Service】
- controller【@controller】
这四个注解功能都是一样的,都是代表讲某个类注册到Spring中,装配Bean
6.4 作用域
6.5 小结
xml与注解
- xml更加万能,适用于任何场合! 维护方便
- 注解 不是自己类使用不了,维护相对复杂
xml与注解最佳实践
-
xml负责管理bean
-
注解只负责属性的注入
-
我们在使用的过程中,只需要注意一个问题,必须让注解生效,就需要开启注解的支持
-
<!--    指定要扫描的包,这个包下的注解就会生效-->
    <context:component-scan base-package="org.example.dao"></context:component-scan>
    <context:annotation-config/>
@Configuration // 被spring容器托管,注册到容器中,因为他本来就是一个@component,@Configuration代表
//这是一个配置类,就和我们之前看的bean.xml
@ComponentScan("org.example.pojo")
//@Import(testConfig.class)
public class testConfig {

    // 注册一个bean,就相当于我们之前写的一个bean标签
    // 这个方法的明代,就相当于bean标签中的id属性
//    这个方法的返回值 就相当于bean标签中的class属性
    @Bean
    public User getUser(){
        return new User();
    }
}
7 使用java的方式配置Spring
@Configuration // 被spring容器托管,注册到容器中,因为他本来就是一个@component,@Configuration代表
//这是一个配置类,就和我们之前看的bean.xml
@ComponentScan("org.example.pojo")
//@Import(testConfig.class)
public class testConfig {

    // 注册一个bean,就相当于我们之前写的一个bean标签
    // 这个方法的明代,就相当于bean标签中的id属性
//    这个方法的返回值 就相当于bean标签中的class属性
    @Bean
    public User getUser(){
        return new User();
    }
}
  @Test
   public void test1(){
//   如果完全使用了配置类方式去做,我们就只能通过AnnotationConfigContext来获取肉,通过配置类的class对象加载
       ApplicationContext context = new AnnotationConfigApplicationContext(testConfig.class);
       User user = (User) context.getBean("user");
       System.out.println(user.getName());
   }
@Component
public class User {

    @Value("张三")
    private String name;

    public String getName() {
        return name;
    }

    public void setName(String name) {
        this.name = name;
    }
}
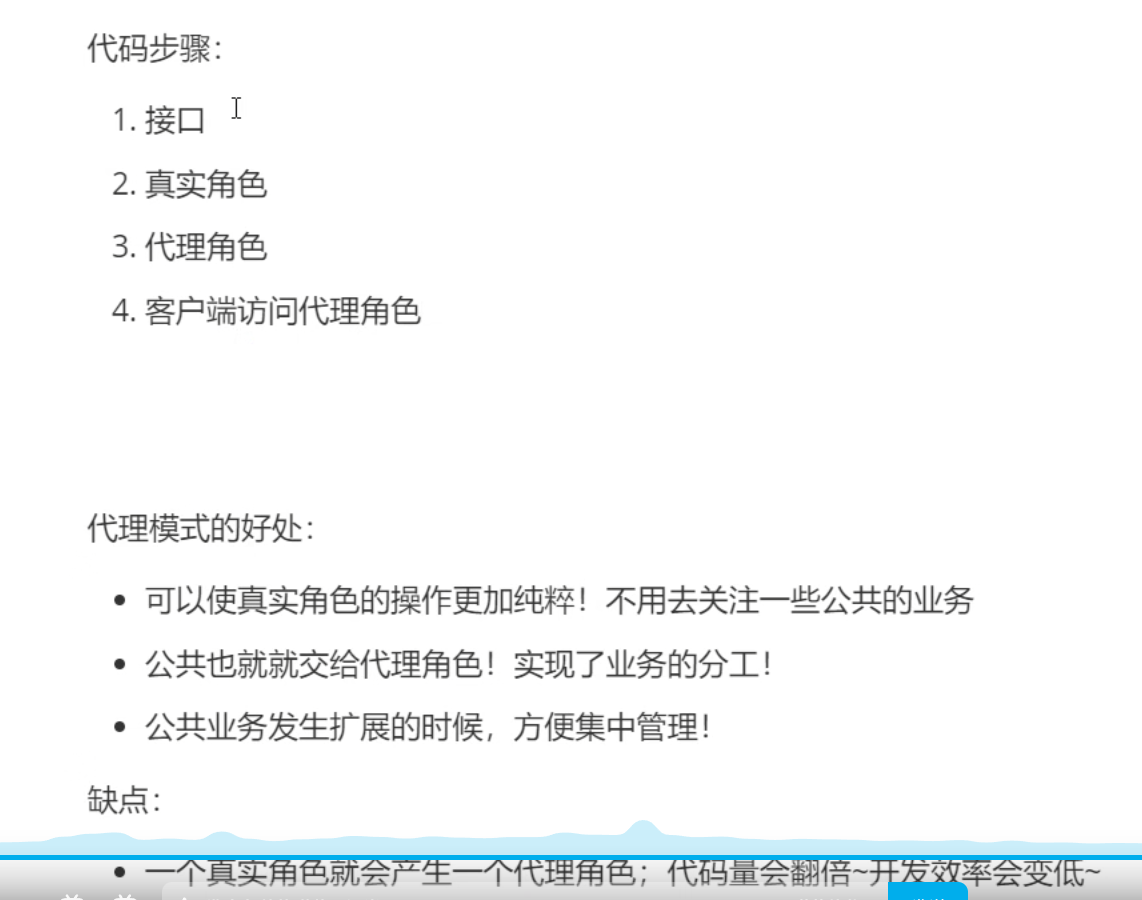
8 静态代理
角色分析
- 抽象角色:一般会使用接口或者抽象类来解决
- 真实角色:被代理的角色
- 代理角色:代理真是角色,代理真实角色后,外面会做一些附属操作
- 客户:访问代理对象的人
9 代理模式
再去看看设计模式
9.2 浅聊AOP

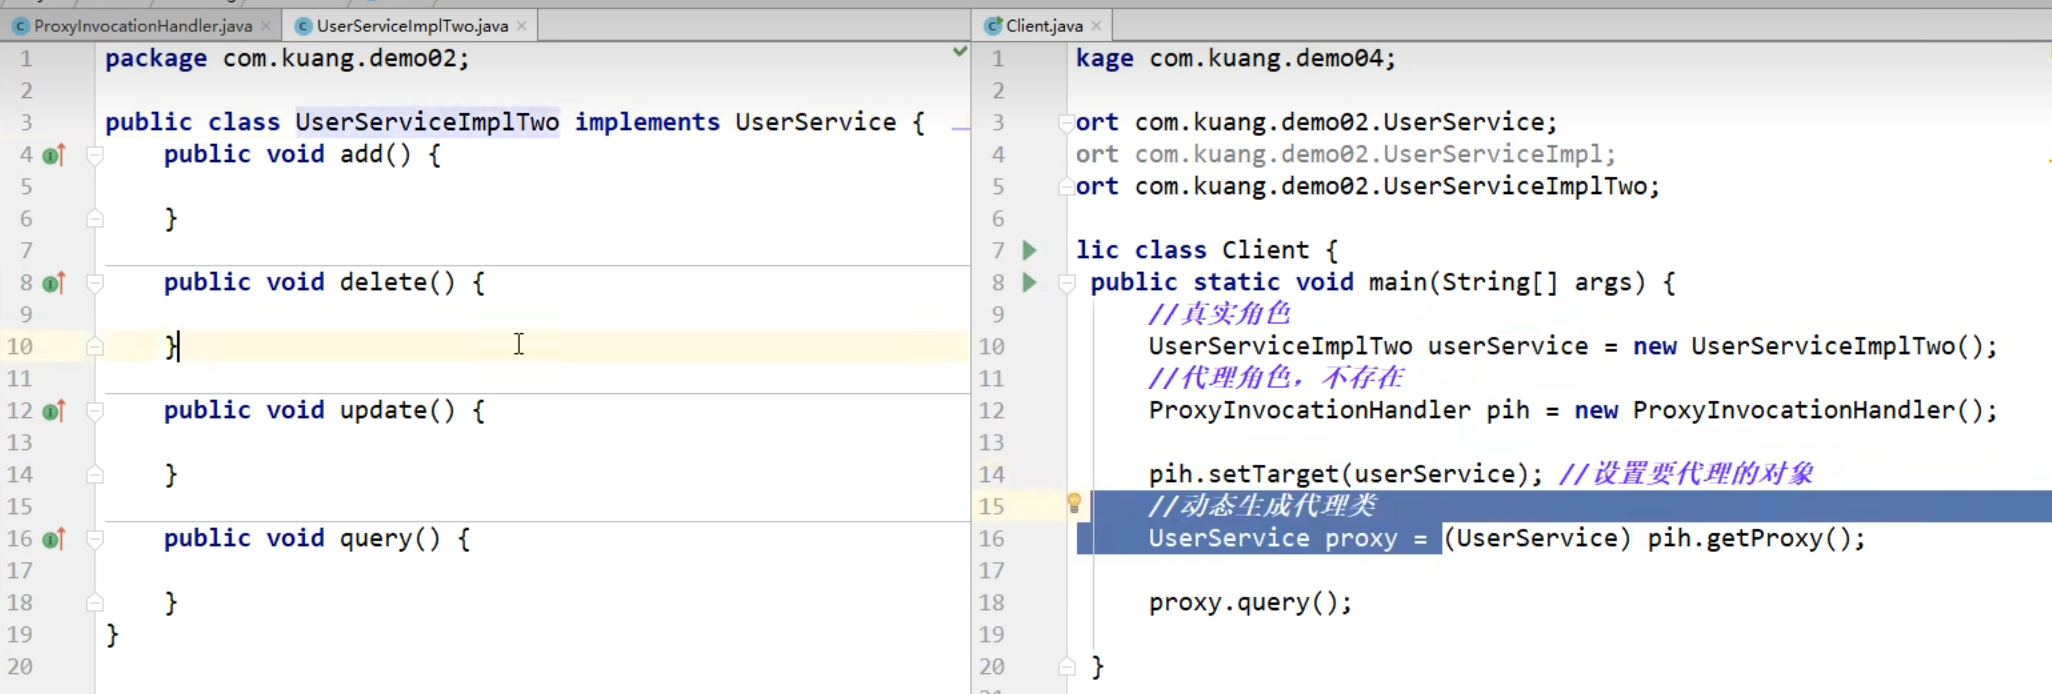
9.3 动态代理
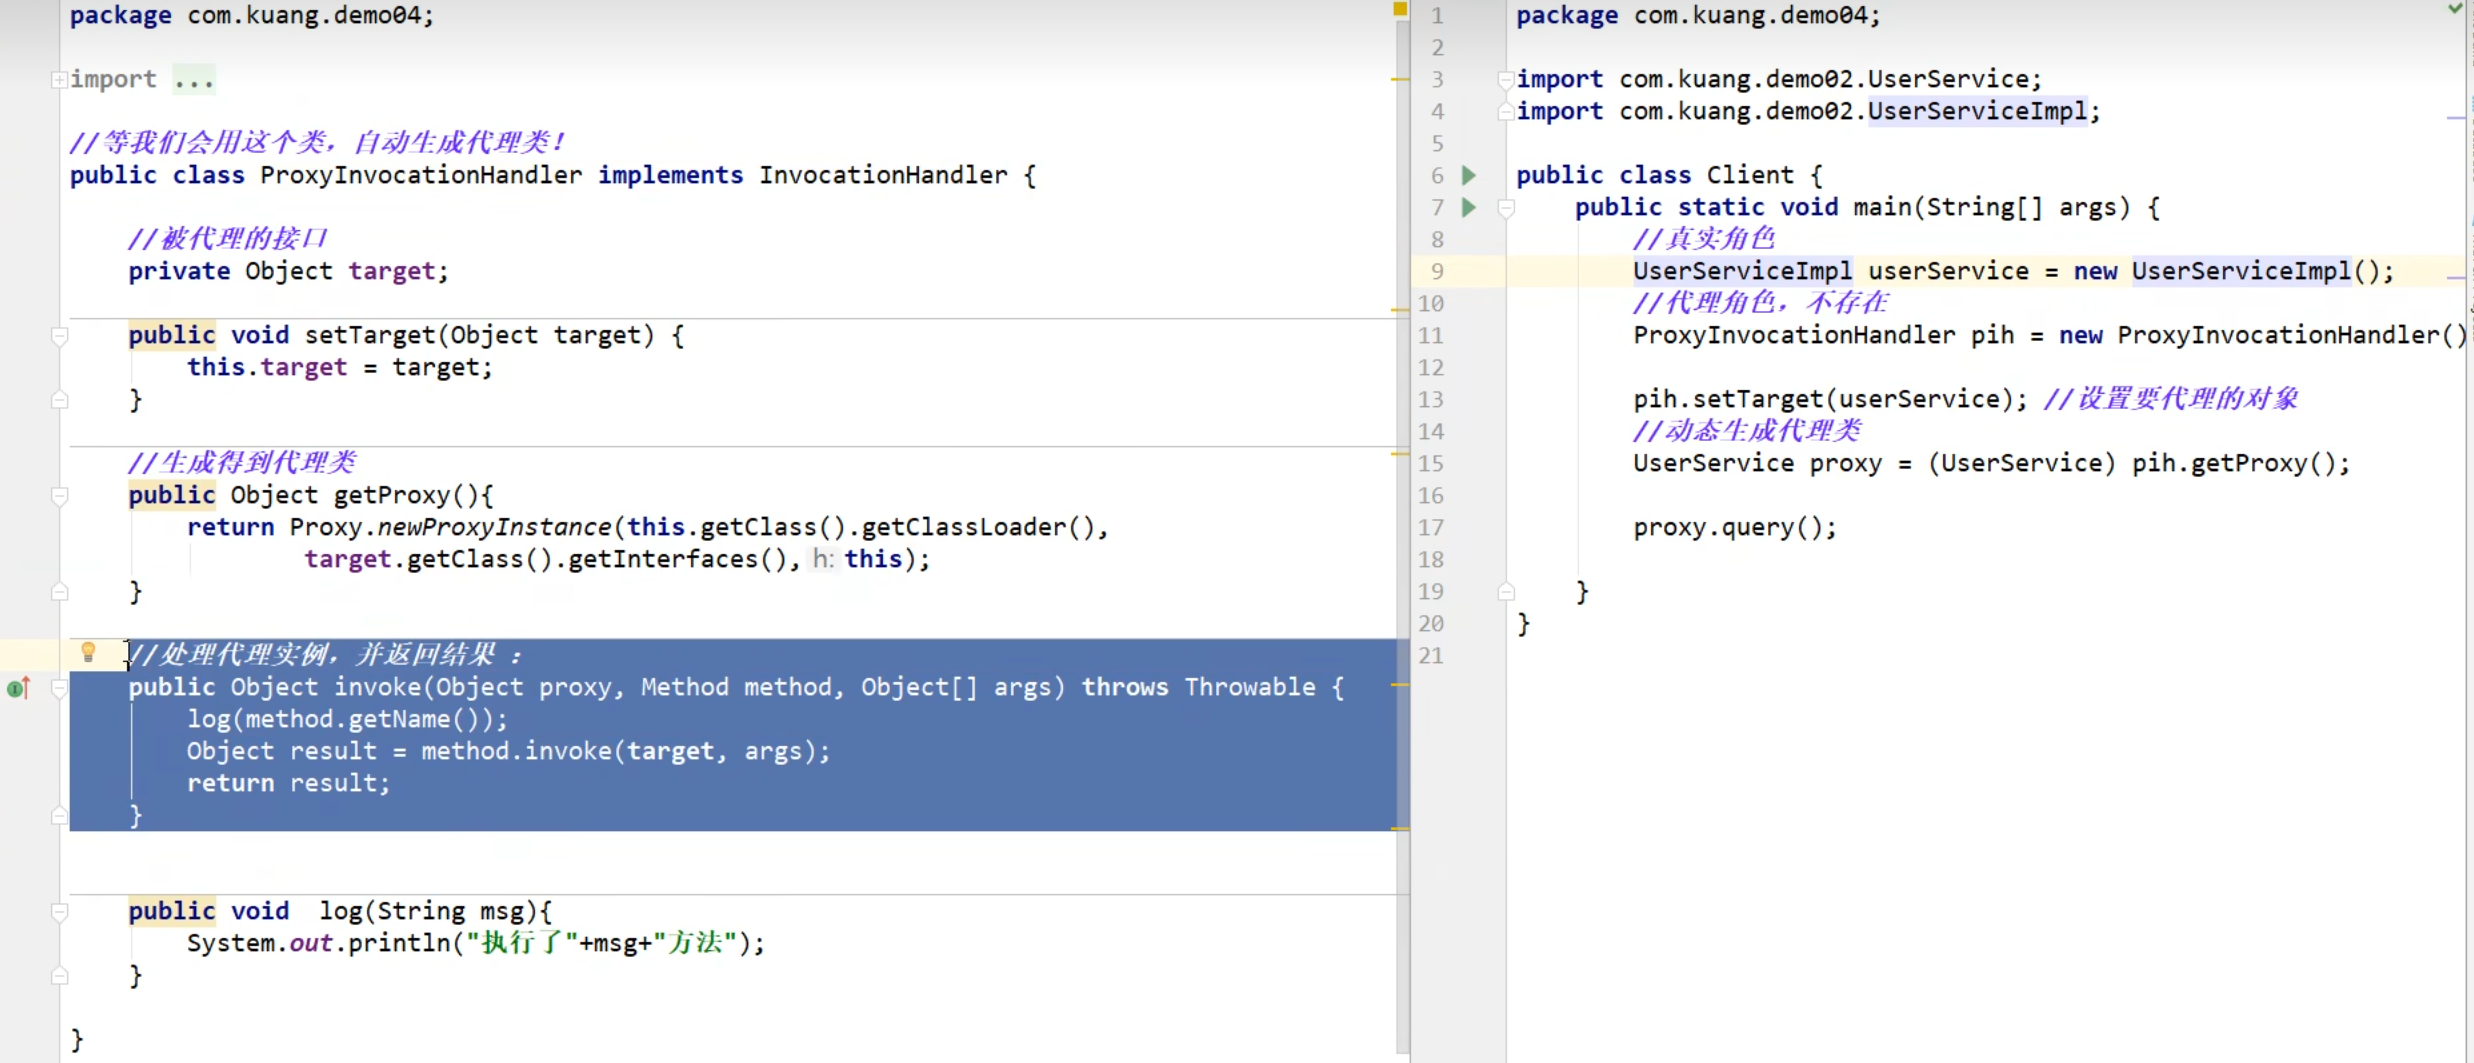
Proxy提供了动态代理类和实例的静态方法,他也是这些方法创建的所有动态代理类的超类

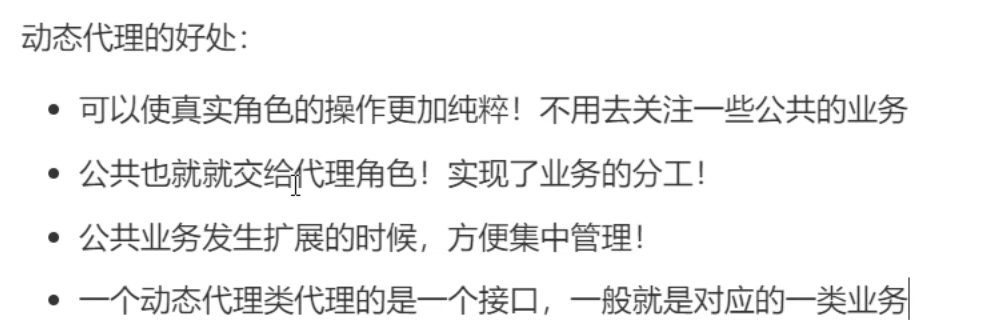
一个动态代理类可以代理多个类,只要是实现了同一个接口即可
10 AOP
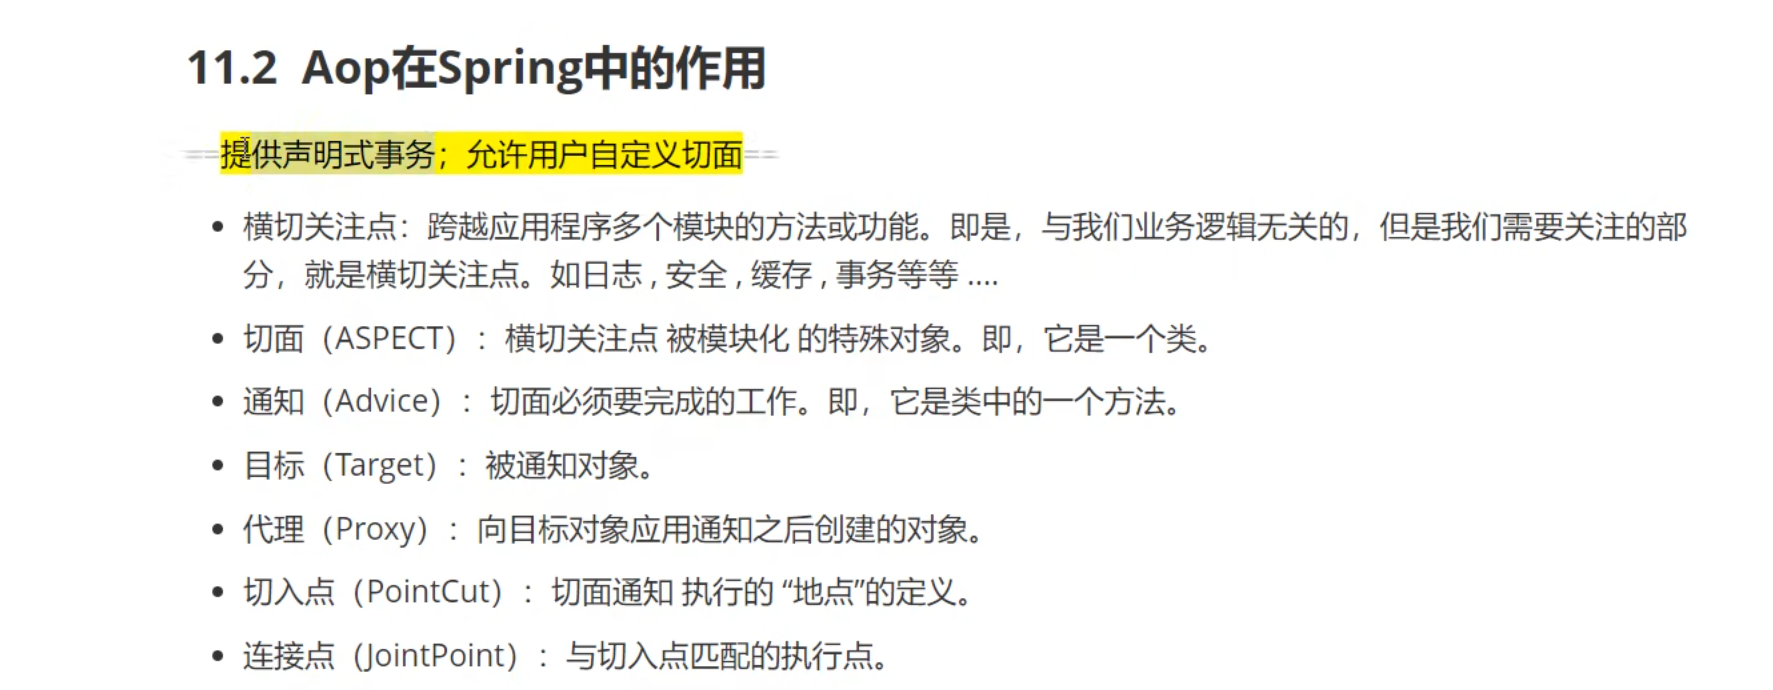
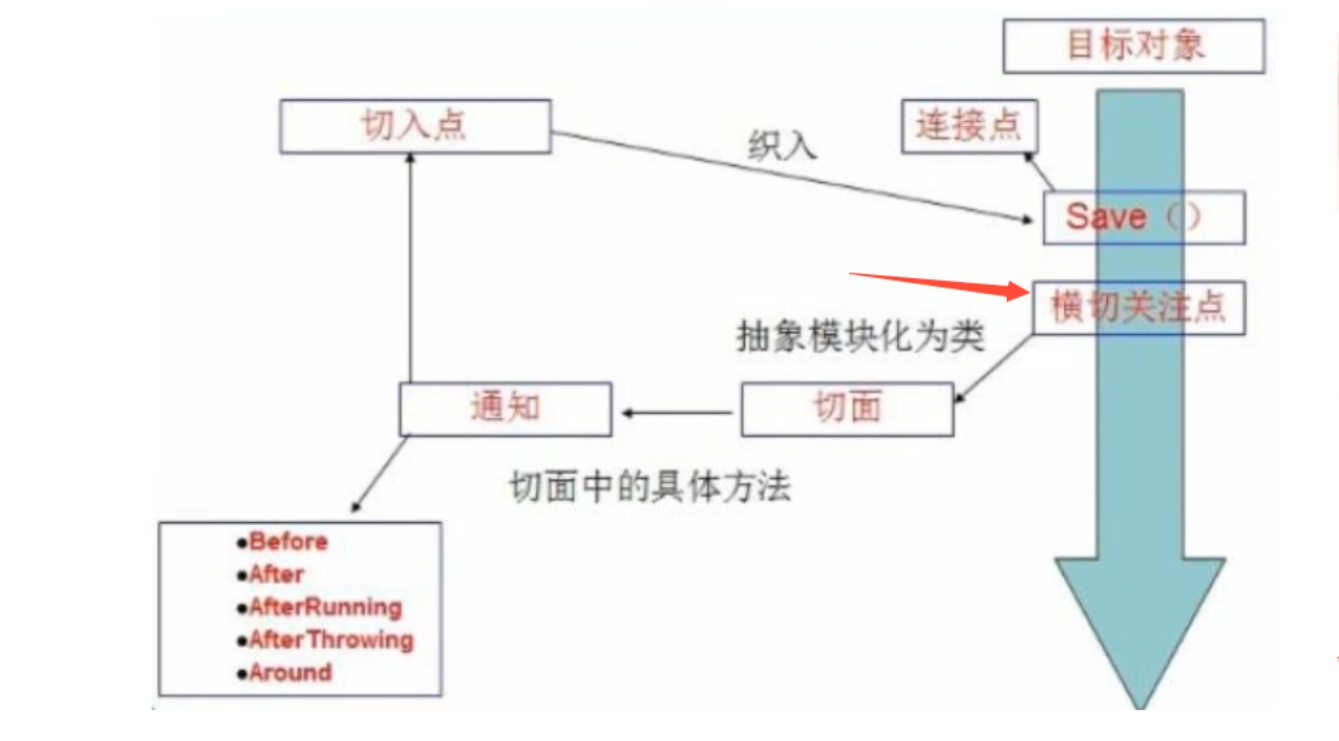
10.1 AOP在Spring中的作用
10.2 配置aop
使用原生spring api接口配置aop
<!-- 方式一 使用原生spring api接口-->
<!-- 配置aop 需要导入aop的约束-->
<!-- <aop:config>-->
<!--<!– !切入点:expression表达式,execution()要执行的位置!–>-->
<!-- <aop:pointcut id="pointcut" expression="execution(* org.example.service.UserServiceImpl.*(..))"/>-->
<!--<!– 执行环绕增加–>-->
<!-- <aop:advisor advice-ref="log" pointcut-ref="pointcut"/>-->
<!-- <aop:advisor advice-ref="afterLog" pointcut-ref="pointcut"/>-->
<!-- </aop:config>-->
使用自定义类【主要是切面定义】
<!--    方式二 自定义类-->
    <bean id="diy" class="org.example.diy.DiyPointCut"></bean>
<aop:config>
<!--    自定义切面 ref要引用的类-->
    <aop:aspect ref="diy">
<!--        切入点-->
        <aop:pointcut id="point" expression="execution(* org.example.service.UserServiceImpl.*(..))"/>
<!--        通知-->
        <aop:before method="before" pointcut-ref="point"/>
        <aop:after method="after" pointcut-ref="point"/>
    </aop:aspect>
</aop:config>
使用注解方式
<!--    方式三 注解-->
    <bean id="annotationPointCut" class="org.example.diy.AnnotationPointCut"></bean>
<!--    开启注解支持-->
    <aop:aspectj-autoproxy/>
@Before("execution(* org.example.service.UserServiceImpl.*(..))")
public void before(){
    System.out.println("=======方法执行前======");
}

@After("execution(* org.example.service.UserServiceImpl.*(..))")
public void after(){
    System.out.println("=======方法执行后======");
}

//在环绕增强中,外面可以给定一个参数,代表我们要获取处理切入的点
@Around("execution(* org.example.service.UserServiceImpl.*(..))")
public void around(ProceedingJoinPoint joinPoint) throws Throwable{

    System.out.println("环绕前");
    Object proceed = joinPoint.proceed();
    System.out.println("环绕后");
}
11 整合mybatis
见文档
12 声明式事务Mybatis-Spring
声明式事务管理 AOP
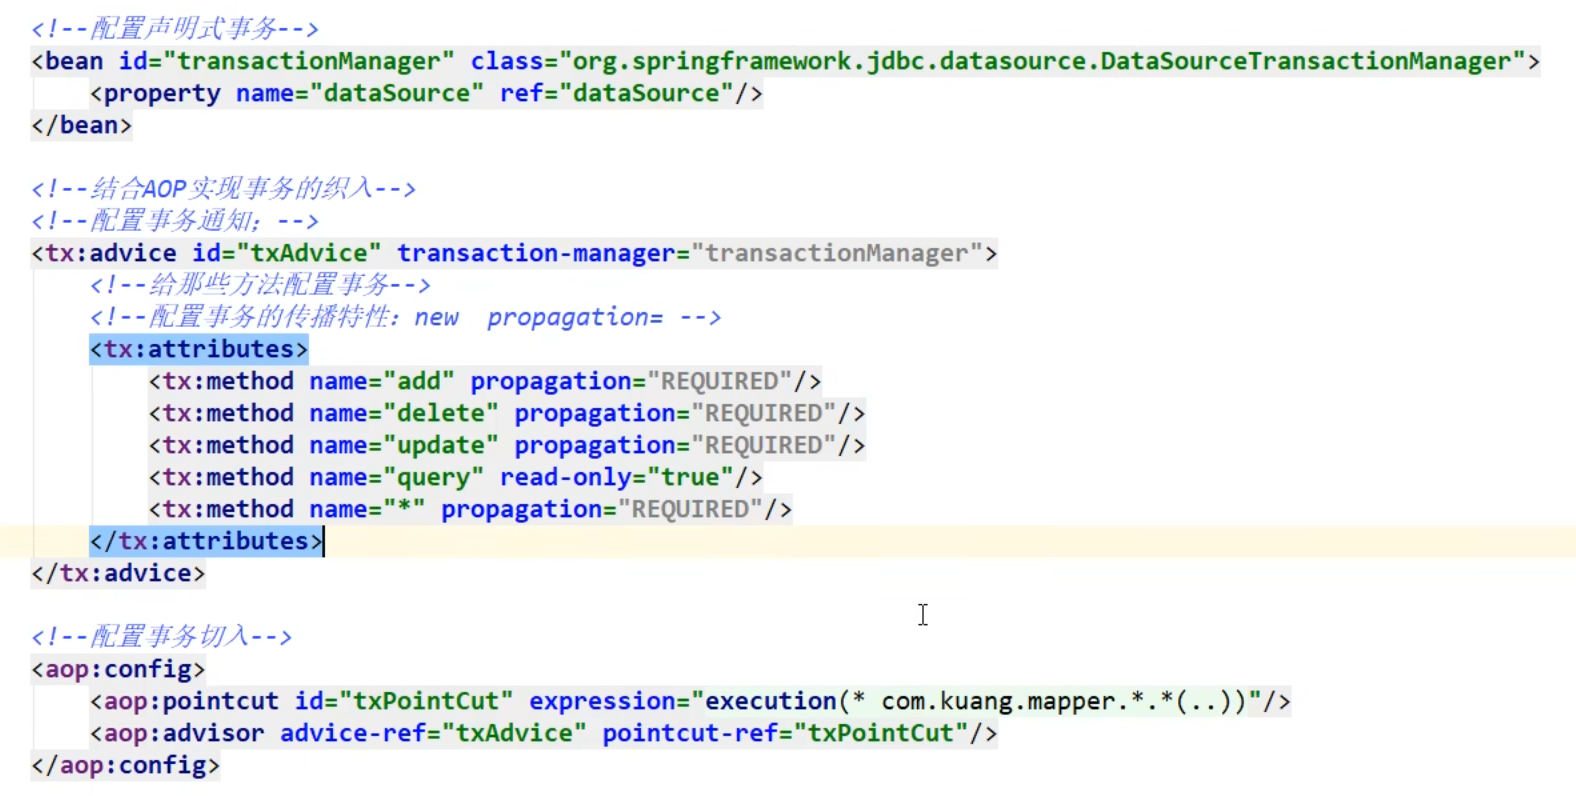
https://mybatis.org/spring/zh/transactions.html
编程式事务管理 需要在代码中,进行事务管理,需要修改原有代码
为什么需要事务?
- 如果不配置事务,可能存在数据提交不一致的情况下;
- 如果不在Spring中配置声明式事务,就需要在代码中手动配置事务
- 事务在项目开发中十分重要,涉及到ACID原则


 3272
3272


 被折叠的 条评论
为什么被折叠?
被折叠的 条评论
为什么被折叠?
 到【灌水乐园】发言


