


虽然iOS提供了UIDatePicker控件来显示日期,但其样式无法更改,功能也无法满足。所以需要自定义日期控件,显示如下
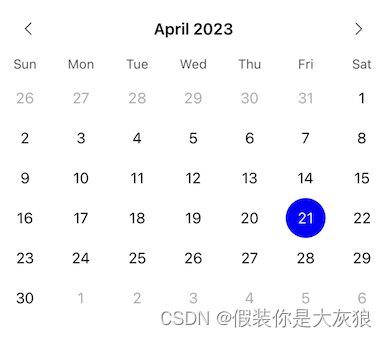
控件中间显示当前月份,左右按钮可以切换月份。日历默认6行,每周以周日开始周六结束。
- (void)setupInitialUI {
    self.backgroundColor = [UIColor whiteColor];

    [self addSubview:self.lastMonthImageView];
    [self.lastMonthImageView mas_makeConstraints:^(MASConstraintMaker *make) {
        make.left.equalTo(self).offset(5);
        make.top.equalTo(self);
        make.width.height.equalTo(@50);
    }];

    [self addSubview:self.nextMonthImageView];
    [self.nextMonthImageView mas_makeConstraints:^(MASConstraintMaker *make) {
        make.right.equalTo(self).offset(-5);
        make.top.equalTo(self);
        make.width.height.equalTo(@50);
    }];

    [self addSubview:self.monthLabel];
    [self.monthLabel mas_makeConstraints:^(MASConstraintMaker *make) {
        make.left.right.equalTo(self);
        make.top.equalTo(self);
        make.height.equalTo(@50);
    }];

    CGFloat itemWidth = self.frame.size.width / 7.0;
    NSArray *titleArray = @[@"Sun", @"Mon", @"Tue", @"Wed", @"Thu", @"Fri", @"Sat"];
    for (NSInteger index = 0; index < 7; index++) {
        UILabel *titleLabel = [self makeTitleLabel:titleArray[index]];
        [self addSubview:titleLabel];

        [titleLabel mas_makeConstraints:^(MASConstraintMaker *make) {
            make.left.equalTo(self).offset(itemWidth * index);
            make.width.equalTo(@(itemWidth));
            make.top.equalTo(self).offset(50);
            make.height.equalTo(@20);
        }];
    }

    [self addSubview:self.collectionView];
    [self.collectionView mas_makeConstraints:^(MASConstraintMaker *make) {
        make.left.right.equalTo(self);
        make.top.equalTo(self).offset(74);
        make.bottom.equalTo(self);
    }];

    [self moveToMonth];
}

- (void)moveToMonth {
}

#pragma mark - UICollectionViewDataSource -
- (NSInteger)collectionView:(UICollectionView *)collectionView numberOfItemsInSection:(NSInteger)section {
    return self.dateArray.count;
}

- (__kindof UICollectionViewCell *)collectionView:(UICollectionView *)collectionView cellForItemAtIndexPath:(NSIndexPath *)indexPath {
    UKCalendarCollectionViewCell *cell = [collectionView dequeueReusableCellWithReuseIdentifier:@"CellId" forIndexPath:indexPath];

    UKCalendarDate *date = self.dateArray[indexPath.row];
    [cell setCalendarDate:date];
    return cell;
}
UKCalendarCollectionViewCell显示控件,
UKCalendarDateDayStyle,当月显示黑色,上月和下月显示灰色。UKCalendarDateEventStyle,目前只有当天一种,可根据实际扩张。
// 非当月显示灰色
typedef NS_ENUM(NSInteger, UKCalendarDateDayStyle) {
    UKCalendarDateDayStyle_Current_Month    = 1,
    UKCalendarDateDayStyle_Last_Month       = 2,
    UKCalendarDateDayStyle_Next_Month       = 3,
};

// 特殊事件显示不同样式,例如当天
typedef NS_ENUM(NSInteger, UKCalendarDateEventStyle) {
    UKCalendarDateEventStyle_Today    = 1,
};

@interface UKCalendarDate : NSObject

@property(nonatomic, assign) NSInteger day;
@property(nonatomic, assign) UKCalendarDateDayStyle dayStyle;
@property(nonatomic, assign) UKCalendarDateEventStyle eventStyle;

@end

@interface UKCalendarCollectionViewCell : UICollectionViewCell

@property(nonatomic, strong) UILabel *dayLabel;

- (void)setCalendarDate:(UKCalendarDate *)date;

@end

@implementation UKCalendarCollectionViewCell

- (instancetype)initWithFrame:(CGRect)frame {
    self = [super initWithFrame:frame];
    if (self) {
        [self setupInitialUI];
    }
    return self;
}

- (void)setCalendarDate:(UKCalendarDate *)date {
    self.dayLabel.text = [NSString stringWithFormat:@"%ld", date.day];

    if (date.dayStyle == UKCalendarDateDayStyle_Current_Month) {
        self.dayLabel.textColor = [UIColor blackColor];
    } else {
        self.dayLabel.textColor = [UIColor lightGrayColor];
    }

    if (date.eventStyle == UKCalendarDateEventStyle_Today) {
        self.dayLabel.layer.backgroundColor = [UIColor blueColor].CGColor;
        self.dayLabel.textColor = [UIColor whiteColor];
    } else {
        self.dayLabel.layer.backgroundColor = [UIColor clearColor].CGColor;
    }
}

- (void)setupInitialUI {
    [self.contentView addSubview:self.dayLabel];
    [self.dayLabel mas_makeConstraints:^(MASConstraintMaker *make) {
        make.center.equalTo(self.contentView);
        make.width.height.equalTo(@40);
    }];
}

- (UILabel *)dayLabel {
    if (!_dayLabel) {
        _dayLabel = [[UILabel alloc] init];
        [_dayLabel setFont:[UIFont systemFontOfSize:15]];
        _dayLabel.textAlignment = NSTextAlignmentCenter;
        _dayLabel.layer.cornerRadius = 20;
        _dayLabel.layer.masksToBounds = YES;
    }
    return _dayLabel;
}
界面不是很复杂,比较麻烦的有两点,NSCalendar正好提供了解决这两个问题的方法
- 如何获取当月的天数,
rangeOfUnit: inUnit: forDate:返回NSRange值,length值就是当月的天数 - 如何获取单月首日的星期,
ordinalityOfUnit: inUnit: forDate:计算所处星期的位置,从星期日开始,值为1
具体计算代码如下
// 把currentDateComponents设置为每月一号
self.currentDateComponents.day = 1;
[self.dateArray removeAllObjects];
NSDate *firstDayDate = [self.calendar dateFromComponents:self.currentDateComponents];

// 计算1号所在星期
NSDateComponents *calcDateComponents = [self.calendar components:self.calendarUnits fromDate:firstDayDate];
NSUInteger firstDayOfWeek = [self.calendar ordinalityOfUnit:NSCalendarUnitWeekday inUnit:NSCalendarUnitWeekOfMonth forDate:firstDayDate];

// 如果1号不是星期一,需要补全前面日期
if (firstDayOfWeek > 1) {
    calcDateComponents.month--;

    // 计算上月最后一天是几号
    NSDate *lastDayDate = [NSDate dateWithTimeInterval:(-24*60*60) sinceDate:firstDayDate];
    NSInteger lastDayOfLastMonth = [self.calendar rangeOfUnit:NSCalendarUnitDay inUnit:NSCalendarUnitMonth forDate:lastDayDate].length;

    // 添加上月日期
    for (NSInteger index = 1; index < firstDayOfWeek; index++) {
        UKCalendarDate *lastMonthDate = [[UKCalendarDate alloc] init];
        lastMonthDate.day = lastDayOfLastMonth - (firstDayOfWeek - index - 1);
        lastMonthDate.dayStyle = UKCalendarDateDayStyle_Last_Month;

        [self.dateArray addObject:lastMonthDate];
    }
}

// 重置
calcDateComponents.month = self.currentDateComponents.month;

// 计算当月最后一天是几号
NSInteger lastDayOfCurrentMonth = [self.calendar rangeOfUnit:NSCalendarUnitDay inUnit:NSCalendarUnitMonth forDate:firstDayDate].length;
// 添加当月日期
for (NSInteger day = 1; day <= lastDayOfCurrentMonth; day++) {
    UKCalendarDate *currentMonthDate = [[UKCalendarDate alloc] init];
    currentMonthDate.day = day;
    currentMonthDate.dayStyle = UKCalendarDateDayStyle_Current_Month;

    calcDateComponents.day = day;
    NSString *day = [self.dateFormat stringFromDate:[self.calendar dateFromComponents:calcDateComponents]];
    if ([day isEqualToString:self.todayDay]) {
        currentMonthDate.eventStyle = UKCalendarDateEventStyle_Today;
    }

    [self.dateArray addObject:currentMonthDate];
}

// 添加下月日期
calcDateComponents.month++;
NSInteger len = 42 - self.dateArray.count;
for (NSInteger day = 1; day <= len; day++) {
    UKCalendarDate *nextMonthDate = [[UKCalendarDate alloc] init];
    nextMonthDate.day = day;
    nextMonthDate.dayStyle = UKCalendarDateDayStyle_Next_Month;

    [self.dateArray addObject:nextMonthDate];
}
[self.collectionView reloadData];


 6万+
6万+

 被折叠的 条评论
为什么被折叠?
被折叠的 条评论
为什么被折叠?
 到【灌水乐园】发言


