Nginx Proxy 代理
1、proxy代理原理
-
反向代理产生的背景:
在计算机世界里,由于单个服务器的处理客户端(用户)请求能力有一个极限,当用户的接入请求蜂拥而入时,会造成服务器忙不过来的局面,可以使用多个服务器来共同分担成千上万的用户请求,这些服务器提供相同的服务,对于用户来说,根本感觉不到任何差别。
-
反向代理:
需要有一个负载均衡设备来分发用户请求,将用户请求分发到空闲的服务器上。服务器返回自己的服务到负载均衡设备。负载均衡设备将服务器的服务返回用户。


2、正/反向proxy的区别
什么是反向代理?为什么叫反向代理?什么是正向代理?
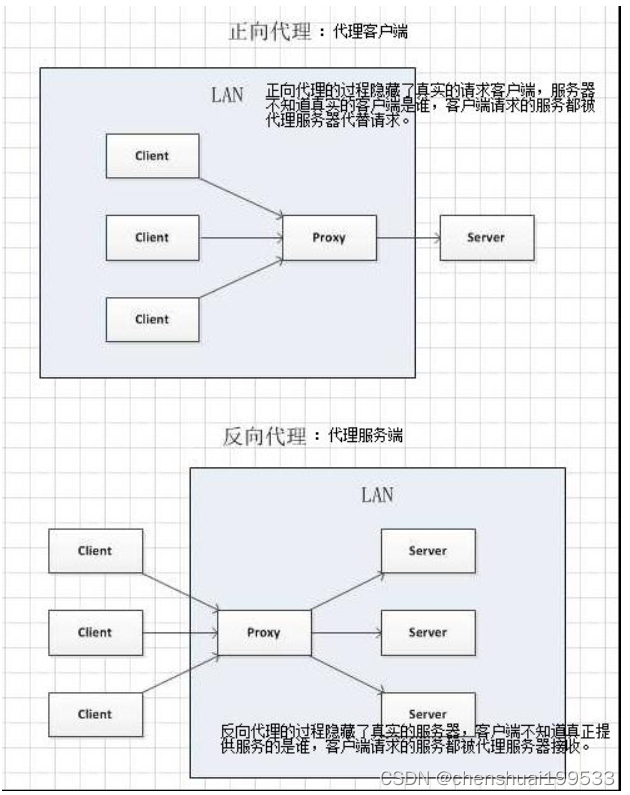
正向代理:实现客户端上网 反向代理:代理访问后端web服务器, 区别:正向代理的对象是客户端,反向代理的对象是服务器端
正向代理和反向代理对比示意图
正向代理中代理的对象是客户端,proxy和client同属一个LAN,对server透明;

3、知识扩展
-
HTTP Server(Web服务器)和Application Server(应用服务器)的区别和联系
Apache/Nginx是静态服务器(HTTP Server):
Nginx优点:负载均衡、反向代理、处理静态文件优势。nginx处理静态请求的速度高于apache;
Apache优点:相对于Tomcat服务器来说处理静态文件是它的优势,速度快。Apache是静态解析,适合静态HTML、图片等。
HTTP Server 关心的是 HTTP 协议层面的传输和访问控制,所以在 Apache/Nginx 上你可以看到代理、负载均衡等功能;
HTTP Server(Nginx/Apache)常用做静态内容服务和代理服务器,将外来请求转发给后面的应用服务(tomcat,jboss,jetty等)。
应用服务器(tomcat/jboss/jetty)是动态服务器(Application Server):
应用服务器Application Server,则是一个应用执行的容器。它首先需要支持开发语言的 Runtime(对于 Tomcat 来说,就是 Java,若是Ruby/Python 等其他语言开发的应用也无法直接运行在 Tomcat 上)。
-
但是事无绝对,为了方便,应用服务器(如tomcat)往往也会集成 HTTP Server 的功能,nginx也可以通过模块开发来提供应用功能,只是不如专业的 HTTP Server 那么强大,所以应用服务器往往是运行在 HTTP Server 的背后,执行应用,将动态的内容转化为静态的内容之后,通过 HTTP Server 返回到客户端。
-
常用开源集群软件有:lvs,keepalived,haproxy,nginx,apache,heartbeat
常用商业集群硬件有:F5, Netscaler,Radware,A10等
4、nginx Proxy 配置
1、代理模块
ngx_http_proxy_module
2、代理配置
代理
Syntax: 	proxy_pass URL;				   #代理的后端服务器URL
Default: 	—
Context: 	location, if in location, limit_except

host: www.qf.com
remote_addr: 10.8.165.79
client-->nginx proxy-->real-server

头信息
Syntax: 	proxy_set_header field value;
Default: 	proxy_set_header Host $proxy_host;		#设置真实客户端地址
            proxy_set_header Connection close;
Context: 	http, server, location

超时
Syntax: 	proxy_connect_timeout time;
Default: 	proxy_connect_timeout 60s;				#链接超时
Context: 	http, server, location

Syntax: 	proxy_read_timeout time;
Default: 	proxy_read_timeout 60s;
Context: 	http, server, location

Syntax: 	proxy_send_timeout time; #nginx进程向fastcgi进程发送request的整个过程的超时时间
Default: 	proxy_send_timeout 60s;
Context: 	http, server, location
3、启用 nginx proxy 代理
环境2台nginx真实服务器
a、nginx-1 启动网站(内容)(作为网站服务器)·
nginx-1的ip:192.168.62.157
已经编译安装好,检查nginx是否启动是否可以访问
[root@nginx-server ~]# cat /home/www/html/index.html
1000phone

[root@nginx-server ~]# cat /etc/nginx/conf.d/aa.conf
server {
        listen 80;
        server_name localhost;
        location / {
               root /home/www/html;
               index index.html index.hml;
        }
}
b、nginx-2 启动代理程序
nginx-2的ip:192.168.62.159
配置nginx的yum源直接yum安装
启动
编辑nginx的配置文件(编辑之前,删除/注释掉之前的配置):
[root@nginx-server ~]# vim /etc/nginx/conf.d/default.conf
server {
    listen       80;
    server_name  localhost;

    location / {
    proxy_pass http://192.168.62.157:80;
    proxy_set_header Host $http_host;
    proxy_set_header X-Real-IP $remote_addr;
    proxy_set_header X-Forwarded-For $proxy_add_x_forwarded_for;

    proxy_connect_timeout 30;
    proxy_send_timeout 60;
    proxy_read_timeout 60;
    }
}
重新加载nginx配置文件
[root@nginx-server ~]# nginx -s reload
c、nginx proxy 具体配置详解
proxy_pass :真实服务器的地址,可以是ip也可以是域名和url地址
proxy_set_header:重新定义或者添加发往后端服务器的请求头
proxy_set_header X-Real-IP :启用客户端真实地址(否则日志中显示的是代理在访问网站)
proxy_set_header X-Forwarded-For:记录代理地址

proxy_connect_timeout:后端服务器连接的超时时间发起三次握手等候响应超时时间
proxy_send_timeout:后端服务器数据回传时间,就是在规定时间之内后端服务器必须传完所有的数据
proxy_read_timeout :nginx接收upstream(上游/真实) server数据超时, 默认60s, 如果连续的60s内没有收到1个字节, 连接关闭。像长连接

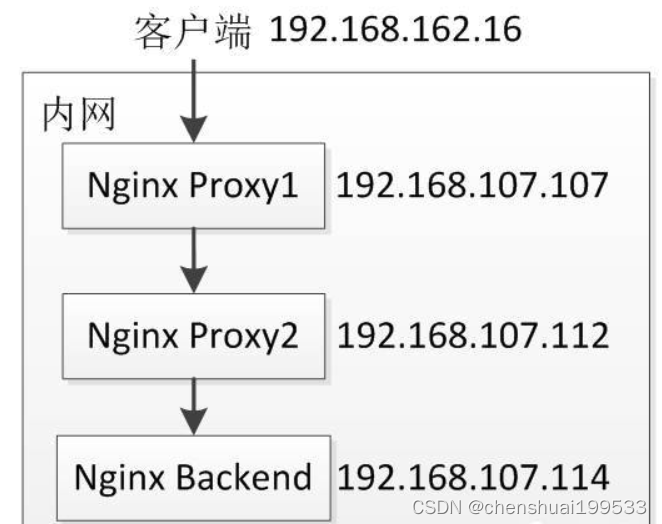
proxy_set_header X-Real-IP
未配置
Nginxbackend 的日志:记录只有192.168.107.112
配置
Nginxbackend 的日志,记录的有192.168.162.16 192.168.107.107 192.168.107.112
注意:proxy_pass http:// 填写nginx-1服务器的地址。
d、 使用PC客户端访问nginx-2服务器地址
浏览器中输入http://192.168.62.159/ (也可以是nginx-2服务器的域名)
成功访问nginx-1服务器页面
e、 观察nginx-1(192.168.62.157)服务器的日志

192.168.62.159 代理服务器地址
192.168.62.1 客户机地址
访问成功。 记录了客户机的IP和代理服务器的IP
5、Nginx负载均衡
1、负载均衡的作用
如果你的Nginx服务器给2台web服务器做代理,负载均衡算法采用轮询,那么当你的一台机器web程序关闭造成web不能访问,那么Nginx服务器分发请求还是会给这台不能访问的web服务器,如果这里的响应连接时间过长,就会导致客户端的页面一直在等待响应,对用户来说体验就大大折扣,这里我们怎么避免这样的情况发生呢。这里我配张图来说明下问题。

如果负载均衡中其中web2发生这样的情况,Nginx首先会去web1请求,但是Nginx在配置不当的情况下会继续分发请求到web2,然后等待web2响应,直到我们的响应时间超时,才会把请求重新分发给web1,这里的响应时间如果过长,用户等待的时间就会越长。
2、upstream配置
首先给大家说下 upstream 这个配置的,这个配置是写一组被代理的服务器地址,然后配置负载均衡的算法。这里的被代理服务器地址有2种写法。
upstream youngfitapp {
      server 192.168.62.157:8080;
      server 192.168.62.158:8080;
}

server {
        listen 80;
        server_name localhost;
        location / {
           proxy_pass  http://youngfitapp;
        }
}
3、负载均衡算法(分发策略)
upstream 支持4种负载均衡调度算法:
A、轮询(默认):每个请求按时间顺序逐一分配到不同的后端服务器;
B、ip_hash:每个请求按访问IP的hash结果分配,同一个IP客户端固定访问一个后端服务器。可以保证来自同一ip的请求被打到固定的机器上,可以解决session问题;
C、url_hash:按访问url的hash结果来分配请求,使每个url定向到同一个后端服务器。后台服务器为缓存的时候效率;
D、fair:这是比上面两个更加智能的负载均衡算法。此种算法可以依据页面大小和加载时间长短智能地进行负载均衡,也就是根据后端服务器的响应时间来分配请求,响应时间短的优先分配。Nginx本身是不支持 fair的,如果需要使用这种调度算法,必须下载Nginx的 upstream_fair模块;
3、配置实例
1、热备:如果你有2台后端服务器,当一台服务器发生事故时,才启用第二台服务器给提供服务。服务器处理请求的顺序:AAAAAA突然A挂啦,BBBBBBBBBBBBBB…
upstream myweb {
      server 192.168.62.157:8080;
      server 192.168.62.158:8080 backup;  #热备
}
2、轮询:Nginx默认就是轮询其权重都默认为1,服务器处理请求的顺序:ABABABABAB…
upstream myweb {
      server 192.168.62.157:8080;
      server 192.168.62.158:8080;
}
3、加权轮询:根据配置的权重的大小而分发给不同服务器不同数量的请求。如果不设置,则默认为1。下面服务器的请求顺序为:ABBABBABBABBABB…
upstream myweb {
      server 192.168.62.157:8080 weight=1;
      server 192.168.62.158:8080 weight=2;
}
4、ip_hash:Nginx会让相同的客户端ip请求相同的服务器。
upstream myweb {
	  ip_hash;
      server 192.168.62.157:8080;
      server 192.168.62.158:8080;
}
5、nginx负载均衡配置状态参数
- down,表示当前的server暂时不参与负载均衡。
- backup,预留的备份机器。当其他所有的非backup机器出现故障或者忙的时候,才会请求backup机器,因此这台机器的压力最轻。
- max_fails,允许请求失败的最大次数,默认为1。当超过最大次数时,返回错误。
- fail_timeout,在经历了max_fails次失败后,暂停服务的时间单位秒。max_fails可以和fail_timeout一起使用。
 upstream myweb {
      server 192.168.62.157:8080 weight=2 max_fails=2 fail_timeout=2;
      server 192.168.62.158:8080 weight=1 max_fails=2 fail_timeout=1;
 }
如果想更多更深入的了解 nginx 的负载均衡算法,nginx官方提供一些插件大家可以了解下。
4、nginx配置7层协议及4层协议方法(扩展)
举例讲解下什么是7层协议,什么是4层协议。
(1)7层协议
OSI(Open System Interconnection)是一个开放性的通行系统互连参考模型,他是一个定义的非常好的协议规范,共包含七层协议。直接上图,这样更直观些:
[外链图片转存失败,源站可能有防盗链机制,建议将图片保存下来直接上传(img-tERf91ez-1652462509755)(assets/1561624521541.png)]
(2)4层协议
TCP/IP协议
之所以说TCP/IP是一个协议族,是因为TCP/IP协议包括TCP、IP、UDP、ICMP、RIP、TELNETFTP、SMTP、ARP、TFTP等许多协议,这些协议一起称为TCP/IP协议。
从协议分层模型方面来讲,TCP/IP由四个层次组成:网络接口层、网络层、传输层、应用层。
[外链图片转存失败,源站可能有防盗链机制,建议将图片保存下来直接上传(img-eV27W6pY-1652462509756)(assets/1561624556568.png)]
(3)协议配置
这里我们举例,在nginx做负载均衡,负载多个服务,部分服务是需要7层的,部分服务是需要4层的,也就是说7层和4层配置在同一个配置文件中。
准备三台机器:
代理服务IP:10.0.105.201 --配置本地host解析域名;
后端服务器IP:nginx-a :10.0.105.199/nginx-b:10.0.105.202(yum安装)后端服务器将nginx服务启动
配置代理服务器的nginx配置文件
worker_processes  4;
worker_rlimit_nofile 102400;
events {
    worker_connections  1024;
}

http {
    include       mime.types;
    default_type  application/octet-stream;

    log_format  main  '$remote_addr - $remote_user [$time_local] "$request" '
                      '$status $body_bytes_sent "$http_referer" '
                      '"$http_user_agent" "$http_x_forwarded_for"';

    #access_log  logs/access.log  main;

    sendfile        on;
    keepalive_timeout  65;
    gzip  on;

    upstream testweb {
	ip_hash;
	server 10.0.105.199:80 weight=2 max_fails=2 fail_timeout=2s;
	server 10.0.105.202:80 weight=2 max_fails=2 fail_timeout=2s;
    }
    server {
        listen       80;
        server_name  www.test.com;
        charset utf-8;
        #access_log  logs/host.access.log  main;
        location / {
	    	proxy_pass http://testweb;
            proxy_set_header Host $host:$server_port;
            proxy_set_header X-Real-IP $remote_addr;
            proxy_set_header X-Forwarded-For $proxy_add_x_forwarded_for;
        }

        error_page   500 502 503 504  /50x.html;
        location = /50x.html {
            root   html;
        	}
	}
	}
}
浏览器测试访问:
10.0.105.202 10.0.105.199服务器yum安装的创建新的配置文件:
[root@nginx-server ~]# cd /etc/nginx/conf.d/
[root@nginx-server conf.d]# cp default.conf test.conf
[root@nginx-server conf.d]# cat test.conf
server {
    listen       80;
    server_name  localhost;

    location / {
         root   /usr/share/nginx/html;
         index  index.html index.htm;
    }
}

[root@nginx-server ~]# nginx -s reload
nginx在1.9.0的时候,增加了一个 stream 模块,用来实现四层协议(网络层和传输层)的转发、代理、负载均衡等。stream模块的用法跟http的用法类似,允许我们配置一组TCP或者UDP等协议的监听,然后通过proxy_pass来转发我们的请求,通过upstream添加多个后端服务,实现负载均衡。
#4层tcp负载
stream {
			upstream myweb {
                hash $remote_addr consistent;
                server 172.17.14.2:8080;
                server 172.17.14.3:8080;
        }
        server {
            listen 80;
            proxy_connect_timeout 10s;
            proxy_timeout 30s;
            proxy_pass myweb;
        }
}
Nginx 会话保持
nginx会话保持主要有以下几种实现方式。
1、ip_hash
ip_hash使用源地址哈希算法,将同一客户端的请求总是发往同一个后端服务器,除非该服务器不可用。
ip_hash语法:
upstream backend {
    ip_hash;
    server backend1.example.com;
    server backend2.example.com;
    server backend3.example.com down;
}
ip_hash简单易用,但有如下问题:
当后端服务器宕机后,session会话丢失;
同一客户端会被转发到同一个后端服务器,可能导致负载失衡;
2、sticky_cookie_insert
使用sticky_cookie_insert启用会话亲缘关系,这会导致来自同一客户端的请求被传递到一组服务器的同一台服务器。与ip_hash不同之处在于,它不是基于IP来判断客户端的,而是基于cookie来判断。因此可以避免上述ip_hash中来自同一客户端导致负载失衡的情况。(需要引入第三方模块才能实现)
sticky模块
语法:
upstream backend {
    server backend1.example.com;
    server backend2.example.com;
    sticky_cookie_insert srv_id expires=1h domain=www.youngfit.cn path=/;
}

server {
    listen 80;
    server_name www.youngfit.cn;
    location / {
		proxy_pass http://backend;
    }
}
说明:
expires:设置浏览器中保持cookie的时间
domain:定义cookie的域
path:为cookie定义路径
3、jvm_route
jvm_route的原理
-
一开始请求过来,没有带session信息,jvm_route就根据轮询(round robin)的方法,发到一台tomcat上面。
-
tomcat添加上session 信息,并返回给客户。
-
用户再此请求,jvm_route看到session中有后端服务器的名称,它就把请求转到对应的服务器上。
Nginx 实现动静分离
为了加快网站的解析速度,可以把动态页面和静态页面由不同的服务器来解析,加快解析速度。降低原来单个服务器的压力。 在动静分离的tomcat的时候比较明显,因为tomcat解析静态很慢,其实这些原理的话都很好理解,简单来说,就是使用正则表达式匹配过滤,然后交给不同的服务器。
1、准备环境
192.168.62.159   代理服务器
192.168.62.157   动态资源
192.168.62.155   静态资源
准备一个nginx代理 两个http 分别处理动态和静态。
192.168.62.159   代理服务器

1.配置nginx反向代理upstream;
[root@nginx-server conf.d]# cat upstream.conf
upstream static {
        server 192.168.62.155:80 weight=1 max_fails=1 fail_timeout=60s;
}
upstream phpserver {
        server 192.168.62.157:80 weight=1 max_fails=1 fail_timeout=60s;
}
server {
        listen      80;
        server_name     localhost;
        #动态资源加载
        location ~ \.(php|jsp)$ {
            proxy_pass http://phpserver;
            proxy_set_header Host $host:$server_port;
            proxy_set_header X-Real-IP $remote_addr;
            proxy_set_header X-Forwarded-For $proxy_add_x_forwarded_for;
                }
        #静态资源加载
        location ~ .*\.(html|gif|jpg|png|bmp|swf|css|js)$ {
            proxy_pass http://static;
            proxy_set_header Host $host:$server_port;
            proxy_set_header X-Real-IP $remote_addr;
            proxy_set_header X-Forwarded-For $proxy_add_x_forwarded_for;
                }
}
192.168.62.155   静态资源

#静态资源配置   主配置文件-include /etc/nginx/conf.d/*.conf
# vim /etc/nginx/conf.d/static.conf
server {
        listen 80;
        server_name     localhost;

        location ~ \.(html|jpg|png|js|css|gif|bmp|jpeg) {
        root /home/www/nginx;
        index index.html index.htm;
        }
}

[root@nginx-server2 nginx]# cat /home/www/nginx/index.html    //模拟静态资源
hello 155
192.168.62.157  动态资源

#动态资源配置:
yum 安装php7.1
[root@nginx-server ~]# rpm -Uvh https://mirror.webtatic.com/yum/el7/epel-release.rpm
[root@nginx-server ~]# rpm -Uvh https://mirror.webtatic.com/yum/el7/webtatic-release.rpm
[root@nginx-server ~]# yum install php71w-xsl php71w php71w-ldap php71w-cli php71w-common php71w-devel php71w-gd php71w-pdo php71w-mysql php71w-mbstring php71w-bcmath php71w-mcrypt -y
[root@nginx-server ~]# yum install -y php71w-fpm
[root@nginx-server ~]# systemctl start php-fpm
[root@nginx-server ~]# systemctl enable php-fpm
编辑nginx的配置文件:
server {
        listen      80;
        server_name     localhost;
        location ~ \.php$ {
            root           /home/nginx/html;  #指定网站目录
            fastcgi_pass   127.0.0.1:9000;    #指定访问地址
            fastcgi_index  index.php;		#指定默认文件
            fastcgi_param  SCRIPT_FILENAME  $document_root$fastcgi_script_name; #站点根目录,取决于root配置项
            include        fastcgi_params;  #包含nginx常量定义
        		}
}

[root@nginx-server1 html]# cat /home/nginx/html/index.php   //模拟动态资源
dongtai
当访问静态页面的时候location 匹配到 (html|jpg|png|js|css|gif|bmp|jpeg) 通过转发到静态服务器,静态服务通过location的正则匹配来处理请求。
当访问动态页面时location匹配到 .\php 结尾的文件转发到后端php服务处理请求。


Nginx 防盗链问题
两个网站 A 和 B, B网站引用了A网站上的图片,这种行为就叫做盗链。
防盗链,就是要防止B引用A的图片。
1、nginx 防止网站资源被盗用模块
ngx_http_referer_module
如何区分哪些是不正常的用户?
HTTP Referer是Header的一部分,当浏览器向Web服务器发送请求的时候,一般会带上Referer,告诉服务器我是从哪个页面链接过来的,服务器借此可以获得一些信息用于处理,例如防止未经允许的网站盗链图片、文件等。因此HTTP Referer头信息是可以通过程序来伪装生成的,所以通过Referer信息防盗链并非100%可靠,但是,它能够限制大部分的盗链情况。
2. 防盗链配置
配置要点:
[root@nginx-server ~]# vim /etc/nginx/nginx.conf
# 日志格式添加"$http_referer"
log_format  main  '$remote_addr - $remote_user [$time_local] "$request" '
                         '$status $body_bytes_sent "$http_referer" '
                         '"$http_user_agent" "$http_x_forwarded_for"';
# valid_referers 使用方式
Syntax: 	valid_referers none | blocked | server_names | string ...;
Default: 	—
Context: server, location
-
none : 允许没有http_referer的请求访问资源;
-
blocked : 允许不是http://开头的,不带协议的请求访问资源—被防火墙过滤掉的;
-
server_names : 只允许指定ip/域名来的请求访问资源(白名单);
准备两台机器,一张图片网站服务器
图片网站服务器:上传图片192.168.1.9
[root@nginx-server ~]# cp test.jpg /usr/share/nginx/html/
[root@nginx-server ~]# cd /etc/nginx/conf.d/
[root@nginx-server conf.d]# cp default.conf default.conf.bak
[root@nginx-server conf.d]# mv default.conf nginx.conf
[root@nginx-server conf.d]# vim nginx.conf
server {
    listen       80;
    server_name  localhost;
    location / {
        root   /usr/share/nginx/html;
        index  index.html index.htm;
    }
}
[root@nginx-server conf.d]# nginx -t
[root@nginx-server conf.d]# systemctl restart nginx
访问:


Referer:这个匹配的连接为空 “-”盗链机器配置:192.168.1.10 [root@nginx-client html]# cat /etc/nginx/conf.d/qf.conf server { listen 80; server_name localhost; location / { root /usr/share/nginx/html; index index.html; } } [root@nginx-client ~]# cd /usr/share/nginx/html/ [root@nginx-client html]# cp index.html index.html.bak [root@nginx-client html]# vim index.html <html> <head> <meta charset="utf-8"> <title>qf.com</title> </head> <body style="background-color:red;"> <img src="http://192.168.1.9/test.jpg"/> </body> </html> [root@nginx-client html]# systemctl restart nginx

查看图片网站服务器日志:

Referer记录了:连接是1.10这台机器。
在图片服务器操作
[root@nginx-server conf.d]# vim nginx.conf
server {
    listen       80;
    server_name  localhost;
    location / {
        root   /usr/share/nginx/html;
        index  index.html index.htm;

        valid_referers none blocked www.jd.com;  #允许这些访问,有none是不允许有跳转链接,none的位置不限制,www.jd.com为允许的跳转
                if ($invalid_referer) {
                   return 403;
                }
        }
}
[root@nginx-server conf.d]# systemctl restart nginx
测试访问:

图片服务器查看日志:

上面配置并没有允许192.168.1.10这台机器访问。
实例二,继续在图片服务器上面操作
[root@nginx-server html]# vim /etc/nginx/conf.d/nginx.conf #将原来的删除掉
server {
    listen       80;
    server_name  localhost;
    location ~  .*\.(gif|jpg|png|jpeg)$ {
        root  /usr/share/nginx/html;

        valid_referers none blocked *.qf.com 192.168.1.10;
                if ($invalid_referer) {
                        return 403;
                }
        }
}
因为none允许为空值访问,所以加不加ip都可以访问,如果把none擦除,就不可以了
重载nginx服务
[root@nginx-server ~]# nginx -s reload
在其中一台机器测试:
测试不带http_refer:
[root@nginx-server conf.d]# curl -I "http://192.168.1.9/test.jpg"
HTTP/1.1 200 OK
Server: nginx/1.16.1
Date: Mon, 02 Sep 2019 14:02:56 GMT
Content-Type: image/jpeg
Content-Length: 27961
Last-Modified: Mon, 02 Sep 2019 13:23:12 GMT
Connection: keep-alive
ETag: "5d6d17c0-6d39"
Accept-Ranges: bytes

测试带非法http_refer:
[root@nginx-server conf.d]# curl -e http://www.baidu.com -I "http://192.168.1.9/test.jpg"
HTTP/1.1 403 Forbidden
Server: nginx/1.16.1
Date: Mon, 02 Sep 2019 14:03:48 GMT
Content-Type: text/html
Content-Length: 153
Connection: keep-alive

测试带合法的http_refer:
[root@nginx-server conf.d]# curl -e http://www.qf.com -I "http://192.168.1.9/test.jpg"
HTTP/1.1 200 OK
Server: nginx/1.16.1
Date: Mon, 02 Sep 2019 14:04:52 GMT
Content-Type: image/jpeg
Content-Length: 27961
Last-Modified: Mon, 02 Sep 2019 13:23:12 GMT
Connection: keep-alive
ETag: "5d6d17c0-6d39"
Accept-Ranges: bytes

[root@ansible-server conf.d]# curl -e http://192.168.1.10 -I "http://192.168.1.9/test.jpg"
HTTP/1.1 200 OK
Server: nginx/1.16.1
Date: Mon, 02 Sep 2019 14:05:36 GMT
Content-Type: image/jpeg
Content-Length: 27961
Last-Modified: Mon, 02 Sep 2019 13:23:12 GMT
Connection: keep-alive
ETag: "5d6d17c0-6d39"
Accept-Ranges: bytes
如果用户直接在浏览器输入你的图片地址,那么图片显示正常,因为它符合规则。
在图片服务器查看日志:
Nginx rewrite地址重写
1、什么是Rewrite
Rewrite对称URL Rewrite,即URL重写,就是把传入Web的请求重定向到其他URL的过程。
- URL Rewrite最常见的应用是URL伪静态化,是将动态页面显示为静态页面方式的一种技术。比如http://www.123.com/news/index.php?id=123 使用URLRewrite 转换后可以显示为 http://www.123.com/news/123.html对于追求完美主义的网站设计师,就算是网页的地址也希望看起来尽量简洁明快。理论上,搜索引擎更喜欢静态页面形式的网页,搜索引擎对静态页面的评分一般要高于动态页面。所以,UrlRewrite可以让我们网站的网页更容易被搜索引擎所收录。
- 从安全角度上讲,如果在URL中暴露太多的参数,无疑会造成一定量的信息泄漏,可能会被一些黑客利用,对你的系统造成一定的破坏,所以静态化的URL地址可以给我们带来更高的安全性。
- 实现网站地址跳转,例如用户访问360buy.com,将其跳转到jd.com。例如当用户访问tianyun.com的80端口时,将其跳转到443端口。
2、Rewrite 相关指令
- Nginx Rewrite 相关指令有 if、rewrite、set、return
2.1、if 语句
-
应用环境
server,location语法:
if (condition) { … }
if 可以支持如下条件判断匹配符号
~ 					正则匹配 (区分大小写)
~* 				    正则匹配 (不区分大小写)
!~                  正则不匹配 (区分大小写)
!~*		            正则不匹配  (不区分大小写)
-f 和!-f 		    用来判断是否存在文件
-d 和!-d 		    用来判断是否存在目录
-e 和!-e 		    用来判断是否存在文件或目录
-x 和!-x 		    用来判断文件是否可执行

在匹配过程中可以引用一些Nginx的全局变量
$args				请求中的参数;
$document_root	    针对当前请求的根路径设置值;
$host				请求信息中的"Host",如果请求中没有Host行,则等于设置的服务器名;
$limit_rate			对连接速率的限制;
$request_method		请求的方法,比如"GET"、"POST"等;
$remote_addr		客户端地址;
$remote_port		客户端端口号;
$remote_user		客户端用户名,认证用;
$request_filename   当前请求的文件路径名(带网站的主目录/usr/local/nginx/html/images/a.jpg)
$request_uri		当前请求的文件路径名(不带网站的主目录/images/a.jpg)
$query_string		与$args相同;
$scheme				用的协议,比如http或者是https
$server_protocol	请求的协议版本,"HTTP/1.0"或"HTTP/1.1";
$server_addr 		服务器地址,如果没有用listen指明服务器地址,使用这个变量将发起一次系统调用以取得地址(造成资源浪费);
$server_name		请求到达的服务器名;
$document_uri 		与$uri一样,URI地址;
$server_port 		请求到达的服务器端口号;
2.2、Rewrite flag
rewrite 指令根据表达式来重定向URI,或者修改字符串。可以应用于server,location, if环境下每行rewrite指令最后跟一个flag标记,支持的flag标记有:
last 			    相当于Apache里的[L]标记,表示完成rewrite。默认为last。
break 				本条规则匹配完成后,终止匹配,不再匹配后面的规则
redirect 			返回302临时重定向,浏览器地址会显示跳转后的URL地址
permanent 		    返回301永久重定向,浏览器地址会显示跳转后URL地址
www.qf.com --> www.jd.com
redirect 和 permanent区别则是返回的不同方式的重定向,对于客户端来说一般状态下是没有区别的。而对于搜索引擎,相对来说301的重定向更加友好,如果我们把一个地址采用301跳转方式跳转的话,搜索引擎会把老地址的相关信息带到新地址,同时在搜索引擎索引库中彻底废弃掉原先的老地址。使用302重定向时,搜索引擎(特别是google)有时会查看跳转前后哪个网址更直观,然后决定显示哪个,如果它觉的跳转前的URL更好的话,也许地址栏不会更改。
2.3、Rewrite匹配参考示例
本地解析hosts文件(windows)
192.168.62.153 www.testpm.com

例1:
[root@nginx html]# pwd
/html
[root@nginx html]# ls
a  b
[root@nginx html]# cat a/1.html
1.html
[root@nginx html]# cat b/2.html
22

# http://www.testpm.com/a/1.html ==> http://www.testpm.com/b/2.html
server {
    listen       80;
    server_name  www.testpm.com;

        location /a {
        root /html;
        index   1.html index.htm;
        rewrite .* /b/2.html permanent;
        }

        location /b {
        root    /html;
        index   2.html index.htm;
        }
}


例2:
[root@mycat html]# pwd
/var/www/html
[root@mycat html]# ls
2018  2019
[root@mycat html]# cat 2018/a/1.html
2018
[root@mycat html]# cat 2019/a/1.html
2019

# http://www.testpm.com/2019/a/1.html ==> http://www.testpm.com/2018/a/1.html
server {
    listen       80;
    server_name  www.testpm.com;

    location /2019/a {
        root    /var/www/html;
        index   1.html index.hml;
        rewrite ^/2019/(.*)$ /2018/$1 permanent;
    }

    location /2018/a {
        root    /var/www/html;
        index   1.html index.htl;
    }

}


例3:
# http://www.qf.com/a/1.html ==> http://jd.com
location /a {
        root    /html;
        if ($host ~* qf.com) {
        rewrite .* http://jd.com permanent;
        }
}


例4:
# http://www.youngfit.com/a/1.html ==> http://jd.com/a/1.html
location /a {
        root /html;
        if ( $host ~* youngfit.com ){
        rewrite .* http://jd.com$request_uri permanent;
        }
}


例5: 在访问目录后添加/  (如果目录后已有/,则不加/)
[root@nginx-server c]# pwd
/usr/share/nginx/html/a/b/c

http://www.qf.com/a/b/c--->http://www.qf.com/a/b/c/
# http://www.qf.com/a/b/c
# $1: /a/b/
# $2: c
# http://$host$1$2/
location /a/b/c {
        root    /usr/share/nginx/html;
        index   index.html index.hml;
        if (-d $request_filename) {
        rewrite ^(.*)([^/])$ http://$host$1$2/ permanent;
        }
}

例6:
[root@nginx html]# pwd
/usr/share/nginx/html
[root@nginx html]# ls
50x.html  index.html  index.html.bak1  reg
[root@nginx html]# cat reg/login.html
login
# http://www.qf.com/login/qf.html ==>  http://www.qf.com/reg/login.html?user=qf
	location /login {
        root   /usr/share/nginx/html;
        rewrite ^/login/(.*)\.html$ http://$host/reg/login.html?user=$1;
        }
    location /reg {
        root /usr/share/nginx/html;
        index login.html;
        }

例7:
[root@nginx-server 33]# pwd
/html/qf/11/22/33
[root@nginx-server 33]# cat 1.html
hello nginx

#http://www.qf.com/qf/11-22-33/1.html  ==>  http://www.qf.com/qf/11/22/33/1.html
location /qf {
            rewrite ^/qf/([0-9]+)-([0-9]+)-([0-9]+)(.*)$ /qf/$1/$2/$3$4 permanent;
        }

        location /qf/11/22/33 {
                root /html;
                index   1.html;
        }
2.4、set 指令
set 指令是用于定义一个变量,并且赋值
应用环境:
server,location,if
应用示例
例8:
#http://alice.testpm.com ==> http://www.testpm.com/alice
#http://jack.testpm.com ==> http://www.testpm.com/jack

[root@nginx-server conf.d]# cd /usr/share/nginx/html/
[root@nginx-server html]# mkdir jack alice
[root@nginx-server html]# echo "jack.." >> jack/index.html
[root@nginx-server html]# echo "alice.." >> alice/index.html

本地解析域名host文件
192.168.62.153 www.testpm.com
192.168.62.153 alice.testpm.com
192.168.62.153 jack.testpm.com
编辑配置文件:
server {
    listen       80;
    server_name  www.testpm.com;

    location / {
         root   /usr/share/nginx/html;
         index  index.html index.htm;
         if ( $host ~* ^www.testpm.com$) {
                break;
                }

         if ( $host ~* "^(.*)\.testpm\.com$" ) {
                set $user $1;
                rewrite .* http://www.testpm.com/$user permanent;
                }
        }
    location /jack {
         root /usr/share/nginx/html;
         index  index.html index.hml;
        }
    location /alice {
         root /usr/share/nginx/html;
         index index.html index.hml;
        }
}
2.5、return 指令
return 指令用于返回状态码给客户端
server,location,if
应用示例:
例9:如果访问的.sh结尾的文件则返回403操作拒绝错误
http://www.testpm.com/1.sh     返回403
server {
    listen       80;
    server_name  www.testpm.com;
    #access_log  /var/log/nginx/http_access.log  main;

    location / {
        root   /usr/share/nginx/html;
        index  index.html index.htm;
        }

    location ~* \.sh$ {
        return 403;
        }
}

例10:80 ======> 443:80转443端口
server {
    listen       80;
    server_name  www.testpm.cn;
    access_log  /var/log/nginx/http_access.log  main;
    return 301 https://www.testpm.cn$request_uri;
}

server {
    listen 443 ssl;
    server_name www.testpm.cn;
    access_log  /var/log/nginx/https_access.log  main;

    #ssl on;
    ssl_certificate   /etc/nginx/cert/2447549_www.testpm.cn.pem;
    ssl_certificate_key  /etc/nginx/cert/2447549_www.testpm.cn.key;
    ssl_session_timeout 5m;
    ssl_protocols TLSv1 TLSv1.1 TLSv1.2;
    ssl_ciphers  ALL:!ADH:!EXPORT56:RC4+RSA:+HIGH:+MEDIUM:+LOW:+SSLv2:+EXP;
    ssl_prefer_server_ciphers on;

    location / {
        root  /usr/share/nginx/html;
        index index.html index.htm;
    }
}

[root@nginx-server ~]# curl -I http://www.testpm.cn
HTTP/1.1 301 Moved Permanently
Server: nginx/1.16.0
Date: Wed, 03 Jul 2019 13:52:30 GMT
Content-Type: text/html
Content-Length: 169
Connection: keep-alive
Location: https://www.testpm.cn/
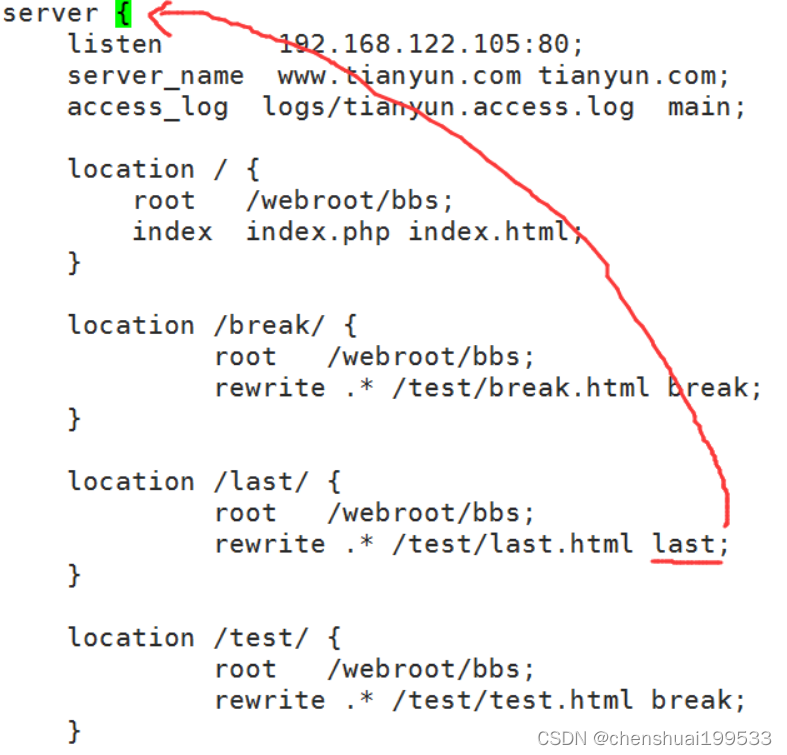
3、last,break详解

[root@localhost test]# cat /etc/nginx/conf.d/last_break.conf
server {
    listen       80;
    server_name  localhost;

    location / {
        root   /usr/share/nginx/html;
        index  index.html index.htm;
    }
 #192.168.153.147/break --> 192.168.153.147/test/break.html
    location /break/ {
        root /usr/share/nginx/html;
        rewrite .* /test/break.html break;
    }
#192.168.153.147/last --> 192.168.153.147/test/last.html
#192.168.153.147/test/last.html --> 192.168.153.147/test/test.html
    location /last/ {
        root /usr/share/nginx/html;
        rewrite .* /test/last.html last;
    }

    location /test/ {
        root /usr/share/nginx/html;
        rewrite .* /test/test.html break;
    }

}
[root@localhost conf.d]# cd /usr/share/nginx/html/
[root@localhost html]# mkdir test
[root@localhost html]# echo "last" > test/last.html
[root@localhost html]# echo "break" > test/break.html
[root@localhost html]# echo "test" > test/test.html

http://192.168.62.159/break/break.html
http://192.168.62.159/last/last.html
注意:
-
last 标记在本条 rewrite 规则执行完后,会对其所在的 server { … } 标签重新发起请求;
-
break 标记则在本条规则匹配完成后,停止匹配,不再做后续的匹配;
4.Nginx 的 https ( rewrite )
server {
        listen       80;
        server_name  *.vip9999.top vip9999.top;

        if ($host ~* "^www.vip9999.top$|^vip9999.top$" ) {
                return 301 https://www.vip9999.top$request_uri;
        }

        if ($host ~* "^(.*).vip9999.top$" ) {
                set $user $1;
                return 301 https://www.vip9999.top/$user;
        }

    }

    # Settings for a TLS enabled server.
    server {
        listen       443 ssl;
        server_name  www.vip9999.top;

        location / {
                root      /usr/share/nginx/html;
                index     index.php index.html;
        }

        #pass the PHP scripts to FastCGI server listening on 127.0.0.1:9000
        location ~ \.php$ {
            root           /usr/share/nginx/html;
            fastcgi_pass   127.0.0.1:9000;
            fastcgi_index  index.php;
            fastcgi_param  SCRIPT_FILENAME  $document_root$fastcgi_script_name;
            include        fastcgi_params;
        }
        ssl on;
        ssl_certificate cert/214025315060640.pem;
        ssl_certificate_key cert/214025315060640.key;
        ssl_session_cache shared:SSL:1m;
        ssl_session_timeout  10m;
        ssl_ciphers HIGH:!aNULL:!MD5;
        ssl_prefer_server_ciphers on;
        }
5、Apache 的 https ( rewrite )拓展
[root@localhost ~]# yum -y install httpd mod_ssl
[root@localhost ~]# vim /etc/httpd/conf.d/vip9999.conf

nginx的location指令详解
Nginx 的 HTTP 配置主要包括三个区块,结构如下:
http { 						# 这个是协议级别
  include mime.types;
  default_type application/octet-stream;
  keepalive_timeout 65;
  gzip on;
    server {			 # 这个是服务级别
      listen 80;
      server_name localhost;
        location / {  # 这个是请求级别
          root html;
          index index.html index.htm;
        }
      }
}
1、location 区段
-
location 是在 server 块中配置,根据不同的 URl使用不同的配置,来处理不同的请求。
-
location 是有顺序的,会被第一个匹配的location 处理。
-
基本语法如下:
location [=|~|~*|^~|@] pattern{……}2、location 前缀含义
=    表示精确匹配,优先级也是最高的
^~   表示url以某个常规字符串开头,理解为匹配url路径即可
~    表示区分大小写的正则匹配
~*   表示不区分大小写的正则匹配
!~   表示区分大小写不匹配的正则
!~*  表示不区分大小写不匹配的正则
/    通用匹配,任何请求都会匹配到
#优先级
= > ~|~*|!~|!~* > /
3、location 配置示例
本地解析域名host
1、没有修饰符 表示:必须以指定模式开始
[root@nginx-server nginx]# pwd
/home/www/nginx
[root@nginx-server nginx]# cat abc/2.html
2.html

server {
    listen       80;
    server_name  www.qf.com;

    location  /abc {
        root    /home/www/nginx;
        index   2.html;
        }
}
那么,如下是对的:
http://www.qf.com/abc
2、=表示:必须与指定的模式精确匹配
server {
    listen       80;
    server_name  www.testpm.cn;
    access_log  /var/log/nginx/http_access.log  main;

    location / {
        root /usr/share/nginx/html;
        index a.html index.htm;
    }

    location = / {
        root /usr/share/nginx/html;
        index b.html index.htm;
    }
}
进行测试:
http://www.testpm.cn
http://www.testpm.cn/a.html
3、~ 表示:指定的正则表达式要区分大小写
[root@nginx-server nginx]# pwd
/home/www/nginx
[root@nginx-server nginx]# ls
abc  ABC
[root@nginx-server nginx]# cat abc/2.html
abc
[root@nginx-server nginx]# cat ABC/2.html
ABC

server {
        server_name localhost;
        location ~ /abc {
                root /home/www/nginx;
                index 2.html index.html;
        }
}

那么:
http://192.168.62.153/abc/  #能看到abc
http://192.168.62.153/ABC/  #看不到 404
4、~* 表示:指定的正则表达式不区分大小写
[root@nginx-server nginx]# pwd
/home/www/nginx
[root@nginx-server nginx]# ls
abc  ABC
[root@nginx-server nginx]# cat abc/2.html
abc
[root@nginx-server nginx]# cat ABC/2.html
ABC

server {
        server_name localhost;
        location ~* /abc {
                root /home/www/nginx;
                index 2.html index.html;
      }
}
那么:
http://192.168.62.153/ABC/
5、^~ :类似于无修饰符的行为,也是以指定模式开始,不同的是,如果模式匹配,那么就停止搜索其他模式了。
查找顺序和优先级
= 大于 ^~  大于 ~|~*|!~|!~* 大于 /
多个location配置的情况下匹配顺序为:首先匹配 =,其次匹配^~, 其次是按正则匹配,最后是交给 / 通用匹配。当有匹配成功时候,停止匹配,按当前匹配规则处理请求。
================================================
(1) =:表示完全匹配;
(2) ^~:匹配URI的前缀,如果一个URI同时满足两个规则的话,匹配最长的规则;
(3) ~:匹配正则表达式,大小写敏感;
(4) ~*:匹配正则表达式,大小写不敏感;
优先级:(1)> (2) > (3) = (4)
location 区段匹配示例

location = / {
  # 只匹配 / 的查询.
  [ configuration A ]
}
location / {
  # 匹配任何以 / 开始的查询,但是正则表达式与一些较长的字符串将被首先匹配。
  [ configuration B ]
}
location ^~ /images/ {
  # 匹配任何以 /images/ 开始的查询并且停止搜索,不检查正则表达式。
  [ configuration C ]
}
location ~* \.(gif|jpg|jpeg)$ {
  # 匹配任何以gif, jpg, or jpeg结尾的文件,但是所有 /images/ 目录的请求将在Configuration C中处理。
  [ configuration D ]
}
各请求的处理如下例:
	/ → configuration A
	/documents/document.html → configuration B
	/images/1.gif → configuration C
	/documents/1.jpg → configuration D
4、root 、alias 指令区别
location /img {
    alias /var/www/image;
    index index.html;
}
#若按照上述配置的话,则访问/img/目录里面的文件时,ningx会自动去/var/www/image/目录找文件
location /img {
    root /var/www/image;
    index index.html;
}
#若按照这种配置的话,则访问/img/目录下的文件时,nginx会去/var/www/image/img/目录下找文件。
- alias 是一个目录别名的定义;
- root 则是最上层目录的定义。
root /home/www/nginx;
index 2.html index.html;
}
}
那么:
http://192.168.62.153/ABC/5、^~ :类似于无修饰符的行为,也是以指定模式开始, 不同的是,如果模式匹配,那么就停止搜索其他模式了。 **查找顺序和优先级**
= 大于 ^~  大于 ~|~*|!~|!~* 大于 /
多个location配置的情况下匹配顺序为:首先匹配 =,其次匹配^~,
其次是按正则匹配,最后是交给 / 通用匹配。当有匹配成功时候,
停止匹配,按当前匹配规则处理请求。
================================================
(1) =:表示完全匹配;
(2) ^~:匹配URI的前缀,如果一个URI同时满足两个规则的话,匹配最长的规则;
(3) ~:匹配正则表达式,大小写敏感;
(4) ~*:匹配正则表达式,大小写不敏感;
优先级:(1)> (2) > (3) = (4)
location 区段匹配示例

location = / {
  # 只匹配 / 的查询.
  [ configuration A ]
}
location / {
  # 匹配任何以 / 开始的查询,但是正则表达式与一些较长的字符串将被首先匹配。
  [ configuration B ]
}
location ^~ /images/ {
  # 匹配任何以 /images/ 开始的查询并且停止搜索,不检查正则表达式。
  [ configuration C ]
}
location ~* \.(gif|jpg|jpeg)$ {
  # 匹配任何以gif, jpg, or jpeg结尾的文件,但是所有 /images/ 目录的请求将在Configuration C中处理。
  [ configuration D ]
}
各请求的处理如下例:
	/ → configuration A
	/documents/document.html → configuration B
	/images/1.gif → configuration C
	/documents/1.jpg → configuration D
4、root 、alias 指令区别
location /img {
    alias /var/www/image;
    index index.html;
}
#若按照上述配置的话,则访问/img/目录里面的文件时,ningx会自动去/var/www/image/目录找文件
location /img {
    root /var/www/image;
    index index.html;
}
#若按照这种配置的话,则访问/img/目录下的文件时,nginx会去/var/www/image/img/目录下找文件。
- alias 是一个目录别名的定义;
- root 则是最上层目录的定义。
- 老版本中:还有一个重要的区别是alias后面必须要用“/”结束,否则会找不到文件的,而root则可有可无。


 2017
2017


 被折叠的 条评论
为什么被折叠?


