


一,ansible环境部署
环境:
    系统:centos7
    主机:4台  1台控制节点 3台被控制节点
1,解析:四台本地解析都要互相做
[root@ansible-1 ~]# vim  /etc/hosts
192.168.222.131 ansible-1(控制节点主机)
192.168.222.129 web1(被控制节点)
192.168.222.130 web2(被控制节点)
192.168.222.128 web2(被控制节点)

2, 配置ssh公钥认证:
控制节点需要发送ssh公钥给所有被控制节点
[root@ansible-1 ~]# ssh-keygen
[root@ansible-1 ~]# ssh-copy-id web1
[root@ansible-1 ~]# ssh-copy-id web2
[root@ansible-1 ~]# ssh-copy-id web3

3,安装ansible
[root@ansible-1 ~]#yum -y  install ansible
[root@ansible-1 ~]#ansible --version
4,将被控制的主机添加到主机列表中
[root@ansible-1 ~]# ls /etc/ansible/
ansible.cfg  hosts  roles
#ansible.cfg配置文件  hosts被控制的主机列表
[root@ansible-1 ~]# vim /etc/ansible/hosts 行尾添加被控制的主机
[zu1]        #被控制主机组web1,可以自定义
web1     #被控制主机
web2     #被控制主机
[zu2]        #被控制主机组web2,可以自定义
web3    #被控制主机

至此,ansible部署完毕,简单吧。
注意:这里可以写IP但不建议,最好写主机名,比较方便,后面有新的主机也可以继续添加的。
二,ansible基础组件和运行流程
1,自动化运维工具对比:
Puppet:基于Ruby 开发,采用 C/S 架构,扩展性强,基于 SSL,远程命令执行相对
较弱
SaltStack:基于 Python 开发,采用 C/S 架构,相对 puppet 更轻量级,配置语法
使用 YAML,使得配置脚本更简单
Ansible:—基于 Python开发,分布式,无需客户端,轻量级,配置语法使用YAML及
Jinja2模板语言,更强的远程命令执行操作。

Ansible介绍:
ansible是新出现的自动化运维工具,基于Python开发,分布式,无需客户端,轻量
级,实现了批量系统配置、批量程序部署、批量运行命令等功能,ansible是基于
模块工作的,本身没有批量部署的能力。真正具有批量部署的是ansible所运行的
模块,ansible只是提供一种框架。
2,ansible介绍,特性,执行流程
Ansible特性
1)、no agents:不需要在被管控主机上安装任何客户端,更新时,只需在
操作机上进行一次更新即可(不用安装客户端。分布式的)
2)、no server:无服务器端,使用时直接运行命令即可
3)、modules in any languages:基于模块工作,可使用任意语言开发模块
4)、yaml,not code:使用yaml语言定制剧本playbook
5)、ssh by default:基于SSH工作
6)、strong multi-tier solution:可实现多级指挥
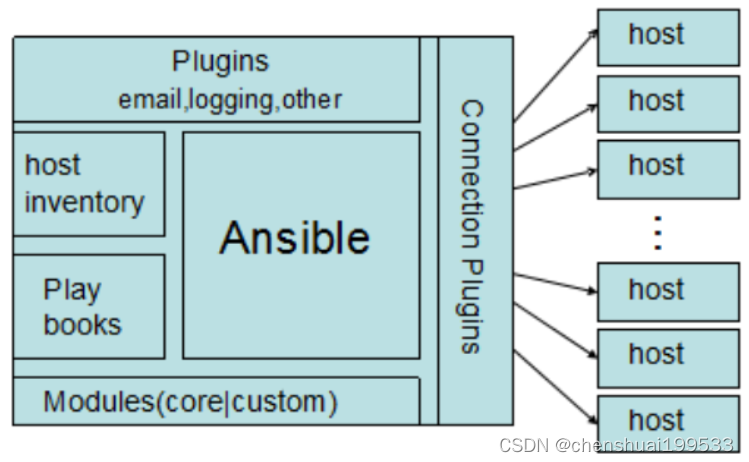
connection plugins:连接插件,负责和被监控端实现通信,默认使用SSH连接
host inventory:主机清单,是一个配置文件里面定义监控的主机
modules : 模块,核心模块、command模块、自定义模块等
plugins : modules功能的补充,包括连接插件,邮件插件等
playbook:编排,定义 Ansible 多任务配置文件,非必需
Ansible执行流程:
读取ansible.cfg文件
通过规则过滤inventory中定义的主机列表
加载task对应的模块
通过ansible core 将模块或命令打包成python脚本文件
将临时脚本文件传输到远程服务器
对应执行用户家目录的‘ansible/tmp/xx/xxx.py’文件
给文件加执行权限
执行py文件并返回结果
删除临时文件并退出
3,主配置文件的解释
主配置文件:
/etc/ansible/ansible.cfg
主要设置一些ansible初始化的信息,比如日志存放路径、模块、插件等配置信息

配置文件中常见参数:
inventory = /etc/ansible/hosts
#这个参数表示资源清单inventory文件的位置
library = /usr/share/ansible
#指向存放Ansible模块的目录,支持多个目录方式,只要用冒号(:)隔开就可以
forks = 5
#并发连接数,默认为5
sudo_user = root
#设置默认执行命令的用户
remote_port = 22
#指定连接被管节点的管理端口,默认为22端口,建议修改,能够更加安全
host_key_checking = False
#设置是否检查SSH主机的密钥,值为True/False。关闭后第一次连接不会提示配置实例
timeout = 60
#设置SSH连接的超时时间,单位为秒
log_path = /var/log/ansible.log
#指定一个存储ansible日志的文件(默认不记录日志)
4,实战测试
语法:
ansible  <pattern>  -m <module_name>  -a <arguments>
     主机名/IP/主机组名+模块名+参数命令
1,pattern--主机清单里定义的主机组名,主机名,IP,别名等,all表示所有的主机,
支持通配符,正则--多个组,组名之间用冒号隔开
2,*web*  --组名或主机名中含web的
3,webservers[0] - webservers组中的第一台主机以~开头,匹配正则
4,-m module_name: 模块名称,默认为command
5,-a arguments: 传递给模块的参数
5,使用ping模块检查ansible节点的连通性:
使用ping模块检查ansible节点的连通性:
        [root@ansible ~]# ansible web1 -m ping
        web1 | SUCCESS => {
            "changed": false,
            "ping": "pong"
        }
        [root@ansible ~]# ansible web1 -m ping -o
        web1 | SUCCESS => {"changed": false, "ping": "pong"}

        同时指定多台机器:
        [root@ansible ~]# ansible web1,web2,web3 -m ping -o
        web3 | SUCCESS => {"changed": false, "ping": "pong"}
        web2 | SUCCESS => {"changed": false, "ping": "pong"}
        web1 | SUCCESS => {"changed": false, "ping": "pong"}

        [root@ansible ~]# ansible web* -m ping -o
        web3 | SUCCESS => {"changed": false, "ping": "pong"}
        web2 | SUCCESS => {"changed": false, "ping": "pong"}
        web1 | SUCCESS => {"changed": false, "ping": "pong"}

        [root@ansible ~]# ansible all -m ping -o
        web1 | SUCCESS => {"changed": false, "ping": "pong"}
        web3 | SUCCESS => {"changed": false, "ping": "pong"}
        web2 | SUCCESS => {"changed": false, "ping": "pong"}
6,使用shell模块和command模块
 执行shell命令: -a 是传给模块的参数
[root@ansible ~]# ansible web1 -m shell -a 'uptime'
web1 | SUCCESS | rc=0 >>10:59:56 up 2 days, 15:04,  2 users,  load
average: 0.00, 0.01, 0.05

[root@ansible ~]# ansible web1 -m command -a 'uptime'
 web1 | SUCCESS | rc=0 >>11:00:03 up 2 days, 15:04,  2 users,  load
  average: 0.00, 0.01, 0.05

因为默认模块就是command,所以上面命令可以不加-m:
[root@ansible ~]# ansible web1 -a 'uptime'
web1 | SUCCESS | rc=0 >>11:01:39 up 2 days, 15:06,  2 users,  load
 average: 0.00, 0.01, 0.05

给控制节点创建用户chen,有三种方式:
[root@ansible ~]#ansible web1 -m shell -a "useradd chen"
[root@ansible ~]#ansible web1 -m command -a "useradd chen"
[root@ansible ~]#ansible web1 -a "useradd chen"

重定向输出到本地文件中:
[root@ansible ~]#ansible web1 -a "df -Th" > /root/a.txt
三,ansible组件–inventory 主机清单
inventory文件通常用于定义要管理主机及其认证信息,例如ssh登录用户名、密码以及key相关信息。
1,主机清单文件配置格式:
1,vim /etc/ansible/hosts
    web1                  //单独指定主机,可以使用主机名称或IP地址
    web2
    web3
#-----------------------------------------------------------------
2,[webservers]        //使用[]标签指定主机组
192.168.10.128
bar.example.com
up.example.com:5309           //指定 SSH 端口 5309
web5  ansible_ssh_host=web2  //设置主机web2的别名为 web5
web1 ansible_ssh_pass='123'
//设置ssh密码,使用-k参数之后提示的密码可以不写,直接回车

www[01:50].example.com        //支持通配符匹配www01,www02,...,www50
db-[a:f].example.com         //通配符匹配db-a,db-b,...,db-f

3,为每个主机单独指定变量,这些变量随后可以在 playbooks 中使用:内置变量
[atlanta]
host1 http_port=80 maxRequestsPerChild=808
host2 http_port=303 maxRequestsPerChild=909
#------------------------------------------------------------------
4,为一个组指定变量,组内每个主机都可以使用该变量:
[atlanta]
host1
host2
[atlanta:vars]
ansible_ssh_pass='123'
ntp_server=ntp.atlanta.example.com
proxy=proxy.atlanta.example.com
#-----------------------------------------------------------------
5,组可以包含其他组:
    [atlanta]
    host1
    host2
    [raleigh]
    host3
    host4
    [southeast:children]   //southeast包括两个子组
    atlanta
    raleigh


6,ansible基于ssh连接inventory中指定的远程主机时,还可以通过参数指定
其交互方式:
ansible_ssh_host #远程主机
ansible_ssh_port #指定远程主机ssh端口
ansible_ssh_user #ssh连接远程主机的用户,默认root
ansible_ssh_pass
#连接远程主机使用的密码,在文件中明文,建议使用--ask-pass或者使用SSH keys

ansible_sudo_pass # sudo密码, 建议使用--ask-sudo-pass
ansible_connection # 指定连接类型: local, ssh, paramiko
ansible_ssh_private_key_file # ssh 连接使用的私钥
ansible_shell_type # 指定连接对端的shell类型, 默认sh,支持csh,fish
ansible_python_interpreter # 指定对端使用的python编译器的路径
2,查看组内主机列表
[root@ansible-1 ~]# ansible web* --list-hosts
或者
[root@ansible-1 ~]# ansible all --list-hosts
  hosts (3):
    ansible-4
    ansible-2
    ansible-3
3,自定义主机列表
[root@ansible-1 ~]# vim /mnt/hostlist
[web1]          #主机组
ansible-2
ansible-3
[web1:vars]     #主机变量
ansible_ssh_port=22
ansible_ssh_user=root
#ansible_ssh_private_key_file=/root/.ssh/id_rsa
ansible_ssh_pass=1

[root@ansible-1 ~]# ansible -i /mnt/hostlist all -m ping -o
ansible-2 | SUCCESS => {"ansible_facts": {"discovered_interpreter_python": "/usr/bin/python"}, "changed": false, "ping": "pong"}
ansible-3 | SUCCESS => {"ansible_facts": {"discovered_interpreter_python": "/usr/bin/python"}, "changed": false, "ping": "pong"}
或者
[root@ansible-1 ~]# ansible -i /mnt/hostlist web1 -m ping -o
ansible-2 | SUCCESS => {"ansible_facts": {"discovered_interpreter_python": "/usr/bin/python"}, "changed": false, "ping": "pong"}
ansible-3 | SUCCESS => {"ansible_facts": {"discovered_interpreter_python": "/usr/bin/python"}, "changed": false, "ping": "pong"}

-i:指定主机清单文件

注意:
一个典型的例子就是shell和command模块,这两个模块在很多情况下都能完成同样
的工作,以下是两个模块之前的区别:

command模块命令将不会使用shell执行,因此,像$HOME这样的变量是不可用的。
还有像 |,& 都将不可用。

shell 模块通过shell程序执行, 默认是/bin/sh, <, >, |, ;, & 可用。
四,ansible组件–(Ad-Hoc点对点)
ad hoc 临时的,在ansible中是指需要快速执行,并且不需要保存的命令。其实
就是执行简单的一条命令。对于复杂的命令则为playbook。

1,获取模块列表
[root@ansible-1 ~]# ansible-doc -l
2,模块使用格式:
[root@ansible-1 ~]# ansible-doc -s yum
1,远程复制备份模块:copy
常用模块:
1.远程复制备份模块:copy
模块参数详解:
src=:指定源文件路径
dest=:目标地址(拷贝到哪里)
owner:指定属主
group:指定属组
mode:指定权限,可以以数字指定比如0644
backup:在覆盖之前将原文件备份,备份文件包含时间信息。有两个选项:yes|no
远程拷贝文件:
[root@ansible-1 ~]#echo 111 > b.txt 创建文件并添加数据
[root@ansible-1 ~]# ansible web1 -m copy -a 'src=/root/b.txt dest=/root owner=root group=root mode=644 ' -o

远程拷贝文件并备份原始文件:
[root@ansible-1 ~]#echo 222 >> b.txt 追加
[root@ansible-1 ~]# ansible web1 -m copy -a 'src=/root/b.txt dest=/root owner=root group=root mode=644 backup=yes' -o
2,用户管理user模块
创建用户并指定密码方法一:
[root@ansible-1 ~]# ansible web1 -m user -a "name=haha password=`echo 1 | openssl passwd -1 -stdin`" -o
"name=   "  #如:指定的用户名
-1 MD5加密算法数字1
创建用户并指定密码方法二:
[root@ansible-1 ~]#ansible web1 -m shell -a "useradd yang && echo 1 | passwd --stdin yang"

方法一:删除用户(adsent #删除用户,但是不会删除家目录)
[root@ansible-1 ~]# ansible web1 -m user -a "name=haha state=absent" -o
方法二:彻底删除干净包括家目录
[root@ansible-1 ~]# ansible web1 -m shell -a "userdel -r haha"
3,软件包管理 yum模块
安装apache
[root@ansible-1 ~]# ansible web1 -m yum -a "name=httpd state=latest" -o

state=     状态是什么,干什么
state=latest       表示最新的
state=removed      表示卸载
卸载软件:
[root@ansible-1 ~]# ansible web1 -m yum -a "name=httpd state=removed" -o
4,服务管理service模块
1,启动服务
[root@ansible~]#ansible web1 -m service -a "name=httpd state=started"
2,停止服务
[root@ansible~]#ansible web1 -m service -a "name=httpd state=stopped"
3,重启服务
[root@ansible~]#ansible web1 -m service -a "name=httpd state=restarted"
4,开机启动
[root@ansible~]#ansible web1 -m service -a "name=httpd state=started enabled=yes"
5,开机关闭
[root@ansible~]#ansible web1 -m service -a "name=httpd state=started enabled=no"
5,文件模块file
模块参数详解:
owner:修改属主
group:修改属组
mode:修改权限
path=:要修改文件的路径
recurse:递归的设置文件的属性,只对目录有效
yes:表示使用递归设置
state:touch创建一个新的空文件;directory当目录存在时不会进行修改

1,创建一个文件
[root@ansible~]# ansible web1 -m file -a 'path=/root/1.txt mode=777 state=touch'
2,创建一个目录
[root@ansible~]# ansible web1 -m file -a 'path=/root/alan mode=777 state=directory'
6,收集信息模块setup
1,搜集所有信息
[root@ansible-1 ~]# ansible web1 -m setup

2,只查询ipv4的地址
[root@ansible-1 ~]# ansible web1 -m setup -a 'filter=ansible_all_ipv4_addresses'

3,查看内存的剩余
[root@ansible-1 ~]# ansible web1 -m setup -a 'filter=ansible_*_mb'
7,利用脚本批量化操作
1,编写脚本
[root@ansible-1 ~]# vim a.sh
#!/bin/bash
a=`free -mh|awk NR==2'{print $2}'`
echo "内存总量是:$a"

2,将脚本拷贝到被控制的节点
[root@ansible-1 ~]# scp a.sh ansible-2:/root
a.sh     100%   75   285.0KB/s   00:00
[root@ansible-1 ~]# scp a.sh ansible-3:/root
a.sh     100%   75   206.5KB/s   00:00
[root@ansible-1 ~]# scp a.sh ansible-4:/root
a.sh     100%   75   377.0KB/s   00:00

3,ansible批量化执行脚本
[root@ansible-1 ~]# ansible all -m shell -a "bash a.sh"
ansible-3 | CHANGED | rc=0 >>
内存总量是:976M
ansible-4 | CHANGED | rc=0 >>
内存总量是:976M
ansible-2 | CHANGED | rc=0 >>
内存总量是:976M
四,ansible-playbook剧本
1,playbook概念简介
通过playbook剧本你可以一次在多台机器执行多个指令。
Playbooks核心元素:
Variables  #变量元素,可传递给Tasks/Templates使用;
Tasks      #任务元素,由模块定义的操作的列表,即调用模块完成任务;
Templates #模板元素,使用了模板语法的文本文件,可根据变量动态生成配置文件;
Handlers   #处理器元素,通常指在某事件满足时触发的操作;
Roles      #角色元素

注意:
一个剧本里面可以有多个play,每个play只能有一个tasks,每个tasks可以有
多个name

playbook的基础组件:
name:信息描述
hosts:用于指定要执行指定任务的主机/主机组
user:基本上是root
tasks:任务列表
vars:定义变量
vars_files:调用定义变量文件
notify:任务执行结果触发的新的定义,需要在handlers执行
案例操作1-创建一个文件和目录
切换路径
[root@ansible-1 ~]# cd /etc/ansible
创建.yml文件
[root@ansible-1 ansible]# vim test.yml #创建文件必须以.yml结尾
- hosts: web1
  user: root
  tasks:
  - name: test-1
    file: state=touch path=/mnt/xingdian.txt
  - name: test-2
    file: state=directory path=/mnt/chen
语法检测
[root@ansible-1 ansible]# ansible-playbook --syntax-check test.yml
playbook: test.yml
批量化运行playbook
[root@ansible-1 ansible]# ansible-playbook test.yml
PLAY [web1] *****************************************************************
TASK [Gathering Facts] *****************************************************************
ok: [ansible-3]
ok: [ansible-2]

TASK [test-1] **************************************************
changed: [ansible-2]
changed: [ansible-3]

TASK [test-2] ***************************************************
ok: [ansible-2]
ok: [ansible-3]

PLAY RECAP ********************************************************
ansible-2 : ok=3 changed=1  unreachable=0  failed=0  skipped=0
    rescued=0    ignored=0
ansible-3 : ok=3 changed=1  unreachable=0  failed=0  skipped=0
   rescued=0    ignored=0

参数解释:
    hosts: 指定的操作主机名/主机组;
    user: 指定什么用户登录远程操作,默认root用户;
    tasks: 指定了一个执行任务;
    name:对任务的描述,在执行过程中会打印出来。
一定注意-和空格,书写规范,不然容易报错
案例操作2-由特定条件触发的Tasks
由特定条件触发的Tasks
[root@ansible-1 ansible]#vim handlers.yml
- host: web1
  user: root
  tasks:
  - name: a
    copy: src=/root/a.txt  dest=/root   #任务执行成功
    notify: b                           #通知notify
  handlers:
  - name: b                             #要和notify定义的一致
    shell: echo 123 >> /root/a.txt      #执行这个命令
注意:
只有copy 模块真正执行后,才会去调用下面的 handlers 相关的操作,追加内容。
所以这种比较适合配置文件发生更改后,需要重启服务的操作。
语法检测:
[root@ansible-1 ansible]#ansible-playbook --syntax-check handlers.yml
playbook: handlers.yml
[root@ansible-1 ansible]#ansible-playbook handlers.yml
案例操作3-安装nginx并启动服务
安装nginx并启动服务
[root@ansible-1 ansible]#vim nginx.yml
- hosts: web1
  user: root
  tasks:
  - name: install nginx
    yum: name=nginx state=latest
    notify: chen
  handlers:
  - name: chen
    service: name=nginx state=started
语法测试:
[root@ansible-1 ansible]#ansible-playbook --syntax-check /home/ansible/nginx.yml
playbook: handlers.yml
[root@ansible-1 ansible]#ansible-playbook nginx.yml
...
案例操作4-基于字符串列表元素实战
基于字符串列表元素实战:
[root@ansible-server ansible]# vim list.yml
- hosts: websrvs
  user: root
  tasks:
  - name: install packages
    yum: name={{ item }} state=latest      #相当于for循环里面的i
    with_items:                           #取值 。但是不支持通配符
     - httpd
     - php
     - php-mysql
     - php-mbstring
     - php-gd
检测语法:
[root@ansible-server ansible]# ansible-playbook --syntax-check list.yml
playbook: list.yml
执行:
[root@ansible-server ansible]# ansible-playbook  list.yml
案例操作5-基于字典列表给元素示例
- hosts: all
  user: root
  tasks:
  - name: create groups
    group: name={{ item }} state=present
    with_items:
    - groupx1
    - groupx2
    - groupx3
   - name: create users
     user: name={{ item.name }} group={{ item.group }} state=present
     with_items:      这里使用的是字典
     - {name: 'userx1', group: 'groupx1'}
     - {name: 'userx2', group: 'groupx2'}
     - {name: 'userx3', group: 'groupx3'}
案例操作6-tags使用
给指定的任务定义一个调用标识,形式如下
只运行指定标记的任务:-t tags
[root@ansible ansible]# ansible-playbook  -t 标记名称 test.yml

跳过某一个被标记的任务:--skip-tags=SKIP_TAGS
[root@ansible ansible]# ansible-playbook  --skip-tags=标记名称 test.yml

从某一个任务开始往下运行:--start-at-task 任务名称
[root@ansible ansible]# ansible-playbook  --start-at-task "start httpd service" test.yml

[root@xingdian /]# vim /home/ansible/tag.yml
---
 - hosts: web
   user: root
   tasks:
   - name: touch file
     file: path=/root/nihao.txt state=touch
     tags: nihao
   - name: mkdir file
     file: path=/root/xingdian state=directory
     tags: xingdian
   - name: touch file1
     file: path=/root/file1.txt state=touch
     tags: file1
案例操作7-批量安装apache服务,并测试访问
[root@ansible-1 ansible]# mkdir apache
[root@ansible-1 ansible]# cd apache
[root@ansible-1 ansible]# echo 111 > index.html
[root@ansible-1 ansible]# vim hello.conf
<virtualhost *:81>
	servername localhost
	documentroot /web1
</virtualhost>
<directory "/web1">
	allowoverride all
	require all granted
</directory>

[root@ansible-1 ansible]#vim apache.yml
- hosts: web1
  user: root
  tasks:
  - name: install apache
    yum: name=httpd
  - name: mkdir file
    file: state=directory path=/web1 mode=777
  - name: copy index
    copy: src=/etc/ansible/apache/index.html dest=/web1
  - name: vim config
    shell: echo "Listen 81" >> /etc/httpd/conf/httpd.conf
  - name: copy config
    copy: src=/etc/ansible/apache/hello.conf dest=/etc/httpd/conf.d/
    notify: start httpd
  handlers:
  - name: start httpd
    service: name=httpd state=started
[root@ansible-1 apache]# ls
apache.yml  hello.conf  index.html

语法检测
[root@ansible-1 apache]# ansible-playbook --syntax-check apache.yml
playbook: apache.yml
安装执行
[root@ansible-1 apache]# ansible-playbook apache.yml
网页测试访问
[root@ansible-1 apache]# curl  http://ansible-2:81
hello
[root@ansible-1 apache]# curl  http://ansible-3:81
hello
五,ansible-role角色
1,角色目录下的组织结构
roles是在ansible中,playbooks的目录组织结构。

files/:存储由copy或script等模块调用的文件;

tasks/: 专门存储任务的目录,一个角色可以定义多个任务
此目录中至少应该有一个名为main.yml的文件,用于定义各task;其它的文件
需要由main.yml进行“包含”调用;

handlers/: 条件  前一个任务执行成功去执行下面的  处理特定事物的文件
此目录中至少应该有一个名为main.yml的文件,用于定义各handler;其它的
文件需要由main.yml进行“包含”调用;

vars/: 变量  定义变量的文件
此目录中至少应该有一个名为main.yml的文件,用于定义各variable;其它的
文件需要由main.yml进行“包含”调用;

templates/: 模板  使用变量的文件存储由template模块调用的模板文本;
role目录结构: 这里的nginx是一个角色的名字,角色里用到文件放在files中,
通过创建playbook来调用这些角色
2,nginx批量化安装部署实战
案例:
1.准备目录结构
[root@ansible-server ~]# cd /etc/ansible/roles/ #role位自带目录,如果不存在可以创建
[root@ansible-server roles]# mkdir nginx/{files,handlers,tasks,templates,vars} -p
2.创建文件:
[root@ansible-server roles]# touch site.yml nginx/{handlers,tasks,vars}/main.yml
[root@ansible-server roles]# yum install -y tree
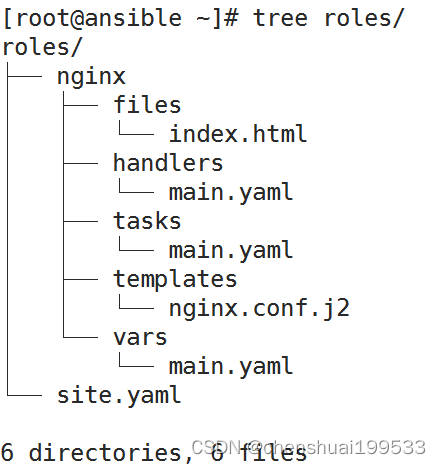
[root@xingdian roles]# tree nginx/
nginx/
├── files
├── handlers
│ └── main.yml
├── tasks
│ └── main.yml
├── templates
└── vars
└── main.yml
5 directories, 3 files
3.创建nginx的测试文件
[root@ansible-server roles]# echo 1234 > nginx/files/index.html
4.安装nginx并配置模板
[root@ansible-server roles]# yum install -y nginx && cp /etc/nginx/nginx.conf.default nginx/templates/nginx.conf.j2
编写任务
[root@ansible-server roles]# vim nginx/tasks/main.yml
---
- name: install epel
yum: name=epel-release state=latest
- name: install nginx
yum: name=nginx state=latest
- name: copy nginx.conf templte
template: src=nginx.conf.j2 dest=/etc/nginx/nginx.conf
- name: copy index.html
copy: src=index.html dest=/usr/share/nginx/html/index.html
notify: start nginx
5.templates模板: 用的是jinja2的语法
准备配置文件
[root@ansible-server roles]# vim nginx/templates/nginx.conf.j2
修改成如下内容。自定义变量
events {
worker_connections {{ worker_connections }};
}
6.编写变量
[root@ansible-server roles]# vim nginx/vars/main.yml #添加如下内容
worker_connections: 2
7.编写handlers
[root@ansible-server roles]# vim nginx/handlers/main.yml #编写如下内容
---
- name: start nginx
service: name=nginx state=started
8.编写剧本
[root@ansible-server roles]# vim site.yml
---
- hosts: webservers4
user: root
roles:
- nginx
9.检测语法
[root@ansible-server roles]# ansible-playbook site.yml --syntax-check
playbook: site.yml
10.执行剧本:
[root@ansible-server roles]# ansible-playbook site.yml
11.查看:
[root@ansible-web4 ~]# netstat -lntp
[root@ansible-web4 ~]# cat /etc/nginx/nginx.conf | grep pro
#worker_processes auto;
worker_processes 2;
12.访问:
[root@ansible-1 apache]# curl http://ansible-4
1234
[root@ansible-1 apache]# curl ansible-4
1234
六,ansible常用的模块
1. setup: 查看远程主机的基本信息
2. ping: 测试远程主机的运行状态
3. file: 设置文件属性
    相关选项如下:
    force:需要在两种情况下强制创建软链接,一种是源文件不存在,但之后会
    建立的情况下;另一种是目标软链接已存在,需要先取消之前的软链,然后
    创建新的软链,有两个选项:yes|no
    group:定义文件/目录的属组
    mode:定义文件/目录的权限
    owner:定义文件/目录的属主
    path:必选项,定义文件/目录的路径
    recurse:递归设置文件的属性,只对目录有效,有两个选项:yes|no
    src:被链接的源文件路径,只应用于state=link的情况
    dest:被链接到的路径,只应用于state=link的情况
    state:
           directory:如果目录不存在,就创建目录
           file:即使文件不存在,也不会被创建
           link:创建软链接
           hard:创建硬链接
           touch:如果文件不存在,则会创建一个新的文件,如果文件或目录.
           已存在,则更新其最后修改时间
           absent:删除目录、文件或者取消链接文件

使用示例:
ansible test -m file -a "src=/etc/fstab dest=/tmp/fstab state=link"
ansible test -m file -a "path=/tmp/fstab state=absent"
ansible test -m file -a "path=/tmp/test state=touch"

4. copy: 把主控端的文件复制到远程主机
    相关选项如下:
    backup:在覆盖之前,将源文件备份,备份文件包含时间信息。有两个选项:
    yes|no
    content:用于替代“src”,可以直接设定指定文件的值
    dest:必选项。要将源文件复制到的远程主机的绝对路径,如果源文件是一个
    目录,那么该路径也必须是个目录
    directory_mode:递归设定目录的权限,默认为系统默认权限
    force:如果目标主机包含该文件,但内容不同,如果设置为yes,则强制覆盖,
    如果为no,则只有当目标主机的目标位置不存在该文件时,才复制。默认为yes
    others:所有的file模块里的选项都可以在这里使用
    src:被复制到远程主机的本地文件,可以是绝对路径,也可以是相对路径。
    如果路径是一个目录,它将递归复制。在这种情况下,如果路径使用“/”来结
    尾,则只复制目录里的内容,如果没有使用“/”来结尾,则包含目录在内的
    整个内容全部复制,类似于rsync
   示例如下:
ansible test -m copy -a "src=/srv/myfiles/foo.conf dest=/etc/foo.conf
 owner=foo group=foo mode=0644"
ansible test -m copy -a "src=/mine/ntp.conf dest=/etc/ntp.conf
 owner=root group=root mode=644 backup=yes"

5.service模块:用于管理服务
该模块包含如下选项:
arguments:给命令行提供一些选项
enabled:是否开机启动 yes|no
name:必选项,服务名称
pattern:定义一个模式,如果通过status指令来查看服务的状态时,没有响应,
就会通过ps指令在进程中根据该模式进行查找,如果匹配到,则认为该服务依然在
运行。
runlevel:运行级别
sleep:如果执行了restarted,在则stop和start之间沉睡几秒钟
state:对当前服务执行启动,停止、重启、重新加载等操作(started,stopped,restarted,reloaded)

使用示例:
ansible test -m service -a "name=httpd state=started enabled=yes"
asnible test -m service -a "name=foo pattern=/usr/bin/foo state=started"
ansible test -m service -a "name=network state=restarted args=eth0"

6.cron模块:用于管理计划任务
包含如下选项:
backup:对远程主机上的原任务计划内容修改之前做备份
cron_file:如果指定该选项,则用该文件替换远程主机上的cron.d目录下的用户
的任务计划
day:日(1-31,*,*/2,……)
hour:小时(0-23,*,*/2,……)
minute:分钟(0-59,*,*/2,……)
month:月(1-12,*,*/2,……)
weekday:周(0-7,*,……)
job:要执行的任务,依赖于state=present
name:该任务的描述
special_time:指定什么时候执行,参数:reboot,yearly,annually,monthly,weekly,daily,hourly
state:确认该任务计划是创建还是删除
user:以哪个用户的身份执行

示例:
ansible test -m cron -a 'name="a job for reboot" special_time=reboot
 job="/some/job.sh"'
七,批量部署lnmp
环境准备:
1.nginx配置文件模板
2.mysql配置文件模板
3.php配置文件模板

mkdir -p /etc/ansible/roles/lnmp/{files,handlers,tasks,templates,vars}
touch /etc/ansible/roles/site.yml
touch /etc/ansible/roles/lnmp/files/index.html
touch /etc/ansible/roles/lnmp/tasks/main.yml
touch /etc/ansible/roles/lnmp/vars/main.yml
touch /etc/ansible/roles/lnmp/templates/nginx.conf.j2

yum -y install nginx
cp /etc/nginx/nginx.conf.default
/etc/ansible/roles/lnmp/templates/nginx.conf.j2

vim /etc/ansible/roles/lnmp/tasks/main.yml
- name: install lnmp
  yum: name={{ item }} state=latest
  with_items:
     - nginx
     - php
     - php-mysql
     - php-mbstring
     - php-gd
     - php-fpm
     - gd
     - mariadb-server
     - mariadb
- name: copy nginx.conf templte
  template: src=nginx.conf.j2 dest=/etc/nginx/nginx.conf
- name: directory
  file: state=directory path=/web mode=777
- name: copy index.php
  copy: src=index.php dest=/web
  notify: start lnmp

vim /etc/ansible/roles/lnmp/handlers/main.yml
---
- name: start lnmp
  service: name={{ item }} state=started
  with_items:
  - nginx
  - mariadb
  - php-fpm

vim /etc/ansible/roles/lnmp/files/index.php
<?php
phpinfo();
?>

vim /etc/ansible/roles/lnmp/vars/main.yml
a: /web
b: index.php
c: $document_root


vim site.yml
---
- hosts: all
  user: root
  roles:
   - lnmp


nginx.j2配置文件:

#user  nobody;
worker_processes  1;

#error_log  logs/error.log;
#error_log  logs/error.log  notice;
#error_log  logs/error.log  info;

#pid        logs/nginx.pid;


events {
    worker_connections  1024;
}


http {
    include       mime.types;
    default_type  application/octet-stream;

    #log_format  main  '$remote_addr - $remote_user [$time_local] "$request" '
    #                  '$status $body_bytes_sent "$http_referer" '
    #                  '"$http_user_agent" "$http_x_forwarded_for"';

    #access_log  logs/access.log  main;

    sendfile        on;
    #tcp_nopush     on;

    #keepalive_timeout  0;
    keepalive_timeout  65;

    #gzip  on;

    server {
        listen       80;
        server_name  localhost;

        #charset koi8-r;

        #access_log  logs/host.access.log  main;

        location / {
            root   {{ a }};
            index  {{ b }} index.html index.htm;
        }

        #error_page  404              /404.html;

        # redirect server error pages to the static page /50x.html
        #
        error_page   500 502 503 504  /50x.html;
        location = /50x.html {
            root   html;
        }

        # proxy the PHP scripts to Apache listening on 127.0.0.1:80
        #
        #location ~ \.php$ {
        #    proxy_pass   http://127.0.0.1;
        #}

        # pass the PHP scripts to FastCGI server listening on 127.0.0.1:9000
        #
        location ~ \.php$ {
            root          {{ a }};
            fastcgi_pass   127.0.0.1:9000;
            fastcgi_index  index.php;
            fastcgi_param  SCRIPT_FILENAME {{ c }}$fastcgi_script_name;
            include        fastcgi_params;
        }

        # deny access to .htaccess files, if Apache's document root
        # concurs with nginx's one
        #
        #location ~ /\.ht {
        #    deny  all;
        #}
    }


    # another virtual host using mix of IP-, name-, and port-based configuration
    #
    #server {
    #    listen       8000;
    #    listen       somename:8080;
    #    server_name  somename  alias  another.alias;

    #    location / {
    #        root   html;
    #        index  index.html index.htm;
    #    }
    #}


    # HTTPS server
    #
    #server {
    #    listen       443 ssl;
    #    server_name  localhost;

    #    ssl_certificate      cert.pem;
    #    ssl_certificate_key  cert.key;

    #    ssl_session_cache    shared:SSL:1m;
    #    ssl_session_timeout  5m;

    #    ssl_ciphers  HIGH:!aNULL:!MD5;
    #    ssl_prefer_server_ciphers  on;

    #    location / {
    #        root   html;
    #        index  index.html index.htm;
    #    }
    #}

}
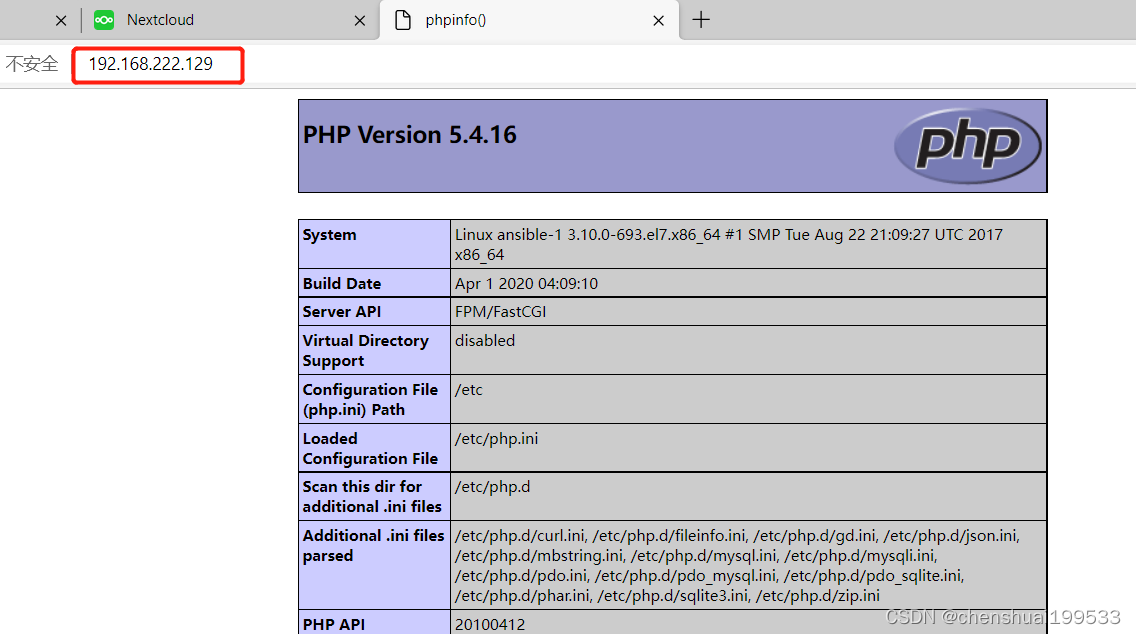
出现这个就表示部署成功了
思考:怎样批量自动化部署mysql5.7


 428
428


 被折叠的 条评论
为什么被折叠?
被折叠的 条评论
为什么被折叠?
 到【灌水乐园】发言


