


前言
本文将介绍如何使用 Ansible 编写角色,在分布式环境下完成 LNMP(Linux、Nginx、MySQL、PHP)的自动化(编译)安装和配置,并验证 PHP 与 MySQL 数据联通性,实现博客和论坛页面的展示。
常规单机部署 LNMP 请参考:LNMP架构搭建-CSDN博客
Docker Dockerfile 单机部署 LNMP 请参考:Docker构建LNMP部署WordPress-CSDN博客
Docker Compose 单机编排部署 LNMP 请参考:Docker-Compose编排LNMP并部署WordPress-CSDN博客
目录
4.1 创建一个新的配置文件 config_global.php
一、环境准备
1. 节点信息表
| 节点名称 | IP | 是否安装Ansible | 软件版本 | 配置 |
| ansible 管理节点 | 192.168.190.103 | 是 | ansible 2.9.27 | 2C2G |
| nginx 被管理节点 | 192.168.190.104 | 否 | nginx-1.24.0 | 8C4G |
| mysql 被管理节点 | 192.168.190.105 | 否 | mysql-boost-5.7.20 | 8C4G |
| php 被管理节点 | 192.168.190.106 | 否 | php-7.1.10 | 8C4G |
2. 防火墙以及地址解析
四台机器均需要操作:
systemctl stop firewalld.service
setenforce 0

cat << eof >> /etc/hosts
192.168.190.103 ansible
192.168.190.104 nginx
192.168.190.105 mysql
192.168.190.106 php
eof
3. 管理节点安装 ansible
[root@ansible ~]# yum install -y epel-release
[root@ansible ~]# yum install -y ansible
[root@ansible ~]# ansible --version
ansible 2.9.27
  config file = /etc/ansible/ansible.cfg
  configured module search path = [u'/root/.ansible/plugins/modules', u'/usr/share/ansible/plugins/modules']
  ansible python module location = /usr/lib/python2.7/site-packages/ansible
  executable location = /usr/bin/ansible
  python version = 2.7.5 (default, Aug  4 2017, 00:39:18) [GCC 4.8.5 20150623 (Red Hat 4.8.5-16)]
4. 免密管理 ssh-keygen
生成 SSH 密钥对:
[root@ansible ~]# ssh-keygen -t rsa      # 一直回车
# rsa表示生成RSA密钥对,RSA是一种非对称加密算法
[root@control ~]# ls .ssh/
id_rsa  id_rsa.pub       # id_rsa 是私钥文件;id_rsa.pub 是公钥文件

将本地主机上的SSH公钥复制到远程主机:
[root@ansible ~]# ssh 192.168.190.104 # ssh root@192.168.190.104,默认root
[root@ansible ~]# ssh 192.168.190.105
[root@ansible ~]# ssh 192.168.190.106
[root@ansible ~]# sshpass -p '123' ssh-copy-id 192.168.190.104
[root@ansible ~]# sshpass -p '123' ssh-copy-id 192.168.190.105
[root@ansible ~]# sshpass -p '123' ssh-copy-id 192.168.190.106
5. 编辑主机清单
[root@ansible ~]# vim /etc/ansible/hosts
[nginx]
192.168.190.104 php_server_ip=192.168.190.106 nginx_html_path=/usr/local/nginx/html

[mysql]
192.168.190.105

[php]
192.168.190.106 php_server_ip=192.168.190.106 nginx_server_ip=192.168.190.104
6. 测试联通性
[root@ansible ~]# ansible all -o -m ping
192.168.190.105 | SUCCESS => {"ansible_facts": {"discovered_interpreter_python": "/usr/bin/python"}, "changed": false, "ping": "pong"}
192.168.190.104 | SUCCESS => {"ansible_facts": {"discovered_interpreter_python": "/usr/bin/python"}, "changed": false, "ping": "pong"}
192.168.190.106 | SUCCESS => {"ansible_facts": {"discovered_interpreter_python": "/usr/bin/python"}, "changed": false, "ping": "pong"}
二、准备 roles 模块
1. 创建 roles 以及项目目录
一般 roles 目录会默认存在:
[root@ansible ~]# mkdir /etc/ansible/roles/nginx/{files,templates,tasks,handlers,vars,defaults,meta} -p
[root@ansible ~]# mkdir /etc/ansible/roles/mysql/{files,templates,tasks,handlers,vars,defaults,meta} -p
[root@ansible ~]# mkdir /etc/ansible/roles/php/{files,templates,tasks,handlers,vars,defaults,meta} -p

[root@ansible ~]# touch /etc/ansible/roles/nginx/{defaults,vars,tasks,meta,handlers}/main.yml
[root@ansible ~]# touch /etc/ansible/roles/mysql/{defaults,vars,tasks,meta,handlers}/main.yml
[root@ansible ~]# touch /etc/ansible/roles/php/{defaults,vars,tasks,meta,handlers}/main.yml
2. 编写 nginx 模块
2.1 准备 files 相关文件
用来存放由 copy 模块或 script 模块调用的文件。
2.1.1 准备 nginx、论坛、博客安装包
[root@ansible ~]# cd /etc/ansible/roles/nginx/files/
[root@ansible files]# ls
Discuz_X3.4_SC_UTF8.zip  nginx-1.24.0.tar.gz  wordpress-4.9.4-zh_CN.tar.gz
2.1.2 准备编译安装 nginx 脚本
[root@ansible files]# vim lnmp.sh
#/bin/bash
nginx (){
nginxpath=`find / -name "*nginx*tar.gz" -exec dirname {} \; | sed -n '1p'`                #找到安装包路径
nginxapp=`find / -name "*nginx*tar.gz" 2> /dev/null |awk -F/ '{print $NF}' | sed -n '1p'` #打印安装包名称
systemctl status nginx.service > /dev/null
if [ $? -eq 0 ];then     #判断上一条命令返回值是否为真
echo  "nginx服务已安装"
else
useradd -M -s /sbin/nologin nginx  #创建用户
echo "正在安装nginx服务,请耐心等待"
tar xf  ${nginxpath}/${nginxapp} -C ${nginxpath} #解压安装包到其路径下
nginxd=`find  ${nginxpath} -maxdepth 1 -type d | grep  nginx- | awk -F/ '{print $NF}'`
#只搜索当前目录,然后筛选出包含nginx- 字符串的目录,并打印这些目录的名称(去掉路径部分),-maxdepth 1表示只搜索当前目录,不搜索子目录
cd  ${nginxpath}/${nginxd}

yum -y install gcc pcre-devel openssl-devel zlib-devel openssl  openssl-devel  &>>/dev/null
./configure --prefix=/usr/local/nginx \
--user=nginx \
--group=nginx \
--with-http_ssl_module \
--with-http_v2_module \
--with-http_realip_module \
--with-http_stub_status_module \
--with-http_gzip_static_module \
--with-pcre \
--with-stream \
--with-stream_ssl_module \
--with-stream_realip_module  > /dev/null
make -j `lscpu | sed -n '4p' | awk '{print $2}'`&> /dev/null
make  install  &> /dev/nullh
ln -s /usr/local/nginx/sbin/nginx /usr/local/sbin/
cat >  /usr/lib/systemd/system/nginx.service  << EOF
[Unit]
Description=nginx
After=network.target
[Service]
Type=forking
PIDFile=/usr/local/nginx/logs/nginx.pid
ExecStart=/usr/local/nginx/sbin/nginx
ExecReload=/bin/kill -1 $MAINPID
ExecStop=/bin/kill -3 $MAINPID
PrivateTmp=true
[Install]
WantedBy=multi-user.target
EOF
chown -R nginx.nginx  /usr/local/nginx
systemctl  daemon-reload  &> /dev/null

#准备安装论坛文件
discuz=`find / -name "*scuz*UTF*.zip" -exec dirname {} \; | sed -n '1p'`
discuzapp=`find  /  -name  "*scuz*UTF*.zip" 2>>/dev/null |awk  -F/ '{print $NF}' | sed -n '1p'`
unzip ${discuz}/${discuzapp}  -d /usr/local/  >>/dev/null
discuzd=`find /usr/local  -maxdepth 1  -type  d  |grep  UTF|awk  -F/  '{print $NF}' | sed -n '1p'`
cp -r /usr/local/${discuzd}/upload/  /usr/local/nginx/html/bbs/
chmod -R 777 /usr/local/nginx/html/bbs/config/
chmod -R 777 /usr/local/nginx/html/bbs/data/
chmod -R 777 /usr/local/nginx/html/bbs/uc_client/
chmod -R 777 /usr/local/nginx/html/bbs/uc_server/
ip=`ifconfig ens33|awk /netmask/'{print $2}'`

#准备安装博客文件"
wordpresspath=`find / -name "*wordpress*" -exec dirname {} \; | sed -n '1p'`                   #找到安装包路径
wordpressapp=`find / -name "*wordpress*" 2> /dev/null | awk  -F/ '{print $NF}' | sed -n '1p'`  #打印安装包名称
tar xf ${wordpresspath}/${wordpressapp} -C /usr/local/nginx/html/ > /dev/null
chmod 777 -R /usr/local/nginx/html/
fi
}


mysql (){
mysqlpath=`find / -name "*mysql*tar.gz" -exec dirname {} \; | sed -n '1p'`
mysqlapp=`find / -name *mysql*tar.gz 2> /dev/null |awk  -F/ '{print $NF}' | sed -n '1p'`
#准备安装MySQL
systemctl start mysqld.service &> /dev/null
if [ $? -eq 0 ];then
echo "mysql is exist"
else
#安装Mysql环境依赖包
yum -y install gcc gcc-c++ cmake bison bison-devel zlib-devel libcurl-devel libarchive-devel boost-devel ncurses-devel gnutls-devel libxml2-devel openssl-devel libevent-devel libaio-devel &> /dev/null
#创建运行用户
useradd -M -s /sbin/nologin  mysql

#编译安装
#解压mysql源码包
tar xf ${mysqlpath}/${mysqlapp} -C ${mysqlpath}
mysqld=`find  ${mysqlpath} -maxdepth 1 -type d | grep mysql- | awk -F/ '{print $NF}'`
cd  ${mysqlpath}/${mysqld}

#执行cmake命令
cmake \
-DCMAKE_INSTALL_PREFIX=/usr/local/mysql \
-DMYSQL_UNIX_ADDR=/usr/local/mysql/mysql.sock \
-DSYSCONFDIR=/etc \
-DSYSTEMD_PID_DIR=/usr/local/mysql \
-DDEFAULT_CHARSET=utf8  \
-DDEFAULT_COLLATION=utf8_general_ci \
-DWITH_EXTRA_CHARSETS=all \
-DWITH_INNOBASE_STORAGE_ENGINE=1 \
-DWITH_ARCHIVE_STORAGE_ENGINE=1 \
-DWITH_BLACKHOLE_STORAGE_ENGINE=1 \
-DWITH_PERFSCHEMA_STORAGE_ENGINE=1 \
-DMYSQL_DATADIR=/usr/local/mysql/data \
-DWITH_BOOST=boost \
-DWITH_SYSTEMD=1   &>>/dev/null

#执行make命令
make  -j `lscpu|sed -n '4p'|awk '{print $2}'` &>>/dev/null
make install > /dev/null

#修改mysql 配置文件
cat > /etc/my.cnf <<EOF
[client]
port = 3306
socket=/usr/local/mysql/mysql.sock

[mysqld]
user = mysql
basedir=/usr/local/mysql
datadir=/usr/local/mysql/data
port = 3306
character-set-server=utf8
pid-file = /usr/local/mysql/mysqld.pid
socket=/usr/local/mysql/mysql.sock
bind-address = 0.0.0.0
skip-name-resolve
max_connections=2048
default-storage-engine=INNODB
max_allowed_packet=16M
server-id = 1

sql_mode=NO_ENGINE_SUBSTITUTION,STRICT_TRANS_TABLES,NO_AUTO_CREATE_USER,NO_AUTO_VALUE_ON_ZERO,NO_ZERO_IN_DATE,NO_ZERO_DATE,ERROR_FOR_DIVISION_BY_ZERO,PIPES_AS_CONCAT,ANSI_QUOTES
EOF

#更改mysql安装目录和配置文件的属主属组
chown -R mysql:mysql /usr/local/mysql/
chown mysql:mysql /etc/my.cnf

#初始化数据库
cd /usr/local/mysql/bin/
./mysqld \
--initialize-insecure \
--user=mysql \
--basedir=/usr/local/mysql \
--datadir=/usr/local/mysql/data  &> /dev/null

#添加mysqld系统服务
cp /usr/local/mysql/usr/lib/systemd/system/mysqld.service /usr/lib/systemd/system/
systemctl daemon-reload  &> /dev/null
systemctl start mysqld.service
systemctl enable mysqld &> /dev/null
echo  "5.----mysql服务已开启----"

ln -s /usr/local/mysql/bin/mysql /usr/bin/
echo   "正在创建bbs数据库,并授权用户"
/usr/local/mysql/bin/mysql  -uroot  -e "set password for 'root'@'localhost' = password ('123456');"
/usr/local/mysql/bin/mysql  -uroot  -p'123456' -e 'create database bbs;' &> /dev/null
/usr/local/mysql/bin/mysql  -uroot  -p'123456' -e "grant all on bbs.* to 'bbsuser'@'%' identified by '123456';" &> /dev/null
/usr/local/mysql/bin/mysql  -uroot  -p'123456' -e "grant all on bbs.* to 'bbsuser'@'localhost' identified by '123456';" &> /dev/null
/usr/local/mysql/bin/mysql  -uroot  -p'123456' -e 'flush privileges;' &> /dev/null

echo   "正在创建wordpress数据库,并授权用户"
/usr/local/mysql/bin/mysql  -uroot  -p'123456' -e 'create database wordpress;' &> /dev/null
/usr/local/mysql/bin/mysql  -uroot  -p'123456' -e 'grant all privileges on wordpress.* to 'wordpress'@'%' identified by '123456';' &> /dev/null
/usr/local/mysql/bin/mysql  -uroot  -p'123456' -e 'grant all privileges on *.* to 'root'@'%' identified by '123456';' &> /dev/null
/usr/local/mysql/bin/mysql  -uroot  -p'123456' -e 'flush privileges;' &> /dev/null
fi
}


php (){
phppath=`find / -name *php*tar* -exec dirname {} \; | sed -n '1p'`
phpapp=`find / -name *php*tar* 2> /dev/null |awk -F/ '{print $NF}' | sed -n '1p'`
#安装编译环境
systemctl start php-fpm.service &> /dev/null
if [ $? -eq 0 ];then
echo "php服务已安装"
else
echo "安装PHP服务"
#安装编译环境"
yum -y install gd libjpeg libjpeg-devel libpng libpng-devel freetype freetype-devel bison re2c libxml2 libxml2-devel zlib zlib-devel curl curl-devel gcc gcc-c++ openssl openssl-devel &> /dev/null
#编译安装
useradd -M -s /sbin/nologin nginx

#解压源码包
tar xf ${phppath}/${phpapp} -C ${phppath}
phpd=`find  ${phppath} -maxdepth 1 -type d |grep  php-|awk  -F/  '{print  $NF}'`
cd  /${phppath}/${phpd}

#检测编译环境,并生成Makefile文件
./configure  --prefix=/usr/local/php --with-mysql-sock=/usr/local/mysql/mysql.sock --with-mysqli --with-zlib --with-curl --with-gd --with-jpeg-dir --with-png-dir --with-freetype-dir --with-openssl --enable-fpm --enable-mbstring --enable-xml --enable-session --enable-ftp --enable-pdo --enable-tokenizer --enable-zip &>>/dev/null

#环境检测完成,正在执行make命令,进行编译
make -j `lscpu|sed -n '4p'|awk '{print $2}'` &> /dev/null

#执行make install命令,将生成的程序或库文件复制到系统指定的位置进行安装
make install > /dev/null
ln -s /usr/local/php/bin/* /usr/local/bin/
ln -s /usr/local/php/sbin/* /usr/local/sbin/
cp /${phppath}/${phpd}/sapi/fpm/php-fpm.service /usr/lib/systemd/system/php-fpm.service
systemctl daemon-reload  > /dev/null
fi
}
$1
2.1.3 创建共享目录脚本
[root@ansible files]# vim nginx_nfs.sh
#!/bin/bash
echo "/usr/local/nginx/html *(rw)" > /etc/exports
# *(rw)表示所有主机都可以以读写模式访问该共享目录
# /etc/exports是NFS(Network File System)服务器的配置文件
chmod -R 777 /usr/local/nginx/html/
systemctl start rpcbind
systemctl start nfs

[root@ansible files]# ls
Discuz_X3.4_SC_UTF8.zip  lnmp.sh  nginx-1.24.0.tar.gz  nginx_nfs.sh  wordpress-4.9.4-zh_CN.tar.gz
2.2 准备 templates 相关文件
用来存放 jinjia2 模板,template 模块会自动在此目录中寻找 jinjia2 模板文件
2.2.1 编辑 nginx 配置文件模板
注意两个变量:php_server_ip,nginx_html_path
[root@ansible files]# cd ../templates/
[root@ansible templates]# vim nginx.conf.j2
#user  nobody;
worker_processes  1;

#error_log  logs/error.log;
#error_log  logs/error.log  notice;
#error_log  logs/error.log  info;

#pid        logs/nginx.pid;


events {
    worker_connections  1024;
}


http {
    include       mime.types;
    default_type  application/octet-stream;

    #log_format  main  '$remote_addr - $remote_user [$time_local] "$request" '
    #                  '$status $body_bytes_sent "$http_referer" '
    #                  '"$http_user_agent" "$http_x_forwarded_for"';

    #access_log  logs/access.log  main;

    sendfile        on;
    #tcp_nopush     on;

    #keepalive_timeout  0;
    keepalive_timeout  65;

    #gzip  on;

    server {
        listen       80;
        server_name  localhost;

        charset utf-8;

        #access_log  logs/host.access.log  main;

        location / {
            root   html;
            index  index.html index.php;
        }

        #error_page  404              /404.html;

        # redirect server error pages to the static page /50x.html
        #
        error_page   500 502 503 504  /50x.html;
        location = /50x.html {
            root   html;
        }

        # proxy the PHP scripts to Apache listening on 127.0.0.1:80
        #
        #location ~ \.php$ {
        #    proxy_pass   http://127.0.0.1;
        #}

        # pass the PHP scripts to FastCGI server listening on 127.0.0.1:9000
        #
        location ~ \.php$ {
            root           html;
            fastcgi_pass   {{php_server_ip}}:9000;
            fastcgi_index  index.php;
            fastcgi_param  SCRIPT_FILENAME  {{nginx_html_path}}$fastcgi_script_name;
            include        fastcgi_params;
        }

        # deny access to .htaccess files, if Apache's document root
        # concurs with nginx's one
        #
        #location ~ /\.ht {
        #    deny  all;
        #}
    }


    # another virtual host using mix of IP-, name-, and port-based configuration
    #
    #server {
    #    listen       8000;
    #    listen       somename:8080;
    #    server_name  somename  alias  another.alias;

    #    location / {
    #        root   html;
    #        index  index.html index.htm;
    #    }
    #}


    # HTTPS server
    #
    #server {
    #    listen       443 ssl;
    #    server_name  localhost;

    #    ssl_certificate      cert.pem;
    #    ssl_certificate_key  cert.key;

    #    ssl_session_cache    shared:SSL:1m;
    #    ssl_session_timeout  5m;

    #    ssl_ciphers  HIGH:!aNULL:!MD5;
    #    ssl_prefer_server_ciphers  on;

    #    location / {
    #        root   html;
    #        index  index.html index.htm;
    #    }
    #}

}
2.3 编写 nginx 模块 task 任务文件
此目录应当包含一个 main.yml 文件,用于定义此角色的任务列表,此文件可以使用 include 包含其它的位于此目录的 task 文件。
[root@ansible templates]# cd ../tasks/
[root@ansible tasks]# vim main.yml
- name: copy nginx package
  copy: src=/etc/ansible/roles/nginx/files/nginx-1.24.0.tar.gz dest=/opt
- name: copy wordpress package
  copy: src=/etc/ansible/roles/nginx/files/Discuz_X3.4_SC_UTF8.zip dest=/opt
- name: copy Discuz package
  copy: src=/etc/ansible/roles/nginx/files/wordpress-4.9.4-zh_CN.tar.gz dest=/opt
- name: install nginx shell
  script: /etc/ansible/roles/nginx/files/lnmp.sh nginx
- name: copy conf.j2
  template: src=/etc/ansible/roles/nginx/templates/nginx.conf.j2 dest=/usr/local/nginx/conf/nginx.conf owner=nginx group=nginx
- name: nfs shell
  script: /etc/ansible/roles/nginx/files/nginx_nfs.sh
- name: start nginx service
  service: enabled=true name=nginx state=started
3. 编写 mysql 模块
3.1 准备 files 相关文件
3.1.1 准备 mysql 安装包
[root@ansible tasks]# cd ../../mysql/files/
[root@ansible files]# ls
mysql-boost-5.7.20.tar.gz
3.1.2 准备编译安装 mysql 脚本
同 2.1.2 脚本一致:
[root@ansible files]# cp /etc/ansible/roles/nginx/files/lnmp.sh .3.1.3 创建共享目录脚本
[root@ansible files]# vim mysql_nfs.sh
#!/bin/bash
echo "/usr/local/mysql  *(rw)" > /etc/exports
chmod -R 777 /usr/local/mysql/
systemctl start rpcbind
systemctl start nfs
3.2 编写 mysql 模块 task 任务文件
此目录应当包含一个 main.yml 文件,用于定义此角色的任务列表,此文件可以使用 include 包含其它的位于此目录的 task 文件
[root@ansible files]# cd ../tasks/
[root@ansible tasks]# vim main.yml
- name: copy package
  copy: src=/etc/ansible/roles/mysql/files/mysql-boost-5.7.20.tar.gz dest=/opt/
- name: install mysql shell
  script: /etc/ansible/roles/mysql/files/lnmp.sh mysql
- name: nfs shell
  script: /etc/ansible/roles/mysql/files/mysql_nfs.sh
4. 编写 php 模块
4.1 准备 files 相关文件
4.1.1 准备 php 安装包
[root@ansible vars]# cd ../../php/files/
[root@ansible files]# ls
php-7.1.10.tar.bz2
4.1.2 准备编译安装 php 脚本
同 2.1.2 脚本一致:
[root@ansible files]# cp /etc/ansible/roles/nginx/files/lnmp.sh .4.1.3 编辑 php 主配置文件
[root@ansible files]# egrep -v "^;" php.ini | egrep -v "^$"
[PHP]
engine = On
short_open_tag = Off
precision = 14
output_buffering = 4096
zlib.output_compression = Off
implicit_flush = Off
unserialize_callback_func =
serialize_precision = -1
disable_functions =
disable_classes =
zend.enable_gc = On
expose_php = On
max_execution_time = 30
max_input_time = 60
memory_limit = 128M
error_reporting = E_ALL
display_errors = On
display_startup_errors = On
log_errors = On
log_errors_max_len = 1024
ignore_repeated_errors = Off
ignore_repeated_source = Off
report_memleaks = On
track_errors = On
html_errors = On
variables_order = "GPCS"
request_order = "GP"
register_argc_argv = Off
auto_globals_jit = On
post_max_size = 8M
auto_prepend_file =
auto_append_file =
default_mimetype = "text/html"
default_charset = "UTF-8"
doc_root =
user_dir =
enable_dl = Off
file_uploads = On
upload_max_filesize = 2M
max_file_uploads = 20
allow_url_fopen = On
allow_url_include = Off
default_socket_timeout = 60
[CLI Server]
cli_server.color = On
[Date]
date.timezone = Asia/Shanghai
[filter]
[iconv]
[intl]
[sqlite3]
[Pcre]
[Pdo]
[Pdo_mysql]
pdo_mysql.cache_size = 2000
pdo_mysql.default_socket=
[Phar]
[mail function]
SMTP = localhost
smtp_port = 25
mail.add_x_header = On
[SQL]
sql.safe_mode = Off
[ODBC]
odbc.allow_persistent = On
odbc.check_persistent = On
odbc.max_persistent = -1
odbc.max_links = -1
odbc.defaultlrl = 4096
odbc.defaultbinmode = 1
[Interbase]
ibase.allow_persistent = 1
ibase.max_persistent = -1
ibase.max_links = -1
ibase.timestampformat = "%Y-%m-%d %H:%M:%S"
ibase.dateformat = "%Y-%m-%d"
ibase.timeformat = "%H:%M:%S"
[MySQLi]
mysqli.max_persistent = -1
mysqli.allow_persistent = On
mysqli.max_links = -1
mysqli.cache_size = 2000
mysqli.default_port = 3306
mysqli.default_socket = /usr/local/mysql/mysql.sock
mysqli.default_host =
mysqli.default_user =
mysqli.default_pw =
mysqli.reconnect = Off
[mysqlnd]
mysqlnd.collect_statistics = On
mysqlnd.collect_memory_statistics = On
[OCI8]
[PostgreSQL]
pgsql.allow_persistent = On
pgsql.auto_reset_persistent = Off
pgsql.max_persistent = -1
pgsql.max_links = -1
pgsql.ignore_notice = 0
pgsql.log_notice = 0
[bcmath]
bcmath.scale = 0
[browscap]
[Session]
session.save_handler = files
session.use_strict_mode = 0
session.use_cookies = 1
session.use_only_cookies = 1
session.name = PHPSESSID
session.auto_start = 0
session.cookie_lifetime = 0
session.cookie_path = /
session.cookie_domain =
session.cookie_httponly =
session.serialize_handler = php
session.gc_probability = 1
session.gc_divisor = 1000
session.gc_maxlifetime = 1440
session.referer_check =
session.cache_limiter = nocache
session.cache_expire = 180
session.use_trans_sid = 0
session.sid_length = 26
session.trans_sid_tags = "a=href,area=href,frame=src,form="
session.sid_bits_per_character = 5
[Assertion]
zend.assertions = 1
[COM]
[mbstring]
[gd]
[exif]
[Tidy]
tidy.clean_output = Off
[soap]
soap.wsdl_cache_enabled=1
soap.wsdl_cache_dir="/tmp"
soap.wsdl_cache_ttl=86400
soap.wsdl_cache_limit = 5
[sysvshm]
[ldap]
ldap.max_links = -1
[mcrypt]
[dba]
[opcache]
[curl]
[openssl]
4.1.4 编辑 php-fpm 主配置文件
[root@ansible files]# egrep -v "^;" php-fpm.conf | egrep -v "^$"
[global]
pid = run/php-fpm.pid
include=/usr/local/php/etc/php-fpm.d/*.conf
4.1.5 编辑 php-fpm 进程池配置文件
这步可选,如果直接复制配置文件至 templates 文件夹模板 .j2 文件自带变量会报错。
[root@ansible files]# egrep -v "^;" www.conf | egrep -v "^$"
[www]
user = nginx
group = nginx
listen = 192.168.190.106:9000      # php 地址
listen.allowed_clients = 127.0.0.1,192.168.190.104  # nginx 地址
pm = dynamic
pm.max_children = 5
pm.start_servers = 2
pm.min_spare_servers = 1
pm.max_spare_servers = 3
4.2 准备 templates 相关文件
[root@ansible files]# cd ../templates/
[root@ansible templates]# vim www.conf.j2
[www]
user = nginx
group = nginx
listen = {{php_server_ip}}:9000
listen.allowed_clients = 127.0.0.1,{{nginx_server_ip}}
pm = dynamic
pm.max_children = 5
pm.start_servers = 2
pm.min_spare_servers = 1
pm.max_spare_servers = 3
4.3 编写 php 模块 task 任务文件
此目录应当包含一个 main.yml 文件,用于定义此角色的任务列表,此文件可以使用 include 包含其它的位于此目录的 task 文件
[root@ansible templates]# cd ../tasks/
[root@ansible tasks]# vim main.yml
- name: copy package
  copy: src=/etc/ansible/roles/php/files/php-7.1.10.tar.bz2 dest=/opt/
- name: create mysql nfs path
  file: path=/usr/local/mysql/ state=directory
- name: create nginx nfs path
  file: path=/usr/local/nginx/html/ state=directory
- name: mount nfs mysql share
  ansible.builtin.mount: src=192.168.190.105:/usr/local/mysql path=/usr/local/mysql fstype=nfs opts=defaults state=mounted
- name: mount nfs nginx share
  ansible.builtin.mount: src=192.168.190.104:/usr/local/nginx/html path=/usr/local/nginx/html fstype=nfs opts=defaults state=mounted
- name: install php shell
  script: /etc/ansible/roles/php/files/lnmp.sh php
- name: copy php-fpm.conf
  copy: src=/etc/ansible/roles/php/files/php-fpm.conf dest=/usr/local/php/etc/php-fpm.conf
- name: copy php.ini
  copy: src=/etc/ansible/roles/php/files/php.ini dest=/usr/local/php/lib/php.ini
- name: copy www.conf
  template: src=/etc/ansible/roles/php/templates/www.conf.j2 dest=/usr/local/php/etc/php-fpm.d/www.conf
- name: start php-fpm server
  service: name=php-fpm state=started
5. 编写 roles 示例
[root@ansible vars]# cd /etc/ansible/
[root@ansible ansible]# vim lnmp.yml
---
- hosts: nginx
  remote_user: root
  roles:
     - nginx
- hosts: mysql
  remote_user: root
  roles:
     - mysql
- hosts: php
  remote_user: root
  roles:
     - php
...
三、执行角色剧本并验证
1. 查看目录
[root@ansible ansible]# ls
ansible.cfg  hosts  lnmp.yml  roles
[root@ansible ansible]# tree
.
├── ansible.cfg
├── hosts
├── lnmp.yml
└── roles
    ├── mysql
    │   ├── defaults
    │   │   └── main.yml
    │   ├── files
    │   │   ├── lnmp.sh
    │   │   ├── mysql-boost-5.7.20.tar.gz
    │   │   └── mysql_nfs.sh
    │   ├── handlers
    │   │   └── main.yml
    │   ├── meta
    │   │   └── main.yml
    │   ├── tasks
    │   │   └── main.yml
    │   ├── templates
    │   └── vars
    │       └── main.yml
    ├── nginx
    │   ├── defaults
    │   │   └── main.yml
    │   ├── files
    │   │   ├── Discuz_X3.4_SC_UTF8.zip
    │   │   ├── lnmp.sh
    │   │   ├── nginx-1.24.0.tar.gz
    │   │   ├── nginx_nfs.sh
    │   │   └── wordpress-4.9.4-zh_CN.tar.gz
    │   ├── handlers
    │   │   └── main.yml
    │   ├── meta
    │   │   └── main.yml
    │   ├── tasks
    │   │   └── main.yml
    │   ├── templates
    │   │   └── nginx.conf.j2
    │   └── vars
    │       └── main.yml
    └── php
        ├── defaults
        │   └── main.yml
        ├── files
        │   ├── lnmp.sh
        │   ├── php-7.1.10.tar.bz2
        │   ├── php-fpm.conf
        │   ├── php.ini
        │   └── www.conf
        ├── handlers
        │   └── main.yml
        ├── meta
        │   └── main.yml
        ├── tasks
        │   └── main.yml
        ├── templates
        │   └── www.conf.j2
        └── vars
            └── main.yml
2. 执行剧本
[root@ansible ansible]# ansible-playbook lnmp.yml

PLAY [nginx] **************************************************************************************

TASK [Gathering Facts] ****************************************************************************
ok: [192.168.190.104]

TASK [copy nginx package] *************************************************************************
changed: [192.168.190.104]

TASK [nginx : copy wordpress package] *************************************************************
changed: [192.168.190.104]

TASK [nginx : copy Discuz dpackage] ***************************************************************
changed: [192.168.190.104]

TASK [install nginx shell] ************************************************************************
changed: [192.168.190.104]

TASK [nginx : copy conf.j2] ***********************************************************************
changed: [192.168.190.104]

TASK [nginx : nfs shell] **************************************************************************
changed: [192.168.190.104]

TASK [start nginx service] ************************************************************************
changed: [192.168.190.104]

PLAY [mysql] **************************************************************************************

TASK [Gathering Facts] ****************************************************************************
ok: [192.168.190.105]

TASK [mysql : copy package] ***********************************************************************
changed: [192.168.190.105]

TASK [install mysql shell] ******************************************************************************
changed: [192.168.190.105]

TASK [mysql : nfs shell] **************************************************************************
changed: [192.168.190.105]

PLAY [php] ****************************************************************************************

TASK [Gathering Facts] ****************************************************************************
ok: [192.168.190.106]

TASK [php : copy package] *************************************************************************
changed: [192.168.190.106]

TASK [php : create mysql nfs path] ****************************************************************
changed: [192.168.190.106]

TASK [php : create nginx nfs path] ****************************************************************
changed: [192.168.190.106]

TASK [php : mount nfs mysql share] ****************************************************************
changed: [192.168.190.106]

TASK [php : mount nfs nginx share] ****************************************************************
changed: [192.168.190.106]

TASK [install php shell] ********************************************************************************
changed: [192.168.190.106]

TASK [copy php-fpm.conf] **************************************************************************
changed: [192.168.190.106]

TASK [copy php.ini] *******************************************************************************
changed: [192.168.190.106]

TASK [php : copy www.conf] ************************************************************************
changed: [192.168.190.106]

TASK [start php-fpm server] ***********************************************************************
changed: [192.168.190.106]

PLAY RECAP ****************************************************************************************
192.168.190.104            : ok=8    changed=7    unreachable=0    failed=0    skipped=0    rescued=0    ignored=0
192.168.190.105            : ok=4    changed=3    unreachable=0    failed=0    skipped=0    rescued=0    ignored=0
192.168.190.106            : ok=11   changed=10   unreachable=0    failed=0    skipped=0    rescued=0    ignored=0
3. 验证 Wordpress
3.1 创建一个新的配置文件 wp-config.php
[root@nginx ~]# cd /usr/local/nginx/html/wordpress
[root@nginx wordpress]# cp wp-config-sample.php wp-config.php
[root@nginx wordpress]# vim wp-config.php
// ** MySQL 设置 - 具体信息来自您正在使用的主机 ** //
/** WordPress数据库的名称 */
define('DB_NAME', 'wordpress');

/** MySQL数据库用户名 */
define('DB_USER', 'wordpress');

/** MySQL数据库密码 */
define('DB_PASSWORD', '123456');

/** MySQL主机 */
define('DB_HOST', '192.168.190.105:3306');
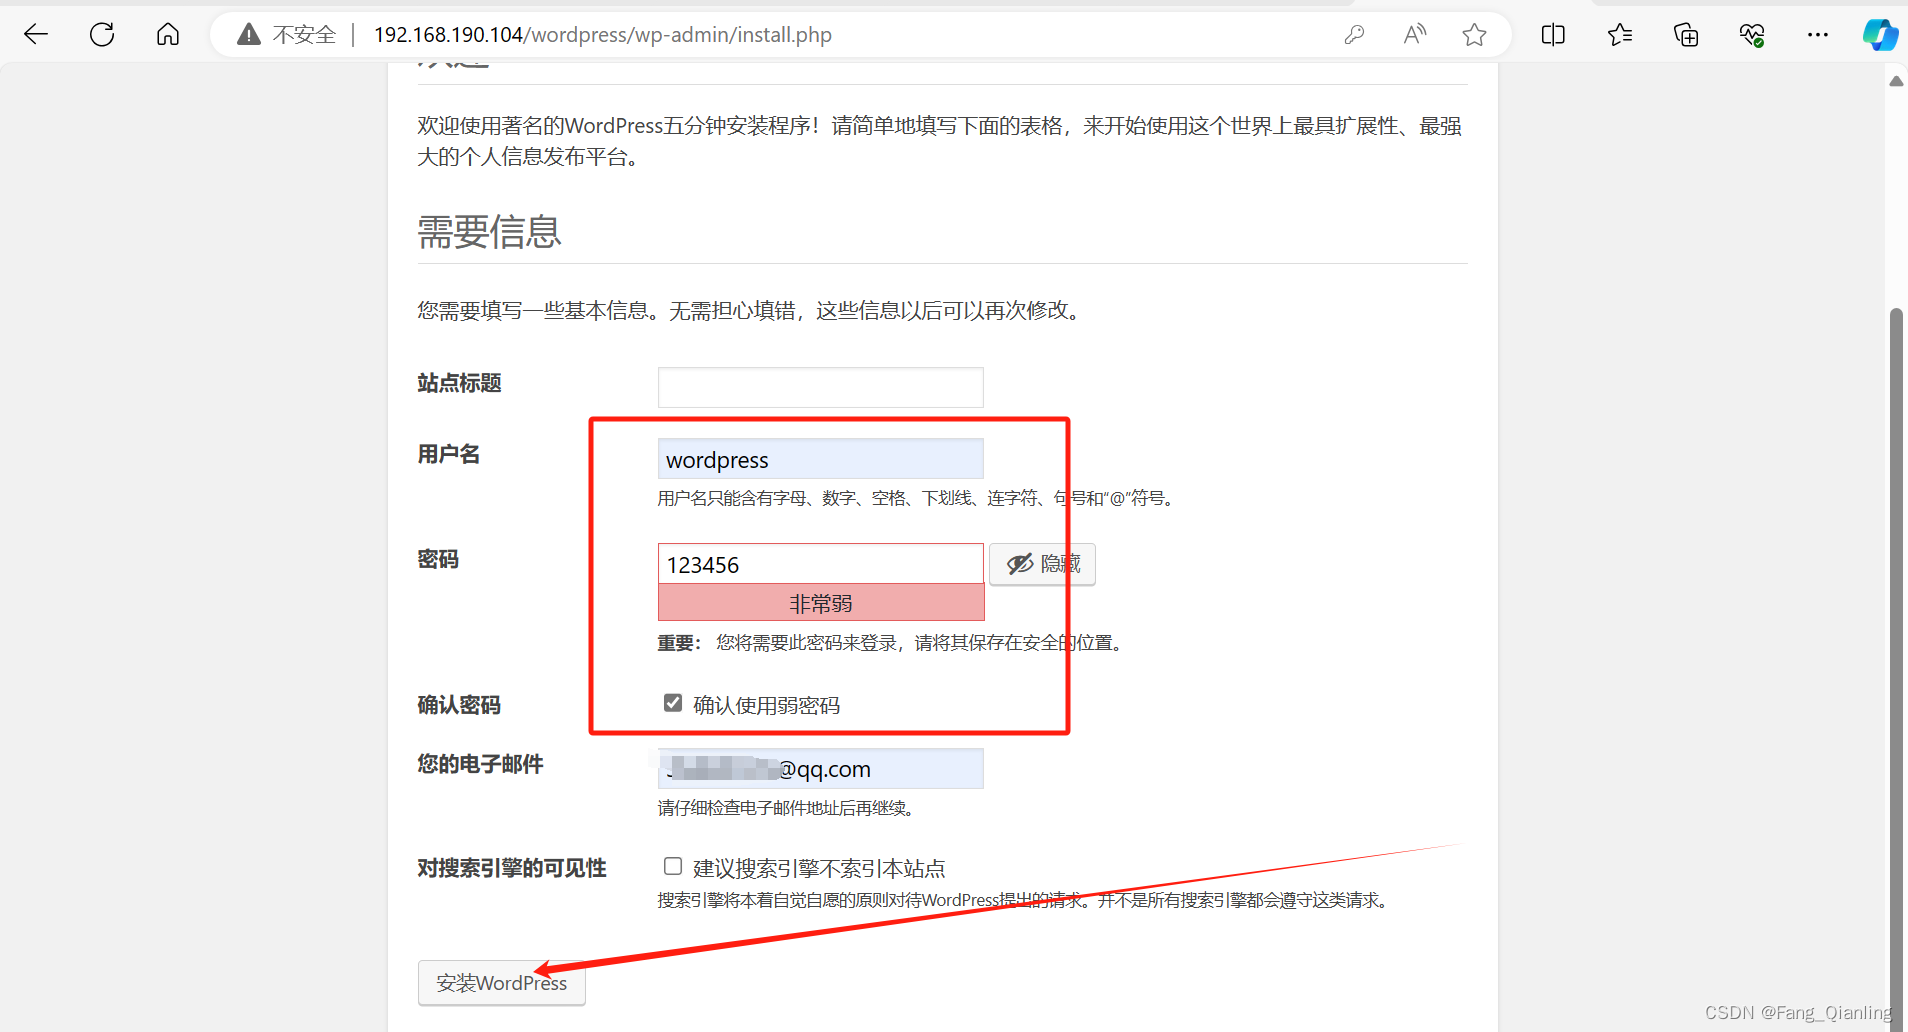
3.2 浏览器访问 wordpress
访问192.168.190.104/wordpress/index.php

4. 验证 Discuz
4.1 创建一个新的配置文件 config_global.php
[root@nginx ~]# cd /usr/local/nginx/html/bbs/config
[root@nginx config]# cp config_global_default.php config_global.php
[root@nginx config]# chmod 777 config_global.php
[root@nginx config]# vim config_global.php
// ----------------------------  CONFIG DB  ----------------------------- //
$_config['db']['1']['dbhost'] = '192.168.190.105:3306';  # 数据库地址端口
$_config['db']['1']['dbuser'] = 'bbsuser';               # 用户名
$_config['db']['1']['dbpw'] = '123456';                  # 密码
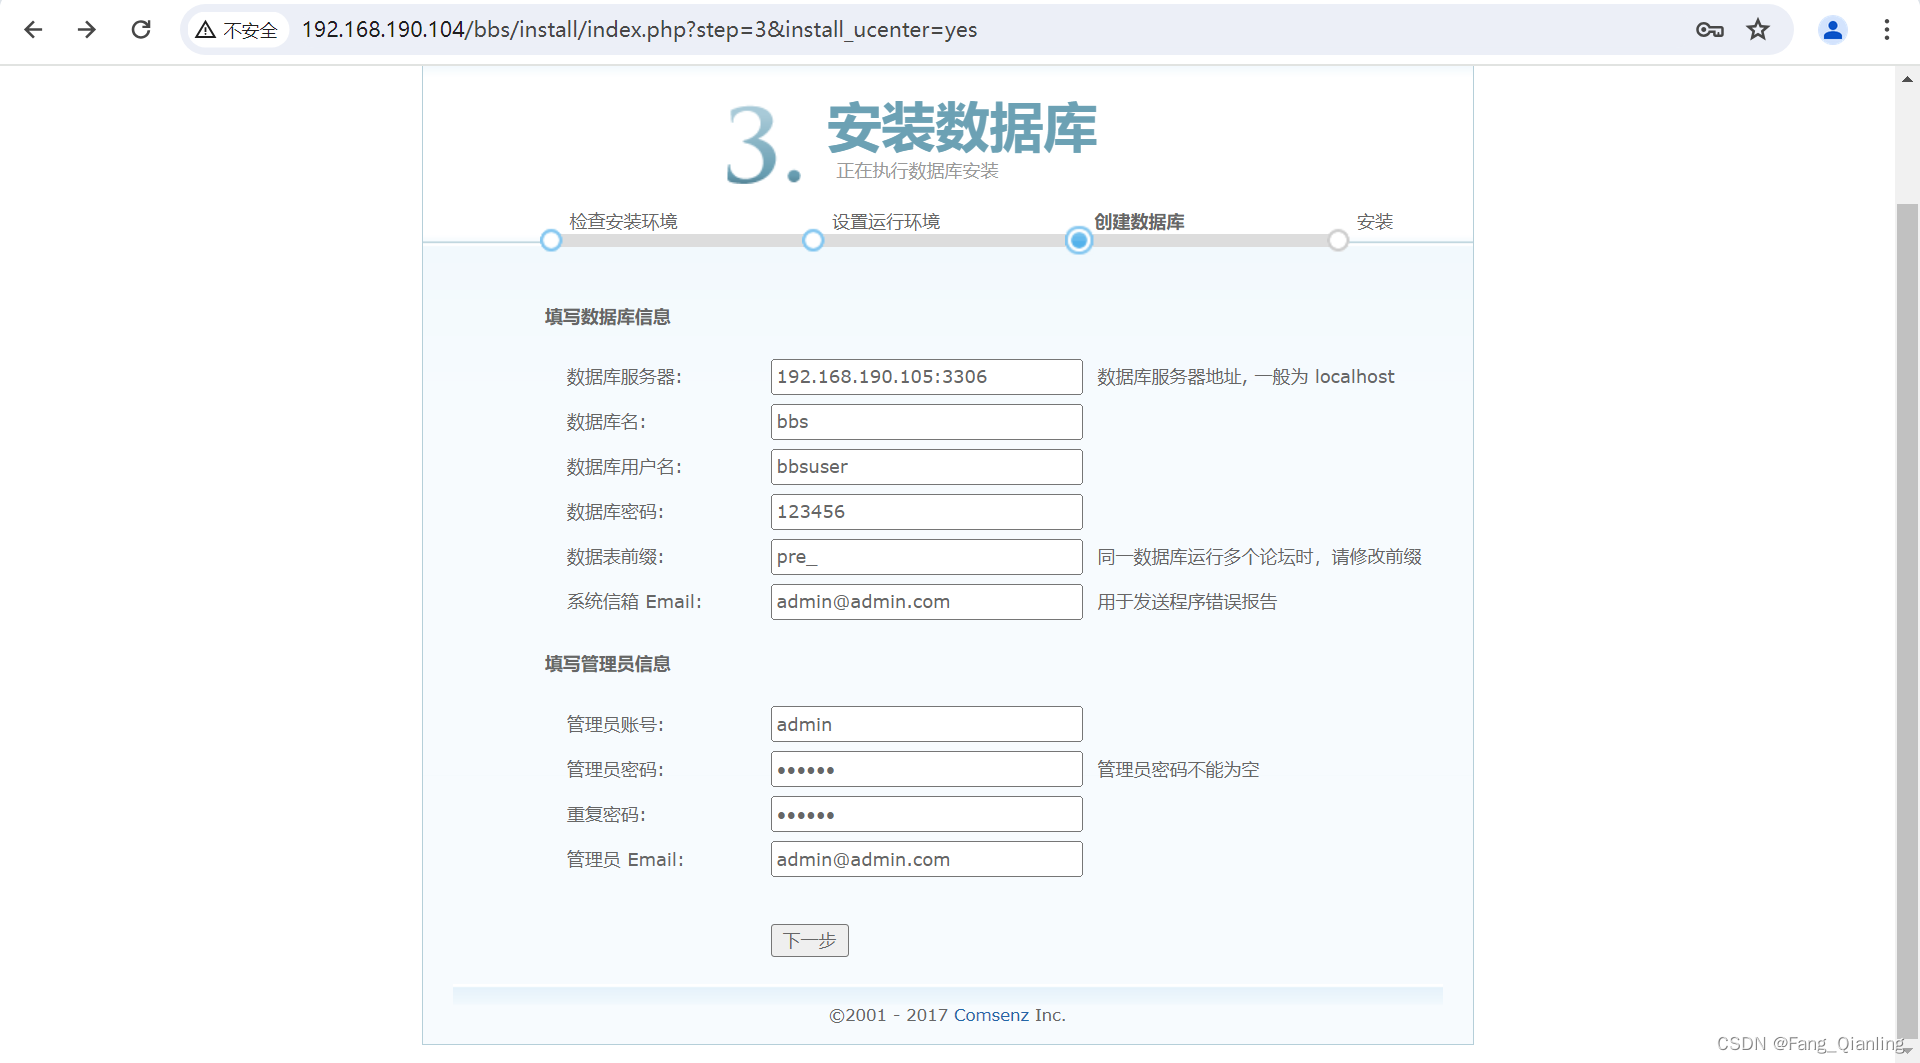
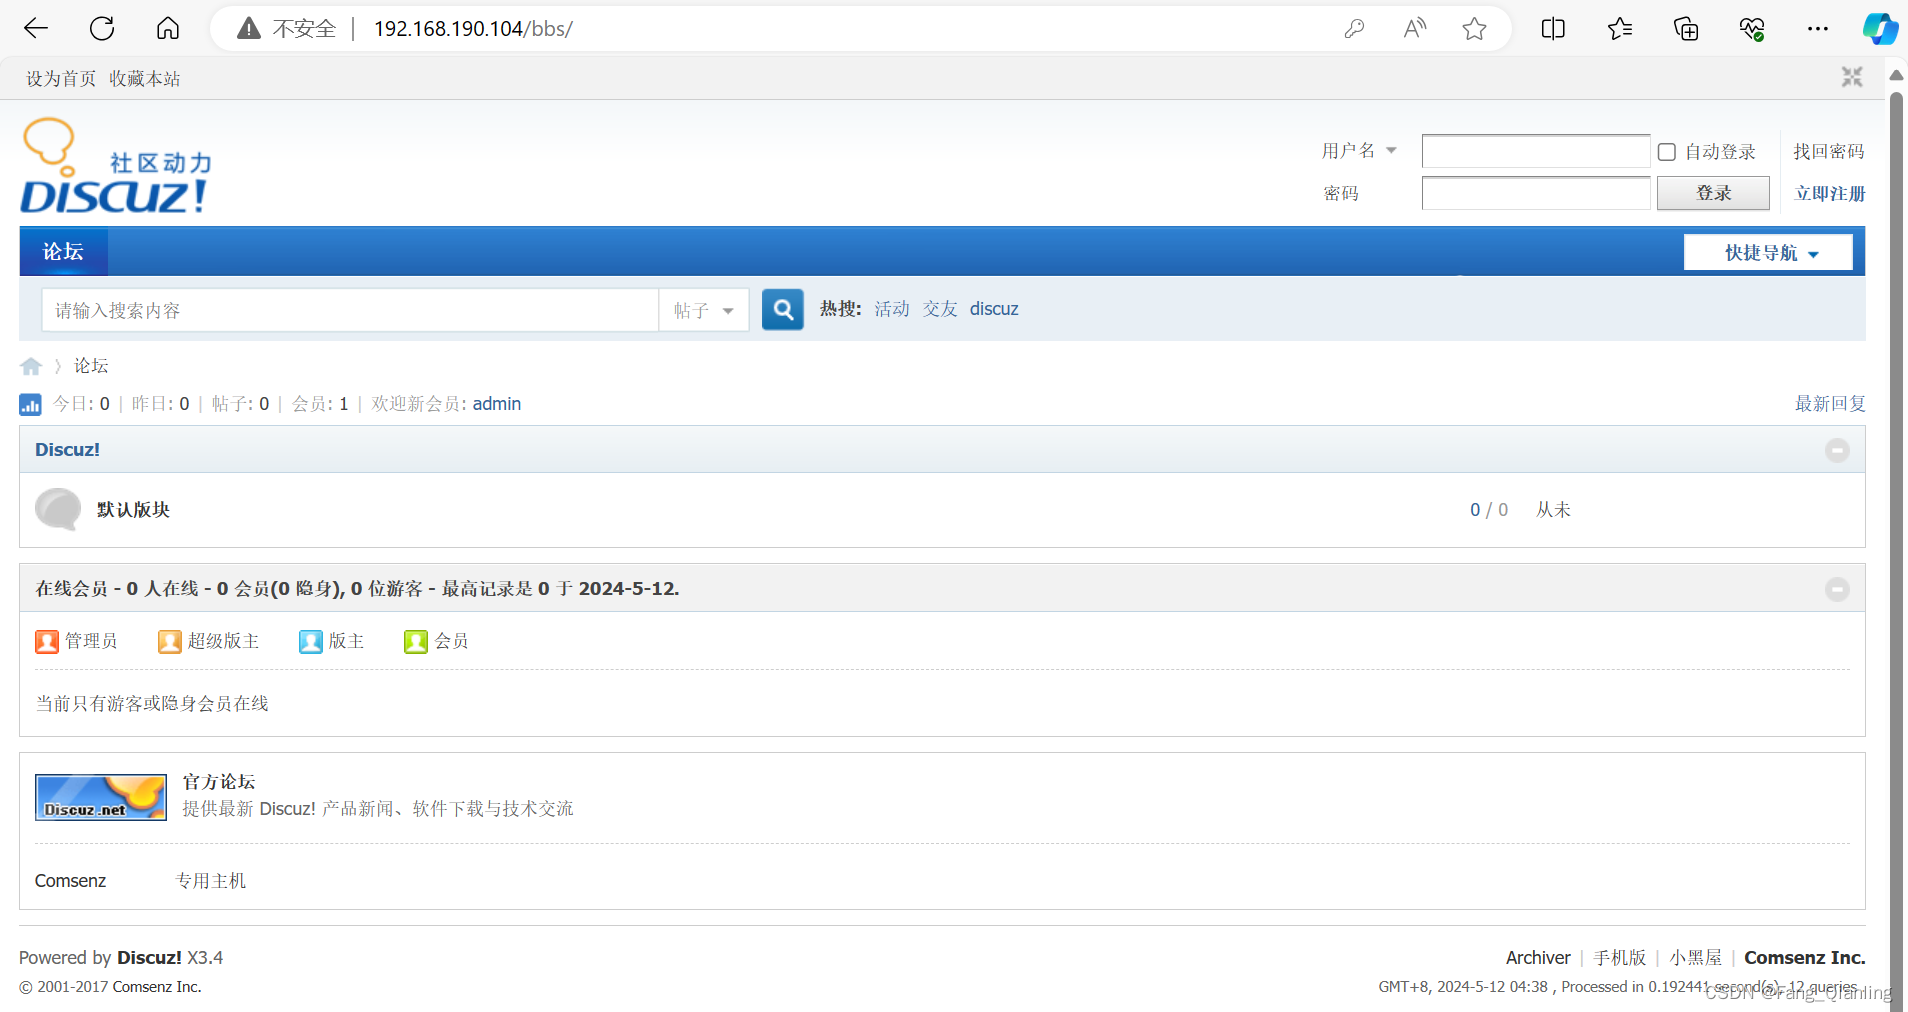
4.2 浏览器访问 Discuz
访问192.168.190.104/bbs/install/index.php


 727
727


 被折叠的 条评论
为什么被折叠?
被折叠的 条评论
为什么被折叠?
 到【灌水乐园】发言


