


Spring batch 系列文章
Spring Batch教程(一) 简单的介绍以及通过springbatch将xml文件转成txt文件
Spring Batch教程(二)示例:将txt文件转成xml文件以及读取xml文件内容存储到数据库mysql
Spring Batch教程(三)示例:从mysql中读取数据写入文本和从多个文本中读取内容写入mysql
Spring Batch教程(四)tasklet使用示例:spring batch的定时任务使用
Spring Batch教程(五)spring boot实现batch功能注解示例:读写文本文件
Spring Batch教程(六)spring boot实现batch功能注解示例:读文件写入mysql
本文介绍了2个示例,即将txt文件转成xml文件以及读取xml文件内容存储到数据库mysql。
本文使用的是jdk8版本,最新版本的spring core和springb batch用不了。
本文分为2个部分,即将txt文件转成xml文件以及读取xml文件内容存储到数据库mysql的两个示例。
一、示例1:将txt文件转换成xml文件
1、maven依赖
	<properties>
		<project.build.sourceEncoding>UTF-8</project.build.sourceEncoding>
		<springframework.version>5.2.25.RELEASE</springframework.version>
		<joda-time.version>2.12.5</joda-time.version>
		<springbatch.version>4.2.8.RELEASE</springbatch.version>
	</properties>
	<dependencies>
		<dependency>
			<groupId>org.springframework.batch</groupId>
			<artifactId>spring-batch-core</artifactId>
			<version>${springbatch.version}</version>
		</dependency>
		<dependency>
			<groupId>org.springframework.batch</groupId>
			<artifactId>spring-batch-infrastructure</artifactId>
			<version>${springbatch.version}</version>
		</dependency>
		<dependency>
			<groupId>org.springframework</groupId>
			<artifactId>spring-core</artifactId>
			<version>${springframework.version}</version>
		</dependency>
		<dependency>
			<groupId>org.springframework</groupId>
			<artifactId>spring-oxm</artifactId>
			<version>${springframework.version}</version>
		</dependency>
        <dependency>
            <groupId>joda-time</groupId>
            <artifactId>joda-time</artifactId>
            <version>${joda-time.version}</version>
        </dependency>
	</dependencies>
2、创建测试文件txt
文件位置:/sping-batch/src/main/resources/personInfo.txt
alanchanchn|76.0|1985-02-01
alan|100.0|1979-09-01
chan|92.0|1993-03-01
alanchan|83.0|1995-08-01
3、PersonInfo bean
import javax.xml.bind.annotation.XmlElement;
import javax.xml.bind.annotation.XmlRootElement;
import javax.xml.bind.annotation.adapters.XmlJavaTypeAdapter;

/**
 *
 * @author alanchan
 *
 */
@XmlRootElement(name = "PersonInfo")
public class PersonInfo {
	private String name;
	private String birthday;
	private double salary;

	@XmlElement(name = "name")
	public String getName() {
		return name;
	}

	public void setName(String name) {
		this.name = name;
	}

	@XmlElement(name = "birthday")
	public String getBirthday() {
		return birthday;
	}

	public void setBirthday(String birthday) {
		this.birthday = birthday;
	}

	@XmlElement(name = "salary")
	public double getSalary() {
		return salary;
	}

	public void setSalary(double salary) {
		this.salary = salary;
	}

	@Override
	public String toString() {
		return "PersonInfo [name=" + name + ", birthday=" + birthday + ", salary=" + salary + "]";
	}

}
4、建立FieldSetMapper
解析txt文件并和javabean进行映射
import org.springframework.batch.item.file.mapping.FieldSetMapper;
import org.springframework.batch.item.file.transform.FieldSet;
import org.springframework.validation.BindException;

import com.win.xml2txt.model.PersonInfo;

/**
 *
 * @author alanchan
 *
 */
public class PersonInfoFieldSetMapper implements FieldSetMapper<PersonInfo> {

	public PersonInfo mapFieldSet(FieldSet fieldSet) throws BindException {
		PersonInfo personInfo = new PersonInfo();
		//数据格式:alanchanchn|76.0|1985-02-01
		personInfo.setName(fieldSet.readString(0));
		personInfo.setBirthday(fieldSet.readString(2));
		personInfo.setSalary(fieldSet.readDouble(1));
		return personInfo;
	}

}
5、创建ItemProcessor实现类
本示例仅仅是过滤一下,salary大于等于100的设置为100×0.8。
import org.springframework.batch.item.ItemProcessor;

import com.win.xml2txt.model.PersonInfo;

/**
 *
 * @author alanchan
 *
 */
public class PersonInfoItemProcessor implements ItemProcessor<PersonInfo, PersonInfo> {

	public PersonInfo process(PersonInfo personIfo) throws Exception {
		System.out.println("Processing result :" + personIfo);

		if (personIfo.getSalary() >= 100) {
			PersonInfo tempPersonInfo = new PersonInfo();
			tempPersonInfo.setName(personIfo.getName());
			tempPersonInfo.setBirthday(personIfo.getBirthday());
			tempPersonInfo.setSalary(100*0.8);
			personIfo = tempPersonInfo;
		}

		return personIfo;
	}

}
6、添加Job listener(JobExecutionListener)
增加一个监听器,查看job执行情况
import java.util.Date;
import java.util.List;

import org.joda.time.DateTime;
import org.springframework.batch.core.BatchStatus;
import org.springframework.batch.core.JobExecution;
import org.springframework.batch.core.JobExecutionListener;

/**
 *
 * @author alanchan
 *
 */
public class PersonInfoJobListener implements JobExecutionListener {
	private DateTime startTime, stopTime;

	public void beforeJob(JobExecution jobExecution) {
		startTime = new DateTime();
		System.out.println("job开始 at :" + startTime);
	}

	public void afterJob(JobExecution jobExecution) {
		stopTime = new DateTime();
		System.out.println("job结束 at :" + stopTime);
		System.out.println("任务耗时(毫秒) :" + getTimeInMillis(startTime, stopTime));

		if (jobExecution.getStatus() == BatchStatus.COMPLETED) {
			System.out.println("job任务完成");
			// Here you can perform some other business logic like cleanup
		} else if (jobExecution.getStatus() == BatchStatus.FAILED) {
			System.out.println("job任务异常如下 ");
			List<Throwable> exceptionList = jobExecution.getAllFailureExceptions();
			for (Throwable th : exceptionList) {
				System.err.println("异常 :" + th.getLocalizedMessage());
			}
		}
	}

	private long getTimeInMillis(DateTime start, DateTime stop) {
		return stop.getMillis() - start.getMillis();
	}

}
7、进行job的配置
文件位置:/sping-batch/src/main/resources/spring-batch-context2.xml
<beans xmlns="http://www.springframework.org/schema/beans"
	xmlns:batch="http://www.springframework.org/schema/batch"
	xmlns:xsi="http://www.w3.org/2001/XMLSchema-instance"
	xsi:schemaLocation="http://www.springframework.org/schema/batch http://www.springframework.org/schema/batch/spring-batch-3.0.xsd
        http://www.springframework.org/schema/beans http://www.springframework.org/schema/beans/spring-beans-4.0.xsd">

    <!-- JobRepository and JobLauncher are configuration/setup classes -->
    <bean id="jobRepository" class="org.springframework.batch.core.repository.support.MapJobRepositoryFactoryBean" />

    <bean id="jobLauncher"   class="org.springframework.batch.core.launch.support.SimpleJobLauncher">
        <property name="jobRepository" ref="jobRepository" />
    </bean>

	<!-- ItemReader reads a complete line one by one from input file -->
	<bean id="flatFileItemReader" 	class="org.springframework.batch.item.file.FlatFileItemReader"	scope="step">
		<property name="resource" value="file:d:/personInfo.txt" />
		<property name="lineMapper">
			<bean		class="org.springframework.batch.item.file.mapping.DefaultLineMapper">
				<property name="fieldSetMapper">
					<!-- Mapper which maps each individual items in a record to properties in POJO -->
					<bean class="com.win.txt2xml.PersonInfoFieldSetMapper" />
				</property>
				<property name="lineTokenizer">
					<!-- A tokenizer class to be used when items in input record are separated 	by specific characters -->
					<bean class="org.springframework.batch.item.file.transform.DelimitedLineTokenizer">
						<property name="delimiter" value="|" />
					</bean>
				</property>
			</bean>
		</property>
	</bean>

	<!-- XML ItemWriter which writes the data in XML format -->
	<bean id="xmlItemWriter" class="org.springframework.batch.item.xml.StaxEventItemWriter">
		<property name="resource" value="file:d:/personInfo.xml" />
		<property name="rootTagName" value="PersonList" />
		<property name="marshaller">
			<bean class="org.springframework.oxm.jaxb.Jaxb2Marshaller">
				<property name="classesToBeBound">
					<list>
						<value>com.win.xml2txt.model.PersonInfo</value>
					</list>
				</property>
			</bean>

		</property>

	</bean>

	<!-- Optional ItemProcessor to perform business logic/filtering on the input records -->
	<bean id="itemProcessor" class="com.win.txt2xml.PersonInfoItemProcessor" />

	<!-- Optional JobExecutionListener to perform business logic before and after the job -->
	<bean id="jobListener" class="com.win.txt2xml.PersonInfoJobListener" />

	<!-- Step will need a transaction manager -->
	<bean id="transactionManager" class="org.springframework.batch.support.transaction.ResourcelessTransactionManager" />

	<!-- Actual Job -->
	<batch:job id="personInfoJob">
		<batch:step id="step1">
			<batch:tasklet transaction-manager="transactionManager">
				<batch:chunk reader="flatFileItemReader" writer="xmlItemWriter" processor="itemProcessor" commit-interval="10" />
			</batch:tasklet>
		</batch:step>
		<batch:listeners>
			<batch:listener ref="jobListener" />
		</batch:listeners>
	</batch:job>

</beans>
8、创建一个运行job的main类
import org.springframework.batch.core.Job;
import org.springframework.batch.core.JobExecution;
import org.springframework.batch.core.JobExecutionException;
import org.springframework.batch.core.JobParameters;
import org.springframework.batch.core.launch.JobLauncher;
import org.springframework.context.ApplicationContext;
import org.springframework.context.support.ClassPathXmlApplicationContext;

/**
 *
 * @author alanchan
 *
 */
public class App {
	@SuppressWarnings("resource")
	public static void main(String args[]) {
		ApplicationContext context = new ClassPathXmlApplicationContext("spring-batch-context2.xml");

		JobLauncher jobLauncher = (JobLauncher) context.getBean("jobLauncher");
		Job job = (Job) context.getBean("personInfoJob");

		try {
			JobExecution execution = jobLauncher.run(job, new JobParameters());
			System.out.println("job执行状态 : " + execution.getStatus());

		} catch (JobExecutionException e) {
			System.out.println("job执行失败");
			e.printStackTrace();
		}
	}
}
9、验证
运行程序 ,查看输出文件内以及控制台内容
1)、控制台输出
控制台看监听器的输出
job开始 at :2023-07-20T16:29:44.321+08:00
Processing result :PersonInfo [name=alanchanchn, birthday=1985-02-01, salary=76.0]
Processing result :PersonInfo [name=alan, birthday=1979-09-01, salary=100.0]
Processing result :PersonInfo [name=chan, birthday=1993-03-01, salary=92.0]
Processing result :PersonInfo [name=alanchan, birthday=1995-08-01, salary=83.0]
job结束 at :2023-07-20T16:29:44.409+08:00
任务耗时(毫秒) :88
job任务完成
job执行状态 : COMPLETED
2)、程序结果输出
文件位置:d:/personInfo.xml,其内容如下
<?xml version="1.0" encoding="UTF-8"?>
<PersonList>
    <PersonInfo>
        <birthday>1985-02-01</birthday>
        <name>alanchanchn</name>
        <salary>76.0</salary>
    </PersonInfo>
    <PersonInfo>
        <birthday>1979-09-01</birthday>
        <name>alan</name>
        <salary>80.0</salary>
    </PersonInfo>
    <PersonInfo>
        <birthday>1993-03-01</birthday>
        <name>chan</name>
        <salary>92.0</salary>
    </PersonInfo>
    <PersonInfo>
        <birthday>1995-08-01</birthday>
        <name>alanchan</name>
        <salary>83.0</salary>
    </PersonInfo>
</PersonList>
二、示例2:读取xml文件写入mysql
1、maven依赖
	<properties>
		<project.build.sourceEncoding>UTF-8</project.build.sourceEncoding>
		<springframework.version>5.2.25.RELEASE</springframework.version>
		<joda-time.version>2.12.5</joda-time.version>
		<mysql.connector.version>5.1.31</mysql.connector.version>
		<springbatch.version>4.2.8.RELEASE</springbatch.version>

	</properties>
	<dependencies>
		<dependency>
			<groupId>org.springframework.batch</groupId>
			<artifactId>spring-batch-core</artifactId>
			<version>${springbatch.version}</version>
		</dependency>
		<dependency>
			<groupId>org.springframework.batch</groupId>
			<artifactId>spring-batch-infrastructure</artifactId>
			<version>${springbatch.version}</version>
		</dependency>
		<dependency>
			<groupId>org.springframework</groupId>
			<artifactId>spring-core</artifactId>
			<version>${springframework.version}</version>
		</dependency>
		<dependency>
			<groupId>org.springframework</groupId>
			<artifactId>spring-oxm</artifactId>
			<version>${springframework.version}</version>
		</dependency>
		<dependency>
			<groupId>org.springframework</groupId>
			<artifactId>spring-jdbc</artifactId>
			<version>${springframework.version}</version>
		</dependency>
		<dependency>
			<groupId>joda-time</groupId>
			<artifactId>joda-time</artifactId>
			<version>${joda-time.version}</version>
		</dependency>
		<dependency>
			<groupId>mysql</groupId>
			<artifactId>mysql-connector-java</artifactId>
			<version>${mysql.connector.version}</version>
		</dependency>
	</dependencies>
2、创建测试文件personinfo.xml
位置:/sping-batch/src/main/resources/PersonInfo.xml
<?xml version="1.0" encoding="UTF-8"?>
<PersonList>
	<PersonInfo>
		<birthday>1985-02-01</birthday>
		<salary>76.0</salary>
		<name>alanchanchn</name>
	</PersonInfo>
	<PersonInfo>
		<birthday>1979-09-01</birthday>
		<salary>61.0</salary>
		<name>alan</name>
	</PersonInfo>
	<PersonInfo>
		<birthday>1993-03-01</birthday>
		<salary>92.0</salary>
		<name>chan</name>
	</PersonInfo>
	<PersonInfo>
		<birthday>1995-08-01</birthday>
		<salary>83.0</salary>
		<name>alanchan</name>
	</PersonInfo>
</PersonList>
3、PersonInfo bean
import javax.xml.bind.annotation.XmlElement;
import javax.xml.bind.annotation.XmlRootElement;
import javax.xml.bind.annotation.adapters.XmlJavaTypeAdapter;

/**
 *
 * @author alanchan
 *
 */
@XmlRootElement(name = "PersonInfo")
public class PersonInfo {
	private String name;
	private String birthday;
	private double salary;

	@XmlElement(name = "name")
	public String getName() {
		return name;
	}

	public void setName(String name) {
		this.name = name;
	}

	@XmlElement(name = "birthday")
	public String getBirthday() {
		return birthday;
	}

	public void setBirthday(String birthday) {
		this.birthday = birthday;
	}

	@XmlElement(name = "salary")
	public double getSalary() {
		return salary;
	}

	public void setSalary(double salary) {
		this.salary = salary;
	}

	@Override
	public String toString() {
		return "PersonInfo [name=" + name + ", birthday=" + birthday + ", salary=" + salary + "]";
	}

}
4、创建ItemProcessor实现类
本示例仅仅是过滤一下,salary小于75的设置为salary*1.5。
import org.springframework.batch.item.ItemProcessor;

import com.win.xml2txt.model.PersonInfo;

/**
 *
 * @author alanchan
 *
 */
public class PersonInfoItemProcessor implements ItemProcessor<PersonInfo, PersonInfo> {

	public PersonInfo process(PersonInfo personInfo) throws Exception {
		System.out.println("Processing result :" + personInfo);

		if (personInfo.getSalary() < 75) {
			PersonInfo tempPersonInfo = new PersonInfo();
			tempPersonInfo.setName(personInfo.getName());
			tempPersonInfo.setBirthday(personInfo.getBirthday());
			tempPersonInfo.setSalary(personInfo.getSalary() * 1.5);
			personInfo = tempPersonInfo;
		}

		return personInfo;
	}

}
5、添加Job listener(JobExecutionListener)
增加一个监听器,查看job执行情况
import java.util.List;

import org.joda.time.DateTime;
//import org.joda.time.DateTime;
import org.springframework.batch.core.BatchStatus;
import org.springframework.batch.core.JobExecution;
import org.springframework.batch.core.JobExecutionListener;

/**
 *
 * @author alanchan
 *
 */
public class PersonInfoJobListener implements JobExecutionListener {

	private DateTime startTime, stopTime;

	public void beforeJob(JobExecution jobExecution) {
		startTime = new DateTime();
		System.out.println("job开始 at :" + startTime);
	}

	public void afterJob(JobExecution jobExecution) {
		stopTime = new DateTime();
		System.out.println("job结束 at :" + stopTime);
		System.out.println("任务耗时(毫秒) :" + getTimeInMillis(startTime, stopTime));

		if (jobExecution.getStatus() == BatchStatus.COMPLETED) {
			System.out.println("job任务完成");
			// Here you can perform some other business logic like cleanup
		} else if (jobExecution.getStatus() == BatchStatus.FAILED) {
			System.out.println("job任务异常如下 ");
			List<Throwable> exceptionList = jobExecution.getAllFailureExceptions();
			for (Throwable th : exceptionList) {
				System.err.println("异常 :" + th.getLocalizedMessage());
			}
		}
	}

	private long getTimeInMillis(DateTime start, DateTime stop) {
		return stop.getMillis() - start.getMillis();
	}

}
6、创建数据转换器
将bean属性与需要插入数据库的字段进行映射,字段顺序取决于配置文件中的顺序。
import java.sql.PreparedStatement;
import java.sql.SQLException;

import org.springframework.batch.item.database.ItemPreparedStatementSetter;

import com.win.xml2txt.model.PersonInfo;

/**
 *
 * @author alanchan
 *
 */
public class PersonInfoItemPreparedStatementSetter implements ItemPreparedStatementSetter<PersonInfo> {

	public void setValues(PersonInfo personInfo, PreparedStatement ps) throws SQLException {
		// 和数据库字段顺序有关
		// insert into personInfo(name, birthday, salary)    values (?, ?, ?)
		ps.setString(1, personInfo.getName());
		ps.setString(2, personInfo.getBirthday());
		ps.setDouble(3, personInfo.getSalary());
	}

}
7、进行job的配置
1)、job配置
文件位置:/sping-batch/src/main/resources/spring-batch-context3.xml
<beans xmlns="http://www.springframework.org/schema/beans"
	xmlns:batch="http://www.springframework.org/schema/batch"
	xmlns:xsi="http://www.w3.org/2001/XMLSchema-instance"
	xsi:schemaLocation="http://www.springframework.org/schema/batch http://www.springframework.org/schema/batch/spring-batch-3.0.xsd
        http://www.springframework.org/schema/beans http://www.springframework.org/schema/beans/spring-beans-4.0.xsd">

	<import resource="classpath:context-datasource.xml"/>
	<!-- JobRepository and JobLauncher are configuration/setup classes -->
	<bean id="jobRepository"		class="org.springframework.batch.core.repository.support.MapJobRepositoryFactoryBean" />

	<bean id="jobLauncher"		class="org.springframework.batch.core.launch.support.SimpleJobLauncher">
		<property name="jobRepository" ref="jobRepository" />
	</bean>

	<!-- ItemReader which reads data from XML file -->
	<bean id="xmlItemReader"		class="org.springframework.batch.item.xml.StaxEventItemReader">
		<property name="resource" value="classpath:PersonInfo.xml" />
		<property name="fragmentRootElementName" value="PersonInfo" />
		<property name="unmarshaller">
			<bean class="org.springframework.oxm.jaxb.Jaxb2Marshaller">
				<property name="classesToBeBound">
					<list>
						<value>com.win.xml2txt.model.PersonInfo</value>
					</list>
				</property>
			</bean>
		</property>
	</bean>

	<!-- ItemWriter which writes data to database -->
	<bean id="databaseItemWriter"		class="org.springframework.batch.item.database.JdbcBatchItemWriter">
		<property name="dataSource" ref="dataSource" />
		<property name="sql">
			<value>
                <![CDATA[
                    insert into personInfo(name, birthday, salary)    values (?, ?, ?)
                ]]>
			</value>
		</property>

		<!-- We need a custom setter to handle the conversion between Jodatime 			LocalDate and MySQL DATE -->
		<property name="ItemPreparedStatementSetter">
			<bean				class="com.win.xml2mysql.PersonInfoItemPreparedStatementSetter" />
		</property>
	</bean>

	<!-- Optional ItemProcessor to perform business logic/filtering on the input
		records -->
	<bean id="itemProcessor"		class="com.win.xml2mysql.PersonInfoItemProcessor" />

	<!-- Optional JobExecutionListener to perform business logic before and
		after the job -->
	<bean id="jobListener"		class="com.win.xml2mysql.PersonInfoJobListener" />

	<!-- Step will need a transaction manager -->
	<bean id="transactionManager"		class="org.springframework.batch.support.transaction.ResourcelessTransactionManager" />

	<!-- Actual Job -->
	<batch:job id="personInfoJob">
		<batch:step id="step1">
			<batch:tasklet transaction-manager="transactionManager">
				<batch:chunk reader="xmlItemReader"					writer="databaseItemWriter" processor="itemProcessor"					commit-interval="10" />
			</batch:tasklet>
		</batch:step>
		<batch:listeners>
			<batch:listener ref="jobListener" />
		</batch:listeners>
	</batch:job>

</beans>
2)、数据源配置
<beans xmlns="http://www.springframework.org/schema/beans"
       xmlns:batch="http://www.springframework.org/schema/batch" xmlns:xsi="http://www.w3.org/2001/XMLSchema-instance"
       xsi:schemaLocation="http://www.springframework.org/schema/beans

http://www.springframework.org/schema/beans/spring-beans-4.0.xsd">

    <bean id="dataSource" class="org.springframework.jdbc.datasource.DriverManagerDataSource">
        <property name="driverClassName" value="com.mysql.jdbc.Driver" />
        <property name="url" value="jdbc:mysql://192.168.10.44:3306/test" />
        <property name="username" value="root" />
        <property name="password" value="12345" />
    </bean>

</beans>
8、创建一个运行job的main类
import org.springframework.batch.core.Job;
import org.springframework.batch.core.JobExecution;
import org.springframework.batch.core.JobExecutionException;
import org.springframework.batch.core.JobParameters;
import org.springframework.batch.core.launch.JobLauncher;
import org.springframework.context.ApplicationContext;
import org.springframework.context.support.ClassPathXmlApplicationContext;

/**
 *
 * @author alanchan
 *
 */
public class App {
	@SuppressWarnings("resource")
	public static void main(String args[]) {
		ApplicationContext context = new ClassPathXmlApplicationContext("spring-batch-context3.xml");

		JobLauncher jobLauncher = (JobLauncher) context.getBean("jobLauncher");
		Job job = (Job) context.getBean("personInfoJob");

		try {
			JobExecution execution = jobLauncher.run(job, new JobParameters());
			System.out.println("job执行状态 : " + execution.getStatus());

		} catch (JobExecutionException e) {
			System.out.println("job执行失败");
			e.printStackTrace();
		}
	}
}
9、创建mysql表
CREATE TABLE personinfo ( NAME VARCHAR ( 30 ) NOT NULL, birthday VARCHAR ( 15 ) NOT NULL, salary DOUBLE NOT NULL );
10、验证
运行程序 ,查看输出文件内以及控制台内容
1)、控制台输出
控制台看监听器的输出
job开始 at :2023-07-20T17:18:42.959+08:00
Processing result :PersonInfo [name=alanchanchn, birthday=1985-02-01, salary=76.0]
Processing result :PersonInfo [name=alan, birthday=1979-09-01, salary=61.0]
Processing result :PersonInfo [name=chan, birthday=1993-03-01, salary=92.0]
Processing result :PersonInfo [name=alanchan, birthday=1995-08-01, salary=83.0]
job结束 at :2023-07-20T17:18:43.177+08:00
任务耗时(毫秒) :218
job任务完成
job执行状态 : COMPLETED
2)、程序结果输出
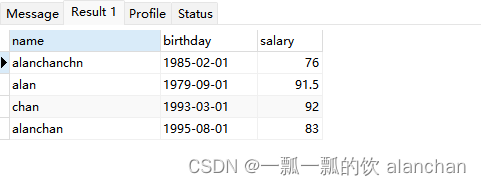
以上,本文介绍了2个示例,即将txt文件转成xml文件以及读取xml文件内容存储到数据库mysql。


 1961
1961


 被折叠的 条评论
为什么被折叠?
被折叠的 条评论
为什么被折叠?
 到【灌水乐园】发言


