Linux: How to Create and Delete Link in Linux?

目录

0. 前言

2. 创建一个软链接

3. 创建一个硬链接

4. 删除原始文件会发生什么

5. 删除链接

5.1 用rm命令


0. 前言

        在Linux系统中,所有关于一个文件的信息都是存储在各自对应的inode中。通过这些inodes,你可以知道关于一个文件的所有元数据(metadata).

        Linux操作系统允许用户创建一个文件的链接(link),可以通过链接进行文件访问,与直接访问原文件是等价的。

        作为一个实用案例,在WSL(Windows Subsystem for Linux)中使用链接会使得工作变得更方便。在WSL中,你的项目文件可能是存储在Windows系统硬盘中,在WSL中原Windows系统硬盘被映射到WSL的/mnt/底下了,比如说,C盘映射为/mnt/c,D盘映射为/mnt/d。。。余者类推。通常你可能并不想挪动原来位于这些盘中的数据,但是从WSL中去访问它们又很麻烦,这个时候你就可以在WSL中创建一个链接,然后你就可以假装这些文件、目录等是原生的位于WSL系统中的数据了。

        以下示例是在WSL2-Ubuntu系统终端执行。但是在其它linux系统终端上执行结果应该也相同。

        Linux系统中的符号链接可以分为软链接(soft links)和硬链接(hard links)两种。

        一个软链接(soft link),或者说符号链接(symbolic link)则更像大部分编程语言中有的文件指针或者快捷方式(shortcuts)一样,它不是对原始文件进行复制一份,而只是指向原始文件,因此并不占用格外的存储空间。软链接与原始文件的inode不同。如果你删除了或者移动了原始文件的话,软链接就失效了(就不能再通过软链接访问到原始文件了)

        另一方面,硬链接基本上可以看作是一个文件的一个精确的复制,硬链接和原文件共享相同的inode。创建硬链接的最大的优点是即便你不小心把原文件删除了,或者把文件挪动了位置,你仍然可以通过硬链接访问它的内容。可以认为硬链接工作在一个更底层的机制上,因此也更为稳固。

2. 创建一个软链接

        创建一个软链接的命令如下

ln -s /path/to/original /path/to/link

        第1个参数s表示soft,第2个参数是原始文件或者目录的路径,第3 个参数是你要创建的link的路径。

        如下图所示,在我的D盘下有个tmp目录,里面有个文件叫“link-to-this-file.txt”。左边是Windows的显示,右边是Ubuntu的显示。

        现在我要在Unbuntu下我的主目录下创建一个该文件的软链接: 

ln -s  /mnt/d/tmp/link-to-this-file.txt softlink.ln

        创建完后,‘ls -al’看一下,可以看到“->”就表示这个链接的指向关系。

        当然也可以创建指向一个文件夹的软链接。比如说,以下创建了一个指向"D:/tmp"的软链接:

ln -s  /mnt/d/tmp slink-to-d-tmp.ln

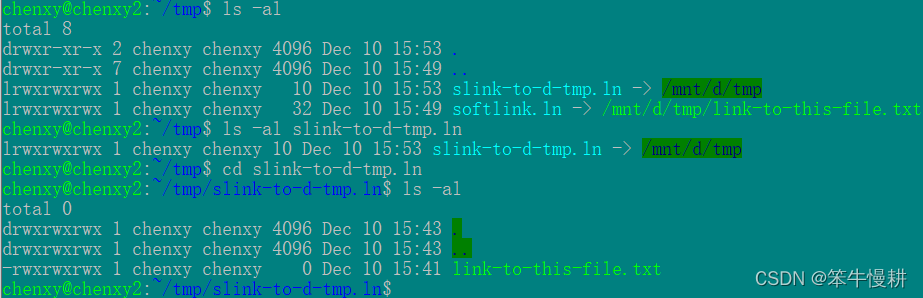
        如上图所示,可以看出创建了一个指向"/mnt/d/tmp"的链接。

        执行" cd slink-tp-d-tmp.ln"后会进入到/mnt/d/tmp中去。

        但是执行" ls -al slink-tp-d-tmp.ln"的话,并没有去显示/mnt/d/tmp中的内容。

3. 创建一个硬链接

        创建一个硬链接的命令与创建软链接的命令基本相同,只是去掉”-s“选项即可。

        但是在WSL中不支持跨系统的硬链接,比如说如果执行以下命令:      

ln /mnt/d/tmp/link-to-this-file.txt hardlink.ln

        会报告错误:

        下面我们创建一个指向"~/tmp/hello.txt" 的硬链接。

ln hello.txt hlink-to-hello.ln
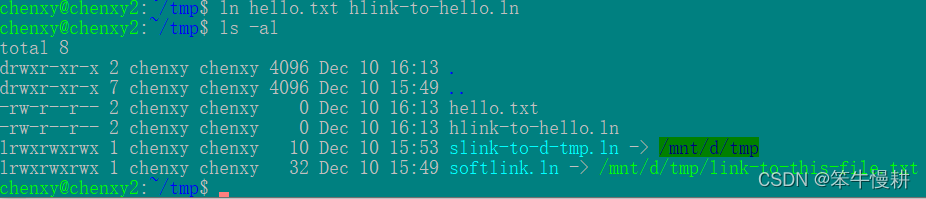
        由上图可知,硬链接的显示是不一样的。

4. 删除原始文件会发生什么

        接下来,我把hello.txt和D:/tmp/link-to-this-file.txt都删掉,看看会发生什么。删掉两个文件我在用'ls -al'看目录中的内容如下:

        如上图所示,hlink-to-hello.ln还是好好的,而指向/mnt/d/tmp/link-to-this-file.txt的软链接变成了红色,表示该软链接已经失效。这个例子清楚地显示了硬链接与软链接的区别。

        但是,需要注意的一点是,对于文件夹不支持建立硬链接(不知道是在一般的linux中都不支持,还是仅在WSL上不支持。需要到真正linux系统上去求证一下^-^。

5. 删除链接

5.1 用rm命令

        删除(either soft or hard)链接与删除普通的文件一样,用普通的rm命令即可。删除链接不会影响原文件或者文件夹。

        但是,这里有一个小小的陷阱。如果在输入删除命令时用tab进行自动完成,会自动地附加上“/”在尾部,这样执行rm命令不会成功。如下所示:

>>rm symlink_to_dir/

        执行命令会返回:

rm: cannot remove 'symlink_to_dir/': Is a directory

If the name of the argument ends with /, the rm command assumes that the file is a directory. The error happens because, when used without the -d or -r option, rm cannot delete directories.

To be on the safe side, never -rf option when removing symbolic links with rm. For example, if you type:

rm -ff symlink_to_dir/

The contents of the target directory will be deleted.

        也可以用unlink命令来删除symbolic link。

        其效果与rm相同。同样,不能在待删除链接名后面带“/”。

        不同点在于unlink只能接一个参数,但是rm可以带多个参数,即同时删除多个链接。

If you delete or move the source file to a different location, the symbolic file will be left dangling (broken).

To find all broken symbolic links under a given directory, run the following command:

find /path/to/directory -xtype l

 执行结果如下:

/path/to/directory/symlink1
/path/to/directory/subdir/symlink2

The command will list all broken links under the directory and its subdirectories.

If you want to exclude the symlinks that are contained in the subdirectories pass the -maxdepth 1 option to find :

find /path/to/directory -maxdepth 1 -xtype l
/path/to/directory/symlink1

Once you find the broken symlinks, you can either manually remove them with rm or unlink or use the -delete option of the find command:

find /path/to/directory -xtype l -delete

[Ref1] How to Create Hard Link and Soft Link in Linux? (linuxhint.com)

[Ref2] How to Create and Use Symbolic Links (aka Symlinks) on Linux (howtogeek.com)

[Ref3] How to Remove (Delete) Symbolic Links in Linux | Linuxize 

Sure, I can help you with that. Here's an example of how you can upload a PHPExcel file to a MySQL database using a front-end framework like EasyUI in a separate front-end and back-end setup. First, let's start with the front-end code using EasyUI to handle the file upload: ```html <!DOCTYPE html> <html> <head> <title>Excel Upload</title> <link rel="stylesheet" type="text/css" href="https://cdn.jsdelivr.net/npm/easyui@1.9.25/themes/default/easyui.css"> <script type="text/javascript" src="https://cdn.jsdelivr.net/npm/jquery/dist/jquery.min.js"></script> <script type="text/javascript" src="https://cdn.jsdelivr.net/npm/easyui@1.9.25/jquery.easyui.min.js"></script> </head> <body> <h2>Excel Upload</h2> <form id="excelForm" method="post" enctype="multipart/form-data"> <input id="excelFile" name="excelFile" type="file"> <button id="uploadBtn" class="easyui-linkbutton" type="submit">Upload</button> </form> <script type="text/javascript"> $(function(){ $('#excelForm').form({ url: 'upload.php', onSubmit: function(){ return $(this).form('validate'); }, success: function(result){ $.messager.show({ title: 'Success', msg: result, timeout: 5000 }); } }); }); </script> </body> </html> ``` Next, let's create the `upload.php` file on the server side to handle the file upload and database insertion: ```php <?php // Include PHPExcel library require_once 'PHPExcel/PHPExcel.php'; // Database connection details $host = 'localhost'; $username = 'your_username'; $password = 'your_password'; $database = 'your_database'; // File upload directory $targetDir = 'uploads/'; // Create target directory if it doesn't exist if (!is_dir($targetDir)) { mkdir($targetDir, 0777, true); } // Handle file upload $targetFile = $targetDir . basename($_FILES["excelFile"]["name"]); move_uploaded_file($_FILES["excelFile"]["tmp_name"], $targetFile); // Read the uploaded file using PHPExcel $objPHPExcel = PHPExcel_IOFactory::load($targetFile); $worksheet = $objPHPExcel->getActiveSheet(); // Database connection $conn = new mysqli($host, $username, $password, $database); if ($conn->connect_error) { die("Connection failed: " . $conn->connect_error); } // Loop through each row in the worksheet foreach ($worksheet->getRowIterator() as $row) { $rowData = []; $cellIterator = $row->getCellIterator(); $cellIterator->setIterateOnlyExistingCells(false); // Loop through each cell in the row foreach ($cellIterator as $cell) { $rowData[] = $cell->getValue(); } // Insert row data into the database $sql = "INSERT INTO your_table_name (column1, column2, column3) VALUES (?, ?, ?)"; $stmt = $conn->prepare($sql); $stmt->bind_param("sss", $rowData[0], $rowData[1], $rowData[2]); $stmt->execute(); } // Close database connection $conn->close(); // Delete the uploaded file unlink($targetFile); echo "Upload successful!"; ?> ``` Make sure to create a directory named "uploads" in the same directory as the `upload.php` file to store the uploaded files. Replace `'your_username'`, `'your_password'`, `'your_database'`, and `'your_table_name'` with your actual database credentials and table name. This is a basic example to get you started. You may need to modify it based on your specific requirements and validations. Additionally, make sure to sanitize and validate user input to prevent any security vulnerabilities. I hope this helps you with uploading PHPExcel files to a MySQL database using a front-end framework like EasyUI in a separate front-end and back-end setup. Let me know if you have any further questions!
评论 1
添加红包

请填写红包祝福语或标题

红包个数最小为10个

红包金额最低5元

当前余额3.43前往充值 >
需支付:10.00
成就一亿技术人!
领取后你会自动成为博主和红包主的粉丝 规则
hope_wisdom
发出的红包

打赏作者

笨牛慢耕

你的鼓励将是我创作的最大动力

¥1 ¥2 ¥4 ¥6 ¥10 ¥20
扫码支付:¥1
获取中
扫码支付

您的余额不足,请更换扫码支付或充值

打赏作者

实付
使用余额支付
点击重新获取
扫码支付
钱包余额 0

抵扣说明:

1.余额是钱包充值的虚拟货币,按照1:1的比例进行支付金额的抵扣。
2.余额无法直接购买下载,可以购买VIP、付费专栏及课程。

余额充值