


最近打算移植一个比较新的 uboot 到开发板,回想起来上一次移植 uboot1.1.6 已经差不多是一年前了,手头保留了一些当时移植分析时的笔记,但是没有归纳梳理,在移植新版 uboot 之前,再来回味一下经典。本文重点在于分析 uboot 启动流程以及 uboot 自身的细节,比如栈空间的划分、如何设置 tag 、如何添加一个自定义命令等。但是不涉及基本的硬件驱动的分析,比如内存初始化、时钟初始化、mmu 、nandflash 等等这些细节不是我们的重点。
一、链接脚本
uboot1.1.6 的链接脚本 u-boot.lds 位于 u-boot-1.1.6\board\smdk2410 目录下:
-
ENTRY(_start)
-
SECTIONS
-
{
-
. = 0x00000000;
-
-
. = ALIGN( 4);
-
.text :
-
{
-
cpu/arm920t/start.o (.text)
-
*(.text)
-
}
-
-
. = ALIGN( 4);
-
.rodata : { *(.rodata) }
-
-
. = ALIGN( 4);
-
.data : { *(.data) }
-
-
. = ALIGN( 4);
-
.got : { *(.got) }
-
-
. = .;
-
__u_boot_cmd_start = .;
-
.u_boot_cmd : { *(.u_boot_cmd) }
-
__u_boot_cmd_end = .;
-
-
. = ALIGN( 4);
-
__bss_start = .;
-
.bss : { *(.bss) }
-
_end = .;
-
}
arm-linux-ld -Bstatic -T u-boot.lds -Ttext 0x33F80000 start.o ...
0x33F80000 在 board/smdk2410/config.mk 中定义,为 TEXT_BASE = 0x33F80000 (链接地址)
整个 uboot 的入口 _start 包含在 cpu/arm920t/start.S 中
二、第一阶段
uboot 的第一阶段主要工作是作基本的初始化工作,例如关看门狗、初始化时钟、初始化 sdram 以及代码重定位,为第二阶段做准备。这里的代码都是没有经过移植的源代码~!
1、设置异常向量
-
.globl _start
-
_start: b reset
-
ldr pc, _undefined_instruction
-
ldr pc, _software_interrupt
-
ldr pc, _prefetch_abort
-
ldr pc, _data_abort
-
ldr pc, _not_used
-
ldr pc, _irq
-
ldr pc, _fiq
-
-
_undefined_instruction: .word undefined_instruction
-
_software_interrupt: .word software_interrupt
-
_prefetch_abort: .word prefetch_abort
-
_data_abort: .word data_abort
-
_not_used: .word not_used
-
_irq: .word irq
-
_fiq: .word fiq
-
-
.balignl 16, 0xdeadbeef
ldr pc, _undefined_instruction
_undefined_instruction:.word undefined_instruction
感觉真是在卖弄,两条指令连起来的结果就是,CPU 会跳转到 undefined_instruction 链接地址处去执行(sdram里)。
那么其实,一条 ldr pc,=undefined_instruction 就够了,它是位置有关码,绝对跳转。
或许,uboot 的作者别有用意我没看透,不知道这是不是个伏笔。在u-boot2015里,就只有一个 reset 一个异常入口了。
2、进入管理模式
-
reset:
-
/*
-
* set the cpu to SVC32 mode
-
*/
-
mrs r0,cpsr
-
bic r0,r0,# 0x1f
-
orr r0,r0,# 0xd3
-
msr cpsr,r0

有时候我们会碰到 CPSR_C ,它其实就是 CPSR 的低 8 位而已。

I:1-禁止irq中断 0-允许irq中断
F:1-禁止fiq中断 1-允许fiq中断
T:1-Thumb 0-arm 指令集
M0-M4 : 工作模式

说了这么多,前边两条指令,先将 cpsr 低 5位 清零,然后或上 1101 0011B
禁止了 irq 和 fiq 中断,工作在 arm 指令集,管理模式。
3、关看门狗
-
-
ldr r0, =pWTCON
-
mov r1, # 0x0
-
str r1, [r0]
-
/*
-
* mask all IRQs by setting all bits in the INTMR - default
-
*/
-
mov r1, # 0xffffffff
-
ldr r0, =INTMSK
-
str r1, [r0]
-
# if defined(CONFIG_S3C2410)
-
ldr r1, = 0x3ff
-
ldr r0, =INTSUBMSK
-
str r1, [r0]
-
# endif
5、设置时钟
-
/* FCLK:HCLK:PCLK = 1:2:4 */
-
/* default FCLK is 120 MHz ! */
-
ldr r0, =CLKDIVN
-
mov r1, # 3
-
str r1, [r0]
-
/*
-
* flush v4 I/D caches
-
*/
-
mov r0, # 0
-
mcr p15, 0, r0, c7, c7, 0 /* flush v3/v4 cache */
-
mcr p15, 0, r0, c8, c7, 0 /* flush v4 TLB */


或者参考:http://blog.sina.com.cn/s/blog_858820890102v1gc.html
7、关 mmu
-
/*
-
* disable MMU stuff and caches
-
*/
-
mrc p15, 0, r0, c1, c0, 0
-
bic r0, r0, # 0x00002300 @ clear bits 13, 9: 8 (--V- --RS)
-
bic r0, r0, # 0x00000087 @ clear bits 7, 2: 0 (B--- -CAM)
-
orr r0, r0, # 0x00000002 @ set bit 2 (A) Align
-
orr r0, r0, # 0x00001000 @ set bit 12 (I) I-Cache
-
mcr p15, 0, r0, c1, c0, 0

8、初始化 sdram 控制器
-
.globl lowlevel_init
-
lowlevel_init:
-
/* memory control configuration */
-
/* make r0 relative the current location so that it */
-
/* reads SMRDATA out of FLASH rather than memory ! */
-
ldr r0, =SMRDATA
-
ldr r1, _TEXT_BASE
-
sub r0, r0, r1
-
ldr r1, =BWSCON /* Bus Width Status Controller */
-
add r2, r0, # 13* 4
-
0:
-
ldr r3, [r0], # 4
-
str r3, [r1], # 4
-
cmp r2, r0
-
bne 0b
-
-
/* everything is fine now */
-
mov pc, lr
-
-
.ltorg
-
/* the literal pools origin */
-
-
SMRDATA:
-
.word ( 0+(B1_BWSCON<< 4)+(B2_BWSCON<< 8)+(B3_BWSCON<< 12)+(B4_BWSCON<< 16)+(B5_BWSCON<< 20)+(B6_BWSCON<< 24)+(B7_BWSCON<< 28))
-
.word ((B0_Tacs<< 13)+(B0_Tcos<< 11)+(B0_Tacc<< 8)+(B0_Tcoh<< 6)+(B0_Tah<< 4)+(B0_Tacp<< 2)+(B0_PMC))
-
.word ((B1_Tacs<< 13)+(B1_Tcos<< 11)+(B1_Tacc<< 8)+(B1_Tcoh<< 6)+(B1_Tah<< 4)+(B1_Tacp<< 2)+(B1_PMC))
-
.word ((B2_Tacs<< 13)+(B2_Tcos<< 11)+(B2_Tacc<< 8)+(B2_Tcoh<< 6)+(B2_Tah<< 4)+(B2_Tacp<< 2)+(B2_PMC))
-
.word ((B3_Tacs<< 13)+(B3_Tcos<< 11)+(B3_Tacc<< 8)+(B3_Tcoh<< 6)+(B3_Tah<< 4)+(B3_Tacp<< 2)+(B3_PMC))
-
.word ((B4_Tacs<< 13)+(B4_Tcos<< 11)+(B4_Tacc<< 8)+(B4_Tcoh<< 6)+(B4_Tah<< 4)+(B4_Tacp<< 2)+(B4_PMC))
-
.word ((B5_Tacs<< 13)+(B5_Tcos<< 11)+(B5_Tacc<< 8)+(B5_Tcoh<< 6)+(B5_Tah<< 4)+(B5_Tacp<< 2)+(B5_PMC))
-
.word ((B6_MT<< 15)+(B6_Trcd<< 2)+(B6_SCAN))
-
.word ((B7_MT<< 15)+(B7_Trcd<< 2)+(B7_SCAN))
-
.word ((REFEN<< 23)+(TREFMD<< 22)+(Trp<< 20)+(Trc<< 18)+(Tchr<< 16)+REFCNT)
-
.word 0x32
-
.word 0x30
-
.word 0x30
9、代码重定位
-
relocate: /* relocate U-Boot to RAM */
-
adr r0, _start /* r0 <- current position of code */
-
ldr r1, _TEXT_BASE /* test if we run from flash or RAM */
-
cmp r0, r1 /* don't reloc during debug */
-
beq stack_setup
-
-
ldr r2, _armboot_start
-
ldr r3, _bss_start
-
sub r2, r3, r2 /* r2 <- size of armboot */
-
add r2, r0, r2 /* r2 <- source end address */
-
-
copy_loop:
-
ldmia r0!, {r3-r10} /* copy from source address [r0] */
-
stmia r1!, {r3-r10} /* copy to target address [r1] */
-
cmp r0, r2 /* until source end addreee [r2] */
-
ble copy_loop
拷贝范围:_start 至 _bss_start 前,拷贝到 0x33f80000 处。
33f80048 <_bss_start>:
33f80048: 33fb064c
0x33fb064c - 0x33f80000 > 192K ,什么意思呢?整个 uboot 除了 bss 段 > 4k,如果是 nandflash 启动的话需要从 nandflash 里读取 uboot 到内核,而这里是直接从 0 地址开始读,并读取 > 193k 的东西,显然 uboot 运行在 Norflash 才可以。默认 uboot 不支持 nandflash 启动。
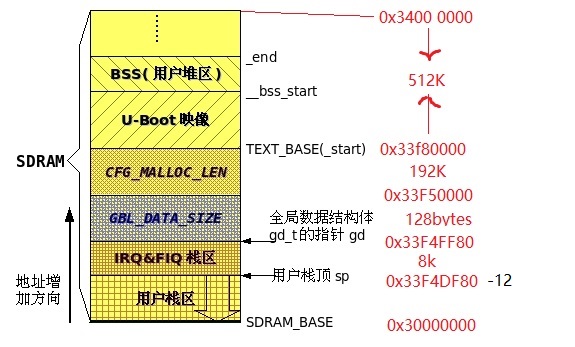
10、设置栈
-
stack_setup:
-
ldr r0, _TEXT_BASE /* upper 128 KiB: relocated uboot */
-
sub r0, r0, #CFG_MALLOC_LEN /* malloc area */
-
sub r0, r0, #CFG_GBL_DATA_SIZE /* bdinfo */
-
-
sub r0, r0, #(CONFIG_STACKSIZE_IRQ+CONFIG_STACKSIZE_FIQ)
-
-
sub sp, r0, # 12 /* leave 3 words for abort-stack */
-
-
clear_bss:
-
ldr r0, _bss_start /* find start of bss segment */
-
ldr r1, _bss_end /* stop here */
-
mov r2, # 0x00000000 /* clear */
-
-
clbss_l:str r2, [r0] /* clear loop... */
-
add r0, r0, # 4
-
cmp r0, r1
-
ble clbss_l
-
0x34000000:
-
( 512K) 存放 uboot
-
0x33F80000: <span style= "white-space:pre"> </span>TEXT_BASE
-
( 64K+ 128K == 192K) <span style= "white-space:pre"> </span>mallo区
-
0x33F50000:
-
( 128bytes) global data区,后边会提到主要放的gd、bd全局结构体
-
0x33F4FF80:
-
( 4* 1024* 2) IRQ+FIQ的栈
-
0x33F4DF80:
-
( 12byte) abort- stack,栈溢出
-
0x33F4DF74: sp
-
clear_bss:
-
ldr r0, _bss_start /* find start of bss segment */
-
ldr r1, _bss_end /* stop here */
-
mov r2, # 0x00000000 /* clear */
-
-
clbss_l:str r2, [r0] /* clear loop... */
-
add r0, r0, # 4
-
cmp r0, r1
-
ble clbss_l
-
ldr pc, _start_armboot
-
-
_start_armboot: .word start_armboot
跳转到 sdram 里的 start_armboot 函数执行。
https://blog.csdn.net/lizuobin2/article/details/52054293#comments
图解Uboot-引导流程
Uboot引导——第一阶段
参考:
https://blog.csdn.net/ce123_zhouwei/article/details/7304909
图解U-Boot:第一阶段源码分析
U-boot第一阶段的详细源码分析可以参看这篇博客
https://blog.csdn.net/czg13548930186/article/details/53484475
uboot源码分析1-启动第一阶段
https://blog.csdn.net/column/mycolumn.html
博客专栏地址
上电
|
初始化/cpu/arm920/start.S
主要工作:
1、 设置arm进入SVC模式
2、 关闭看门狗,屏蔽所有中断,设置时钟分频
3、 进入cpu_init_crit
a) 关闭数据和指令cache,禁用mmu
b) 进入lowlevel_init初始化存储控制器
4、 判断是否在norflash中,如果是,复制uboot到sdram中
5、 如果不是或者拷贝完毕,建立堆栈stack_steup
6、 Bss段清零,clear bss
|
Start_armboot /lib_arm/board.c
第一阶段执行完毕,执行第二阶段c语言代码
U-Boot第一阶段的启动流程。这个阶段主要是初始化硬件设备,为加载U-Boot的第二阶段代码准备RAM空间最后跳转到lib_arm/board.c中start_armboot函数,
这是第二阶段的入口点。
Uboot引导——第二阶段
https://blog.csdn.net/qixi_feng/article/details/9005392
图解U-Boot:第二阶段源码分析
Uboot第二阶段的详细源码分析可以参考这篇博客
https://blog.csdn.net/czg13548930186/article/details/76339222
Start_armboot /lib_arm/board.c
1、 初始化gd和bd
2、 Init_sequence
3、 初始化flash
4、 Env_relocate,将环境参数读入内存中的指定位置
5、 初始化网络设备
6、 Device_init设备初始化
7、 Jumptable_init,跳转表初始化,用来登记函数调用地址
8、 Console_init_r,后期控制台初始化
9、 Enable_interrupt,使能中断处理
10、 Cs8900_get_eneaddr
11、 Main_loop
详细的流程和细节要参考第二篇文档和uboot源码来仔细分析了。


 651
651

 被折叠的 条评论
为什么被折叠?
被折叠的 条评论
为什么被折叠?
 到【灌水乐园】发言


