


1 准备Bean类-User
package com.ws.edu.spring;

public class User {
	private int id;
	private String name;
	public int getId() {
		return id;
	}
	public void setId(int id) {
		this.id = id;
	}
	public String getName() {
		return name;
	}
	public void setName(String name) {
		this.name = name;
	}
	public User() {
		super();
	}
	public User(int id, String name) {
		super();
		this.id = id;
		this.name = name;
	}
	@Override
	public String toString() {
		return "User [id=" + id + ", name=" + name + "]";
	}
}
2 编写基于XML的配置文件-beans.xml
<?xml version="1.0" encoding="UTF-8"?>
<beans xmlns="http://www.springframework.org/schema/beans"
    xmlns:xsi="http://www.w3.org/2001/XMLSchema-instance"
    xsi:schemaLocation="http://www.springframework.org/schema/beans
        http://www.springframework.org/schema/beans/spring-beans.xsd">

	<bean id="user" class="com.ws.edu.spring.User"/>
</beans>
3 使用容器-App
package com.ws.edu.spring;

import org.springframework.context.ApplicationContext;
import org.springframework.context.support.ClassPathXmlApplicationContext;

public class App {
	public static void main(String[] args) {
		ApplicationContext context = new ClassPathXmlApplicationContext("beans.xml");
		User user = context.getBean("user",User.class);
		System.out.println(user);
	}
}
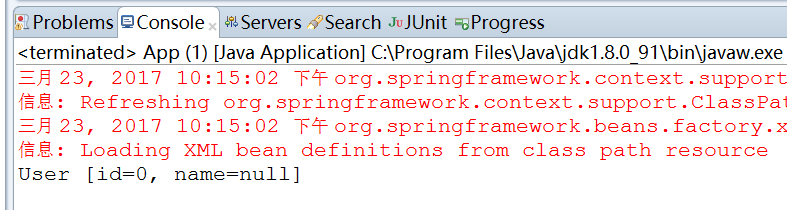
4 运行结果
5 使用<import/>引入其他的xml配置文件
Spring可以在bean定义中使用一个或多个<import/>从其他的配置文件引入bean定义,如下示例:
<beans>
    <import resource="services.xml"/>
    <import resource="resources/messageSource.xml"/>
    <import resource="/resources/themeSource.xml"/>

    <bean id="bean1" class="..."/>
    <bean id="bean2" class="..."/>
</beans>
5.1 编写Bean类-User1
package com.ws.edu.spring;

public class User1 {
	private int id;
	private String name;
	public int getId() {
		return id;
	}
	public void setId(int id) {
		this.id = id;
	}
	public String getName() {
		return name;
	}
	public void setName(String name) {
		this.name = name;
	}
	public User1() {
		super();
	}
	public User1(int id, String name) {
		super();
		this.id = id;
		this.name = name;
	}
	@Override
	public String toString() {
		return "User [id=" + id + ", name=" + name + "]";
	}
}
5.2 编写beans1.xml配置文件
<?xml version="1.0" encoding="UTF-8"?>
<beans xmlns="http://www.springframework.org/schema/beans"
    xmlns:xsi="http://www.w3.org/2001/XMLSchema-instance"
    xsi:schemaLocation="http://www.springframework.org/schema/beans
        http://www.springframework.org/schema/beans/spring-beans.xsd">

	<bean id="user1" class="com.ws.edu.spring.User1"/>
</beans>
5.3 修改beans.xml配置文件
<?xml version="1.0" encoding="UTF-8"?>
<beans xmlns="http://www.springframework.org/schema/beans"
    xmlns:xsi="http://www.w3.org/2001/XMLSchema-instance"
    xsi:schemaLocation="http://www.springframework.org/schema/beans
        http://www.springframework.org/schema/beans/spring-beans.xsd">

    <import resource="beans1.xml"/>

	<bean id="user" class="com.ws.edu.spring.User"/>
</beans>
5.4 修改App类
package com.ws.edu.spring;

import org.springframework.context.ApplicationContext;
import org.springframework.context.support.ClassPathXmlApplicationContext;

public class App {
	public static void main(String[] args) {
		ApplicationContext context = new ClassPathXmlApplicationContext("beans.xml");
		User user = context.getBean("user",User.class);
		System.out.println(user);
		User1 user1 = context.getBean("user1",User1.class);
		System.out.println(user1);
	}
}
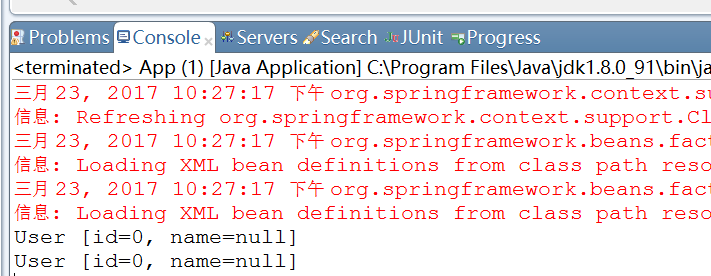
5.5 运行结果


 97
97

 被折叠的 条评论
为什么被折叠?
被折叠的 条评论
为什么被折叠?
 到【灌水乐园】发言


