


1.创建一个boot项目,file —> new project —>Maven —> next,起好名字,进去pom里!这是我的pom,可以直接复制使用!注意名字!!!再删除无关文件(具体看结构图)。
<?xml version="1.0" encoding="UTF-8"?>
<project xmlns="http://maven.apache.org/POM/4.0.0"
         xmlns:xsi="http://www.w3.org/2001/XMLSchema-instance"
         xsi:schemaLocation="http://maven.apache.org/POM/4.0.0 http://maven.apache.org/xsd/maven-4.0.0.xsd">
    <modelVersion>4.0.0</modelVersion>

    <parent>
        <groupId>org.springframework.boot</groupId>
        <artifactId>spring-boot-starter-parent</artifactId>
        <version>2.1.4.RELEASE</version>
        <relativePath/> <!-- lookup parent from repository -->
    </parent>
    <groupId>com.example</groupId>
    <artifactId>boot-jh-demo</artifactId>
    <packaging>pom</packaging>
    <version>1.0-SNAPSHOT</version>
    <modules>
        <module>boot-web</module>
        <module>boot-model</module>
        <module>boot-dao</module>
        <module>boot-service</module>
        <module>boot-util</module>
    </modules>
<dependencies>
    <dependency>
        <groupId>org.springframework.boot</groupId>
        <artifactId>spring-boot-starter</artifactId>
    </dependency>

    <dependency>
        <groupId>org.springframework.boot</groupId>
        <artifactId>spring-boot-starter-test</artifactId>
        <scope>test</scope>
    </dependency>

    <!-- spring-boot的web启动的jar包 -->

</dependencies>

    <properties>
        <!--<thymeleaf.version>3.0.9.RELEASE</thymeleaf.version>
        <thymeleaf-layout-dialect.version>2.2.2</thymeleaf-layout-dialect.version>-->
        <project.build.sourceEncoding>UTF-8</project.build.sourceEncoding>
    </properties>

    <!-- 使用maven打包 -->
    <build>
        <plugins>
            <plugin>
                <artifactId>maven-compiler-plugin</artifactId>
                <version>3.8.0</version>
                <configuration>
                    <source>1.8</source>
                    <target>1.8</target>
                </configuration>
            </plugin>
        </plugins>
    </build>
</project>
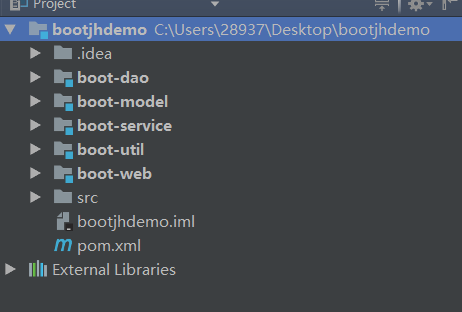
2.创建demo项目的子模块,在项目上右键单击选择:new ->Module ->Spring Initializr,先创建名为 boot-web的boot子项目,再选择:new -> Module ->Maven 创建分别为boot-service,boot-dao,boot-model ,boot-util 4个子项目 创建完成后目录如下:项目结构图。
3.更改父工程的pom.xml 文件为如下 添加<modules>标签是否指定了子模块
<modules>
        <module>boot-web</module>
        <module>boot-service</module>
        <module>boot-dao</module>
        <module>boot-model</module>
        <module>boot-util</module>
    </modules>
3.在web的pom.xml中引入service,service引入dao,到引入model,model引入util,并把parent指向父项目。
3.1 web的pom.xml
<?xml version="1.0" encoding="UTF-8"?>
<project xmlns="http://maven.apache.org/POM/4.0.0" xmlns:xsi="http://www.w3.org/2001/XMLSchema-instance"
   xsi:schemaLocation="http://maven.apache.org/POM/4.0.0 http://maven.apache.org/xsd/maven-4.0.0.xsd">
   <modelVersion>4.0.0</modelVersion>

   <parent>
      <artifactId>boot-jh-demo</artifactId>
      <groupId>com.example</groupId>
      <version>1.0-SNAPSHOT</version>
   </parent>

   <artifactId>boot-web</artifactId>
   <version>0.0.1-SNAPSHOT</version>
   <name>boot-web</name>
   <description>Demo project for Spring Boot</description>

   <dependencies>
      <dependency>
         <groupId>com.example</groupId>
         <artifactId>boot-service</artifactId>
         <version>1.0-SNAPSHOT</version>
      </dependency>

      <dependency>
           <groupId>org.springframework.boot</groupId>
           <artifactId>spring-boot-starter-web</artifactId>
           </dependency>
   </dependencies>

   <build>
      <plugins>
         <plugin>
            <groupId>org.springframework.boot</groupId>
            <artifactId>spring-boot-maven-plugin</artifactId>
         </plugin>
      </plugins>
   </build>

</project>
3.2 service的pom.xml
<?xml version="1.0" encoding="UTF-8"?>
<project xmlns="http://maven.apache.org/POM/4.0.0"
         xmlns:xsi="http://www.w3.org/2001/XMLSchema-instance"
         xsi:schemaLocation="http://maven.apache.org/POM/4.0.0 http://maven.apache.org/xsd/maven-4.0.0.xsd">
    <parent>
        <artifactId>boot-jh-demo</artifactId>
        <groupId>com.example</groupId>
        <version>0.0.1-SNAPSHOT</version>
    </parent>
    <modelVersion>4.0.0</modelVersion>

    <artifactId>boot-service</artifactId>

    <dependencies>

    <!-- 添加对上层的依赖 -->
    <dependency>
        <groupId>com.example</groupId>
        <artifactId>boot-dao</artifactId>
        <version>0.0.1-SNAPSHOT</version>
    </dependency>
    </dependencies>
</project>
3.3dao的pom.xml
<?xml version="1.0" encoding="UTF-8"?>
<project xmlns="http://maven.apache.org/POM/4.0.0"
         xmlns:xsi="http://www.w3.org/2001/XMLSchema-instance"
         xsi:schemaLocation="http://maven.apache.org/POM/4.0.0 http://maven.apache.org/xsd/maven-4.0.0.xsd">
    <parent>
        <artifactId>boot-jh-demo</artifactId>
        <groupId>com.example</groupId>
        <version>0.0.1-SNAPSHOT</version>
    </parent>
    <modelVersion>4.0.0</modelVersion>

    <artifactId>boot-dao</artifactId>
<dependencies>
    <!-- 添加对上层的依赖 -->
    <dependency>
        <groupId>com.example</groupId>
        <artifactId>boot-model</artifactId>
        <version>0.0.1-SNAPSHOT</version>
    </dependency>
</dependencies>
</project>
3.3model和service,dao一样,此处略过!
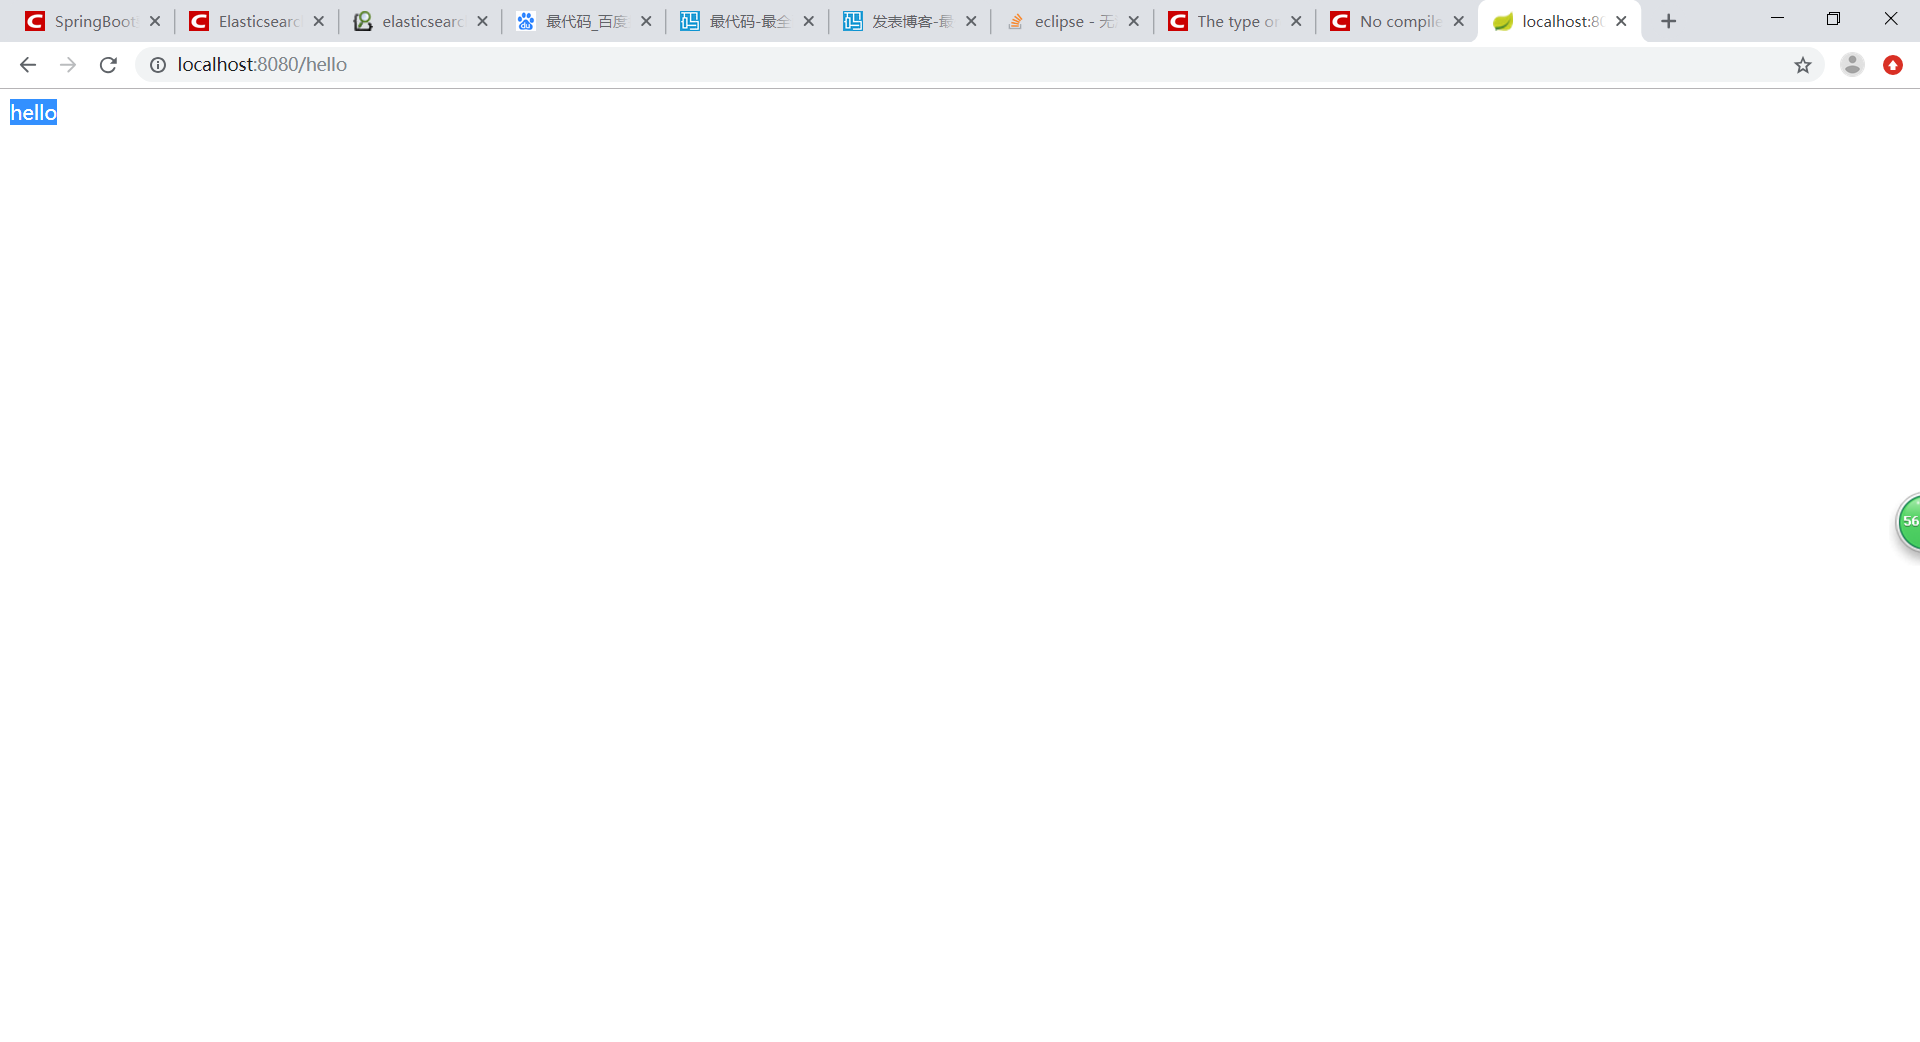
4.测试,在web的pom中引入boot常用的jar包,web中创建controller文件夹下再创建TestController
@Controller
public class TestController {

        @RequestMapping(value = "/hello",method = RequestMethod.GET)
        public String test(){
            return "hello";
        }
}
5.启动web下的启动类.
6.如需要源码,请在群里@人间蒸发


 195
195

 被折叠的 条评论
为什么被折叠?
被折叠的 条评论
为什么被折叠?
 到【灌水乐园】发言


