


下载google inception-v3模型参数来辨识图片
inception-v3的源码可以参考github上的tensorflow
当然整个训练过程在个人电脑或者一般的额服务器上是不可能运行的,所以只能下载训练参数来进行模拟,在一个没有GPU的电脑上也可以轻松实现图片识别
查看inception结构图的代码:
1.inception的训练结构图
import tensorflow as tf
import os
import tarfile
import requests
#下载文件
inception_prediction_model_url ="http://download.tensorflow.org/models/image/imagenet/inception-2015-12-05.tgz"

inception_prediction_model_dir ="inception_model"
if not os.path.exists(inception_prediction_model_dir):
    os.makedirs(inception_prediction_model_dir)

filename =inception_prediction_model_url.split('/')[-1]
filepath=os.path.join(inception_prediction_model_dir,filename)

if not os.path.exists(filepath):
    print("download: ",filename)
    r=requests.get(inception_prediction_model_url,stream=True)
    with open(filepath,'wb') as f:
        for chunk in r.iter_content(chunk_size=1024):
            if chunk:
                f.write(chunk)
print ('finish: ',filename)
#解压文件
tarfile.open(filepath,'r:gz').extractall(inception_prediction_model_dir)
#模型存放文件的结构
log_dir ='inception_log'
if not os.path.exists(log_dir):
    os.makedirs(log_dir)

inception_graph_def_file =os.path.join(inception_prediction_model_dir,'classify_image_graph_def.pb')
with tf.Session() as sess:
    #创建一个图来存在训练好的模型
    with tf.gfile.FastGFile(inception_graph_def_file,'rb') as f:
        graph_def = tf.GraphDef()
        graph_def.ParseFromString(f.read())
        tf.import_graph_def(graph_def,name='')
    #保存图的结构--使用tensorboard查看
    writer = tf.summary.FileWriter(log_dir,sess.graph)
    writer.close()
随后cd到指定的logdir目录下(filewriter(logdir)): 输入指定命令
tensorboard --logdir="logdir"
打开localhost:6006可以查看到训练计算图
2.inception-v3辨识图片
首先查看一下上面解压的文件中的两个文件
①imagenet_2012_challenge_label_map_proto.pbtxt。文件内容如下所示: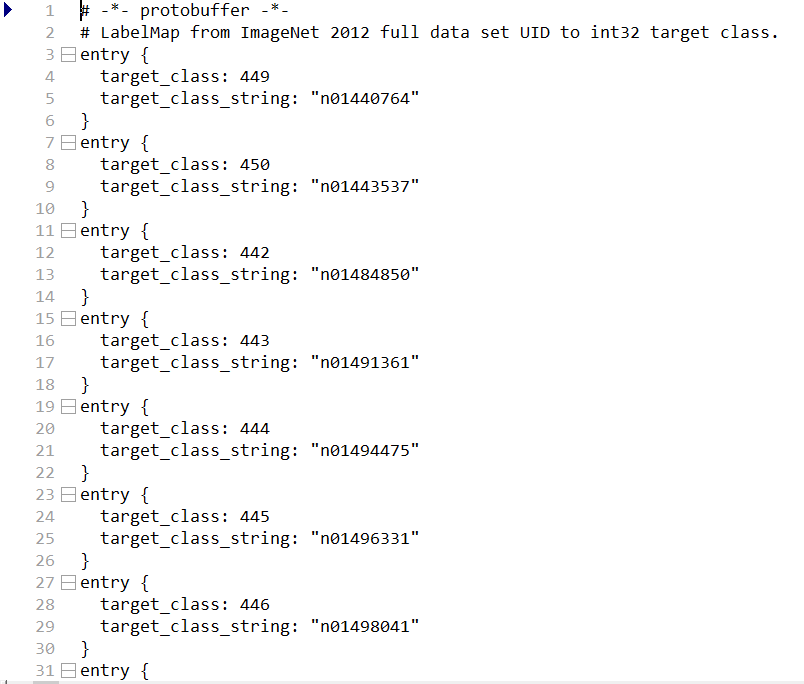
Inception模型是识别1000个类别的,可以看到每个entry中都有一个指定的数字标签,数字标签下面有一个string,这个string是用来映射相应的信息的,具体的参考第二份文件
②imagenet_synset_to_human_label_map。文件内容如下所示: 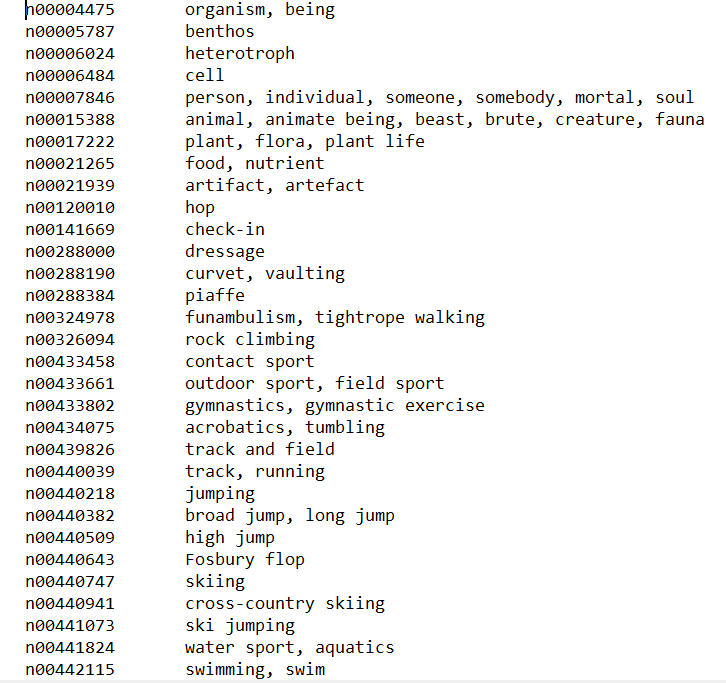
文件①中的string通过文件②映射到具体的图片描述信息
下面是具体的实现代码:
#导入需要的模块
import tensorflow as tf
import os
import numpy as np
import re
from PIL import Image
#在linux中使用
#import Image 就可以了
import matplotlib.pyplot as plt
#定义一个类用来根据编号返回内容:
class NodeLookup(object):
    def __init__(self):
        label_lookup_path ='inception_model/imagenet_2012_challenge_label_map_proto.pbtxt'
        uid_lookup_path='inception_model/imagenet_synset_to_human_label_map.txt'
        self.node_lookup=self.load(label_lookup_path,uid_lookup_path)

    def load(self,label_lookup_path,uid_lookup_path):
        proto_as_ascii_lines = tf.gfile.GFile(uid_lookup_path).readlines()
        uid_to_human = {}
        #按行读取数据
        for line in proto_as_ascii_lines:
            line=line.strip('\n')
            parsed_items = line.split('\t')
            #分类标签编号
            uid =parsed_items[0]
            #分类名称
            human_string = parsed_items[1]
            #建立两者之间的映射
            uid_to_human[uid] = human_string

        #加载1000个分类标签
        proto_as_ascii = tf.gfile.GFile(label_lookup_path).readlines()
        node_id_to_uid={}
        for line in proto_as_ascii:
            if line.startswith('  target_class:'):
                #获取分类号
                target_class = int(line.split(': ')[1])
            if line.startswith('  target_class_string:'):
                #获取字符串
                target_class_string = line.split(': ')[1]
                #建立映射
                node_id_to_uid[target_class]=target_class_string[1:-2]
        #将两个文件建立联系
        node_id_to_name={}
        for key,value in node_id_to_uid.items():
            name = uid_to_human[value]
            node_id_to_name[key] = name
        return node_id_to_name
    #根据编号返回名称
    def id_to_string(self,node_id):
        if node_id not in self.node_lookup:
            return ''
        return self.node_lookup[node_id]
#创建图来存放训练好的模型参数
with tf.gfile.FastGFile('inception_model/classify_image_graph_def.pb','rb') as f:
    graph_def = tf.GraphDef()
    graph_def.ParseFromString(f.read())
    tf.import_graph_def(graph_def,name='')

with tf.Session() as sess:
    softmax_tensor = sess.graph.get_tensor_by_name('softmax:0')
    #遍历目录
    for root,dirs,files in os.walk('images/'):
        for file in files:
            #载入图片
            image_data = tf.gfile.FastGFile(os.path.join(root,file),'rb').read()
            #jpeg格式的图片
            predictions = sess.run(softmax_tensor,{'DecodeJpeg/contents:0':image_data})
            #结果转为1维度
            predictions = np.squeeze(predictions)
            #打印图片信息
            image_path = os.path.join(root,file)
            print (image_path)
            #显示图片
            img=Image.open(image_path)
            plt.imshow(img)
            plt.axis("off")
            plt.show()
            #排序
            top_k = predictions.argsort()[-5:][::-1]
            node_lookup = NodeLookup()
            for node_id in top_k:
                human_string =node_lookup.id_to_string(node_id)
                #置信度
                score = predictions[node_id]
                print ('%s (score = %.5f)' % (human_string, score))
需要说明的是:
①运行代码前需要在代码的目录下建立一个文件夹images,然后放入jpg格式的图片
②该模型对人没有办法准确识别,毕竟只有1000种分类
结果样例图如下: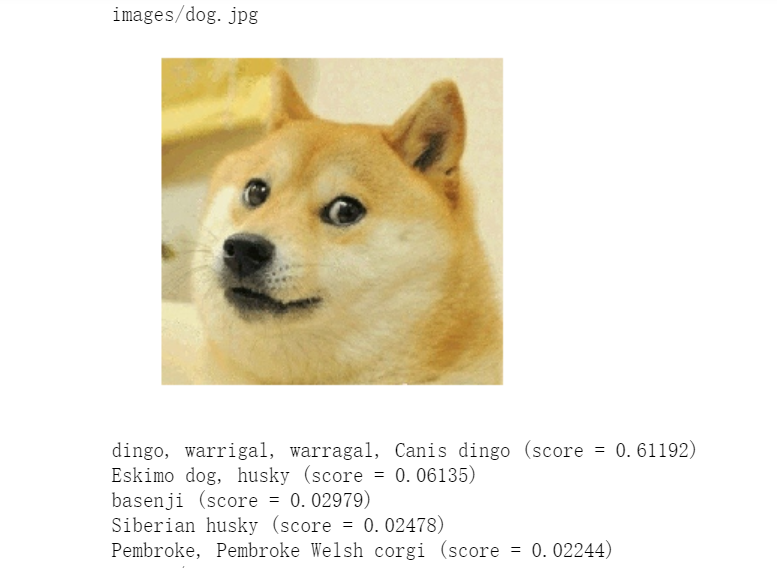
3.summary
其实整个过程就是一个参数模型的restore过程。比较简单。
4.拓展
有兴趣的可以去研究一个inception模型的结构和作用,对于理解图像处理网络模型以及卷积网络有一定的帮助,这里给一个关于inception模型分析的链接: http://blog.csdn.net/u010402786/article/details/52433324


 586
586


 被折叠的 条评论
为什么被折叠?
被折叠的 条评论
为什么被折叠?
 到【灌水乐园】发言


