


25.1 docker简介
• 官网 www.docker.com
• github https://github.com/docker/docker.github.io
• 开源的容器引擎,可以让开发者打包应用以及依赖的库,然后发布到任何流行的linux发行版上,移植很方便
• 由go语言编写,基于apache2.0协议发布
• 基于linux kernel,要想在win下运行需要借助一个vm(虚拟机)来实现
• 自2013年开始,近些年发展迅猛
• docker从1.13x开始,版本分为社区版ce和企业版ee,并且基于年月的时间线形式,当前最新稳定版为17.09 参考http://blog.csdn.net/chenhaifeng2016/article/details/68062414
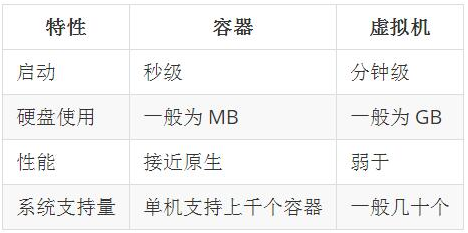
Docker和传统的虚拟化比较


Docker的优势
• 启动非常快,秒级实现
• 资源利用率高,一台高配置服务器可以跑上千个docker容器
• 更快的交付和部署,一次创建和配置后,可以在任意地方运行
• 内核级别的虚拟化,不需要额外的hypevisor支持,会有更高的性能和效率
• 易迁移,平台依赖性不强
Docker核心概念
• 镜像,是一个只读的模板,类似于安装系统用到的那个iso文件,我们通过镜像来完成各种应用的部署。
• 容器,镜像类似于操作系统,而容器类似于虚拟机本身。它可以被启动、开始、停止、删除等操作,每个容器都是相互隔离的。
•仓库,存放镜像的一个场所,仓库分为公开仓库和私有仓库。 最大的公开仓库是Docker hub(hub.docker.com),国内公开仓库(dockerpool.com)
25.2 安装docker
首先下载repo的源
[root@hongwei-02 ~]# curl https://download.docker.com/linux/centos/docker-ce.repo -o  /etc/yum.repos.d/docker.repo
  % Total    % Received % Xferd  Average Speed   Time    Time     Time  Current
                                 Dload  Upload   Total   Spent    Left  Speed
100  2424  100  2424    0     0    395      0  0:00:06  0:00:06 --:--:--   670
[root@hongwei-02 ~]#
安装好之后就可以直接使用yum安装了
[root@hongwei-02 ~]# yum install -y docker-ce
已加载插件:fastestmirror
启动docker服务
[root@hongwei-02 ~]# systemctl start docker
[root@hongwei-02 ~]#
看一下进程和自带的iptables规则
[root@hongwei-02 ~]# systemctl start docker
[root@hongwei-02 ~]# ps aux|grep docker
root      2635  1.2  5.3 601992 54484 ?        Ssl  16:58   0:00 /usr/bin/dockerd
root      2641  0.4  2.5 317236 25940 ?        Ssl  16:58   0:00 docker-containerd --config /var/run/docker/containerd/containerd.toml
root      2803  0.0  0.0 112664   960 pts/0    R+   16:59   0:00 grep --color=auto docker
[root@hongwei-02 ~]# iptables -nvL
Chain INPUT (policy ACCEPT 215 packets, 43446 bytes)
 pkts bytes target     prot opt in     out     source               destination

Chain FORWARD (policy DROP 0 packets, 0 bytes)
 pkts bytes target     prot opt in     out     source               destination
    0     0 DOCKER-USER  all  --  *      *       0.0.0.0/0            0.0.0.0/0
    0     0 DOCKER-ISOLATION-STAGE-1  all  --  *      *       0.0.0.0/0            0.0.0.0/0
    0     0 ACCEPT     all  --  *      docker0  0.0.0.0/0            0.0.0.0/0            ctstate RELATED,ESTABLISHED
    0     0 DOCKER     all  --  *      docker0  0.0.0.0/0            0.0.0.0/0
    0     0 ACCEPT     all  --  docker0 !docker0  0.0.0.0/0            0.0.0.0/0
    0     0 ACCEPT     all  --  docker0 docker0  0.0.0.0/0            0.0.0.0/0

Chain OUTPUT (policy ACCEPT 239 packets, 39719 bytes)
 pkts bytes target     prot opt in     out     source               destination

Chain DOCKER (1 references)
 pkts bytes target     prot opt in     out     source               destination

Chain DOCKER-ISOLATION-STAGE-1 (1 references)
 pkts bytes target     prot opt in     out     source               destination
    0     0 DOCKER-ISOLATION-STAGE-2  all  --  docker0 !docker0  0.0.0.0/0            0.0.0.0/0
    0     0 RETURN     all  --  *      *       0.0.0.0/0            0.0.0.0/0

Chain DOCKER-ISOLATION-STAGE-2 (1 references)
 pkts bytes target     prot opt in     out     source               destination
    0     0 DROP       all  --  *      docker0  0.0.0.0/0            0.0.0.0/0
    0     0 RETURN     all  --  *      *       0.0.0.0/0            0.0.0.0/0

Chain DOCKER-USER (1 references)
 pkts bytes target     prot opt in     out     source               destination
    0     0 RETURN     all  --  *      *       0.0.0.0/0            0.0.0.0/0
[root@hongwei-02 ~]#
25.3 镜像管理
下载centos镜像
[root@hongwei-02 ~]#  docker pull centos
Using default tag: latest
latest: Pulling from library/centos
256b176beaff: Downloading   10.1MB/71.7MB
因为下载的centos镜像在国外网站,很慢,所以我们可以配置一个加速器,让速度提升起来
[root@hongwei-02 ~]# cat /etc/docker/daemon.json
{

 "registry-mirrors": ["https://registry.docker-cn.com"]

}
[root@hongwei-02 ~]#
再次下载镜像速度很快
比如我们也可以拉取ubuntu
[root@hongwei-02 ~]# docker pull ubuntu
Using default tag: latest
latest: Pulling from library/ubuntu
124c757242f8: Pull complete
9d866f8bde2a: Pull complete
fa3f2f277e67: Pull complete
398d32b153e8: Pull complete
afde35469481: Pull complete
Digest: sha256:de774a3145f7ca4f0bd144c7d4ffb2931e06634f11529653b23eba85aef8e378
Status: Downloaded newer image for ubuntu:latest
[root@hongwei-02 ~]#
查看本地的镜像
[root@hongwei-02 ~]# docker images
REPOSITORY          TAG                 IMAGE ID            CREATED             SIZE
centos              latest              5182e96772bf        4 weeks ago         200MB
[root@hongwei-02 ~]#
搜索镜像,其中xxx是关键词
[root@hongwei-02 ~]# docker search jumpserver
NAME                             DESCRIPTION                           STARS               OFFICIAL            AUTOMATED
jumpserver/jumpserver                                                  10
jiaxiangkong/jumpserver_docker   开源跳板机(堡垒机):认证,授权,审计,自动化运维             10
hhding/jumpserver-docker         ssh proxy node                        3                                       [OK]
njqaaa/jumpserver                jumpserver                            2                                       [OK]
jumpserver/guacamole             guacamole for jumpserver              1                                       [OK]
baselibrary/jumpserver           jumpserver                            1                                       [OK]
zhegao/jumpserver                Jumpserver 1.4.0                      1
jumpserver/allinone              jumpserver all in one                 1                                       [OK]
zqiannnn/jumpserver-ansible      JumpServer Ansible Addon              1                                       [OK]
kubernetesio/sshd-jumpserver     sshd-jumpserver                       0                                       [OK]
vikings/jumpserver                                                     0
zsjohny/jumpserver               bastion web ui                        0                                       [OK]
satoms/jumpserver                                                      0
jumpserver/python                                                      0
qiwihui/jumpserver               jumpserver docker                     0                                       [OK]
jumpserver/coco                                                        0
qq58945591/jumpserver            JumpServer集成coco和luna,使用nginx进行反向代…   0                                       [OK]
jumpserver/luna                                                        0
lc13579443/jumpserver            Jumpserver all in one Dockerfile      0                                       [OK]
ibuler/jumpserver                                                      0
qbtrade/jumpserver                                                     0
jumpserver/core                  Jumpserver Official Docker Image      0                                       [OK]
qbtrade/jumpserver_coco                                                0
jumpserver/base-env-alpine                                             0
mapsic/jumpserver                jumpserver                            0                                       [OK]
[root@hongwei-02 ~]#
给镜像打标签
[root@hongwei-02 ~]# docker tag centos hongwei_centos
[root@hongwei-02 ~]# docker images
REPOSITORY          TAG                 IMAGE ID            CREATED             SIZE
ubuntu              latest              cd6d8154f1e1        35 hours ago        84.1MB
centos              latest              5182e96772bf        4 weeks ago         200MB
hongwei_centos      latest              5182e96772bf        4 weeks ago         200MB
[root@hongwei-02 ~]#
可以看到有一个hongwei_centos镜像但是其实是跟centos一样的标签
我们可以把hongwei镜像做一个新的镜像,不跟centos一个id
[root@hongwei-02 ~]# docker tag centos test:180907
[root@hongwei-02 ~]# docker images
REPOSITORY          TAG                 IMAGE ID            CREATED             SIZE
ubuntu              latest              cd6d8154f1e1        35 hours ago        84.1MB
centos              latest              5182e96772bf        4 weeks ago         200MB
hongwei_centos      latest              5182e96772bf        4 weeks ago         200MB
test                180907              5182e96772bf        4 weeks ago         200MB
[root@hongwei-02 ~]#
把镜像启动为容器,-i表示让容器的标准输入打开,-t表示分配一个伪终端,-d表示后台启动,要把-i -t -d 放到镜像名字前面
[root@hongwei-02 ~]# docker run -itd centos
docker run -itd centos
1736cc3e215aa4b1fc2b82a0dde0e4ef8f2279d9046f5ee784ceab3a5ebd1e29
[root@hongwei-02 ~]#
查看运行的容器
[root@hongwei-02 ~]# docker ps
CONTAINER ID        IMAGE               COMMAND             CREATED             STATUS              PORTS               NAMES
1736cc3e215a        centos              "/bin/bash"         16 minutes ago      Up 13 minutes                           xenodochial_snyder
[root@hongwei-02 ~]#
加上-a选项后可以查看所有容器,包括未运行的
[root@hongwei-02 ~]# docker ps
CONTAINER ID        IMAGE               COMMAND             CREATED             STATUS              PORTS               NAMES
1736cc3e215a        centos              "/bin/bash"         16 minutes ago      Up 13 minutes                           xenodochial_snyder
[root@hongwei-02 ~]# docker ps -a
CONTAINER ID        IMAGE               COMMAND             CREATED             STATUS              PORTS               NAMES
1736cc3e215a        centos              "/bin/bash"         16 minutes ago      Up 14 minutes                           xenodochial_snyder
[root@hongwei-02 ~]#
用来删除指定镜像, 其中后面的参数可以是tag,如果是tag时,实际上是删除该tag。当后面的参数为镜像ID时,则会彻底删除整个镜像,所有标签也会一同删除
[root@hongwei-02 ~]# docker rmi hongwei_centos
Untagged: hongwei_centos:latest
[root@hongwei-02 ~]# docker images
REPOSITORY          TAG                 IMAGE ID            CREATED             SIZE
ubuntu              latest              cd6d8154f1e1        36 hours ago        84.1MB
centos              latest              5182e96772bf        4 weeks ago         200MB
test                180907              5182e96772bf        4 weeks ago         200MB
[root@hongwei-02 ~]#
25.4 通过容器创建镜像
其中xxxxx为容器id,这个id可以用docker ps查看,最后面的bash为进入容器后我们要执行的命令,这样就可以打开一个终端
[root@hongwei-02 ~]# docker exec -it 1736cc3e215a bash
[root@1736cc3e215a /]# ^C
[root@1736cc3e215a /]# df -h
Filesystem                                                                                          Size  Used Avail Use% Mounted on
/dev/mapper/docker-253:0-35873068-c7fe0c84fc7f7a039a553a0f5aedb2c47bb516a6e3689fa8d63ac0ef9c25de67   10G  243M  9.8G   3% /
tmpfs                                                                                                64M     0   64M   0% /dev
tmpfs                                                                                               493M     0  493M   0% /sys/fs/cgroup
/dev/mapper/centos-root                                                                              28G   11G   18G  39% /etc/hosts
shm                                                                                                  64M     0   64M   0% /dev/shm
tmpfs                                                                                               493M     0  493M   0% /proc/acpi
tmpfs                                                                                               493M     0  493M   0% /proc/scsi
tmpfs                                                                                               493M     0  493M   0% /sys/firmware
[root@1736cc3e215a /]#
[root@1736cc3e215a /]# free
              total        used        free      shared  buff/cache   available
Mem:        1009276      697824       63660        1872      247792      149176
Swap:       2097148       30020     2067128
[root@1736cc3e215a /]#
进入到该容器中,我们做一些变更,比如安装一些东西,然后针对这个容器进行创建新的镜像
[root@1736cc3e215a /]# yum install -y net-tools
Loaded plugins: fastestmirror, ovl
Determining fastest mirrors
已经在容器里执行了安装net-tools,要想保存变更过的容器,可以使用以下命令:
docker commit -m "描述" -a "描述" 容器id 新的容器名
-m:描述,可以写一些变更的信息
-a:描述,可以指定作者相关信息
当然,-a可以省略
[root@hongwei-02 ~]# docker commit -m "install net-tools" -a "hongwei" 1736cc3e215a centos_with_net-tools
sha256:3cf5264e5fc00dda337ea5118652a98b92e1ae42295b4c700cdc44c76d7479e8
[root@hongwei-02 ~]#
查看 一下
[root@hongwei-02 ~]# docker images
REPOSITORY              TAG                 IMAGE ID            CREATED             SIZE
centos_with_net-tools   latest              3cf5264e5fc0        19 seconds ago      293MB
ubuntu                  latest              cd6d8154f1e1        36 hours ago        84.1MB
centos                  latest              5182e96772bf        4 weeks ago         200MB
test                    180907              5182e96772bf        4 weeks ago         200MB
[root@hongwei-02 ~]#
运行centos_with_net-tools并进入容器:
[root@hongwei-02 ~]# docker run -it centos_with_net-tools
[root@a916b87dab6d /]#
[root@a916b87dab6d /]# ifconfig
eth0: flags=4163<UP,BROADCAST,RUNNING,MULTICAST> mtu 1500
inet 172.17.0.4 netmask 255.255.0.0 broadcast 172.17.255.255
ether 02:42:ac:11:00:04 txqueuelen 0 (Ethernet)
RX packets 8 bytes 648 (648.0 B)
RX errors 0 dropped 0 overruns 0 frame 0
TX packets 0 bytes 0 (0.0 B)
TX errors 0 dropped 0 overruns 0 carrier 0 collisions 0
lo: flags=73<UP,LOOPBACK,RUNNING> mtu 65536
inet 127.0.0.1 netmask 255.0.0.0
loop txqueuelen 0 (Local Loopback)
RX packets 0 bytes 0 (0.0 B)
RX errors 0 dropped 0 overruns 0 frame 0
TX packets 0 bytes 0 (0.0 B)
TX errors 0 dropped 0 overruns 0 carrier 0 collisions 0
[root@a916b87dab6d /]#
进入容器内也是可以联网的
[root@a916b87dab6d /]# ping www.qq.com
PING www.qq.com (111.30.132.101) 56(84) bytes of data.
64 bytes from 111.30.132.101 (111.30.132.101): icmp_seq=1 ttl=127 time=50.2 ms
64 bytes from 111.30.132.101 (111.30.132.101): icmp_seq=2 ttl=127 time=49.5 ms
64 bytes from 111.30.132.101 (111.30.132.101): icmp_seq=3 ttl=127 time=49.7 ms
64 bytes from 111.30.132.101 (111.30.132.101): icmp_seq=4 ttl=127 time=49.0 ms
64 bytes from 111.30.132.101 (111.30.132.101): icmp_seq=5 ttl=127 time=49.4 ms
64 bytes from 111.30.132.101 (111.30.132.101): icmp_seq=6 ttl=127 time=49.2 ms
64 bytes from 111.30.132.101 (111.30.132.101): icmp_seq=7 ttl=127 time=49.3 ms
64 bytes from 111.30.132.101 (111.30.132.101): icmp_seq=8 ttl=127 time=49.2 ms
64 bytes from 111.30.132.101 (111.30.132.101): icmp_seq=9 ttl=127 time=72.0 ms
64 bytes from 111.30.132.101 (111.30.132.101): icmp_seq=10 ttl=127 time=49.1 ms
64 bytes from 111.30.132.101 (111.30.132.101): icmp_seq=11 ttl=127 time=49.0 ms
64 bytes from 111.30.132.101 (111.30.132.101): icmp_seq=12 ttl=127 time=48.9 ms
64 bytes from 111.30.132.101 (111.30.132.101): icmp_seq=13 ttl=127 time=49.2 ms
64 bytes from 111.30.132.101 (111.30.132.101): icmp_seq=14 ttl=127 time=49.6 ms
^C
--- www.qq.com ping statistics ---
14 packets transmitted, 14 received, 0% packet loss, time 22408ms
rtt min/avg/max/mdev = 48.973/50.993/72.035/5.846 ms
[root@a916b87dab6d /]#
25.5 通过模板创建镜像
下载一个模版
[root@hongwei-02 ~]# curl -O http://openvz.org/Download/templates/precreated
  % Total    % Received % Xferd  Average Speed   Time    Time     Time  Current
                                 Dload  Upload   Total   Spent    Left  Speed
100   319  100   319    0     0     46      0  0:00:06  0:00:06 --:--:--    93
[root@hongwei-02 ~]#
然后去浏览器下载一个tar.gz
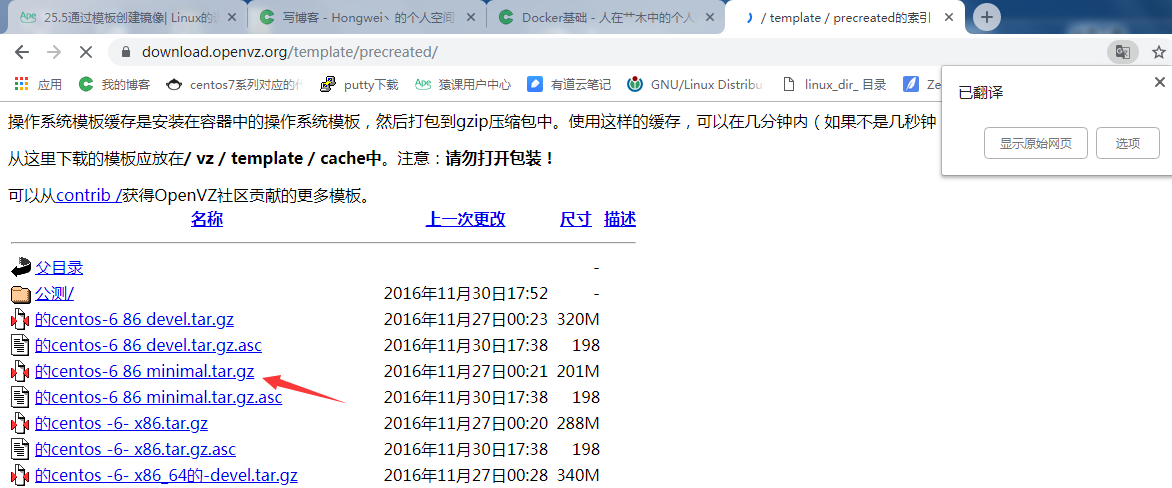
然后在传到虚拟机上
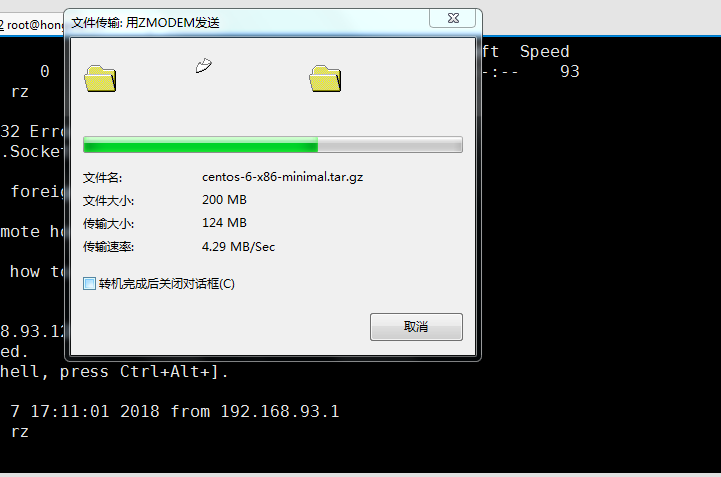
[root@hongwei-02 ~]# ls
25Docker入门.pptx  centos-6-x86-minimal.tar.gz  php-7.1.6.tar.bz2  temp
aming.txt          log                          precreated         zabbix-release-3.2-1.el7.noarch.rpm
anaconda-ks.cfg    logs                         shell
[root@hongwei-02 ~]#
导入模板命令:cat 模版 | docker import - 镜像名称
[root@hongwei-02 ~]# cat centos-6-x86-minimal.tar.gz|docker import - centos6
sha256:4e9eef98b65cb07ced6c7899aec4ae049e4a1efc394239c00b8ecf3c29143c23
[root@hongwei-02 ~]#
[root@hongwei-02 ~]# docker images
REPOSITORY              TAG                 IMAGE ID            CREATED             SIZE
centos6                 latest              4e9eef98b65c        37 seconds ago      512MB
centos_with_net-tools   latest              3cf5264e5fc0        About an hour ago   293MB
ubuntu                  latest              cd6d8154f1e1        37 hours ago        84.1MB
centos                  latest              5182e96772bf        4 weeks ago         200MB
test                    180907              5182e96772bf        4 weeks ago         200MB
[root@hongwei-02 ~]#
把现有镜像,导出为一个文件:
[root@hongwei-02 ~]# docker save -o centos_with_nettool.tar centos6
[root@hongwei-02 ~]#
我们还可以用该文件恢复本地镜像:
[root@hongwei-02 ~]# docker load --input centos_with_nettool.tar
Loaded image: centos6:latest
[root@hongwei-02 ~]#
或者
[root@hongwei-02 ~]# docker load < centos_with_nettool.tar
Loaded image: centos6:latest
[root@hongwei-02 ~]#
可以把自己的镜像传到dockerhub官方网站上去,但前提是需要先注册一个用户,后续如果有需求再研究吧
25.6 容器管理
创建一个容器,但该容器并没有启动
[root@hongwei-02 ~]# docker create -it centos6 bash
93f041e868539d3ed0556dcf0330733f59b2c2f4322a6e93a0312599394eccc0
[root@hongwei-02 ~]#
可以使用-a选项来查看
[root@hongwei-02 ~]# docker ps -a
CONTAINER ID        IMAGE                   COMMAND             CREATED              STATUS                       PORTS               NAMES
93f041e86853        centos6                 "bash"              About a minute ago   Created                                          xenodochial_meitner
a916b87dab6d        centos_with_net-tools   "/bin/bash"         15 hours ago         Exited (130) 15 hours ago                        cranky_noether
75f6208e2a3f        centos_with_net-tools   "/bin/bash"         15 hours ago         Exited (255) 4 minutes ago                       hungry_chebyshev
1736cc3e215a        centos                  "/bin/bash"         16 hours ago         Exited (255) 4 minutes ago                       xenodochial_snyder
[root@hongwei-02 ~]#
启动容器后,可以使用 docker ps 查看到,有start 就有stop,和restart
[root@hongwei-02 ~]# docker start 93f041e86853
93f041e86853
[root@hongwei-02 ~]# docker ps
CONTAINER ID        IMAGE               COMMAND             CREATED             STATUS              PORTS               NAMES
93f041e86853        centos6             "bash"              2 minutes ago       Up 5 seconds                            xenodochial_meitner
[root@hongwei-02 ~]#
之前我们使用的docker run 相当于先create再start
[root@hongwei-02 ~]#  docker run -it centos bash
[root@0930199d3bb9 /]#
直接可以进入容器了。要想退出可以使用exit命令或者ctrl+d组合键,退出后容器也就停止了。
停止容器
docker stop 容器id,比如:
[root@hongwei-02 ~]# docker stop 93f041e86853
93f041e86853
[root@hongwei-02 ~]# docker ps
CONTAINER ID        IMAGE               COMMAND             CREATED             STATUS              PORTS               NAMES
[root@hongwei-02 ~]# docker ps -a
CONTAINER ID        IMAGE                   COMMAND             CREATED              STATUS                        PORTS               NAMES
0930199d3bb9        centos                  "bash"              About a minute ago   Exited (0) 35 seconds ago                         goofy_mendeleev
93f041e86853        centos6                 "bash"              5 minutes ago        Exited (137) 17 seconds ago                       xenodochial_meitner
a916b87dab6d        centos_with_net-tools   "/bin/bash"         15 hours ago         Exited (130) 15 hours ago                         cranky_noether
75f6208e2a3f        centos_with_net-tools   "/bin/bash"         15 hours ago         Exited (255) 9 minutes ago                        hungry_chebyshev
1736cc3e215a        centos                  "/bin/bash"         16 hours ago         Exited (255) 9 minutes ago                        xenodochial_snyder
[root@hongwei-02 ~]#
给容器自定义名字
[root@hongwei-02 ~]# docker run --name liuye -itd centos bash
20e1766af1c72f63cf05e8326c5711a7296f89f71d72038c3417fa2452039bb0
[root@hongwei-02 ~]#
容器退出后直接删除
[root@hongwei-02 ~]# docker run --rm -itd centos bash  -c "sleep 5"
19d3423a301c3ddd31db5885fe53bb7c47d9b6197c57e7a52e74012f1990d3f7
[root@hongwei-02 ~]#
[root@hongwei-02 ~]# docker ps
CONTAINER ID        IMAGE               COMMAND             CREATED             STATUS              PORTS               NAMES
20e1766af1c7        centos              "bash"              56 seconds ago      Up 53 seconds                           liuye
[root@hongwei-02 ~]#
获取容器的历史信息
[root@hongwei-02 ~]# docker run -itd centos bash -c "echo 123"
79f15976fabb63336be7411252a647cd162f939d884c47497a00110a0b3ff9c2
[root@hongwei-02 ~]# docker logs 79f15976fab
123
[root@hongwei-02 ~]#
进入后台运行的容器
[root@hongwei-02 ~]# docker run --name yeye -itd centos
3ba69ed4b222927febcac58959ebe0023a4e78642f2fce3256b7839f5ee277b7
[root@hongwei-02 ~]# docker attach yeye
[root@3ba69ed4b222 /]#
此方法不太好,因为退出之后,容器也退出了。所以建议使用exec选项:
[root@hongwei-02 ~]# docker run -itd centos bash
b2379bb3dc585a3b03e6ef1dd183f586d38933bce9bb65457a6ce1ee3a47728b
[root@hongwei-02 ~]# docker exec -it b2379bb3dc585a3b03e6e bash
[root@b2379bb3dc58 /]#
删除容器
docker rm -f 容器id,-f强制删除
[root@hongwei-02 ~]# docker ps
CONTAINER ID        IMAGE               COMMAND             CREATED              STATUS              PORTS               NAMES
b2379bb3dc58        centos              "bash"              About a minute ago   Up 58 seconds                           compassionate_lumiere
20e1766af1c7        centos              "bash"              7 minutes ago        Up 7 minutes                            liuye
[root@hongwei-02 ~]# docker rm -f 20e1766af1c7
20e1766af1c7
[root@hongwei-02 ~]# docker ps
CONTAINER ID        IMAGE               COMMAND             CREATED              STATUS              PORTS               NAMES
b2379bb3dc58        centos              "bash"              About a minute ago   Up About a minute                       compassionate_lumiere
[root@hongwei-02 ~]#
容器的导出
[root@hongwei-02 ~]# docker run -itd centos bash
8b6fb3fc7dc44a4d9b2fa668144e855524249a4ffce4ed2f5c64ee0d45f487f3
[root@hongwei-02 ~]# docker export 8b6fb3fc7dc4 > mycentos.tar
[root@hongwei-02 ~]#
容器的导入:cat 文件名 | docker import - 自定义的容器名
[root@hongwei-02 ~]# cat mycentos.tar | docker import - test
sha256:dd4c8af22d64ff98f24cb468128264b21bb3c377ec368b80b627943c02a93978
[root@hongwei-02 ~]#
25.7 仓库管理
1、下载镜像
docker pull 镜像名
使用registry搭建本地私有仓库。
[root@hongwei-02 ~]# docker pull registry
Using default tag: latest
latest: Pulling from library/registry
4064ffdc82fe: Pull complete
c12c92d1c5a2: Pull complete
4fbc9b6835cc: Pull complete
765973b0f65f: Pull complete
3968771a7c3a: Pull complete
Digest: sha256:51bb55f23ef7e25ac9b8313b139a8dd45baa832943c8ad8f7da2ddad6355b3c8
Status: Downloaded newer image for registry:latest
[root@hongwei-02 ~]#
启动registry
[root@hongwei-02 ~]# docker run -d -p 5000:5000 registry
cc55a87409b7dc14bca571a2673c8a024049a893bacc6646287bea44c230f0f8
[root@hongwei-02 ~]#
-p:端口映射,宿主机的端口:容器监听的端口。
[root@hongwei-02 ~]# docker ps -a
CONTAINER ID        IMAGE                   COMMAND                  CREATED             STATUS                        PORTS                    NAMES
cc55a87409b7        registry                "/entrypoint.sh /etc…"   30 seconds ago      Up 25 seconds                 0.0.0.0:5000->5000/tcp   distracted_visvesvaraya
8b6fb3fc7dc4        centos                  "bash"                   4 minutes ago       Up 4 minutes                                           festive_pare
b2379bb3dc58        centos                  "bash"                   6 minutes ago       Up 6 minutes                                           compassionate_lumiere
3ba69ed4b222        centos                  "/bin/bash"              7 minutes ago       Exited (0) 6 minutes ago                               yeye
79f15976fabb        centos                  "bash -c 'echo 123'"     9 minutes ago       Exited (0) 9 minutes ago                               vibrant_colden
0930199d3bb9        centos                  "bash"                   16 minutes ago      Exited (0) 15 minutes ago                              goofy_mendeleev
93f041e86853        centos6                 "bash"                   20 minutes ago      Exited (137) 14 minutes ago                            xenodochial_meitner
a916b87dab6d        centos_with_net-tools   "/bin/bash"              15 hours ago        Exited (130) 15 hours ago                              cranky_noether
75f6208e2a3f        centos_with_net-tools   "/bin/bash"              15 hours ago        Exited (255) 24 minutes ago                            hungry_chebyshev
1736cc3e215a        centos                  "/bin/bash"              16 hours ago        Exited (255) 24 minutes ago                            xenodochial_snyder
[root@hongwei-02 ~]#
访问
[root@hongwei-02 ~]# curl 127.0.0.1:5000/v2/_catalog
{"repositories":[]}
[root@hongwei-02 ~]#
仓库是新建的,为空。
把镜像传到仓库。
先把要上传的镜像打标签:
[root@hongwei-02 ~]# docker images
REPOSITORY              TAG                 IMAGE ID            CREATED             SIZE
test                    latest              dd4c8af22d64        4 minutes ago       200MB
centos6                 latest              4e9eef98b65c        15 hours ago        512MB
centos_with_net-tools   latest              3cf5264e5fc0        15 hours ago        293MB
ubuntu                  latest              cd6d8154f1e1        2 days ago          84.1MB
centos                  latest              5182e96772bf        4 weeks ago         200MB
test                    180907              5182e96772bf        4 weeks ago         200MB
registry                latest              b2b03e9146e1        2 months ago        33.3MB
[root@hongwei-02 ~]# docker tag centos 192.168.93.128:5000/centos7
[root@hongwei-02 ~]# docker images
REPOSITORY                    TAG                 IMAGE ID            CREATED             SIZE
test                          latest              dd4c8af22d64        5 minutes ago       200MB
centos6                       latest              4e9eef98b65c        15 hours ago        512MB
centos_with_net-tools         latest              3cf5264e5fc0        15 hours ago        293MB
ubuntu                        latest              cd6d8154f1e1        2 days ago          84.1MB
192.168.93.128:5000/centos7   latest              5182e96772bf        4 weeks ago         200MB
centos                        latest              5182e96772bf        4 weeks ago         200MB
test                          180907              5182e96772bf        4 weeks ago         200MB
registry                      latest              b2b03e9146e1        2 months ago        33.3MB
[root@hongwei-02 ~]#
上传:
[root@hongwei-02 ~]# docker push 192.168.93.128:5000/centos7
The push refers to repository [192.168.93.128:5000/centos7]
Get https://192.168.93.128:5000/v2/: http: server gave HTTP response to HTTPS client
[root@hongwei-02 ~]#
报错,修改配置文件/etc/docker/daemon.json ,添加私有仓库地址:"insecure-registries": ["192.168.93.128:5000"]
[root@hongwei-02 ~]# vim /etc/docker/daemon.json

{"insecure-registries": ["192.168.10.101:5000"]}
重启docker:
[root@hongwei-02 ~]# systemctl restart docker启动容器,重新推送:
因为前面重启了docker,所以容器会停止,必须启动容器才能推送。
[root@hongwei-02 ~]# docker ps -a
CONTAINER ID        IMAGE                   COMMAND                  CREATED             STATUS                           PORTS               NAMES
cc55a87409b7        registry                "/entrypoint.sh /etc…"   31 minutes ago      Exited (2) 25 minutes ago                            distracted_visvesvaraya
8b6fb3fc7dc4        centos                  "bash"                   35 minutes ago      Exited (137) 25 minutes ago                          festive_pare
b2379bb3dc58        centos                  "bash"                   37 minutes ago      Exited (137) 25 minutes ago                          compassionate_lumiere
3ba69ed4b222        centos                  "/bin/bash"              37 minutes ago      Exited (0) 37 minutes ago                            yeye
79f15976fabb        centos                  "bash -c 'echo 123'"     40 minutes ago      Exited (0) 40 minutes ago                            vibrant_colden
0930199d3bb9        centos                  "bash"                   About an hour ago   Exited (0) 45 minutes ago                            goofy_mendeleev
93f041e86853        centos6                 "bash"                   About an hour ago   Exited (137) 45 minutes ago                          xenodochial_meitner
a916b87dab6d        centos_with_net-tools   "/bin/bash"              16 hours ago        Exited (130) 16 hours ago                            cranky_noether
75f6208e2a3f        centos_with_net-tools   "/bin/bash"              16 hours ago        Exited (255) About an hour ago                       hungry_chebyshev
1736cc3e215a        centos                  "/bin/bash"              17 hours ago        Exited (255) About an hour ago                       xenodochial_snyder
[root@hongwei-02 ~]# docker start cc55a87409b7
cc55a87409b7
[root@hongwei-02 ~]# docker push 192.168.93.128:5000/centos7
The push refers to repository [192.168.93.128:5000/centos7]
1d31b5806ba4: Pushed
latest: digest: sha256:fc2476ccae2a5186313f2d1dadb4a969d6d2d4c6b23fa98b6c7b0a1faad67685 size: 529
[root@hongwei-02 ~]#
查看一下:
[root@hongwei-02 ~]# curl 127.0.0.1:5000/v2/_catalog
{"repositories":["centos7"]}
[root@hongwei-02 ~]#
推送一个ubuntu:
[root@hongwei-02 ~]# docker images
REPOSITORY                    TAG                 IMAGE ID            CREATED             SIZE
test                          latest              dd4c8af22d64        About an hour ago   200MB
centos6                       latest              4e9eef98b65c        15 hours ago        512MB
centos_with_net-tools         latest              3cf5264e5fc0        16 hours ago        293MB
ubuntu                        latest              cd6d8154f1e1        2 days ago          84.1MB
test                          180907              5182e96772bf        4 weeks ago         200MB
192.168.93.128:5000/centos7   latest              5182e96772bf        4 weeks ago         200MB
centos                        latest              5182e96772bf        4 weeks ago         200MB
registry                      latest              b2b03e9146e1        2 months ago        33.3MB
[root@hongwei-02 ~]# docker tag ubuntu 192.168.93.128:5000/ubuntu
[root@hongwei-02 ~]#
[root@hongwei-02 ~]# docker push 192.168.93.128:5000/ubuntu
The push refers to repository [192.168.93.128:5000/ubuntu]
8d7ea83e3c62: Pushed
6a061ee02432: Pushed
f73b2816c52a: Pushed
6267b420796f: Pushed
a30b835850bf: Pushed
latest: digest: sha256:a819482773d99bbbb570626b6101fa37cd93a678581ee564e89feae903c95f20 size: 1357
[root@hongwei-02 ~]# curl 127.0.0.1:5000/v2/_catalog
{"repositories":["centos7","ubuntu"]}
[root@hongwei-02 ~]#
下载私有仓库的镜像
[root@hongwei-02 ~]# docker pull 192.168.93.128:5000/ubuntu
Using default tag: latest
latest: Pulling from ubuntu
Digest: sha256:a819482773d99bbbb570626b6101fa37cd93a678581ee564e89feae903c95f20
Status: Image is up to date for 192.168.93.128:5000/ubuntu:latest
[root@hongwei-02 ~]#
25.8 数据管理
在容器里的数据,一旦容器停止或者删除,则数据就丢失了,因此可以挂载宿主机的目录到容器里面,这样就可以把容器的数据保存在宿主机了。
挂载本地目录到容器里
[root@hongwei-02 ~]# touch haha > /data/1.txt
[root@hongwei-02 ~]# docker run -tid -v /data/:/mydata centos bash
b63bca0d72286d01cea7a53254f0fb8725b8d3426ff92a860bc9b28622790481
[root@hongwei-02 ~]#
-v:指定挂载目录,:前面的是宿主机本地目录,:后面的是容器的目录,会自动创建,无需事先创建。
进入容器,查看一下:
[root@hongwei-02 ~]# docker exec -it b63bca0d72286d bash
[root@b63bca0d7228 /]# ls
anaconda-post.log  dev  home  lib64  mnt     opt   root  sbin  sys  usr
bin                etc  lib   media  mydata  proc  run   srv   tmp  var
[root@b63bca0d7228 /]# ls /mydata/
1.txt  ftp  gitroot  mariadb  mongodb  mysql  redis_data  sample.git  wwwroot
[root@b63bca0d7228 /]#
[root@b63bca0d7228 /]#  mkdir /mydata/haha
[root@b63bca0d7228 /]#
本地查看:
[root@hongwei-02 ~]# ll /data/
总用量 8
-rw-r--r--  1 root     root        0 9月   8 10:27 1.txt
drwxr-xr-x. 2 pure-ftp pure-ftp   20 7月  15 22:33 ftp
drwxr-xr-x  3 root     root       23 8月  29 15:35 gitroot
drwxr-xr-x  2 root     root        6 9月   8 10:29 haha
drwx------. 5 mysql    root     4096 7月   2 15:17 mariadb
drwxr-xr-x  7 root     root       71 8月  28 01:33 mongodb
drwx------. 9 mysql    mysql    4096 9月   8 10:02 mysql
drwxr-xr-x  6 root     root       50 8月  25 09:50 redis_data
drwxr-xr-x  7 git      git       111 8月  29 15:21 sample.git
drwxr-xr-x. 8 root     root       92 7月  17 18:06 wwwroot
[root@hongwei-02 ~]#
挂载数据卷
挂载目录的时候,可以指定容器的name,如果不指定则会随机定义。可以使用docker ps查看,即最右侧一列。
[root@hongwei-02 ~]# docker ps
CONTAINER ID        IMAGE               COMMAND                  CREATED             STATUS              PORTS                    NAMES
b63bca0d7228        centos              "bash"                   3 minutes ago       Up 3 minutes                                 nifty_brahmagupta
cc55a87409b7        registry            "/entrypoint.sh /etc…"   About an hour ago   Up 9 minutes        0.0.0.0:5000->5000/tcp   distracted_visvesvaraya
[root@hongwei-02 ~]#
挂载数据卷:
[root@hongwei-02 ~]# docker run -itd --volumes-from distracted_visvesvaraya centos bash
4f0c3bbe1ae89fa1f38b148f4e45433b895c662724ad757e5ac683ea41672ed9
[root@hongwei-02 ~]#
这样使用centos镜像创建了新的容器,并且使用distracted_visvesvaraya容器的数据卷
3、定义数据卷容器
有时候需要多个容器之间相互共享数据,类似于Linux的nfs,所以可以搭建一个专门的数据卷容器,然后其他容器之间挂载该数据卷,
建立数据卷容器
[root@hongwei-02 ~]# docker run -itd -v /mydata/ --name testvol centos bash
b0752aad78823b8b1c94ea94f8491c081b1c75cc9c9a93cce7e8cf2230517047
[root@hongwei-02 ~]# 注意:这里的/mydata是容器里的目录,并非宿主机本地的目录。
其他容器挂载此数据卷
[root@hongwei-02 ~]# docker run -itd --volumes-from testvol centos bash
5ca422ab48add775d08f1a518b1b601cd3b1093184a7f13539ed6ce56d28f938
[root@hongwei-02 ~]#
25.9 数据卷备份恢复
备份:
(1)宿主机创建一个备份目录
[root@hongwei-02 ~]# mkdir /vol_data_backup
[root@hongwei-02 ~]#
(2)创建一个容器
首先是要testvol数据卷新开一个容器,同时还需把宿主机本地的/vol_data_backup目录挂载到该容器的/backup目录中,然后再把/home目录的文件打包成data.tar文件放到/backup目录中。
[root@hongwei-02 ~]# docker run --volumes-from testvol -v /vol_data_backup:/backup centos tar cvf /backup/data.tar /home/
tar: Removing leading `/' from member names
/home/
[root@hongwei-02 ~]# ls /vol_data_backup/
data.tar
[root@hongwei-02 ~]#
2、恢复
先新建一个数据卷容器,再建一个新的容器并挂载该数据卷容器,然后把tar包解包。
创建新的数据卷容器(创建的数据卷目录名称必须和备份的数据卷名称一致):
[root@hongwei-02 ~]# docker run -itd -v /backup --name testvol2 centos bash
f623c9eb08eaa8d2d3b587598e01e4fce2bb910461ef8aef4c3bf2b1c1a344b5
[root@hongwei-02 ~]#
挂载数据卷新建容器,并解包:
[root@hongwei-02 ~]# docker run -it --volumes-from testvol2 -v /vol_data_backup/:/backup  centos bash
[root@e37a35a663c0 /]# ls
anaconda-post.log  bin  etc   lib    media  opt   root  sbin  sys  usr
backup             dev  home  lib64  mnt    proc  run   srv   tmp  var
[root@e37a35a663c0 /]# mkdir haha
[root@e37a35a663c0 /]# tar xf backup/data.tar -C haha/
[root@e37a35a663c0 /]# ls /haha
home
[root@e37a35a663c0 /]#
25.10 docker网络模式
docker网络模式有host、none、container、bridge模式。
·host模式,使用docker run时使用--net=host可以指定。docker使用的网络实际上和宿主机的一样,在容器内看到的网卡ip是宿主机的ip。
·container模式,设置:--net=container:容器id/容器名,多个容器使用共同的网络,看到的ip是一样的
·none模式,设置:--net=none,此模式下,不会配置任何网络
bridge模式,设置:--net=bridge。不指定模式,默认情况下就使用bridge模式。此模式会为每个容器分配一个独立的Network Namespace。类似于vmware的nat网络模式。同一个宿主机上的所有容器会在同一个网段下,相互之间可以通信。
1、外面网络访问容器
(1)新建一个容器。使用默认网络模式。
[root@hongwei-02 ~]# docker images
REPOSITORY                    TAG                 IMAGE ID            CREATED             SIZE
test                          latest              dd4c8af22d64        About an hour ago   200MB
centos6                       latest              4e9eef98b65c        16 hours ago        512MB
centos_with_net-tools         latest              3cf5264e5fc0        17 hours ago        293MB
192.168.93.128:5000/ubuntu    latest              cd6d8154f1e1        2 days ago          84.1MB
ubuntu                        latest              cd6d8154f1e1        2 days ago          84.1MB
test                          180907              5182e96772bf        4 weeks ago         200MB
192.168.93.128:5000/centos7   latest              5182e96772bf        4 weeks ago         200MB
centos                        latest              5182e96772bf        4 weeks ago         200MB
registry                      latest              b2b03e9146e1        2 months ago        33.3MB
[root@hongwei-02 ~]# docker run -itd 5182e96772bf bash
8315431f88575b78ddc78a182d0268ef31bb7ab07c6210300f4f1c6878c61ad4
进入容器,安装nginx服务
[root@hongwei-02 ~]# docker exec -it ddb28881218 bash
[root@ddb288812186 /]# yum install -y epel-release
Loaded plugins: fastestmirror, ovl
Determining fastest mirrors
 * base: mirrors.aliyun.com
 * extras: mirrors.aliyun.com
 * updates: mirrors.aliyun.com
base                                                                              | 3.6 kB  00:00:00
extras                                                                            | 3.4 kB  00:00:00
updates                                                                           | 3.4 kB  00:00:00
(1/4): extras/7/x86_64/primary_db                                                 | 187 kB  00:00:06
(2/4): base/7/x86_64/group_gz                                                     | 166 kB  00:00:06
(3/4): updates/7/x86_64/primary_db                                                | 5.2 MB  00:00:07
(4/4): base/7/x86_64/primary_db                                                   | 5.9 MB  00:01:07
Resolving Dependencies
--> Running transaction check
---> Package epel-release.noarch 0:7-11 will be installed
--> Finished Dependency Resolution

Dependencies Resolved

=========================================================================================================
 Package                      Arch                   Version                Repository              Size
=========================================================================================================
Installing:
 epel-release                 noarch                 7-11                   extras                  15 k

Transaction Summary
=========================================================================================================
Install  1 Package

Total download size: 15 k
Installed size: 24 k
Downloading packages:
warning: /var/cache/yum/x86_64/7/extras/packages/epel-release-7-11.noarch.rpm: Header V3 RSA/SHA256 Signature, key ID f4a80eb5: NOKEY
Public key for epel-release-7-11.noarch.rpm is not installed
epel-release-7-11.noarch.rpm                                                      |  15 kB  00:00:06
Retrieving key from file:///etc/pki/rpm-gpg/RPM-GPG-KEY-CentOS-7
Importing GPG key 0xF4A80EB5:
 Userid     : "CentOS-7 Key (CentOS 7 Official Signing Key) <security@centos.org>"
 Fingerprint: 6341 ab27 53d7 8a78 a7c2 7bb1 24c6 a8a7 f4a8 0eb5
 Package    : centos-release-7-5.1804.1.el7.centos.x86_64 (@Updates)
 From       : /etc/pki/rpm-gpg/RPM-GPG-KEY-CentOS-7
Running transaction check
Running transaction test
Transaction test succeeded
Running transaction
  Installing : epel-release-7-11.noarch                                                              1/1
  Verifying  : epel-release-7-11.noarch                                                              1/1

Installed:
  epel-release.noarch 0:7-11

Complete!
[root@ddb288812186 /]# yum install -y nginx
退出容器,把容器导出为镜像
[root@ddb288812186 /]# exit
[root@hongwei-02 ~]# docker commit -m "install nginx"  -a "haha" ddb288812186 centos_with_nginx
sha256:36bd1498a1774c02fdc4b4da1b6505026846d354fda81f9fbb29197b3676aa69
[root@hongwei-02 ~]#
查看一下:
[root@hongwei-02 ~]# docker images
REPOSITORY                    TAG                 IMAGE ID            CREATED             SIZE
centos_with_nginx             latest              36bd1498a177        45 seconds ago      408MB
test                          latest              dd4c8af22d64        About an hour ago   200MB
centos6                       latest              4e9eef98b65c        16 hours ago        512MB
centos_with_net-tools         latest              3cf5264e5fc0        17 hours ago        293MB
192.168.93.128:5000/ubuntu    latest              cd6d8154f1e1        2 days ago          84.1MB
ubuntu                        latest              cd6d8154f1e1        2 days ago          84.1MB
192.168.93.128:5000/centos7   latest              5182e96772bf        4 weeks ago         200MB
centos                        latest              5182e96772bf        4 weeks ago         200MB
test                          180907              5182e96772bf        4 weeks ago         200MB
registry                      latest              b2b03e9146e1        2 months ago        33.3MB
[root@hongwei-02 ~]#
使用刚才导出的镜像创建容器,并做端口映射
将宿主机的8088端口映射到容器的80端口。
[root@hongwei-02 ~]# docker run -itd -p 8088:80 centos_with_nginx bash
5cc349fc6cd1bfdbb8d078c232002f3743353a02a926d7aff386276f456fa484
[root@hongwei-02 ~]#
25.11 opration not permitted
新建的容器,启动nginx或httpd服务时会报错,如下所示:
[root@hongwei-02 ~]# docker exec -it 5cc349fc6cd1b bash
[root@5cc349fc6cd1 /]# systemctl start nginx
Failed to get D-Bus connection: Operation not permitted
[root@5cc349fc6cd1 /]#
这是因为dbus-daemon没有启动。解法方法:启动容器时加上:--privileged -e "container=docker",并且最后的命令bash改为/usr/sbin/init
把上面创建的容器(cc4823f4e7756f7c9 )删除之后再创建新的容器。
[root@hongwei-02 ~]# docker rm -f 5cc349fc6cd1
5cc349fc6cd1
[root@hongwei-02 ~]# docker run -itd --privileged -e "container=docker"  -p 8088:80 centos_with_nginx /usr/sbin/init
5ffb76939a4f1bbb5e1986a3702f08fe540fa605cbe7bc1522aa9f4b41ccecd1
[root@hongwei-02 ~]#
进入容器,启动nginx:
[root@hongwei-02 ~]# docker exec -it 5ffb76939a bash
[root@5ffb76939a4f /]# systemctl start nginx
[root@5ffb76939a4f /]#
[root@5ffb76939a4f /]# ps aux|grep nginx
root        87  0.0  0.2 120812  2088 ?        Ss   03:02   0:00 nginx: master process /usr/sbin/nginx
nginx       88  0.0  0.3 121276  3116 ?        S    03:02   0:00 nginx: worker process
root        90  0.0  0.0   9092   664 pts/1    S+   03:02   0:00 grep --color=auto nginx
[root@5ffb76939a4f /]#
25.12 配置桥接网络
为了使用本地网络中的机器和docker容器更方便的通信,通常会有将docker容器配置到和主机同一网段的需求。
只要将docker容器和宿主机的网卡桥连起来,再给docker容器配置ip即可。
1、宿主机网络配置
修改ens33的配置文件,配置br0文件。
[root@hongwei-02 ~]# cd /etc/sysconfig/network-scripts/
[root@hongwei-02 network-scripts]# ls
ifcfg-ens33  ifdown-ipv6    ifdown-TeamPort  ifup-ippp   ifup-routes       network-functions
ifcfg-lo     ifdown-isdn    ifdown-tunnel    ifup-ipv6   ifup-sit          network-functions-ipv6
ifdown       ifdown-post    ifup             ifup-isdn   ifup-Team
ifdown-bnep  ifdown-ppp     ifup-aliases     ifup-plip   ifup-TeamPort
ifdown-eth   ifdown-routes  ifup-bnep        ifup-plusb  ifup-tunnel
ifdown-ib    ifdown-sit     ifup-eth         ifup-post   ifup-wireless
ifdown-ippp  ifdown-Team    ifup-ib          ifup-ppp    init.ipv6-global
[root@hongwei-02 network-scripts]# cp ifcfg-ens33 ifcfg-br0
[root@hongwei-02 network-scripts]#
ens33配置文件
[root@hongwei-02 network-scripts]# vim ifcfg-ens33

TYPE=Ethernet
BOOTPROTO=static
DEFROUTE=yes
PEERDNS=yes
PEERROUTES=yes
IPV4_FAILURE_FATAL=no
IPV6INIT=yes
IPV6_AUTOCONF=yes
IPV6_DEFROUTE=yes
IPV6_PEERDNS=yes
IPV6_PEERROUTES=yes
IPV6_FAILURE_FATAL=no
NAME=ens33
#UUID=1a6dc668-1e56-4388-af94-c2f013a74b14
DEVICE=ens33
ONBOOT=yes
#IPADDR=192.168.93.128
#NETMASK=255.255.255.0
#GATEWAY=192.168.93.2
#DNS1=119.29.29.29
BRIDGE=br0
br0配置文件:
[root@hongwei-02 network-scripts]# vim ifcfg-br0

TYPE=Bridge
BOOTPROTO=static
DEFROUTE=yes
PEERDNS=yes
PEERROUTES=yes
IPV4_FAILURE_FATAL=no
IPV6INIT=yes
IPV6_AUTOCONF=yes
IPV6_DEFROUTE=yes
IPV6_PEERDNS=yes
IPV6_PEERROUTES=yes
IPV6_FAILURE_FATAL=no
NAME=br0
UUID=1a6dc668-1e56-4388-af94-c2f013a74b14
DEVICE=br0
ONBOOT=yes
IPADDR=192.168.93.128
NETMASK=255.255.255.0
GATEWAY=192.168.93.2
DNS1=119.29.29.29
重启网络:
[root@hongwei-02 ~]# systemctl restart network
[root@hongwei-02 ~]#
查看网络:
[root@hongwei-02 ~]# ip addr
1: lo: <LOOPBACK,UP,LOWER_UP> mtu 65536 qdisc noqueue state UNKNOWN
    link/loopback 00:00:00:00:00:00 brd 00:00:00:00:00:00
    inet 127.0.0.1/8 scope host lo
       valid_lft forever preferred_lft forever
    inet6 ::1/128 scope host
       valid_lft forever preferred_lft forever
2: ens33: <BROADCAST,MULTICAST,UP,LOWER_UP> mtu 1500 qdisc pfifo_fast state UP qlen 1000
    link/ether 00:0c:29:a8:7a:67 brd ff:ff:ff:ff:ff:ff
    inet 192.168.93.180/24 brd 192.168.93.255 scope global dynamic ens33
       valid_lft 1785sec preferred_lft 1785sec
4: br0: <NO-CARRIER,BROADCAST,MULTICAST,UP> mtu 1500 qdisc noqueue state DOWN
    link/ether ba:72:8e:17:0f:52 brd ff:ff:ff:ff:ff:ff
    inet 192.168.93.128/24 brd 192.168.93.255 scope global br0
       valid_lft forever preferred_lft forever
[root@hongwei-02 ~]#
安装pipework
[root@hongwei-02 ~]# yum install git -y
使用git下载pipework
[root@hongwei-02 ~]# git clone https://github.com/jpetazzo/pipework
正克隆到 'pipework'...
remote: Counting objects: 501, done.
remote: Total 501 (delta 0), reused 0 (delta 0), pack-reused 501
接收对象中: 100% (501/501), 172.97 KiB | 271.00 KiB/s, done.
处理 delta 中: 100% (264/264), done.
[root@hongwei-02 ~]#
将pipework命令放到/usr/local/bin目录中
[root@hongwei-02 ~]# cd pipework/
[root@hongwei-02 pipework]# cp pipework /usr/local/bin/
[root@hongwei-02 pipework]#
使用centos_with_net-tools镜像创建一个none模式的容器
[root@hongwei-02 ~]# docker run -itd --net=none --name aming123 centos_with_net-tools  bash
d120fa1e9a68d9026af8d0450c8061a6379f1efb365d298e8778f5b9a7544b55
使用pipework命令设置网络
第3步中创建的容器使用none模式,没有网络,所以使用pipework创建桥连,用法:
pipework 桥连网卡名 容器id 自定义ip/掩码@网关
[root@hongwei-02 ~]# pipework br0 aming123 192.168.93.132/24@192.168.93.2进入容器查看网络信息:
[root@d120fa1e9a68 /]# ifconfig
eth1: flags=4163<UP,BROADCAST,RUNNING,MULTICAST>  mtu 1500
        inet 192.168.93.132  netmask 255.255.255.0  broadcast 192.168.93.255
        ether a2:9b:0f:60:5f:12  txqueuelen 1000  (Ethernet)
        RX packets 8  bytes 648 (648.0 B)
        RX errors 0  dropped 0  overruns 0  frame 0
        TX packets 1  bytes 42 (42.0 B)
        TX errors 0  dropped 0 overruns 0  carrier 0  collisions 0

lo: flags=73<UP,LOOPBACK,RUNNING>  mtu 65536
        inet 127.0.0.1  netmask 255.0.0.0
        loop  txqueuelen 0  (Local Loopback)
        RX packets 0  bytes 0 (0.0 B)
        RX errors 0  dropped 0  overruns 0  frame 0
        TX packets 0  bytes 0 (0.0 B)
        TX errors 0  dropped 0 overruns 0  carrier 0  collisions 0

[root@d120fa1e9a68 /]#
然后去打开新的虚拟机看看能不能ping通02机器的ip
十四、dockerfile
dockerfile的格式
1、FROM //指定基于哪个基础镜像
格式:FROM 镜像,或者,FROM 镜像:标签
如:FROM centos、FROM centos:latest
2、MAITAINER //指定作者的信息
比如:MAITAINER haha haha@haha,com
3、RUN //镜像操作指令
格式:RUN 命令,或者,RUN ["executable","param1","param2"],比如:
RUN yum install httpd -y
RUN ["/bin/bash","-c","echo hello"]
4、CMD //跟RUN很像
3种格式:
CMD ["executable","param1","param2"]
CMD command param1 param2
CMD ["param1","param2"]
CMD用了指定容器启动时用到的命令,只能有一条。比如:
CMD ["/bin/bash","/usr/local/nginx/sbin/nginx","-c","/usr/local/nginx/conf/nginx.conf"]
5、EXPOSE
格式:EXPOSE <port> [<port>...],比如
EXPORT 22 80 3306
用了指定要映射出去的端口。启动容器时使用-P则自动分配端口,-p则手动设置端口映射。
6、ENV //定义变量
格式:ENV <key><value>
比如:ENV PATH /usr/local/mysql/bin:$PATH
主要是为后续的RUN指令提供一个环境变量。当然也可以自定义变量。比如
ENV MYSQL_version 5.6
7、ADD 拷贝文件或目录到某个目录
格式:ADD <src><dest>
其中src支持url。
8、COPY
格式与ADD一样,但不同的是,不支持url
9、ENTRYPOINT
格式类似CMD,容器启动时要执行的命令,与CMD很像,也是只有一条生效。如果写多条,只有最后一条生效。和CMD不同的是:
CMD可以被docker run指定覆盖,而ENTRYPOINT不能覆盖。比如,容器名为mycentos,在Dockerfile中定义CMD如下:
CMD ["/bin/echo","test"]
启动容器的命令:docker run mycentos 这会输出test。
如果使用:docker run -it mycentos /bin/bash 什么都不会输出。
ENTRYPOINT不会被覆盖,而且比CMD或者docker run指定的命令要靠前执行。
ENTRYPOINT ["echo","test"]
docker run -it mycentos 123,则会输出test 123,这相当于执行命令echo test 123
10、VOLUME 指定挂载点
格式:VOLUME ["/目录"]
创建一个可以从本地主机或其他容器挂载的挂载点
11、USER
格式:USER daemon
指定运行容器的用户,很少用,一般都是root用户运行容器。
12、WORKDIR
格式:WORKDIR 目录
为后续的RUN、CMD或者ENTRYPOINT指定工作的目录
十五、Dockerfile示例(安装nginx)
1、在写Dockerfile之前先准备好nginx的配置文件
主配置文件:nginx.conf,虚拟主机配置文件:server.conf
nginx.conf文件内容:
user  nginx  nginx;
worker_processes  1;
worker_rlimit_nofile 65535;
error_log  /var/log/nginx/error.log notice;
events {
    use epoll;
    worker_connections  65535;
}
http {
    include mime.types;
    default_type application/octet-stream;
    server_names_hash_bucket_size 3526;
    server_names_hash_max_size 4096;
    log_format combined_realip '$remote_addr $http_x_forwarded_for [$time_local]'
    ' $host "$request_uri" $status'
    ' "$http_referer" "$http_user_agent"';
    sendfile on;
    tcp_nopush on;
    keepalive_timeout 30;
    client_header_timeout 3m;
    client_body_timeout 3m;
    send_timeout 3m;
    connection_pool_size 256;
    client_header_buffer_size 1k;
    large_client_header_buffers 8 4k;
    request_pool_size 4k;
    output_buffers 4 32k;
    postpone_output 1460;
    client_max_body_size 10m;
    client_body_buffer_size 256k;
    client_body_temp_path /usr/local/nginx/client_body_temp;
    proxy_temp_path /usr/local/nginx/proxy_temp;
    fastcgi_temp_path /usr/local/nginx/fastcgi_temp;
    fastcgi_intercept_errors on;
    tcp_nodelay on;
    gzip on;
    gzip_min_length 1k;
    gzip_buffers 4 8k;
    gzip_comp_level 5;
    gzip_http_version 1.1;
    gzip_types text/plain application/x-javascript text/css text/htm
    application/xml;


    include /usr/local/nginx/conf.d/*.conf;

}
server.conf文件内容:
server {
listen       80;
server_name  localhost;
location / {
    root   /usr/local/nginx/html;
    index  index.php index.html index.htm;
}
error_page   500 502 503 504  /50x.html;
location = /50x.html {
    root   /usr/local/nginx/html;
}

#location ~ \.php$ {
#    root           /usr/local/nginx/html;
#    fastcgi_pass   127.0.0.1:9000;
#    fastcgi_index  index.php;
#    fastcgi_param  SCRIPT_FILENAME   /usr/local/nginx/html$fastcgi_script_name;
#    include        fastcgi_params;
#}

}
2、创建Dockerfile文件
Dockerfile、nginx.conf、server.conf三个文件都放在/root目录中。
[root@hongwei-02 ~]# vim Dockerfile
###  Set the base image to CentOS
FROM centos

#File Author / Maintainer
MAINTAINER caomuzhong www.logmm.com

#Install necessary tools
RUN yum install -y gcc gcc-c++ pcre-devel openssl-devel libxml2-devel openssl libcurl-devel make zlib zlib-devel gd-devel

#Install Nginx
RUN useradd -r -s /sbin/nologin nginx
RUN mkdir -p /usr/local/nginx/
RUN mkdir -p /var/log/nginx
RUN chown nginx.nginx /var/log/nginx
RUN touch /var/log/nginx/error.log
RUN chown nginx.nginx /var/log/nginx/error.log
ADD http://nginx.org/download/nginx-1.14.0.tar.gz .
RUN tar xzvf nginx-1.14.0.tar.gz
RUN cd nginx-1.14.0 && ./configure --prefix=/usr/local/nginx     --user=nginx     --group=nginx     --http-log-path=/mydata/logs/nginx/access.log     --error-log-path=/mydata/logs/nginx/error.log     --with-http_ssl_module     --with-http_realip_module     --with-http_flv_module     --with-http_mp4_module     --with-http_gunzip_module     --with-http_gzip_static_module     --with-http_image_filter_module     --with-http_stub_status_module &&  make && make install
RUN rm -f /usr/local/nginx/conf/nginx.conf
RUN mkdir /usr/local/nginx/conf.d/
COPY nginx.conf  /usr/local/nginx/conf/nginx.conf
COPY server.conf /usr/local/nginx/conf.d/

#Expose ports
EXPOSE 80

#Set the default command to execute when creating a new container
ENTRYPOINT /usr/local/nginx/sbin/nginx && tail -f /etc/passwd
3、创建镜像
[root@hongwei-02 ~]# docker build -t centos_nginx .
Sending build context to Docker daemon  910.7MB
...
Successfully built f3f68e71836d
Successfully tagged centos_nginx:latest
[root@hongwei-02 ~]#
查看镜像:
[root@hongwei-02 ~]# docker images
REPOSITORY          TAG                 IMAGE ID            CREATED             SIZE
centos_nginx        latest              f3f68e71836d        22 seconds ago      499MB
centos_with_nginx   latest              30371a3263a7        24 hours ago        408MB
centos              latest              5182e96772bf        4 weeks ago         200MB
registry            latest              b2b03e9146e1        2 months ago        33.3MB
[root@hongwei-02 ~]#
4、启动容器
启动容器,进入查看nginx:
[root@hongwei-02 ~]# docker run -itd -p 81:80 centos_nginx bash
e03a016801683c686e669587523f77d14aa32e9ba6bac851146fe01dc4faa0e6
[root@hongwei-02 ~]# docker exec -it e03a016801 bash
[root@e03a01680168 /]# ps aux | grep nginx
root          1  0.0  0.0  11680  1352 pts/0    Ss+  14:45   0:00 /bin/sh -c /usr/local/nginx/sbinnginx && tail -f /etc/passwd bash
root          7  0.0  0.0  72928  1316 ?        Ss   14:45   0:00 nginx: master process /usr/localnginx/sbin/nginx
nginx         9  0.0  1.4 100064 28616 ?        S    14:45   0:00 nginx: worker process
root         24  0.0  0.0   9088   660 pts/1    S+   14:45   0:00 grep --color=auto nginx
[root@e03a01680168 /]#
宿主机的81端口映射到容器的80端口。
宿主机ip:192.168.93.128,浏览器打开:192.168.93.128:81
十六、使用docker compose部署服务
docker compose可以方便我们快捷高效地管理容器的启动、停止、重启等操作,它类似于Linux的shell脚本,基于yaml语法,在该文件里可以描述应用的框架,比如用什么镜像、数据卷、网络模式、监听端口等信息。
我们可以在一个compose文件中定义一个多容器的应用,然后通过该compose来启动这个应用。
1、下载docker-compose
安装方法:https://docs.docker.com/compose/install/#install-compose
下载地址:https://github.com/docker/compose/releases
[root@hongwei-02 ~]# curl -L https://github.com/docker/compose/releases/download/1.22.0/docker-compose-$(uname -s)-$(uname -m) -o /usr/local/bin/docker-compose2、添加可执行权限
[root@hongwei-02 ~]# chmod +x /usr/local/bin/docker-compose3、查看docker-compose版本信息
[root@hongwei-02 ~]# docker-compose version
docker-compose version 1.22.0, build f46880fe
docker-py version: 3.4.1
CPython version: 3.6.6
OpenSSL version: OpenSSL 1.1.0f  25 May 2017
[root@hongwei-02 ~]#
十七、docker compose示例
查看一下有哪些镜像:
[root@hongwei-02 ~]# docker images
REPOSITORY          TAG                 IMAGE ID            CREATED             SIZE
centos_nginx        latest              f3f68e71836d        31 minutes ago      499MB
centos_with_nginx   latest              30371a3263a7        25 hours ago        408MB
centos              latest              5182e96772bf        4 weeks ago         200MB
registry            latest              b2b03e9146e1        2 months ago        33.3MB
[root@hongwei-02 ~]#
1、创建compose文件
这里使用centos_nginx、centos两个镜像创建一个compose文件:
[root@hongwei-02 ~]# vim docker-compose.yml
version: "2"
services:
  app1:
     image: centos_nginx
     ports:
       - "82:80"
     networks:
       - "net1"
     volumes:
       - /app1/:/app1
  app2:
     image: centos
     networks:
       - "net2"
     volumes:
       - /app2/:/app2
     entrypoint: tail -f /etc/passwd
networks:
  net1:
     driver: bridge
  net2:
     driver: bridge
注意缩进。
2、运行:
[root@hongwei-02 ~]# docker-compose up -d
Creating network "root_net1" with driver "bridge"
Creating network "root_net2" with driver "bridge"
Creating root_app1_1 ... done
Creating root_app2_1 ... done
[root@hongwei-02 ~]#
查看一下容器运行情况:
[root@hongwei-02 ~]# docker ps
CONTAINER ID        IMAGE               COMMAND                  CREATED             STATUS              PORTS                NAMES
1119eba47792        centos              "tail -f /etc/passwd"    50 seconds ago      Up 49 seconds                            root_app2_1
5651b4fc7d0d        centos_nginx        "/bin/sh -c '/usr/lo…"   50 seconds ago      Up 49 seconds       0.0.0.0:82->80/tcp   root_app1_1
e03a01680168        centos_nginx        "/bin/sh -c '/usr/lo…"   39 minutes ago      Up 39 minutes       0.0.0.0:81->80/tcp   sleepy_goldberg
[root@hongwei-02 ~]#
app1、app2均已运行。
3、停止
[root@hongwei-02 ~]# docker-compose stop
Stopping root_app2_1 ... done
Stopping root_app1_1 ... done
[root@hongwei-02 ~]#
4、帮助信息
直接执行docker-compose命令,可以查看相关帮助信息
[root@hongwei-02~]# docker-compose
Define and run multi-container applications with Docker.Usage:
docker-compose [-f <arg>...] [options] [COMMAND] [ARGS...]
docker-compose -h|--helpOptions:
-f, --file FILE Specify an alternate compose file
(default: docker-compose.yml)
-p, --project-name NAME Specify an alternate project name
(default: directory name)
--verbose Show more output
--log-level LEVEL Set log level (DEBUG, INFO, WARNING, ERROR, CRITICAL)
--no-ansi Do not print ANSI control characters
-v, --version Print version and exit
-H, --host HOST Daemon socket to connect to--tls Use TLS; implied by --tlsverify
--tlscacert CA_PATH Trust certs signed only by this CA
--tlscert CLIENT_CERT_PATH Path to TLS certificate file
--tlskey TLS_KEY_PATH Path to TLS key file
--tlsverify Use TLS and verify the remote
--skip-hostname-check Don't check the daemon's hostname against the
name specified in the client certificate
--project-directory PATH Specify an alternate working directory
(default: the path of the Compose file)
--compatibility If set, Compose will attempt to convert deploy
keys in v3 files to their non-Swarm equivalentCommands:
build Build or rebuild services
bundle Generate a Docker bundle from the Compose file
config Validate and view the Compose file
create Create services
down Stop and remove containers, networks, images, and volumes
events Receive real time events from containers
exec Execute a command in a running container
help Get help on a command
images List images
kill Kill containers
logs View output from containers
pause Pause services
port Print the public port for a port binding
ps List containers
pull Pull service images
push Push service images
restart Restart services
rm Remove stopped containers
run Run a one-off command
scale Set number of containers for a service
start Start services
stop Stop services
top Display the running processes
unpause Unpause services
up Create and start containers
version Show the Docker-Compose version information
docker-compose语法文档:http://www.web3.xin/index/article/182.html
十八、Harbor安装使用
1、下载并解压harbor
下载地址:https://storage.googleapis.com/harbor-releases/release-1.6.0/harbor-offline-installer-v1.6.0-rc3.tgz
安装装harbor之前,必须先安装好docker-compose。
docker-compose在前面已经安装好了。
[root@hongwei-02 ~]# tar xf harbor-offline-installer-v1.6.0-rc3.tgz 2、修改配置文件
进入解压后的目录,修改harbor.cfg文件,修改过hostname = 192.168.93.128
[root@hongwei-02 ~]# cd harbor/
[root@hongwei-02 harbor]# vim  harbor.cfg
hostname = 192.168.93.128
3、修改docker.service文件
修改ExecStart=/usr/bin/dockerd --insecure-registry=192.168.10.101。
[root@lb01 harbor]# vim /usr/lib/systemd/system/docker.service
ExecStart=/usr/bin/dockerd --insecure-registry=192.168.10.101
4、安装harbor
在harbor解压目录中执行./install..sh命令
[root@lb01 harbor]# ./install.sh


 6万+
6万+

 被折叠的 条评论
为什么被折叠?
被折叠的 条评论
为什么被折叠?
 到【灌水乐园】发言


