


基本原理
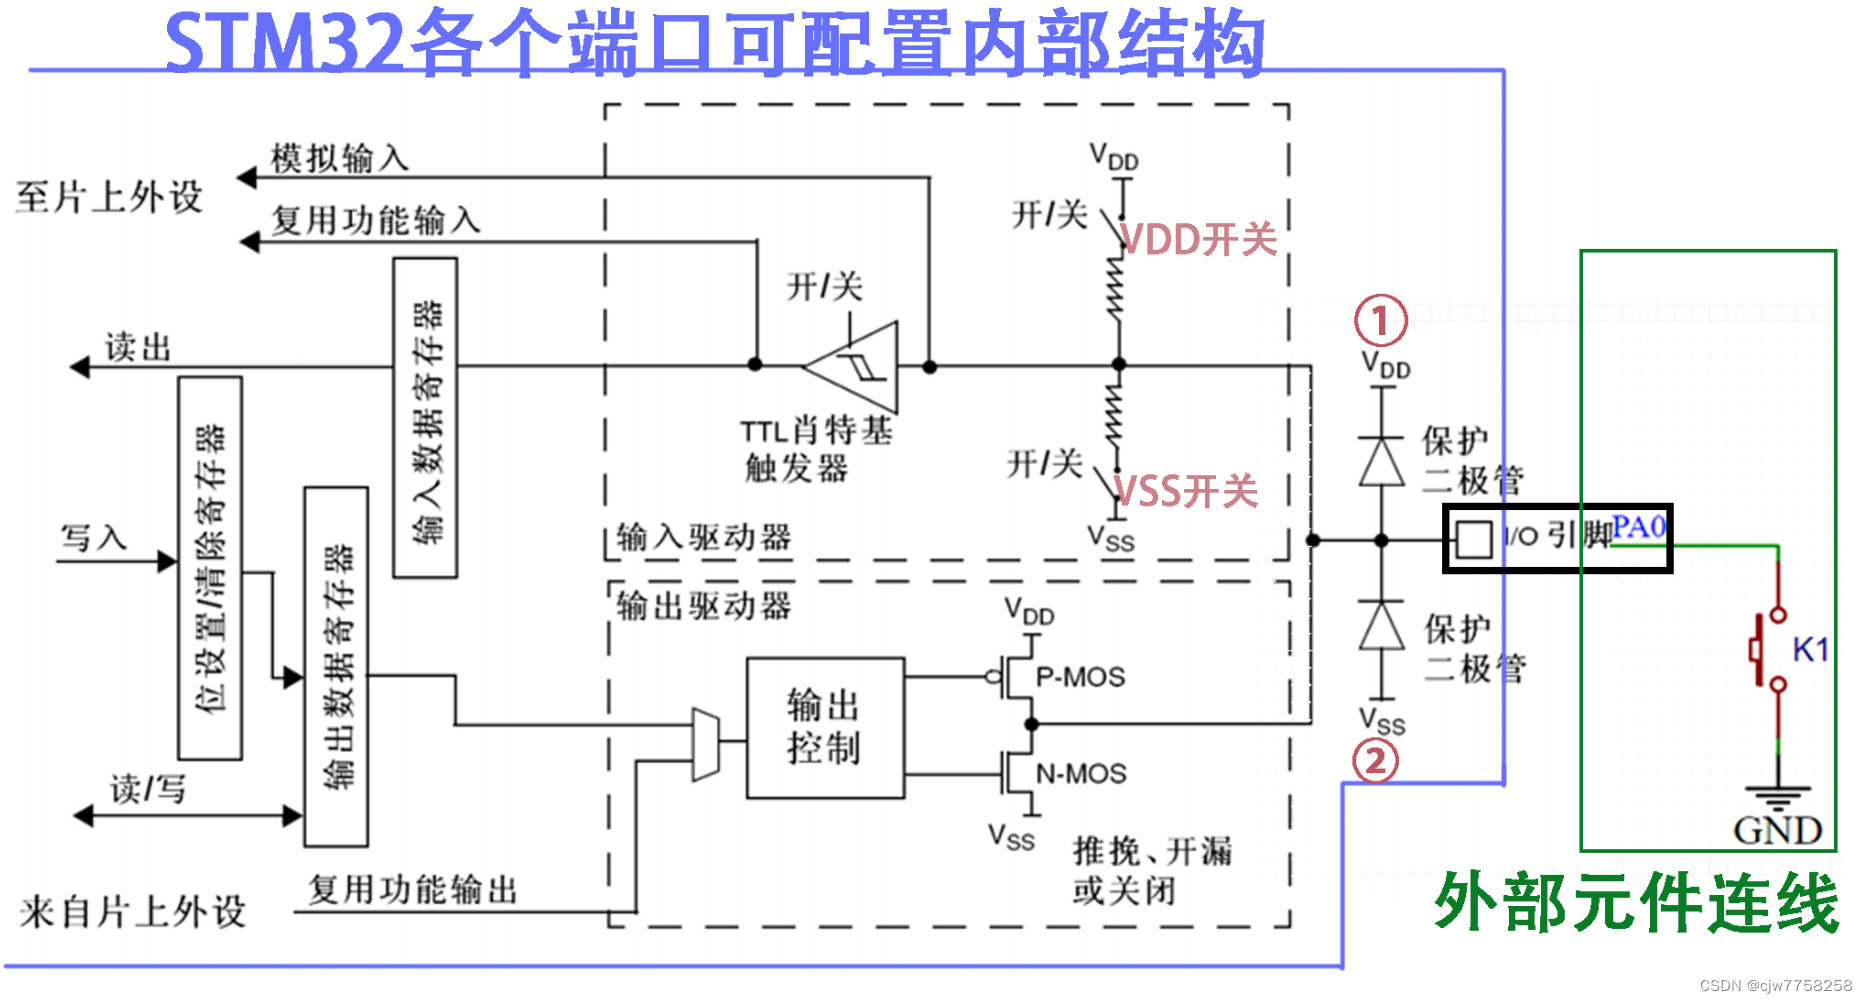 在按键控制LED灯亮灭中,必须要求配置为上拉输入模式。在按键开k1断开,及不操作的时候,上拉输入模式有VDD上拉电阻将引脚电平上拉,保证了不会出现浮动的现象。
配置好了上拉输入模式,VSS开关就已经断开了,下拉通过K1按键开关的通断来实现的。所以在这种方式下,按下K1为低电平,松开K1位高电平。
函数设置
LED.C
#include "stm32f10x.h"                  // Device header
void LED_Init(void)						//初始化
{
	RCC_APB2PeriphClockCmd(RCC_APB2Periph_GPIOA, ENABLE);

	GPIO_InitTypeDef GPIO_InitStructure;
	GPIO_InitStructure.GPIO_Mode = GPIO_Mode_Out_PP;
	GPIO_InitStructure.GPIO_Pin = GPIO_Pin_1 | GPIO_Pin_2;
	GPIO_InitStructure.GPIO_Speed = GPIO_Speed_50MHz;
	GPIO_Init(GPIOA, &GPIO_InitStructure);

	GPIO_SetBits(GPIOA, GPIO_Pin_1 | GPIO_Pin_2); //由于初始化后默认是为低电平,SetBits为了让端口置高。设定为了让LED开始是熄灭的状态。
}

void LED1_ON(void)		//LED1点亮程序
{
	GPIO_ResetBits (GPIOA, GPIO_Pin_1);
}

void LED1_OFF(void)		//LED1熄灭程序
{
	GPIO_SetBits(GPIOA, GPIO_Pin_1);
}

void LED1_Turn(void)		//状态取反。实现按下送开LED亮,按下送开LED熄灭
{
	if (GPIO_ReadOutputDataBit(GPIOA, GPIO_Pin_1) == 0)
	{
		GPIO_SetBits(GPIOA, GPIO_Pin_1);
	}
	else
	{
		GPIO_ResetBits(GPIOA, GPIO_Pin_1);
	}
}


void LED2_ON(void)		//LED2点亮程序
{
	GPIO_ResetBits(GPIOA, GPIO_Pin_2);
}

void LED2_OFF(void)		//LED2熄灭程序
{
	GPIO_SetBits(GPIOA, GPIO_Pin_2);
}

void LED2_Turn(void)		//状态取反。
{
	if (GPIO_ReadOutputDataBit(GPIOA, GPIO_Pin_2) == 0)	//读取指定端口管脚的输出。If读取的管脚(GPIO_Pin_2)输出为0。
	{
		GPIO_SetBits(GPIOA, GPIO_Pin_2);	//就将GPIO_Pin_2置高(置1)
	}
	else
	{
		GPIO_ResetBits(GPIOA, GPIO_Pin_2);	//否则置底(置0)
	}
}
LED.H
#ifndef __LED_H
#define __LED_H

void LED_Init(void);
void LED1_ON(void);
void LED1_OFF(void);
void LED1_Turn(void);
void LED2_ON(void);
void LED2_OFF(void);
void LED2_Turn(void);

#endif
Key.c
#include "stm32f10x.h"                  // Device header
#include "Delay.h"

void Key_Init(void)
{
	RCC_APB2PeriphClockCmd(RCC_APB2Periph_GPIOB, ENABLE);

	GPIO_InitTypeDef GPIO_InitStructure;
	GPIO_InitStructure.GPIO_Mode = GPIO_Mode_IPU;	//这里需要读取按键K1,用的上拉输入。
	GPIO_InitStructure.GPIO_Pin = GPIO_Pin_1 | GPIO_Pin_11;	//K1按键引脚接在了,PB1和PB11两个接口上。
	GPIO_InitStructure.GPIO_Speed = GPIO_Speed_50MHz;
	GPIO_Init(GPIOB, &GPIO_InitStructure);
}

uint8_t Key_GetNum(void)					//右键查询:uint8_t是typedef unsigned char
{
	uint8_t KeyNum = 0;
	if (GPIO_ReadInputDataBit(GPIOB, GPIO_Pin_1) == 0)	//if判断按键1按下没有松手。
	{
		Delay_ms(20);		//消抖动
		while (GPIO_ReadInputDataBit(GPIOB, GPIO_Pin_1) == 0);		//还没有松手,在while里面循环。
		Delay_ms(20);		//松手,跳出while,延时消抖动。
		KeyNum = 1;	        //按键1返回1
	}
	if (GPIO_ReadInputDataBit(GPIOB, GPIO_Pin_11) == 0)   //if判断按键2按下没有松手。
	{
		Delay_ms(20);
		while (GPIO_ReadInputDataBit(GPIOB, GPIO_Pin_11) == 0);
		Delay_ms(20);
		KeyNum = 2;
	}

	return KeyNum;
}
Key.h
#ifndef __KEY_H
#define __KEY_H

void Key_Init(void);
uint8_t Key_GetNum(void);

#endif
main函数
#include "stm32f10x.h"                  // Device header
#include "Delay.h"
#include "LED.h"
#include "Key.h"

uint8_t KeyNum;

int main(void)
{
	LED_Init();
	Key_Init();

	while (1)
	{
		KeyNum = Key_GetNum();    //将 Key_GetNum() 返回值给KeyNum
		if (KeyNum == 1)
		{
			LED1_Turn();
		}
		if (KeyNum == 2)
		{
			LED2_Turn();
		}
	}
}
对于按键输入而言,我们可以通过库函数的配置来进行实现,然后再通过简单的主函数来实现按键对流水灯的控制。


 1807
1807

 被折叠的 条评论
为什么被折叠?
被折叠的 条评论
为什么被折叠?
 到【灌水乐园】发言


