


为了达到高可用目的,一个应用一般会部署多个实例,前面用nginx做负载。有些时候我们希望一个用户的所有请求都打到其中一个实例上(比如会话或者状态不能在服务集群所有实例间进行共享时),nginx官方默认的解决方案是通过ip_hash实现,但是ip hash 不够准确,ip hash其实就是把客户端ip v4地址4段中的前3段拿来做hash运算得到一个hash值,通过该hash值决定请求打到哪个服务上;在很多内外应用中,内网用户很多都在一个网段下,导致ip地址的前3段基本都一样的,这导致所有请求都会打到其中一个服务实例上,而其他服务实例没有负载。
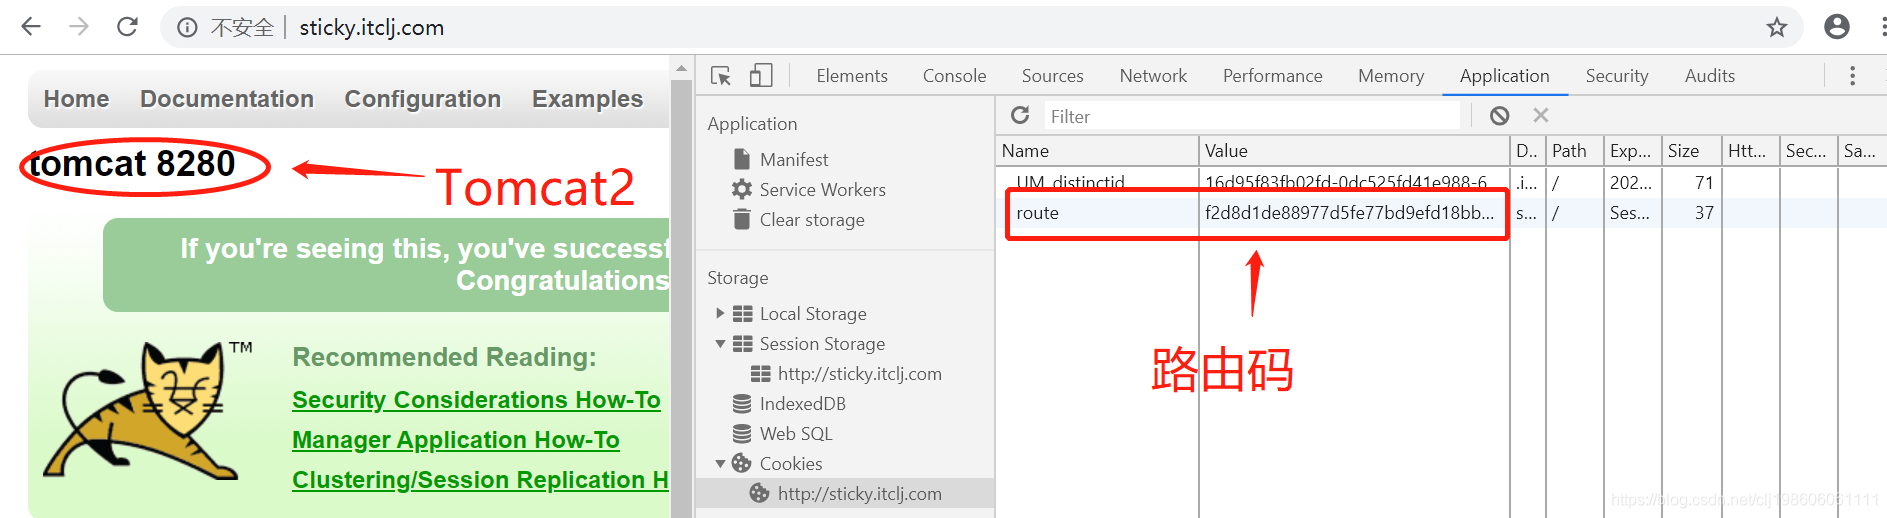
sticky负载模式是通过分配的路由码实现客户端和后端服务实例绑定。具体处理过程为:客户端第一次向服务发起请求时不带路由码,nginx通过轮休的负载方式把请求打到其中的一个后端服务实例,确定具体服务实例后,nginx分配一个路由码带到响应cookies里,客户端在cookies中保存该路由码,每次请求的时候都带上,nginx接收到请求后,解析请求头里面的route cookies值,根据该值把请求转发到该值绑定的后端服务实例,达到回话粘粘的效果。
sticky负载模式必须要客户端支持cookies。
重新编译nginx
安装基础依赖包,下载sticky模块和nginx源码和其他模块。
# yum -y install wget tar git gcc make pcre pcre-devel zlib zlib-devel openssl openssl-devel GeoIP GeoIP-devel#
# cd /tmp
# git clone https://github.com/gnosek/nginx-upstream-fair.git
# git clone https://bitbucket.org/nginx-goodies/nginx-sticky-module-ng.git
# git clone https://github.com/yaoweibin/nginx_upstream_check_module.git
# wget http://nginx.org/download/nginx-1.16.1.tar.gz
解压编译
# tar -xvzf nginx-1.16.1.tar.gz
# cd nginx-1.16.1

# ./configure --prefix=/usr/share/nginx --sbin-path=/usr/sbin/nginx --conf-path=/etc/nginx/nginx.conf --error-log-path=/var/log/nginx/error.log --http-log-path=/var/log/nginx/access.log --http-client-body-temp-path=/var/lib/nginx/tmp/client_body --http-proxy-temp-path=/var/lib/nginx/tmp/proxy --http-fastcgi-temp-path=/var/lib/nginx/tmp/fastcgi --pid-path=/var/run/nginx.pid --lock-path=/var/lock/subsys/nginx --user=nginx --group=nginx --with-http_gzip_static_module --with-http_stub_status_module --with-http_ssl_module --with-pcre --with-file-aio --with-http_realip_module --without-http_scgi_module --without-http_uwsgi_module --without-http_fastcgi_module --with-http_geoip_module --add-module=/tmp/nginx-sticky-module-ng --add-module=/tmp/nginx_upstream_check_module
# make
# make install
# openssl dhparam -out /etc/nginx/dhparams.pem 2048
执行下面的命令,创建需要的目录和权限
# mkdir /etc/nginx/conf.d
# mkdir -p /var/lib/nginx/tmp/client_body
# chown -R nginx.nginx /var/lib/nginx/
# chmod -R 770 /var/lib/nginx/
创建初始化脚本
添加配置文件/etc/init.d/nginx让nginx随系统启动一起启动。
当我们执行service nginx命令的时候,这个文件将会被执行。
# chmod +x /etc/init.d/nginx
#!/bin/sh
#
# nginx - this script starts and stops the nginx daemin
#
# chkconfig:   - 85 15
# description:  Nginx is an HTTP(S) server, HTTP(S) reverse \
#               proxy and IMAP/POP3 proxy server
# processname: nginx
# config:      /etc/nginx/nginx.conf
# pidfile:     /var/run/nginx.pid
# user:        nginx

# Source function library.
. /etc/rc.d/init.d/functions

# Source networking configuration.
. /etc/sysconfig/network

# Check that networking is up.
[ "$NETWORKING" = "no" ] && exit 0

nginx="/usr/sbin/nginx"
prog=$(basename $nginx)

NGINX_CONF_FILE="/etc/nginx/nginx.conf"

lockfile=/var/run/nginx.lock

start() {
    [ -x $nginx ] || exit 5
    [ -f $NGINX_CONF_FILE ] || exit 6
    echo -n $"Starting $prog: "
    daemon $nginx -c $NGINX_CONF_FILE
    retval=$?
    echo
    [ $retval -eq 0 ] && touch $lockfile
    return $retval
}

stop() {
    echo -n $"Stopping $prog: "
    killproc $prog -QUIT
    retval=$?
    echo
    [ $retval -eq 0 ] && rm -f $lockfile
    return $retval
}

restart() {
    configtest || return $?
    stop
    start
}

reload() {
    configtest || return $?
    echo -n $"Reloading $prog: "
    killproc $nginx -HUP
    RETVAL=$?
    echo
}

force_reload() {
    restart
}

configtest() {
  $nginx -t -c $NGINX_CONF_FILE
}

rh_status() {
    status $prog
}

rh_status_q() {
    rh_status >/dev/null 2>&1
}

case "$1" in
    start)
        rh_status_q && exit 0
        $1
        ;;
    stop)
        rh_status_q || exit 0
        $1
        ;;
    restart|configtest)
        $1
        ;;
    reload)
        rh_status_q || exit 7
        $1
        ;;
    force-reload)
        force_reload
        ;;
    status)
        rh_status
        ;;
    condrestart|try-restart)
        rh_status_q || exit 0
            ;;
    *)
        echo $"Usage: $0 {start|stop|status|restart|condrestart|try-restart|reload|force-reload|configtest}"
        exit 2
esac
让服务随系统启动
# chkconfig --add nginx
# chkconfig --level 345 nginx on
重启服务
# service nginx restart
检查编译模块
# nginx -V
输出
nginx version: nginx/1.16.1
built by gcc 4.8.5 20150623 (Red Hat 4.8.5-39) (GCC)
built with OpenSSL 1.0.2k-fips  26 Jan 2017
TLS SNI support enabled
configure arguments: --prefix=/usr/share/nginx --sbin-path=/usr/sbin/nginx --conf-path=/etc/nginx/nginx.conf --error-log-path=/var/log/nginx/error.log --http-log-path=/var/log/nginx/access.log --http-client-body-temp-path=/var/lib/nginx/tmp/client_body --http-proxy-temp-path=/var/lib/nginx/tmp/proxy --http-fastcgi-temp-path=/var/lib/nginx/tmp/fastcgi --pid-path=/var/run/nginx.pid --lock-path=/var/lock/subsys/nginx --user=nginx --group=nginx --with-http_gzip_static_module --with-http_stub_status_module --with-http_ssl_module --with-pcre --with-file-aio --with-http_realip_module --without-http_scgi_module --without-http_uwsgi_module --without-http_fastcgi_module --with-http_geoip_module --add-module=/tmp/nginx-sticky-module-ng --add-module=/tmp/nginx_upstream_check_module
使用
在/etc/nginx/conf.d下新建配置文件sticky_test.conf,upstream负载模式设置为sticky,配置内容如下。
upstream sticky.itclj.lo {
    sticky;
    server 127.0.0.1:8180;
    server 127.0.0.1:8280;
}

server {
        listen 80;
        server_name  sticky.itclj.com;
        location  ~*^.+$ {
           proxy_pass  http://sticky.itclj.lo;
           proxy_http_version 1.1;
           proxy_set_header Upgrade $http_upgrade;
           proxy_set_header Connection "upgrade";
        }
}
- nginx下负载多个Tomcat请参考:https://blog.csdn.net/clj198606061111/article/details/22621003
- sticky官方完整配置说明:http://nginx.org/en/docs/http/ngx_http_upstream_module.html#sticky


 1130
1130


 被折叠的 条评论
为什么被折叠?
被折叠的 条评论
为什么被折叠?
 到【灌水乐园】发言


